by Scott Muniz | Feb 17, 2021 | Security, Technology
This article is contributed. See the original author and article here.
Google has released Chrome version 88.0.4324.182 for Windows, Mac, and Linux. This version addresses vulnerabilities that an attacker could exploit to take control of an affected system.
CISA encourages users and administrators to review the Chrome Release and apply the necessary updates.
by Contributed | Feb 17, 2021 | Technology
This article is contributed. See the original author and article here.
During the pandemic, we all found ourselves in isolation, and relying more and more on effective electronic means of communication. The amount of digital conversations increased dramatically, and we need to rely on bots to help us handle some of those conversations. In this blog post, I give brief overview of conversational AI on Microsoft platform and show you how to build a simple educational bot to help students learn.
Do We Need Bots, and When?
Many people believe that in the future we will be interacting with computers using speech, in the same way we interact between each other. While the future is still vague, we can already benefit from conversational interfaces in many areas, for example:
- In user support, which has traditionally been based on interpersonal communication, automated chat-bots can solve a lot of routine problems for the users, leaving human specialists for solving only unusual cases.
- During surgical operation, when hands-free interaction is essential. From personal experience, I find it personally more convenient to set morning alarm and “good night” music through voice assistant before going to sleep.
- Automating some functions in interpersonal communication. My favorite example is a chat-bot that you can add to a group chat when organizing a party, and it will track how much money each of the participants spent on the preparation.
At the current state of development of conversational AI technologies, a chat bot will not replace a human, and it will not pass Turing test.
In practice, chat bots act as an advanced version of a command line, in which you do not need to know exact commands to perform an action.
Thus, successful bot applications will not try to pretend to be a human, because such behavior is likely to cause some user dissatisfaction in the future. It is one of the responsible conversational AI principles, which you need to consider when designing a bot.
Educational Bots
During the pandemic, one of the areas that is being transformed the most is education. We can envision educational bots that help student answer most common questions, or act as a virtual teaching assistant. In this blog post, I will show you how to create a simple assistant bot that will be able to handle several questions from the field of Geography.
Before we jump to this task, let’s talk about Microsoft conversational AI stack in general, and consider different development options.
Conversational AI Development Stack
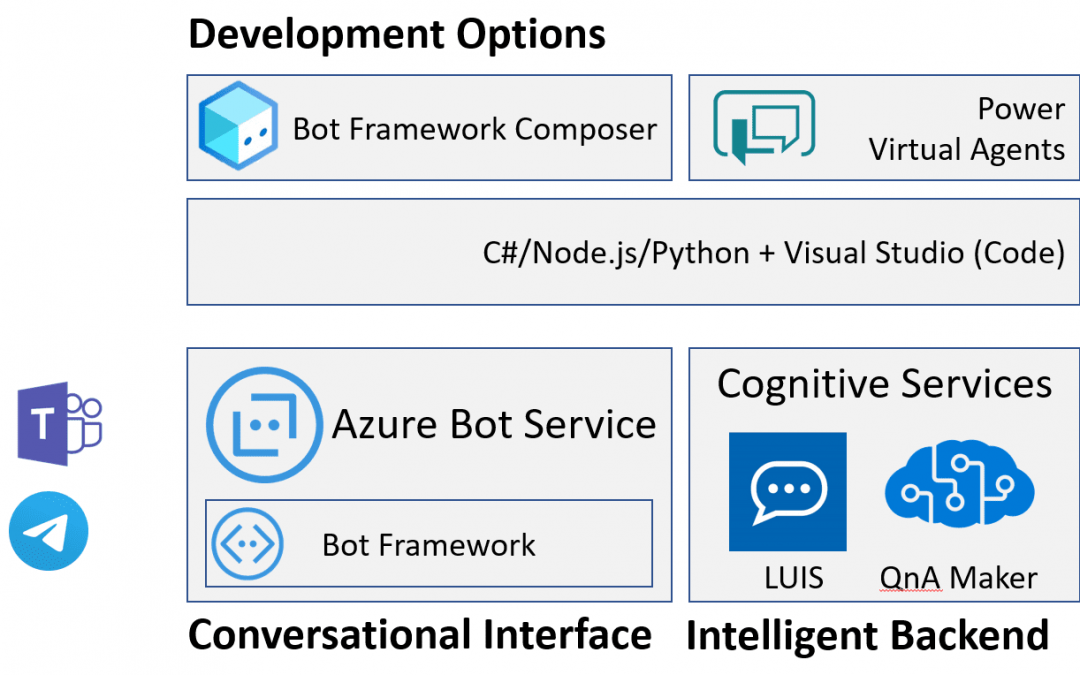
When it comes to conversational AI, we can logically think of a conversational agent having two main parts:
- Conversational interface handles passing messages from the user to the bot and back. It takes care about communication between user messaging agent (such as Microsoft Teams, Skype or Telegram) and our application logic, and includes code to handle request-response logic.
- Intelligent backend adds some AI functionality to your bot, such are recognizing user’s phrases, or finding best possible answer.
A bot can exist without any intelligent backend, but it would not be smart. Still, bots like that are useful for automating simple tasks, such as form filling, or handling some pre-defined workflow.
Here I present slightly simplified view of the whole Bot Ecosystem, but this way it is easier to get the picture.
Conversational Interface: Microsoft Bot Framework and Azure Bot Services
At the heart of conversational interface is Microsoft Bot Framework – an open-source development framework (with source code available on GitHub), which contains useful abstractions for bot development. The main idea of Bot Framework is to abstract communication channel, and develop bots as web endpoints that asynchronously handle request-response communication.
Decoupling of bot logic and communication channel allows you to develop bot code once, and then connect it easily to different platforms, such as Skype, Teams or Telegram. Omnichannel bots are now made simple!
Bot Framework SDK supports primarily C#, Node.js, Python and Java, although C# or Node.js are highly recommended.
To host bots developed with Bot Framework on Azure, you use Azure Bot Services. It hosts bot logic itself (either as web application, or azure function), as well as allows you to declaratively define physical channels that your bot will be connected to. You can connect your bot to Skype or Telegram through Azure Portal with a few simple steps.
Intelligent Backend: LUIS and QnA Maker
Many modern bots support some form of natural language interaction. To do it, the bot needs to understand the user’s phrase, which is typically done through intent classification. We define a number of possible intents or actions that the bot can support, and then map an input phrase to one of the intents.
This mapping is typically done using a neural network trained on some dataset of sample phrases. To take away the complexity of training your own neural network model, Microsoft provides Lanuguage Understanding Intelligent Service, or LUIS, which allows you to train a model either through web interface, or an API.
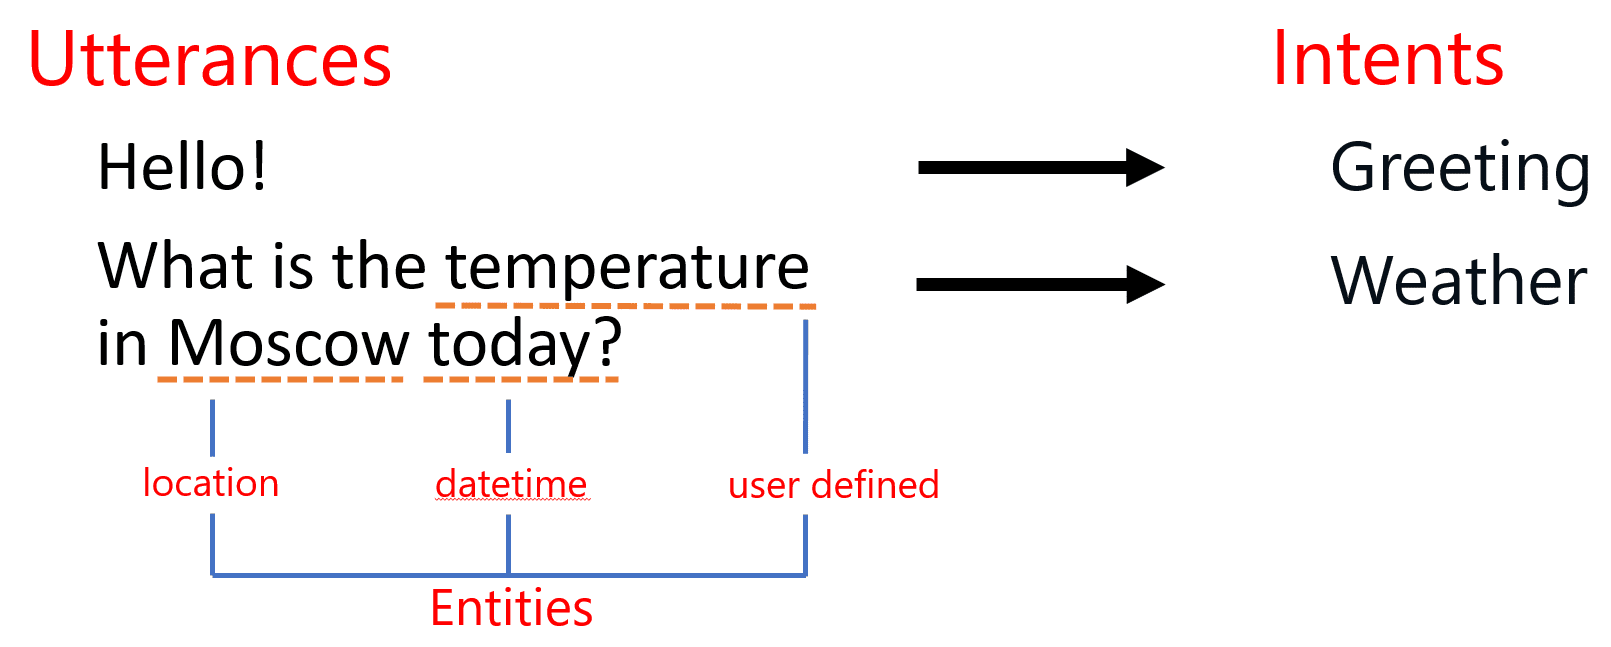
In addition to intent classification, LUIS also performs named entity recognition (or NER). It can automatically extract some entities of well-known types, such as geolocations or references to date and time, and can learn to extract some user-defined entities as well.
Having entities extracted and intent correctly determined it should be much easier to program the logic of your bot. This is often done using slot filling technique: extracted entities from the user’s input populate some slots in a dictionary, and if some more values are required to perform the task – additional dialog is initiated to ask additional info from the user.
Another type of bot behavior that often comes up is the ability to find best matching phrase or piece of information in some table, i.e. do an intelligent lookup. It is useful if you want to provide FAQ-style bot that can answer user’s questions based on some database of answers, or if you just want to program chit-chat behavior with some common responses. To implement this functionality, you can use QnA Maker – a complex service, that encapsulates Azure Cognitive Search, and provides simple way to build question-answering functionality. You can index any existing FAQ document, or provide question-answer pairs through the web interface, and then hook up QnA maker to your bot with a few lines of code.
Bot Development: Composer, Power Virtual Agents or Code?
As I mentioned above, bots can be developed using your favorite programming language. However, this approach requires you to write some boilerplate code, understand asynchronous calls, and therefore has a significant learning curve. There are some simpler options that are good for a start!
It is recommended to start developing your bot using low-code approach through Bot Framework Composer – an interactive visual tool that allows you to design your bot by drawing dialog diagrams.
Composer integrates LUIS and QnA maker out of the box, so that you do not need to train those services through web interface first, and then worry about integrating them to your bot. From the same UI, you are able to specify events triggered by some user phrases, and dialogs that respond to them.
Another similar low-code option would be to use Power Virtual Agents (PVA), a tool from Power Platform family of tools for business automation. It would be especially useful if you are already familiar with Power Platform, and using any of its tools to enhance productivity. In this case, PWA will be a natural choice, and it will integrate nicely into all your data points and business processes. In short – Composer is a great low-code tool for developers, while PVA is more for business users.
Getting Started with Bot Development
Let me show you how we can start the development of a simple educational bot that will help K-12 students with their geography classes. We will develop a simple bot, which you can later host on Microsoft Azure and connect to most popular communication channels, such as Teams, Slack or Telegram. If you do not have an Azure account, you can get a free trial (or here, if you are a student).
To begin with, we will implement three simple functions in our bot:
- Being able to tell a capital city for a country (What is the capital of Russia?).
- Giving definitions of most useful terms, eg. answering a questions like What is a capital?
- Support for simple chit-chat (How are you today?)
Those two functions cover two most important elements of our intelligent backend: QnA Maker (which can be used to implement the last two points) and LUIS.
Starting with Bot Composer
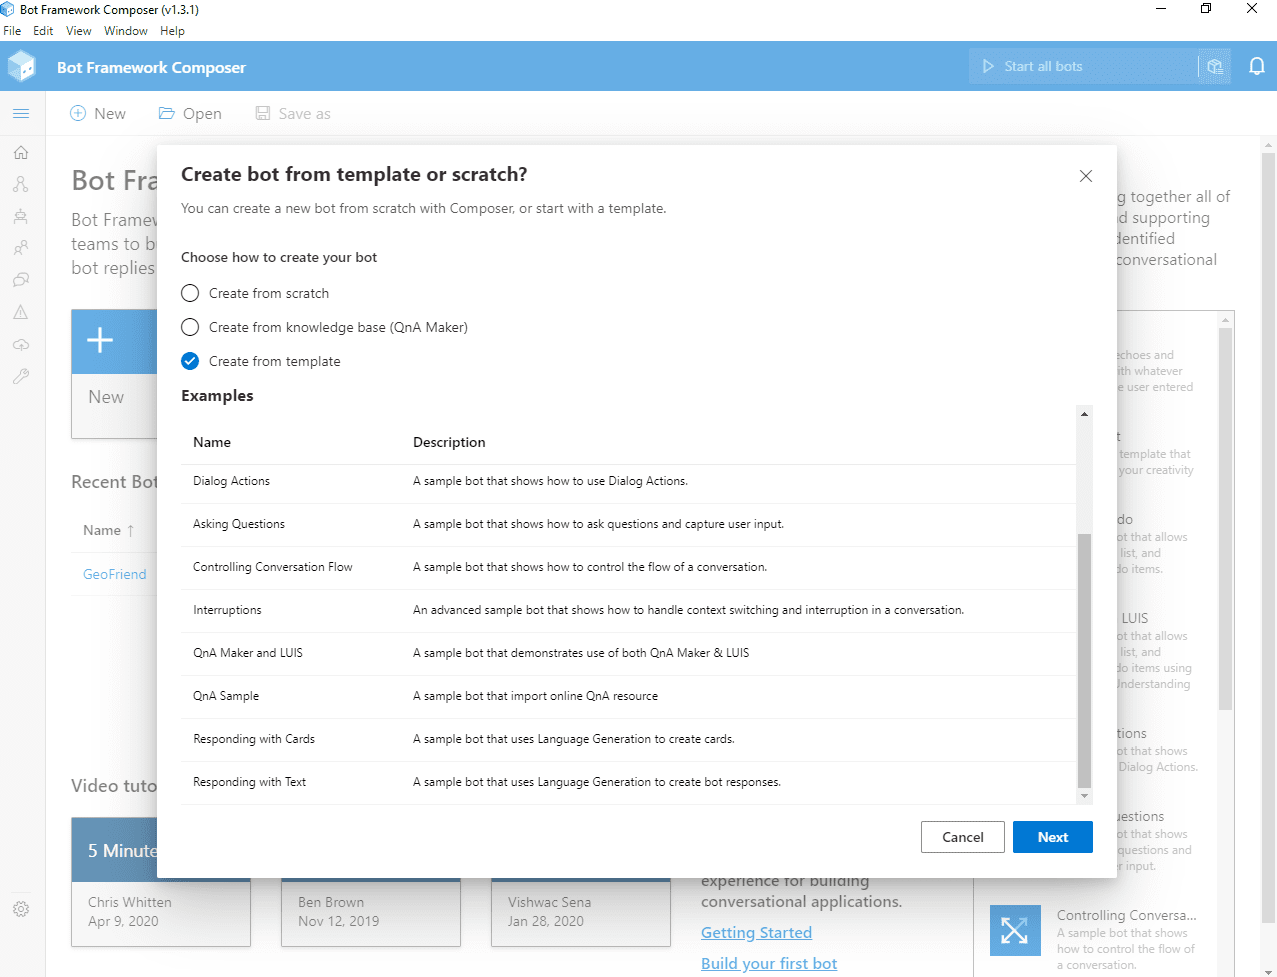
To begin development, you need to [install Bot Framework Composer][InstallComposer] – I recommend to do it as desktop application. Then, after starting it, click on New button, and chose starting template for your bot: QnA Maker and LUIS:
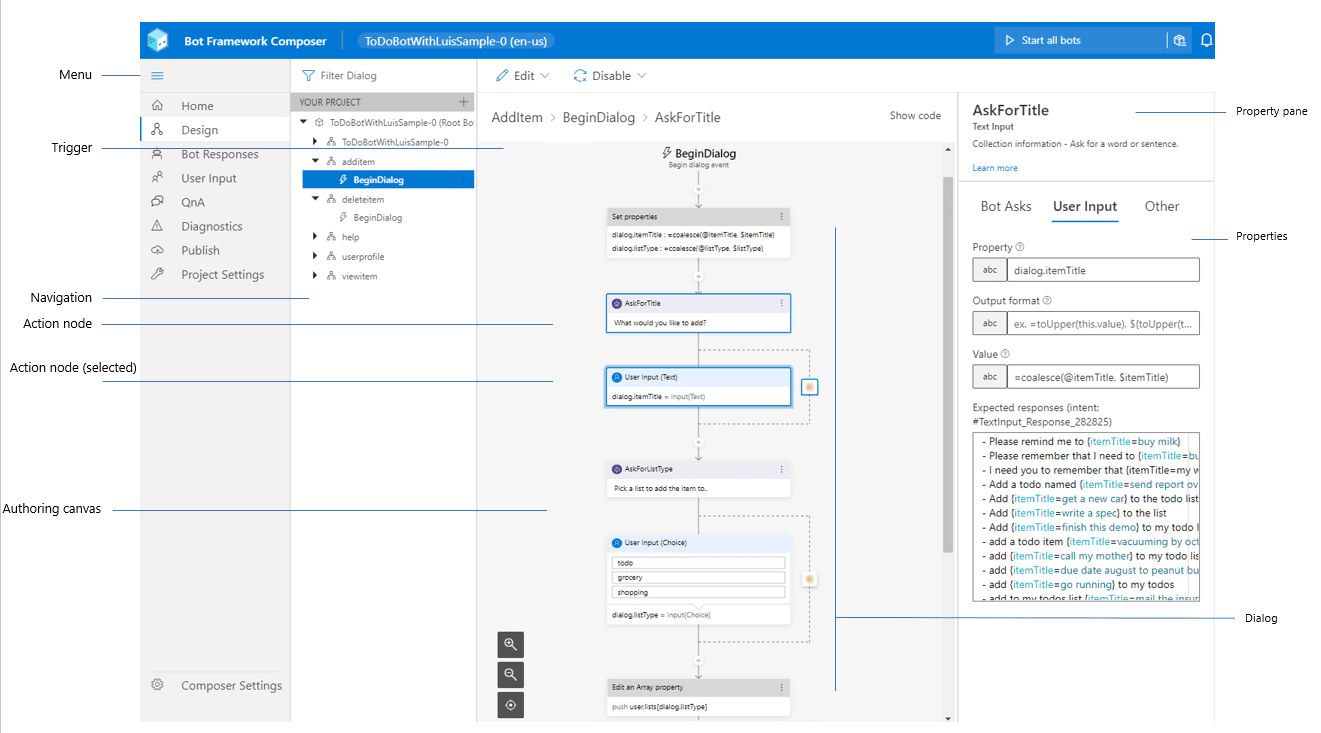
Once you do that, you will see the main screen of composer, with a list of triggers on the left, and the main pane to design dialogs:
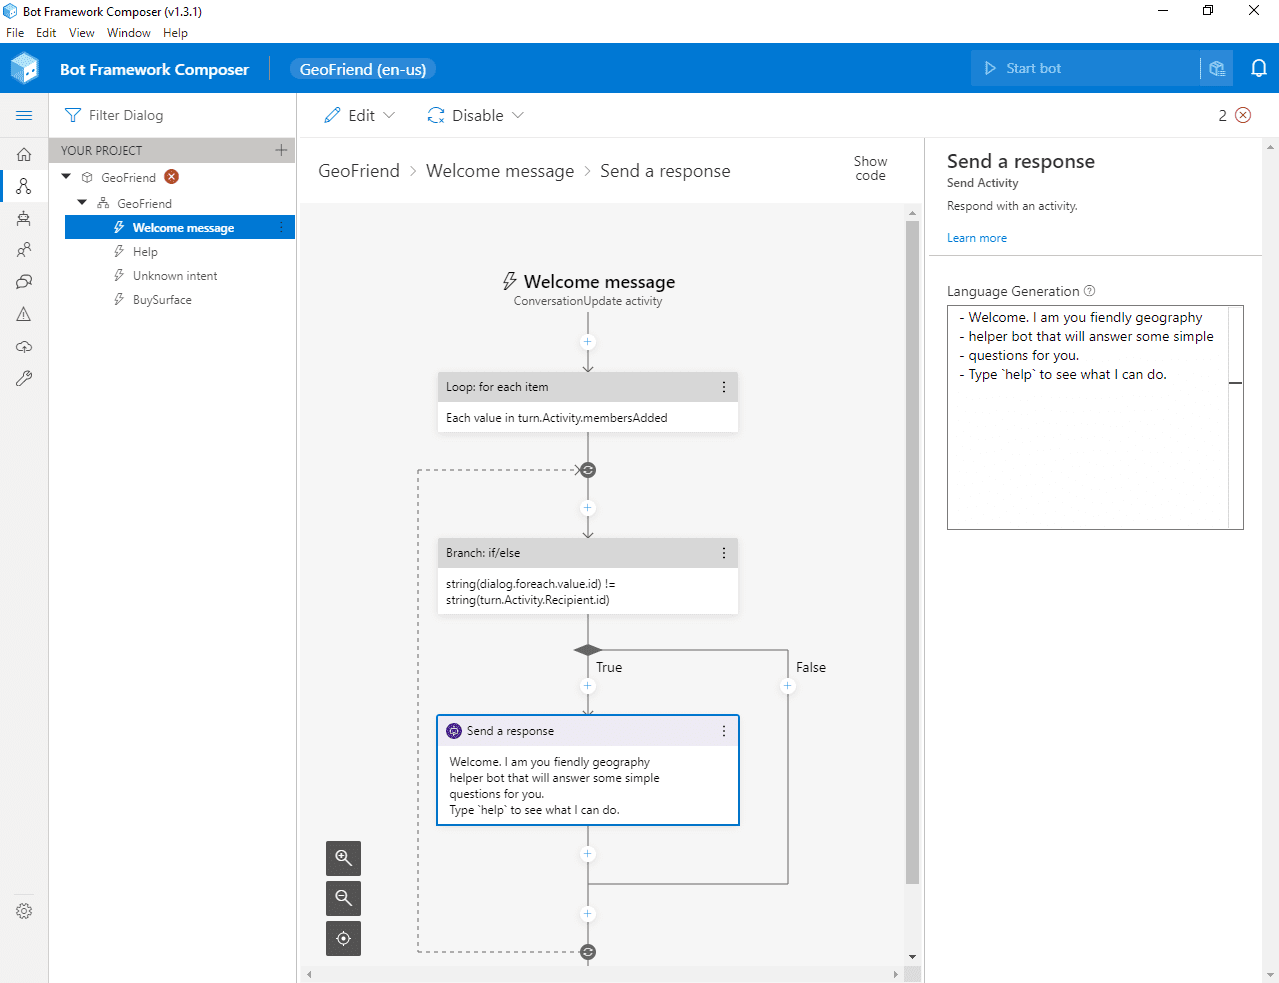
Here, you can delete an unused trigger BuySurface (which is left over from the demo), and go to Welcome message to customize the phrase that the bot says to new user. The logic of Welcome Message trigger is a bit complex, you need to look for a box called Send a response, and change the message in the right pane.
The language used to define phrases is called Language generation, or lg. A few useful syntax rules to know:
- A phrase starts with
–. If want to chose from a number of replies, specify several phrases, and one of them will be selected randomly. For example: “`bash
- Hello, I am geography helper bot!
- Hey, welcome!
- Hi, looking forward to chat with you! “`
- Comments start with
>
- Some additional definitions start with
@
- You can use
${…} syntax for variable substitution (we will see an example of this later)
Connecting to Azure Services
To use intelligent backend, you need to create Azure resources for LUIS and QnA Maker and provide corresponding keys to Composer:
- Create LUIS Authoring Resource, and make sure to remember the region in which it was created, and copy key from Keys and Endpoint page in Azure Portal.
- Create QnA Maker Service, and copy corresponding key
- In Composer, go to bot settings by pressing Project Settings button in the left menu (look for a wrench icon, or expand the menu if unsure). Under settings, fill in LUIS Authoring Key, LUIS region and QnA Maker Subscription key.
Starting the Bot
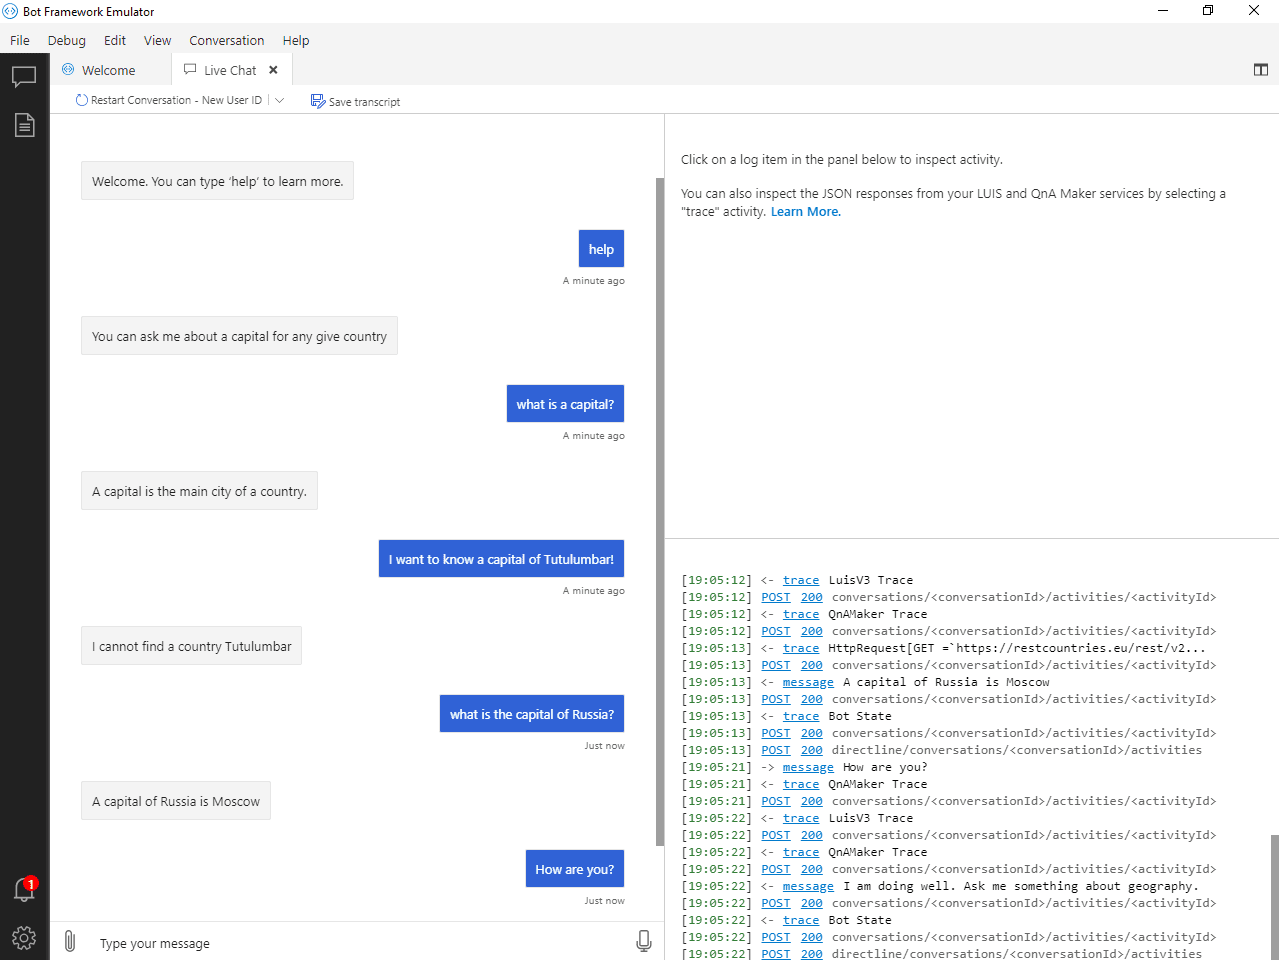
At this point, you can already start chatting with your bot. Click Start bot in the upper right corner, and let some time for the magic to happen. When starting a bot, Composer actually creates and trains underlying LUIS model, builds bot framework project, and starts local web server with a copy of the bot, ready to serve your requests.
To chat with a bot, click Test in emulator button (you need to have Bot Framework Emulator) installed for this to work). This automatically opens up the chat window with all required settings, and you can start talking to your bot right away.
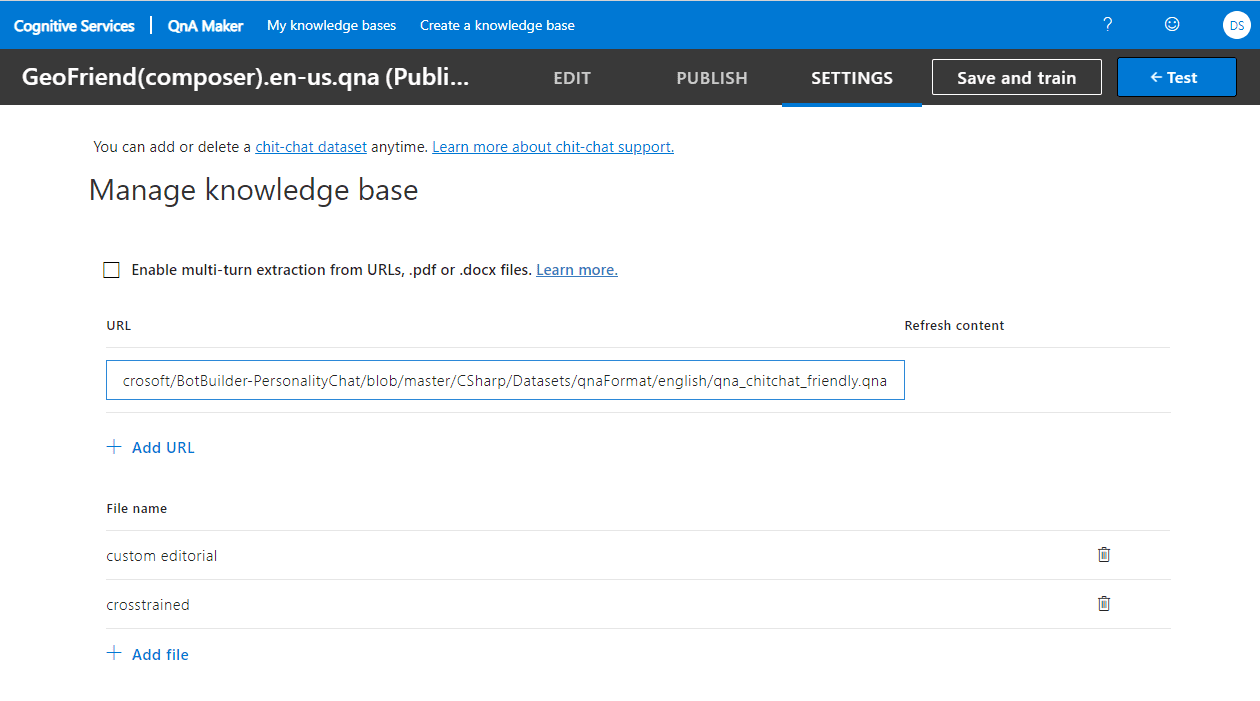
Creating QnA Maker Knowledge base
Let’s start with creating term dictionary using QnA Maker. Click on QnA left menu, and then Create new KB.
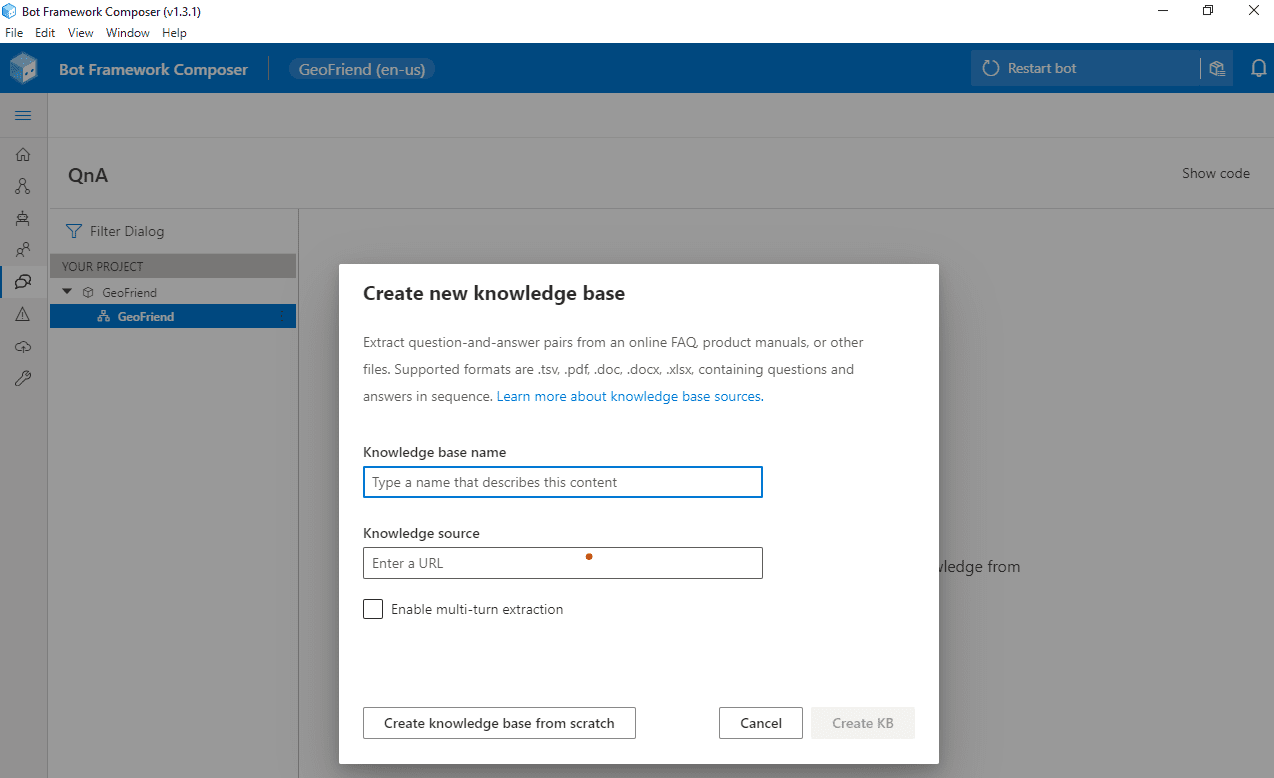
Here you can either start from some existing data (provided as an URL to html, pdf, Word or Excel document), or start creating phrases from scratch.
In most of the cases, you would have a document to start with, but in our case we will start from scratch. After creating a knowledge base, you can click Add QnA Pair to add all question-answer combinations you need. Note that you can add several options of the question by using All alternative phrasing link.
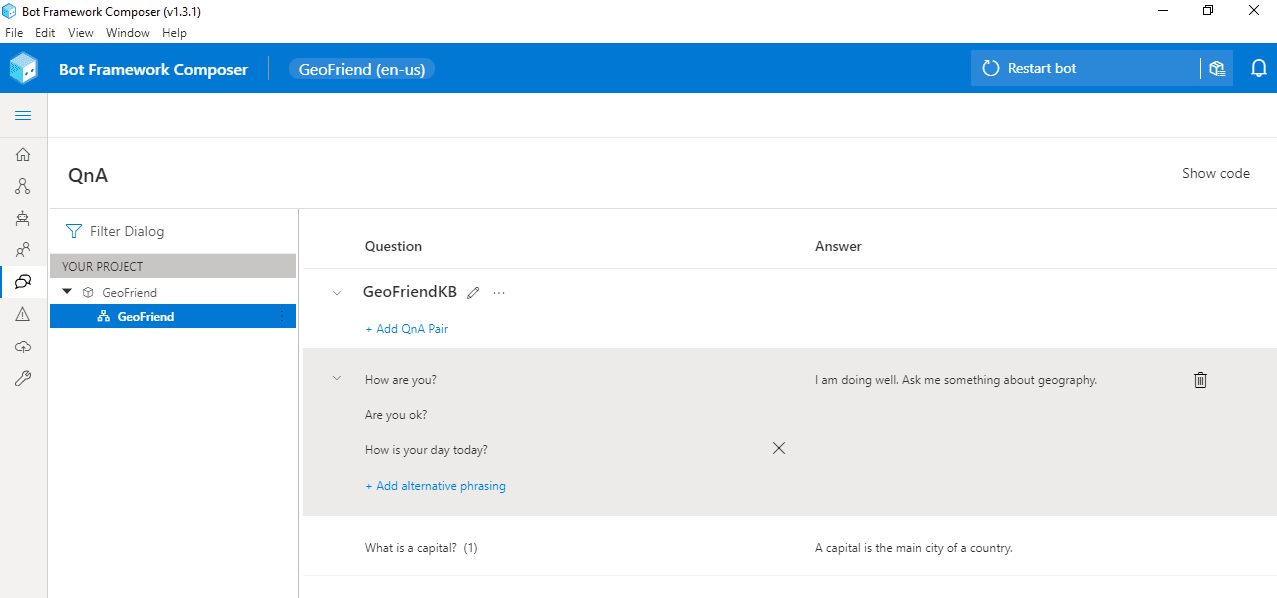
In our case, I have added a how are you phrase (with several options), and a phrase to explain the meaning of the word capital.
Having added the phrases, we can start a bot and make sure that it correctly reacts to given phrases, or similar versions of those phrases – QnA maker does not require it to be an exact match, it looks for similar phrases to make a decision on which answer to provide.
Adding Specific Actions with LUIS
To give our bot an ability to give capitals of countries, we need to add some specific functionality to look for a capital, triggered by a certain phrase. We definitely do not want to type all 200+ countries and their capitals into QnA Maker!
A functionality to get information about a country is openly available via REST Countries API. For example, if we make GET request to https://restcountries.eu/rest/v2/name/Russia, we will get JSON response like this:
[ {“name”:“Russian Federation”,

   “topLevelDomain”:[“.ru”],

   “capital”:“Moscow”, … } ]
To ask for a capital of a given country, a user will say something like What is a capital of Russia?, or I want to know the capital of Italy. This phrase intent can be recognized using LUIS, and the name of the country is also extracted.
To add LUIS trigger, from the Design page of the composer, select your bot dialog and press “…” next to it. You will see Add a trigger option in the drop-down box. Select it, and then chose Intent recognized as trigger type.
Intent Recognized is the most common trigger type. However, you can specify Dialog events, that allow you to structure part of the conversation as a separate dialog, or some conversational activities, such as Handoff to human.
Then, specify trigger phrases, using a variation of LG language. In our case, we will use the following:
– what is a capital of {country=Russia}?

– I want to know a capital of {country=Italy}.

– Give me a capital of {country=Greece}!
Here, we specify a number of trigger phrases starting with –, and we indicate that we want to extract part of the phrase as an entity country. LUIS will automatically train a model to extract entities based on the provided utterances, so make sure to provide a number of possible phrases.
There are some pre-defined entity types, such as datetimeV2, number, etc. Using pre-defined types is recommended, and entity type can be specified using @ <entity_type> <entity_name> notation. In our case, we can use geographyV2 entity type, which extracts geographic locations, including countries.
Once we have defined phrase recognizer, we need to add a block that will do the actual REST call and fetch information on the given country. Use use Send HTTP Request block, and specify the following parameters:
This would make the REST call to the API, and the result will be stored into dialog.result property. If we provided a valid country, json result will be automatically parsed, otherwise, invalid operation code will be recorded in dialog.result.statusCode – in our case, 404.
To test if the call was successful and define different logic based on the result, we insert Branch: If/Else block, and specify the following condition: = equals(dialog.result.statusCode,200). True condition will correspond to the left branch, and we will insert Send a response block there, with the following text:
– A capital of ${@country} is ${dialog.result.content[0].capital}
In case result code is not 200, the right branch will be executed, where we will insert an error message. Our final dialog should look like this:

Adding Preconfigured Chit-Chat Functionality
It would be nice if your bot could respond to more everyday phrases, such as How old are you?, or Do you enjoy being a bot. We can define all those phrases in QnA Maker, but that would take us quite some time to do so. Luckily, there is Project Personality Chat that contains a number of pre-defined QnA Maker knowledge bases for several languages, and for a number of personalities:
- Professional
- Friendly
- Witty
- Caring
- Enthusiastic
You can grab a link to the knowledge base from here, then go to QnA Maker Portal, find your knowledge base, and add this URL link to your service:
Having done that, click Save and Train, and enjoy a talk to your bot! You can even try ask it about life, universe and everything!
Testing the Bot and Publishing to Azure
Now that our basic bot functionality is complete, we can test the bot in bot emulator:
Once the bot is running locally, we can deploy it to Azure right from the Composer. If you go to Publish from the left menu, you will be able to define Publishing profile for your bot. Select Define new publishing profile, and chose one of the following:

The most standard way to deploy is to use Azure Web App. Composer will only require you to provide Azure subscription and resource group name, and it will take care of creating all the required resources (including bot-specific LUIS/QnA Maker instances) automatically. It may take awhile, but it will save you a lot of time and hassle of doing manual deployment.
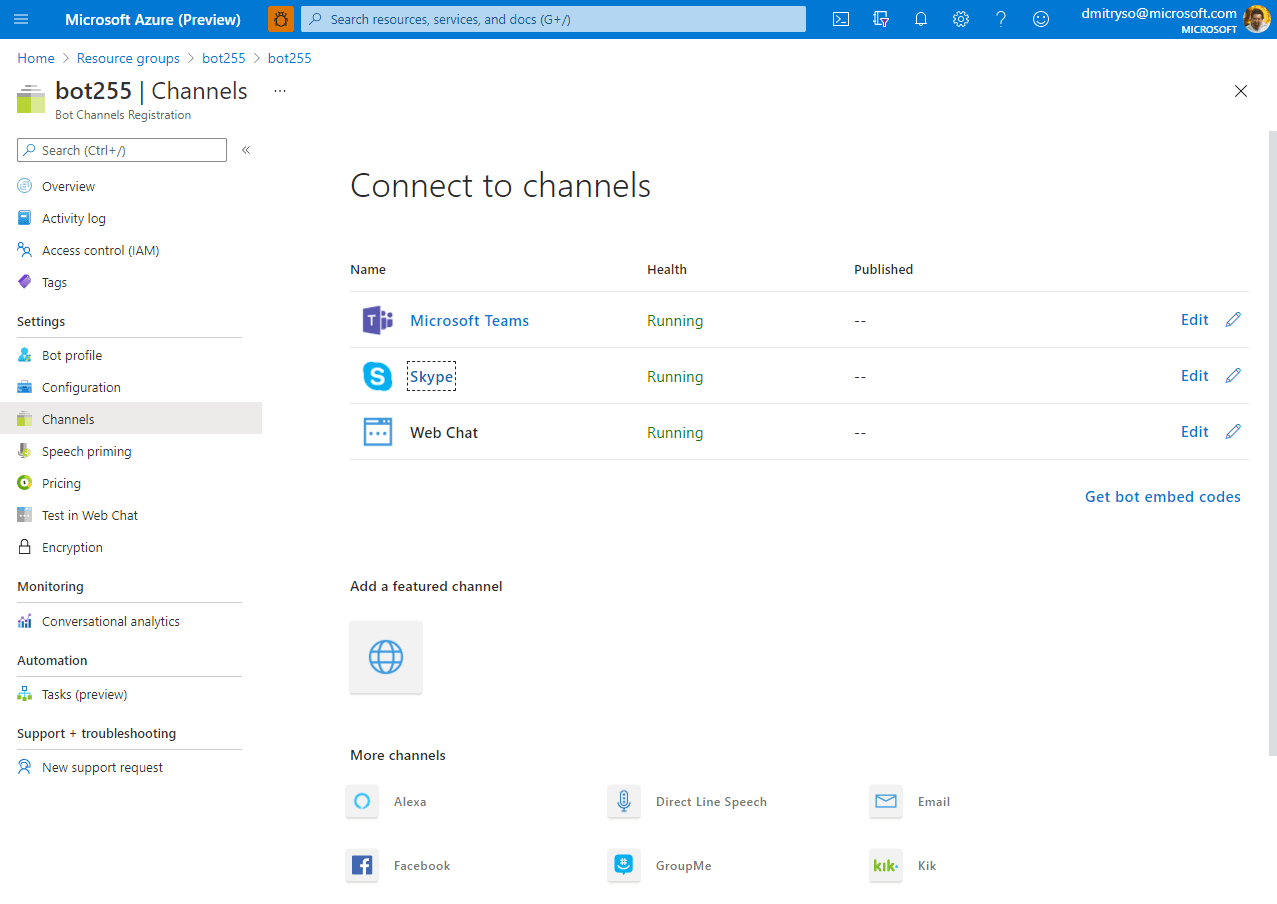
Once the bot is published to Azure, you can go to Azure portal and configure Channels through which you bot would be available to external world, such as Telegram, Microsoft Teams, Slack or Skype.
Conclusion
Creating a bot using Bot Composer seems like an easy thing to do. In fact, you can create quite powerful bots almost without any code! And you can also hook them to your enterprise endpoint using such features as HTTP REST APIs and OAuth authorization.
However, there are cases when you need to significantly extend bot functionality using code. In this case, you have several options:
- Keep main bot authoring in Bot Composer, and develop Custom Actions in C#
- Export complete bot code using Custom Runtime feature of Composer, which exports complete bot code in C# or Javascript, which you can then fully customize. This approach is not ideal, because you will lose the ability to maintain the source of your bot in Composer.
- Write a bot from the beginning in one of the supported languages (C#, JS, Python or Java) using Bot Framework.
If you want to explore how the same Educational bot for Geography can be written in C#, check out this Microsoft Learn Module: Create a chat bot to help students learn with Azure Bot Service.
I am sure conversational approach to UI can prove useful in many cases, and Microsoft Conversational Platform offers you wide variety of tools to support all your scenarios.
by Contributed | Feb 17, 2021 | Technology
This article is contributed. See the original author and article here.
On November 10, 2020, Microsoft announced the general availability of Microsoft Endpoint DLP (Data Loss Prevention). Endpoint DLP is a native integrated experience that identifies and protects sensitive information accessed by information workers in the applications they use every day. It is part of Microsoft Information Protection, an intelligent, unified, and extensible solution to know your data, protect your data, and prevent data loss across all the touchpoints within an enterprise – including Microsoft 365 apps and services, on-premises file stores, endpoint devices, and third-party SaaS applications and services.
Seamless Endpoint DLP onboarding for Microsoft Defender for Endpoint customers
As a Microsoft Defender for Endpoint customer, you can take advantage of a seamless onboarding to Endpoint DLP.
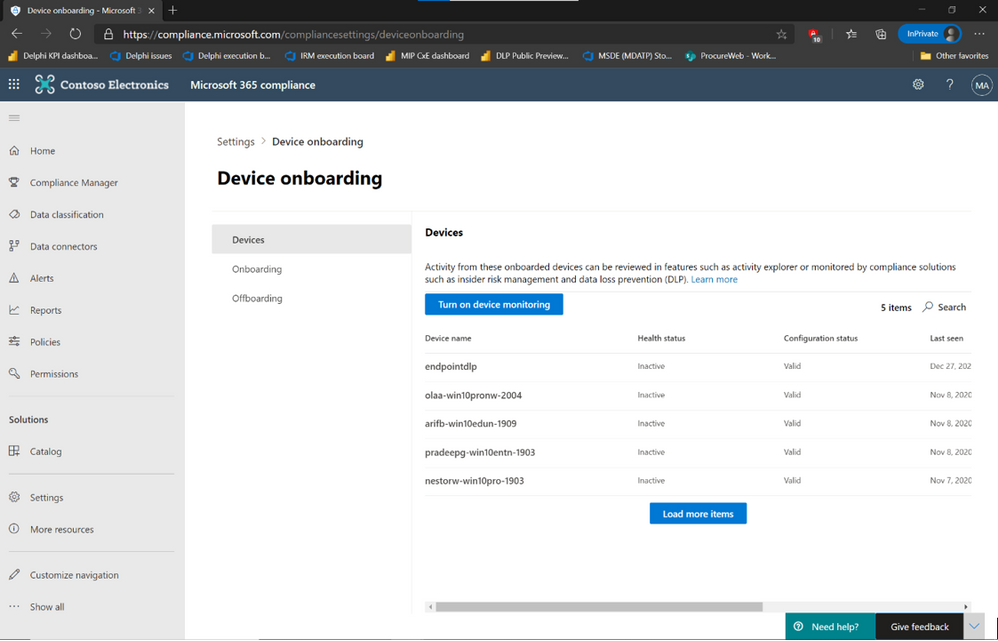
If you own the required licenses, all it takes is a single click in Microsoft 365 Compliance portal’s device onboarding the to enable Endpoint DLP across all your Windows 10 devices that are onboarded to Defender for Endpoint.
If you don’t own the appropriate license, we encourage you to try out our Endpoint DLP capabilities by signing up for a free trial of Microsoft 365 E5 Compliance, available through the
For more information, read our official documentation on Endpoint DLP onboarding.
Once a device is onboarded, Endpoint DLP automatically provides telemetry information and data discovery capabilities for sensitive data out of the box. Endpoint DLP monitors sensitive data for file access, copy, paste, print and saving to removable media, file shares and uploads via browsers for Office 365, PDF, and CSV files without requiring the configuration of policies. Endpoint DLP also analyzes files for sensitivity related information by parsing the file content, extracting sensitive information types, and assigned sensitivity label, if it exists. This telemetry is available in Activity Explorer, alongside similar telemetry from other Microsoft workloads.
This telemetry data provides a direct view into information worker’s regular interactions with sensitive information and can be used to streamline the identification and deployment of DLP policies that would have the most significant impact on improving the overall security posture of the organization by reducing the risk of sensitive data loss.
Deprecating Azure Information Protection integration with Microsoft Defender for Endpoint (preview)
Microsoft Defender for Endpoint has an integration with Azure Information Protection (AIP) that shares sensitive data user activity and device risk data. This information is stored in the Log Analytics workspace and is displayed in the AIP Analytics screens, along with the other AIP audit logs. It is an integration has been available to customers as part of a Public Preview.
Endpoint DLP incorporates an improved discovery and protection solution for sensitive data stored on endpoint devices that facilitates greater visibility and integration between solutions. On March 29, 2021, the current integration between Microsoft Defender for Endpoint and AIP will be deprecated. Existing Microsoft Defender for Endpoint customers who have been using the Public Preview of the AIP integration are encouraged to move to Endpoint DLP and enjoy the improved security capabilities and activity visibility in . For more information about Endpoint DLP, see please read our documentation as well as our announcement blog.
The integration is controlled by an on/off toggle in the Microsoft Defender Security Center under Settings -> Advanced features:
When deprecated, this setting will be removed, and Microsoft Defender for Endpoint will not forward signals to Azure Information Protection.
If you haven’t yet tried out Endpoint DLP, sign up for a free trial in the Microsoft 365 admin center.
If you’re not yet taking advantage of Microsoft’s industry leading optics and endpoint security capabilities, sign up for a free trial of Microsoft Defender Endpoint today.
Additional resources:
- For more information on Data Loss Prevention, please see our blog and our documentation
- For videos on Microsoft’s Unified DLP approach and Endpoint DLP, watch the following:
- For more information on DLP alerts and event management, check out the documentation
by Contributed | Feb 17, 2021 | Technology
This article is contributed. See the original author and article here.
THIS POST NEEDS TO BE BACKDATED TO 2/12/18
Decentralized digital identities and blockchain: The future as we see it – Microsoft 365 Blog
Howdy folks,
I hope you’ll find today’s post as interesting as I do. It’s a bit of brain candy and outlines an exciting vision for the future of digital identities.
Over the last 12 months we’ve invested in incubating a set of ideas for using Blockchain (and other distributed ledger technologies) to create new types of digital identities, identities designed from the ground up to enhance personal privacy, security and control. We’re pretty excited by what we’ve learned and by the new partnerships we’ve formed in the process. Today we’re taking the opportunity to share our thinking and direction with you. This blog is part of a series and follows on Peggy Johnson’s blog post announcing that Microsoft has joined the ID2020 initiative. If you haven’t already Peggy’s post, I would recommend reading it first.
I’ve asked Ankur Patel, the PM on my team leading these incubations to kick our discussion on Decentralized Digital Identities off for us. His post focuses on sharing some of the core things we’ve learned and some of the resulting principles we’re using to drive our investments in this area going forward.
And as always, we’d love to hear your thoughts and feedback.
Best Regards,
Alex Simons (Twitter: @Alex_A_Simons)
Director of Program Management
Microsoft Identity Division
—————————————————
Greetings everyone, I’m Ankur Patel from Microsoft’s Identity Division. It is an awesome privilege to have this opportunity to share some of our learnings and future directions based on our efforts to incubate Blockchain/distributed ledger based Decentralized Identities.
What we see
As many of you experience every day, the world is undergoing a global digital transformation where digital and physical reality are blurring into a single integrated modern way of living. This new world needs a new model for digital identity, one that enhances individual privacy and security across the physical and digital world.
Microsoft’s cloud identity systems already empower thousands of developers, organizations and billions of people to work, play, and achieve more. And yet there is so much more we can do to empower everyone. We aspire to a world where the billions of people living today with no reliable ID can finally realize the dreams we all share like educating our children, improving our quality of life, or starting a business.
To achieve this vision, we believe it is essential for individuals to own and control all elements of their digital identity. Rather than grant broad consent to countless apps and services, and have their identity data spread across numerous providers, individuals need a secure encrypted digital hub where they can store their identity data and easily control access to it.
Each of us needs a digital identity we own, one which securely and privately stores all elements of our digital identity. This self-owned identity must be easy to use and give us complete control over how our identity data is accessed and used.
We know that enabling this kind of self-sovereign digital identity is bigger than any one company or organization. We’re committed to working closely with our customers, partners and the community to unlock the next generation of digital identity-based experiences and we’re excited to partner with so many people in the industry who are making incredible contributions to this space.
What we’ve learned
To that end today we are sharing our best thinking based on what we’ve learned from our decentralized identity incubation, an effort which is aimed at enabling richer experiences, enhancing trust, and reducing friction, while empowering every person to own and control their Digital Identity.
- Own and control your Identity. Today, users grant broad consent to countless apps and services for collection, use and retention beyond their control. With data breaches and identity theft becoming more sophisticated and frequent, users need a way to take ownership of their identity. After examining decentralized storage systems, consensus protocols, blockchains, and a variety of emerging standards we believe blockchain technology and protocols are well suited for enabling Decentralized IDs (DID).
- Privacy by design, built in from the ground up.
Today, apps, services, and organizations deliver convenient, predictable, tailored experiences that depend on control of identity-bound data. We need a secure encrypted digital hub (ID Hubs) that can interact with user’s data while honoring user privacy and control.
- Trust is earned by individuals, built by the community.
Traditional identity systems are mostly geared toward authentication and access management. A self-owned identity system adds a focus on authenticity and how community can establish trust. In a decentralized system trust is based on attestations: claims that other entities endorse – which helps prove facets of one’s identity.
- Apps and services built with the user at the center.
Some of the most engaging apps and services today are ones that offer experiences personalized for their users by gaining access to their user’s Personally Identifiable Information (PII). DIDs and ID Hubs can enable developers to gain access to a more precise set of attestations while reducing legal and compliance risks by processing such information, instead of controlling it on behalf of the user.
- Open, interoperable foundation.
To create a robust decentralized identity ecosystem that is accessible to all, it must be built on standard, open source technologies, protocols, and reference implementations. For the past year we have been participating in the Decentralized Identity Foundation (DIF) with individuals and organizations who are similarly motivated to take on this challenge. We are collaboratively developing the following key components:
- Decentralized Identifiers (DIDs) – a W3C spec that defines a common document format for describing the state of a Decentralized Identifier
- Identity Hubs – an encrypted identity datastore that features message/intent relay, attestation handling, and identity-specific compute endpoints.
- Universal DID Resolver – a server that resolves DIDs across blockchains
- Verifiable Credentials – a W3C spec that defines a document format for encoding DID-based attestations.
- Ready for world scale:
To support a vast world of users, organizations, and devices, the underlying technology must be capable of scale and performance on par with traditional systems. Some public blockchains (Bitcoin [BTC], Ethereum, Litecoin, to name a select few) provide a solid foundation for rooting DIDs, recording DPKI operations, and anchoring attestations. While some blockchain communities have increased on-chain transaction capacity (e.g. blocksize increases), this approach generally degrades the decentralized state of the network and cannot reach the millions of transactions per second the system would generate at world-scale. To overcome these technical barriers, we are collaborating on decentralized Layer 2 protocols that run atop these public blockchains to achieve global scale, while preserving the attributes of a world class DID system.
- Accessible to everyone:
The blockchain ecosystem today is still mostly early adopters who are willing to spend time, effort, and energy managing keys and securing devices. This is not something we can expect mainstream people to deal with. We need to make key management challenges, such as recovery, rotation, and secure access, intuitive and fool-proof.
Our next steps
New systems and big ideas, often make sense on a whiteboard. All the lines connect, and assumptions seem solid. However, product and engineering teams learn the most by shipping.
Today, the Microsoft Authenticator app is already used by millions of people to prove their identity every day. As a next step we will experiment with Decentralized Identities by adding support for them into to Microsoft Authenticator. With consent, Microsoft Authenticator will be able to act as your User Agent to manage identity data and cryptographic keys. In this design, only the ID is rooted on chain. Identity data is stored in an off-chain ID Hub (that Microsoft can’t see) encrypted using these cryptographic keys.
Once we have added this capability, apps and services will be able to interact with user’s data using a common messaging conduit by requesting granular consent. Initially we will support a select group of DID implementations across blockchains and we will likely add more in the future.
Looking ahead
We are humbled and excited to take on such a massive challenge, but also know it can’t be accomplished alone. We are counting on the support and input of our alliance partners, members of the Decentralized Identity Foundation, and the diverse Microsoft ecosystem of designers, policy makers, business partners, hardware and software builders. Most importantly we will need you, our customers to provide feedback as we start testing these first set of scenarios.
This is our first post about our work on Decentralized Identity. In upcoming posts we will share information about our proofs of concept as well as technical details for key areas outlined above.
We look forward to you joining us on this venture!
Key resources:
Regards,
Ankur Patel (@_AnkurPatel)
Principal Program Manager
Microsoft Identity Division

by Contributed | Feb 17, 2021 | Technology
This article is contributed. See the original author and article here.
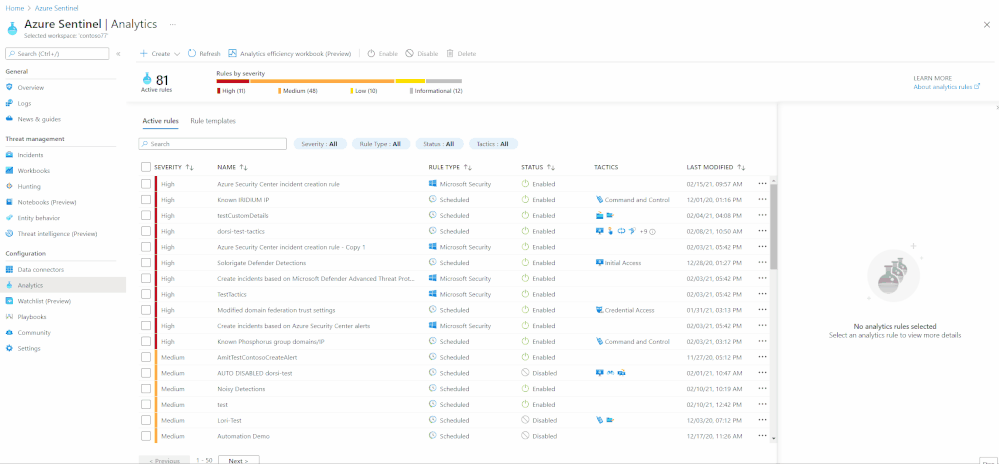
This blog post covers a new feature of the Azure Sentinel entity pages: four new UEBA-related insights to the insights panel.
When you encounter any entity (currently limited to users and hosts) in a search, an alert, or an investigation, you can select the entity and be taken to an entity page, a datasheet full of useful information about that entity. The types of information you will find on this page include basic facts about the entity, a timeline of notable events related to this entity, and insights into the entity’s behavior.
Entity pages consist of three parts:
- Entity info – located in the left-side panel, contains the entity’s identifying information, collected from data sources like Azure Active Directory, Azure Monitor, Azure Security Center, and Microsoft Defender.
- Activity timeline – The center panel shows a graphical and textual timeline of notable events related to the entity, such as alerts, bookmarks, and activities.
- Insights – The right-side panel presents behavioral insights on the entity. These insights help to identify anomalies and security threats quickly.
We’ve added four UEBA-related insights to the insights panel that this post will describe.
Spoiler (Highlight to read)
* To benefit from these insights, UEBA must be enabled and a timeframe of at least 4 days.
* To benefit from these insights, UEBA must be enabled and a timeframe of at least 4 days.
UEBA Insights
This insights section summarizes anomalous user activities – across geographical locations, devices, and environments; across time and frequency horizons (compared to user’s own history); compared to peers’ behavior, and compared to organization’s behavior.
Clicking on “See all anomalies” will present you with the specific anomalies associated with the user and the evidence.
UEBA Insights
User Peers Based on Security Group Membership
This insight presents the user’s peers based on Azure AD Security Groups membership. This provides the SecOps analysts with visibility to other users who share similar permissions as the user.
 User Peers Based on Security Group Membership
User Access Permissions to Azure Subscription
This insight shows a user’s access permissions to the Azure subscriptions that it can access directly or transitively (via Azure AD groups or service principals). Clicking on “View detailed information” will present the Azure subscriptions’ names and the access method (directly or via which group/service principal).
 User Access Permissions to Azure Subscription
Threat Indicators Related to The User
This insight shows the collection of known threats by threat type and family and enriched by Microsoft’s threat intelligence service, relating to IP addresses represented in the user’s activities.
 Threat indicators related to the user
Going Forward
Try out the new insights provided by Sentinel UEBA and let us know your feedback using any of the channels listed in the Resources. We’re working on surfacing more interesting insights that will help you investigate entities faster. 
Many thanks to Payal Rani & Rajvardhan Oak for contributing to the insights work

by Contributed | Feb 17, 2021 | Technology
This article is contributed. See the original author and article here.
In this blog post I want to explain how you can send an Adaptive Card with CLI Microsoft 365. I will guide you from zero to hero :rocket:, so even if you don’t know anything about the CLI Microsoft 365 or about Adaptive cards, don’t stop reading, you will be able to do that in a few minutes- I promise!
What is CLI Microsoft 365?
Lets first get us all on the same page and clarify, what CLI Microsoft 365 is and why we should use it: It is a CLI (Command Line Interface) which let’s us manage Microsoft 365 from any kind of OS: It doesn’t matter if we work on Windows, MacOS or Linux. Previously, some configurations were only possible by PowerShell for Windows, which limited a lot of admins. But even if you work on Windows and are pretty fine with using PowerShell, CLI might be a nice alternative to try out.
How to use CLI Microsoft 365
I will now describe your first steps:
Install Node.js
To use the CLI Microsoft 365, you will need to install Node.js – Please follow these steps:
* go to https://nodejs.org/en/
* download the LTS version of Node.js
* install Node.js
If in doubt, if you have the correct version installed or if you need to use different versions of Node.js, please read Use Node Version Manager to develop your SPFx apps by Toni Pohl
Install CLI Microsoft 365
Now that you have Node.js installed, we can continue with installing the CLI Microsoft 365. You can choose any shell you like: If you want to, you can use PowerShell or PowerShell in the Terminal in Visual Studio Code or whatever makes you happy. I like to use the PowerShell terminal in Visual Studio Code, because links render to be clickable and this saves me copy/pasting links into a new browser tab. But if you like to any other shell, that is perfectly fine as well. To install CLI Microsoft 365, run the command:
npm i -g @pnp/cli-microsoft365
In case you wonder:
* the `i` is an alias for `install`
* the `-g` means that we want to install this package globally
* it will take about 2 minutes
Login
Now that we installed CLI Microsoft 365, it’s time to actually do something here. But before we can get or post anything, we will need to log into our tenant. Pro Tip: You can use your your Developer tenant for this. If you don’t know, what this is, please go read What is a “Dev Tenant” and why would you want one? by Julie Turner
Run the following command:
m365 login
In response you will be asked to open a web browser and login with a code. If you are using Visual Studio Code, you can click on the link, please copy the code upfront.

After you pasted the code,
* click Next
* pick an account out of the list of accounts
You will be seeing this message and can close this browser tab- we won’t need it anymore.

Yay! You successfully logged in! You don’t believe that? Let’s check with CLI Microsoft 365 and run this command to get your status:
m365 status
and it will get your status for you:

If you want some inspiration, what you could do now, run this command:
m365 help

which gives you a list of things you can try, these are called command groups, as each of them can contain several commands. When you now choose one of the command groups and run for example this one:
m365 outlook
you will get the commands, that are available to you in this command group. Sometimes, you can go several levels deep-Just try them out!
What are Adaptive Cards?
Next thing we need to know is, what are Adaptive Cards and why would we want to use them? When we look at adaptivecards.io we can read the definition Adaptive Cards are platform-agnostic snippets of UI, authored in JSON, that apps and services can openly exchange. When delivered to a specific app, the JSON is transformed into native UI that automatically adapts to its surroundings. It helps design and integrate light-weight UI for all major platforms and frameworks. This means, that we get a nice method to share and display information without needing to know how to use HTML/CSS to render them correctly in different host applications. If you like to know more, please read Get started with Adaptive Cards by Tomasz Poszytek
How do we send an Adaptive Card with CLI Microsoft 365?
Now that we know what is an Adaptive Card, let’s have a look on how we get this sent by CLI. The documentation provides us with a sample and this sample needs to have a URL. Where do we get this from? This depends on where you want to send this Adaptive Card to. In this example, I want to use Microsoft Teams as host application and therefore we will need to create an incoming webhook in Teams.
Create the Webhook
If you have no clue what is a webhook, no problem, Rabia Williams got you covered with How to configure and use Incoming Webhooks in Microsoft Teams
* Open Microsoft Teams
* Click the ellipsis icon on the Teams channel that you want to send the Adaptive Card to
* Click Connectors
* Search for ‘webhook’

* Click Add
* Click Add (yes, yet again)
* Give your webhook a name
* If you like to, you can upload a picture- messages sent via this webhook (our Adaptive Card) will have this image then as Profile Pic – this step is optional.
* Click Create
* Copy the generated URL
* Click Done
This URL is the URL we will need in the command later – If you want to, paste it into a notepad or similar.
Author your Card
Now it’s time to author your card. You can do this in a lot of editors, I use either the Adaptive Cards Designer or the Adaptive Cards Viewer Extension in Visual Studio Code, but recently also found Adaptive Card Studio. You can also use one of the provided samples and use them as-is or adjust them to your needs.
If you feel like authoring your Card in Designer or Visual Studio Code is fine for you right now, go ahead with this, otherwise you can also use the examples that are provided in the documentation of CLI Microsoft 365. I used the last one, ‘Send custom card with card data’.
For everyone not very familiar writing and understanding code: We can make more sense of the snippet by copy/paste this into Visual Studio Code, and then press Alt+z to soft-wrap this and then separate the Adaptive Card from the rest:
* Select JSON in Language Mode
* Insert somenew lines right before the first `{`
* Delete the `’` at the beginning and the end of the snippet
* Format with Shift + Alt + f
Now go ahead and adjust the sample to work in your environment:
* replace the URL in the code with the URL that we copied when we added the webhook connector to Teams
* copy the whole code
* run it
!! Turned out, that there are some differences how to use quotes `’` or `”` – please consider which shell you are using before you copy/paste the code from CLI Microsoft 365 documentation.
Congratulations :rocket:- you sent your first adaptive Card with CLI.
## Feedback and what’s next?
I hope you liked this little post on how to get started with CLI Microsoft 365 and learning how to send an Adaptive Card with it. I would like to learn, for which use cases you would do this? Please comment below!
by Contributed | Feb 17, 2021 | Technology
This article is contributed. See the original author and article here.
Gauge the performance of your team and detections using our new out-of-the-box workbooks
Building a Security Operations Center (SOC) from scratch or revamping one is a daunting challenge. We have developed a “Toolkit” to help SOC managers and analysts improve performance. The toolkit is a powerful set of 3 workbooks, all customizable and easily accessible, that help you gauge the most fundamental metrics. With these workbooks, you can measure analysts’ efficiency, detection coverage, alert performance, and more.
We have enhanced the workbooks to provide cross-workspace support allowing for an effective single pane of glass view even in multi-workspace use cases. Each workbook gauges specific performance metrics.
The three workbooks are;
- Detection efficiency
- SOC efficiency
- Incident overview
Detection efficiency
The modern SOC handles multiple data sources and needs to detect threats and provide insights to the analyst. Since SOC resources are limited, a delicate balance must be struck between maximizing the detection of threats and minimizing the occurrence of false positives.
In the detection efficiency workbook, we try to provide different perspectives on detections.
- Alert rules – a holistic view of our detections provides us with insights into the detections’ overall coverage. In this section, we can see our MITRE ATT&CK framework coverage, overall rules status, rules that require attention, and a view of the detections suite.
- Alerts – in this view, we will look at the alerts created from our detections. Since not all rules will create incidents, we can monitor the noisiness of the detections and see which ones require tuning. In the alerts insights section, we provide insights into detections that are not firing and might require attention and track the load from different providers.
- Incidents – The load on the SOC is determined by the number of incidents we create. Here we can monitor which detections created incidents and the reasons incidents are closed. When looking at the incident load and the closing reason, we can deduce which detections require attention and tuning.
Iterating on all 3 views in a repetitive process will improve our detection efficiency, SOC performance, and, ideally, the organization’s detection suite. This continuous process should adapt our detections to the ever-changing security threat landscape.
There are two ways to access this workbook –
- The workbooks gallery – You can find this new workbook template by choosing Workbooks from the Azure Sentinel navigation menu and selecting the Templates tab. Choose Detection efficiency from the gallery and click one of the View saved workbook and View template buttons.
- The Analytics pane – You can find the new workbook in the Alert rules action panel at the top of the pane. If a saved workbook were created from the workbook template, the button would lead to the saved workbook. If not, it will lead to the workbook template. More details can be found in the documentation.
SOC efficiency
With the out-of-the-box security operations efficiency workbook template, you can monitor your SOC operations. The workbook contains the following metrics:
- Incident created over time.
- Incidents created by closing classification, severity, owner, and status
- Mean time to triage
- Mean time to closure
- Incidents created over time by severity, owner, status, product, and tactics.
- Time to triage percentiles
- Time to closure percentiles
- Mean time to triage per owner
- Recent activities
- Recent closing classifications

There are two ways to access this workbook –
- The workbooks gallery – You can find this new workbook template by choosing Workbooks from the Azure Sentinel navigation menu.
- The incidents pane: You can find the new workbook in the Incidents action panel at the top of the pane. If a saved workbook was created from the workbook template, the button would lead to the saved workbook. If not, it will lead to the workbook template. More details can be found in the documentation.
Incident overview
With this out-of-the-box Incident overview workbook template, you can customize the data your analysts get on a given incident, including a view of auditing data, recommendations, and more on a given incident. The workbook contains the following metrics:
- Incident’s title, alerts, status, bookmark, severity, owner, etc.
- Closing reasons of similar incidents
- Recent actions that were taken on the incident
- Incident’s comments
- Time to closure/triage

There are 2 ways to access this workbook –
- The workbooks gallery – You can find this new workbook template by choosing Workbooks from the Azure Sentinel navigation menu.
- The incidents pane – You can find the new workbook in the Incident preview panel on the incidents list’s right side. If a saved workbook was created from the workbook template, the button would lead to the saved workbook. If not, it will lead to the workbook template.
Thanks to all the reviewers @Ofer_Shezaf, @Yechiel_Levin, @mariasvc, @krisquick, and @Sarah_Young, and special thanks to @romarsia for the collaboration

by Contributed | Feb 17, 2021 | Dynamics 365, Microsoft 365, Technology
This article is contributed. See the original author and article here.
Finance leaders are organizations’ linchpins, and during crises such as the pandemic, they take on enormous responsibilities to steer their businesses through the storm while simultaneously preparing for the future. Some of the actions savvy finance leaders are taking during these uncertain times are to continue to reduce costs, mitigate risks, and accelerate their company’s digital transformations.
Our upcoming event, Finance Reimagined, is a free virtual conference. The summit will feature talks from finance leaders, from whom you’ll learn about hard-won lessons and hear valuable insights. Discover the actions your peers and industry leaders are taking to sustain core financial processes through the pandemic and how they’re pivoting to the future amidst continued uncertainties. And engage with thought leadership content, peer-to-peer discussions, and more.
- What: Finance Reimagined virtual CFO summit
- When: February 24, 2021
Capture learnings and best practices
During the summit, for which more than 2,000 finance leaders have registered, successful leaders reveal how they are leading their companies through three key stages: Response, Recovery, and Reimagination.
As Microsoft CEO Satya Nadella explained in the New York Times, response means “responding to the immediate impact through office closures, cost cuts,” etc. Next comes “recovery, which is already underway in many places, and will be more like a ‘dial’ than a ‘switch.'” The critical third phase is “reimagination.” This is where “innovations born of necessity during the previous two phases will emerge, like remote control of manufacturing processes, AI bots helping diagnose patients, and more effective distance-learning technologies.”
The most innovative and renowned finance leaders have used the crises to not only respond and recover but to further embrace the potential of digital transformation and to reimagine the future.
Gain insights from impactful speakers
Hear keynotes from industry leaders, including economist Rebecca Henderson, the John and Natty McArthur University Professor at Harvard Business School, who will share her thoughts on reimagining capitalism and grappling with the future of work, and finance leaders Mark Fowler of AstraZeneca and Ritesh Tiwari of Unilever.
Get a sneak peek of PwC’s CFO Pulse Survey, which provides a vision and practical steps to “the new normal.” This includes how finance is shifting to embrace and enable the modern workplace across cost, risk, and efficiency agendas.
Learn how to embrace the need to move quickly and how doing so requires a modern finance function that is resilient, adaptable, cost-effective, and focused on speed to value in a session with Tony Klimas, partner, Global Finance Practice Leader at Ernst & Young LLP, and Myles Corson, Global and Americas Market Leader, Financial Account Advisory Services at Ernst & Young LLP. They will also reveal findings from the 2020 DNA of the CFO study and share lessons from the front lines.
See how targeted solutions are addressing key challenges
See how finance leaders are overcoming challenges through sessions focused on you and your pain points. For example, learn how to confidently complete a virtual close, provide engaging analytics to support quick decisions, and take a quantitative approach to understand and address employee engagement.
In other sessions, take a deep dive into predictive analytics, and learn how AI is being infused into financial processes to proactively reduce write-offs, improve cash flow, and make accurate, data-driven, and proactive decisions. And see real-world uses of automated SOX control, including how Microsoft leveraged models to automate the processing of payout statements, saving close to 20,000 hours of manual work and bringing the error rate to zero.
Engage with peers and build your network
Engage in peer-to-peer discussions through small-group breakout sessions. Join existing roundtables or create your own and invite peers to discuss challenges related to respond, recover, or reimagine. Connect with thought leaders and advisories, and add these business leaders to your own professional network.
Register today
Benefit from others’ hard-won lessons and prepare for the future. Register now for Finance Reimagined.
The post Join Microsoft at Finance Reimagined: response, recovery, and reimagination appeared first on Microsoft Dynamics 365 Blog.
Brought to you by Dr. Ware, Microsoft Office 365 Silver Partner, Charleston SC.

by Scott Muniz | Feb 17, 2021 | Security, Technology
This article is contributed. See the original author and article here.
Official websites use .gov
A .gov website belongs to an official government organization in the United States.

Secure .gov websites use HTTPS A
lock ( )
) or
https:// means you’ve safely connected to the .gov website. Share sensitive information only on official, secure websites.

by Scott Muniz | Feb 17, 2021 | Security, Technology
This article is contributed. See the original author and article here.
The North Korean government has used multiple versions of AppleJeus since the malware was initially discovered in 2018. This section outlines seven of the versions below. The MARs listed above provide further technical details of these versions. Initially, HIDDEN COBRA actors used websites that appeared to host legitimate cryptocurrency trading platforms to infect victims with AppleJeus; however, these actors are now also using other initial infection vectors, such as phishing, social networking, and social engineering techniques, to get users to download the malware.
Targeted Nations
HIDDEN COBRA actors have targeted institutions with AppleJeus malware in several sectors, including energy, finance, government, industry, technology, and telecommunications. Since January 2020, the threat actors have targeted these sectors in the following countries: Argentina, Australia, Belgium, Brazil, Canada, China, Denmark, Estonia, Germany, Hong Kong, Hungary, India, Ireland, Israel, Italy, Japan, Luxembourg, Malta, the Netherlands, New Zealand, Poland, Russia, Saudi Arabia, Singapore, Slovenia, South Korea, Spain, Sweden, Turkey, the United Kingdom, Ukraine, and the United States (figure 1).
Figure 1: Countries targeted with AppleJeus by HIDDEN COBRA threat actors since 2020
AppleJeus Versions Note
The version numbers used for headings in this document correspond to the order the AppleJeus campaigns were identified in open source or through other investigative means. These versions may or may not be in the correct order to develop or deploy the AppleJeus campaigns.
AppleJeus Version 1: Celas Trade Pro
Introduction and Infrastructure
In August 2018, open-source reporting disclosed information about a trojanized version of a legitimate cryptocurrency trading application on an undisclosed victim’s computer. The malicious program, known as Celas Trade Pro, was a modified version of the benign Q.T. Bitcoin Trader application. This incident led to the victim company being infected with a Remote Administration Tool (RAT) known as FALLCHILL, which was attributed to North Korea (HIDDEN COBRA) by the U.S. Government. FALLCHILL is a fully functional RAT with multiple commands that the adversary can issue from a command and control (C2) server to infected systems via various proxies. FALLCHILL typically infects a system as a file dropped by other HIDDEN COBRA malware (Develop Capabilities: Malware [T1587.001]). Because of this, additional HIDDEN COBRA malware may be present on systems compromised with FALLCHILL.[4]
Further research revealed that a phishing email from a Celas LLC company (Phishing: Spearphishing Link [T1566.002]) recommended the trojanized cryptocurrency trading application to victims. The email provided a link to the Celas’ website, celasllc[.]com (Acquire Infrastructure: Domain [T1583.001]), where the victim could download a Windows or macOS version of the trojanized application.
The celasllc[.]com domain resolved to the following Internet Protocol (IP) addresses from May 29, 2018, to January 23, 2021.
45.199.63[.]220107.187.66[.]103145.249.106[.]19175.29.32[.]160185.142.236[.]213185.181.104[.]82198.251.83[.]27208.91.197[.]46209.99.64[.]18
The celasllc[.]com domain had a valid Sectigo (previously known as Comodo) Secure Sockets Layer (SSL) certificate (Obtain Capabilities: Digital Certificates [T1588.004]). The SSL certificate was “Domain Control Validated,” a weak security verification level that does not require validation of the owner’s identity or the actual business’s existence.
Celas Trade Pro Application Analysis
Windows Program
The Windows version of the malicious Celas Trade Pro application is an MSI Installer (.msi). The MSI Installer installation package comprises a software component and an application programming interface (API) that Microsoft uses for the installation, maintenance, and removal of software. The installer looks legitimate and is signed by a valid Sectigo certificate that was purchased by the same user as the SSL certificate for celasllc[.]com (Obtain Capabilities: Code Signing Certificates [T1588.003]). The MSI Installer asks the victim for administrative privileges to run (User Execution: Malicious File [T1204.002]).
Once permission is granted, the threat actor is able to run the program with elevated privileges (Abuse Elevation Control Mechanism [T1548]) and MSI executes the following actions.
- Installs
CelasTradePro.exe in folder C:Program Files (x86)CelasTradePro
- Installs
Updater.exe in folder C:Program Files (x86)CelasTradePro
- Runs
Updater.exe with the CheckUpdate parameters
The CelasTradePro.exe program asks for the user’s exchange and loads a legitimate-looking cryptocurrency trading platform—very similar to the benign Q.T. Bitcoin Trader—that exhibits no signs of malicious activity.
The Updater.exe program has the same program icon as CelasTradePro.exe. When run, it checks for the CheckUpdate parameter, collects the victim’s host information (System Owner/User Discovery [T1033]), encrypts the collected information with a hardcoded XOR encryption, and sends information to a C2 website (Exfiltration Over C2 Channel [T1041]).
macOS X Program
The macOS version of the malicious application is a DMG Installer that has a disk image format that Apple commonly uses to distribute software over the internet. The installer looks legitimate and has a valid digital signature from Sectigo (Obtain Capabilities: Digital Certificates [T1588.004]). It has very similar functionality to the Windows version. The installer executes the following actions.
- Installs
CelasTradePro in folder /Applications/CelasTradePro.app/Contents/MacOS/
- Installs
Updater in folder /Applications/CelasTradePro.app/Contents/MacOS
- Executes a
postinstall script
- Moves
.com.celastradepro.plist to folder LaunchDaemons
- Runs
Updater with the CheckUpdate parameter
CelasTradePro asks for the user’s exchange and loads a legitimate-looking cryptocurrency trading platform—very similar to the benign Q.T. Bitcoin Trader—that exhibits no signs of malicious activity.
Updater checks for the CheckUpdate parameter and, when found, it collects the victim’s host information (System Owner/User Discovery [T1033]), encrypts the collected information with a hardcoded XOR key before exfiltration, and sends the encrypted information to a C2 website (Exfiltration Over C2 Channel [T1041]). This process helps the adversary obtain persistence on a victim’s network.
The postinstall script is a sequence of instructions that runs after successfully installing an application (Command and Scripting Interpreter: AppleScript [T1059.002]). This script moves property list (plist) file .com.celastradepro.plist from the installer package to the LaunchDaemons folder (Scheduled Task/Job: Launchd [T1053.004]). The leading “.” makes it unlisted in the Finder app or default Terminal directory listing (Hide Artifacts: Hidden Files and Directories [T1564.001]). Once in the folder, this property list (plist) file will launch the Updater program with the CheckUpdate parameter on system load as Root for every user. Because the LaunchDaemon will not run automatically after the plist file is moved, the postinstall script launches the Updater program with the CheckUpdate parameter and runs it in the background (Create or Modify System Process: Launch Daemon [T1543.004]).
Payload
After a cybersecurity company published a report detailing the above programs and their malicious extras, the website was no longer accessible. Since this site was the C2 server, the payload cannot be confirmed. The cybersecurity company that published the report states the payload was an encrypted and obfuscated binary (Obfuscated Files or Information [T1027]), which eventually drops FALLCHILL onto the machine and installs it as a service (Create or Modify System Process: Windows Service [T1543.003]). FALLCHILL malware uses an RC4 encryption algorithm with a 16-byte key to protect its communications (Encrypted Channel: Symmetric Cryptography [T1573.001]). The key employed in these versions has also been used in a previous version of FALLCHILL.[5][6]
For more details on AppleJeus Version 1: Celas Trade Pro, see MAR-10322463-1.v1.
AppleJeus Version 2: JMT Trading
Introduction and Infrastructure
In October 2019, a cybersecurity company identified a new version of the AppleJeus malware—JMT Trading—thanks to its many similarities to the original AppleJeus malware. Again, the malware was in the form of a cryptocurrency trading application, which a legitimate-looking company, called JMT Trading, marketed and distributed on their website, jmttrading[.]org (Acquire Infrastructure: Domain [T1583.001]). This website contained a “Download from GitHub” button, which linked to JMT Trading’s GitHub page (Acquire Infrastructure: Web Services [T1583.006]), where Windows and macOS X versions of the JMT Trader application were available for download (Develop Capabilities: Malware [T1587.001]). The GitHub page also included .zip and tar.gz files containing the source code.
The jmttrading[.]org domain resolved to the following IP addresses from October 15, 2016, to January 22, 2021.
45.33.2[.]7945.33.23[.]18345.56.79[.]2345.79.19[.]19696.126.123[.]244146.112.61[.]107184.168.221[.]40184.168.221[.]57198.187.29[.]20198.54.117[.]197198.54.117[.]198198.54.117[.]199198.54.117[.]200198.58.118[.]167
The jmttrading[.]org domain had a valid Sectigo SSL certificate (Obtain Capabilities: Digital Certificates [T1588.004]). The SSL certificate was “Domain Control Validated,” a weak security verification level that does not require validation of the owner’s identity or the actual business’s existence. The current SSL certificate was issued by Let’s Encrypt.
JMT Trading Application Analysis
Windows Program
The Windows version of the malicious cryptocurrency application is an MSI Installer. The installer looks legitimate and has a valid digital signature from Sectigo (Obtain Capabilities: Digital Certificates [T1588.004]). The signature was signed with a code signing certificate purchased by the same user as the SSL certificate for jmttrading[.]org (Obtain Capabilities: Code Signing Certificates [T1588.003]). The MSI Installer asks the victim for administrative privileges to run (User Execution: Malicious File [T1204.002]).
Once permission is granted, the MSI executes the following actions.
- Installs
JMTTrader.exe in folder C:Program Files (x86)JMTTrader
- Installs
CrashReporter.exe in folder C:Users<username>AppDataRoamingJMTTrader
- Runs
CrashReporter.exe with the Maintain parameter
The JMTTrader.exe program asks for the user’s exchange and loads a legitimate-looking cryptocurrency trading platform—very similar to CelasTradePro.exe and the benign Q.T. Bitcoin Trader—that exhibits no signs of malicious activity.
The program CrashReporter.exe is heavily obfuscated with the ADVObfuscation library, renamed “snowman” (Obfuscated Files or Information [T1027]). When run, it checks for the Maintain parameter and collects the victim’s host information (System Owner/User Discovery [T1033]), encrypts the collected information with a hardcoded XOR key before exfiltration, and sends the encrypted information to a C2 website (Exfiltration Over C2 Channel [T1041]). The program also creates a scheduled SYSTEM task, named JMTCrashReporter, which runs CrashReporter.exe with the Maintain parameter at any user’s login (Scheduled Task/Job: Scheduled Task [T1053.005]).
macOS X Program
The macOS version of the malicious application is a DMG Installer. The installer looks legitimate and has very similar functionality to the Windows version, but it does not have a digital certificate and will warn the user of that before installation. The installer executes the following actions.
- Installs
JMTTrader in folder /Applications/JMTTrader.app/Contents/MacOS/
- Installs
.CrashReporter in folder /Applications/JMTTrader.app/Contents/Resources/
- Note: the leading “.” makes it unlisted in the Finder app or default Terminal directory listing.
- Executes a
postinstall script
- Moves
.com.jmttrading.plist to folder LaunchDaemons
- Changes the file permissions on the
plist
- Runs
CrashReporter with the Maintain parameter
- Moves
.CrashReporter to folder /Library/JMTTrader/CrashReporter
- Makes
.CrashReporter executable
The JMTTrader program asks for the user’s exchange and loads a legitimate-looking cryptocurrency trading platform—very similar to CelasTradePro and the benign Q.T. Bitcoin Trader—that exhibits no signs of malicious activity.
The CrashReporter program checks for the Maintain parameter and is not obfuscated. This lack of obfuscation makes it easier to determine the program’s functionality in detail. When it finds the Maintain parameter, it collects the victim’s host information (System Owner/User Discovery [T1033]), encrypts the collected information with a hardcoded XOR key before exfiltration, and sends the encrypted information to a C2 website (Exfiltration Over C2 Channel [T1041]).
The postinstall script has similar functionality to the one used by CelasTradePro, but it has a few additional features (Command and Scripting Interpreter: AppleScript [T1059.002]). It moves the property list (plist) file .com.jmttrading.plist from the Installer package to the LaunchDaemons folder (Scheduled Task/Job: Launchd [T1053.004]), but also changes the file permissions on the plist file. Once in the folder, this property list (plist) file will launch the CrashReporter program with the Maintain parameter on system load as Root for every user. Also, the postinstall script moves the .CrashReporter program to a new location /Library/JMTTrader/CrashReporter and makes it executable. Because the LaunchDaemon will not run automatically after the plist file is moved, the postinstall script launches CrashReporter with the Maintain parameter and runs it in the background (Create or Modify System Process: Launch Daemon [T1543.004]).
Payload
Soon after the cybersecurity company tweeted about JMT Trader on October 11, 2019, the files on GitHub were updated to clean, non-malicious installers. Then on October 13, 2019, a different cybersecurity company published an article detailing the macOS X JMT Trader, and soon after, the C2 beastgoc[.]com website went offline. There is not a confirmed sample of the payload to analyze at this point.
For more details on AppleJeus Version 2: JMT Trading, see MAR-10322463-2.v1.
AppleJeus Version 3: Union Crypto
Introduction and Infrastructure
In December 2019, another version of the AppleJeus malware was identified on Twitter by a cybersecurity company based on many similarities to the original AppleJeus malware. Again, the malware was in the form of a cryptocurrency trading application, which was marketed and distributed by a legitimate-looking company, called Union Crypto, on their website, unioncrypto[.]vip (Acquire Infrastructure: Domain [T1583.001]). Although this website is no longer available, a cybersecurity researcher discovered a download link, https://www.unioncrypto[.]vip/download/W6c2dq8By7luMhCmya2v97YeN, recorded on VirusTotal for the macOS X version of UnionCryptoTrader. In contrast, open-source reporting stated that the Windows version might have been downloaded via instant messaging service Telegram, as it was found in a “Telegram Downloads” folder on an unnamed victim.[7]
The unioncrypto[.]vip domain resolved to the following IP addresses from June 5, 2019, to July 15, 2020.
104.168.167[.]16198.54.117[.]197198.54.117[.]198198.54.117[.]199198.54.117[.]200
The domain unioncrypto[.]vip had a valid Sectigo SSL certificate (Obtain Capabilities: Digital Certificates [T1588.004]). The SSL certificate was “Domain Control Validated,” a weak security verification level that does not require validation of the owner’s identity or the actual business’s existence.
Union Crypto Trader Application Analysis
Windows Program
The Windows version of the malicious cryptocurrency application is a Windows executable (.exe) (User Execution: Malicious File [T1204.002]), which acts as an installer that extracts a temporary MSI Installer.
The Windows program executes the following actions.
- Extracts
UnionCryptoTrader.msi to folder C:Users<username>AppDataLocalTemp{82E4B719-90F74BD1-9CF1-56CD777E0C42}
- Runs
UnionCryptoUpdater.msi
- Installs
UnionCryptoTrader.exe in folder C:Program FilesUnionCryptoTrader
- Installs
UnionCryptoUpdater.exe in folder C:Users<username>AppDataLocalUnionCryptoTrader
- Deletes
UnionCryptoUpdater.msi
- Runs
UnionCryptoUpdater.exe
The program UnionCryptoTrader.exe loads a legitimate-looking cryptocurrency arbitrage application—defined as “the simultaneous buying and selling of securities, currency, or commodities in different markets or in derivative forms to take advantage of differing prices for the same asset”—which exhibits no signs of malicious activity. This application is very similar to another cryptocurrency arbitrage application known as Blackbird Bitcoin Arbitrage.[8]
The program UnionCryptoUpdater.exe first installs itself as a service (Create or Modify System Process: Windows Service [T1543.003]), which will automatically start when any user logs on (Boot or Logon Autostart Execution [T1547]). The service is installed with a description stating it “Automatically installs updates for Union Crypto Trader.” When launched, it collects the victim’s host information (System Owner/User Discovery [T1033]), combines the information in a string that is MD5 hashed and stored in the auth_signature variable before exfiltration, and sends it to a C2 website (Exfiltration Over C2 Channel [T1041]).
macOS X Program
The macOS version of the malicious application is a DMG Installer. The installer looks legitimate and has very similar functionality to the Windows version, but it does not have a digital certificate and will warn the user of that before installation. The installer executes the following actions.
- Installs
UnionCryptoTrader in folder /Applications/UnionCryptoTrader.app/Contents/MacOS/
- Installs
.unioncryptoupdater in folder /Applications/UnionCryptoTrader.app/Contents/Resources/
- Note: the leading “.” makes it unlisted in the Finder app or default Terminal directory listing
- Executes a
postinstall script
- Moves
.vip.unioncrypto.plist to folder LaunchDaemons
- Changes the file permissions on the
plist to Root
- Runs
unioncryptoupdater
- Moves
.unioncryptoupdater to folder /Library/UnionCrypto/unioncryptoupdater
- Makes
.unioncryptoupdater executable
The UnionCryptoTrader program loads a legitimate-looking cryptocurrency arbitrage application, which exhibits no signs of malicious activity. The application is very similar to another cryptocurrency arbitrage application known as Blackbird Bitcoin Arbitrage.
The .unioncryptoupdater program is signed ad-hoc, meaning it is not signed with a valid code-signing identity. When launched, it collects the victim’s host information (System Owner/User Discovery [T1033]), combines the information in a string that is MD5 hashed and stored in the auth_signature variable before exfiltration, and sends it to a C2 website (Exfiltration Over C2 Channel [T1041]).
The postinstall script has similar functionality to the one used by JMT Trading (Command and Scripting Interpreter: AppleScript [T1059.002]). It moves the property list (plist) file .vip.unioncrypto.plist from the Installer package to the LaunchDaemons folder (Scheduled Task/Job: Launchd [T1053.004]), but also changes the file permissions on the plist file to Root. Once in the folder, this property list (plist) file will launch the .unioncryptoupdater on system load as Root for every user. The postinstall script moves the .unioncryptoupdater program to a new location /Library/UnionCrypto/unioncryptoupdater and makes it executable. Because the LaunchDaemon will not run automatically after the plist file is moved, the postinstall script launches .unioncryptoupdater and runs it in the background (Create or Modify System Process: Launch Daemon [T1543.004]).
Payload
The payload for the Windows malware is a Windows Dynamic-Link-Library. UnionCryptoUpdater.exe does not immediately download the stage 2 malware but instead downloads it after a time specified by the C2 server. This delay could be implemented to prevent researchers from directly obtaining the stage 2 malware.
The macOS X malware’s payload could not be downloaded, as the C2 server is no longer accessible. Additionally, none of the open-source reporting for this sample contained copies of the macOS X payload. The macOS X payload is likely similar in functionality to the Windows stage 2 detailed above.
For more details on AppleJeus Version 3: Union Crypto, see MAR-10322463-3.v1.
Commonalities between Celas Trade Pro, JMT Trading, and Union Crypto
Hardcoded Values
In each AppleJeus version, there are hardcoded values used for encryption or to create a signature when combined with the time (table 1).
Table 1: AppleJeus hardcoded values and uses
| AppleJeus Version |
Value |
Use |
| 1: Celas Trade Pro |
Moz&Wie;#t/6T!2y |
XOR encryption to send data |
| 1: Celas Trade Pro |
W29ab@ad%Df324V$Yd |
RC4 decryption |
| 2: JMT Trader Windows |
X,%`PMk–Jj8s+6=15:20:11 |
XOR encryption to send data |
| 2: JMT Trader OSX |
X,%`PMk–Jj8s+6=x02 |
XOR encryption to send data |
| 3: Union Crypto Trader |
12GWAPCT1F0I1S14 |
Combined with time for signature |
The Union Crypto Trader and Celas LLC (XOR) values are 16 bytes in length. For JMT Trader, the first 16 bytes of the Windows and macOS X values are identical, and the additional bytes are in a time format for the Windows sample. The structure of a 16-byte value combined with the time is also used in Union Crypto Trader to create the auth_signature.
As mentioned, FALLCHILL was reported as the final payload for Celas Trade Pro. All FALLCHILL samples use 16-byte hardcoded RC4 keys for sending data, similar to the 16-byte keys in the AppleJeus samples.
Open-Source Cryptocurrency Applications
All three AppleJeus samples are bundled with modified copies of legitimate cryptocurrency applications and can be used as originally designed to trade cryptocurrency. Both Celas LLC and JMT Trader modified the same cryptocurrency application, Q.T. Bitcoin Trader; Union Crypto Trader modified the Blackbird Bitcoin Arbitrage application.
Postinstall Scripts, Property List Files, and LaunchDaemons
The macOS X samples of all three AppleJeus versions contain postinstall scripts with similar logic. The Celas LLC postinstall script only moves the plist file to a new location and launches Updater with the CheckUpdate parameter in the background. The JMT Trader and Union Crypto Trader also perform these actions and have identical functionality. The additional actions performed by both postinstall scripts are to change the file permissions on the plist, make a new directory in the /Library folder, move CrashReporter or UnionCryptoUpdater to the newly created folder, and make them executable.
The plist files for all three AppleJeus files have identical functionality. They only differ in the files’ names and one default comment that was not removed from the Celas LLC plist. As the logic and functionality of the postinstall scripts and plist files are almost identical, the LaunchDaemons created also function the same.
They will all launch the secondary executable as Root on system load for every user.
AppleJeus Version 4: Kupay Wallet
Introduction and Infrastructure
On March 13, 2020, a new version of the AppleJeus malware was identified. The malware was marketed and distributed by a legitimate-looking company, called Kupay Wallet, on their website kupaywallet[.]com (Acquire Infrastructure: Domain [T1583.001]).
The domain www.kupaywallet[.]com resolved to IP address 104.200.67[.]96 from March 20, 2020, to January 16, 2021. CrownCloud US, LLC controlled the IP address (autonomous system number [ASN] 8100), and is located in New York, NY.
The domain www.kupaywallet[.]com had a valid Sectigo SSL certificate (Obtain Capabilities: Digital Certificates [T1588.004]). The SSL certificate was “Domain Control Validated,” a weak security verification level that does not require validation of the owner’s identity or the actual business’s existence.
Kupay Wallet Application Analysis
Windows Program
The Windows version of the malicious cryptocurrency application is an MSI Installer. The MSI executes the following actions.
- Installs
Kupay.exe in folder C:Program Files (x86)Kupay
- Installs
KupayUpgrade.exe in folder C:Users<username>AppDataRoamingKupaySupport
- Runs
KupayUpgrade.exe
The program Kupay.exe loads a legitimate-looking cryptocurrency wallet platform, which exhibits no signs of malicious activity and is very similar to an open-source platform known as Copay, distributed by Atlanta-based company BitPay.
The program KupayUpgrade.exe first installs itself as a service (Create or Modify System Process: Windows Service [T1543.003]), which will automatically start when any user logs on (Boot or Logon Autostart Execution [T1547]). The service is installed with a description stating it is an “Automatic Kupay Upgrade.” When launched, it collects the victim’s host information (System Owner/User Discovery [T1033]), combines the information in strings before exfiltration, and sends it to a C2 website (Exfiltration Over C2 Channel [T1041]).
macOS X Program
The macOS version of the malicious application is a DMG Installer. The installer looks legitimate and has very similar functionality to the Windows version, but it does not have a digital certificate and will warn the user of that before installation. The installer executes the following actions.
- Installs
Kupay in folder /Applications/Kupay.app/Contents/MacOS/
- Installs
kupay_upgrade in folder /Applications/Kupay.app/Contents/MacOS/
- Executes a
postinstall script
- Creates
KupayDaemon folder in /Library/Application Support folder
- Moves
kupay_upgrade to the new folder
- Moves
com.kupay.pkg.wallet.plist to folder /Library/LaunchDaemons/
- Runs the command
launchctl load to load the plist without a restart
- Runs
kupay_upgrade in the background
Kupay is likely a copy of an open-source cryptocurrency wallet application, loads a legitimate-looking wallet program (fully functional), and its functionality is identical to the Windows Kupay.exe program.
The kupay_upgrade program calls its function CheckUpdate (which contains most of the logic functionality of the malware) and sends a POST to the C2 server with a connection named “Kupay Wallet 9.0.1 (Check Update Osx)” (Application Layer Protocol: Web Protocols [T1071.001]). If the C2 server returns a file, it is decoded and written to the victim’s folder /private/tmp/kupay_update with permissions set by the command chmod 700 (only the user can read, write, and execute) (Command and Scripting Interpreter [T1059]). Stage 2 is then launched, and the malware, kupay_upgrade, returns to sleeping and checking in with the C2 server at predetermined intervals (Application Layer Protocol: Web Protocols [T1071.001]).
The postinstall script has similar functionality to other AppleJeus scripts (Command and Scripting Interpreter: AppleScript [T1059.002]). It creates the KupayDaemon folder in /Library/Application Support folder and then moves kupay_upgrade to the new folder. It moves the property list (plist) file com.kupay.pkg.wallet.plist from the Installer package to the /Library/LaunchDaemons/ folder (Scheduled Task/Job: Launchd [T1053.004]). The script runs the command launchctl load to load the plist without a restart (Command and Scripting Interpreter [T1059]). But, since the LaunchDaemon will not run automatically after the plist file is moved, the postinstall script launches kupay_upgrade and runs it in the background (Create or Modify System Process: Launch Daemon [T1543.004]).
Payload
The Windows malware’s payload could not be downloaded since the C2 server is no longer accessible. Additionally, none of the open-source reporting for this sample contained copies of the payload. The Windows payload is likely similar in functionality to the macOS X stage 2 detailed below.
The stage 2 payload for the macOS X malware was decoded and analyzed. The stage 2 malware has a variety of functionalities. Most importantly, it checks in with a C2 and, after connecting to the C2, can send or receive a payload, read and write files, execute commands via the terminal, etc.
For more details on AppleJeus Version 4: Kupay Wallet, see MAR-10322463-4.v1.
AppleJeus Version 5: CoinGoTrade
Introduction and Infrastructure
In early 2020, another version of the AppleJeus malware was identified. This time the malware was marketed and distributed by a legitimate-looking company called CoinGoTrade on their website coingotrade[.]com (Acquire Infrastructure: Domain [T1583.001]).
The domain CoinGoTrade[.]com resolved to IP address 198.54.114[.]175 from February 28, 2020, to January 23, 2021. The IP address is controlled by NameCheap Inc. (ASN 22612) and is located in Atlanta, GA. This IP address is in the same ASN for Dorusio[.]com and Ants2Whale[.]com.
The domain CoinGoTrade[.]com had a valid Sectigo SSL certificate (Obtain Capabilities: Digital Certificates [T1588.004]). The SSL certificate was “Domain Control Validated,” a weak security verification level that does not require validation of the owner’s identity or the actual business’s existence.
CoinGoTrade Application Analysis
Windows Program
The Windows version of the malicious application is an MSI Installer. The installer appears to be legitimate and will execute the following actions.
- Installs
CoinGoTrade.exe in folder C:Program Files (x86)CoinGoTrade
- Installs
CoinGoTradeUpdate.exe in folder C:Users<username>AppDataRoamingCoinGoTradeSupport
- Runs
CoinGoTradeUpdate.exe
CoinGoTrade.exe loads a legitimate-looking cryptocurrency wallet platform with no signs of malicious activity and is a copy of an open-source cryptocurrency application.
CoinGoTradeUpdate.exe first installs itself as a service (Create or Modify System Process: Windows Service [T1543.003]), which will automatically start when any user logs on (Boot or Logon Autostart Execution [T1547]). The service is installed with a description stating it is an “Automatic CoinGoTrade Upgrade.” When launched, it collects the victim’s host information (System Owner/User Discovery [T1033]), combines the information in strings before exfiltration, and sends it to a C2 website (Exfiltration Over C2 Channel [T1041]).
macOS X Program
The macOS version of the malicious application is a DMG Installer. The installer looks legitimate and has very similar functionality to the Windows version, but it does not have a digital certificate and will warn the user of that before installation. The installer executes the following actions.
- Installs
CoinGoTrade in folder /Applications/CoinGoTrade.app/Contents/MacOS/
- Installs
CoinGoTradeUpgradeDaemon in folder /Applications/CoinGoTrade.app/Contents/MacOS/
- Executes a
postinstall script
- Creates
CoinGoTradeService folder in /Library/Application Support folder
- Moves
CoinGoTradeUpgradeDaemon to the new folder
- Moves
com.coingotrade.pkg.product.plist to folder /Library/LaunchDaemons/
- Runs
CoinGoTradeUpgradeDaemon in the background
The CoinGoTrade program is likely a copy of an open-source cryptocurrency wallet application and loads a legitimate-looking, fully functional wallet program).
The CoinGoTradeUpgradeDaemon program calls its function CheckUpdate (which contains most of the logic functionality of the malware) and sends a POST to the C2 server with a connection named “CoinGoTrade 1.0 (Check Update Osx)” (Application Layer Protocol: Web Protocols [T1071.001]). If the C2 server returns a file, it is decoded and written to the victim’s folder /private/tmp/updatecoingotrade with permissions set by the command chmod 700 (only the user can read, write, and execute) (Command and Scripting Interpreter [T1059]). Stage 2 is then launched, and the malware, CoinGoTradeUpgradeDaemon, returns to sleeping and checking in with the C2 server at predetermined intervals (Application Layer Protocol: Web Protocols [T1071.001]).
The postinstall script has similar functionality to the other scripts (Command and Scripting Interpreter: AppleScript [T1059.002]) and installs CoinGoTrade and CoinGoTradeUpgradeDaemon in folder /Applications/CoinGoTrade.app/Contents/MacOS/. It moves the property list (plist) file com.coingotrade.pkg.product.plist to the /Library/LaunchDaemons/ folder (Scheduled Task/Job: Launchd [T1053.004]). Because the LaunchDaemon will not run automatically after the plist file is moved, the postinstall script launches CoinGoTradeUpgradeDaemon and runs it in the background (Create or Modify System Process: Launch Daemon [T1543.004]).
Payload
The Windows malware’s payload could not be downloaded because the C2 server is no longer accessible. Additionally, none of the open-source reporting for this sample contained copies of the payload. The Windows payload is likely similar in functionality to the macOS X stage 2 detailed below.
The stage 2 payload for the macOS X malware was no longer available from the specified download URL. Still, a file was submitted to VirusTotal by the same user on the same date as the macOS X CoinGoTradeUpgradeDaemon. These clues suggest that the submitted file may be related to the macOS X version of the malware and the downloaded payload.
The file prtspool is a 64-bit Mach-O executable with a large variety of features that have all been confirmed as functionality. The file has three C2 URLs hardcoded into the file and communicates to these with HTTP POST multipart-form data boundary string. Like other HIDDEN COBRA malware, prtspool uses format strings to store data collected about the system and sends it to the C2s.
For more details on AppleJeus Version 5: CoinGoTrade, see MAR-10322463-5.v1.
AppleJeus Version 6: Dorusio
Introduction and Infrastructure
In March 2020, an additional version of the AppleJeus malware was identified. This time the malware was marketed and distributed by a legitimate-looking company called Dorusio on their website, dorusio[.]com (Acquire Infrastructure: Domain [T1583.001]). Researchers collected samples for Windows and macOS X versions of the Dorusio Wallet (Develop Capabilities: Malware [T1587.001]). As of at least early 2020, the actual download links result in 404 errors. The download page has release notes with version revisions claiming to start with version 1.0.0, released on April 15, 2019.
The domain dorusio[.]com resolved to IP address 198.54.115[.]51 from March 30, 2020 to January 23, 2021. The IP address is controlled by NameCheap Inc. (ASN 22612) and is located in Atlanta, GA. This IP address is in the same ASN for CoinGoTrade[.]com and Ants2Whale[.]com.
The domain dorusio[.]com had a valid Sectigo SSL certificate (Obtain Capabilities: Digital Certificates [T1588.004]). The SSL certificate was “Domain Control Validated,” a weak security verification level that does not require validation of the owner’s identity or the actual business’s existence.
Dorusio Application Analysis
Windows Program
The Windows version of the malicious application is an MSI Installer. The installer appears to be legitimate and will install the following two programs.
- Installs
Dorusio.exe in folder C:Program Files (x86)Dorusio
- Installs
DorusioUpgrade.exe in folder C:Users<username>AppDataRoamingDorusioSupport
- Runs
DorusioUpgrade.exe
The program, Dorusio.exe, loads a legitimate-looking cryptocurrency wallet platform with no signs of malicious activity and is a copy of an open-source cryptocurrency application.
The program DorusioUpgrade.exe first installs itself as a service (Create or Modify System Process: Windows Service [T1543.003]), which will automatically start when any user logs on (Boot or Logon Autostart Execution [T1547]). The service is installed with a description stating it “Automatic Dorusio Upgrade.” When launched, it collects the victim’s host information (System Owner/User Discovery [T1033]), combines the information in strings before exfiltration, and sends it to a C2 website (Exfiltration Over C2 Channel [T1041]).
macOS X Program
The macOS version of the malicious application is a DMG Installer. The installer looks legitimate and has very similar functionality to the Windows version, but it does not have a digital certificate and will warn the user of that before installation. The installer executes the following actions.
- Installs
Dorusio in folder /Applications/Dorusio.app/Contents/MacOS/
- Installs
Dorusio_upgrade in folder /Applications/Dorusio.app/Contents/MacOS/
- Executes a
postinstall script
- Creates
DorusioDaemon folder in /Library/Application Support folder
- Moves
Dorusio_upgrade to the new folder
- Moves
com.dorusio.pkg.wallet.plist to folder /Library/LaunchDaemons/
- Runs
Dorusio_upgrade in the background
The Dorusio program is likely a copy of an open-source cryptocurrency wallet application and loads a legitimate-looking wallet program (fully functional). Aside from the Dorusio logo and two new services, the wallet appears to be the same as the Kupay Wallet. This application seems to be a modification of the open-source cryptocurrency wallet Copay distributed by Atlanta-based company BitPay.
The Dorusio_upgrade program calls its function CheckUpdate (which contains most of the logic functionality of the malware) and sends a POST to the C2 server with a connection named “Dorusio Wallet 2.1.0 (Check Update Osx)” (Application Layer Protocol: Web Protocols [T1071.001]). If the C2 server returns a file, it is decoded and written to the victim’s folder /private/tmp/Dorusio_update with permissions set by the command chmod 700 (only the user can read, write, and execute) (Command and Scripting Interpreter [T1059]). Stage 2 is then launched, and the malware, Dorusio_upgrade, returns to sleeping and checking in with the C2 server at predetermined intervals (Application Layer Protocol: Web Protocols [T1071.001]).
The postinstall script has similar functionality to other AppleJeus scripts (Command and Scripting Interpreter: AppleScript [T1059.002]). It creates the DorusioDaemon folder in /Library/Application Support folder and then moves Dorusio_upgrade to the new folder. It moves the property list (plist) file com.dorusio.pkg.wallet.plist from the Installer package to the /Library/LaunchDaemons/ folder (Scheduled Task/Job: Launchd [T1053.004]). Because the LaunchDaemon will not run automatically after the plist file is moved, the postinstall script launches Dorusio_upgrade and runs it in the background (Create or Modify System Process: Launch Daemon [T1543.004]).
Payload
Neither the payload for the Windows nor macOS X malware could be downloaded; the C2 server is no longer accessible. The payloads are likely similar in functionality to the macOS X stage 2 from CoinGoTrade and Kupay Wallet, or the Windows stage 2 from Union Crypto.
For more details on AppleJeus Version 6: Dorusio, see MAR-10322463-6.v1.
AppleJeus 4, 5, and 6 Installation Conflictions
If a user attempts to install the Kupay Wallet, CoinGoTrade, and Dorusio applications on the same system, they will encounter installation conflicts.
If Kupay Wallet is already installed on a system and the user tries to install CoinGoTrade or Dorusio:
- Pop-up windows appear, stating a more recent version of the program is already installed.
If CoinGoTrade is already installed on a system and the user attempts to install Kupay Wallet:
Kupay.exe will be installed in the C:Program Files (x86)CoinGoTrade folder.- All
CoinGoTrade files will be deleted.
- The folders and files contained in the
C:Users<username>AppDataRoamingCoinGoTradeSupport will remain installed.
KupayUpgrade.exe is installed in the new folder C:Users<username>AppDataRoamingKupaySupport.
If Dorusio is already installed on a system and the user attempts to install Kupay Wallet:
Kupay.exe will be installed in the C:Program Files (x86)Dorusio folder.- All
Dorusio.exe files will be deleted.
- The folders and files contained in
C:Users<username>AppDataRoamingDorusioSupport will remain installed.
KupayUpgrade.exe is installed in the new folder C:Users<username>AppDataRoamingKupaySupport.
AppleJeus Version 7: Ants2Whale
Introduction and Infrastructure
In late 2020, a new version of AppleJeus was identified called “Ants2Whale.” The site for this version of AppleJeus is ants2whale[.]com (Acquire Infrastructure: Domain [T1583.001]). The website shows a legitimate-looking cryptocurrency company and application. The website contains multiple spelling and grammar mistakes indicating the creator may not have English as a first language. The website states that to download Ants2Whale, a user must contact the administrator, as their product is a “premium package” (Develop Capabilities: Malware [T1587.001]).
The domain ants2whale[.]com resolved to IP address 198.54.114[.]237 from September 23, 2020, to January 22, 2021. The IP address is controlled by NameCheap, Inc. (ASN 22612) and is located in Atlanta, GA. This IP address is in the same ASN for CoinGoTrade[.]com and Dorusio[.]com.
The domain ants2whale[.]com had a valid Sectigo SSL certificate (Obtain Capabilities: Digital Certificates [T1588.004]). The SSL certificate was “Domain Control Validated,” a weak security verification level that does not require validation of the owner’s identity or the actual business’s existence.
Ants2Whale Application Analysis
Windows Program
As of late 2020, the Windows program was not available on VirusTotal. It is likely very similar to the macOS X version detailed below.
macOS X Program
The macOS version of the malicious application is a DMG Installer. The installer looks legitimate and has very similar functionality to the Windows version, but it does not have a digital certificate and will warn the user of that before installation. The installer executes the following actions.
- Installs
Ants2Whale in folder /Applications/Ants2whale.app/Contents/MacOS/Ants2whale
- Installs
Ants2WhaleHelper in folder /Library/Application Support/Ants2WhaleSupport/
- Executes a
postinstall script
- Moves
com.Ants2whale.pkg.wallet.plist to folder /Library/LaunchDaemons/
- Runs
Ants2WhaleHelper in the background
The Ants2Whale and Ants2WhaleHelper programs and the postinstall script function almost identically to previous versions of AppleJeus and will not be discussed in depth in this advisory.
For more details on AppleJeus Version 7: Ants2Whale, see MAR-10322463-7.v1.
ATT&CK Profile
Figure 2 and table 2 provide summaries of the MITRE ATT&CK techniques observed.
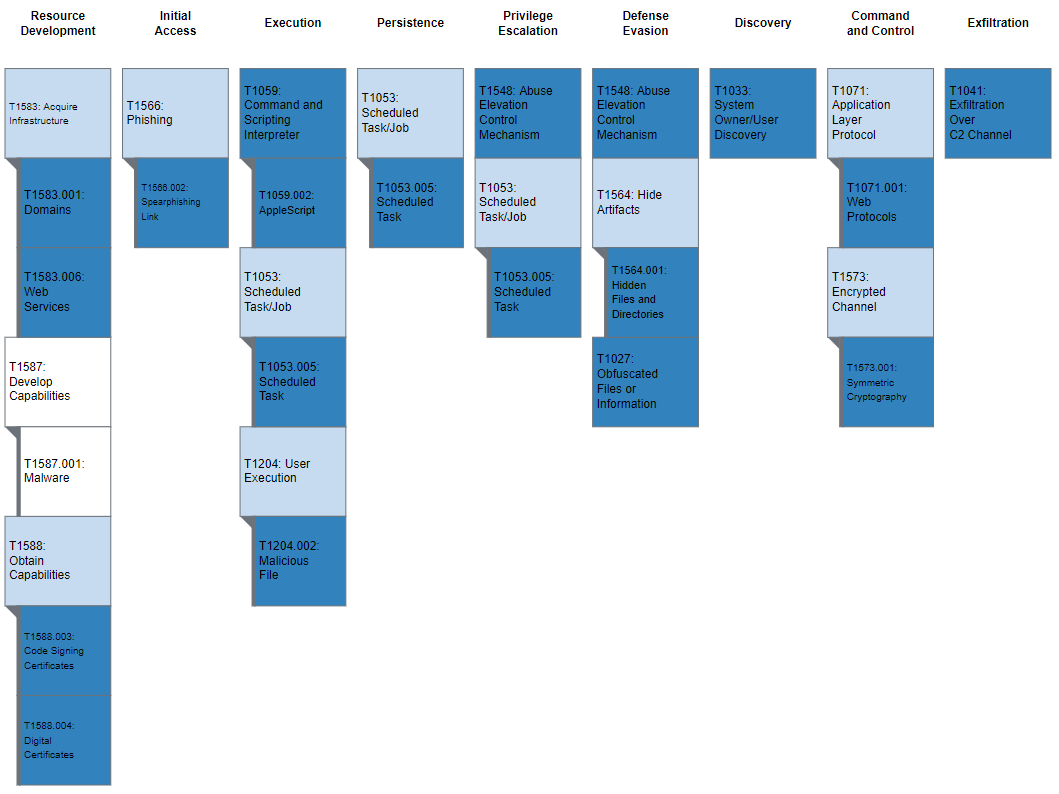
Figure 2: MITRE ATT&CK enterprise techniques used by AppleJeus
Table 2: MITRE ATT&CK techniques observed

Recent Comments