by Contributed | Feb 21, 2021 | Technology
This article is contributed. See the original author and article here.
Overview
AKS-HCI , short for Azure Kubernetes Service on Azure Stack HCI is an on-premises Microsoft supported Kubernetes offering. AKS-HCI is built of and consistent with open-source Kubernetes offering. AKS-HCI simplifies on-premises Kubernetes deployment by offering a automated and standardized approach to deploying and managing Kubernetes clusters.
AKS-HCI provides consistency with Azure Kubernetes Service as much as possible in feature and operational details. This presents choices for deploying on-premises workloads and simplifies instrumentation of workload mobility between cloud and the edge.
AKS-HCI is designed from the get-go with security as one of its principal value propositions. An earlier blog written by my colleague, provides an overview of the security story for AKS-HCI.
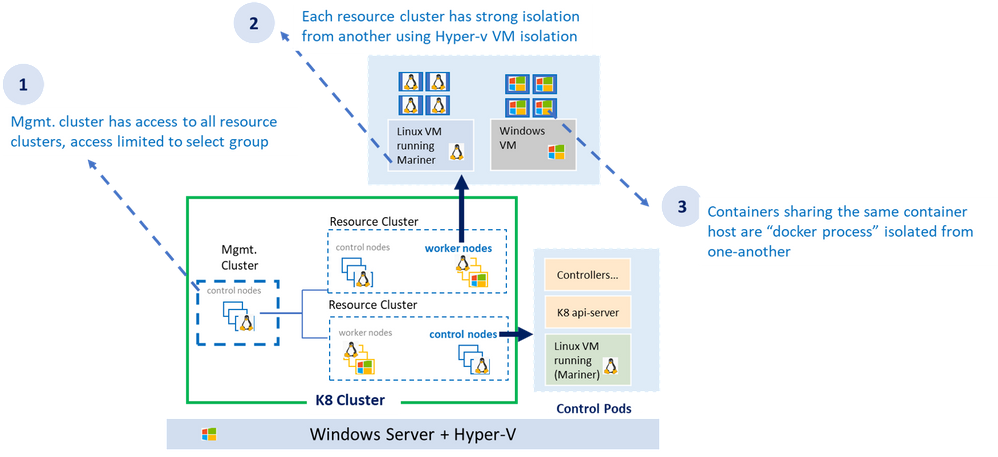
As shown in the diagram above, the AKS-HCI security model follows least privilege principal. The all-powerful management cluster, the cluster used to create the workload clusters (also called resource clusters) is managed by handful of administrators and access to it is limited. Direct access to container host (think ability to SSH) is not allowed.
Each resource (workload) cluster deploys one or more virtual machine serving as container host for the workload cluster. The container host runs the control plane and the worker pods. Virtual machines provide strong kernel level isolation and contain the blast radius by preventing malware from escaping out to the host and affecting other workload clusters. Administrators also have the option to create separate physical clusters.
Finally, the containers themselves running within the virtual machine are process isolated with their respective resources and namespaces.
AKS-HCI Built with Strong Identity & Access Management Foundation
AKS-HCI supports both AD (Active Directory) and AAD (Azure Active Directory) identities. Connectivity to AKS-HCI via AAD identity is instrumented via Azure Arc integration. Starting February as part of the public preview, AKS-HCI will be supporting authentication and Single Sign On via AD (Active Directory) identity using kubectl
AD (Active Directory) Authentication provides several advantages over using certificate-based client authentication.

Kubernetes (a.k.a. K8S) uses configuration (referred as “kubeconfig”) stored on the client machine to connect to the api-server. This configuration contains authentication information to connect to the api-server. Any interaction with the K8 cluster happens via the api-server, one can think of having access to the api-server as having keys to the K8 kingdom. Hence access to the api-server that is built on strong identity and access management foundation is critical to securing your K8 deployment.
Kubernetes offers various options to connect to the api-server, of those the configuration used to connect to the api-server using AD identity is the most secure, this is primarily because AD kubeconfig (think of AD kubeconfig as a type of kubeconfig) does not hold any secret that can potentially be used to compromise access to the api-server.

By default, AKS-HCI uses “certificate” based kubeconfig to connect clients to the api-server. The certificate based kubeconfig contains authentication information such as private keys. If malware or attacker gets access to this configuration file, they will be able to get access to the api-server and that would be like getting keys to the kingdom. As mentioned, earlier, by contrast the AD kubeconfig does not hold any secret and merely having possession of AD kubeconfig does not grant access to the cluster. Eliminating the need to safely distribute kubeconfig improves security and efficiency, directly attributable to significant cost savings.
AD kubeconfig complements the “certificate” based kubeconfig, while certificate based kubeconfig is available to a select group of admins and used to connect to the cluster for initial provisioning (including setting up AD integration), the AD kubeconfig can be freely distributed without any security concerns to a wider group of users. An important distinction to note, unlike static configuration e.g. certificate based kubeconfig where users with the same configuration will always resolve to the same privileges, AD kubeconfig dynamically resolves privileges based on the user context it is applied.
Another benefit is the representation of identities in SID format, the human friendly group names in the role binding definition are stored in the SID format as K8 CRD. This provides protection against any human error in representing group names and naming conflicts or collisions as the group names need to resolve to corresponding SIDs in the domain server before access is granted. A related extension to this is the ability to represent AD groups in the RBAC role bindings, more on that in later part.
The windows server or the container host does not need to be domain joined for AD Authentication to work as long as the domain server and container host are time synchronized.
Lastly, integration with Active Directory provide the opportunity to take advantage of Microsoft Defender for Identity to detect advanced threat attacks.
Let’s now dive a bit into the trenches on AD integration works under the hood.
How it Works Under the Hood
The underlying implementation uses Kerberos protocol and requires Active Directory domain joined windows client. The client authenticates to the server (in our case K8 api-server) using Kerberos protocol. A few things need to be set up before the cluster can accept AD credentials for Authentication.

As shown in the diagram, an AD account for the api-server and corresponding SPN (service principal name) should be created on the AD domain server, the AD domain server also acts as the key distribution center. Next, a “keytab” corresponding to the the SPN needs to be generated.
Keytab contains symmetric encryption keys used to decrypt service tickets, the service ticket is presented to the api-server from the client machine.
These service tickets represent AD groups in SID format that is provided to the client upon successful authentication to the domain server. More details to follow on this flow.
A tool like ktpass (for windows machines) or ktutil (for linux machines) can be used to generate keytab. A client-side plugin is part of the installation to broker communication between kubectl and the api-server.
Three Fundamental Loops of Authentication Flow
At it’s essence, the flow consists of three fundamental loops. . The “first loop” is the user acquiring the “service ticket” from the domain server contingent on successful authentication (we will get into this in a minute). This service ticket has user’s group membership in SID format.
The service ticket is generated for specific SPN (api-server in our case) and is provided to the user based on the user presenting what is known as TGT (ticket granting ticket). The user is able to get TGT based on successfully logging into the windows domain joined machine using their SSO credentials.

The “second loop” is the user presenting the “service ticket” to the api-server when she attempts to connect to the api-server via kubectl. This serves two purposes, to authenticate and authorize.
The “third” and the final loop is the api-server then taking the “service ticket”, unwrapping and unpacking the service ticket using keytab secret stored as K8 secret.
The api-server unpacks the ticket, extracts the group information, and validates against the RBAC (role-based access control) configuration (a.k.a role bindings in K8). In order for the user to execute command via kubectl both authentication and authorization steps need to complete successfully.
Using AD Groups for Authorization

RBAC in K8 is defined in configuration known as “role bindings”. It is a two-step process where a role is defined and then the role is bound to user or group using role bindings. With AD integration users now have the ability to bind roles to AD groups.
When the service ticket is unpacked the group names are compared against the AD groups defined in role binding and access is granted based on the role binding definition.
Details on Few Anticipated Questions about this feature
Q: Do I need continuous connectivity of the container host to my domain server for AD Authentication to work
The container host does not need to have connectivity to the domain server, however, ensure the keytab is updated when the AD password of the api-server is updated.
Q: What is the expected behavior if the password on the AD account of the api-server expires
The service ticket granted to the api-server is cached for about 8-10 hours after which the keytab file (based on prior api-server password) would not be able to decrypt the service ticket and the authentication will fail.
Q: What are the next steps to enable AD Authentication if the api-server password expires
AD admin creates a new password and new keytab is generated. Un-install and re-install AD with the new keytab.
Q: Will AKS-HCI alert me, if api-server AD password is about to expire
AKS-HCI does not have direct line of sight to AD and cannot alert on expiring password.
Q: Can I renew my password before it expires
Yes, you can update the password, refer to the AD SSO set up and installation document for more details.
Stay Tuned for more
We are releasing AD integration for the resource / workload clusters, we will follow up integrating the management cluster in later releases including extending AD Authentication to Windows Admin Center (WAC). Stay tuned as we continue to bring new security features to AKS-HCI.
by Contributed | Feb 21, 2021 | Technology
This article is contributed. See the original author and article here.
There was an announcement that you could refer to Azure Key Vault secrets from either Azure App Service or Azure Functions, without having to put their versions explicitly. Therefore, the second approach mentioned in my previous post has become now the most effective way to access Azure Key Vault Secrets.
@Microsoft.KeyVault(SecretUri=https://<keyvault_name>.vault.azure.net/secrets/<secret_name>)
With this approach, the reference always returns the latest version of the secret. Make sure that, when a newer version of the secret is created, it takes up to one day to get synced. Therefore, if your new version of the secret is less than one day old, you should consider the rotation. For the rotation, the ideal number of versions of each secret could be two. If there are more than two versions in one secret, it’s better to disable all the older ones for the sake of security.
As there’s no maximum number of secrets defined in Azure Key Vault, sometimes there are too many secrets stored in one Key Vault instance. In this case, finding old versions of secrets and disable them by hand should consider automation; otherwise, it needs too many hands. This sort of automation can be done by Azure Functions with the Azure Key Vault SDK. Let me show how to do so in this post.
You can find the sample code used in this post at this GitHub repository.
Azure Key Vault SDK
There are currently two SDKs taking care of Azure Key Vault.
As the first one has been deprecated, you should use the second one. In addition to that, use Azure.Identity SDK for authentication and authorisation. Once you create a new Azure Functions project, run the following commands to install these two NuGet packages.
    dotnet add package Azure.Security.KeyVault.Secrets –version 4.2.0-beta.4

    dotnet add package Azure.Identity –version 1.4.0-beta.3
The Key Vault package uses the IAsyncEnumerable interface. Therefore, also install this System.Linq.Async package.
dotnet add package System.Linq.Async –version 4.1.1
NOTE: As of this writing, Azure Functions doesn’t support .NET 5 yet. Therefore avoid installing 5.0.0 version of the System.Linq.Async package.
We’ve got all the libraries necessary. Let’s build a Functions app.
Building Functions Code to Disable Old Versions of Each Secret
Run the following command that creates a new HTTP Trigger function.
func new –name BulkDisableSecretsHttpTrigger –template HttpTrigger –language C#
You’ve got the basic function endpoint with default settings. Change the HttpTrigger binding values. Leave the POST method only and enter the routing URL of secrets/all/disable (line #5).
    public static class BulkDisableSecretsHttpTrigger

    {

        [FunctionName(“BulkDisableSecretsHttpTrigger”)]

        public static async Task<IActionResult> Run(

            [HttpTrigger(AuthorizationLevel.Function, “POST”, Route = “secrets/all/disable”)] HttpRequest req,

            ILogger log)

        {
Populate two values from the environment variables. One is the URL of the Key Vault instance, and the other is the tenant ID where the Key Vault instance is currently hosted.
            // Get the KeyVault URI

            var uri = Environment.GetEnvironmentVariable(“KeyVault__Uri”);
            // Get the tenant ID where the KeyVault lives

            var tenantId = Environment.GetEnvironmentVariable(“KeyVault__TenantId”);
Then, create the SecretClient that accesses the Key Vault instance. While instantiating the client, you should provide the DefaultAzureCredentialOptions instance as well. If the account logged into Azure is able to access multiple tenants, you should explicitly provide the tenant ID; otherwise, it throws the authentication error (line #4-6).
It happens more frequently on your local machine than on Azure.
            // Set the tenant ID, in case your account has multiple tenants logged in

            var options = new DefaultAzureCredentialOptions()

            {

                SharedTokenCacheTenantId = tenantId,

                VisualStudioTenantId = tenantId,

                VisualStudioCodeTenantId = tenantId,

            };

            var client = new SecretClient(new Uri(uri), new DefaultAzureCredential(options));
Once logged in, get all secrets, iterate them and process each one of them. First things first, let’s get all the secrets (line #2-4).
            // Get the all secrets

            var secrets = await client.GetPropertiesOfSecretsAsync()

                                      .ToListAsync()

                                      .ConfigureAwait(false);
            var utcNow = DateTimeOffset.UtcNow;

            var results = new Dictionary<string, object>();
Now, iterate all the secrets and process them. But we don’t need all the versions of each secret but need only Enabled versions. Therefore use WhereAwait for filtering out (line #7). Then, sort them in the reverse-chronological order by using OrderByDescendingAwait (line #8). Now, you’ll have got the latest version at first.
            foreach (var secret in secrets)

            {

                // Get the all versions of the given secret

                // Filter only enabled versions

                // Sort by the created date in a reverse order

                var versions = await client.GetPropertiesOfSecretVersionsAsync(secret.Name)

                                           .WhereAwait(p => new ValueTask<bool>(p.Enabled.GetValueOrDefault() == true))

                                           .OrderByDescendingAwait(p => new ValueTask<DateTimeOffset>(p.CreatedOn.GetValueOrDefault()))

                                           .ToListAsync()

                                           .ConfigureAwait(false);
If there is no active version in the secret, stop processing and continue to the next one.
                // Do nothing if there is no version enabled

                if (!versions.Any())

                {

                    continue;

                }
If there is only one active version in the secret, stop processing and continue to the next.
                // Do nothing if there is only one version enabled

                if (versions.Count < 2)

                {

                    continue;

                }
If the latest version of the secret is less than one day old, the rotation is still necessary. Therefore, stop processing and continue to the next one.
                // Do nothing if the latest version was generated less than a day ago

                if (versions.First().CreatedOn.GetValueOrDefault() <= utcNow.AddDays(-1))

                {

                    continue;

                }
Now, the secret has more than two versions and needs to disable the old ones. Skip the first (latest) one process the next one (line #2), set the Enabled to false (line #6), and update it (line #8).
                // Disable all versions except the first (latest) one

                var candidates = versions.Skip(1).ToList();

                var result = new List<SecretProperties>() { versions.First() };

                foreach (var candidate in candidates)

                {

                    candidate.Enabled = false;
                    var response = await client.UpdateSecretPropertiesAsync(candidate).ConfigureAwait(false);
                    result.Add(response.Value);

                }
                results.Add(secret.Name, result);

            }
And finally, store the processed result into the response object, and return it.
            var res = new ContentResult()

            {

                Content = JsonConvert.SerializeObject(results, Formatting.Indented),

                ContentType = “application/json”,

            };
            return res;

        }

    }
You’ve got the logic ready! Run the Function app, and you will see that all the secrets have been updated with the desired status. Suppose you change the trigger from HTTP to Timer, or integrate the current HTTP trigger with Azure Logic App with scheduling. In that case, you won’t have to worry about older versions of each secret to being disabled.
So far, we’ve walked through how an Azure Functions app can manage older versions of each secret of Azure Key Vault while Azure App Service and Azure Functions are referencing the ones in Azure Key Vault. I hope that this sort of implementation can reduce the amount of management overhead.
This article was originally published on Dev Kimchi.
by Contributed | Feb 21, 2021 | Technology
This article is contributed. See the original author and article here.
News this week includes:
Announcing general availability for Java Message Service (JMS) 2.0 API on Azure Service Bus Premium
Microsoft Teams Meetings for Government video series available now
IoT Driving Sustainability and a New Green ROI
Karl Wester-Ebbinghaus is our member of the week and a great contributor in the Windows Server Community.
View the Weekly Roundup for Feb 15-19th in Sway and attached PDF document.
https://sway.office.com/s/fGD8WWz1hargtCMw/embed

by Contributed | Feb 21, 2021 | Technology
This article is contributed. See the original author and article here.
Hi,
Recently, I built the Azure Solution Architect Map , the Azure Security Architect Map and the Azure Infrastructure Architect Map aimed at helping Architects finding their way in Azure. Here are all the maps in my series of Architecture Maps:
I’m now coming with the next map in this series, namely: the Cloud-native Azure Application Architect Map.
As usual, this map is by no means the holy grail and is just there to highlight some good fit between Azure Services and Design Patterns. This map is certainly subject to controversy as they are thousands of ways to design and develop and application. My goal is only to highlight some possibilities.
As usual, here is a screenshot of the map:

The map focuses on the following areas:
- Data & Big Data
- Common Design Patterns: SAGA, Circuit Breaker, Event-driven Architecture, etc.
- Domain-driven Design & Microservices: yes I clubbed them together :)
- Artificial Intelligence: NLP, Supervised & Unsupervised ML etc.
- Miscellaneous: things that come back regularly when developing applications such as real-time HTTP, search, job scheduling etc.
How to read this map?
Whenever you see the attachment icon  , it means that I have attached an explanation on a given rationale or service. If you see a (*) next to a node, it is kind of a must read information. So for instance, in the following screenshot:

I want to catch your attention on why I make an association between DDD and Microservices:

as well as why I make an association between CQRS and DDD:

You might of course disagree with this but at least, you understand my rationale.
The link icon  is a pointer to the corresponding Microsoft documentation.
Note that I haven’t dived into AKS or Service Fabric since this guys would deserve a dedicated map and are not Azure services like others, they are a universe by themselves.
With this tool, any Cloud-native Application Architect should quickly grasp the application landscape of Azure.
Update: the online MindMapMaker tool deletes maps that are older than a year, therefore, just visit the last version.
Here are all the maps in my series of Architecture Maps:
by Contributed | Feb 21, 2021 | Technology
This article is contributed. See the original author and article here.
Initial Update: Sunday, 21 February 2021 16:32 UTC
We are aware of issues within Log Search Alerts in Australia Southeast region and are actively investigating. Some customers may experience delayed or missed Log Search Alerts.
- Work Around: None
- Next Update: Before 02/21 19:00 UTC
We are working hard to resolve this issue and apologize for any inconvenience.
-Jeff

by Contributed | Feb 20, 2021 | Technology
This article is contributed. See the original author and article here.
In my day to day, I get to work with many customers migrating their data to Postgres. I work with customers migrating from homogenous sources (PostgreSQL), and also from heterogenous database sources such as Oracle and Redshift. Why do people pick Postgres? Because of the richness of PostgreSQL—and features like stored procedures, JSONB, PostGIS for geospatial workloads, and the many useful Postgres extensions, including my personal favorite: Citus.
A large chunk of the migrations that I help people with are homogenous Postgres-to-Postgres data migrations to the cloud. As Azure Database for PostgreSQL runs open source Postgres, in many cases the application migration can be drop-in and doesn’t require a ton effort. The majority of the effort usually goes into deciding on and implementing the right strategy for performing the data migration. For those of you who cannot afford any downtime during the Postgres migration process, there are of course data migration services that can help. But if you can afford some downtime for the migration during a specific maintenance window (e.g. during weekends, nights, etc.), then simple Postgres utilities such as pg_dump and pg_restore can be used.
In this post, let’s walk through the tradeoffs to consider while using pg_dump and pg_restore for your Postgres database migrations—and how you can optimize your migrations for speed, too. Let’s also explore scenarios in which you need to migrate very large Postgres tables. With large tables, using pg_dump and pg_restore to migrate your database might not be the most optimal approach. The good news is we’ll walk through a nifty Python tool for migrating large database tables in Postgres. With this tool we observed the migration of a large Postgres table (~1.4TB) complete in 7 hrs. 45 minutes vs. more than 1 day with pg_dump/pg_restore.
Faster migrations with pg_dump & pg_restore
pg_dump is a standard and traditional utility for backing up a PostgreSQL database. pg_dump takes a consistent snapshot of your Postgres database, even if the database is being actively used. pg_dump gives you multiple command-line options (I call them flags) that you can use to control the format and the content of the data you’re backing up. Some of the common and most useful command-line options for pg_dump enable you to do things like:
- Fine-grained control of dumping specific schemas, specific tables, just the data, etc.
- Control of the format of the dump; options include plain-text or the custom or directory formats, which are compressed by default.
- Using the
–jobs/-j command line option, which provides the ability to specify the number of concurrent threads to use for the dump. Each thread dumps a specific table, and this command line option controls how many tables to dump simultaneously.
You can use the pg_restore utility to restore a PostgreSQL database from an archive created by pg_dump. Similar to pg_dump, pg_restore also provides a lot of control over how you restore the archive. For example, you can restrict the restore to specific database objects/entities, specify parallel jobs for the restore, and so on.
TIP: Place the client machine on which you perform pg_dump/pg_restore as close as possible to the source and the target database, to avoid performance issues with bad network latency. If only one of the two is possible, you can choose either. Just be sure to place the client machine as close as possible to the target database, or the source database, or both.
In summary, pg_dump and pg_restore are the most commonly used, native, robust, and proven utilities for homogenous (Postgres to Postgres) database migrations. Using these utilities is the default way to perform data migrations when you can afford downtime (within some acceptable maintenance window).
With the wealth of command-line options that pg_dump and pg_restore provide, it is important to use those options in an optimal way based on the scenario at hand. Let’s walk through some of the scenarios you may face, to understand how best to use pg_dump and pg_restore.
What if you need to migrate more than 5 large Postgres tables?
Suppose your Postgres database has multiple (say, more than 5) decently-sized (greater than 5GB) tables. You can use the -j flag to specify the number of threads to use when performing a pg_dump and pg_restore. Doing so not only maximizes resource (compute/memory/disk) utilization on the source and target servers, but it also scales the available network bandwidth. (However you should be cautious that pg_dump and pg_restore don’t become network hogs and don’t affect your other workloads.) Thus, using pg_dump and pg_restore can provide significant performance gains.
If you’re performing an offline migration with no other load on the Postgres servers, you can specify that the number of jobs is a multiple of the number of cores in the system, which will maximize compute utilization on servers. However, if you’re performing a dump/restore just for backup/restore reasons on servers that have production load, be sure to specify a number of jobs that doesn’t affect the performance on the existing load.
You can use directory format (-Fd), which would inherently provide a compressed dump (using gzip). We have sometimes seen over 5X compression while using the -Fd flag. For larger databases (e.g. over 1 TB), compressing the dump can reduce the impact of disk IOPs getting bottlenecked on the server from which you are capturing a dump.
Below are sample pg_dump and pg_restore commands that use 5 jobs for the dump and restore respectively:
pg_dump -d 'postgres://username:password@hostname:port/database' -Fd -j 5 -f dump_dir

pg_restore --no-acl --no-owner -d 'postgres://username:password@hostname:port/database' --data-only -Fd -j5 dump_dir
How to migrate if most of your tables are small, but one of your tables is very large?
Suppose your database has a single large table (over 5GB) while the rest of the tables are small (less than 1 GB). You can pipe the output of pg_dump into pg_restore so you needn’t wait for the dump to finish before starting restore; the two can run simultaneously. This avoids storing the dump on client which is a good thing, since avoiding storing the dump on the client can significantly reduce the overhead of IOPs needed to write the dump to the disk.
In this scenario, the -j flag might not help because pg_dump/pg_restore run only a single thread per table. The utilities will be throttled on dumping and restoring the largest table. Also, unfortunately, when you use the -j flag, you cannot pipe the output of pg_dump to pg_restore. Below is an example command showing the usage:
pg_dump -d 'postgres://username:password@hostname:port/source_database' -Fc | pg_restore --no-acl --no-owner -d 'postgres://username:password@hostname:port/target_database' --data-only
The techniques in the above 2 sections can drastically improve your data migration times with pg_dump and pg_restore, particularly when one or more large tables are involved. In addition, this post about speeding up Postgres restores walks through similar techniques and gives you step-by-step guidance on how to achieve ~100% performance gains with pg_dump/pg_restore. This is one of my favorite Postgres blogs on pg_dump and pg_restore, hence sharing for reference. 
pg_dump/pg_restore is single threaded at a single table level, which can slow down migrations
Even when you use the above optimizations, since pg_dump and pg_restore can use only a single thread each when migrating a single table, the entire migration can get bottlenecked on a specific set of very large tables. For databases over 1 TB with a couple of tables representing majority of the data, we’ve seen pg_dump and pg_restore take multiple days, which leads to the following question.
How can I use multiple threads to migrate a single large table in PostgreSQL?
You can leverage multiple threads to migrate a single large table by logically chunking/partitioning the Postgres table into multiple pieces and then using a pair of threads—one to read from source and one to write to the target per piece. You can chunk the table based on a watermark column. The watermark column can be a monotonically increasing column (e.g., id column) (OR) a timestamp column (e.g., created_at, updated_at, etc).
There are many commercial tools out there that implement the above logic. In the spirit of sharing, below is a Python script, called Parallel Loader, that is a sample implementation of the above logic. You can find the Parallel Loader script on GitHub if you want to use it yourself.
#suppose the filename is parallel_migrate.py

import os
import sys

#source info
source_url = sys.argv[1]
source_table = sys.argv[2]

#dest info
dest_url = sys.argv[3]
dest_table = sys.argv[4]

#others
total_threads=int(sys.argv[5]);
size=int(sys.argv[6]);

interval=size/total_threads;
start=0;
end=start+interval;

for i in range(0,total_threads):
        if(i!=total_threads-1):
                select_query = '"COPY (SELECT * from ' + source_table + ' WHERE id>='+str(start)+' AND id<'+str(end)+") TO STDOUT"";
                read_query = "psql "" + source_url + "" -c " + select_query
                write_query = "psql "" + dest_url + "" -c "COPY " + dest_table +" FROM STDIN""
                os.system(read_query+'|'+write_query + ' &')
        else:
                select_query = '"COPY (SELECT * from '+ source_table +' WHERE id>='+str(start)+") TO STDOUT"";
                read_query = "psql "" + source_url + "" -c " + select_query
                write_query = "psql "" + dest_url + "" -c "COPY " + dest_table +" FROM STDIN""
                os.system(read_query+'|'+write_query)
        start=end;
        end=start+interval;
How to invoke the Parallel Loader Script
python parallel_migrate.py "source_connection_string" source_table "destination_connection_string" destination_table number_of_threads count_of_table
With the Parallel Loader script, you can also control the number of threads used for migrating the large table. In the above invocation, the number_of_threads argument controls the parallelism factor.
Example invocation of the Parallel Loader Script
python parallel_migrate.py "host=test_src.postgres.database.azure.com port=5432 dbname=postgres user=test@test_src password=xxxx sslmode=require" test_table "host=test_dest.postgres.database.azure.com port=5432 dbname=postgres user=test@test_dest password=xxxx sslmode=require" test_table 8 411187501
The above implementation uses the monotonically increasing id column of a table to chunk it out and stream data from the source table to the target table using parallel threads. You can find some pre-requisites and recommendations for using Parallel Loader on this GitHub repo.
Comparing performance of Parallel Loader vs. pg_dump & pg_restore, for large Postgres tables
To compare the performance of pg_dump and pg_restore to the Parallel Loader script, I migrated a 1.4 TB Postgres table (with indexes) from one Postgres database to another in Azure in the same region, using both techniques.
You can see in the table below that the Parallel Loader script performed over 3X faster than pg_dump and pg_restore for this Postgres to Postgres data migration.
|
Parallel Loader
|
pg_dump & pg_restore
|
Time to migrate 1.4TB Postgres database (with indexes) in same Azure region
|
7 hours 45 minutes
|
> 1 day
|
 Figure 1: We observed a network throughput of ~9.5GB every 5 minutes for the migration, peaking at 27.9GB per 5 minutes.
Parallel Loader uses the COPY command for faster performance
Note that Parallel Loader uses the COPY command across each thread for reading data from the source and writing data to the target database. The COPY command is the best way for bulk ingestion in Postgres. We have seen ingestion throughputs of over a million rows per second with the COPY command.
 Figure 2: Screenshot that shows the activity (pg_stat_activity) consisting of COPY commands on the target database. These COPY commands are generated by the Parallel Loader script while migrating a large table. Each COPY command translates to a single thread generated by the script.
Bottom line: you can use pg_dump/pg_restore in conjunction with Parallel Loader for faster Postgres data migrations
The pg_dump/pg_restore utilities are fantastic tools for migrating from a Postgres database to another Postgres database. However, they can drastically slow down when there are very large tables in the database. To solve that problem, you can use the approach explained in this post: to parallelize single large table migrations to Postgres by using the Parallel Loader script. We’ve seen customers use a combination of Parallel Loader and pg_dump/pg_restore to successfully migrate their Postgres databases. Parallel Loader can take care of the large tables while pg_dump/pg_restore can be used to migrate the rest of your Postgres tables.
More useful data migration resources:
by Contributed | Feb 20, 2021 | Technology
This article is contributed. See the original author and article here.
What do you see when you look up at the stars?
Pinholes of light in an endless canvas? A ribbon of constellations? Or a sea of enticing destinations and mysteries to explore?
If you’re an explorer at heart, you’re in luck.
More spacecraft are lifting off than ever before, and we’re collecting data from farther and farther away. As the industry continues to shift and adapt with new technologies, this is the perfect time to consider a career in space exploration. In fact, Microsoft recently launched Azure Space to extend the capabilities of Azure beyond the stratosphere and use insights from space discovery to solve our biggest problems here at home.
Find your flight path
If you’re thinking really big now, awesome. Chart a course for your interstellar success with introductory, self-paced paths and modules on Microsoft Learn. Consider them early missions in an ongoing journey and prepare yourself for launch.
“I think that being a developer is an essential literacy skill—just like reading, writing, and math—that everyone should be exposed to and have the option to integrate into the things that they’re passionate about. Our space-themed Microsoft Learn paths were created for learners just like you, to inspire you to take your ideas beyond what you thought was possible and apply what you learn to whatever you love.”
Dr. Sarah Guthals
Principal Program Manager, Azure Education
|
Mission 1: Discover the role of Python in space exploration
Take your first giant leap with an introduction to Python and its role in the solutions that NASA creates. Get to know the programming tools that you’ll use, learn and practice core programming concepts, and get more familiar with machine learning and AI. Along the way, you’ll hear experiences and advice from actual NASA employees.
Mission 2: Learn how to predict rocket launch delays with machine learning
If you’ve completed your first mission, installed Python and Microsoft Visual Studio Code, and are able to code simple programs in Python, you’re ready to dive into machine learning. Solve a real-life challenge that NASA faces before a launch and see how machine learning can help with other related issues in space discovery.
Mission 3: Learn how to use Python and AI to classify space rocks
Once you have a basic understanding of how Python is used for data science and machine learning, go deeper and learn how to create an AI model that can classify the type of space rock in a random photo.
Mission 4: Plan a mission to the Moon and bring some space rocks home
Now you’re really taking off. Learn how to prepare data for analysis, represent it clearly, and explore it using Python and pandas. Can you get your rocket to the Moon and bring it back full of space rocks?
Test the limits of AI with Bugs and the gang
If you’re mentoring younger students or teaching them about computer science and AI, check out the Space Jam: A New Legacy coding workshops. In these online workshops inspired by the upcoming movie, students aged eight and older learn how to build a playable prototype of a video game and explore careers in game design.
If you’re using the workshop to teach, take your lesson further with the educator resources in the Microsoft Store Space Jam: A New Legacy curriculum. However, these workshops are also a great way to help any curious kid in your life learn more about what you do and get them excited to try their own project.
And, let’s be honest, sometimes the stuff that’s made for kids is pretty fun for us too. ;)

by Contributed | Feb 20, 2021 | Technology
This article is contributed. See the original author and article here.
Val Verde school district in Southern California has been a pioneer in education for more than two decades.
One of the first districts on the internet in Southern California and one of the first 10 Google Certified schools, Val Verde has always been at the forefront of the future. They’ve been diving into new technology since acquiring a fleet of freshly released NeXT workstations in 1985.
Home to 20,000 students across 22 schools, Val Verde’s been a Microsoft-centric shop for the last 15-20 years but also dove into Google and Chromebooks early on.
Today, their district is a hybrid of Microsoft Office 365 for admin and teaching staff, with Chromebooks and G Suite for students who have been one-to-one with Chromebooks district-wide for the last two and a half years.
So it makes sense that Val Verde were super early adopters of Microsoft 365 Universal Print for an entire school district.
Leading the charge into the Universal Print beta were Matt Penner, Director of Information and Instructional Technology, and Brian Falk, Network Service Manager: Val Verde’s two futurists with over 20 years of IT experience.
An opportunity presented by remote working
When the uncertainty of a global pandemic hit, Val Verde was well poised to transition to a remote working setup for their staff and teachers. One wrinkle was how Matt and Brian’s IT team could support printing for the Microsoft-centric Val Verde business and teaching staff with their on-premises server set-up. Printing was a breeze for the students on Google and Chromebook, but those using Microsoft couldn’t access the on-premises print infrastructure.
It was a speedbump, but Matt and Brian smelled opportunity: “Our grand vision — this has been several years in the making — is that you can work on anything you want, wherever you want, anytime you want,” says Matt.
Backed by a likewise visionary superintendent, last year Matt and Brian were able to roll out 980 laptops completely on Azure during their school district’s Covid-19 closure.
“We’ve been moving everything to the cloud,” says Matt. “Managing it all through Azure. Our goal is to put all of our servers in Azure.”
Farming a multi-site data network up to the cloud
What makes a vision a vision is how insurmountable it may seem, which was the case for Brian. The central head of network solutions responsible for all of Val Verde’s dozens of schools and thousands of students, Brian only had three IT engineers on his team and no CISO. Supporting their entire district remotely while delivering security and efficiency meant tasks such as swapping hard drives because the SCSI board failed needed to quickly become a thing of the past.
“We are no longer in the data center game,” says Matt. “That is not our core value expertise. Our expertise is school districts and we’ll take PaperCut, Laserfiche, Azure, Google, and 20,000 Chromebooks and make them all work together because that’s what we’re good at.”
“So let’s farm that up to Azure. Just the simple cost, too, of DR and everything else. We’ve got all that, but that’s not where the value-add is. Not when Microsoft and some of these other companies can do it much better and at much better efficiencies of scale than we can.”
A plan that was years in the making
Just 12 months ago, moving from on-premises to cloud on such a large scale for a multi-site school district wasn’t on a lot of radars. “Nobody was looking at this, says Brian. “And I think the pandemic started changing some mindsets.”
Fortunately for Brian, Matt, and Val Verde, they had already begun changing their mindset before their district’s closure.
“Matt and I have had this discussion for almost three years about how we were going to move to the cloud, how we were going to get disassociated from our local networks. The pandemic, for us, has just been the catalyst to make that happen so much quicker.” – Brian Falk
Brian states the realization to enact their vision was instant: “On March 13th (2020) when we were all sent home due to the pandemic, we found that those physical devices were a huge hindrance to us and caused us all sorts of problems.” “Having to have that local Active Directory that nobody could access anymore, having to have those local file servers that nobody could access anymore, having those printers that just sat there and became stagnant because they were not accessible. We had to then enact the plan that we’d been looking at. We started enacting it almost immediately.”
Matt and Brian didn’t look to their own field for inspiration, they looked to corporate enterprises like Netflix and Amazon and followed their blueprint, rather than what others were doing in education. “I don’t think there’s a lot of people looking to do this,” says Matt on jumping into the Universal Print beta. “We’re hearing from Microsoft, ‘You’re like the only district in California who’s doing this’.” But it’s not about being lured to the bleeding edge by a shining lure: “We just like to push the envelope in a way that makes sense, that’s sustainable.”
Printing in the cloud with Microsoft and PaperCut
The announcement of Microsoft’s Universal Print was timely for Brian, as their print network was an additional pain-point during their closure: “Suddenly we have all these Azure devices that are trying to talk to on-prem printers in a classic, old print server traditional way.”“As we came into the pandemic we started testing on our Azure deployment, and we started seeing that there were some real challenges to trying to print the old-fashioned way, using the traditional print servers and being able to connect and talk to our printing. So we started digging to see what was out there and, of course, Universal Print popped up.”
Matt and Brian had already been managing their printing for tracking and reporting with PaperCut since 2016. The memory of successfully setting up cloud printing so easily for their superintendent’s Google Pixelbook came into play when they were looking into Universal Print: “I remember Matt and I were sitting in a meeting and we started Googling some stuff on Universal Print,” says Brian. “Right there on Universal Print’s page was a list of solution providers they were working with and there was PaperCut. We remembered the Google issue and the Google printing and we’re like, ‘If PaperCut made that so simple, then this was going to be easy with them as well.’
”Jumping into the Universal Print beta immediatelyWaiting patiently since Universal Print was announced, Brian says the pair leaped the second it was available for their licensing level: “It released, and within a day we were into the beta.”
“Within the first couple of hours we had the PaperCut connector downloaded and we were starting to work there,” says Brian. What they really appreciated was the immediate support from Microsoft and PaperCut: “Something that is the greatest part is when you’re sitting there and you’re dealing with a beta and they say, ‘Hold on, let’s get the developers on.’”
Living the cloud printing vision free of the old ‘magic network’ and VPNs
After that, the implementation was a breeze: “It went so smooth. We put in over fourteen hundred printers that we uploaded into Universal Print and we did it in batches. We didn’t want to do fourteen hundred printers all at once. But I think in the period of one week we had fourteen hundred printers into Universal Print.“

With Microsoft’s Universal Print and PaperCut, Brian states that Val Verde’s staff are now living their vision of being on a magic network, with their printing needs spoken for as well: “That teacher needs to print off ten lesson plans and they’re at home. They print off the ten lesson plans and whoever is in the office, picks them up for them and they’re done. It’s so easy.”
The risk of being a visionary is if you’re traversing unexplored territory, who knows when you might step into quicksand and begin floundering. That’s where the difference-maker was with Universal Print and PaperCut, despite being in beta: “To have direct access into your development team was amazing,” says Brian. “We kind of look at ourselves with this little school district out in the middle of nowhere. And here you guys are saying, ‘Yeah, we’ll talk with you. We’ll work through this with you.’”
Universal Print’s general availability is right around the corner and will be a part of Microsoft 365 enterprise and education and Business Premium. Add PaperCut in the mix and you unlock new print management powers – like full tracking and feature-packed print release. Microsoft 365 customers who would like to try Universal Print now in their organizations can start at https://aka.ms/up_trynow.
Find out more about PaperCut’s Microsoft Universal Print Connector
by Contributed | Feb 20, 2021 | Technology
This article is contributed. See the original author and article here.
Ask IT Professionals what their biggest pain points are – and the story is always the same: time-consuming, tedious work that distracts from high-value, high-impact strategic projects.
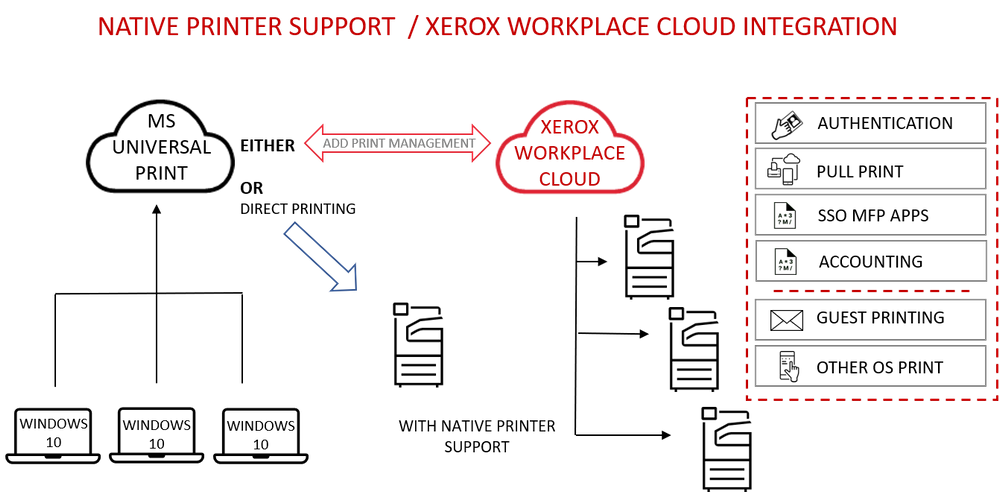
Xerox is partnering with Microsoft to host print infrastructure in the cloud, eliminating the need for onsite print servers and installing printer drivers on Windows devices.
“Clients can redirect IT resources to more strategic business priorities by migrating their print infrastructure to a secure cloud environment.” – Bertrand Cerisier – VP Global Offer Marketing, Xerox.
Integrated with Microsoft 365, Universal Print provides centralized printer set-up, management and maintenance for Windows 10 devices.
Stronger together: Universal Print with Xerox Workplace Cloud
Universal Print by Microsoft, together with the Xerox Workplace Cloud print management solution, adds a comprehensive layer of security and control across the print environment. The Xerox Workplace Cloud also delivers cloud connectivity and support for client operating systems, including Mac, ChromeOS, iOS and Android.
Cloud-to-cloud integration unlocks advanced print management capabilities like full printer usage tracking, feature-packed print release, mobile print, and advanced security benefits.
Print to a single print queue and securely release jobs at any printer with a swipe of a badge or tap of the phone.
Additional advantages include:
- Card or mobile authentication for user access to the printer/MFP
- Pull Print to deliver secure release and cost control
- Reporting, accounting and user analytics to monitor print costs
- Print rules to limit print expenditure
- Printing from mobile devices for guest users
- Central configuration and management of printer security settings
Built on Microsoft Azure, Xerox Workplace Cloud offers a robust and dependable turnkey solution for Microsoft 365 users.
Direct cloud connectivity and simple setup
For native printer support, Xerox will provide a range of product firmware updates. The Universal Print ready printer range connects directly to a Microsoft 365 tenant. Once the printer is registered with Azure Active Directory it can be managed as a native Azure AD object, providing simple, trouble-free cloud printing.
All Xerox office devices are compatible with the Universal Print connector, so it is easy to get started with the standard Universal Print feature set today.
Learn more at https://aka.ms/UP_Xerox.
by Contributed | Feb 20, 2021 | Technology
This article is contributed. See the original author and article here.
Ricoh will start supporting Microsoft Universal Print including native support with our Smart Operation Panel application, so customers can easily register printers in Azure AD for Universal Print.
Integrating Ricoh Smart Operations Panel MPS with Universal Print offers the following benefits to customers:
- Administrators can distribute printers to Azure AD joined Windows devices. Devices users can print directly to the cloud-configured service from any Windows device when connected to the internet and authenticated to Azure AD (Active Directory).
- Centralized print reporting capabilities allow IT admins to view print job history and usage reports.
- Ricoh printers with native support of Universal Print will not require an on-premises print server or printer driver installation.
- There is a function to set the user privileges, so users can only print to those printers.
- Data is encrypted during transfer over the network and when stored in non-volatile storage.
- Ricoh printers without native support for Universal Print can be use with the Universal Print connector to take advantage of the Universal Print benefits.
To learn more about Ricoh and their products, please visit Smart Operation Panel Technology | Ricoh USA (ricoh-usa.com)


Recent Comments