by Contributed | Apr 8, 2021 | Technology
This article is contributed. See the original author and article here.
Introduction
Hello everyone, this is Andrew Coughlin and I am a Customer Engineer at Microsoft focusing on Azure IaaS. In this blog I will be discussing an issue I came across while working with one of my customers.
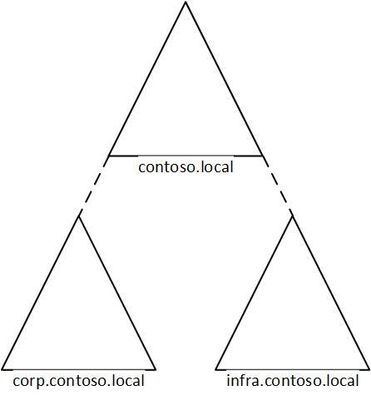
I was working with a customer to setup Active Directory authentication for Azure Files over smb for a storage account in their environment. Below shows a generic layout of how the domain is setup. The domain had a single forest with multiple domains inside that forest:
Domain
|
Resource Type
|
contoso.local
|
Domain controllers
|
corp.contoso.local*
|
users, workstations, groups, domain controllers
|
infra.contoso.local*
|
servers, service accounts, domain controllers
|
*AD Connect Sync is configured
The storage account was going to be joined to infra.contoso.local, and admin account the user was logged into the workstation running the commands was part of the corp.contoso.local domain.
Prerequisites
- Ensure these steps have been completed before setting up the storage account.
- Create a storage account as documented here, then create a Azure File Share as documented here.
Troubleshooting Steps
We started following the documentation as noted here, for setting up Authentication for Active Directory Domain Services authentication over SMB for Azure file shares. However, when we ran the Join-AzStorageAccountForAuth, it would fail with the following error message:

While reviewing the error message I noticed something strange, it is looking at corp.contoso.local, instead of infra.contoso.local, even though we specified the OU that the storage account should be joined to. The reason behind this is because the admin account we are logged into the system with is part of corp.contoso.local. After doing some research I then noticed there was a -Domain switch in the Join-AzStorageAccountForAuth.
We then ran the command with the -Domain “infra.contoso.local” switch and once completed we received a success status which showed the storage account had been joined.

Next, we want to verify the storage account had been joined and checked the OU that I specified in the join command and confirmed the storage account was in the correct OU.

Then we proceeded with the rest of the steps as outlined in the documentation.
Conclusion
If you have ran into this issue, I hope you find this blog helpful and reduces the time in troubleshooting this error when joining a storage account to your Active Directory Domain. Thank you for taking the time to read this blog and have a great day!
Disclaimer
The sample scripts are not supported under any Microsoft standard support program or service. The sample scripts are provided AS IS without warranty of any kind. Microsoft further disclaims all implied warranties including, without limitation, any implied warranties of merchantability or of fitness for a particular purpose. The entire risk arising out of the use or performance of the sample scripts and documentation remains with you. In no event shall Microsoft, its authors, or anyone else involved in the creation, production, or delivery of the scripts be liable for any damages whatsoever (including, without limitation, damages for loss of business profits, business interruption, loss of business information, or other pecuniary loss) arising out of the use of or inability to use the sample scripts or documentation, even if Microsoft has been advised of the possibility of such damages.
by Contributed | Apr 8, 2021 | Technology
This article is contributed. See the original author and article here.
Hello Folks,
I’ve been working with some colleagues on a shared demo environment, and one issue came up during a session with customers that highlighted a problem. If any of us change the local admin password of the servers or redeploys the environment with a password of their own. We no longer can access it without contacting the group and request the new password.
I started to look a way to regularly update the password from a location that is built specifically for storing passwords and other secrets. Namely, Azure Key Vault.
And, I had just read the PowerShell’s Team blog announcing the general availability of their SecretManagement and SecretStore modules. That seemed like the best candidates to help. The SecretManagement module helps users manage secrets by providing a common set of cmdlets to interface with secrets across vaults. IT utilizes an extensible model where local and remote vaults (including Azure Key Vaults) can be registered and unregistered for use in accessing and retrieving secrets.
The module provides the following cmdlets for accessing secrets and managing SecretVaults:
- Get-Secret
- Get-SecretInfo
- Get-SecretVault
- Register-SecretVault
- Remove-Secret
- Set-Secret
- Set-SecretInfo
- Set-SecretVaultDefault
- Test-SecretVault
- Unregister-SecretVault
The solution
To address our issue, we took the following steps.
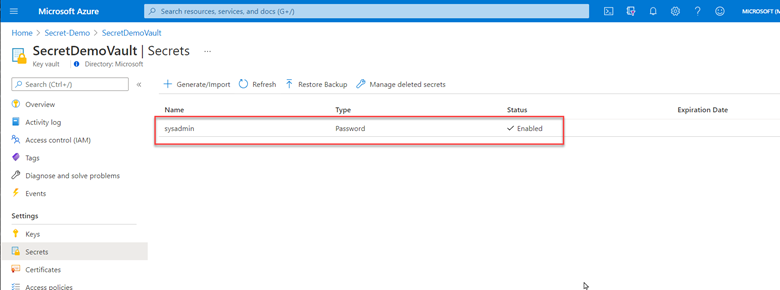
1- Created a key vault and created/stored a secret with a complex password. (because it’s in the demo resource group, we can all retrieve the secret when needed)
2- Deployed Azure Automation in our environment and created a Run as account to provide authentication for managing resources in Azure with the Azure cmdlets.
3- Created a new Runbook that would get the secret from Key vault using PowerShell Microsoft.PowerShell.SecretManagement module and using the Azure VMAccess extension would update the local admin password to the one retrieved from Key vault. (The sample code available below). Of course, this is proof of concept at this point and needs to be worked on. However, it does open the door to other usage. This could be re-used and modified to run on a schedule to generate a new complex password and store it in Key Vault, then update all the servers in your environment with the new password on a regular basis.

4- Here is the sample code.
param(

    [string]$ResourceGroupName = "Secret-Demo",
    [string]$vaultname = "SecretDemoVault"

)
Disable-AzContextAutosave -Scope Process

$VERSION = "1.0"
$currentTime = (Get-Date).ToUniversalTime()

Write-Output "Runbook started. Version: $VERSION at $currentTime"
Write-Output "---------------------------------------------------"

# Authenticate with your Automation Account
	$connection = Get-AutomationConnection -Name AzureRunAsConnection
    # Wrap authentication in retry logic for transient network failures
    $logonAttempt = 0
    while(!($connectionResult) -and ($logonAttempt -le 10))
    {
        $LogonAttempt++
        # Logging in to Azure...
        $connectionResult = Connect-AzAccount `
                                -ServicePrincipal `
                                -Tenant $connection.TenantID `
                                -ApplicationId $connection.ApplicationID `
                                -CertificateThumbprint $connection.CertificateThumbprint

        Start-Sleep -Seconds 30
    }

    $AzureContext = Get-AzSubscription -SubscriptionId $connection.SubscriptionID
    $SubID = $AzureContext.id
    Write-Output "Subscription ID: $SubID"
    Write-Output "Resource Group: $ResourceGroupName"
    Write-Output "VaultName: $vaultname"

# Get Secret from KeyVault
    Register-SecretVault -Name AzKeyVault -ModuleName Az.KeyVault -VaultParameters @{ AZKVaultName = $vaultname; SubscriptionId = $SubID }
    $secret = Get-Secret -Vault AzKeyVault -Name sysadmin
    Write-Output "SecretValue :  $secret"
    $Credential = New-Object -TypeName PSCredential -ArgumentList "sysadmin", $secret

# Get a list of all virtual machines in subscription
    $VMList = Get-AzVM -ResourceGroupName $ResourceGroupName
    foreach ($vm in $VMList)
    {
        Write-Output "Reseting password on $vm.name"
        Set-AzVMAccessExtension -ResourceGroupName $ResourceGroupName -VMName $Vm.Name -Credential $Credential -typeHandlerVersion "2.0" -Name VMAccessAgent
    }
The code above required me to import some PowerShell Modules into our Automation environment. The modules I imported from the gallery

The added modules were the following:
- Az.Accounts
- Az.Compute
- AZ.KeyVault
- Microsoft.PowerShell.SecretManagement
- Microsoft.PowerShell.SecretStore

5- Once created and published I linked the Runbook to a schedule that will execute the script nightly.

That’s it! a simple solution based on a new PowerShell module that provides us with loads of value. Maybe it will be of value for you too.
Cheers!
Pierre
by Contributed | Apr 8, 2021 | Technology
This article is contributed. See the original author and article here.
Overview & Use Case
Thanks to Ivan Ovchinnikov, Lead integration developer at Group-IB, Rijuta Kapoor from Microsoft Azure Sentinel Threat Intelligence team, Sreedhar Ande from Microsoft Azure Sentinel PG, the whole Group-IB Threat Intelligence and Azure Sentinel Threat Intelligence Product Group teams for the technical brainstorming, contributing and proof reading!
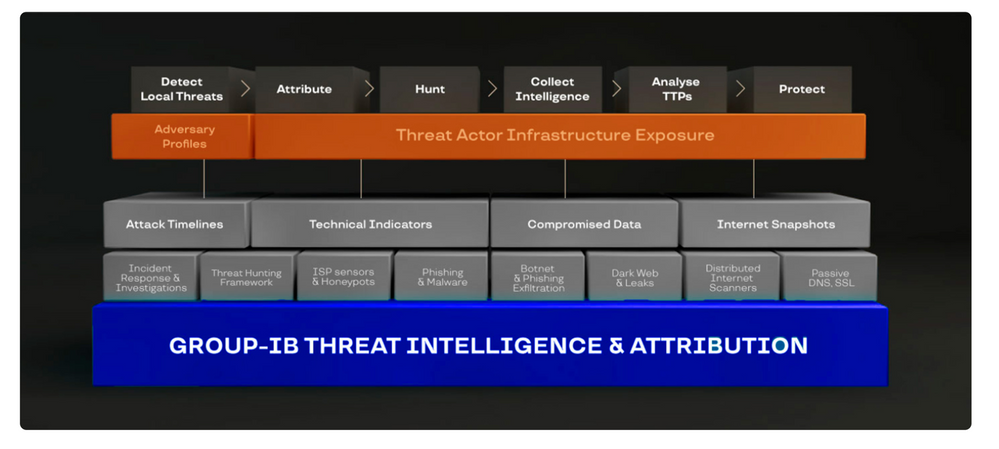
Group-IB Threat Intelligence & Attribution (TI&A) is a system for analyzing and attributing cyberattacks, threat hunting, and protecting network infrastructure based on data relating to adversary tactics, tools and activity. TI&A combines unique data sources and experience in investigating high-tech crimes and responding to complex multi-stage attacks worldwide. The system stores data on threat actors, domains, IPs, and infrastructures collected over the last 15 years, including those that criminals attempted to wipe out. The functionality of the system helps customize it to the threat landscape not only relevant to a particular industry, but also to a specific company in a certain country. Below is the high-level architecture of Group-IB TI&A:
SOC team requirement is to ingest Group-IB TI&A feeds & indicators based on multiple TI collections to Azure Sentinel (and writes them to Microsoft Security Graph API to be listed under Azure Sentinel ThreatIntelligenceIndicators table and custom log tables as well) for automatic scanning and detecting matched TI feeds/indicators across their organizational data sources logs for further investigation and analysis.
Implementation
First let’s understand and get more technical details on the Group-IB TI&A collections to see how we can ingest and map these feeds/indicators to the Azure Sentinel Threat Intelligence data types via TI&A APIs and Azure Sentinel Automation (Playbooks):
gib-tia
|
Collection
|
Has Indicators
|
Indicators Content
|
Description
|
GIBTIA_APT_Threats
|
apt/threat
|
Yes
|
GIB APT Threat Indicator(IPv4)
GIB APT Threat Indicator(domain)
GIB APT Threat Indicator(url)
GIB APT Threat Indicator(md5)
GIB APT Threat Indicator(sha256)
GIB APT Threat Indicator(sha1)
|
Group-IB continuously monitors activities undertaken by hacker groups, investigate, collect, and analyze information about all emerging and ongoing attacks. Based on this information, we provide IOC’s related to APT Groups Attacks
|
GIBTIA_APT_ThreatActor
|
apt/threat_actor
|
No
|
N/A
|
This collection contains APT groups’ info, with detailed descriptions
|
GIBTIA_Attacks_ddos
|
attacks/ddos
|
Yes
|
GIB DDoS
Attack(IPv4)
|
The “DDoS attacks” collection contains a DDoS Attacks targets and C2 indicators
|
GIBTIA_Attacks_deface
|
attacks/deface
|
Yes
|
GIB Attack Deface(url)
|
The “Deface” collection contains information about online resources that have become subject to defacement attacks (the visual content of a website being substituted or modified)
|
GIBTIA_Attacks_phishing
|
attacks/phishing
|
Yes
|
GIB Phishing Domain(domain)
GIB Phishing IP(IPv4)
GIB Phishing URL(url)
|
The “Attacks Phishing” collection provides information about various phishing resources (including URLs, Domains and IPs.)
|
GIBTIA_Attacks_phishing_kit
|
attacks/phishing_kit
|
Yes
|
GIB Phishing Kit Email(email)
|
The “Atacks Phishing Kits” collection contains information about the archives of phishing kits. Emails gotten from kits can be obtained as indicators
|
GIBTIA_BP_phishing
|
bp/phishing
|
Yes
|
GIB Phishing Domain(domain)
GIB Phishing IP(IPv4)
GIB Phishing URL(url)
|
The “BP Phishing” collection provides events related to clients company
|
GIBTIA_BP_phishing_kit
|
bp/phishing_kit
|
Yes
|
GIB Phishing Kit Email(email)
|
The “BP Phishing Kit” collection provides phishing kits related to clients company
|
GIBTIA_Compromised_account
|
compromised/account
|
Yes
|
GIB Compromised Account CNC(url)
GIB Compromised Account CNC(domain)
GIB Compromised Account CNC(IPv4)
|
This collection contains credentials collected from various phishing resources, botnets, command-and-control (C&C) servers used by hackers
|
GIBTIA_Compromised_card
|
compromised/card
|
Yes
|
GIB Compromised Card CNC URL(url)
GIB Compromised Card CNC Domain(domain)
GIB Compromised Card CNC IP(IPv4)
|
This collection contains information about compromised bank cards. This includes data collected from card shops, specialized forums, and public sources
|
GIBTIA_Compromised_imei
|
compromised/imei
|
Yes
|
GIB Compromised IMEI CNC Domain(domain)
GIB Compromised IMEI CNC URL(url)
GIB Compromised IMEI CNC IP(IPv4)
|
The section contains data on infected mobile devices, which is obtained by analyzing mobile botnets. It does not contain personal data and is available to all system users
|
GIBTIA_Compromised_mule
|
compromised/mule
|
Yes
|
GIB Compromised Mule CNC Domain(domain)
GIB Compromised Mule CNC URL(url)
GIB Compromised Mule CNC IP(IPv4)
|
This section contains information about bank accounts to which threat actors have transferred or plan to transfer stolen money. Man-in-the-Browser (MITB) attacks, mobile Trojans, and phishing kits allow fraudsters to make money transfers automatically. Playbook provides C2 data related to compromitation
|
GIBTIA_HI_Threats
|
hi/threat
|
Yes
|
GIB HI Threat Indicator(domain)
|
Group-IB continuously monitors activities undertaken by hacker groups, investigate, collect, and analyze information about all emerging and ongoing attacks. Based on this information, we provide IOC’s related to Hackers Attacks
|
GIBTIA_HI_ThreatActor
|
hi/threat_actor
|
No
|
N/A
|
This collection contains non-APT groups’ and Individual hackers info, with detailed descriptions
|
GIBTIA_Malware_cnc
|
malware/cnc
|
Yes
|
GIB Malware CNC Domain(domain)
GIB Malware CNC URL(url)
GIB Malware CNC IP(IPv4)
|
The “Malware” collection contains Malwares C2 detected by group IB
|
GIBTIA_Malware_Targeted_Malware
|
malware/targeted_malware
|
Yes
|
GIB Malware Targeted Malware(md5)
GIB Malware Targeted Malware(sha1)
GIB Malware Targeted Malware(sha256)
GIB Malware Targeted Malware Inject(md5)
|
The “Targeted Trojans” section contains information about malicious programs targeting the client’s infrastructure. Information is collected by examining a multitude of malicious files and investigating various incidents
|
GIBTIA_OSI_GitLeak
|
osi/git_leak
|
No
|
N/A
|
Open-source repositories such as GitHub contain codes that anyone can search for. They are often used by threat actors planning to attack a specific company. The “Git Leaks” section contains the above data in code repositories
|
GIBTIA_OSI_PublicLeak
|
osi/public_leak
|
No
|
N/A
|
The “Public leaks” collection contains the leaked clinets data collected on popular file-sharing resources or text/information exchange websites
|
GIBTIA_OSI_Vulnerability
|
osi/vulnerability
|
No
|
N/A
|
The “Vulnerabilities” collection displays information about vulnerabilities detected in the software by version
|
GIBTIA_Suspicious_ip_open_proxy
|
suspicious_ip/open_proxy
|
Yes
|
GIB Open Proxy Address(IPv4)
|
The “Open proxy” collection proviedes information about lists of proxy servers that are publicly available on various online resources related to anonymity. In addition, proxy servers may be configured as open proxies intentionally or as a result of misconfiguration or breaches
|
GIBTIA_Suspicious_ip_socks_proxy
|
suspicious_ip/socks_proxy
|
Yes
|
GIB Socks Proxy Address(IPv4)
|
The “Socks proxy” collection providess information about addresses where malware that turns infected computers into SOCKS proxies has been installed. Such computers (bots) are rented out and used in various attacks to ensure the attacker as much anonymity as possible
|
GIBTIA_Suspicious_ip_tor_node
|
suspicious_ip/tor_node
|
Yes
|
GIB Tor Node Address(IPv4)
|
The “Tor Node” collection displays information about Tor exit nodes, which are the final Tor relays in the circuit. The nodes act as a medium between a Tor client and public Internet
|
#Deployment Steps
The whole custom connectors code & deployment templates with detailed instructions and considerations already been uploaded at Azure Sentinel github Playbooks repo
Step(1): Azure Sentinel gib-tia Playbooks
- Deploy GIBIndicatorsProcessor playbook first
- Deploy required collections Playbooks and configure the following parameters:
- GIB Username – is a login to access Group-IB TI&A Web Interface
- Save only indicators – set to true if only indicators enrichment is required, otherwise, an additional table in Workspace with full event content will be created
- Some collections provide no indicators, so do not have this parameter configurable and add Group-IB TI&A events only in Log Workspace
- GIB Action – This is an action required to set in a particular indicator type provided through the current collection.(The action to apply if the indicator is matched from within the target Product security tool. Possible values are: unknown, allow, block, alert)
- GIB API URL – is an GIB TI&A API URL
- Configure API Key variable. API Key can be generated in the Profile Section in Group-IB TI&A Web Interface
Step(2): Register an Azure AD App for TI Indicators Graph API Write Access
- Go to Azure Active Directory / App Registrations
- Create +New Registration
- Give it a name. Click Register
- Click API Permissions Blade
- Click Add a Permission
- Click Microsoft Graph
- Click Application Permissions
- Check permissions for ThreatIndicators (ThreatIndicators.ReadWrite.OwnedBy). Click Add permissions
- Click grant admin consent for domain.com
- Click Certificates and Secrets
- Click New Client Secret
- Enter a description, select never. Click Add
- IMPORTANT. Click copy next to the new secret and paste it somewhere temporarily. You cannot come back to get the secret once you leave the blade
- Copy the client ID from the application properties and paste it somewhere as you will need it to be added to the Playbooks
- Also copy the tenant ID from the AAD directory properties blade


Detection & Investigation
A sample Azure Sentinel Analytics rule to identify a match in CommonSecurityLog Event data from any FileHash IOC from gib-tia, we highly recommend you to check out the list of the Azure Sentinel TI Out of the box TI analytics rules:
//gib-tia TI map File Hash to CommonSecurityLog Event data sources in Azure Sentinel, to identify a match in CommonSecurityLog Event data from any FileHash IOC from gib-tia

let dt_lookBack = 1h;

let ioc_lookBack = 14d;

let fileHashIndicators = ThreatIntelligenceIndicator

| where SourceSystem == "SecurityGraph" and ThreatType == "Malware"

| where TimeGenerated >= ago(ioc_lookBack) and ExpirationDateTime > now()

| where Active == true

| where isnotempty(FileHashValue);

// Handle matches against both lower case and uppercase versions of the hash:

( fileHashIndicators | extend  FileHashValue = tolower(FileHashValue)

  |union (fileHashIndicators | extend FileHashValue = toupper(FileHashValue)))

|  join (

   CommonSecurityLog | where TimeGenerated >= ago(dt_lookBack)

   | where isnotempty(FileHash)

   | extend CommonSecurityLog_TimeGenerated = TimeGenerated

)

on $left.FileHashValue == $right.FileHash

| summarize LatestIndicatorTime = arg_max(TimeGenerated, *) by IndicatorId

| project LatestIndicatorTime, Description, ActivityGroupNames, IndicatorId, ThreatType, Url, ExpirationDateTime, ConfidenceScore,

CommonSecurityLog_TimeGenerated, SourceIP, SourcePort, DestinationIP, DestinationPort, SourceUserID, SourceUserName, DeviceName, DeviceAction,

RequestURL, DestinationUserName, DestinationUserID, ApplicationProtocol, Activity

| extend timestamp = CommonSecurityLog_TimeGenerated, IPCustomEntity = SourceIP, HostCustomEntity = DeviceName, AccountCustomEntity = SourceUserName, URLCustomEntity = Url

Get started today!
We encourage you to try it now!
You can also contribute new connectors, workbooks, analytics and more in Azure Sentinel. Get started now by joining the Azure Sentinel Threat Hunters GitHub community.
by Contributed | Apr 7, 2021 | Technology
This article is contributed. See the original author and article here.
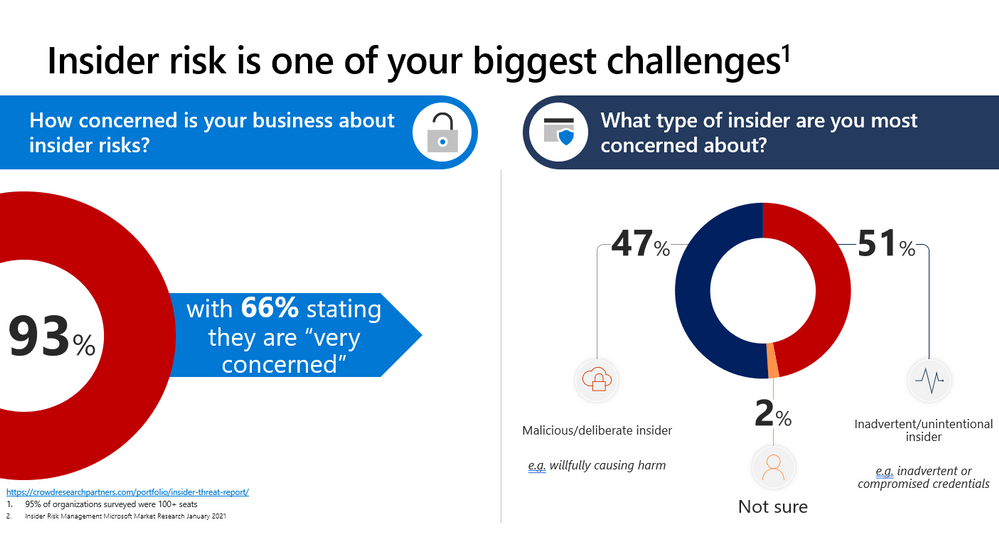
This webinar covers new announcements and recent updates in our risk management products – Insider Risk Management.
Watch on-demand
Resources:
Insider risk management in Microsoft 365 – Microsoft 365 Compliance | Microsoft Docs
Get started with Insider Risk Management
This webinar was presented on March 24, 2021, and the recording can be found here.
Attached to this post are:
- The FAQ document that summarizes the questions and answers that came up over the course of both webinars.
- A PDF copy of the presentation.
Thanks to those of you who participated during the two sessions and if you haven’t already, don’t forget to check out our resources available on the Tech Community.
Thanks!
@Robin_Baldwin on behalf of the MIP and Compliance CXE team

by Contributed | Apr 7, 2021 | Technology
This article is contributed. See the original author and article here.
By Luke Ramsdale – Service Engineer | Microsoft Endpoint Manager – Intune
This is the fourth blog in our series on using BitLocker with Intune. In the first post, we described occasions when a BitLocker-enabled device enters recovery mode. You can read about the reasons a device enters recovery mode in the documentation under What causes BitLocker recovery. This post walks you through BitLocker recovery options with Windows devices managed with Intune.
BitLocker recovery functionality
Since the inception of the BitLocker configuration service provider (CSP) in Windows 10, version 1703, there’s been an option to configure BitLocker recovery on protected operating system (OS) drives. This option provides a method to back up recovery information to Microsoft Azure Active Directory (Azure AD) or Azure Active Directory Domain Services (Azure AD DS).
Additionally, new password rotation functionality added in Windows 10, version 1909, allows the recovery key to refresh automatically after it is used to recover a BitLocker enabled device. Only the key used for recovery is refreshed.
BitLocker key rotation remote action in the Microsoft Endpoint Manager admin center
 Azure AD joined device system drive recovery settings
This setting will configure whether the device will back up the password and key or just the key in Azure AD DS.
- The recovery password is a 48-digit recovery password that is used to unlock a volume when the device enters recovery mode.
- The key package and password will help decrypt the encrypted volume if the disk becomes corrupted or damaged.
For more information on BitLocker recovery, review this article, especially the Recovery password retrieval, BitLocker key package, and Retrieving the BitLocker key package sections.
 Configure BitLocker recovery package settings
Setting this to Allowed or Required will generate a 48-digit recovery password during BitLocker initialization and send it to Azure AD if the policy Require device to back up recovery information to Azure Active Directory is set to Yes. Administrative users will be allowed to create new recovery passwords manually on the device.
Setting this option to Deny prevents BitLocker encryption from creating a recovery password and sending it to Azure AD. It will disallow users from generating new recovery passwords manually.
Note
For BitLocker silent encryption to succeed, this setting should be configured to Allowed or Required.
4. Hide recovery options during BitLocker setup
Setting this option to Yes will prevent the end user from accessing recovery options such as saving the key to file or printing it out during the BitLocker setup process. This setting does not apply to silent encryption.
5. Enable BitLocker after recovery information to store
When this option is set to Yes, the recovery key will be backed up to Azure AD DS. This setting is only required in an Azure hybrid services joined scenario.
6. Block the use of certificate-based data recovery agent (DRA)
Setting this option to Yes blocks the ability to use a data recovery agent (DRA) to recover BitLocker enabled drives. Selecting Not Configured will allow the DRA to be set up.
Note
Setting up a DRA requires an enterprise PKI infrastructure to deploy the DRA agent and certificates. A DRA agent gives administrators another method to recover encrypted drives if the recovery key is not available. However, configuring DRA using Intune is not currently supported.
Creating a recovery key text file on the device
After configuring the recovery options in the BitLocker policy, it’s important that the end user can easily access the recovery key on their device. Using the following BitLocker drive encryption settings, you can create a recovery key file manually (as an administrative user) and save the BitLocker recovery key to a local drive as a text file.
- Navigate to Control Panel > System and Security > BitLocker Encryption.
- Select Save to a file if the drive has been encrypted silently.
 BitLocker Drive Encryption window
Note
We don’t recommend printing recovery keys or saving them to a file. Instead, use Active Directory backup or a cloud-based backup. Cloud-based backup includes Azure AD and a Microsoft Account.
Scenario—Troubleshooting an Azure AD joined device
Step 1. Examining recovery settings in mobile device management (MDM) logs
As we discussed in the blog post, Troubleshooting BitLocker from the Microsoft Endpoint Manager admin center, the first step in troubleshooting is examining the encryption report in the Microsoft Endpoint Manager admin center. If that doesn’t help, your next step is to examine the MDM logs on the device to see if the policy has applied successfully. There are many ways to collect event logs from a Windows device. You can read this article to learn about the procedures for collecting logs.
When you enroll a device or change policy settings, you should see similar information for recovery settings in the DeviceManagement-Enterprise-Diagnostic-Provider event log. If there are problems applying the policy from an MDM agent perspective, errors will show up in this log.
The following example shows troubleshooting an Azure AD joined device viewing this event log and the MDMDiagnostics report. The deployment is successful, and you can see that there are two ways to view the same settings.
 DeviceManagement-Enterprise-Diagnostic-Provider event log
 DeviceManagement-Enterprise-Diagnostic-Provider output from the general tab
 MDMDiagnostics report entry
<data id="OSAllowDRA_Name" value="true"/>

<data id="OSRecoveryPasswordUsageDropDown_Name" value="1"/>

<data id="OSRecoveryKeyUsageDropDown_Name" value="2"/>

<data id="OSHideRecoveryPage_Name" value="false"/>

<data id="OSActiveDirectoryBackup_Name" value="true"/>

<data id="OSActiveDirectoryBackupDropDown_Name" value="1"/>

<data id="OSRequireActiveDirectoryBackup_Name" value="true"/>
Step 2. Checking the BitLocker-API event log
If the report confirms that there were no errors applying the policy in the DeviceManagement-Enterprise-Diagnostic-Provider event log, the next step is to check event logs in the BitLocker-API folder to see how the recovery information was processed. (The Management log, Operational log and other logs are generated in this folder.) To review the event log, right-click on Start > Event Viewer > Applications and Services Logs > Microsoft > Windows > BitLocker–API.
This example displays the Management log and shows that the key was successfully backed up to Azure AD.
 Successful back-up to Azure AD
In the following example, backing up the key failed because the device was Azure AD joined but the policy specified backing up to Azure AD DS.
 Policy causes back-up error
After the key is backed up, BitLocker encryption will start immediately.
 Encryption begins after back-up
Important
In this scenario, the same policy and settings are used to silently encrypt an Azure hybrid services joined Windows 10 device. (See the above scenario for the event text and settings).
Step 1. Examining the event log
The policy settings are picked up in the DeviceManagement-Enterprise-Diagnostic-Provider event log:
 Policy settings in the DeviceManagement-Enterprise-Diagnostic-Provider event log
Step 2. Checking the BitLocker-API event log
In the BitLocker-API event log, you see the following events:
- First, recovery information is backed up to Azure AD.
 Recovery information is backed up to Azure AD
- Then recovery information is backed up to Active Directory Domain Services.
 Backup to Azure AD DS
- As soon as the keys have been backed up to both Azure AD and Azure AD DS, encryption begins:
 Encryption begins after the backup process is complete.
- The recovery key is now visible in the Microsoft Endpoint Manager admin center. To view the recovery key:
Open the Microsoft Endpoint Manager admin center.
Select Devices > All devices.
Select your device from the list and then select Monitor > Recovery keys.
 Recovery key in the MEM admin center
Additional viewing and troubleshooting tools
BitLocker Recovery Password Viewer tool
 BitLocker Recovery tab in the Properties dialog box
 Additional FVE attributes stored in Azure AD DS
 Manage-bde command prompt showing key protectors
 Client-driven password rotation options
 BitLocker-API event log
 Successful recovery password rotation and Azure AD deletion request
It’s also possible to initiate the rotation of recovery passwords for individual devices remotely.
Navigate to the Microsoft Endpoint Manager admin center.
Select Devices > Windows.
Select a device from the list of devices, select Overview > ellipses (…), and then select BitLocker key rotation.
 Option for remote BitLocker key rotation
After selecting this option, you will receive an additional prompt to make sure you understand the implications:
 BitLocker key rotation confirmation screen
All the existing keys will be removed from the device and the new recovery key will be stored in Azure AD or Azure AD DS . The key that was deleted from the device and stored in Azure AD will be removed.
Summary of BitLocker recovery options with Intune managed devices
- You can store recovery keys in Azure AD before initiating the encryption of a device if the device is Azure AD joined.
- Recovery keys can also be stored in Azure AD and on-premises Active directory (if required) for Azure hybrid services joined devices.
- For increased security you can rotate a device’s recovery keys automatically or manually through the Microsoft Endpoint Manager admin center.
- For troubleshooting recovery key policy processing, examine the DeviceManagement-Enterprise-Diagnostic-Provider event log and MDMDiagnostic report.
- For troubleshooting recovery key implementation, examine the BitLocker-API event log and use the manage-bde -protectors command.
Note
DRA is not currently supported for Intune managed devices.
Frequently asked questions (FAQs)
- What happens if a device is removed from Intune? Will I still have access to the recovery keys?
Answer: If the device is backed up to Microsoft Azure Active Directory (Azure AD) or on-premises Active Directory and the device object is not removed from those directories, then the key will still accessible.
- Does Intune store recovery keys for removable storage devices?
Answer: Currently there is no way to store the recovery key for removable storage devices in Azure AD or on-premises Active Directory.
- What are the minimum role-based access control (RBAC) rights required to access the recovery key in the Intune console?
Answer: To be able to access the recovery keys, an administrator must be granted Helpdesk Administrator permissions. Find out more about Azure AD roles in this article.
- If my device is already encrypted before enrolling into Intune, how do I back up the recovery key?
Answer: Use the BackupToAAD-BitLockerKeyProtector PowerShell Cmdlet or rotate the key from the Microsoft Endpoint Manager admin center.
More info and feedback
For further resources on this subject, please see the links below.
BitLocker recovery guide (Windows 10)
BitLocker CSP documentation
Setting the BitLocker encryption algorithm for Autopilot devices
Encrypt Windows 10 devices with BitLocker in Intune – Microsoft Intune
Guidelines for troubleshooting BitLocker
The last post in this series will cover recommended settings for configuring BitLocker encryption with Endpoint security. Stay tuned! Check out other blogs in this series:
- Enabling BitLocker with Microsoft Endpoint Manager – Microsoft Intune – Microsoft Tech Community
- Troubleshooting BitLocker from the Microsoft Endpoint Manager admin center – Microsoft Tech Community
- Troubleshooting BitLocker policies from the client side – Microsoft Tech Community
Let us know if you have any additional questions by replying to this post or reaching out to @IntuneSuppTeam on Twitter.
by Contributed | Apr 7, 2021 | Technology
This article is contributed. See the original author and article here.
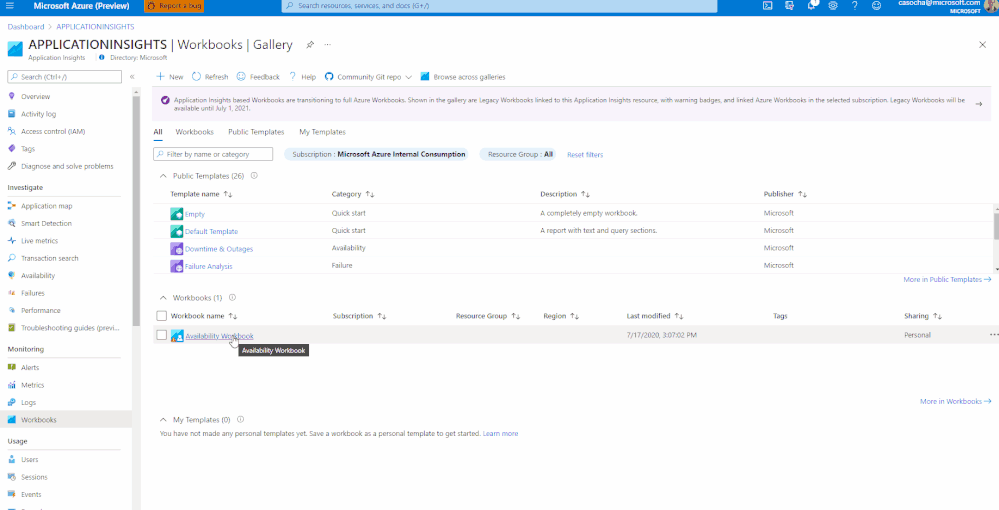
Workbooks in Application Insights are a powerful tool for guided investigations, data analysis, & rich visualizations.
We’ve updated the Application Insights Workbooks resource type to match the resource type used by all other Azure Workbooks so our users can take full advantage of all the functionality provided by Workbooks. The new Workbook resources can be queried via Azure Resource Graph, support ARM templates, saved in the region of your choice, & more!
To take advantage of these new features & preserve your favorite reports please convert your existing workbooks by June 30, 2021.
Conversion steps to take:
- Open the desired workbook
- Select the ‘Edit’ option
- Then click ‘Save as’
- Enter the workbook’s name
- Select a subscription, resource group, & region where you have write access
- Delete the legacy workbook
(Optional)
- Update links in other workbooks to use your new version
See this documentation for in-depth conversion guidance and more information about the upcoming change!
by Contributed | Apr 7, 2021 | Technology
This article is contributed. See the original author and article here.
Final Update: Friday, 19 March 2021 17:09 UTC
We’ve confirmed that all systems are back to normal with no customer impact as of 3/19, 14:36 UTC. Our logs show the incident started on 03/19, 07:00 UTC and that during the 7 hours and 36 minutes that it took to resolve the issue customers of Application Insights might have experienced a delay in data availability, missed or incorrect alerts, or data access API unavailability.
- Root Cause: The failure was due to a software flaw in a back-end system. A patch has been rolled out to the affected system and the problem is mitigated.
- Incident Timeline: 7 Hours & 36 minutes – 03/19, 07:00 UTC through 03/19, 14:36 UTC
We understand that customers rely on Application Insights as a critical service and apologize for any impact this incident caused.
-Jack
Update: Friday, 19 March 2021 11:17 UTC
Root cause has been isolated to a backend service which was impacting East US, East US2, West Europe and West US2. Some Customers may experience intermittent data access issues and intermittent data latency. Customers may also experience missing or delayed alerts.
- Work Around: None
- Next Update: Before 03/19 17:30 UTC
-Soumyajeet
by Contributed | Apr 7, 2021 | Technology
This article is contributed. See the original author and article here.
Final Update: Friday, 19 March 2021 06:18 UTC
We’ve confirmed that all systems are back to normal with no customer impact as of 3/19, 05:10 UTC. Our logs show the incident started on 3/19, 04:30 UTC and that during the 40 minutes that it took to resolve the issue some of the customers may have experienced intermittent data latency, data access and missed or delayed alerts in East US region.
- Root Cause: The failure was due to a backend dependency.
- Incident Timeline: 40 Minutes – 19/3, 04:30 UTC through 19/3, 05:10 UTC
We understand that customers rely on Application insights as a critical service and apologize for any impact this incident caused.
-Soumyajeet
by Contributed | Apr 7, 2021 | Technology
This article is contributed. See the original author and article here.
Final Update: Thursday, 18 March 2021 05:25 UTC
We’ve confirmed that all systems are back to normal with no customer impact as of 03/18, 03:36 UTC. Our logs show the incident started on 03/17, 21:05 UTC and that during the 6 hours 31 minutes that it took to resolve the issue some customers may have experienced late arriving logs data, and missed or misfired Log Search Alerts in East US and West Europe regions..
- Root Cause: We determined that there was a slow down in the backend service, preventing the requests from completing.
- Incident Timeline: 6 Hours & 31 minutes – 03/17, 21:05 UTC through 03/18 03:36 UTC
We understand that customers rely on Application Insights as a critical service and apologize for any impact this incident caused.
-Madhav
by Contributed | Apr 7, 2021 | Technology
This article is contributed. See the original author and article here.
Final Update: Wednesday, 17 March 2021 01:54 UTC
We’ve confirmed that all systems are back to normal with no customer impact as of 03/17, 01:45 UTC. Our logs show the incident started on 03/17, 00:42 UTC and that during the one hour that it took to resolve the issue approximately 50% customers in the East US region experienced data ingestion latency and possibly delayed or misfired alerts.
- Root Cause: The failure was due to a back end system reaching its operational threshold. Once the system was restarted and scaled out, the backlog of ingestion data began to drain.
- Incident Timeline: 1 hour and 3 minutes – 03/17, 00:42 UTC through 03/17, 01:45 UTC
We understand that customers rely on Azure Log Analytics as a critical service and apologize for any impact this incident caused.
-Jack
Update: Wednesday, 17 March 2021 01:39 UTC
Root cause has been isolated to a back end system reaching its system limits which caused ingestion to back up and result in latency and possible missed or late-firing alerts. To address this issue we scaled out the back end service. The ingestion back up is mostly resolved and ingestion will shortly be back working as expected. Some customers may continue to experience data latency and improperly fired alerts. We estimate less than one hour before all latency in data and alerting is addressed.
- Next Update: Before 03/17 03:00 UTC
-Jack


Recent Comments