This article is contributed. See the original author and article here.
By Luke Ramsdale – Service Engineer | Microsoft Endpoint Manager – Intune
This is the fourth blog in our series on using BitLocker with Intune. In the first post, we described occasions when a BitLocker-enabled device enters recovery mode. You can read about the reasons a device enters recovery mode in the documentation under What causes BitLocker recovery. This post walks you through BitLocker recovery options with Windows devices managed with Intune.
BitLocker recovery functionality
Since the inception of the BitLocker configuration service provider (CSP) in Windows 10, version 1703, there’s been an option to configure BitLocker recovery on protected operating system (OS) drives. This option provides a method to back up recovery information to Microsoft Azure Active Directory (Azure AD) or Azure Active Directory Domain Services (Azure AD DS).
Additionally, new password rotation functionality added in Windows 10, version 1909, allows the recovery key to refresh automatically after it is used to recover a BitLocker enabled device. Only the key used for recovery is refreshed.
An administrator can initiate BitLocker key rotation remotely from the Microsoft Endpoint Manager admin center by navigating to Devices > Windows to select the device for the BitLocker key rotation.
Note
There are prerequisites that devices must meet to support rotation. Read this article to discover how to support rotation of the BitLocker recovery key.
 BitLocker key rotation remote action in the Microsoft Endpoint Manager admin center
This method will remove all the keys on the device and back up a single key to either Azure AD or on-premises Active Directory.
Configuring BitLocker recovery settings
Recovery options for an Azure AD joined device
In this scenario, the BitLocker policy is configured to silently encrypt an Azure AD joined device and is set with the following system drive recovery options:
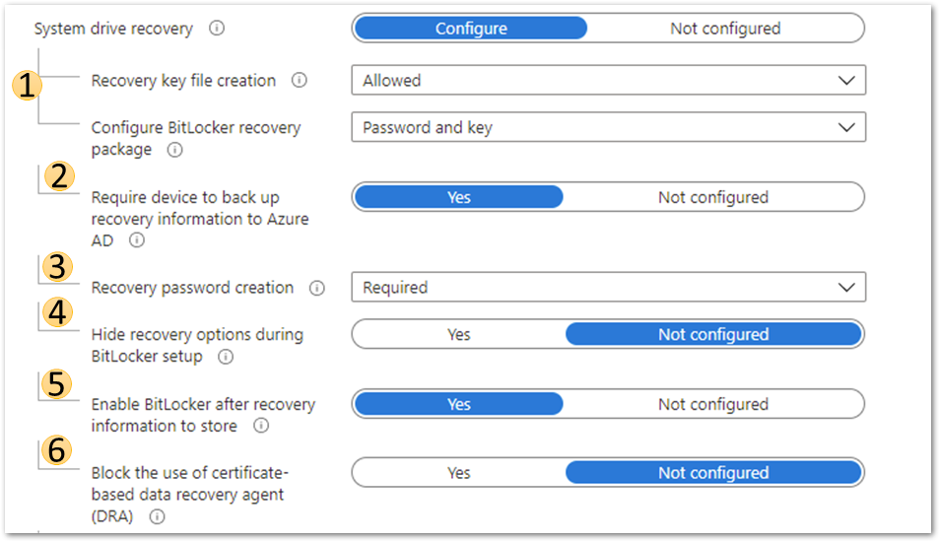 Azure AD joined device system drive recovery settings
1. BitLocker recovery key and package
This setting will configure whether the device will back up the password and key or just the key in Azure AD DS.
- The recovery password is a 48-digit recovery password that is used to unlock a volume when the device enters recovery mode.
- The key package and password will help decrypt the encrypted volume if the disk becomes corrupted or damaged.
For more information on BitLocker recovery, review this article, especially the Recovery password retrieval, BitLocker key package, and Retrieving the BitLocker key package sections.
 Configure BitLocker recovery package settings
2. Require device to back up recovery information to Azure AD
If configured to Yes, BitLocker will not complete until the recovery key has been saved to Azure AD. Setting this to Not configured means that BitLocker encryption will complete even if the recovery key backup to Azure AD fails.
3. Recovery password creation
Setting this to Allowed or Required will generate a 48-digit recovery password during BitLocker initialization and send it to Azure AD if the policy Require device to back up recovery information to Azure Active Directory is set to Yes. Administrative users will be allowed to create new recovery passwords manually on the device.
Setting this option to Deny prevents BitLocker encryption from creating a recovery password and sending it to Azure AD. It will disallow users from generating new recovery passwords manually.
Note
For BitLocker silent encryption to succeed, this setting should be configured to Allowed or Required.
4. Hide recovery options during BitLocker setup
Setting this option to Yes will prevent the end user from accessing recovery options such as saving the key to file or printing it out during the BitLocker setup process. This setting does not apply to silent encryption.
5. Enable BitLocker after recovery information to store
When this option is set to Yes, the recovery key will be backed up to Azure AD DS. This setting is only required in an Azure hybrid services joined scenario.
6. Block the use of certificate-based data recovery agent (DRA)
Setting this option to Yes blocks the ability to use a data recovery agent (DRA) to recover BitLocker enabled drives. Selecting Not Configured will allow the DRA to be set up.
Note
Setting up a DRA requires an enterprise PKI infrastructure to deploy the DRA agent and certificates. A DRA agent gives administrators another method to recover encrypted drives if the recovery key is not available. However, configuring DRA using Intune is not currently supported.
Creating a recovery key text file on the device
After configuring the recovery options in the BitLocker policy, it’s important that the end user can easily access the recovery key on their device. Using the following BitLocker drive encryption settings, you can create a recovery key file manually (as an administrative user) and save the BitLocker recovery key to a local drive as a text file.
- Navigate to Control Panel > System and Security > BitLocker Encryption.
- Select Save to a file if the drive has been encrypted silently.
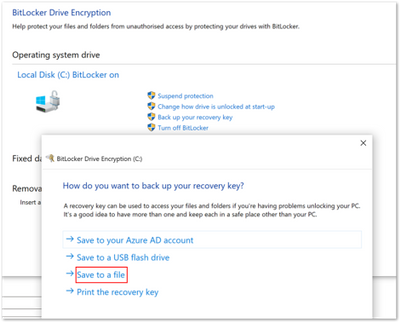 BitLocker Drive Encryption window
Note
We don’t recommend printing recovery keys or saving them to a file. Instead, use Active Directory backup or a cloud-based backup. Cloud-based backup includes Azure AD and a Microsoft Account.
Scenario—Troubleshooting an Azure AD joined device
Step 1. Examining recovery settings in mobile device management (MDM) logs
As we discussed in the blog post, Troubleshooting BitLocker from the Microsoft Endpoint Manager admin center, the first step in troubleshooting is examining the encryption report in the Microsoft Endpoint Manager admin center. If that doesn’t help, your next step is to examine the MDM logs on the device to see if the policy has applied successfully. There are many ways to collect event logs from a Windows device. You can read this article to learn about the procedures for collecting logs.
When you enroll a device or change policy settings, you should see similar information for recovery settings in the DeviceManagement-Enterprise-Diagnostic-Provider event log. If there are problems applying the policy from an MDM agent perspective, errors will show up in this log.
The following example shows troubleshooting an Azure AD joined device viewing this event log and the MDMDiagnostics report. The deployment is successful, and you can see that there are two ways to view the same settings.
 DeviceManagement-Enterprise-Diagnostic-Provider event log
 DeviceManagement-Enterprise-Diagnostic-Provider output from the general tab
 MDMDiagnostics report entry
<data id="OSAllowDRA_Name" value="true"/>

<data id="OSRecoveryPasswordUsageDropDown_Name" value="1"/>

<data id="OSRecoveryKeyUsageDropDown_Name" value="2"/>

<data id="OSHideRecoveryPage_Name" value="false"/>

<data id="OSActiveDirectoryBackup_Name" value="true"/>

<data id="OSActiveDirectoryBackupDropDown_Name" value="1"/>

<data id="OSRequireActiveDirectoryBackup_Name" value="true"/>
Step 2. Checking the BitLocker-API event log
If the report confirms that there were no errors applying the policy in the DeviceManagement-Enterprise-Diagnostic-Provider event log, the next step is to check event logs in the BitLocker-API folder to see how the recovery information was processed. (The Management log, Operational log and other logs are generated in this folder.) To review the event log, right-click on Start > Event Viewer > Applications and Services Logs > Microsoft > Windows > BitLocker–API.
This example displays the Management log and shows that the key was successfully backed up to Azure AD.
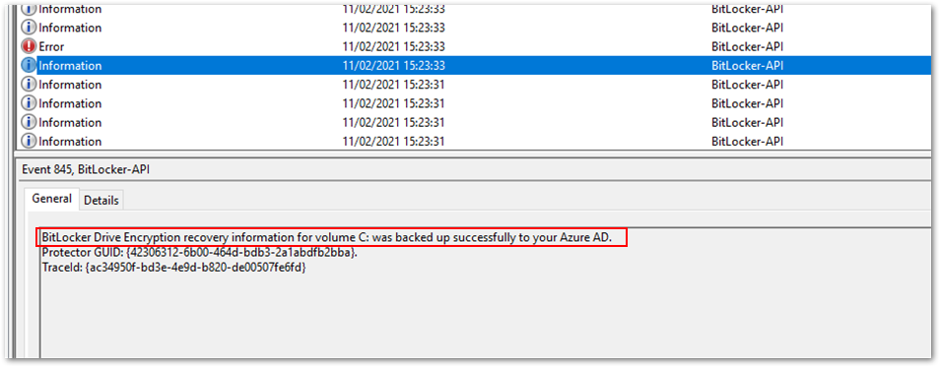 Successful back-up to Azure AD
In the following example, backing up the key failed because the device was Azure AD joined but the policy specified backing up to Azure AD DS.
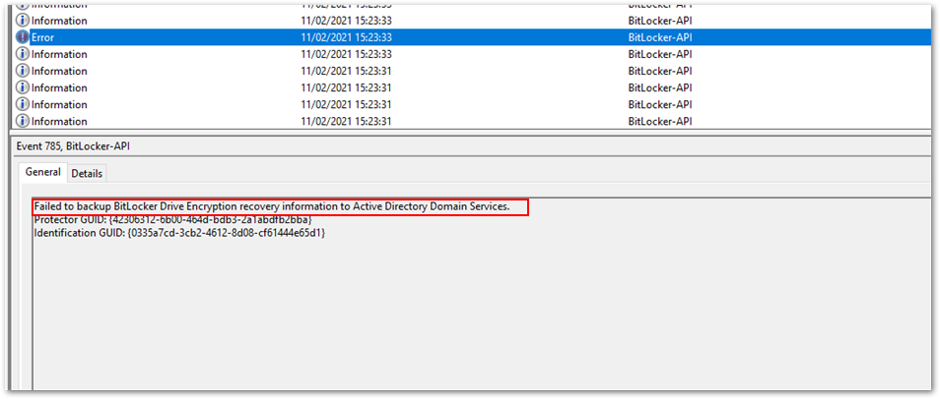 Policy causes back-up error
After the key is backed up, BitLocker encryption will start immediately.
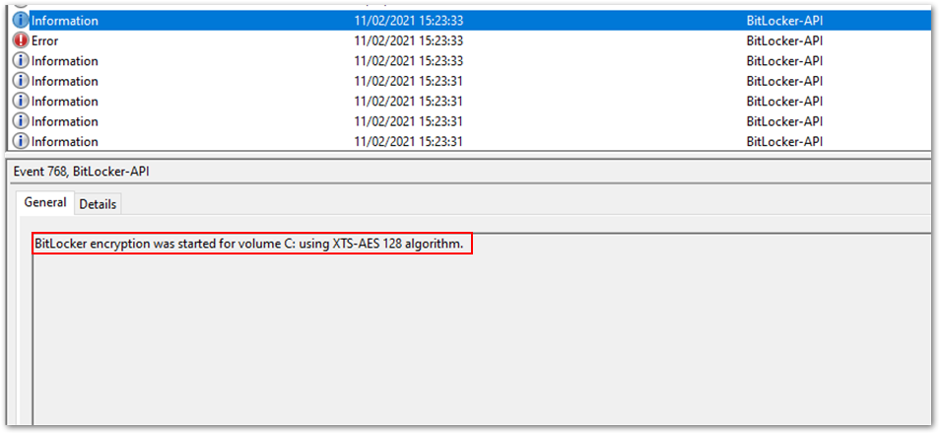 Encryption begins after back-up
Important
For Windows Autopilot devices, follow these instructions on configuring the BitLocker policy assignment to avoid starting automatic encryption before the Intune policy is applied.
Scenario – Troubleshooting an Azure hybrid joined device
In this scenario, the same policy and settings are used to silently encrypt an Azure hybrid services joined Windows 10 device. (See the above scenario for the event text and settings).
Step 1. Examining the event log
The policy settings are picked up in the DeviceManagement-Enterprise-Diagnostic-Provider event log:
 Policy settings in the DeviceManagement-Enterprise-Diagnostic-Provider event log
Step 2. Checking the BitLocker-API event log
In the BitLocker-API event log, you see the following events:
- First, recovery information is backed up to Azure AD.
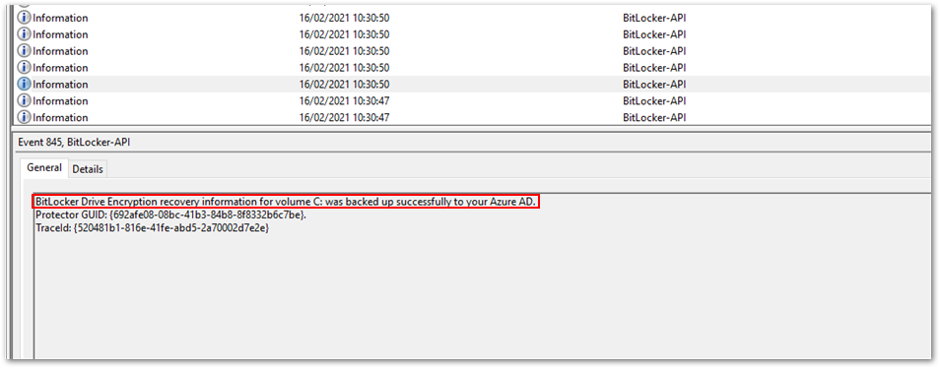 Recovery information is backed up to Azure AD
 - Then recovery information is backed up to Active Directory Domain Services.
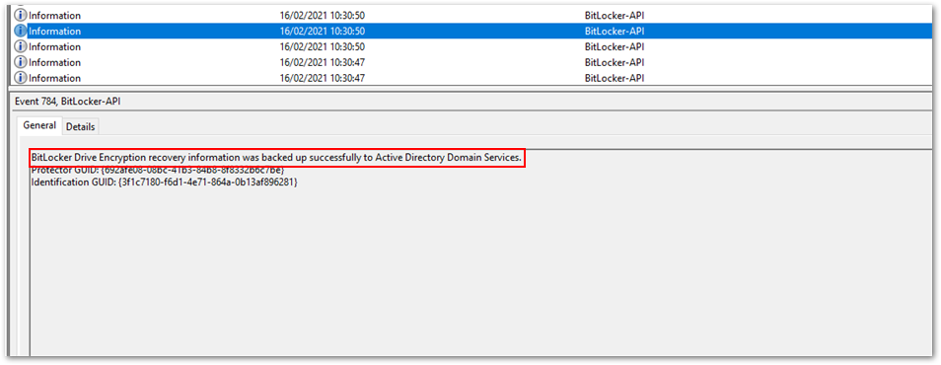 Backup to Azure AD DS
 - As soon as the keys have been backed up to both Azure AD and Azure AD DS, encryption begins:
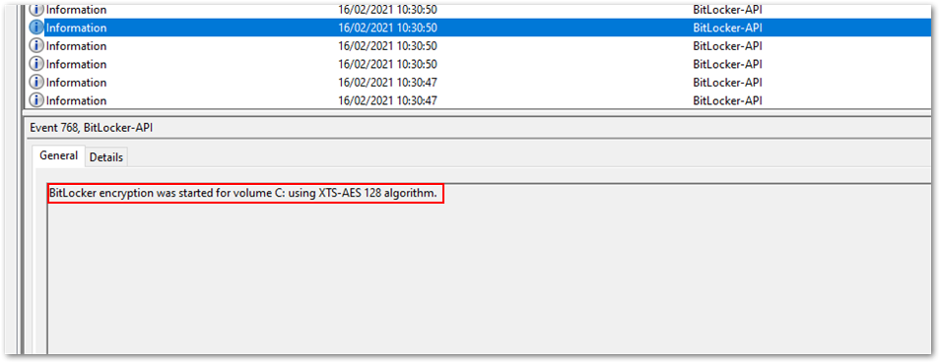 Encryption begins after the backup process is complete.
 - The recovery key is now visible in the Microsoft Endpoint Manager admin center. To view the recovery key:
Open the Microsoft Endpoint Manager admin center.
Select Devices > All devices.
Select your device from the list and then select Monitor > Recovery keys.
 Recovery key in the MEM admin center
Additional viewing and troubleshooting tools
BitLocker Recovery Password Viewer tool
You can also see the recovery key in the Active Directory Users and Computers Microsoft Management Console (MMC) snap-in. Select the BitLocker Recovery tab in the Properties dialog box of a device to view the BitLocker recovery passwords. You must have the BitLocker Recovery Password Viewer — an optional tool included with the Remote Server Administration Tools (RSAT) — to see the tab in the dialog box. Find out more in the Recovery password retrieval section of this article.
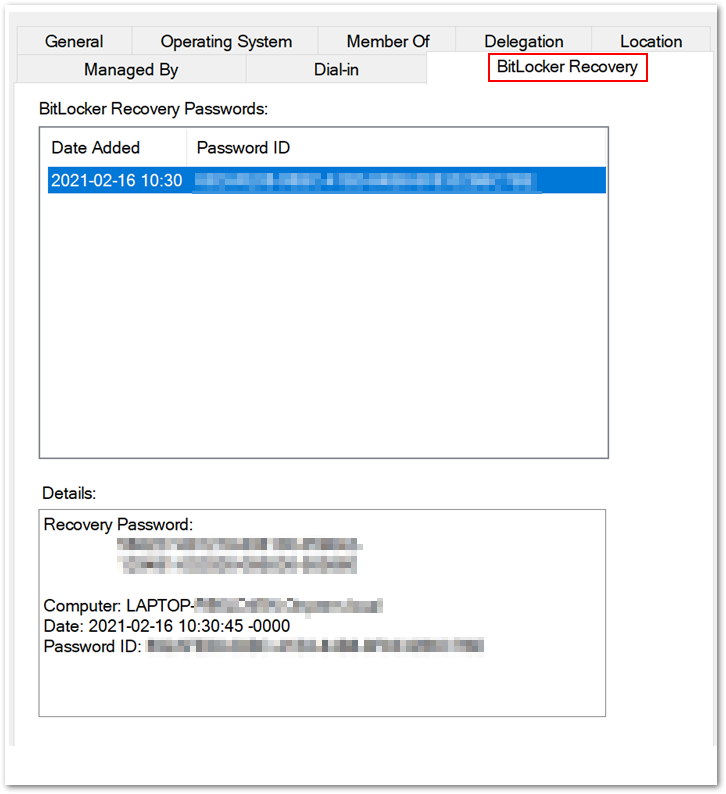 BitLocker Recovery tab in the Properties dialog box
Active Directory Service Interface Editor (ADSI Edit) tool
ADSI Edit is an MMC snap-in that lets you connect to Active Directory database partitions or to an LDAP server. If you view the device using this tool, you can see additional full volume encryption (FVE) attributes stored in Azure AD DS. In the example below, you see the key package, recovery GUID, recovery password and volume GUID.
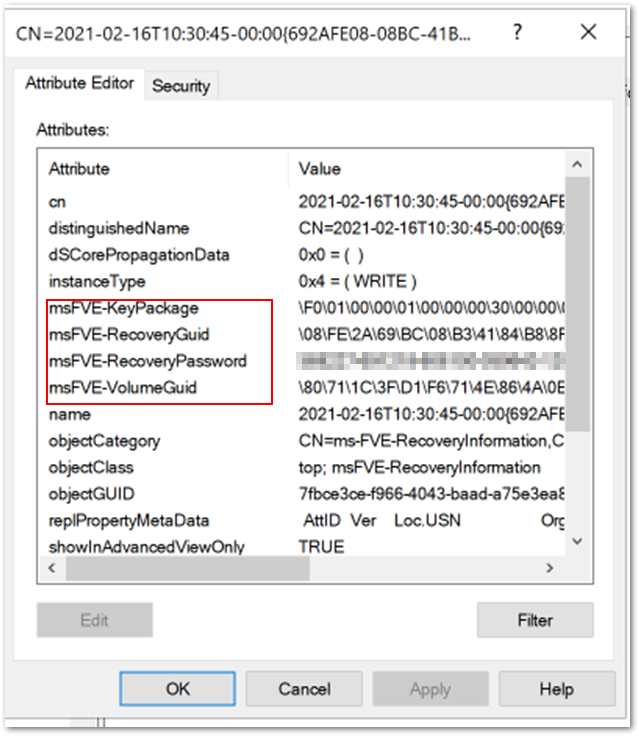 Additional FVE attributes stored in Azure AD DS
Note
If you are deploying an Azure hybrid services joined device with Autopilot and you have configured the policy to back up to Azure AD and Azure AD DS, it is possible that the key will only back up to Azure AD DS. BitLocker might start encrypting when the device is joined to Azure AD DS but not when it’s added to Azure AD.
Manage-bde command line tool
Manage-bde is a command-line tool useful for scripting BitLocker operations. Use the manage–bde -protectors -get command to view and verify the current key protector for the specified volume. (You must run the command line as an administrator.)
For example, using the following command will list all the key protectors in use and display the password protector that was created on the device:
Manage-bde -protectors – get c:
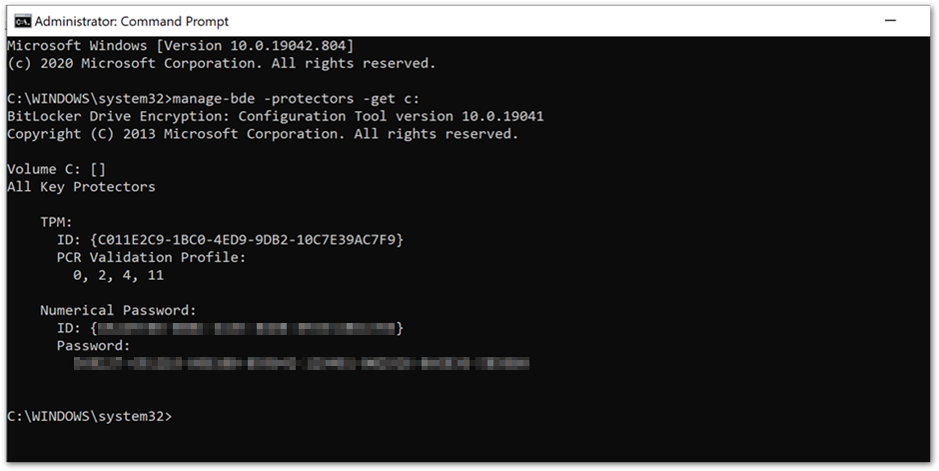 Manage-bde command prompt showing key protectors
When you’re troubleshooting, check to see that the operating system (OS) volume is configured to use the password protector and that the protector and identification GUIDs matches the BitLocker-API event log.
Recovery Key Rotation
Automatic password rotation
Windows 10, version 1909 introduced new BitLocker CSP settings to configure recovery password rotation. Password rotation helps increase the security of a device by rotating the password once it has been used for recovery, which prevents re-use of the same password.
You can select Configure client-driven recovery password rotation as an option in Endpoint security settings. Navigate to Microsoft Endpoint Manager admin center and select Endpoint security > Disk encryption.
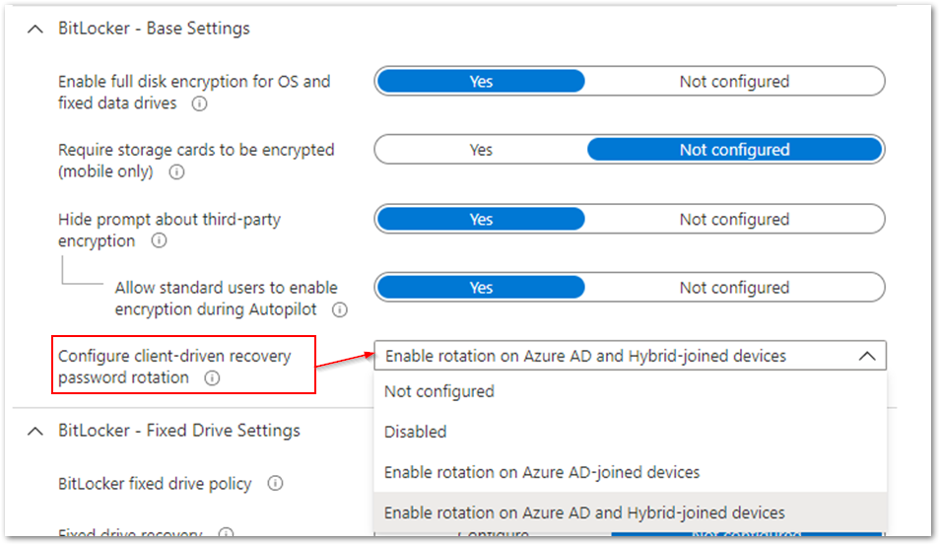 Client-driven password rotation options
In the above example, the rotation option is set to Enable rotation on Azure AD and Hybrid-joined devices. It will automatically change the key when an end user enters it to recover a device.
- If a device requires recovery after rebooting, the user will see a blue screen prompting the recovery key password.
- Once the key has been entered and the device boots, you (as the administrator) will see the following information logged in the BitLocker-API event log:
 BitLocker-API event log
 - Then when the password rotation and Active AD deletion requests have completed, you can view the event in the log:
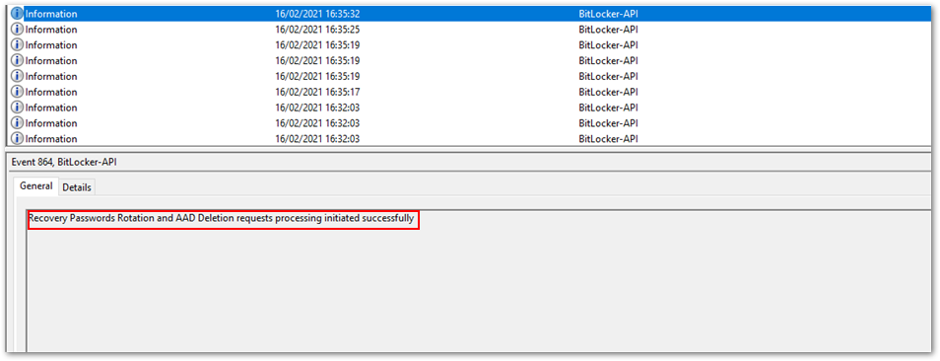 Successful processing of < > requests
 - This will be followed by a series of events stating the recovery information is backed up successfully to Azure AD and Azure AD DS, which you saw in the earlier example.
- After the keys have been stored, you should see that the new key has been deposited in Azure AD and the old key has been removed from the device and Azure AD.
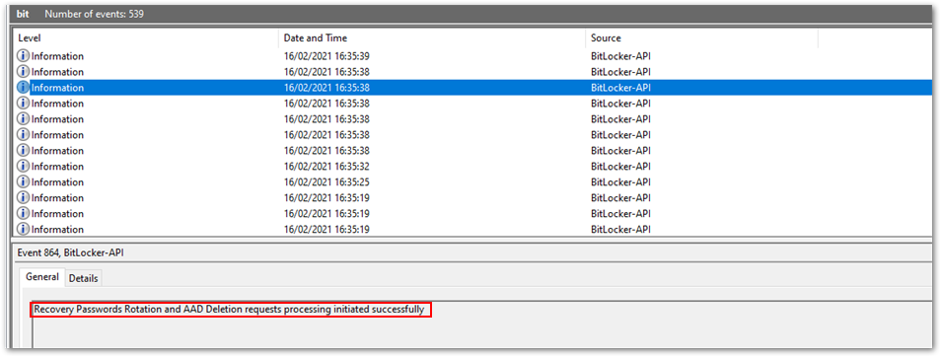 Successful recovery password rotation and Azure AD deletion request
Remote rotation of recovery passwords for individual devices
It’s also possible to initiate the rotation of recovery passwords for individual devices remotely.
Navigate to the Microsoft Endpoint Manager admin center.
Select Devices > Windows.
Select a device from the list of devices, select Overview > ellipses (…), and then select BitLocker key rotation.
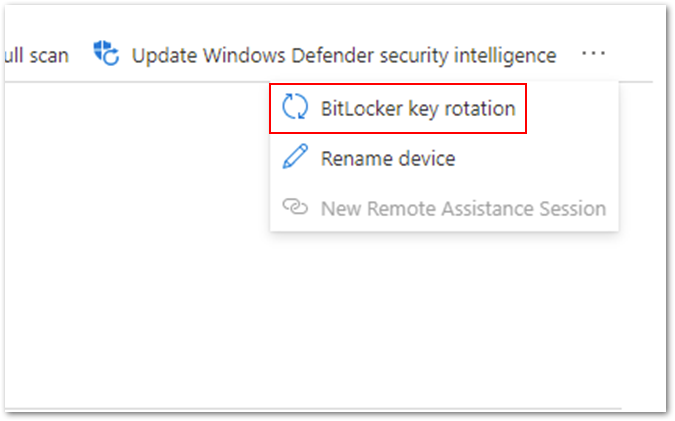 Option for remote BitLocker key rotation
After selecting this option, you will receive an additional prompt to make sure you understand the implications:
 BitLocker key rotation confirmation screen
All the existing keys will be removed from the device and the new recovery key will be stored in Azure AD or Azure AD DS . The key that was deleted from the device and stored in Azure AD will be removed.
Summary of BitLocker recovery options with Intune managed devices
- You can store recovery keys in Azure AD before initiating the encryption of a device if the device is Azure AD joined.
- Recovery keys can also be stored in Azure AD and on-premises Active directory (if required) for Azure hybrid services joined devices.
- For increased security you can rotate a device’s recovery keys automatically or manually through the Microsoft Endpoint Manager admin center.
- For troubleshooting recovery key policy processing, examine the DeviceManagement-Enterprise-Diagnostic-Provider event log and MDMDiagnostic report.
- For troubleshooting recovery key implementation, examine the BitLocker-API event log and use the manage-bde -protectors command.
Note
DRA is not currently supported for Intune managed devices.
Frequently asked questions (FAQs)
- What happens if a device is removed from Intune? Will I still have access to the recovery keys?
Answer: If the device is backed up to Microsoft Azure Active Directory (Azure AD) or on-premises Active Directory and the device object is not removed from those directories, then the key will still accessible. - Does Intune store recovery keys for removable storage devices?
Answer: Currently there is no way to store the recovery key for removable storage devices in Azure AD or on-premises Active Directory. - What are the minimum role-based access control (RBAC) rights required to access the recovery key in the Intune console?
Answer: To be able to access the recovery keys, an administrator must be granted Helpdesk Administrator permissions. Find out more about Azure AD roles in this article. - If my device is already encrypted before enrolling into Intune, how do I back up the recovery key?
Answer: Use the BackupToAAD-BitLockerKeyProtector PowerShell Cmdlet or rotate the key from the Microsoft Endpoint Manager admin center.
More info and feedback
For further resources on this subject, please see the links below.
BitLocker recovery guide (Windows 10)
Setting the BitLocker encryption algorithm for Autopilot devices
Encrypt Windows 10 devices with BitLocker in Intune – Microsoft Intune
Guidelines for troubleshooting BitLocker
The last post in this series will cover recommended settings for configuring BitLocker encryption with Endpoint security. Stay tuned! Check out other blogs in this series:
- Enabling BitLocker with Microsoft Endpoint Manager – Microsoft Intune – Microsoft Tech Community
- Troubleshooting BitLocker from the Microsoft Endpoint Manager admin center – Microsoft Tech Community
- Troubleshooting BitLocker policies from the client side – Microsoft Tech Community
Let us know if you have any additional questions by replying to this post or reaching out to @IntuneSuppTeam on Twitter.
Brought to you by Dr. Ware, Microsoft Office 365 Silver Partner, Charleston SC.


Recent Comments