by Contributed | Apr 14, 2021 | Technology
This article is contributed. See the original author and article here.
In this technical blogpost we’re going to talk about the powerful combination of Azure Live Video Analytics (LVA) 2.0 and Intel OpenVINO DL Streamer Edge AI Extension. In our sample setup we will use an Intel NUC device as our edge device. You can read through this blogpost to get an understanding of the setup but it requires some technical skills to repeat the same steps so we rely on existing tutorials and samples as much as possible. We will show the seamless integration of this combination where we will use LVA to create and manage the media pipeline on the edge device and extract metadata using the Intel OpenVINO DL – Edge AI Extension module which is also managed through a single deployment manifest using Azure IoT Edge Hub. For this blogpost we will use an Intel NUC from the 10th generation but it can run on any Intel device. We will look at the specifications and performance of this little low power device and how well it performs as an edge device for LVA and AI inferencing by Intel DL Streamer. The device will receive a simulated camera stream and we will use gRPC as the protocol to feed images to the inference service from the camera feed at the actual framerate (30fps).
The Intel OpenVINO Model Server (OVMS) and Intel Video Analytics Serving (VA Serving) can utilize the iGPU of the Intel NUC device. The Intel DL Streamer – Edge AI Extension we are using here is based on Intel’s VA Serving with native support for Live Video Analytics. We will show you how easy it is to enable iGPU for the AI inferencing thanks to this native support from Intel.
Live Video Analytics (LVA) is a platform for building AI-based video solutions and applications. You can generate real-time business insights from video streams, processing data near the source and applying the AI of your choice. Record videos of interest on the edge or in the cloud and combine them with other data to power your business decisions.
LVA was designed to be a flexible platform where you can plugin AI services of your choice. These can be from Microsoft, the open source community or your own. To further extend this flexibility we have designed the service to allow integration with existing AI models and frameworks. One of these integrations is the OpenVINO DL Streamer Edge AI Extension Module.
The Intel OpenVINO™ DL Streamer – Edge AI Extension module is a based on Intel’s Video Analytics Serving (VA Serving) that serves video analytics pipelines built with OpenVINO™ DL Streamer. Developers can send decoded video frames to the AI extension module which performs detection, classification, or tracking and returns the results. The AI extension module exposes gRPC APIs.

Setting up the environment and pipeline
We will walk through the steps to set up LVA 2.0 with Intel DL Streamer Edge AI Extension module and set it up on my Intel NUC device. I will use the three different pipelines offered by the Intel OpenVINO DL Streamer Edge AI Extension module. These include Object Detection, Classification and Tracking.

Once you’ve deployed the Intel OpenVINO DL Streamer Edge AI Extension module you will be able to use the different pipelines by setting environment variables, PIPELINE_NAME, PIPELINE_VERSION in the deployment manifest. The supported pipelines are:
PIPELINE_NAME |
PIPELINE_VERSION |
object_detection |
person_vehicle_bike_detection |
object_classification |
vehicle_attributes_recognition |
object_tracking |
person_vehicle_bike_tracking |
The hardware used for the demo
For this test I purchased an Intel NUC Gen10 for around $1200 USD. The Intel NUC is a small form device with good performance to power ratio. It puts full size PC power in the palm of your hands, so it is convenient as a powerful edge device for LVA. It comes in different configurations so you can trade off performance vs costs. In addition, it comes as a ready-to-run, Performance Kit or just the NUC boards for custom applications. I went for the most powerful i7 Performance Kit and ordered the maximum allowed memory separately. The full specs are:
- Intel NUC10i7FNH – 6 cores at 4.7Ghz
- 200GB M.2 SSD
- 64GB DDR4 memory
- Intel® UHD Graphics for 10th Gen Intel® Processors


Let’s set everything up
These steps expect that you have already set up your LVA environment by using one of our quickstart tutorials. This includes:
- Visual Studio Code with all extensions mentioned in the quickstart tutorials
- Azure Account
- Azure IoT Edge Hub
- Azure Media Services Account
In addition to the prerequisites for the LVA tutorials, we also need an Intel device where we will run LVA and extend it with the Intel OpenVINO DL Streamer Edge AI Extension Module.
- Connect your Intel device and install Ubuntu. In my case I will be using Ubuntu 20.10
- Once we have the OS installed follow these instructions to set up IoT Edge Runtime
- Install Intel GPU tools: Intel GPU Tools: sudo apt-get install intel-gpu-tools (optional)
- Now install LVA. Assuming you already have a LVA set up, you can start with this step
When you’re done with these steps your Intel device should be visible in your IoT Extension in VS Code.

Now I’m going to follow this tutorial to set up the Intel OpenVINO DL Streamer Edge AI Extension module: https://aka.ms/lva-intel-openvino-dl-streamer-tutorial
Once you’ve completed these steps you should have:
- Intel edge device with IoT Edge Runtime connected to IoT Hub
- Intel edge device with LVA deployed
- Intel OpenVINO DL Streamer Edge AI Extension module deployed
The use cases
Now that we have our setup up and running Let’s go through some of the use cases where this setup can help you. We’ll use the sample videos we have available to us and observe the results we get from the module..
Since the Intel NUC is a very small form factor it can easily be deployed in close proximity to a video source like an IP camera. It is also very quiet and does not generate a lot of heat. You can mount it above a ceiling, behind a door, on top or inside a bookshelf or underneath a desk to name a few examples. I will be using sample videos like a recording of a parking lot and a cafeteria. You can imagine a situation where we have this NUC located at these venues to analyze the camera feed.
Highway Vehicle Classification and Event Based Recording
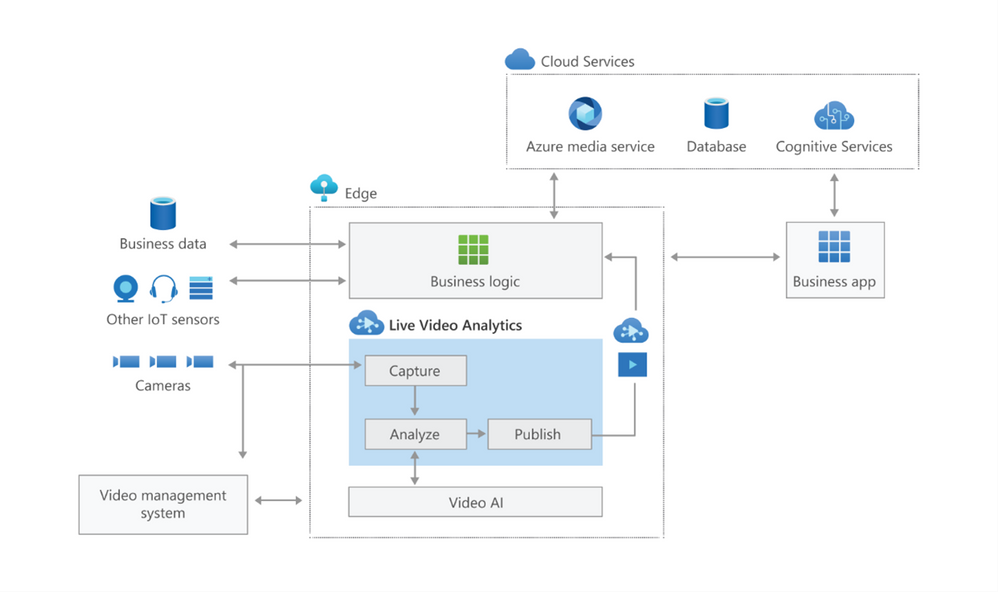
Let’s imagine a use case where I’m concerned about the specific vehicle type and color using a specific piece of highway and want to know and see the video frames where these vehicles appear. We can use LVA together with the Intel DL Streamer – Edge AI Extension module to analyze a highway and trigger on a specific combination of vehicle type, color and confidence level. For instance a white van with a confidence above 0.8. Within LVA we can deploy a custom module like this objectsEventFilter module. The module will create a trigger to the Signal Gate node when these three directives are met. This will create an Azure Media Services asset which we can playback from the cloud. The diagram looks like this:

When we run the pipeline the rtsp source is split into the signal gate node that will hold a buffer of the video and it is send to the gRPC Extension node. The gRPC Extension will create images out of the video frames and feed into the Intel DL Streamer – Edge AI Extension module. When using the classification pipeline it will return inference results containing type attributes. These are forwarded as IoT messages and will feed into the objectsEventFilter module. We can filter on specific attributes to send a IoT message trigger the Signal Gate node with an Azure Media Services Asset as result.
In the inference results you will see a message like this:
{
      "type": "entity",
      "entity": {
        "tag": {
          "value": "vehicle",
          "confidence": 0.8907926
        },
        "attributes": [
          {
            "name": "color",
            "value": "white",
            "confidence": 0.8907926
          },
          {
            "name": "type",
            "value": "van",
            "confidence": 0.8907926
          }
        ],
        "box": {
          "l": 0.63165444,
          "t": 0.80648696,
          "w": 0.1736759,
          "h": 0.22395049
        }
      }
This is meeting our objectsEventFilter module thresholds which will give the following IoT Message:
[IoTHubMonitor] [2:05:28 PM] Message received from [nuclva20/objectsEventFilter]:
{
  "confidence": 0.8907926,
  "color": "white",
  "type": "van"
}
This will trigger the Signal Gate to open and forward the video feed to the Asset Sink node.
[IoTHubMonitor] [2:05:29 PM] Message received from [nuclva20/lvaEdge]:
{
  "outputType": "assetName",
  "outputLocation": "sampleAssetFromEVR-LVAEdge-20210325T130528Z"
}
The Asset Sink Node will store a recording on Azure Media Services for cloud playback.

Deploying objectsEventFilter module
You can follow this tutorial to deploy a custom module for Event Based Recording. Only this time we will use the objectsEventFilter module instead of the objectCounter. You can copy the module code from here. The steps are the same to build and push the image to your container registry as with the objectCounter tutorial.
I will be using video samples that I upload to my device in the following location: /home/lvaadmin/samples/input/
Now they are available through the RTSP simulator module by calling rtsp://rtspsim:554/media/{filename}
Next we deploy a manifest to the device with the environment settings that specify the type of model. In this case I want to detect and classify vehicles that show up in the image.
"Env":[
                    "PIPELINE_NAME=object_classification",
                    "PIPELINE_VERSION=vehicle_attributes_recognition",
Next step is to change the “operations.json” file of the c2d-console-app to reference the rtsp file. For instance if I want to use the “co-final.mkv” I set the operations.json file to:
{
  "name": "rtspUrl",
  "value": "rtsp://rtspsim:554/media/co-final.mkv"
}
Now that I have deployed the module to my device I can invoke the media graph by executing the c2d-console-app (i.e. press F5 in VS Code)
Note: Remember to listen for event messages by clicking on “Start Monitoring Built-in Event Endpoint” in the VS Code IoT Hub Extension.
In the output window of VS Code we will see messages flowing in a json structure. For the co-final.mkv using the object tracking for vehicles, persons and bikes we see output like this:
Timestamp: of the media, we maintain the timestamp end to end so you can always relate messages across media timespan.
Entity tag: Which type of object was detected (vehicle, person or bike)
Entity Attributes: The color of the entity (white) and the type of the entity (van)
Box: The box size and location on the picture where we detected this entity.
Let’s have a look at the CPU load of the device. When we SSH into the device we can type the command “sudo htop”. This will show details of the device load like CPU/Memory.

We see a load of ~32% for this model on the Intel NUC. It is extracting and analyzing at 30fps. So we can safely say we can run multiple camera feeds on this small device as we have plenty of headroom. We could also trade off fps to a allow even more camera feeds density per device.
iGPU offload support
- Right-click on this template and “generate a deployment manifest”. The deployment manifest is now available in the “edge/config/” folder
- Right click the deployment manifest and deploy to single device, select your Intel device
- Now execute the same c2d-console-app again (press F5 in VS Code). After about 30 seconds you will see the same data again in your output window.


Here you can see the iGPU is showing a load of around ~44% to run the AI tracking model. At the same time we see a 50% decrease of CPU usage compared to the first run which was using only CPU. We still observe some CPU activity because the LVA media graph still uses the CPU.
To summarize
In this blogpost and during the tutorial we have walked through the steps to:
- Deploy IoT Edge Runtime on an Intel NUC.
- We connected the device to our IoT Hub so we can control and manage the device using the IoT Hub together with the VS Code IoT Hub Extension.
- We used the LVA sample to deploy LVA onto the Intel device.
- In addition we took the Intel OpenVINO – Edge AI Extension Module and deployed this onto the Intel Device using IoT Hub.
This enables us to use the combination of LVA and Intel OpenVINO DL Streamer Edge AI Extension module to extract metadata from the video feed using the Intel pre-trained models. The Intel OpenVINO DL Streamer Edge AI Extension module allows us to change the pipeline by simply changing variables in the deployment manifest. It also enables us to make full use of the iGPU capabilities of the device to increase throughput, inference density (multiple camera feeds) and use more sophisticated models. With this setup you can bring powerful AI inferencing close to the camera source. The Intel NUC packs enough power to run the model for multiple camera feeds with low power consumption, low noise and in a small form factor. The inference data can be used for your business logic.
Call to actions
by Contributed | Apr 14, 2021 | Technology
This article is contributed. See the original author and article here.
We all sometimes create presentations with some PowerShell demos. And often, we need to use credentials to log in to systems for example PowerShell when delivering these presentations. This can lead that we don’t use very strong passwords because we don’t want to type them during a presentation, you see the problem? So, here is how you can use the PowerShell SecretManagement and SecretStore modules to store your demo credentials on your machine.
Doing this is pretty simple:
Install the SecretManagement and SecretStore PowerShell modules.
Install-Module Microsoft.PowerShell.SecretManagement, Microsoft.PowerShell.SecretStore
Register a SecretStore to store your passwords and credentials. I this example we are using a local store to do that. Later in this blog post, we will also have a look at how you can use Azure Key Vault to store your secrets. This is handy if you are working on multiple machines.
Register-SecretVault -Name SecretStore -ModuleName Microsoft.PowerShell.SecretStore -DefaultVault
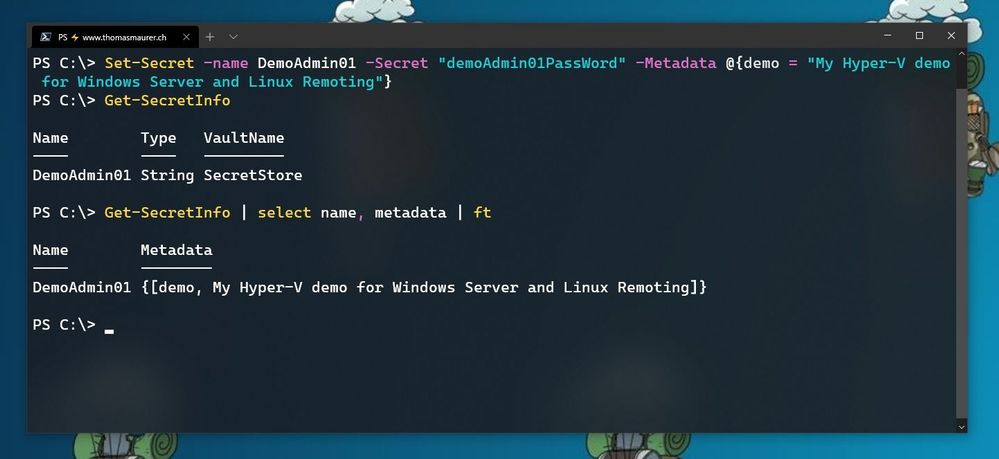
Now we can store our credentials in the SecretStore. In this example, I am going to store the password using, and I will add some non-sensitive data as metadata to provide some additional description.
Set-Secret -name DemoAdmin01 -Secret "demoAdmin01PassWord" -Metadata @{demo = "My Hyper-V demo for Windows Server and Linux Remoting"}
Store Secret in PowerShell SecretStore
Now you can start using this secret in the way you need it. In my case, it is the password of one of my admin users.
$DemoAmdin01secret = Get-Secret -Vault SecretStore -Name DemoAdmin01
$DemoAmdin01Cred = New-Object -TypeName PSCredential -ArgumentList "DemoAdmin01", $DemoAmdin01secret
These two lines, I could also store in my PowerShell profile I use for demos, or in my demo startup script. In this case, the credential object is available for you to use.
 Use SecretStore crednetials
If you are using multiple machines and you want to keep your passwords in sync, the Azure Key Vault extension.
Install-Module Az.KeyVault
Register-SecretVault -Module Az.KeyVault -Name AzKV -VaultParameters @{ AZKVaultName = $vaultName; SubscriptionId = $subID}
Now you can store and get secrets from the Azure Key Vault and you can simply use the -Vault AzKV parameter instead of -Vault SecretStore.
I hope this blog provides you with a short overview of how you can leverage PowerShell SecretManagement and SecretStore, to store your passwords securely. If you want to learn more about SecretManagement check out Microsoft Docs.
I also highly recommend that you read @Pierre Roman blog post on leveraging PowerShell SecretManagement to generalize a demo environment.
by Contributed | Apr 14, 2021 | Technology
This article is contributed. See the original author and article here.
The Cloud Service Extended Support is a new service type which is similar to classic Cloud Service. The biggest difference between them is that the new Cloud Service Extended Support is ARM (Azure Resource Manager) based resource and can be used with ARM features such as tags, policy, RBAC, ARM template.
About the migration from the classic Cloud Service to Cloud Service Extended Support, Azure officially provided a way called in-place migration. The detailed information can be found at: https://docs.microsoft.com/en-us/azure/cloud-services-extended-support/in-place-migration-portal.
In this blog, we will present how we can manually create a new Cloud Service Extended Support and deploy the same project into this new service. The classic Cloud Service project will have following features and after migration, all these features will be kept:
- Remote Desktop
- SSL certificate for HTTPS endpoints
- Using the same IP address before and after migration
The main advantage of manual migration
Before how to do this manual migration, let us highlight the main advantage of the manual migration:
- The name of the new Cloud Service Extended Support can be decided by yourself. You can use a user-friendly name such as CSEStest.
- Both of manual and in-place migration need the modification of the project code. During manual migration process, this modification is already included. With in-place migration process, it may be more difficult for you to modify the code.
- This manual migration process is using ARM template to deploy new resources. You can do some changes by your own idea such as enabling RDP Extension which is not enabled in classic Cloud Service. But the in-place migration does not allow you to do so. It will keep the same configuration.
Before you begin
There will be some additional points to do before we start the migration. Please have a check of following points carefully since it may cause unexpected issue if they are not matched:
- Follow the “Before you begin” part of the document to check if you are an administrator/coadministrator of the subscription.
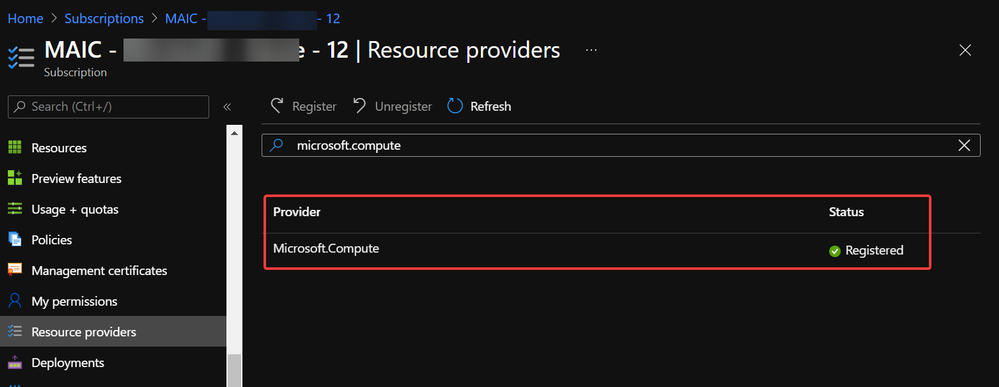
- In subscription page of Azure Portal, check the resource providers Microsoft.Compute, Microsoft.Network and Microsoft.Storage are already registered.
Example of resource provider registration
- We should have a running classic Cloud Service and its whole project code. If it is using certificate for any purpose (for HTTPS endpoint in this blog), that certificate in .pfx format and its password are also needed for the deployment.
With above 3 conditions, there should not be any other permission issue for this manual migration process. And for this process, a container in storage account is also required. If you do not have one yet, please follow this document to create one storage account and follow next 2 screenshots to create a new container.
https://docs.microsoft.com/en-us/azure/storage/common/storage-account-create?tabs=azure-portal#create-a-storage-account-1
 Create container 1
 Create container 2
Then, let us move on the main process.
Reserve the IP address of the classic Cloud Service and upgrade it to be used for Cloud Service Extended Support
In this example, my classic Cloud Service is testcstocses in resource group cstocses, in East US region.
- Use PowerShell command to keep the current IP address as a classic Reserved IP, with name ReservedIPCSES. The location must be the same as your classic Cloud Service location.
New-AzureReservedIP -ReservedIPName ReservedIPCSES -ServiceName testcstocses -Location "East US"
 Keep the IP to classic reserved IP
- Follow document to upgrade the generated classic Reserved IP to basic SKU Public IP (There is bug in script in official document)
https://docs.microsoft.com/en-us/azure/virtual-network/virtual-network-public-ip-address-upgrade?tabs=option-upgrade-powershell%2Coption-migrate-powershell#upgrade-migrate-a-classic-reserved-ip-to-a-static-public-ip
a. Verify if the classic Reserved IP is still associated with the classic Cloud Service. If yes, check if we can remove the association. (By design, the newly generated classic reserved IP should be still associated with classic Cloud Service)
## Variables for the command ##
$name = 'ReservedIPCSES'

## This section is only needed if the Reserved IP is not already disassociated from any Cloud Services ##
$service = 'testcstocses'
Remove-AzureReservedIPAssociation -ReservedIPName $name -ServiceName $service

$validate = Move-AzureReservedIP -ReservedIPName $name -Validate
$validate.ValidationMessages
 PowerShell commands to verify association between classic Cloud Service and generated reserved IP
b. If the result in above screenshot is Succeeded, then run the following command to remove the link.
Move-AzureReservedIP -ReservedIPName $name -Prepare
Move-AzureReservedIP -ReservedIPName $name -Commit
 Upgrade classic Reserved IP to basic tier
The new generated Basic SKU Public IP will be in a new resource group called {publicipname}-Migrated.
 Migrated basic tier reserved IP
- Set a DNS name on this Public IP. (Optional but recommended since the new Cloud Service Extended Support will not offer a DNS name as classic Cloud Service)
 Configure DNS name on public IP
- Move the Public IP into the original resource group.
 Move public IP to specific resource group 1
 Move public IP to specific resource group 2
- (Optional) If your original classic Cloud Service is using any certificate, create a Key Vault in the same region (East US in this example) and upload the .pfx format certificate.
 Create Key Vault 1
 Create Key Vault 2
Do not forget to check this checkbox “Azure Virtual Machines for deployment” in Access policy page.
 Create Key Vault 3
After creation of Key Vault, import the certificate.
 Upload certificate into Key Vault 1
 Upload certificate into Key Vault 2
 Upload certificate into Key Vault result
- Follow the official document to modify the classic Cloud Service code to make them match Cloud Service Extended Support requirement.
https://docs.microsoft.com/en-us/azure/cloud-services-extended-support/deploy-prerequisite
https://docs.microsoft.com/en-us/azure/cloud-services-extended-support/deploy-template
The yellow part is about the usage of the certificate. It is not necessary for all Cloud Service project.
The green part is the important information which we will use in following steps. Please take a note of it.
.csdef file
<?xml version=”1.0″ encoding=”utf-8″?>
<ServiceDefinition name=”AzureCloudService2″ xmlns=”http://schemas.microsoft.com/ServiceHosting/2008/10/ServiceDefinition” schemaVersion=”2015-04.2.6“>
<WebRole name=”WebRole1” vmsize=”Standard_D1_V2“>
<Sites>
<Site name=”Web”>
<Bindings>
<Binding name=”Endpoint1″ endpointName=”Endpoint1″ />
<Binding name=”HttpsIn” endpointName=”HttpsIn” />
</Bindings>
</Site>
</Sites>
<Endpoints>
<InputEndpoint name=”Endpoint1″ protocol=”http” port=”80″ />
<InputEndpoint name=”HttpsIn” protocol=”https” port=”443″ certificate=”Certificate1″ />
</Endpoints>
<Certificates>
<Certificate name=”Certificate1″ storeLocation=”LocalMachine” storeName=”My” permissionLevel=”limitedOrElevated”/>
</Certificates>
</WebRole>
</ServiceDefinition>
.cscfg file
<?xml version=”1.0″ encoding=”utf-8″?>
<ServiceConfiguration serviceName=”AzureCloudService2″ xmlns=”http://schemas.microsoft.com/ServiceHosting/2008/10/ServiceConfiguration” osFamily=”6″ osVersion=”*” schemaVersion=”2015-04.2.6“>
<Role name=”WebRole1“>
<Instances count=”1” />
<Certificates>
<Certificate name=”Certificate1″ thumbprint=”909011xxxxxxxxxx712303838613″ thumbprintAlgorithm=”sha1″ />
</Certificates>
</Role>
<NetworkConfiguration>
<VirtualNetworkSite name=”cstocsesvnet” />
<AddressAssignments>
<InstanceAddress roleName=”WebRole1″>
<Subnets>
<Subnet name=”WebRole1_subnet” />
</Subnets>
</InstanceAddress>
<ReservedIPs>
<ReservedIP name=”ReservedIPCSES” />
</ReservedIPs>
</AddressAssignments>
</NetworkConfiguration>
</ServiceConfiguration>
The thumbprint of the certificate can be found in Key Vault, Certificates page.
 Thumbprint of the certificate in Key Vault
- Package the project as we do for classic Cloud Service project. Then copy out the .cspkg and .cscfg files.
 Package in Visual Studio
 Package result for a classic Cloud Service project (certificate isn’t from package process)
- Upload the .cscfg file and .cspkg file into a container of storage account.
 Upload .cspkg and .cscfg to Storage container
- After uploading, generate the SAS URL of these 2 files one by one. We can click on the file, switch to Generate SAS, click on Generate SAS token and URL and find the needed SAS URL at the end of the page.
 Generate SAS token of .cscfg and .cspkg
The generated SAS token should be like:
https://storageforcses.blob.core.windows.net/test/AzureCloudService2.cspkg?sp=r&st=2021-04-02T10:47:04Z&se=2021-04-02T18:47:04Z&spr=https&sv=2020-02-10&sr=b&sig=osktC5FtJpI1uX28D2UMtJaZVi8FmhW6kpIHH%2FuFTUU%3D
https://storageforcses.blob.core.windows.net/test/ServiceConfiguration.Cloud.cscfg?sp=r&st=2021-04-02T10:48:12Z&se=2021-04-02T18:48:12Z&spr=https&sv=2020-02-10&sr=b&sig=8BmMScBU%2Bm6hRkKtUoiRNs%2F2NHYiHay8qxJq5TM%2BkGU%3D
- (Optional) If you use Key Vault to save the certificate, please visit the Certificate page and click 2 times on the uploaded certificate. You’ll find a URL at the end of the page with format:
https://{keyvaultname}.vault.azure.net/secrets/{certificatename}/{id}
 Find secret URL of certificate 1
 Find secret URL of certificate 2
Make a note of this URL for using it in next step. The following is my example: https://cstocses.vault.azure.net/secrets/csescert/e2f6ab1744374de38ae831ba8896edb9
Also, please make a note of the subscription ID, name of resource group where Key Vault is deployed and the Key Vault service name. These will also be used in next step.
- Please modify the following ARM template and parameters. And then save them into JSON format files. In my test, I saved into template.json and parameter.json.
Tips: The yellow parts are the optional parts. If you do not use any certificate, you can remove it from both template and parameter files. The green parts are the information noted from .csdef and .cscfg files. Please make sure they are the same and correct.
ARM template: (Except the above tips about certificate, no need to modify the ARM template file)
{
“$schema”: “https://schema.management.azure.com/schemas/2015-01-01/deploymentTemplate.json#“,
“contentVersion”: “1.0.0.0”,
“parameters”: {
“cloudServiceName”: {
“type”: “string”,
“metadata”: {
“description”: “Name of the cloud service”
}
},
“location”: {
“type”: “string”,
“metadata”: {
“description”: “Location of the cloud service”
}
},
“deploymentLabel”: {
“type”: “string”,
“metadata”: {
“description”: “Label of the deployment”
}
},
“packageSasUri”: {
“type”: “securestring”,
“metadata”: {
“description”: “SAS Uri of the CSPKG file to deploy”
}
},
“configurationSasUri”: {
“type”: “securestring”,
“metadata”: {
“description”: “SAS Uri of the service configuration (.cscfg)”
}
},
“roles”: {
“type”: “array”,
“metadata”: {
“description”: “Roles created in the cloud service application”
}
},
“vnetName”: {
“type”: “string”,
“defaultValue”: “csesVNet”,
“metadata”: {
“description”: “Name of vitual network”
}
},
“subnetSetting”: {
“type”: “array”,
“metadata”: {
“description”: “Setting of subnets”
}
},
“publicIPName”: {
“type”: “string”,
“defaultValue”: “contosocsIP”,
“metadata”: {
“description”: “Name of public IP address”
}
},
“upgradeMode”: {
“type”: “string”,
“defaultValue”: “Auto”,
“metadata”: {
“UpgradeMode”: “UpgradeMode of the CloudService”
}
},
“secrets”: {
“type”: “array”,
“metadata”: {
“description”: “The key vault id and certificates referenced in the .cscfg file”
}
},
“rdpPublicConfig”: {
“type”: “string”,
“metadata”: {
“description”: “Public config of remote desktop extension”
}
},
“rdpPrivateConfig”: {
“type”: “securestring”,
“metadata”: {
“description”: “Private config of remote desktop extension”
}
}
},
“variables”: {
“cloudServiceName”: “[parameters(‘cloudServiceName’)]”,
“subscriptionID”: “[subscription().subscriptionId]”,
“lbName”: “[concat(variables(‘cloudServiceName’), ‘LB’)]”,
“lbFEName”: “[concat(variables(‘cloudServiceName’), ‘LBFE’)]”,
“resourcePrefix”: “[concat(‘/subscriptions/’, variables(‘subscriptionID’), ‘/resourceGroups/’, resourceGroup().name, ‘/providers/’)]”
},
“resources”: [
{
“apiVersion”: “2019-08-01”,
“type”: “Microsoft.Network/virtualNetworks”,
“name”: “[parameters(‘vnetName’)]”,
“location”: “[parameters(‘location’)]”,
“properties”: {
“addressSpace”: {
“addressPrefixes”: [
“10.0.0.0/16”
]
},
“subnets”: “[parameters(‘subnetSetting’)]”
}
},
{
“apiVersion”: “2020-10-01-preview”,
“type”: “Microsoft.Compute/cloudServices”,
“name”: “[variables(‘cloudServiceName’)]”,
“location”: “[parameters(‘location’)]”,
“tags”: {
“DeploymentLabel”: “[parameters(‘deploymentLabel’)]”,
“DeployFromVisualStudio”: “true”
},
“dependsOn”: [
“[concat(‘Microsoft.Network/virtualNetworks/’, parameters(‘vnetName’))]”
],
“properties”: {
“packageUrl”: “[parameters(‘packageSasUri’)]”,
“configurationUrl”: “[parameters(‘configurationSasUri’)]”,
“upgradeMode”: “[parameters(‘upgradeMode’)]”,
“roleProfile”: {
“roles”: “[parameters(‘roles’)]”
},
“networkProfile”: {
“loadBalancerConfigurations”: [
{
“id”: “[concat(variables(‘resourcePrefix’), ‘Microsoft.Network/loadBalancers/’, variables(‘lbName’))]”,
“name”: “[variables(‘lbName’)]”,
“properties”: {
“frontendIPConfigurations”: [
{
“name”: “[variables(‘lbFEName’)]”,
“properties”: {
“publicIPAddress”: {
“id”: “[concat(variables(‘resourcePrefix’), ‘Microsoft.Network/publicIPAddresses/’, parameters(‘publicIPName’))]”
}
}
}
]
}
}
]
},
“osProfile”: {
“secrets”: “[parameters(‘secrets’)]”
},
“extensionProfile”: {
“extensions”: [
{
“name”: “RDPExtension”,
“properties”: {
“autoUpgradeMinorVersion”: true,
“publisher”: “Microsoft.Windows.Azure.Extensions”,
“type”: “RDP”,
“typeHandlerVersion”: “1.2.1”,
“settings”: “[parameters(‘rdpPublicConfig’)]”,
“protectedSettings”: “[parameters(‘rdpPrivateConfig’)]”
}
}
]
}
}
}
]
}
Parameters:
Tips:
For example:
“roles”: {
“value”: [
{
“name”: “WebRole1”,
“sku”: {
“name”: “Standard_D1_v2”,
“tier”: “Standard”,
“capacity”: “1”
}
},
{
“name”: “WorkerRole1”,
“sku”: {
“name”: “Standard_D1_v2”,
“tier”: “Standard”,
“capacity”: “2”
}
}
]
},
…
“subnetSetting”: {
“value”: [
{
“name”: “WebRole1_subnet”,
“properties”: {
“addressPrefix”: “10.0.0.0/24”
}
},
{
“name”: “WorkerRole1_subnet”,
“properties”: {
“addressPrefix”: “10.0.1.0/24”
}
}
]
},
- In the secrets part, sourceVault is the resource URI of your Key Vault. It’s constructed by /subscriptions/{subscription-id}/resourceGroups/{resourcegroup-name}/providers/Microsoft.KeyVault/vaults/{keyvault-name} And the certificateUrl is the one we noted in step 10.
- In rdpPublicConfig and rdpPrivateConfig, we only need to change the username and password we want to use to enable RDP. For example, here I use “admin” as username and “Password” as password.
{
“$schema”: “https://schema.management.azure.com/schemas/2015-01-01/deploymentParameters.json#“,
“contentVersion”: “1.0.0.0”,
“parameters”: {
“cloudServiceName”: {
“value”: “cstocses”
},
“location”: {
“value”: “eastus”
},
“deploymentLabel”: {
“value”: “deployment label of cstocses by ARM template”
},
“packageSasUri”: {
“value”: “https://storageforcses.blob.core.windows.net/test/AzureCloudService2.cspkg?sp=r&st=2021-04-02T10:47:04Z&se=2021-04-02T18:47:04Z&spr=https&sv=2020-02-10&sr=b&sig=osktC5FtJpI1uX28D2UMtJaZVi8FmhW6kpIHH%2FuFTUU%3D“
},
“configurationSasUri”: {
“value”: “https://storageforcses.blob.core.windows.net/test/ServiceConfiguration.Cloud.cscfg?sp=r&st=2021-04-02T10:48:12Z&se=2021-04-02T18:48:12Z&spr=https&sv=2020-02-10&sr=b&sig=8BmMScBU%2Bm6hRkKtUoiRNs%2F2NHYiHay8qxJq5TM%2BkGU%3D“
},
“roles”: {
“value”: [
{
“name”: “WebRole1“,
“sku”: {
“name”: “Standard_D1_v2“,
“tier”: “Standard”,
“capacity”: “1“
}
}
]
},
“vnetName”: {
“value”: “cstocsesVNet“
},
“subnetSetting”: {
“value”: [
{
“name”: “WebRole1_subnet“,
“properties”: {
“addressPrefix”: “10.0.0.0/24”
}
}
]
},
“publicIPName”: {
“value”: “ReservedIPCSES“
},
“upgradeMode”: {
“value”: “Auto”
},
“secrets”: {
“value”: [
{
“sourceVault”: {
“id”: “/subscriptions/4f27bec7-26bd-40f7-af24-5962a53d921e/resourceGroups/cstocses/providers/Microsoft.KeyVault/vaults/cstocses”
},
“vaultCertificates”: [
{
“certificateUrl”: “https://cstocses.vault.azure.net/secrets/csescert/e2f6ab1744374de38ae831ba8896edb9“
}
]
}
]
},
“rdpPublicConfig”: {
“value”: “<PublicConfig>rn <UserName>admin</UserName>rn <Expiration>4/2/2022 12:00:00 AM</Expiration>rn</PublicConfig>”
},
“rdpPrivateConfig”: {
“value”: “<PrivateConfig>rn <Password>Password</Password>rn</PrivateConfig>”
}
}
}
- Use PowerShell command to deploy the ARM template. (Not necessary by PowerShell. You can also use Azure Portal or Azure CLI to deploy the template)
https://docs.microsoft.com/en-us/powershell/module/az.resources/new-azresourcegroupdeployment?view=azps-5.7.0
Please remember to replace the resource group name and the path of the template and parameter JSON file in the command before running it.
New-AzResourceGroupDeployment -ResourceGroupName "cstocses" -TemplateFile "C:UsersjerryzDesktopCSES testdemotemplate.json" -TemplateParameterFile "C:UsersjerryzDesktopCSES testdemoparameter.json"
 ARM template deployment result
Result: (The classic Cloud Service is deleted)
 All created resources in this process


Recent Comments