Windows 11 SE is a new edition of Windows built off of Windows 11. It’s a cloud-first operating system specifically designed for students and teachers, that brings the best of Windows and Microsoft 365 with Office. Windows 11 SE experiences come to life on a new class of affordable OEM partner devices, which start at $249 in the US.
We’ve also launched the Microsoft Surface Laptop SE, purpose-built for education and Windows 11 SE. This brings streamlined performance and more efficient hardware, which leads to greater all-day battery life. Take apart your Surface Laptop SE to replace parts using common tools, without worrying about adhesives.
Video Transcript:
– Up next, we have a special show for education as we take a closer look at both the new Windows 11 SE edition, along with the new Surface Laptop SE, built exclusively for education. Now we’ll show you the combined learning experiences along with how to deploy and manage all your Windows 11 SE devices at scale using Microsoft Intune for Education. To walk us through all of this, here today by Steve Dispensa, VP for Windows Management. Welcome back to the show.
– Thanks a lot. It’s great to be here.
– Now a few months ago, we announced Windows 11 SE, and the new Surface Laptop SE. So these also represent purpose-built software and hardware for education. How does this change things compared to what we’ve done in the past?
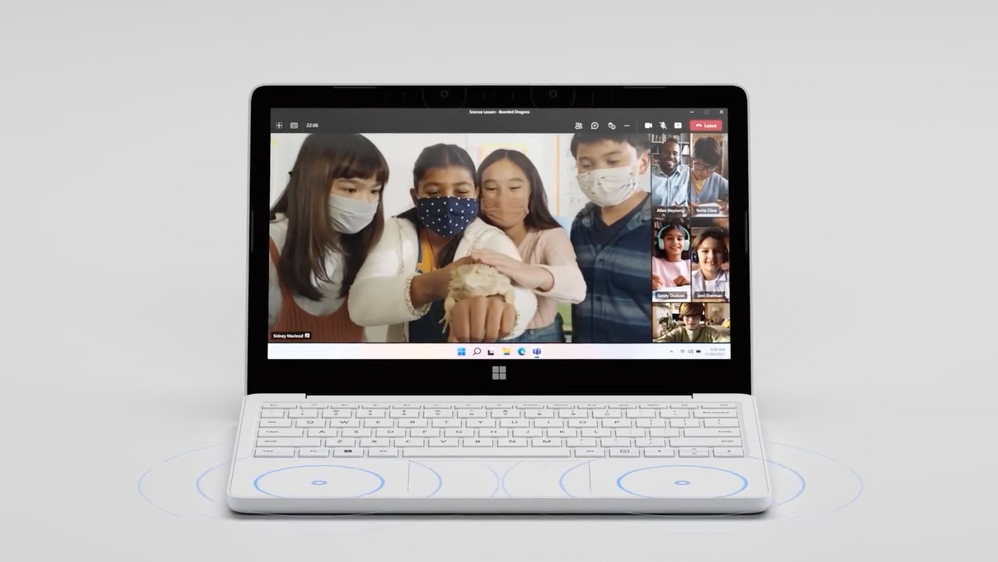
– Well, there’s a lot to unpack here. We focused heavily on the end-to-end experience with an education-specific OS that is streamlined and secure, and it brings Windows 11 to new device price points. And this addresses a key technology gap in software and hardware that’s existed for primary and early secondary students, or K through 8, as we refer to them in the US. First, Windows 11 SE is a new edition of Windows built off of Windows 11. It’s a cloud-first operating system, specifically designed for students and teachers that brings the best of Windows and Microsoft 365 with Office. And while we are cloud first, we’re not cloud dependent. Students can also continue to work offline, especially if they don’t have reliable internet connectivity at home, and they can sync their local work to the cloud with OneDrive when they’re back online. Second, at the endpoint, Windows 11 SE experiences come to life on a new class of super affordable OEM partner devices, as you can see here, which start at $249 in the US. And of course, we’ve also launched the Microsoft Surface Laptop SE, which is purpose built for education and Windows 11 SE. This brings streamlined performance and more efficient hardware, which leads to greater all day battery life. For example, on the Surface Laptop SE, the battery will last up to 16 hours.
– So it’s a powerful and tailor-made experience then for students. So how have we thought about management?
– So there’s lots of good news there. This is the first version of Windows that’s purely managed from the cloud. In fact, Windows 11 SE is designed for efficient cloud-based management for the full range of tasks across the device lifecycle. Additionally, using our firmware management controls via Intune, with Surface Laptop SE you can manage hardware components like you’re seeing here. Additionally, this level of cloud-based management is combined with tailored productivity that brings inclusivity to learning. Here, for example, you’re seeing OneNote with Immersive Reader. I’ll pause here, so you can hear it.
– [Immersive Reader] Bearded dragons are uniquely adapted to survive in arid forests and inland desert.
– And in addition to native voice controls in Windows 11 SE, these accessibility features make the learning experience more inclusive for students. So there are a ton of benefits, especially when you compare Windows 11 SE to Chromebooks.
– And really something to reiterate here is that these devices are only available for education organizations. You’re not going to find them, for example, in stores or online, but why do we go deeper into the student experience for Windows 11 SE. Can you show us what you can do with one of these devices?
– Yeah, absolutely. So at the core of this is the familiar Windows 11 experience. It has the same simplified user interface, great multitasking with Snap Assist and cloud file sync with OneDrive. Windows 11 SE is optimized for running apps that run in the browser either in Edge or in Chrome. In fact, as you can see, I have Edge pre-installed on this device. And another benefit of Edge is that because it’s based on the Chromium engine, Google Chrome extensions will run on it. Here you can see, we have quite a few popular extensions installed. And from the browser, you can see the social learning app, Flipgrid, where students can also connect with others using video. The Microsoft Teams desktop app is pre-installed, which is perfect for remote learning and working or chatting with other students and your teachers. And for the best productivity experience, you can see Word here and you can see, we have the desktop apps for the rest of Office, including Excel, PowerPoint, and OneNote. These apps are the full Office desktop apps that you know, which by design work offline and they’re great for hybrid learning outside of the classroom. And we’ve also pre-installed Minecraft Education Edition, with its built-in capabilities specifically designed for learning environments.
– And one thing to point out here is that Teams, the Office apps and Minecraft like you just showed, those are all native Win32 apps. So can I install other Win32 apps on these devices?
– Yes, so we’ve designed Windows 11 SE to be compatible with Win32 and with Universal Windows Platform, or UWP apps. Here, you can see, we have both types of apps represented in Intune for Education. These apps can only be installed by device admins, and students themselves can’t install apps, which helps remove a lot of security risks and even prevent distraction. And if you’re using enterprise-grade security tools for Microsoft, those work like they would with other versions of Windows. And to make sure you can access the right apps, we’ve worked with educators and their IT teams to curate a supported list of third-party apps that all promote learning outcomes, which we are continually updating. We have allowed categories for browsers and apps for test taking, accessibility, classroom communication, content filtering, and device management, which we’ve documented at aka.ms/Windows11SEapps. So if your school uses Zoom or Google Chrome, these will work perfectly on Windows 11 SE.
– Okay, and this is one of the biggest differences, you know, compared to Windows 11 Home or Pro and SE, in that there’s a set of defined and approved apps that are supported and that can be installed, which, you know, given the potential for malware risks and really the need to keep these experiences specifically scoped for learning, these can solve for better security and also bring better student productivity. And we’re going to touch a lot more on these aspects when we get to device management. But before we go there, I see that you also have a Surface Laptop SE in front of you. So can we take a look at that?
– Sure. I’d be glad to. The Surface Laptop SE is our most affordable Surface. It’s designed with the same attention to detail that Surface is known for. It has a super durable polycarbonate outer shell in glacier white, and it comes with all the connections that you need to connect and learn with a headset jack, full-sized USB-A and USB-C ports, which also can be used for device charging, and it supports a dedicated power connector. And on the other side of the device is a Kensington-compatible security lock. Then importantly, it’s designed to be easy to repair with replaceable components using commonly available tools. And as we move to the inside, you’ll see there’s a selection of Intel Celeron processors, virtual TPM 2.0 for security, 4 or 8 gigabytes of memory and 64 or 128 gigabytes of eMMC internal storage. And it supports Wi-Fi 5 and Bluetooth 5.0 LE for wireless connectivity.
– Great. So it’s durable, it’s serviceable. It’s got a lot of great ports on it. You know, I know a lot of people watching probably have those charging carts with USB-C connectors that they’re using in their schools, so it’s going to make it really easy to deploy.
– That’s right. This is specifically designed with education in mind. Moving back to the hardware, the display is beautiful. It measures 11.6 inches diagonally with a 1366×768 pixel resolution. In fact, its size and lightweight make it perfect to carry and fit into a school backpack. It’s keyboard and touchpad are designed to have the same premium typing and precision touchpad navigation that you’ve come to expect from Surface. And there’s an onboard HD webcam, which is great for online learning and optimized for producing accurate colors and skin tones. It also has stereo speakers and crystal clear microphones for an optimized experience with Microsoft Teams or with video discussions using Flipgrid. And you know, having just spent some time with this device, I really appreciate the comfortable typing experience. The touchpad, camera, speakers, and microphone are also great, especially considering a $249 starting price.
– Great. So now you’ve touched on serviceability. So let’s dive in and really show you what’s possible here. So what’s key to this are these seven Torx screws on the base of the device, because they’re not hidden by the rubber feet like they often are, and that’s by design. And you just need to remove, effectively, what’s visible. Now the great thing here is that the feet are also replaceable. And before I show you the process, I’m going to flash up a disclaimer, as we recommend that you seek professional assistance before dismantling, especially if you’re new to device repair. Now here you’re are seeing our Microsoft Surface engineer, Branden Cole, demonstrating. You can see that he starts by removing the screws from the base of the device. And it’s going to take a few moments to do this. He then moves to the front of the device and starts unclipping all the clips around the keyboard and touchpad panel. Now with that complete, there are two ribbon cables that are connected via ZIF connectors that you need to unclip to remove the keyboard panel. Then before he does anything, it’s always a good idea for safety, he disconnects the battery and other connectors on the board. And this leaves him free to remove the battery. And in the end, he’s able to remove the motherboard, which also includes the replaceable Wi-Fi module. Then you’ve got the display module, the speakers, and those are removable too. And so you can replace those items as needed with available parts. And by the way, once the keyboard panel was removed, as you saw, Branden only needed to remove Phillips head screws and everything else was fastened just with clips and without using adhesives. So that’s serviceability. But I want to switch gears to the management experience, because I know a lot of IT or tech-forward educational staff are probably weighing up their options between Windows 11 SE devices and other platforms. So what’s the management experience like?
– Well, the good news is, for anybody that’s managed Windows devices in the cloud before, this should be a very familiar experience for them. In fact, let me do a demo of this for you here. First, importantly, Windows 11 SE requires Intune as a cloud-based and simplified management solution. And the service is included with the device. Using Intune for Education, you can start the device management life cycle using Windows Autopilot. And what this does is it lets you centrally configure and provision your apps and policies for all of your Windows 11 SE devices from the cloud, without needing to take delivery of, or even touch the devices themselves. So it’s super easy for IT and even easier for students setting up a new device. They just need to sign in with their school account. And if they’re using Autopilot now the configuration process works the same as with other version of Windows 10 or Windows 11. Using Intune, once you configure which apps you want to provision and which policies you want to enforce, you can work with your hardware providers to assign that profile to the devices before they even leave the factory. And once you or a student takes delivery and connects the device to the internet, it’ll be provisioned to your specification with all the apps and policies that a student and your IT team needs automatically. Some of the configurations you can make in Windows 11 SE from Intune include wireless or connectivity profiles, so your students stay connected to trusted networks. And remember when we talked about Win32 and UWP app support? Intune for Education is the mechanism that you’ll use to add or remove apps from Windows 11 SE devices. You can see here, I have a long list of learning apps and management tool packages imported into my Intune environment. And these can all be targeted, in my case, to devices running Windows 11 SE. Now from the Surface Management Portal, you can keep track of your Surface devices, including their warranty status and any open support requests that you might have. And you can even make new support requests directly from Endpoint Manager.
– Makes sense, and it should be pretty familiar for all the IT admins who are watching today. So what does the process then look like to reset a Windows 11 SE device?
– Well, the good news is you never have to reimage a Windows 11 SE device. In fact, all the actions you have to take to reset a Windows 11 SE device can be done entirely from the cloud. Let’s say you want to reset a device like this one for a new school year or for reassignment. In Intune for Education, I’ll go to my Windows devices and I’ll pick this one here that you can see is running Windows, and the model is a Surface Laptop SE. From here, I just need to select Autopilot reset and confirm. And finally, I’ll go back to the Windows 11 SE device and connect to the internet. It gets the reset command from Intune and it’ll reset the device to a clean state. And note that this device could have connected to the internet from anywhere, whether it was at a student’s house, or lost or misplaced, or even in your lab at school for the reset to take place. And this ease of management and familiarity goes through everything we do in Windows 11 SE.
– And it’s great seeing, you know, the hardware and software experiences and management experiences on Windows 11 SE and Surface Laptop SE. So if somebody’s watching maybe from education and looking to learn more, what do you recommend?
– So the good news is Windows 11 SE devices are starting to ship now. To learn more about Windows 11 SE and our OEM partner devices go to aka.ms/Windows11SE. And for more information about the Surface Laptop SE, go to surface.com/education.
– Thanks Steve, for joining us, and the great tour of Windows 11 SE Intune and the Surface Laptop SE. Of course, keep watching Microsoft Mechanics for the latest in tech updates, subscribe to our channel if you haven’t already. And thank you for watching.


Recent Comments