by Contributed | May 7, 2021 | Technology
This article is contributed. See the original author and article here.
Hello! In today’s “Voice of the Customer” blog, Chris Szorc, Director of IT Engineering for Gogo, explains how the company cut costs and streamlined their identity and access management as the pandemic was grounding their airline partners, drying up revenue, and forcing thousands of employees to work remotely. By leveraging their existing Azure subscription, Chris and her IT team were able to migrate thousands of internal and external users to Microsoft Azure Active Directory for simplified, secure access across their enterprise.
Editor’s Note:
This story began in May 2020 when Gogo served both Commercial Aviation and Business Aviation. In December 2020, Gogo’s Commercial Aviation business was sold to Intelsat. As a result, the structure and business model has changed drastically for Gogo, which now has approximately 350 employees and is solely focused on serving Business Aviation.
How to cut costs and simplify IAM during hard times
By Chris Szorc, Director of IT Engineering for Gogo
In 2020, Gogo was a provider of in-flight broadband internet services for commercial and business aircraft. We were based in Chicago, Illinois with 1,100 employees, and at the time we equipped more than 2,500 commercial and 6,600 business aircraft with onboard Wi-Fi services, including 2Ku, our latest in-flight satellite-based Wi-Fi technology.
As we all know, 2020 wasn’t a great year for the airline industry. Last May, the pandemic had drastically shrunk our revenue, forcing the company to cut costs wherever possible. A looming three-year renewal contract with Okta prompted my IT team to consider bringing all our identity and access management (IAM) under the Microsoft umbrella to cut costs and simplify access.
Favor security and simplicity
Pulling off a major migration to Microsoft Azure Active Directory (Azure AD)—when the IT team is shorthanded and working remotely—would be a challenge for anyone. For my team, the first consideration was security. We had to protect our PCI (payment card industry) status, as well as the custom apps that we create with our airline partners. We certify ourselves with ISO (International Organization for Standardization), and we pass our SOX (Sarbanes Oxley Act) audits every year. As it happened, Deloitte was reviewing us, so the industry certifications for Azure AD and Microsoft 365 helped maintain our security standing as well. We made sure to get the most from our Microsoft agreement—including all the security tools in the Microsoft Azure tool set.
We were already using on-premises Active Directory, but we wanted a hybrid cloud identity model for the seamless single sign-on (SSO) experience for our users and applications. We collaborate with a lot of airlines and contractors; so hybrid access fits our model. Like us, you might see migration as an opportunity to reduce the number of redundant apps in your user base. At Gogo, we went app by app, figuring out how people were using each of them, and we saw that Microsoft could cover data analytics among other business functions, as well as IAM.
We were able to further consolidate and simplify by adopting the full Microsoft 365 suite of productivity tools. Microsoft Teams, in particular, was a hit with users. People were working from home because of the pandemic, and discovered they preferred Teams over Skype. Once our people started asking for it, that gave us the green light to roll out Teams companywide as a unified platform for online meetings, document sharing, and more.
Make use of vendor support
Times were tough enough already; we couldn’t allow migrating our multifactor authentication from Okta to Azure AD to disrupt workflow. We knew we couldn’t overwhelm our help desk with calls and tickets; so, we chose to make the migration in waves of 100 users at a time.
My advice—take advantage of all the technical support that’s available. After all, it’s not as if you’ll have a complete test environment to train yourself. You have your production identity, domain, and your services—multifactor authentication, conditional access, sign in—and if you don’t do it right, you’re severely impacting people.
No matter how qualified your IT team is, there’s a wealth of knowledge that a good vendor can provide. Microsoft FastTrack was included with our Azure AD subscription. We also used Netrix for guidance on bringing the migration in on time. FastTrack helped us know where to put people and how to organize—their entire mission is built around helping you complete a successful migration.
FastTrack also helped us untangle previous IAM implementations that were set up before my team was hired. They showed us where Okta Verify could be replaced with the latest best practices in multifactor authentication, enabling us to deliver simplified, up-to-date security with Azure AD. That’s the kind of issue you rarely anticipate during a migration, and it’s one where the right support proves invaluable.
Ensure maximum ROI
At Gogo, we’re already enjoying the advantages that come with unifying our IAM for simplicity and maximum return on investment (ROI). Since adopting Teams and other Microsoft 365 apps, we’ve been able to drop other services like Box and Okta—that saves the company money.
We’re doing federated sharing with Microsoft Exchange Online, sharing calendars with partner tenants, which has been great for planning meetings. We do entitlement management to set up catalog access packages with expiration policies, to stage workflow and access reviews for vendors and collaborators, rather than give them identities in our Gogo directory.
Our IT team seized on migration as an opportunity to implement Azure AD’s self-service password reset feature, which allows users to reset their password without involving the help desk. The decision to simplify your IAM solution will likely pay off in more ways than you can anticipate. We accomplished more than just a migration from Okta to Azure AD; Microsoft helped us streamline our IT services and provided us with direction for future improvements.
Learn more
I hope Gogo’s story of undertaking a daunting migration during tough times serves as inspiration for your organization. To learn more about our customers’ experiences, take a look at the other stories in the “Voice of the Customer” series.
Learn more about Microsoft identity:
by Contributed | May 7, 2021 | Technology
This article is contributed. See the original author and article here.
Model Lifecycle Management for Azure Digital Twins
Author – Andy Cross (External), Director of Elastacloud Ltd, a UK based Cloud and Data consultancy
Azure MVP, Microsoft RD.
Ten years ago, my business partner Richard Conway and I founded Elastacloud to operate as a consultancy that truly understood the value of the Cloud around data, elasticity and scale; building next generation systems on top of Azure that are innovative and impactful. For the last year, I’ve been leading the build of a Digital Twin based IoT product we call Elastacloud Intelligent Spaces.
When working with Azure Digital Twins, customers often ask what the best practice is for managing DTDL Versions. At Elastacloud, we have been working with Azure Digital Twins for some time and I’d like to share the approach we developed to manage our DTDL model lifecycles from .NET 5.0.
What is DTDL?
If you are not familiar with Azure Digital Twins and DTDL, Azure Digital Twins is a PaaS service for modelling related data such as you’d often find in real world scenarios. It is a natural fit for IoT projects, since you can model how a sensor relates to a building, to a room, to a carbon intensity metric, to their enclosing electrical circuit, to an owner, to neighboring sensors and their respected metrics, owners, rooms and so on. It is a Graph Database, which focusses on the links that exist in the graph, giving it the edge over more commonly found relational databases, since it features the ability to rapidly and concisely traverse data by its links across a whole data set.
Azure Digital Twins adopts the idea that the nodes on the graph (known as Digital Twins) can be typed. This means that the store of Entities that holds the data are in defined sets of shapes that are defined in Digital Twin Definition Language. The definition language allows developers to constrain the data that an entity can store, in a list of contents. These are broadly synonymous with the notion of columns in a traditional relational database. Just like in other database systems, when a development team iterates on a data structure to add a property, edit or remove one, the development team has to consider how to keep the software and the data structure in sync.
What is the Version challenge?
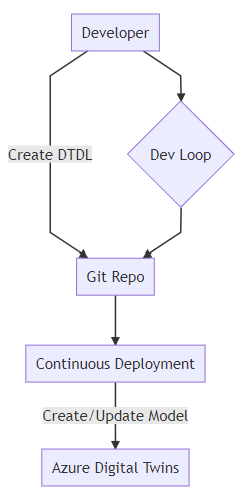
Models in DTDL are stored in a JSON format, and therefore typically stored as a .json file. We store these in a git repository right alongside the code that interacts with the data shapes that they define.
The key question of the Version Challenge therefore is: “When I update my model definitions in my local dev environment, how do I automatically update the models that are available in Azure Digital Twin?”
There is one additional twist, when you want to use a model, for example to create a new digital twin, you have to know the version number of the model that you want to create. This means your software needs to also be kept in sync with your models, and your deployment.
In order to keep track of all this, each Azure Digital Twin model has a model identifier. The structure of a Digital Twin Model Identifier (DTMI) is:
dtmi:[some:segmented:name];[version]
For example:
dtmi:com:elastacloud:intelligentspaces:room;168
Our solution then needs to solve these top-level issues, whilst being developer friendly, and fitting into best practice for deployments.
We might consider this ideal workflow:
A developer workflow that includes continuous deployment of DTDL models as described in the text.
Building Blocks
We want to be able to construct our approach to versioning without prejudicing our ability to use the fullness of ADT features. There are a few main options that present themselves to us:
- Hold the JSON representation of the DTDL on disk as a file
- Build the JSON representation from a software representation (for instance .NET class)
Both of these are valid cases. The JSON representation reflects the on-the-wire payload. The .NET class might give us the ability to later use this class to create instances of the DTDL defined Twin.
Considering this idea, we might consider something like the following:
{
  "@id": "dtmi:elastacloud:core:NamedTwin;1",
  "@type": "Interface",
  "contents": [
    {
      "@type": "Property",
      "displayName": {
        "en": "name",
        "es": "nombre"
      },
      "name": "name",
      "schema": "string",
      "writable": true
    }
  ],
  "description": {
    "en": "This is a Twin object that holds a name.",
    "es": "Este es un objeto Twin que contiene un nombre."
  },
  "displayName": {
    "en": "Named Twin Object",
    "es": "Objeto Twin con nombre"
  },
  "@context": "dtmi:dtdl:context;2"
}
We might then want to create a Plain Old CLR Object (POCO) representation:
public class NamedTwinModel
{
  public string name { get; set; }
}
While we are able to see that the Interface is in alignment with the DTDL definition of contents, it is not immediately apparent how we would manage displayName and globalisation concerns thereof within a POCO.
Note that from a purist’s perspective, a POCO should try to avoid attributes where possible, to boost readability. So a [DisplayName(“en”, “name”)] annotated approach is possible, but not ideal.
Furthermore, you’ll note that the DTDL wraps the contents which is the type definition, with a set of descriptors and globalization values. In order to achieve this, we might consider a wrapped generic POCO approach:
public class Globalisation {
   public string En { get; set; }
   public string Es { get; set; }
}
public class DtdlWrapper<TContents> {
    public T Contents { get; set; }
    public Globalisation Description { get; set; }
}
...
var namedDtdl = new DtdlWrapper<NamedTwinModel>();
namedDtdl.Contents = new NamedTwinModel();
namedDtdl.Contents.name = "what should I put here?";
The problem we start to face when expressing things in this case for the DTDL definitions themselves, is that we are actually building a class hierarchy that is more akin to the Azure Digital Twin instances than it is to the DTDL definitions. As such, we’re going to have to create instances, then use Reflection over them but ignore their values. We could use default values or lookup the types more directly, but still the problem is the same; class definitions in .NET describe how you can create instances, and don’t directly translate to DTDL in an easy to understand way.
Thus, from our perspective, we want to make sure that our description DTDL is native json since there are aspects which are not naturally amenable to encapsulating with a Plain Old CLR Object (POCO). We will use our POCOs to represent instances of Azure Digital Twins, i.e. the data itself, and not the schema.
This means we store the DTDL in JSON format on disk. But this isn’t anywhere near the end of the story for versioning and .NET development.
We just learned that POCOs can represent instances or Digital Twins quite effectively. If we’re going to code with .NET we will still need to use some kind of class to interact with, in order to do CRUD operations on the Azure Digital Twin.
The building blocks are therefore:
- Raw JSON held as a file
- POCOs to describe instances of those DTDL defined classes
Versioning
Versioning models in DTDL is achieved in a DTMI using an integer value held in the identifier. From the DTDL v2 documentation :
In DTDL, interfaces are versioned by a single version number (positive integer) in the last segment of their identifier. The use of the version number is up to the model author. In some cases, when the model author is working closely with the code that implements and/or consumes the model, any number of changes from version to version may be acceptable. In other cases, when the model author is publishing an interface to be implemented by multiple devices or digital twins or consumed by multiple consumers, compatible changes may be appropriate.
Firstly, mapping POCOs to DTDL in the way we have discussed requires that we choose to actively validate against DTDL, passively validate or don’t validate at all. Some options:
- Active; we build a way to check whether a DTDL model exists in Azure Digital Twins on any CRUD activity, that the properties match in name and type
- Passive; we do similarly to Active, but use JSON files as the validation target, and assume that the JSON files are in-line with the target database
- None; we don’t validate, but instead lead Azure Digital Twins error if we get something wrong, and we react to that error.
In our approach, we want to be able to support either radical or compatible changes but we will have to consider some additional factors brought in by .NET type constraints:
- if a DTDL interface changes types, the .NET POCO properties that exist must match its DTDL values
- if a DTDL interface changes its named properties, the .NET POCO needs to be updated to reflect this
- if a DTDL interface adds a new property, we need to decide whether it’s an error or not for the POCO to not have the property. This is a happy problem, as we’re roughly compatible even if we don’t add the property.
- if the DTDL interface deletes a property, we need to decide whether we do create and update methods but omit that value at runtime.
 A workflow that shows the order of checking a Model Existence and the states that it may be in.
Applying Versioning
Once we have our DTDL prepared in JSON, we still need to get these into Azure Digital Twins. We have a few choices again to make around how we want to handle versioning.
The absolute core of creating Azure Digital Twins DTDL models from a .NET perspective is to use the Azure.DigitalTwins.Core package available on NuGet, to create the models. In short:
// you need to setup three variables first; tenantId, clientId
// and adtInstanceUrl. var
credentials = new InteractiveBrowserCredential(tenantId, clientId);
DigitalTwinsClient client = new DigitalTwinsClient(new Uri(adtInstanceUrl), credentials);
await client.CreateModelsAsync(new string[] { "DTDL Model in JSON here..." } );
That’s the core of creating those DTDL models. We could just load the JSON files directly from disk as a string and add it to the array passed to CreateModelsAsync, however we have options to employ that might help us out in the future.
For example, we can get the existing models by calling client.GetModelsAsync. We can iterate on these models and check whether our new models to create share a @id including the version. If this is the case we can validate whether the contents are the same, and choose to throw an exception if not, if we are seeking to maintain a high level of compatibility.
Should we find that a model exists for a previous version (i.e. our JSON file has a higher dtmi version) we can choose to decommission that model. This is a one way operation, so we better be careful to do this in a managed fashion. For instance, we might want to decommission a model only after it has been replaced for a period of time, so that we may have live-updates to the system. If this is the case, we should be comfortable that all writers to the Azure Digital Twin have been upgraded.
When a model is decommissioned, new digital twins will no longer be able to be defined by this model. However, existing digital twins may continue to use this model. Once a model is decommissioned, it may not be recommissioned.
Anyway, should we choose to do that, once a model is created (say dtmi:elastacloud:core:NamedTwin;2) we might choose to decommission the previous version:
await client.DecommissionModelAsync("dtmi:elastacloud:core:NamedTwin;1");
The key thought process around Decommissioning relates to the choice you want to make around version compatibility with your code. The idea we take at Elastacloud is that we want to be able to be sure that the latest Git-held version of the DTDL model is available but also that previous versions should also be available for a period of time that we consider to be an SLA, until we are sure that all consumers have been updated to the latest version.
 A strategy for decommissioning DTDL Models in Azure Digital Twins, shown as a workflow that checks an SLA
Other Considerations
Naming standards between .NET and JSON are different. We should name according to the framework that hosts the code, and use Serialization techniques to convert between naming divergences. For example, Properties in .NET start with a capital letter in many circumstances, whereas in JSON they tend to start with lowercase.
DTDL includes a set of standard semantic types that can be applied to Telemetries and Properties. When a Telemetry or Property is annotated with one of these semantic types, the unit property must be an instance of the corresponding unit type, and the schema type must be a numeric type (double, float, integer, or long).
.NET Tooling Approach
So far we have a few key components that we have to build in order to hit our best practice goal.
- A .NET application that deploys the models to the Azure Digital Twin instance. That understands versions of DTDL that are already deployed, and the versions held locally, and helps assert compatibility.
- A .NET application that holds POCOs that can represent DTDL deployed to Azure Digital Twins and can help marshal data between .NET and Azure Digtal Twins.
This helps us define two main categories of error conditions; deployment and runtime.
 A tooling approach to deploying Azure Digital Twin DTDL model changes
CI/CD deployment
At Elastacloud we use our own `twinmigration` tool for managing this process. The tool is a dotnet global tool that we built and that provides features designed for CI/CD purposes.
Since a dotnet global tool is a convenient way of distributing software into pipelines, we add a task to our CI/CD pipeline that takes the latest version of JSON files from a git repo, and validates them against what is already deployed in an ADT instance.
Following the output of a validation stage, we might choose to also run a deploy stage. This will do the action of adding the models to an Azure Digital Twin.
Finally, we have a decommissioning step which causes “older” models to be made unavailable for creation, so that we can keep good data quality practices.
In Summary
For more information about what we’re doing with Azure Digital Twins, visit our website at Intelligent Spaces — Elastacloud, we’ll be updating it regularly with information on our approaches. We have some tools that are ready to go, such as NuGet Gallery | Elastacloud.TwinMigration that help you to do the things we’ve described here!
Thanks for reading.
by Contributed | May 7, 2021 | Technology
This article is contributed. See the original author and article here.
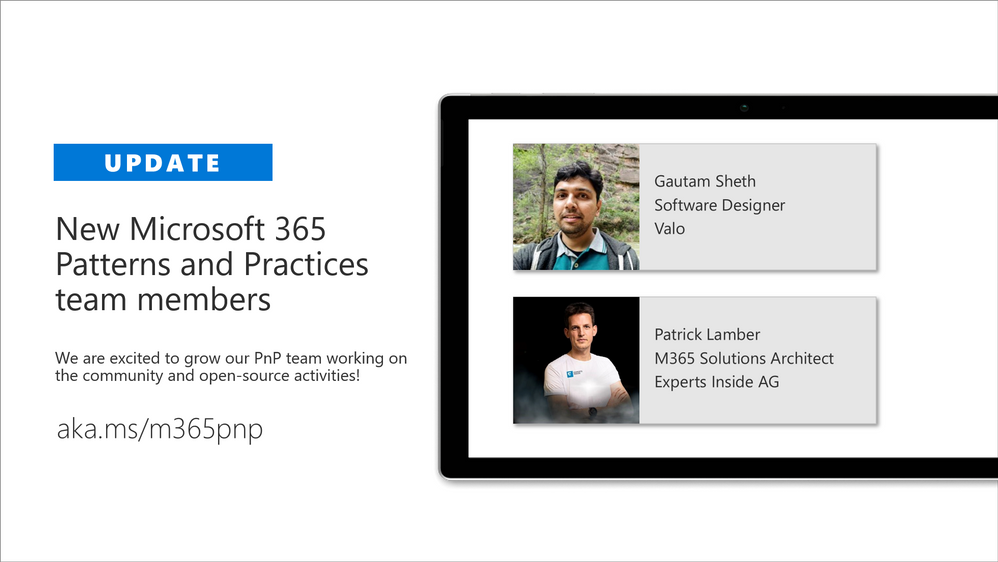
We are excited to announce that we are again extending our virtual Microsoft 365 Patterns and Practices (PnP) team with additional community members. PnP team is responsible of the different community activities in different community channels, including our open-source work in the GitHub. This team consist of Microsoft employees and community members (MVPs) focused on helping the community the best use of Microsoft products, like Microsoft Teams, Power Platform, OneDrive, SharePoint or API layer like Microsoft Graph.
We announced our new PnP team model in April 2020 with additional community members and are further extending this team with new community members. We believe that working together as a one unified team across the organization barriers, we can make even larger worldwide impact and helping other community member to succeed on adopting different practices within Microsoft 365 platform.
Gautam Sheth – Software Designer

Gautam is a Software Designer at Valo. Coming from a developer background, he builds products using the Microsoft 365 developer stack. He is also a maintainer of the PnP PowerShell repository and a contributor to PnP Framework and SPFx related repositories. He loves to contribute to the community and share his learnings. He is a firm believer in Sharing is Caring and helping others.
You can read his blogs at https://gautamdsheth.wordpress.com and tweets @gautamdsheth
Outside of work, you can find him reading books, listening to Bollywood songs or occasionally speaking at local community/user group events.
Patrick Lamber – Microsoft 365 Solutions Architect

Patrick is a Microsoft Developer MVP and Microsoft 365 solutions architect at Experts Inside AG. He builds business solutions in the Microsoft 365 ecosystem for his international customers and he is the main developer of EasyLife 365 a new governance solution for Microsoft 365.
Patrick actively contributes to various projects on GitHub. You can follow him on GitHub.
When Patrick isn’t coding or helping customers, you will find him walking his dog or dancing Salsa around the world.
If you are looking for more details on what Microsoft 365 Patterns and Practices (PnP) is all about, see more details on the different activities and projects from https://aka.ms/m365pnp, including all community calls, open-source projects, samples and more.
There are also numerous exciting new projects under development which will be released as open-source solutions soon addressing Microsoft Teams, OneDrive, Microsoft Graph and SharePoint areas. We want to thank also the countless of other community members who have been involved on this journey for past years. We still consider this as just a start and are looking your feedback and input to further improve the processes and model we use.
Got ideas, feedback, comments on our community work? – Don’t hesitate to let us know. We are here for you. Everyone is welcome!
Sharing is Caring!
Previous related announcements
Friday 7th of May, 2021

by Contributed | May 7, 2021 | Technology
This article is contributed. See the original author and article here.
Microsoft partners like Archive360, BlockApps, and Drizti deliver transact-capable offers, which allow you to purchase directly from Azure Marketplace. Learn about these offers below:
|
Archive2Azure: Archive360’s Archive2Azure platform enables you to migrate, onboard, secure, validate, classify, search, analyze, and dispose of data from a variety of disparate sources, including email, Microsoft 365, social media, and more. Built for Microsoft Azure, Archive2Azure helps enterprises control costs, optimize storage, and address data management and compliance requirements.
|
 |
STRATO for Business Networks: BlockApps’ STRATO platform on Microsoft Azure enables you to create and manage programmable business networks. Transactions on STRATO networks leverage blockchain technology to satisfy requirements for speed, reliability, and security. Bring the reliability and efficiency of face-to-face interactions to digital transactions through secure and connected information.
|
 |
HPCBOX: HPC Cluster for OpenFOAM: HPCBOX by Drizti lets you plug cloud infrastructure into your application pipeline. This HPC Cluster for OpenFOAM provides distributed parallel and hardware-accelerated 3D support. Read the blog post “More performance and choice with new Azure HBv3 virtual machines for HPC” to learn about Drizti’s involvement in the launch of HBv3 series VMs on Azure.
|
|
by Contributed | May 7, 2021 | Technology
This article is contributed. See the original author and article here.
Through my bedroom window, I can see the street in a typical suburban residential neighborhood. It is a relatively quiet street with mostly cars passing by occasionally, but due to increase in package deliveries, there have been more trucks and delivery folks seen on the street recently.
I want to put a camera on my bedroom window overlooking the street below and build a package delivery monitoring AI application that will detect when a person or a truck is seen by the camera. I want the package delivery monitoring AI application to show me these event detections in a video analytics dashboard that is updated in real-time. I also want to be able to view a short video clip of the detected event.
Here are some details about the project using an Azure Percept DevKit.
You can adapt the project and choose other object classes to build your own AI application for your environment and scenario.
Here’s what you will need to get started
Subscription and Hardware
- Azure subscription (with full access to Azure services)
- Azure Percept DK (Edge Vision/AI device with Azure IoT Edge)

Azure Percept ($349 in Microsoft store)
https://www.microsoft.com/en-us/store/build/azure-percept/8v2qxmzbz9vc
Host: NXP iMX8m processor
Vision AI: Intel Movidius Myriad X (MA2085) vision processing unit (VPU)
- Inseego 5G MiFi ® M2000 mobile hotspot (fast and reliable cloud connection for uploading videos)

Radio: Qualcomm ® Snapdragon ™ X55 modem
Carrier/plan: T-Mobile 5G Magenta plan
https://www.t-mobile.com/tablet/inseego-5g-mifi-m2000
Key Azure Services/Technologies used
- Azure IoT edge (edgeAgent, edgeHub docker containers)
- Azure Live Video Analytics (LVA) on the edge
- Azure IoT Central LVA Edge Gateway
- Azure IoT Hub
- Azure IoT Central
- Azure Media Services (AMS)
- ACR
4. Overall setup and description
Step 1: Unbox and setup the Azure Percept
This step should take about 5-10 minutes if all goes well. Follow the setup instructions here https://docs.microsoft.com/en-us/azure/azure-percept/quickstart-percept-dk-set-up
Here are some screenshots that I captured as I went through my Azure Percept device setup process.

Key points to remember during the device setup are to make sure you note down the IP address of the Azure Percept and setup your ssh username and password so you can ssh into the Azure Percept from your host machine. During the setup, you can create a new Azure IoT hub on the cloud or you can use an existing Azure IoT hub that you may already have in your Azure subscription.
Step 2: Ensure good cloud connectivity (uplink/downlink speed for videos)
For the package delivery monitoring AI application I am building, the Azure percept will be connecting to the cloud to upload several video clips depending on the number of detected events. Ensure that the video uplink speeds are very good. Here is a screenshot of the speed test for the Inseego 5G MiFi ® M2000 mobile hotspot from T-Mobile that I am using for my setup.


Step 3: Build an Azure IoT Central application
Now that the Azure Percept is fully setup and connected to the cloud, we will create a new Azure IoT Central app. Visit https://apps.azureiotcentral.com/ to start building a new Azure IoT Central application. Navigate to retail and then select the Video analytics – object and motion detection application template and create your application. When you are finished creating the application, navigate to the Administration section of the app (in the left menu) to:
- API Tokens menu item -> Generate a new API token and make a note of it (this will begin with SharedAccessSignature sr=)
- Your application menu item -> Note the App URL and APP ID
- Device connection menu item -> Select SAS-IoT-Devices and make a note of the Scope ID and Primary key for the device
The above information will be needed in later steps to configure the Azure Percept so that Azure Percept can securely talk to our newly created IoT central app.
Step 4: Download a baseline reference app from github
Download a reference app from github that we will use as a baseline for building our own package delivery monitoring AI application on Azure Percept. On your host machine, clone the following repo
git clone https://github.com/Azure/live-video-analytics.git
and then navigate to the ref-appslva-edge-iot-central-gateway folder. We will be modifying a few files in this folder.

Step 5: Porting reference app to Azure Percept
The downloaded reference app is a generic LVA application and was not purpose-built for Azure Percept ARM-64 device. Hence, we need to make a few changes, such as building docker containers for ARM-64, updating the AMS graph topology file and updating deployment manifest before we can run the reference application on the Azure Percept which is an ARM-64 device running Mariner OS (based upon the Fedora Linux distribution
5A. Update objectGraphInstance.json
First, navigate to setup/mediaGraphs/objectGraphInstance.json file and update the rtspUrl and inferencingUrl as follows:
"parameters": [
   {
      "name": "rtspUrl",
      "value": "rtsp://AzurePerceptModule:8554/h264"
   },
   {
      "name": "inferencingUrl",
      "value": "http://yolov3tiny/score"
   }
This will allow the AzurePerceptModule to send the RTSP stream from the Azure Percept’s camera to the http extension module in the Azure media graph running on Azure Percept (via the LVA Edge Gateway docker container). We will also be building a yolov3tiny object detection docker container that will provide the inference when the http extension node in the media graph calls the inferencing URL http://yolov3tiny/score
You can learn more about Azure Media Graphs here:
https://docs.microsoft.com/en-us/azure/media-services/live-video-analytics-edge/media-graph-concept
5B. Update state.json
Navigate to setup/state.json file and update the appKeys section with the IoT Central app information you noted down from Step 3.
"appKeys": {
   "iotCentralAppHost": "<IOT_CENTRAL_HOST>",
   "iotCentralAppApiToken": "<IOT_CENTRAL_API_ACCESS_TOKEN>",
   "iotCentralDeviceProvisioningKey": "<IOT_CENTRAL_DEVICE_PROVISIONING_KEY>",
   "iotCentralScopeId": "<SCOPE_ID>"
5C. Update arm64v8.dockerfile
Navigate to dockerarm64v8.dockerfile and add the following line:
ADD ./setup/state.json /data/storage/state.json
This will allow the LVA Edge Gateway container running on Azure Percept to connect directly and securely to IoT Central app
5D. Build LVA Edge Gateway docker container for the Azure Percept
Use the following commands to build the LVA Edge Gateway docker container for ARM64v8 and push it to your Azure Container Registry
docker build -f docker/arm64v8.Dockerfile –no-cache . -t lvaedgegateway:2.0-arm64v8
docker login -u <your_acr_name>  -p <your_acr_password> <your_acr_name>.azurecr.io
docker push <your_acr_name>.azurecr.io/lvaedgegateway:2.0-arm64v8
5E. Build YOLOv3 tiny docker container for the Azure Percept
Navigate to live-video-analyticsutilitiesvideo-analysisyolov3-onnx folder and use the following commands to build the Yolov3tiny docker container for ARM64v8 and push it to your Azure Container Registry
docker build -f yolov3-tiny.dockerfile . –no-cache -t lvaextension:http-yolov3-tiny-onnx-v1.0
docker login -u <your_acr_name>  -p <your_acr_password> <your_acr_name>.azurecr.io
docker push <your_acr_name>.azurecr.io/lvaextension:http-yolov3-tiny-onnx-v1.0
5F. Update deployment manifest with Yolov3tiny and AzurePerceptModule and update AMS account name and the LVAEdge section
Navigate to setup/deploymentManifests/deployment.arm64v8.json to add Yolov3tiny and AzurePerceptModule and update the AMS account name and the LVAEdge section as follows:
Note that the App id, App secret and tenant id in the LVA Edge section should come from your AMS account and not IoT Central.
"yolov3tiny": {
   "version": "1.0",
   "type": "docker",
   "status": "running",
   "restartPolicy": "always",
   "settings": {
      "image": "<your_acr_name>.azurecr.io/lvaextension:http-yolov3-tiny-onnx-v1.0",
      "createOptions": "{"HostConfig":{"Privileged":true,"PortBindings":{"80/tcp":[{"HostPort":"8080"}]}}}"
   }
},
"AzurePerceptModule": {
   "version": "1.0",
   "type": "docker",
   "status": "running",
   "restartPolicy": "always",
   "settings": {
      "image": "unifiededgescenarios.azurecr.io/azureeyemodule:0.0.2-arm64v8",
      "createOptions": "{"Cmd":["/bin/bash","-c","./app/inference -s=720p"],"ExposedPorts":{"8554/tcp":{}},"Name":"/rtspserver","HostConfig":{"Binds":["/dev/bus/usb:/dev/bus/usb"],"Privileged":true,"PortBindings":{"8554/tcp":[{"HostPort":"8554"}]}}}"
   }
},
"LvaEdgeGatewayModule": {
   "settings": {
      "image": "<your_acr_name>.azurecr.io/lvaedgegateway:2.6-arm64v8",
      "createOptions": "{"HostConfig":{"PortBindings":{"9070/tcp":[{"HostPort":"9070"}]},"Binds":["/data/storage:/data/storage","/data/media:/data/media/"]}}"
   },
   "type": "docker",
   "env": {
      "lvaEdgeModuleId": {
      "value": "lvaEdge"
   },
   "amsAccountName": {
      "value": "<your_ams_account_name>"
   },
   "lvaEdge": {
   "properties.desired": {
      "applicationDataDirectory": "/var/lib/azuremediaservices",
      "azureMediaServicesArmId": "/subscriptions/<your_Azure_sub_id>/resourceGroups/<your_resource_group_name>/providers/microsoft.media/mediaservices/<your_ams_account_name",
      "aadEndpoint": "https://login.microsoftonline.com",
      "aadTenantId": "<your_tenant_id>",
      "aadServicePrincipalAppId": "<your_APP_ID>",
      "aadServicePrincipalSecret": "<your_app_secret>”
      "aadResourceId": "https://management.core.windows.net/",
      "armEndpoint": "https://management.azure.com/"
   }
}
Step 6: Create device template in IoT central and upload deployment manifest
In your IoT Central application, navigate to Device Templates, and select the LVA Edge Gateway device template. Select Version to create a new template called LVA Edge Gateway v2 and then select Create. Click on “replace manifest” and upload the deployment manifest file setup/deploymentManifests/deployment.arm64v8.json that we updated in the previous step. Finally, publish the device template.

Step 7: Create new IoT device using the device template
Navigate to the devices page on the IoT Central app and create a new IoT edge gateway device using the LVA Edge Gateway template we just created in the previous step.

To obtain the device credentials, on the Devices page, select your device. Select Connect. On the Device connection page, make a note of the ID Scope, the Device ID, and the device Primary Key. You will use these values later for provisioning the Azure Percept (Note: make sure the connection method is set to Shared access signature).
Step 8: Provision the Azure Percept
SSH into Azure Percept and update the provisioning script.
sudo yum install nano
sudo nano /etc/iotedge/config.yaml
Add the following section to config.yaml
# DPS symmetric key provisioning configuration provisioning:
  source: "dps"
  global_endpoint: "https://global.azure-devices-provisioning.net"
  scope_id: "{scope_id}"
  attestation:
    method: "symmetric_key"
    registration_id: "{registration_id}"
    symmetric_key: "{symmetric_key}"
Update scope_id, registration_id (this is the device id) and symmetric_key with the IoT Central app information you noted down in the previous step.
Finally, reboot the Azure Percept and then ssh into it to make sure the following six docker containers are running:

Step 9: Add camera, manage camera settings and start LVA processing
Now that we have created the IoT edge gateway device, we need to add camera as a downstream device. In IoT central, go to your device page and select “Commands” and add camera by providing a camera name, camera id and the RTSP URL and select Run.

On your Azure Percept, you can confirm that the LVA Edge Gateway module received the request to add camera by checking the docker logs:
sudo docker logs -f LvaEdgeGatewayModule
Navigate to the newly created camera device and select the “manage” tab to modify the camera settings as shown below:

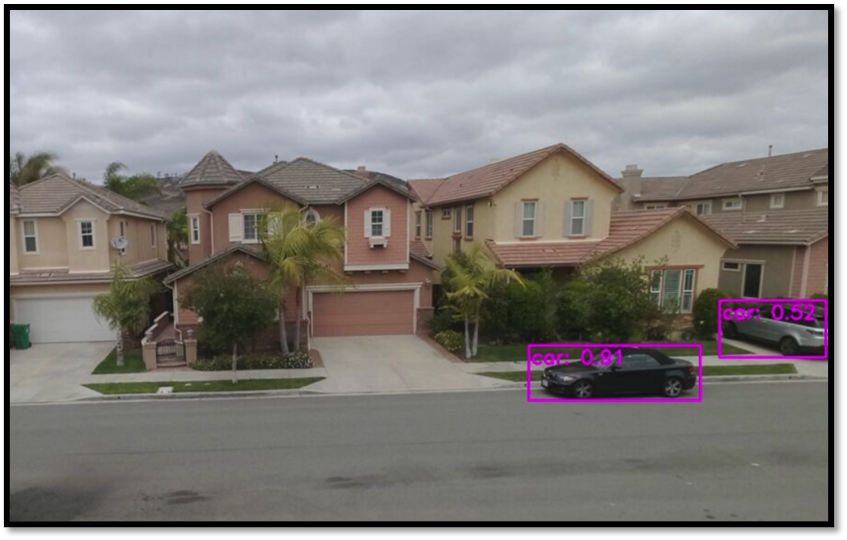
You can see that I have added “person” and “truck” as detection classes with a minimum confidence threshold of 50%. You can select your own object classes here (object class can be any of the 91 object classes that are supported by the COCO dataset on which our YOLOv3 model was trained).
Finally, navigate to the commands tab of the camera page and click on Run to Start LVA Processing.

This will start the AMS graph instance on the Azure Percept. Azure Percept will now start sending AI inference events (in our case a person or a truck detection event) to IoT central (via IoT hub message sink) and the video clips (capturing the person or truck event detections) to your AMS account (AMS sink).
Step 10: View charts and event videos on the camera device dashboard
Navigate to the camera device and select the dashboard tab. Whenever the camera sees a truck or a person, the YOLOv3 detection model will send the corresponding AI inference events with the detection class and confidence % to IoT central. The charts on the IoT Central dashboard will update in real-time to reflect these detections.

If you scroll further down on the dashboard, you will see a tile that shows event detections and links to corresponding AMS video streaming URL

The IoT Central application stores the video in Azure Media Services from where you can stream it. You need a video player to play the video stored in Azure Media Services.
On your host machine, run the amp-viewer docker container that has the AMS video player.
docker run -it --rm -e amsAadClientId="<FROM_AZURE_PORTAL>" -e amsAadSecret="<FROM_AZURE_PORTAL>" -e amsAadTenantId="<FROM_AZURE_PORTAL>" -e amsArmAadAudience="https://management.core.windows.net" -e amsArmEndpoint="https://management.azure.com" -e amsAadEndpoint="https://login.microsoftonline.com" -e amsSubscriptionId="<FROM_AZURE_PORTAL>" -e amsResourceGroup="<FROM_AZURE_PORTAL>" -e amsAccountName="<FROM_AZURE_PORTAL>" -p 8094:8094 mcr.microsoft.com/lva-utilities/amp-viewer:1.0-amd64
Once the AMP viewer docker container is running on your host machine, clicking on any of the streaming video URLs will bring up a short clip of the video that was captured for the corresponding event.
Here are a couple of video clips that were captured by my Azure Percept and sent to AMS when it detected a person or a truck in the scene. The first video shows that the Azure Percept detected me as a person and the second video shows that the Azure Percept detected a FedEx truck as it zipped past the scene. In just a few hours after unboxing the Azure Percept, I was able to set up a quick Proof of Concept of a package delivery monitoring AI application using Azure services and my Inseego 5G MiFi ® M2000 mobile hotspot!


Note: The views and opinions expressed in this article are those of the author and do not necessarily reflect an official position of Inseego Corp.

Recent Comments