
by Contributed | Oct 13, 2021 | Technology
This article is contributed. See the original author and article here.
We are excited to announce the support for Ddsv4 (General Purpose) and Edsv4 (Memory optimized) VM series with Azure Database for PostgreSQL – Flexible Server (Preview).
As you may know, the Flexible Server option in Azure Database for PostgreSQL is a fully managed PostgreSQL service that handles your mission-critical workloads with predictable performance. Flexible Server offers you with compute tier choices including Burstable compute tier for dev/test use cases, a General Purpose compute tier for running your small and medium production workloads, and a Memory Optimized compute tier to handle your large, mission-critical workloads. Flexible Server allows you to dynamically scale your compute across these tiers and compute sizes.
In addition to the existing DsV3 and EsV3 series of compute, you can now deploy using Ddsv4 and Edsv4 (V4-series) computes for your general purpose and memory optimized computing needs.
What are Ddsv4/Edsv4 VM series?
The Ddsv4 and Edsv4 VM series are based on the 2nd generation Intel Xeon Platinum 8272CL (Cascade Lake). This custom processor runs at a base speed of 2.5GHz and can achieve all-core turbo frequency of 3.4GHz. These compute tiers offer 50 percent larger and faster local storage, as well as better local disk IOPS for both Read and Write caching compared to the Dv3 and Ev3 compute sizes.
- Ddsv4 compute sizes provide a good balance of memory-to-vCPU performance, with up to 64 vCPUs, 256 GiB of RAM, and include local SSD storage.
- Edsv4 compute sizes feature a high memory-to-CPU ratio, with up to 64 vCPUs, 504 GiB of RAM, and include local SSD storage. The Edsv4 also supports a 20vCPU compute size with 160GiB of memory.
Ok. What are the benefits of running Flexible Server on v4-series?
- The V4-series compute sizes provide a faster processing power.
- V4-series also include high-speed local storage which are automatically used by PostgreSQL Flexible Server for read caching without requiring any user action.
So, depending on your workload and your data size, you could expect up to 40% performance improvement with V4 series compared to V3.
How about Flexible server V4-series pricing?
Please refer to the Azure Database for PostgreSQL – Flexible Server pricing page for detailed pricing. The V4-series flexible servers can be deployed using pay-as-you-go (PAYG or on-demand) pricing as well as reserved instance (RI) pricing. RI pricing offers up to 58% discount over PAYG pricing, depending on the compute tier and the reservation period.
I am currently running my server Postgres on V3-series. How can I migrate to V4-series?
You can simply scale your compute to any V4 compute size with a couple of clicks. From compute + storage blade (as illustrated in Figures 1, 2, and 3), you can simply modify your compute size to the desired V4 compute size. As scaling (compute migration) is an offline operation which would need couple of minutes of downtime in most cases, it is recommended that you perform scale operations during non-peak periods of your server. During the scale operation, your storage is detached from your existing server and gets attached to the new, scaled server. Flexible server offers a complete flexibility to scale your compute across all compute tiers and compute sizes at any time. You can either scale-up or scale-down the compute.
V4-series computes are only available with General Purpose or the Memory Optimized compute tiers. If you choose either of these tiers, then you’ll be able to select the new Ddsv4 compute size for General Purpose—or Edsv4 compute size for Memory Optimized compute tiers.
For example, to scale to General V4 compute size, from the “Compute + Storage” blade, choose the General Purpose tier.
 Figure 1: Screenshot from the Azure Portal, of the provisioning workflow for the Flexible Server option in Azure Database for PostgreSQL Compute + Storage blade. This is where you can select the compute tier (General purpose / Memory Optimized)
Then choose a General Purpose Ddsv4 compute size that suits your application needs.
 Figure 2: Screenshot of the pulldown menu for the “General Purpose” compute size choice in the Compute + Storage blade for Flexible Server in Azure Database for PostgreSQL. You can see new Ddsv4 choices on the list.
Similarly, when you choose Memory Optimized compute tier shown in Figure 1, you can choose a Edsv4 compute size.
 Figure 3: Screenshot of the pulldown menu for the “Memory Optimized” compute size choice in the Compute + Storage blade for Flexible Server in Azure Database for PostgreSQL. You can see new Edsv4 choices on the list.
How do I transfer my existing reservations from V3 to V4?
If you are already using reserved instances with V3, you can easily exchange the reservations to the desired V4 compute, and you may just have to pay the difference in pricing depending on the compute tier.
Are these V4 compute tiers available in all regions?
Please see this list of regions for V3/V4 VM series availability.
All sounds good. What are the limitations?
- Currently, local disk caching is enabled for storage provisioned up to 2TiB, with plans to support caching for larger provisioned storage sizes in the future.
- The compute scaling is an offline operation and expect a couple of minutes of downtime. It is recommended to perform such scale operations during non-peak periods.
Where can I learn more about Flexible Server?
by Contributed | Oct 10, 2021 | Technology
This article is contributed. See the original author and article here.
Active geo-replication is an Azure SQL Database feature that allows you to create readable secondary databases of individual databases on a server in the same or different data center (region).
We have received few cases where customers would like to have this setup across subscriptions with private endpoints. This article describes how to achieve it and set up GEO replication between two Azure SQL servers across subscriptions using private endpoints while public access is disallowed.
To start with this setup, kindly make sure the below are available in your environment.
- Two subscriptions for primary and secondary environments,
- Primary Environment: Azure SQL Server, Azure SQL database, and Virtual Network.
- Secondary Environment: Azure SQL Server, Azure SQL database, and Virtual Network.
Note: Use paired region for this setup, and you can have more information about paired regions by accessing this link.
- Public access should be enabled during the GEO replication configuration.
- Both your virtual network’s subnet should not overlap IP addresses. You can refer to this blog for more information.
For this article , the primary and secondary environments will be as below:
Primary Environment
Subscription ID: Primary-Subscription
Server Name: primaryservertest.database.windows.net
Database Name: DBprim
Region: West Europe
Virtual Network: VnetPrimary
Subnet: PrimarySubnet – 10.0.0.0/24
Secondary Environment
Subscription ID: Secondary-Subscription
Server Name: secservertest1.database.windows.net
Region: North Europe
Virtual Network: VnetSec
Subnet: SecondarySubnet – 10.2.0.0/24
Limitations
- Creating a geo-replica on a logical server in a different Azure tenant is not supported
- Cross-subscription geo-replication operations including setup and failover are only supported through T-SQL commands.
- Creating a geo-replica on a logical server in a different Azure tenant is not supported when Azure Active Directory only authentication for Azure SQL is active (enabled) on either primary or secondary logical server.
GEO Replication Configuration
Follow the below steps to configure GEO replication (make sure the public access is enabled while executing the below steps)
1) Create a privileged login/user on both primary and secondary to be used for this setup:
a. Connect to your primary Azure SQL Server and create a login and a user on your master database using the below script:
--Primary Master Database
create login GeoReplicationUser with password = 'P@$$word123'

create user GeoReplicationUser for login GeoReplicationUser
alter role dbmanager add member GeoReplicationUser
Get the created user SID and save it:
select sid from sys.sql_logins where name = 'GeoReplicationUser'
b. On the primary database create the required user as below:
-- primary user database
create user GeoReplicationUser for login GeoReplicationUser
alter role db_owner add member GeoReplicationUser
c. Connect to your secondary server and create the same login and user while using the same SID you got from point A:
--Secondary Master Database
create login GeoReplicationUser with password = 'P@$$word123', sid=0x010600000000006400000000000000001C98F52B95D9C84BBBA8578FACE37C3E
create user GeoReplicationUser for login GeoReplicationUser;
alter role dbmanager add member GeoReplicationUser
2) Make sure that both primary and secondary Azure SQL servers firewall rules are configured to allow the connection (such as the IP address of the host running SQL Server Management Studio).
3) Log in with the created user to your primary Azure SQL server to add the secondary server and configure GEO replication, by running the below script on the primary master database:
-- Primary Master database
alter database DBprim add secondary on server [secservertest1]
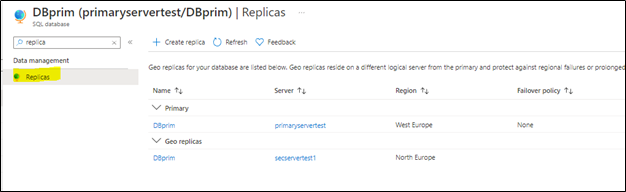
4) To verify the setup, access your Azure portal, go to your primary Azure SQL database, and access Replicas blade as below:
You will notice that the secondary database has been added and configured.
Note: before moving to the next step make sure your replica has completed the seeding and is marked as “readable” under replica status (as highlighted below):

Configuring private endpoints for both servers
Now, we will start preparing the private endpoints setup for both primary and secondary servers.
1) From Azure Portal > Access Primary Server > private endpoints connections blade > add new private endpins as below:

we will select the primary subscription to host the primary server private endpoints,


Next, the primary private endpoint will be linked to the primary virtual network and make sure the private DNS zone is linked to the primary subscription as below:

2. Create secondary server private endpoint, from Azure Portal > Access Secondary Server > private endpoints connections blade > add a new private endpoint as below:
in the below steps, we will select the secondary server virtual network and subscription,


In the next step, will link the secondary server private endpoint with the primary private DNS Zone, as Both primary and secondary private endpoints should be linked to the same private DNS zone (as below),

3) Once both private endpoints are created, make sure that they are accepted as mentioned in this document.

4) Access your private DNS zone from Azure portal, and verify that both are linked to the same one. This can be checked by accessing Azure portal > go to private DNS zone > select your primary subscription and check it as below,


Note: this step has been discussed in detail in this blog article.
Virtual Network setup
You need to make sure your Azure Virtual networks have Vnet peering between primary and secondary, in order to allow communication once the public access is disabled. For more information, you can access this document.
Disabling public access
Once the setup is ready you can disallow public access on your Azure SQL servers,

Next
once the public access is disabled, the GEO replication will be running under private endpoints between your Azure SQL server across subscriptions.
Troubleshooting
1- You may encounter below error when adding the secondary using T-SQL
alter database DBprim add secondary on server [secservertest1]
Msg 42019, Level 16, State 1, Line 1
ALTER DATABASE SECONDARY/FAILOVER operation failed. Operation timed out.
Possible solution: Set “deny public access” to off while setting up the geo replication via the T-SQL commands , once the geo replication is set up “deny public access” can be turned back on and the secondary will be able to sync and get the data from primary, public access only needs to be on for setting up the geo replication.
2- Also, You may encounter below error when adding the secondary using T-SQL
alter database DBprim add secondary on server [secservertest1]
Msg 40647, Level 16, State 1, Line 1
Subscription ‘xxxxxxxx-xxxx-xxxx-xxxx-xxxxxxxxxx’ does not have the server ‘secservertest1’.
Possible solution: Make sure that both private links use the same private DNS zone that was used for the primary. Refer to blog for more information.
References
Active geo-replication – Azure SQL Database | Microsoft Docs
Using Failover Groups with Private Link for Azure SQL Database – Microsoft Tech Community
Disclaimer
Please note that products and options presented in this article are subject to change. This article reflects the Geo Replication across different subscriptions with private endpoints option available for Azure SQL Database in October, 2021.
Closing remarks
I hope this article was helpful for you, please like it on this page and share through social media. please feel free to share your feedback in the comments section below.
by Contributed | Oct 8, 2021 | Technology
This article is contributed. See the original author and article here.
Azure security baseline for Azure Functions well describes the security consideration in general while developing an Azure Functions application. In addition to that, Azure Functions offers a built-in authentication method through the functions key. If you use the OpenAPI extension for Azure Functions, you can define the endpoint authentication and authorisation for each API endpoint in various ways. You can even try them through the Swagger UI page. Throughout this post, I’m going to discuss six different approaches for access control to Azure Functions API endpoints using the OpenAPI extension.
This GitHub repository contains the sample app used in this post.
OpenAPI Spec for Authentication
It could be a good idea to take a look at the authentication spec defined in OpenAPI before going further.
type: defines what type of authentication method will be used. Currently, it accepts API Key, HTTP, OAuth2, and OpenID Connect. But, the OpenAPI v2 spec doesn’t support the OpenID Connect.
name: declares the auth key name. It’s required for API Key.
in: defines the location of the auth key. It’s required for API Key and accepts query, header, or cookie.
scheme: declares the auth scheme. It’s required for HTTP auth and accepts either Basic or Bearer.
bearerFormat: uses JWT in most cases when using the Bearer token through the HTTP auth.
flows: is required for the OAuth2 auth. Its value can be implicit, password, clientCredentials, or authorizationCode.
openIdConnectUrl: is necessary for the OpenID Connect auth. However, it is advised to use either OAuth2 or Bearer auth for the OpenAPI v2 spec.
Based on the understandings above, let’s apply the different auth approach to Azure Function endpoints through the OpenAPI extension.
APK Key in Querystring
This is the built-in feature of Azure Functions. Let’s take a look at the code below. If you installed the OpenAPI extension, you could add the decorators. Spot on the OpenApiSecurityAttribute(…) decorator, which sets the value (line #6-9).
Type: SecuritySchemeType.ApiKey
In: OpenApiSecurityLocationType.Query
Name: code
    public static class ApiKeyInQueryAuthFlowHttpTrigger

    {

        [FunctionName(nameof(ApiKeyInQueryAuthFlowHttpTrigger))]

        [OpenApiOperation(operationId: “apikey.query”, tags: new[] { “apikey” }, Summary = “API Key authentication code flow via querystring”, Description = “This shows the API Key authentication code flow via querystring”, Visibility = OpenApiVisibilityType.Important)]
        [OpenApiSecurity(“apikeyquery_auth”,

                         SecuritySchemeType.ApiKey,

                         In = OpenApiSecurityLocationType.Query,

                         Name = “code”)]
        [OpenApiResponseWithBody(statusCode: HttpStatusCode.OK, contentType: “application/json”, bodyType: typeof(Dictionary<string, string>), Summary = “successful operation”, Description = “successful operation”)]

        public static async Task Run(

            [HttpTrigger(AuthorizationLevel.Function, “GET”, Route = null)] HttpRequest req,

            ILogger log)

        {

            log.LogInformation(“C# HTTP trigger function processed a request.”);
            var queries = req.Query.ToDictionary(q => q.Key, q => (string) q.Value);

            var result = new OkObjectResult(queries);
            return await Task.FromResult(result).ConfigureAwait(false);

        }

    }
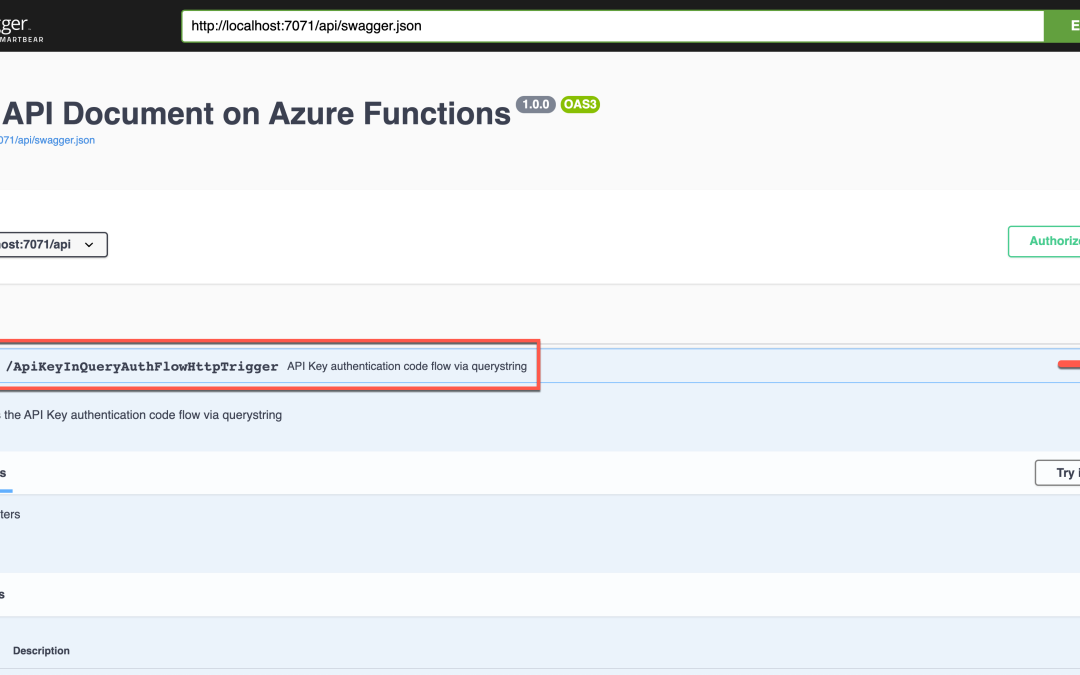
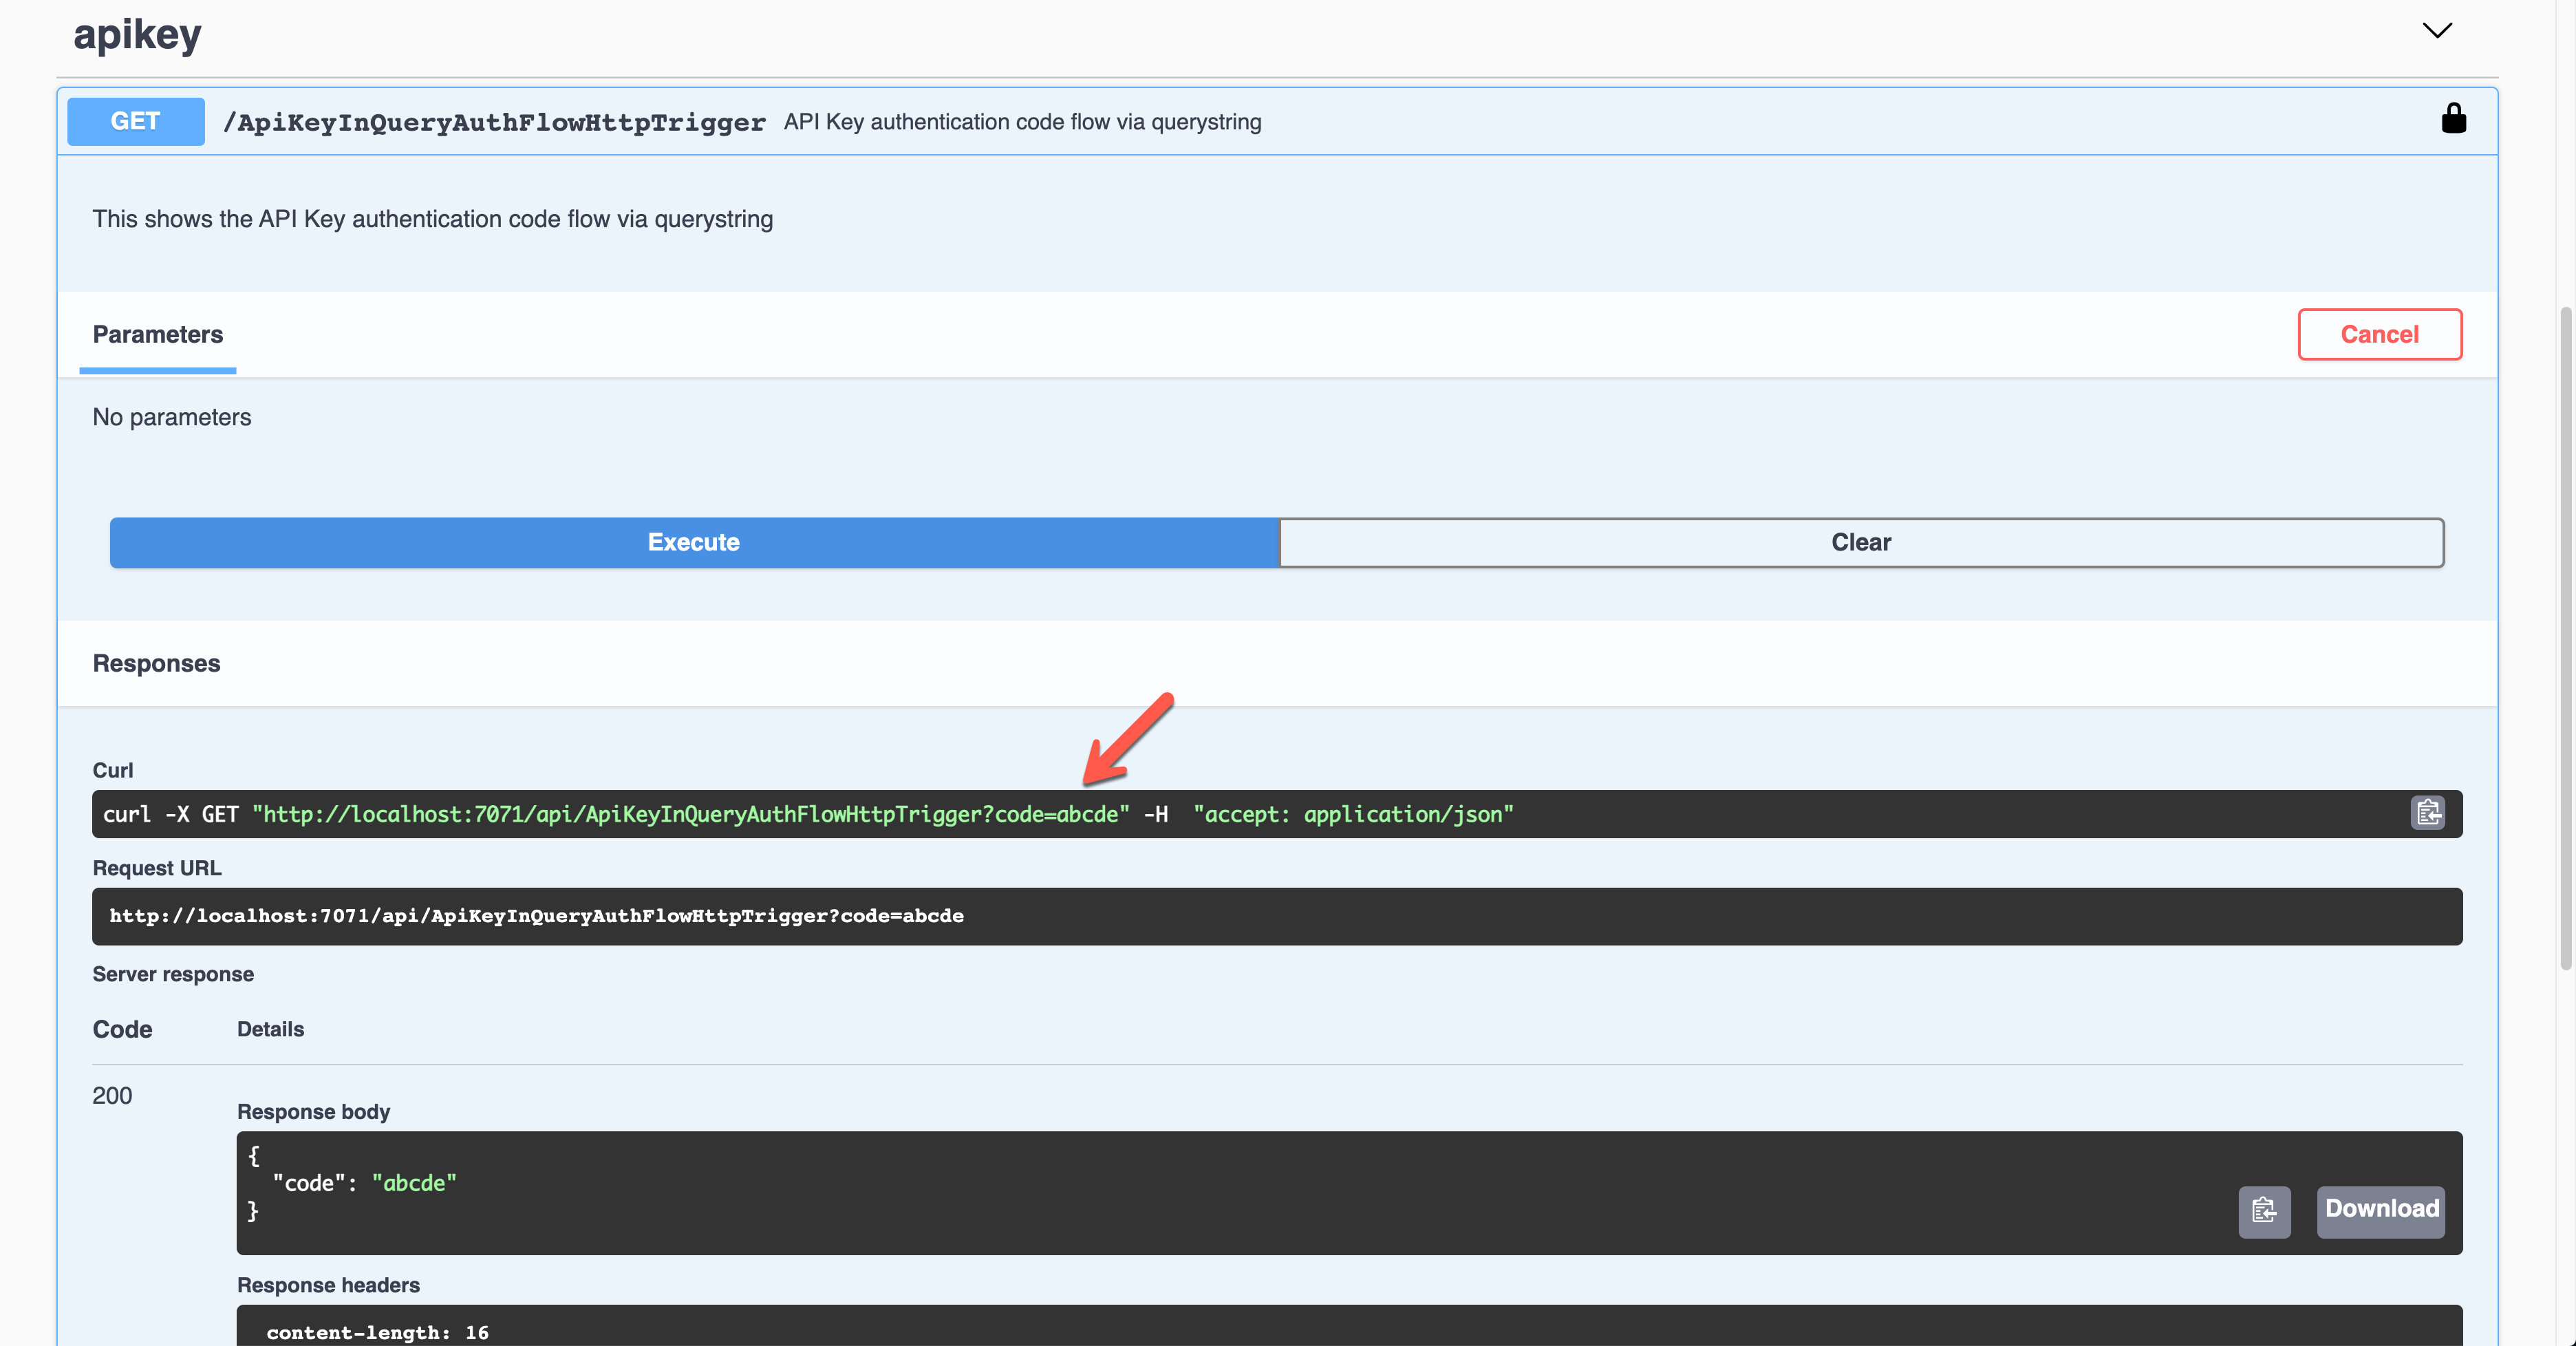
Run the function app, and you will see the Swagger UI page.
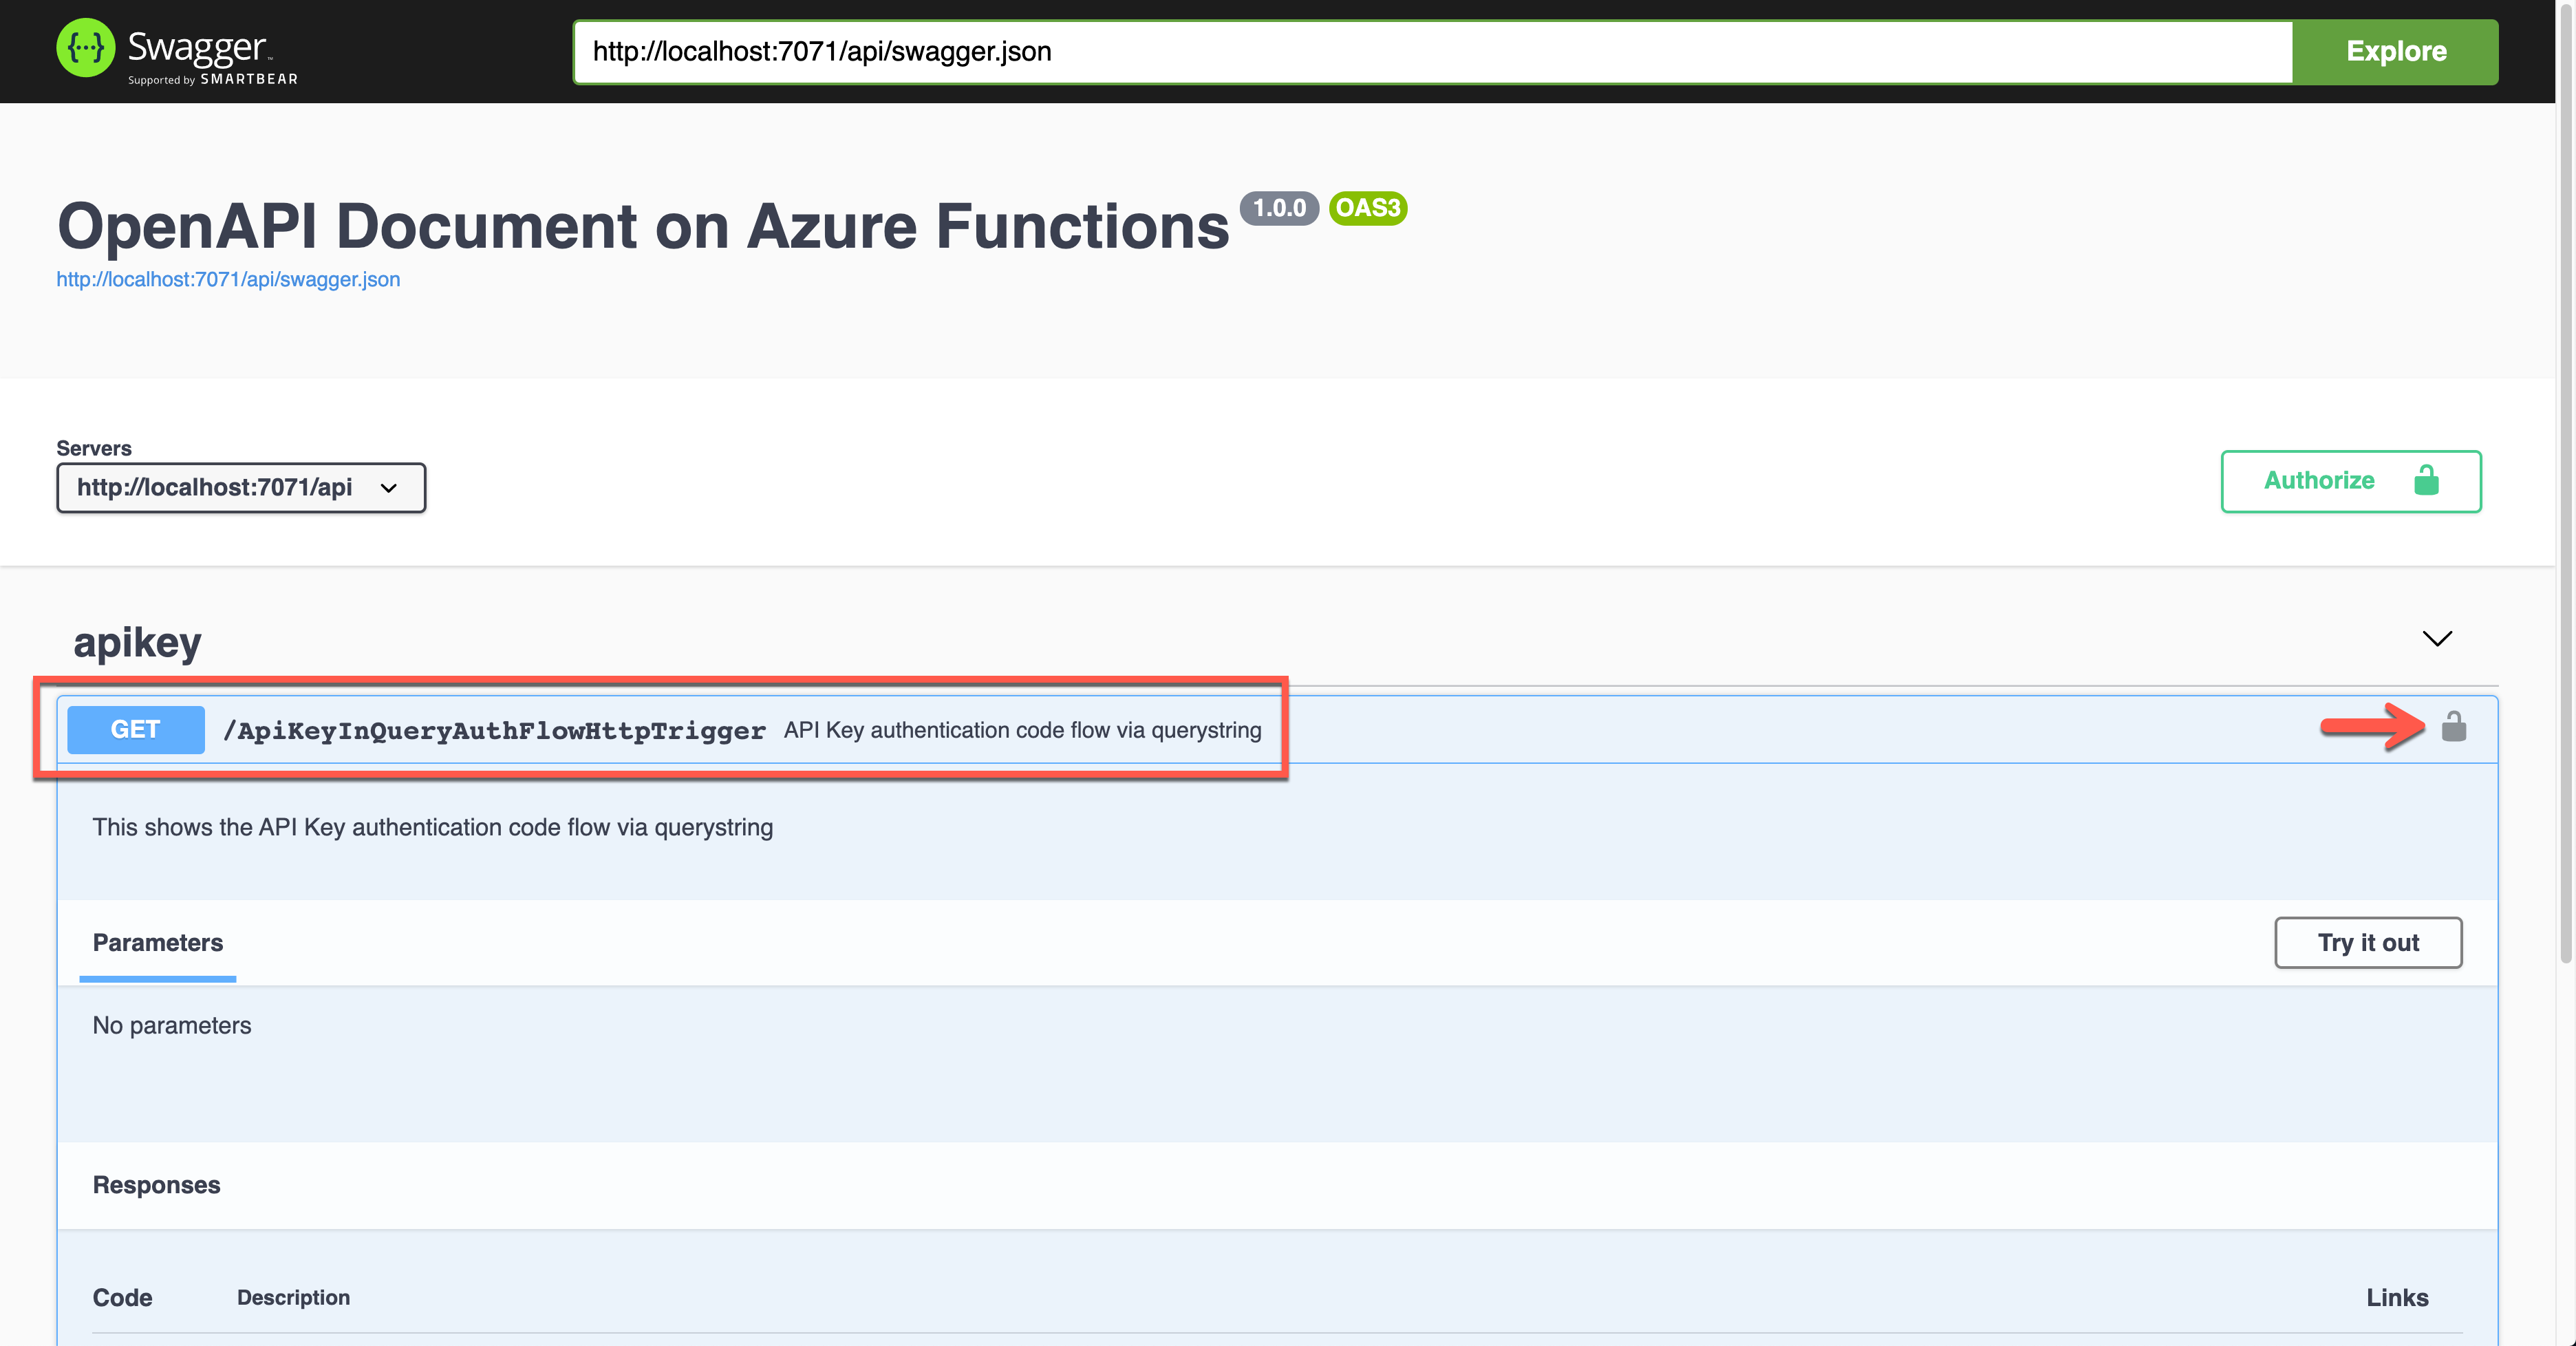
Click the lock button on the right-hand side to enter the API key value. This value will be appended to the querystring parameter.
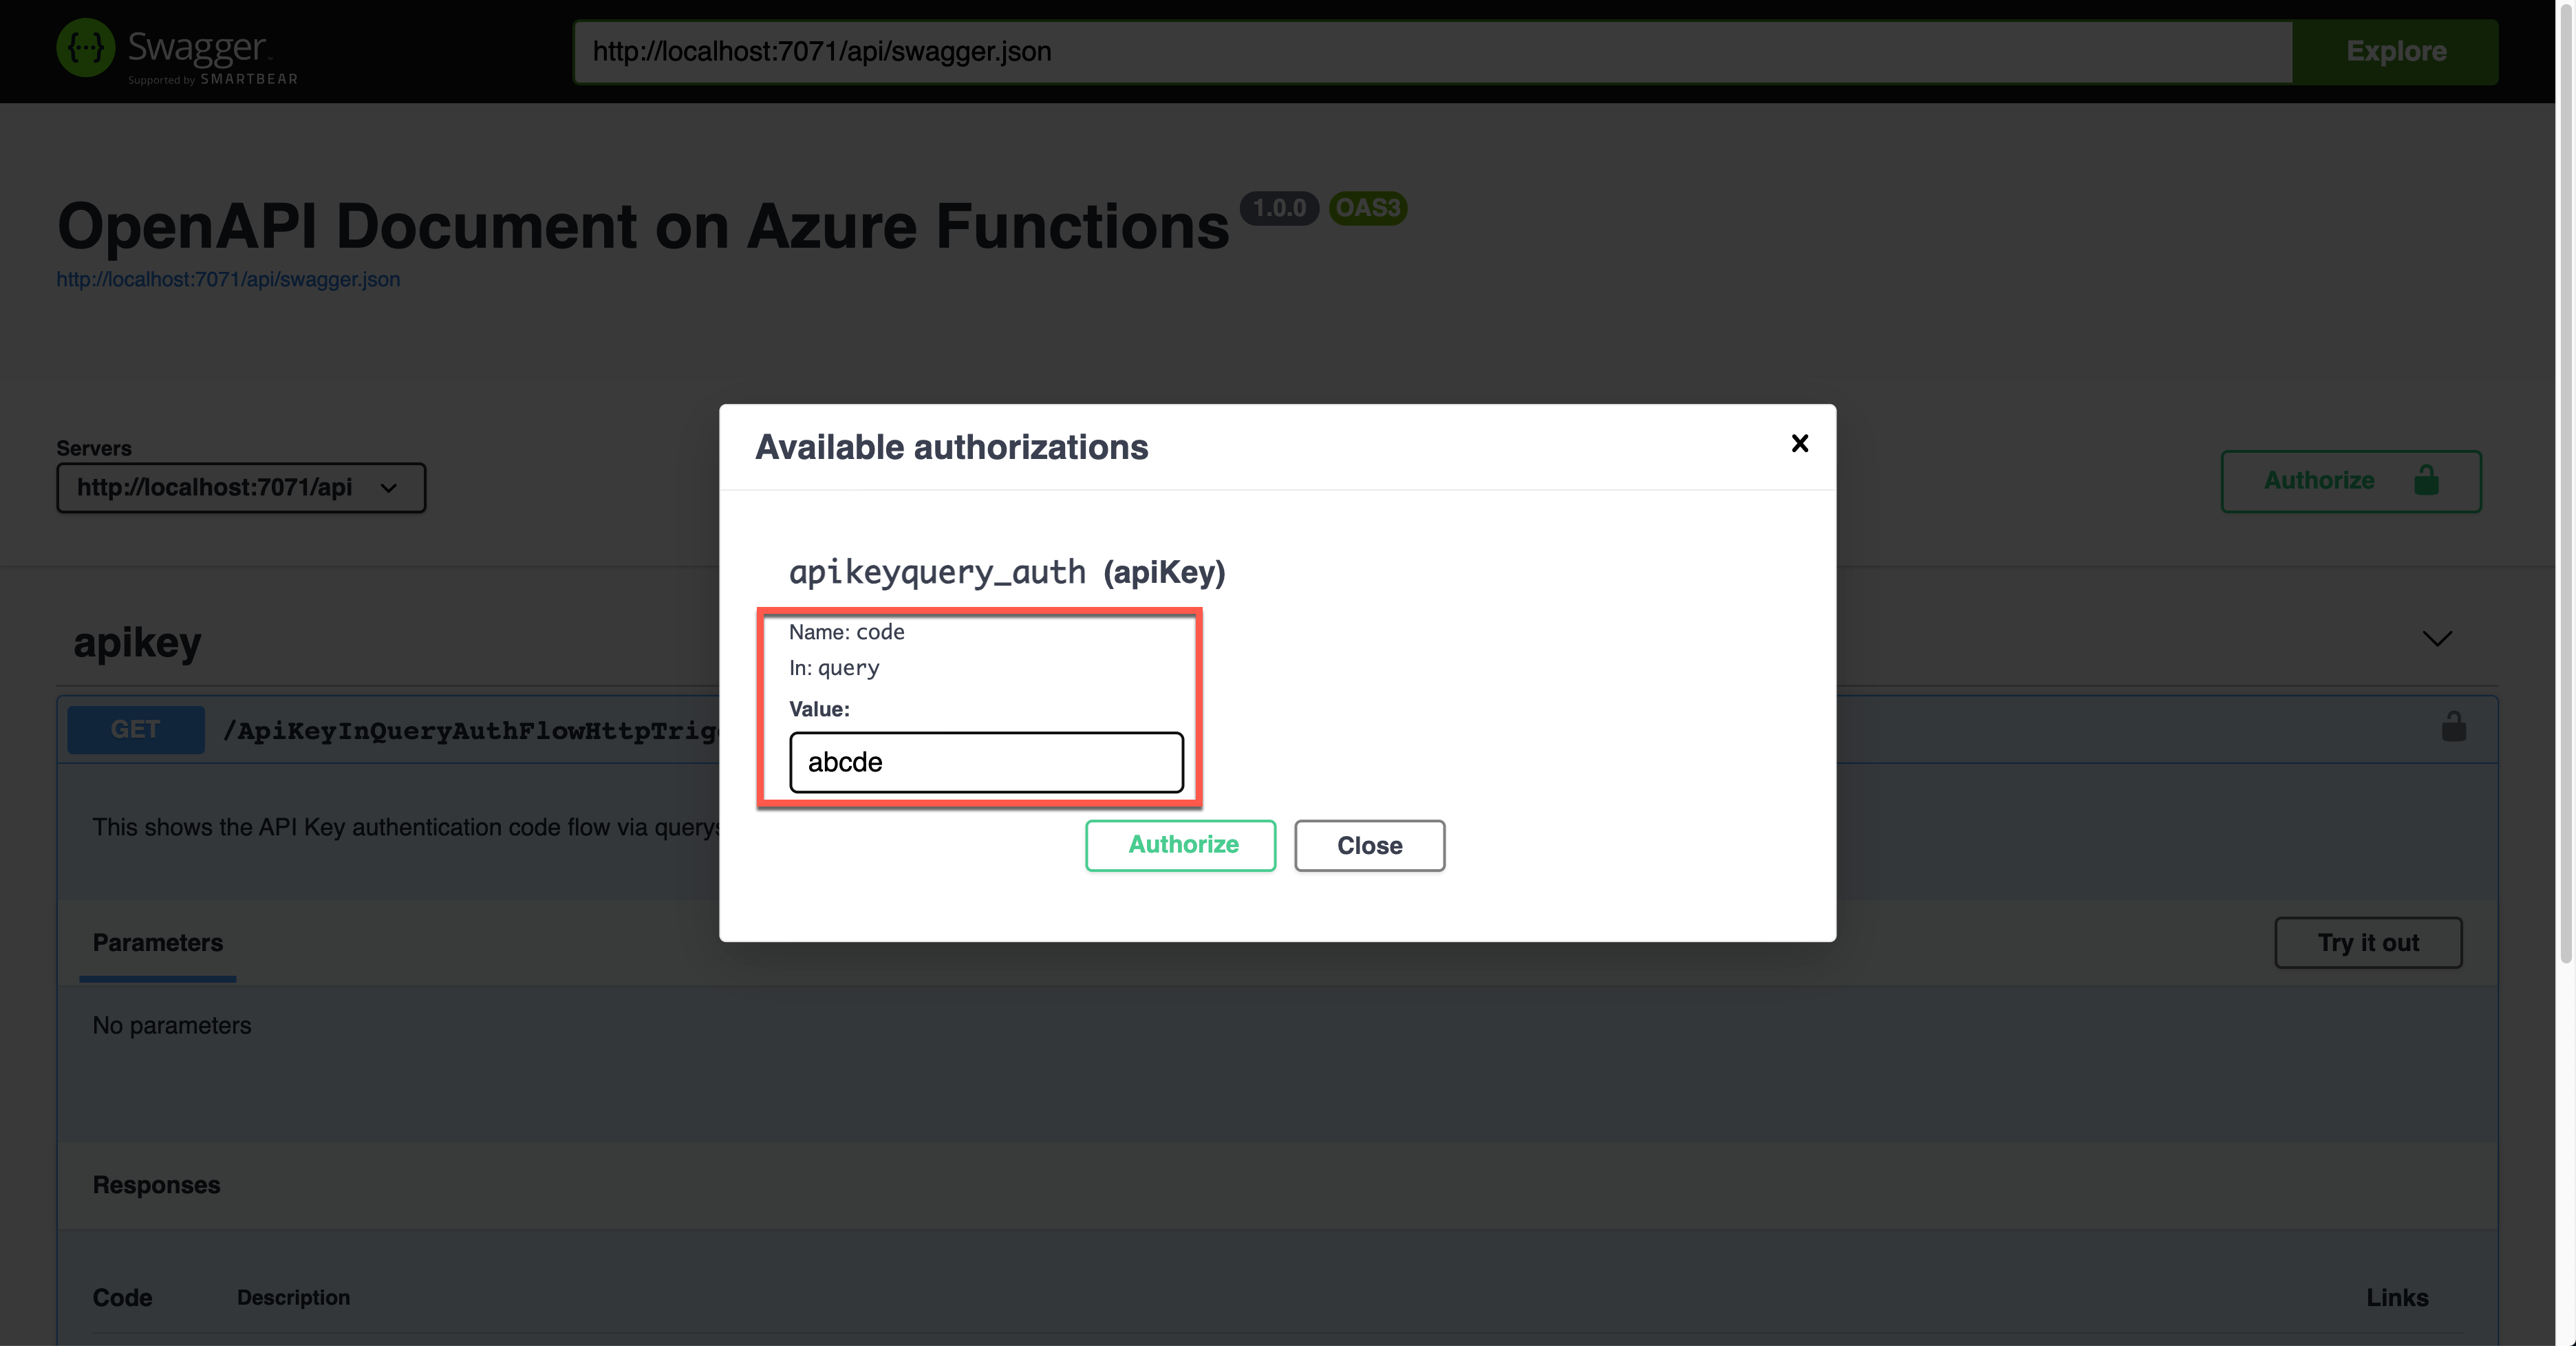
The result screen shows the API key passed through the querystring parameter, code.
API Key in Request Header
It’s also the Azure Function’s built-in feature. This time, set the value of the OpenApiSecurityAttribute(…) decorator like below (line #6-9).
Type: SecuritySchemeType.ApiKey
In: OpenApiSecurityLocationType.Header
Name: x-functions-key
    public static class ApiKeyInHeaderAuthFlowHttpTrigger

    {

        [FunctionName(nameof(ApiKeyInHeaderAuthFlowHttpTrigger))]

        [OpenApiOperation(operationId: “apikey.header”, tags: new[] { “apikey” }, Summary = “API Key authentication code flow via header”, Description = “This shows the API Key authentication code flow via header”, Visibility = OpenApiVisibilityType.Important)]
        [OpenApiSecurity(“apikeyheader_auth”,

                         SecuritySchemeType.ApiKey,

                         In = OpenApiSecurityLocationType.Header,

                         Name = “x-functions-key”)]
        [OpenApiResponseWithBody(statusCode: HttpStatusCode.OK, contentType: “application/json”, bodyType: typeof(Dictionary<string, string>), Summary = “successful operation”, Description = “successful operation”)]

        public static async Task Run(

            [HttpTrigger(AuthorizationLevel.Function, “GET”, Route = null)] HttpRequest req,

            ILogger log)

        {

            log.LogInformation(“C# HTTP trigger function processed a request.”);
            var headers = req.Headers.ToDictionary(q => q.Key, q => (string) q.Value);

            var result = new OkObjectResult(headers);
            return await Task.FromResult(result).ConfigureAwait(false);

        }

    }
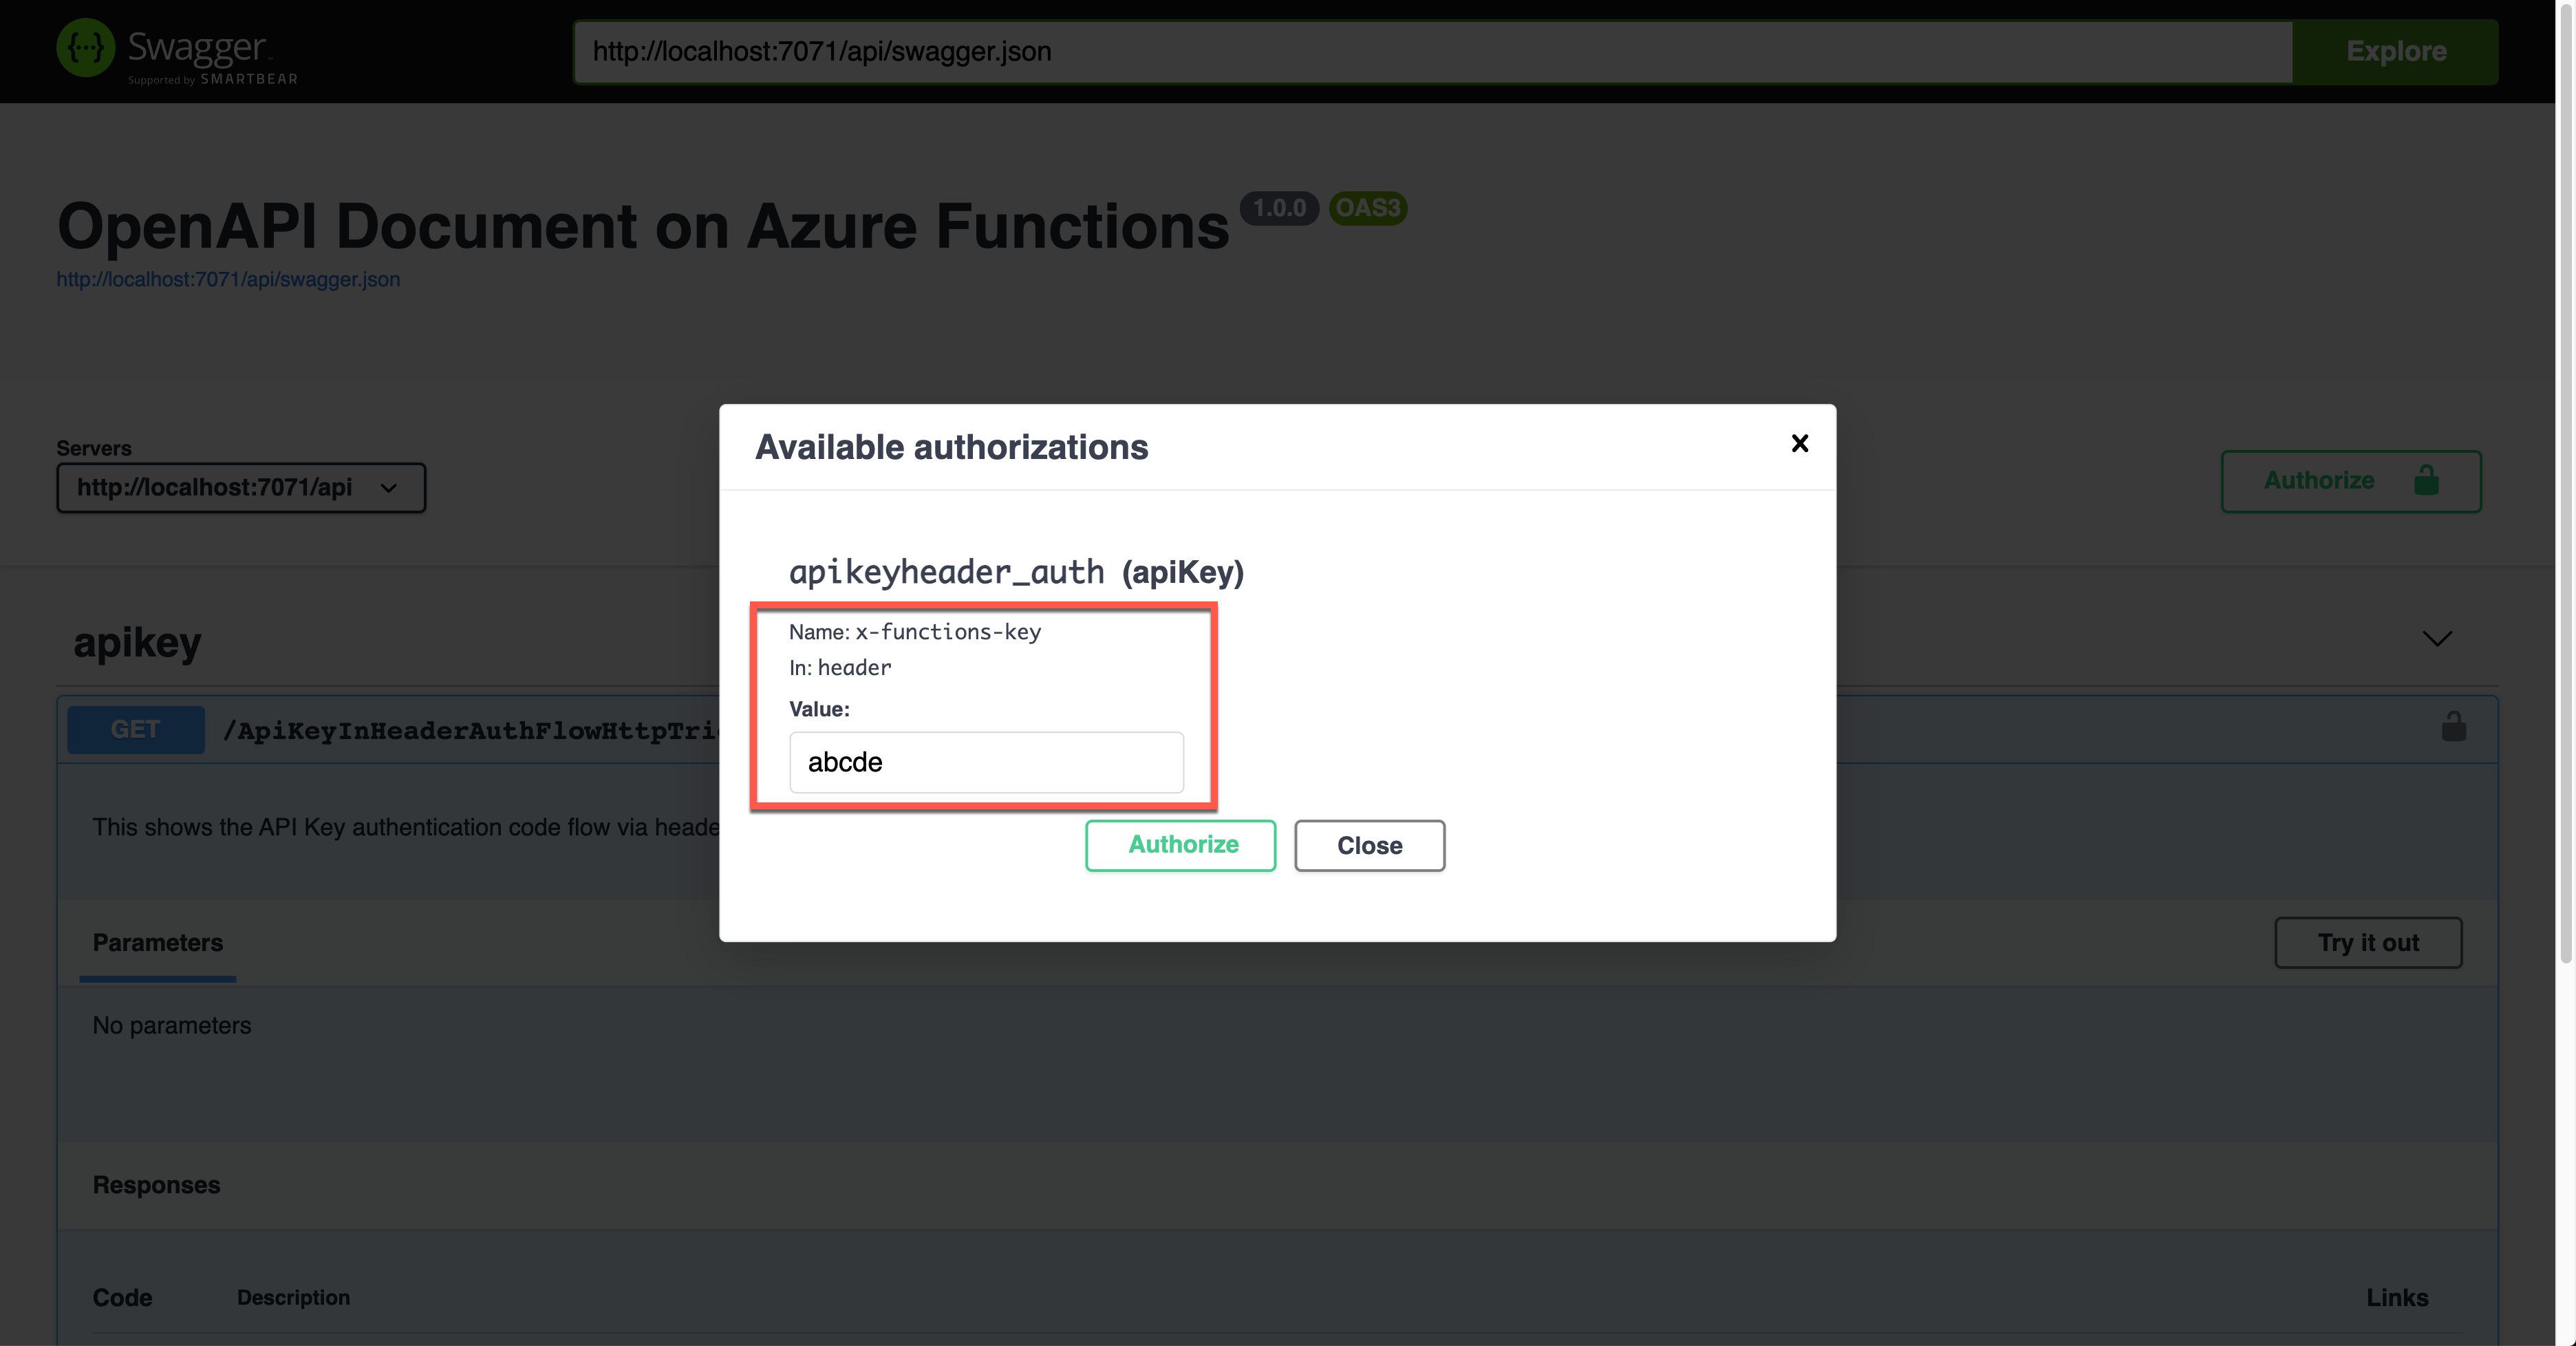
Run the function app and see the Swagger UI page.
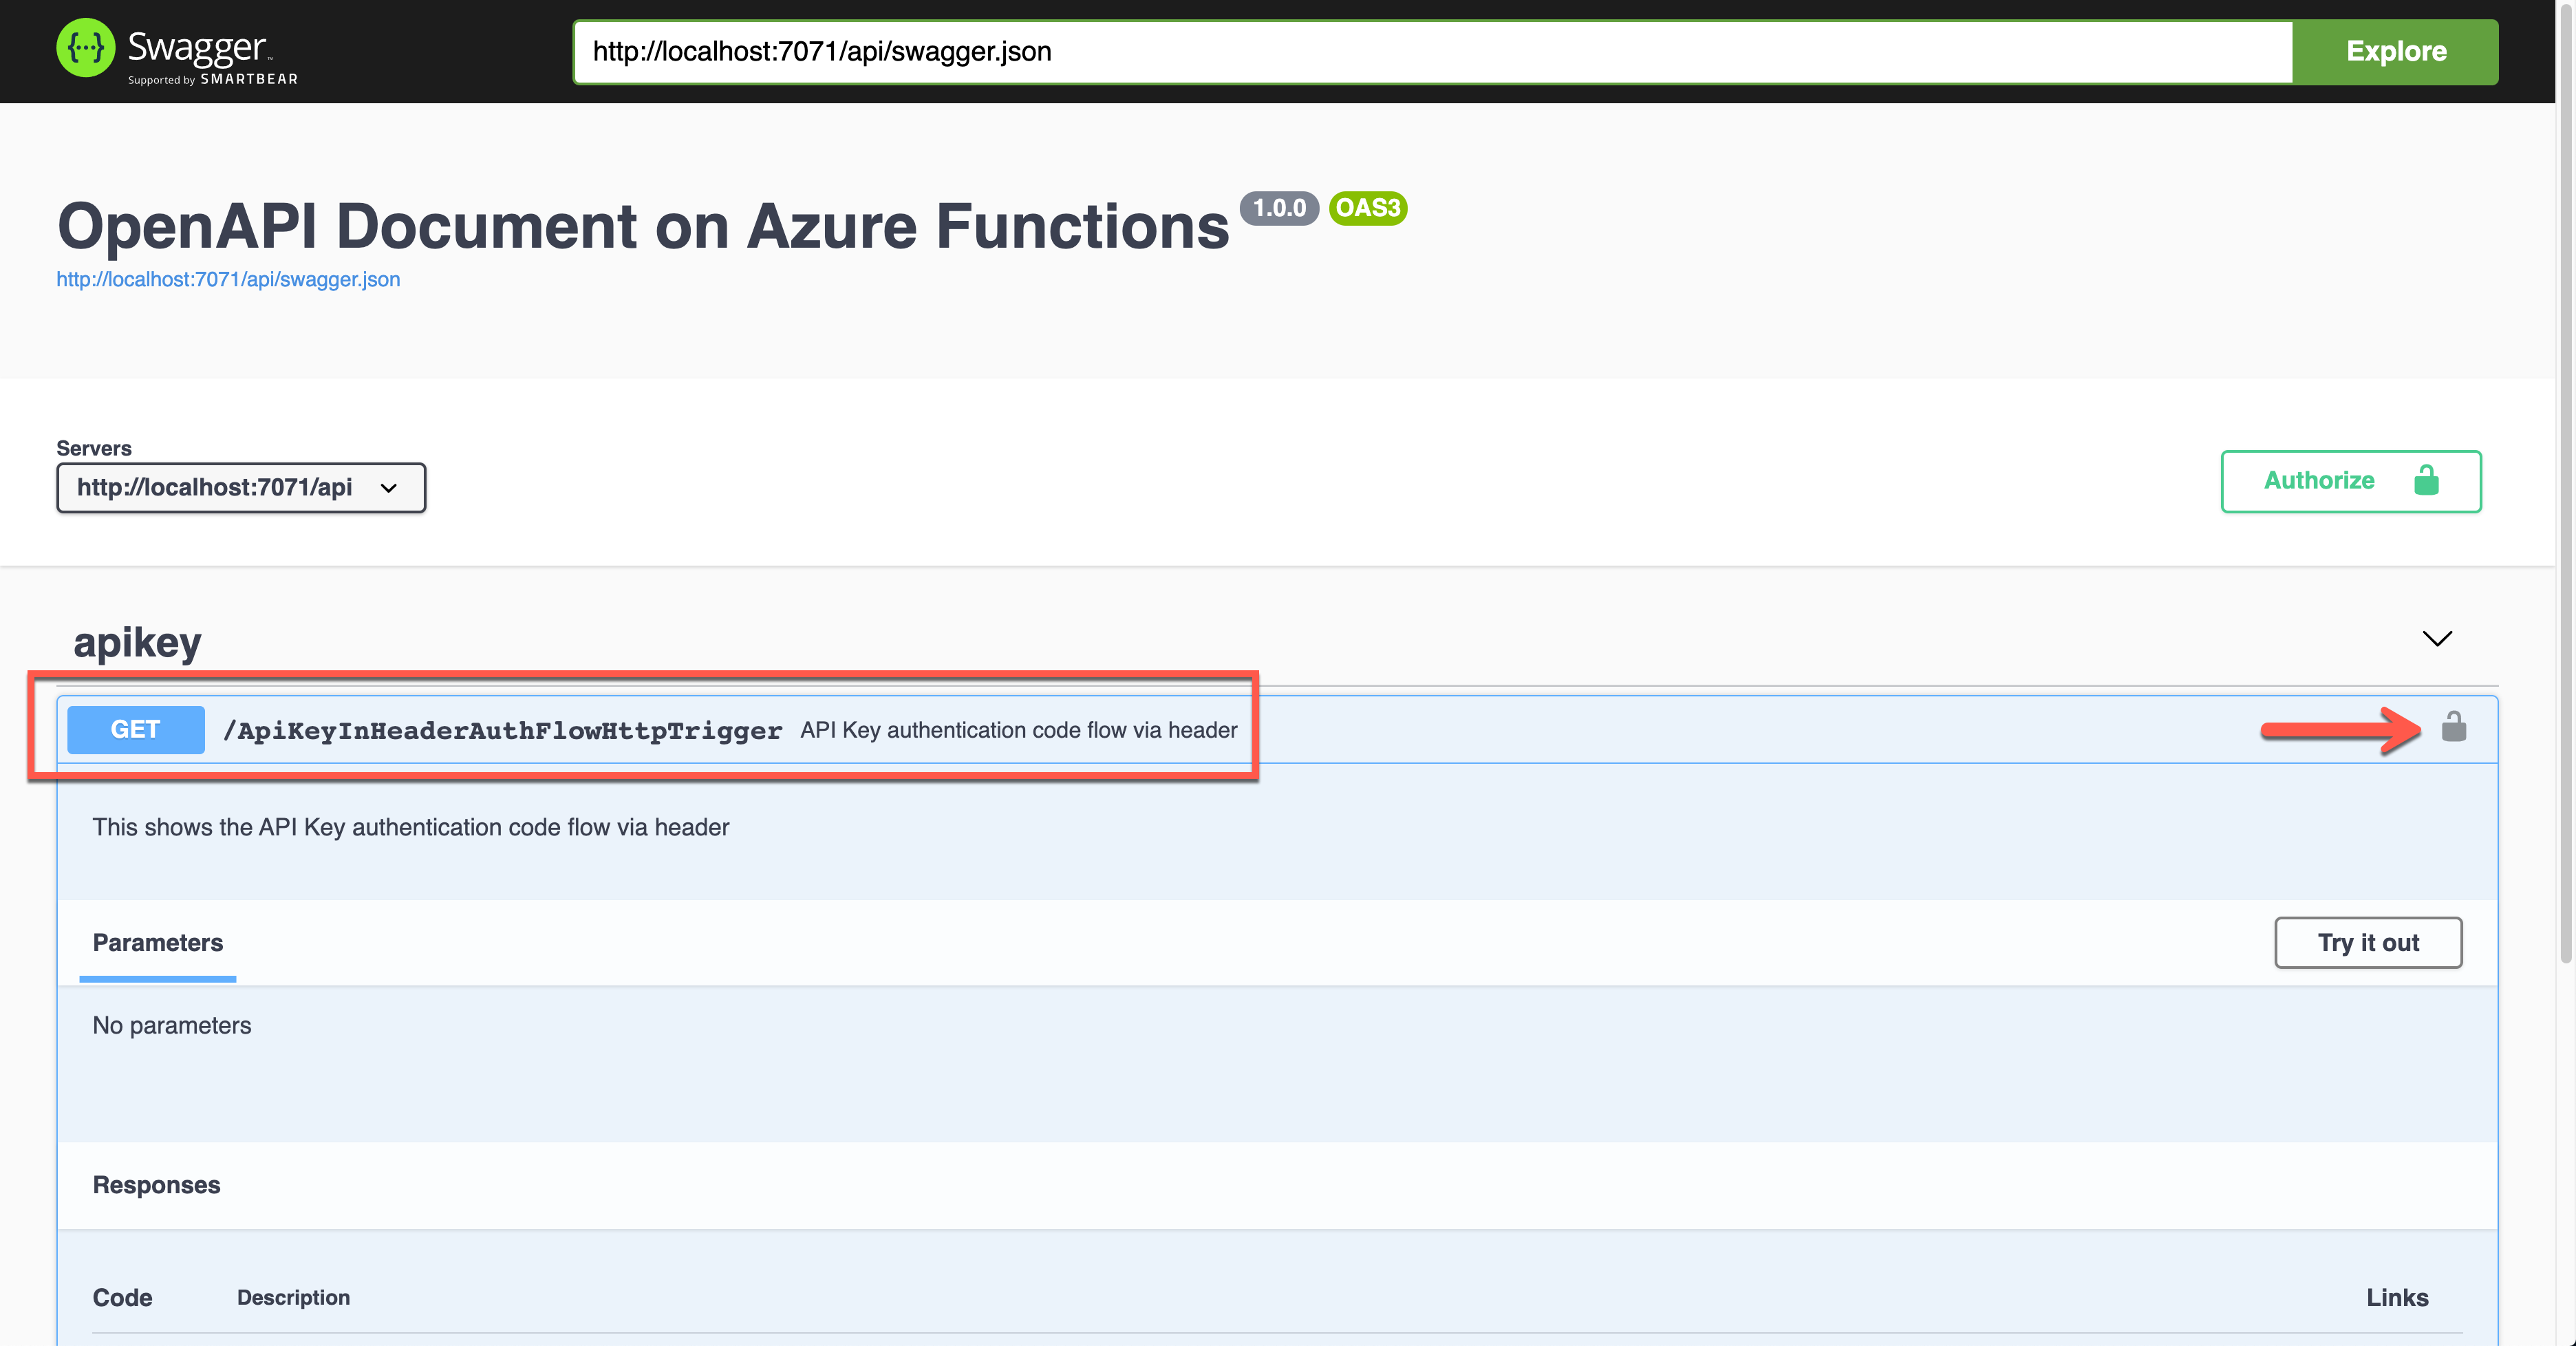
If you want to authenticate the endpoint, enter the API key value to the field, labelled as x-functions-key.
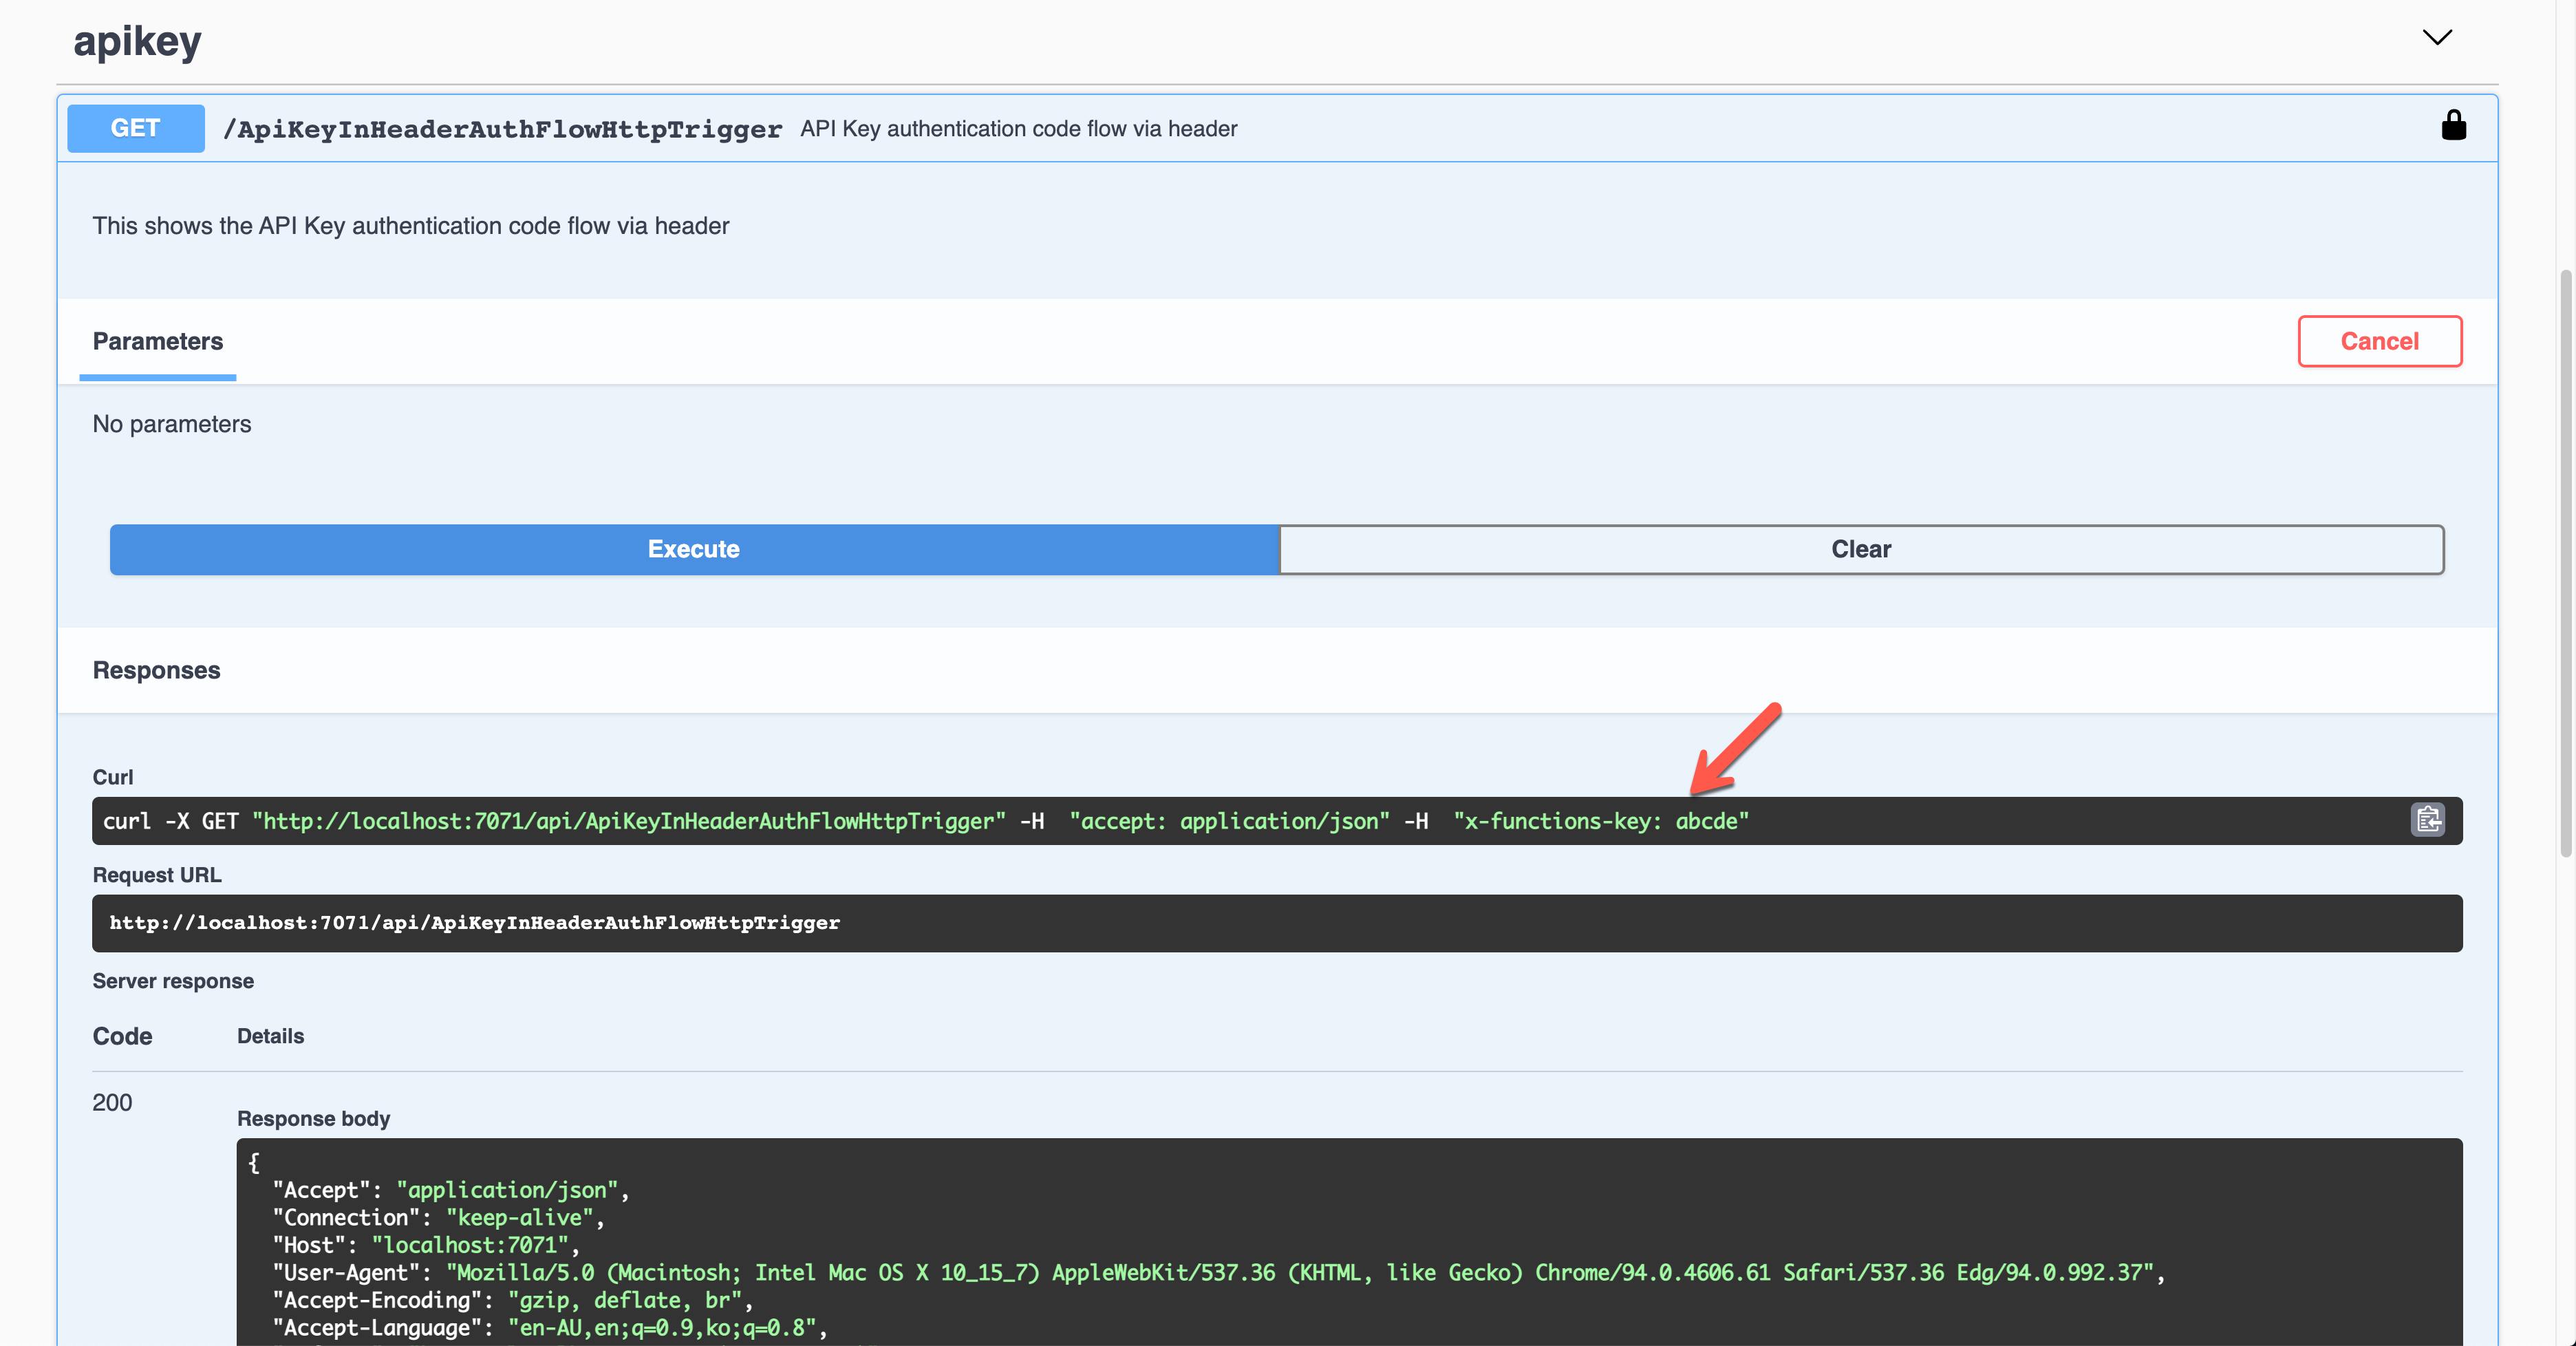
As a result, the API key was sent through the request header, x-functions-key.
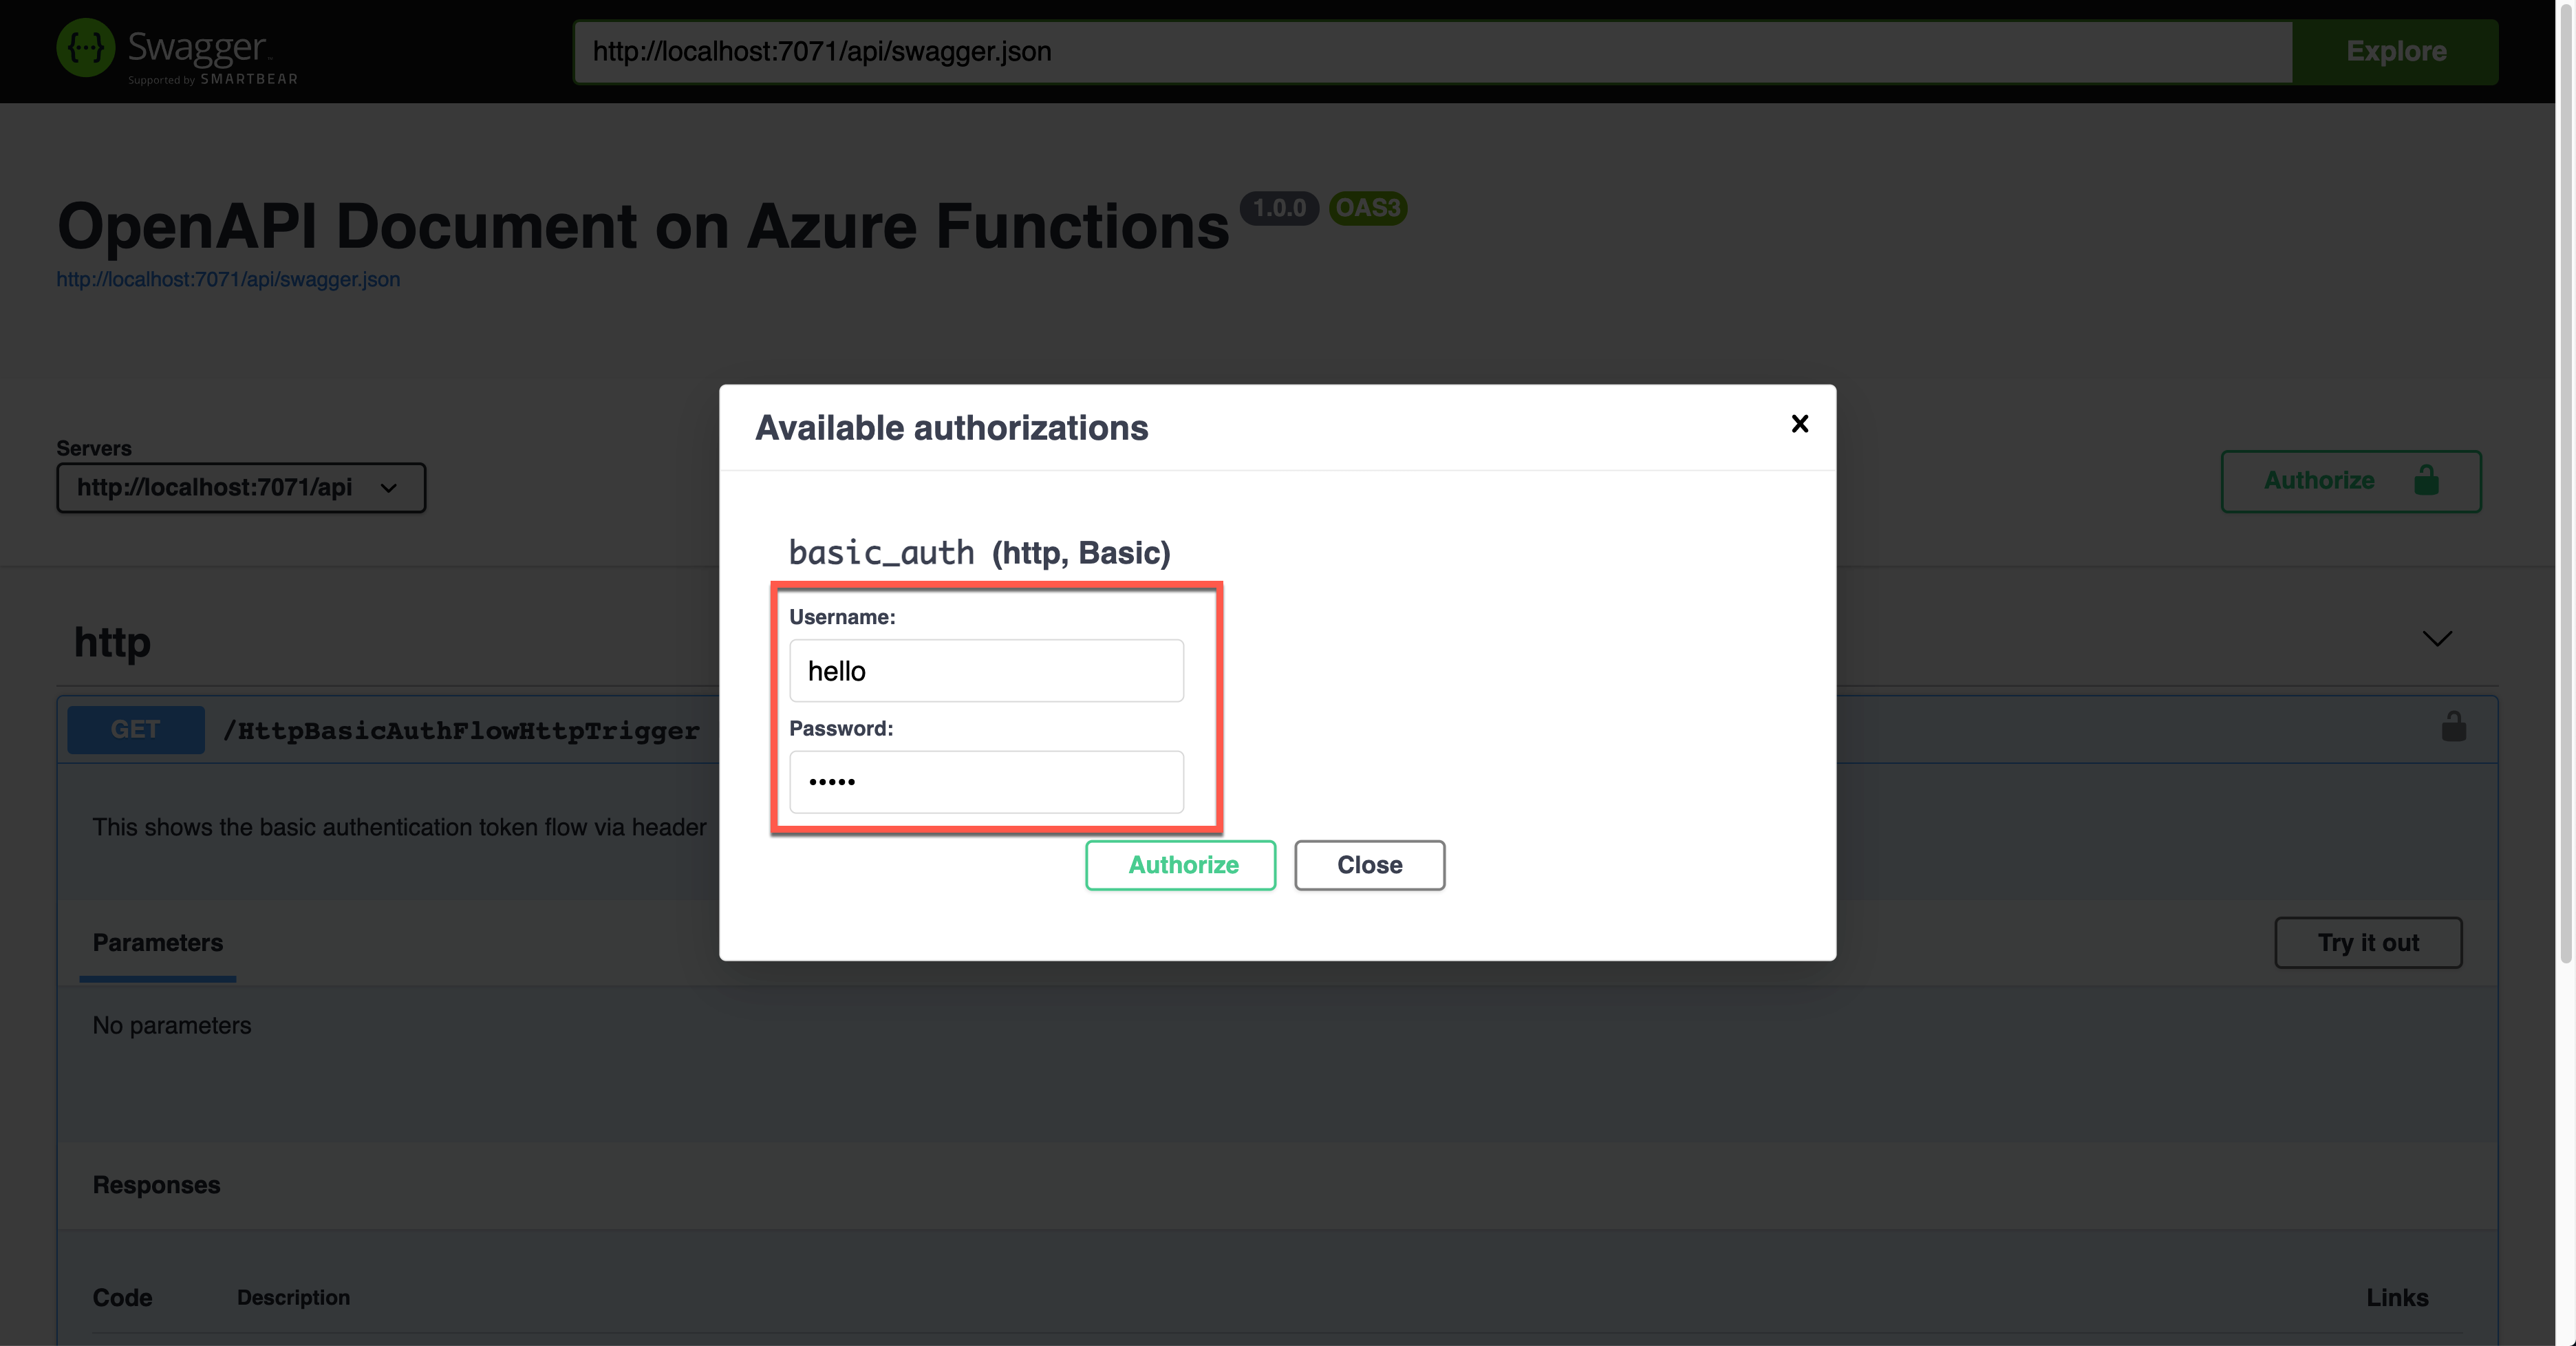
Basic Auth Token
Let’s use the Basic auth token this time. Set the property values of OpenApiSecurityAttribute(…) (line #6-8).
Type: SecuritySchemeType.Http
Scheme: OpenApiSecuritySchemeType.Basic
As this is not the built-in feature, you can use this approach for additional auth methods or replace the built-in feature. If you don’t want to use the built-in API key, you should set the auth level value of the HttpTrigger binding to AuthorizationLevel.Anonymous (line #12).
    public static class HttpBasicAuthFlowHttpTrigger

    {

        [FunctionName(nameof(HttpBasicAuthFlowHttpTrigger))]

        [OpenApiOperation(operationId: “http.basic”, tags: new[] { “http” }, Summary = “Basic authentication token flow via header”, Description = “This shows the basic authentication token flow via header”, Visibility = OpenApiVisibilityType.Important)]
        [OpenApiSecurity(“basic_auth”,

                         SecuritySchemeType.Http,

                         Scheme = OpenApiSecuritySchemeType.Basic)]
        [OpenApiResponseWithBody(statusCode: HttpStatusCode.OK, contentType: “application/json”, bodyType: typeof(Dictionary<string, string>), Summary = “successful operation”, Description = “successful operation”)]

        public static async Task Run(

            [HttpTrigger(AuthorizationLevel.Anonymous, “GET”, Route = null)] HttpRequest req,

            ILogger log)

        {

            log.LogInformation(“C# HTTP trigger function processed a request.”);
            var headers = req.Headers.ToDictionary(q => q.Key, q => (string) q.Value);

            var result = new OkObjectResult(headers);
            return await Task.FromResult(result).ConfigureAwait(false);

        }

    }
Run the app to see the Swagger UI like below.

To authenticate your endpoint, you should enter the Username and Password, added to the Authorization header.
The result screen shows the request header of Authorization with the base64 encoded value.
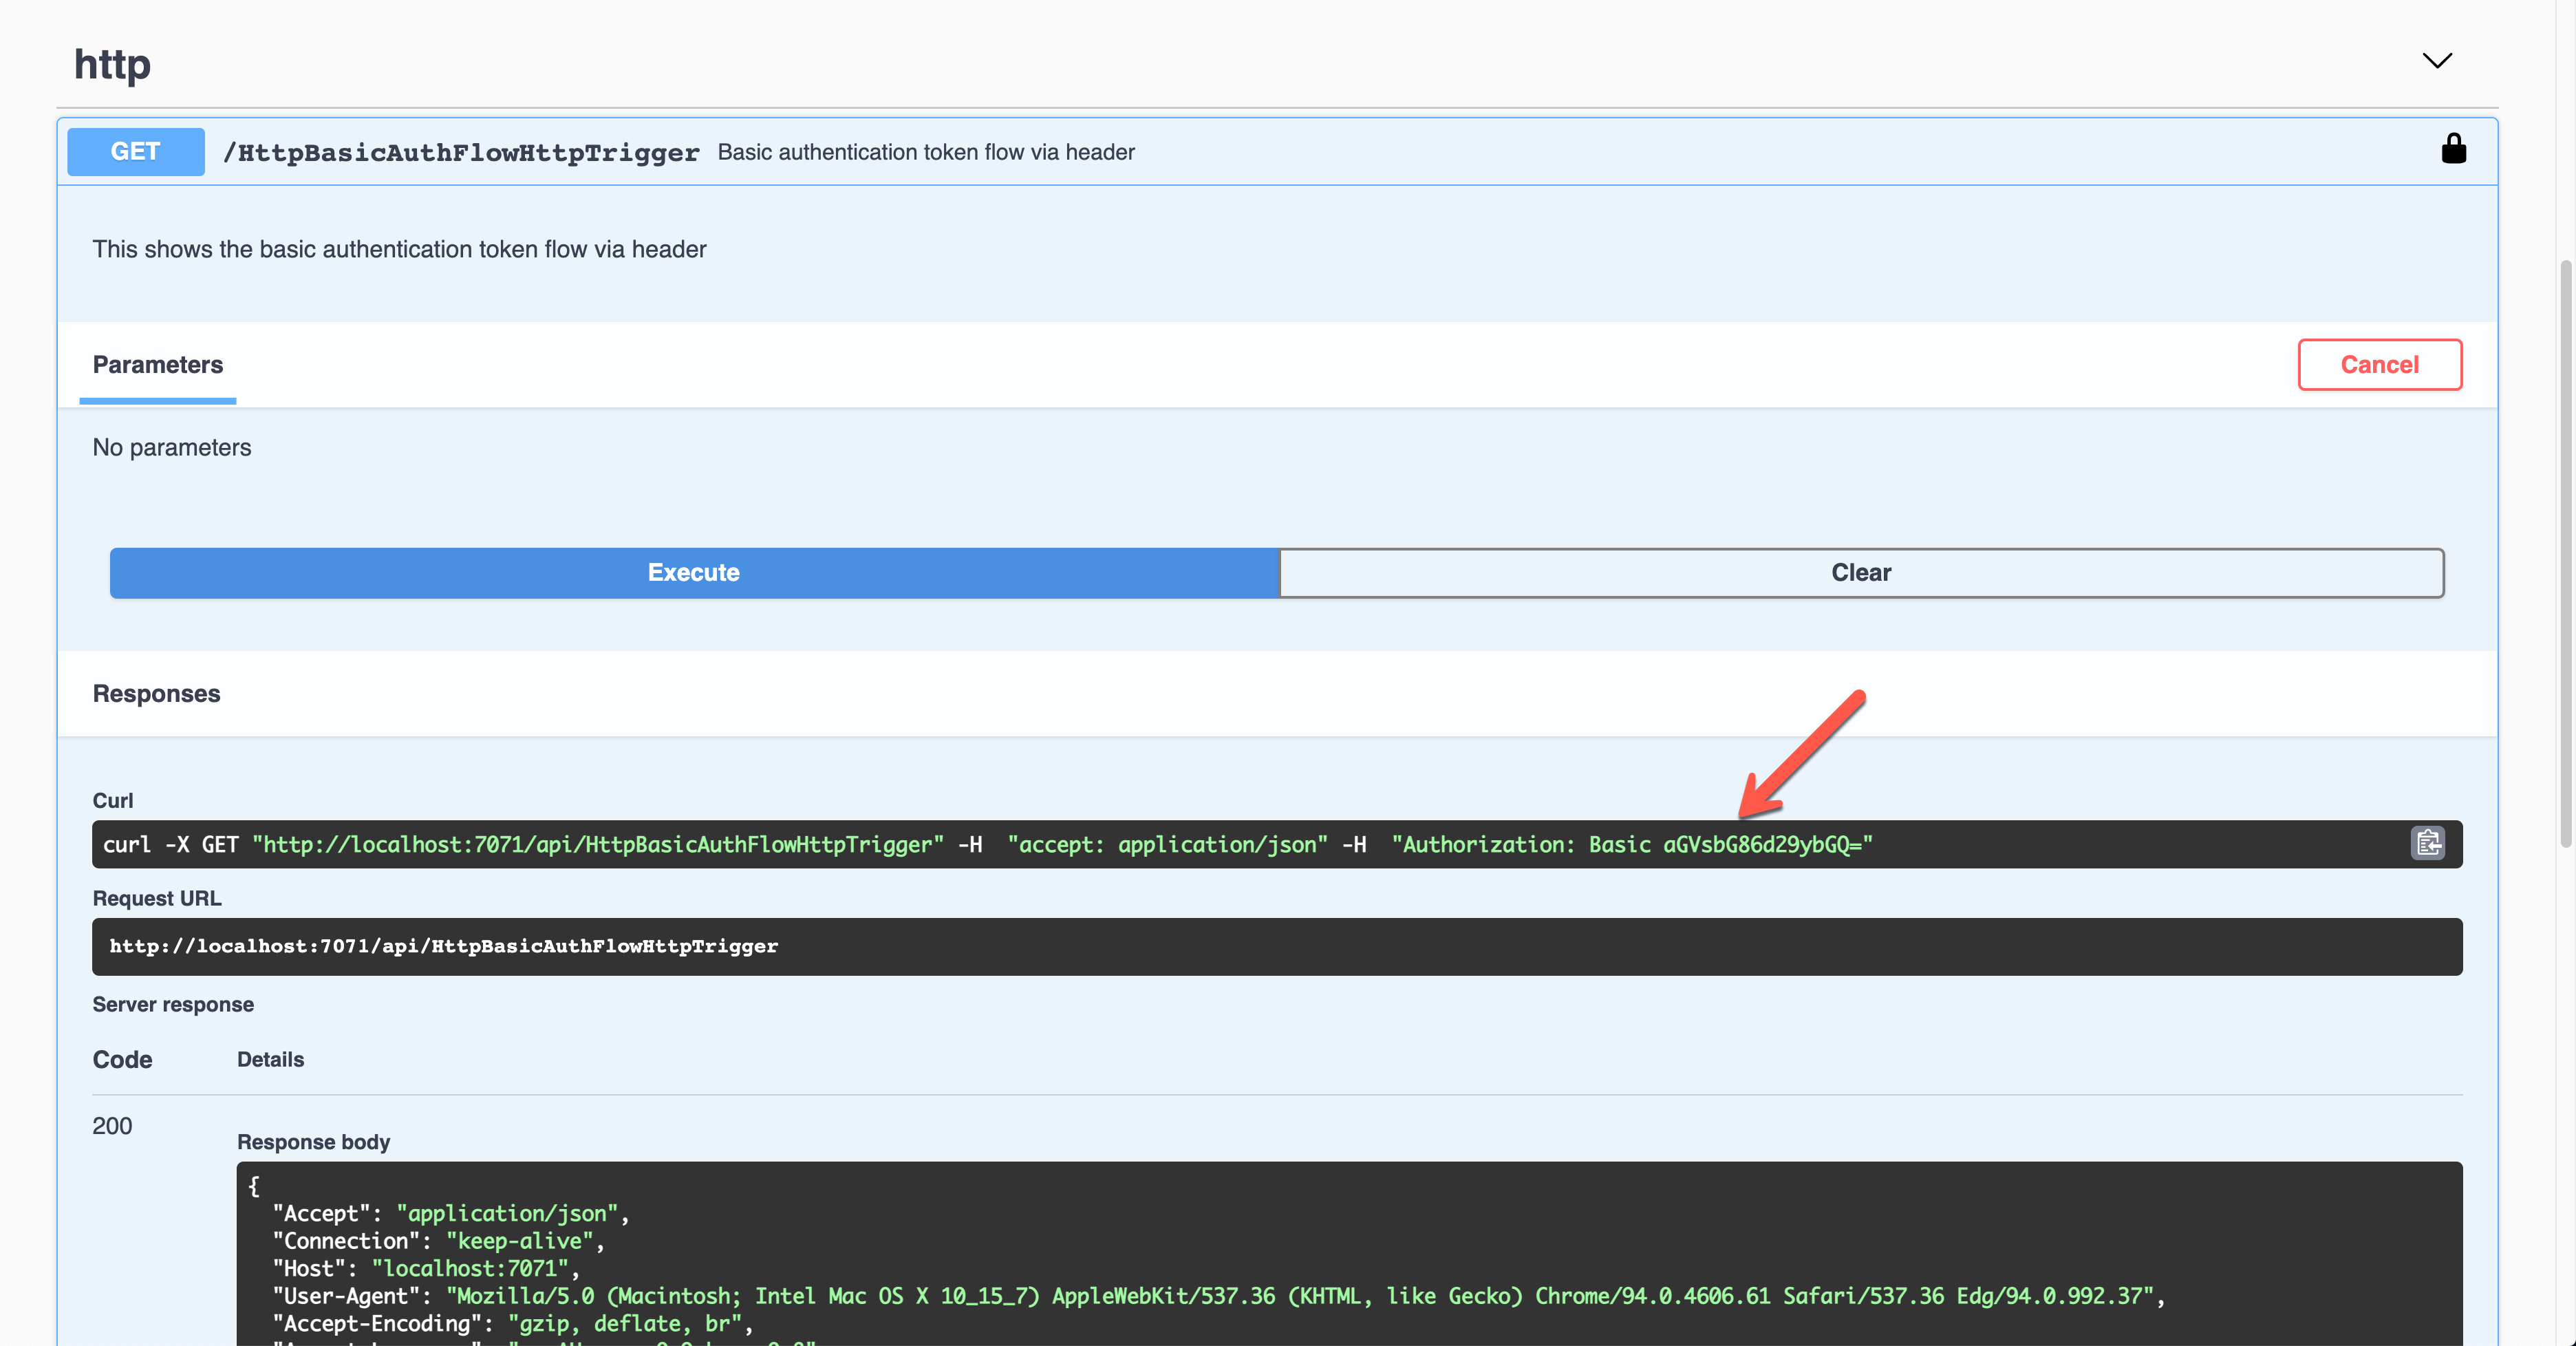
Then, you should validate the auth details with your custom logic.
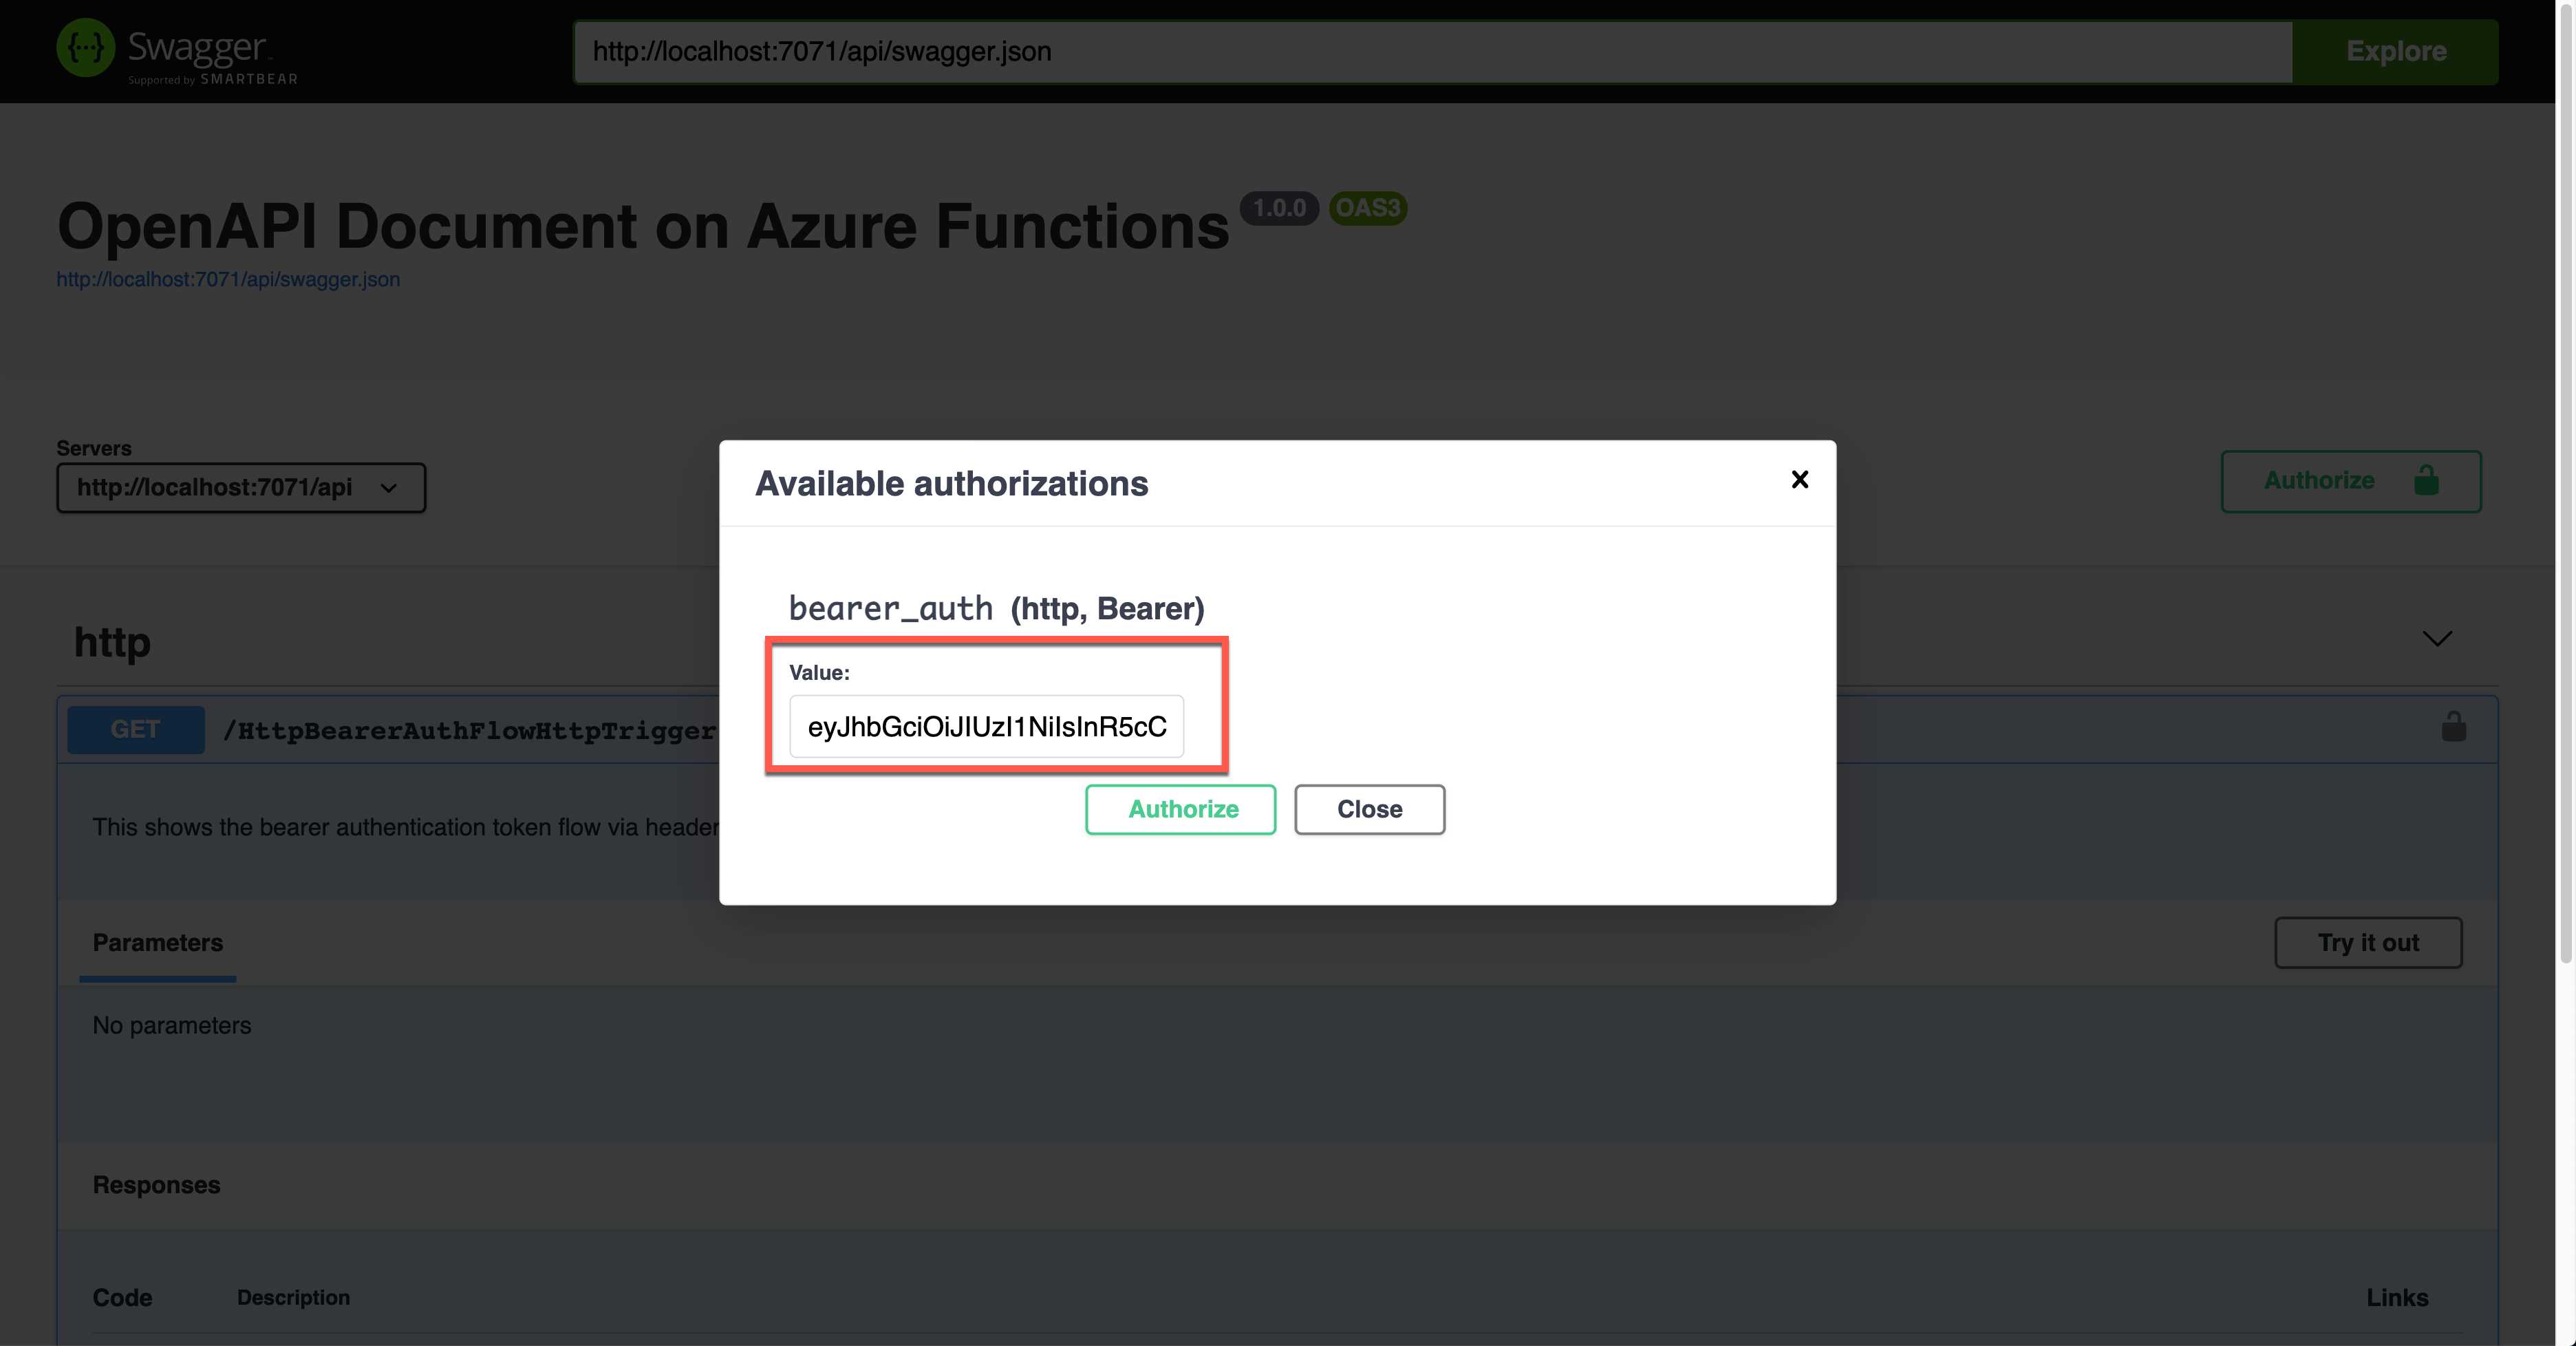
Bearer Auth Token
Similarly, this time, let’s use the Bearer auth token. Set the property values of OpenApiSecurityAttribute(…) (line #5).
Type: SecuritySchemeType.Http
Scheme: OpenApiSecuritySchemeType.Bearer
BearerFormat: JWT
You now know how to set the auth level of the HttpTrigger binding to AuthorizationLevel.Anonymous (line #13).
    public static class HttpBearerAuthFlowHttpTrigger

    {

        [FunctionName(nameof(HttpBearerAuthFlowHttpTrigger))]

        [OpenApiOperation(operationId: “http.bearer”, tags: new[] { “http” }, Summary = “Bearer authentication token flow via header”, Description = “This shows the bearer authentication token flow via header”, Visibility = OpenApiVisibilityType.Important)]
        [OpenApiSecurity(“bearer_auth”,

                         SecuritySchemeType.Http,

                         Scheme = OpenApiSecuritySchemeType.Bearer,

                         BearerFormat = “JWT”)]
        [OpenApiResponseWithBody(statusCode: HttpStatusCode.OK, contentType: “application/json”, bodyType: typeof(Dictionary<string, string>), Summary = “successful operation”, Description = “successful operation”)]

        public static async Task Run(

            [HttpTrigger(AuthorizationLevel.Anonymous, “GET”, Route = null)] HttpRequest req,

            ILogger log)

        {

            log.LogInformation(“C# HTTP trigger function processed a request.”);
            var headers = req.Headers.ToDictionary(q => q.Key, q => (string) q.Value);

            var handler = new JwtSecurityTokenHandler();

            var token = handler.ReadJwtToken(headers[“Authorization”].Split(‘ ‘).Last());

            var claims = token.Claims.Select(p => p.ToString());

            var content = new { headers = headers, claims = claims };
            var result = new OkObjectResult(content);
            return await Task.FromResult(result).ConfigureAwait(false);

        }

    }
Run the function app and see the Swagger UI page.

During the authentication, you are asked to enter the Bearer token value. The Authorization header will add the value.
The result screen shows the JWT value in the Authorization header.
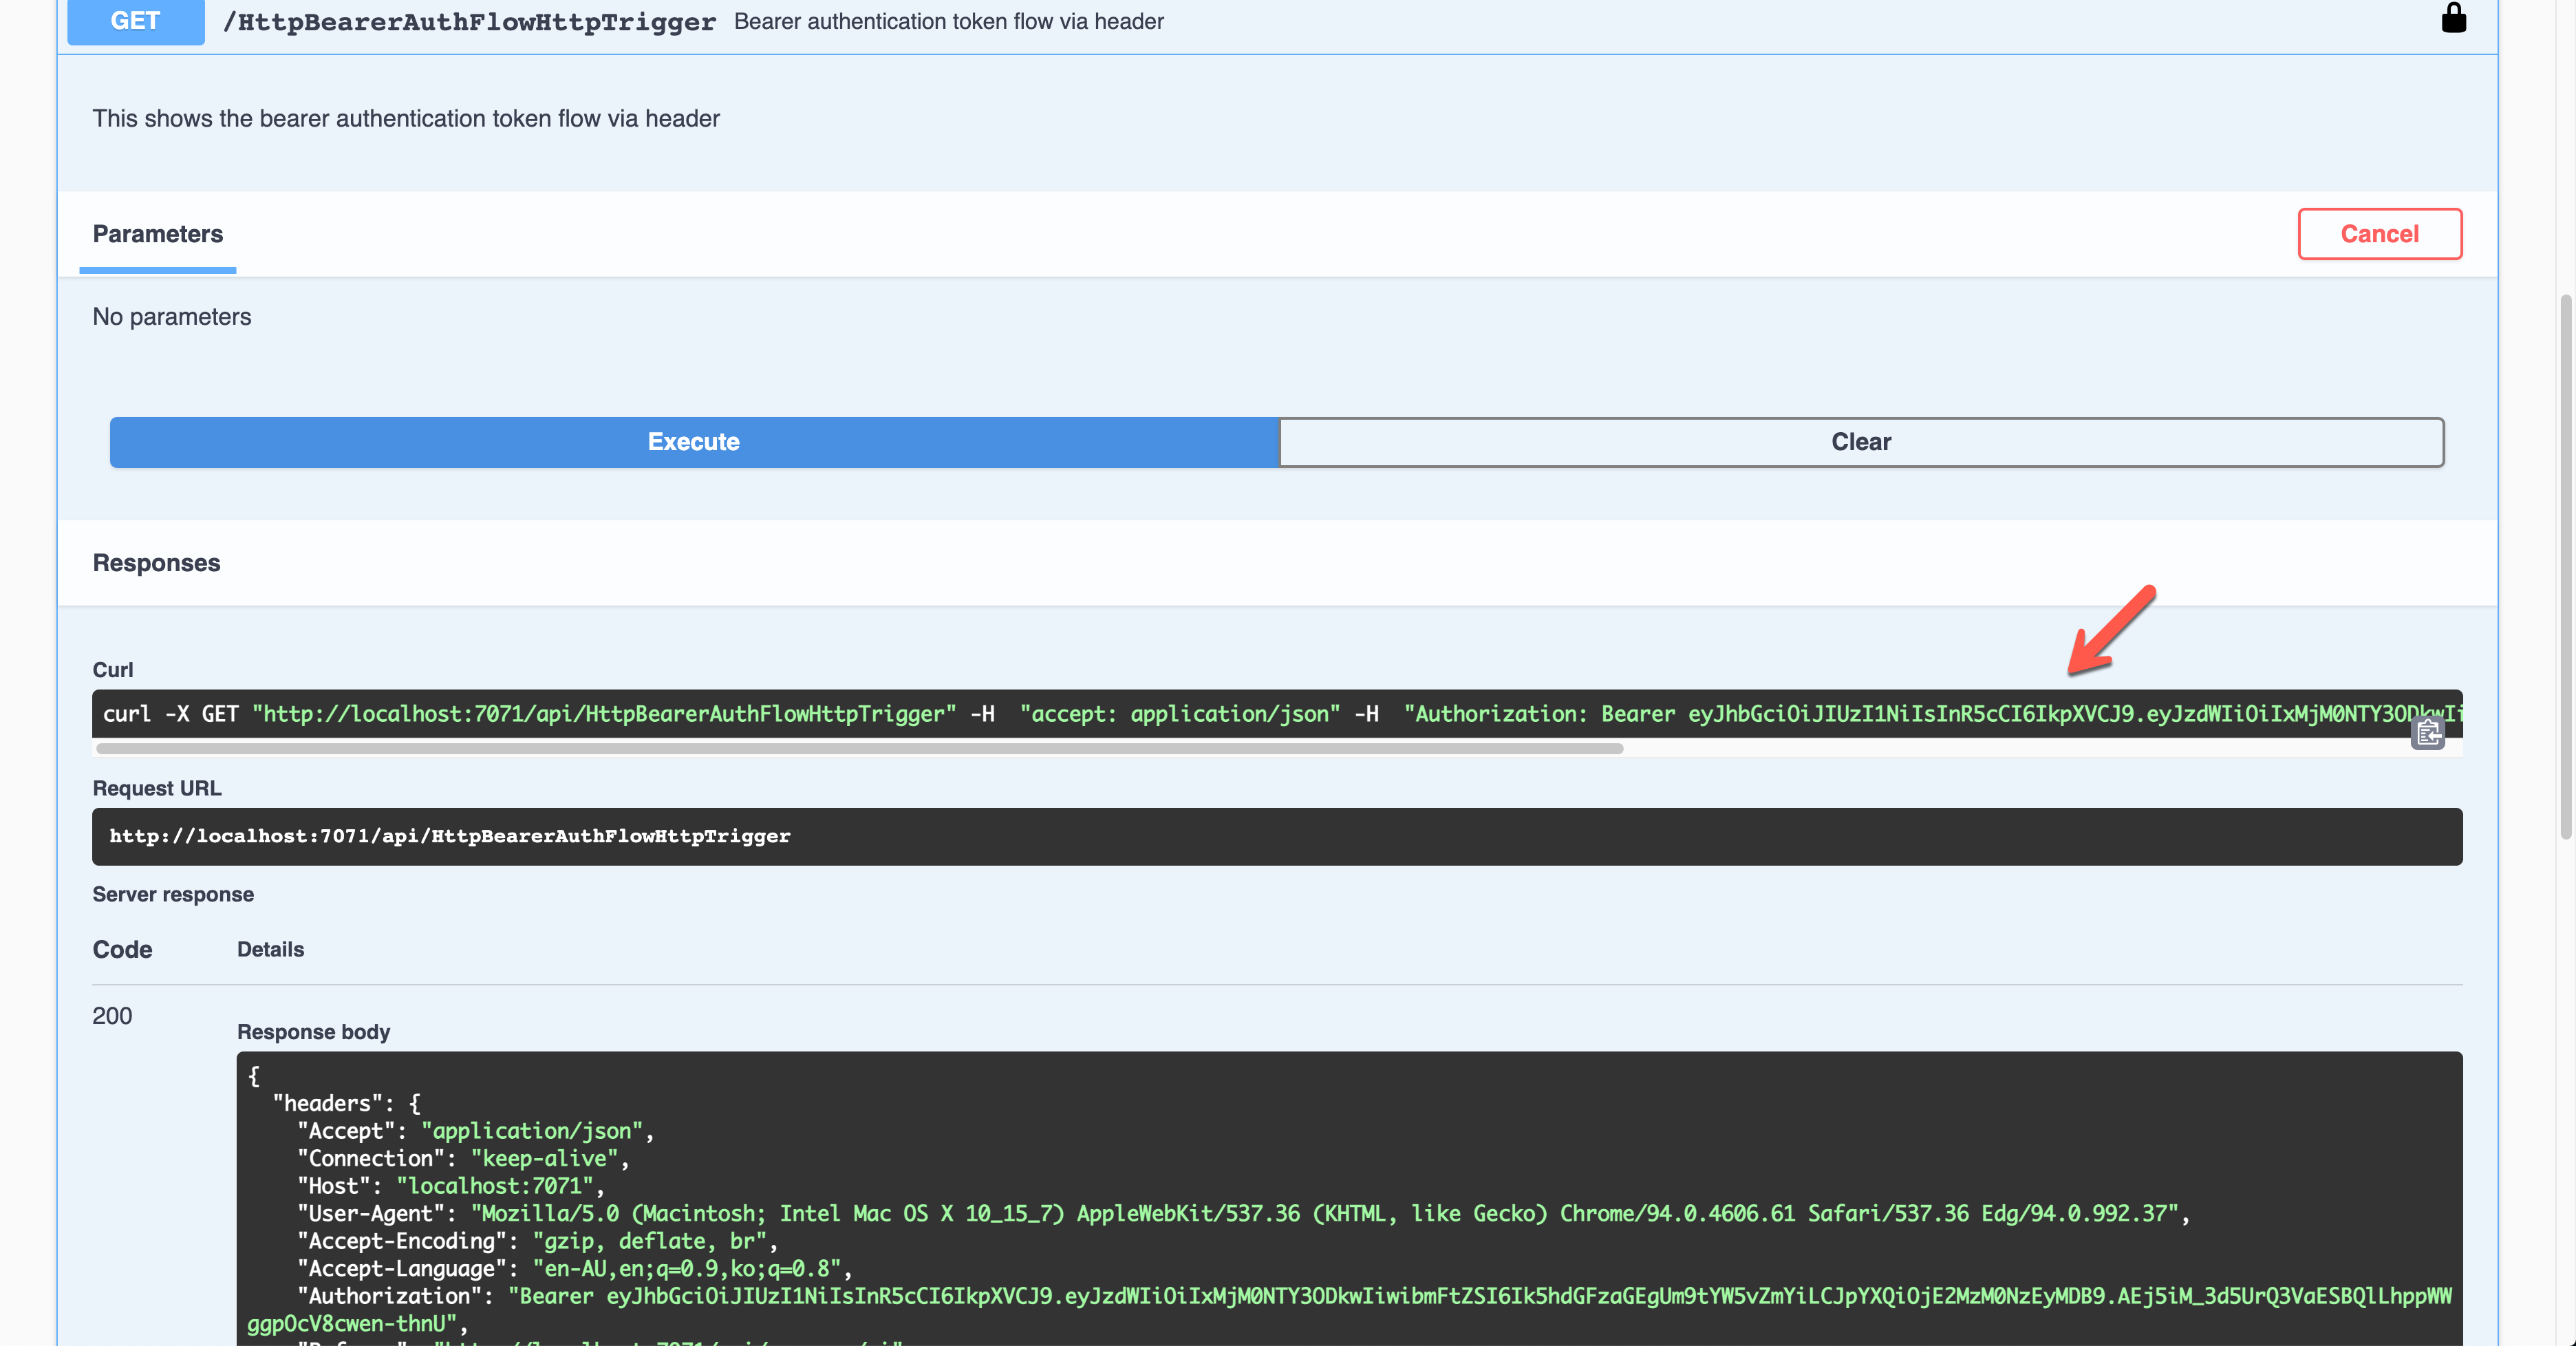
You should decode the JWT and find the appropriate claims and validate them for further processing.
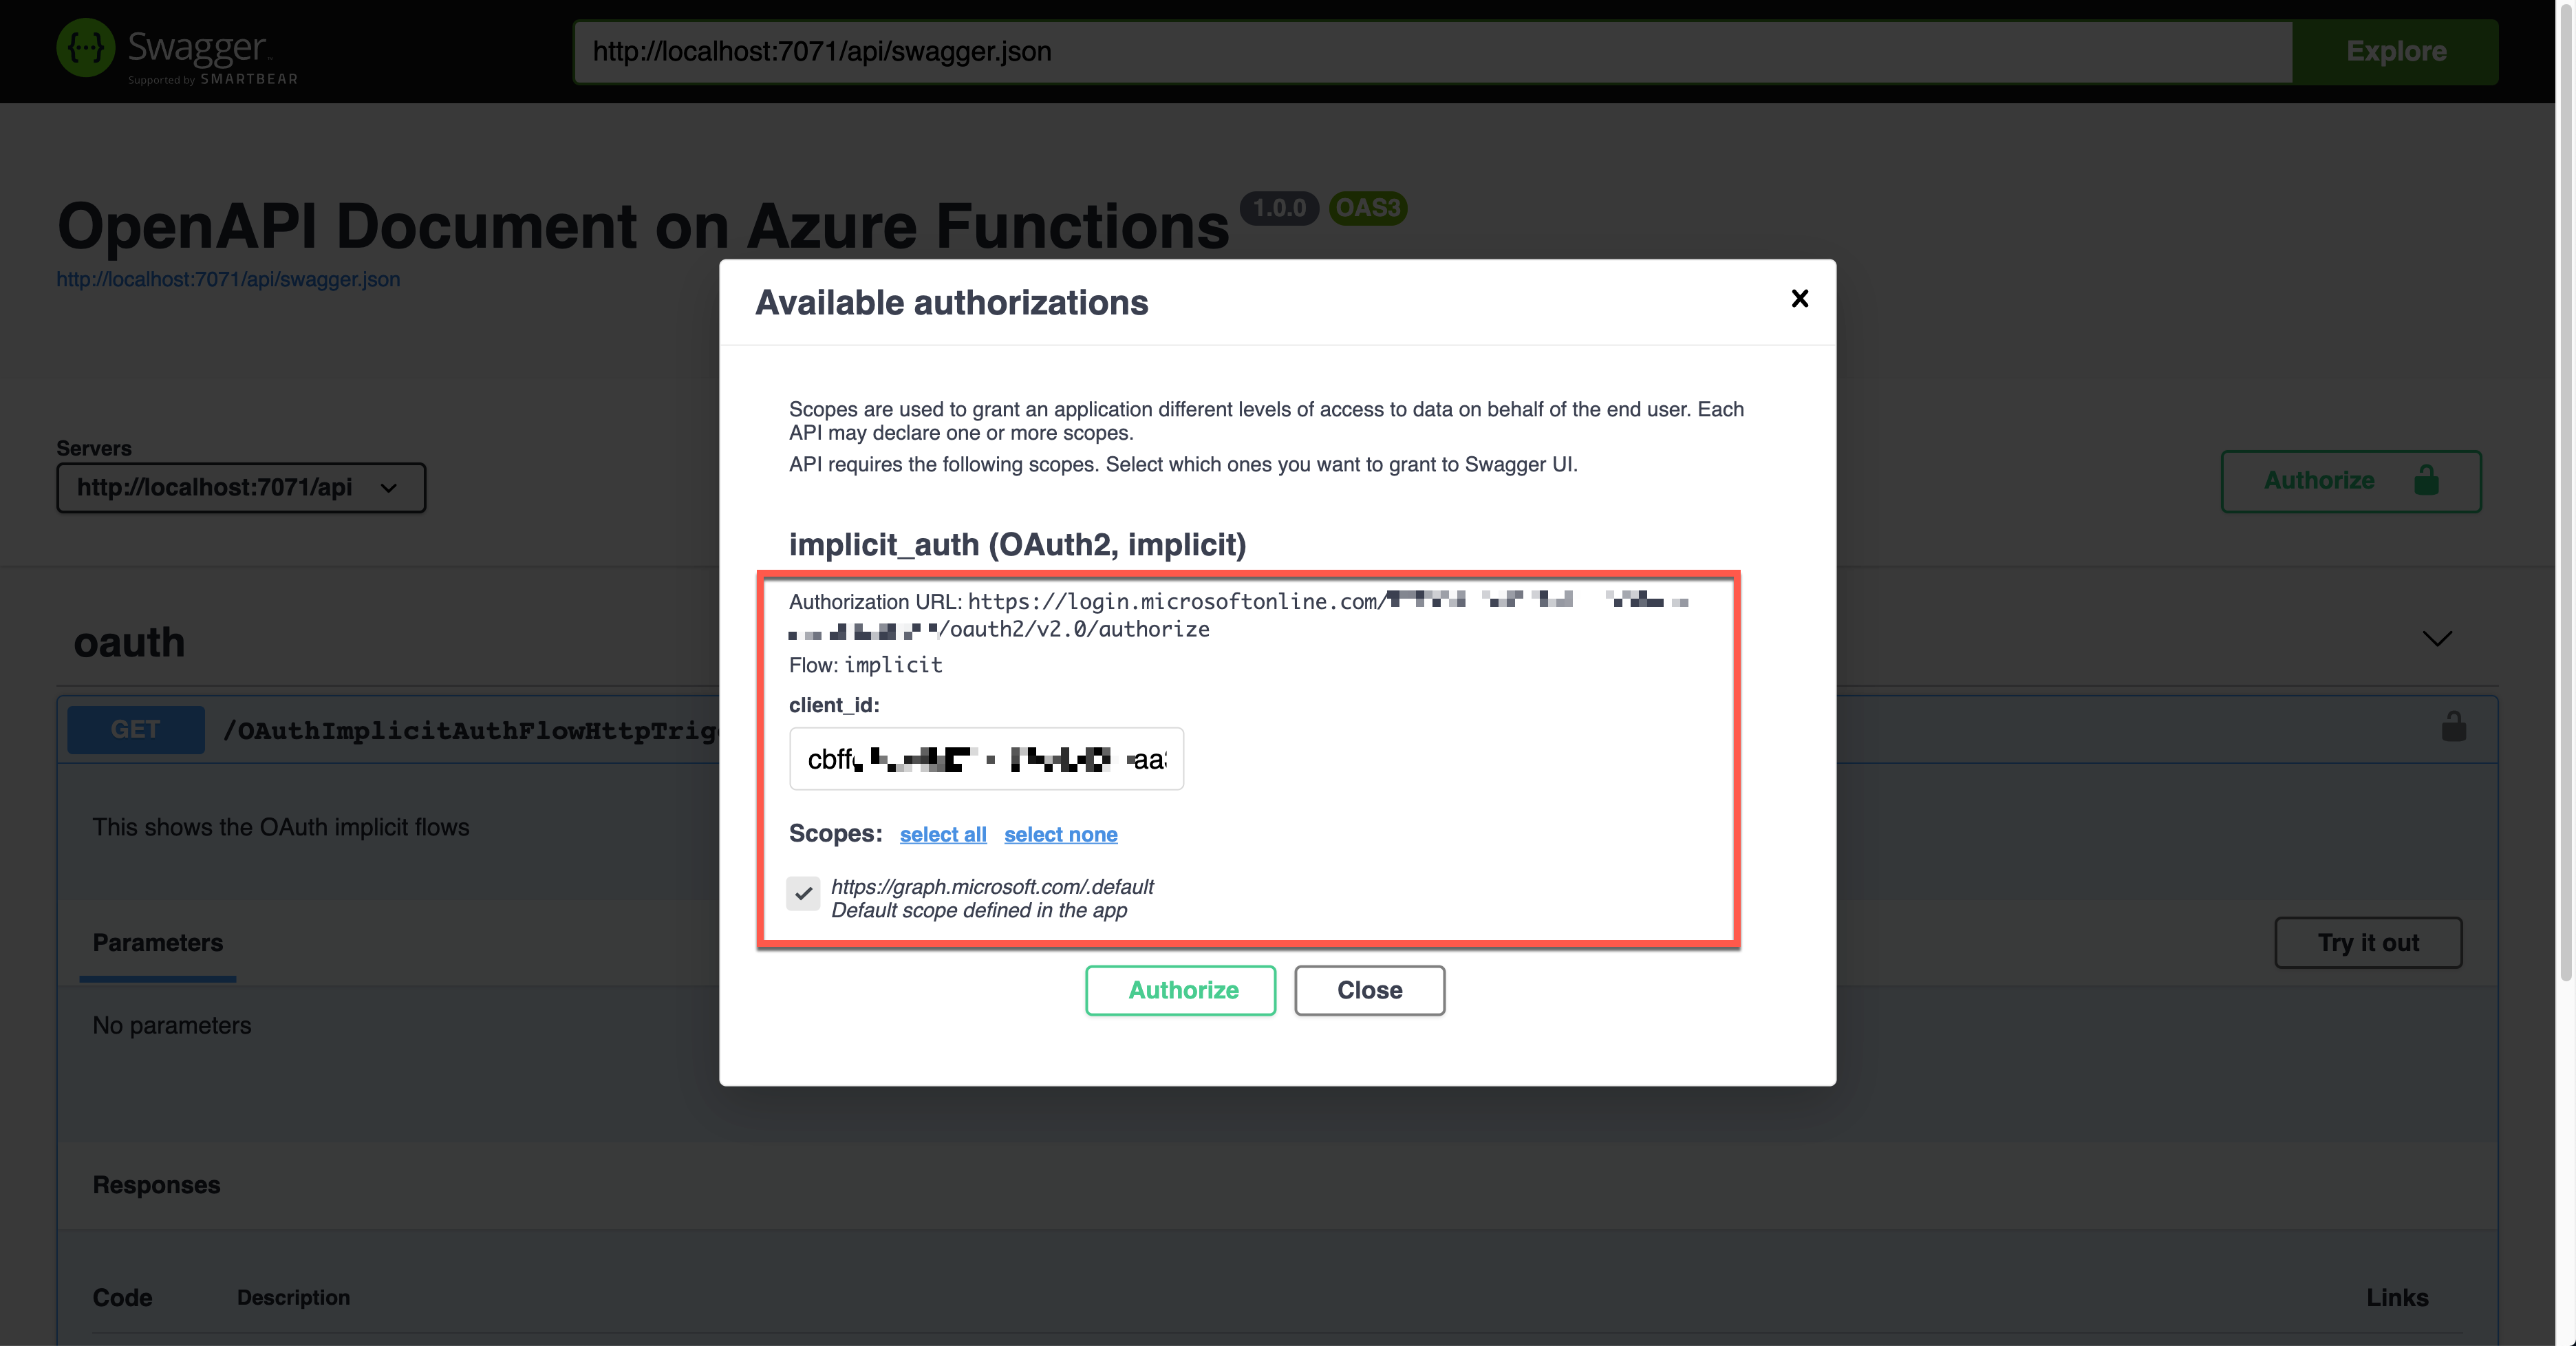
OAuth2 Implicit Auth Flow
Although there are many ways in the OAuth2 authentication flow, I’m going to use the Implicit flow for this time. Set the properties of OpenApiSecurityAttribute(…) (line #6-8).
Type: SecuritySchemeType.OAuth2
Flows: ImplicitAuthFlow
Auth level is also set to Anonymous (line #12).
    public static class OAuthImplicitAuthFlowHttpTrigger

    {

        [FunctionName(nameof(OAuthImplicitAuthFlowHttpTrigger))]

        [OpenApiOperation(operationId: “oauth.flows.implicit”, tags: new[] { “oauth” }, Summary = “OAuth implicit flows”, Description = “This shows the OAuth implicit flows”, Visibility = OpenApiVisibilityType.Important)]
        [OpenApiSecurity(“implicit_auth”,

                         SecuritySchemeType.OAuth2,

                         Flows = typeof(ImplicitAuthFlow))]
        [OpenApiResponseWithBody(statusCode: HttpStatusCode.OK, contentType: “application/json”, bodyType: typeof(IEnumerable), Summary = “successful operation”, Description = “successful operation”)]

        public static async Task Run(

            [HttpTrigger(AuthorizationLevel.Anonymous, “GET”, Route = null)] HttpRequest req,

            ILogger log)

        {

            log.LogInformation(“C# HTTP trigger function processed a request.”);
            var headers = req.Headers.ToDictionary(p => p.Key, p => (string) p.Value);

            var handler = new JwtSecurityTokenHandler();

            var token = handler.ReadJwtToken(headers[“Authorization”].Split(‘ ‘).Last());

            var claims = token.Claims.Select(p => p.ToString());
            var result = new OkObjectResult(claims);
            return await Task.FromResult(result).ConfigureAwait(false);

        }

    }
You can see ImplicitAuthFlow as the flow type. Since it uses Azure Active Directory, it sets AuthorizationUrl, RefreshUrl, and Scopes values. It also takes the single tenant type, which requires the tenant ID (line #3-6, 10, 14-15). Scopes has the default value (line #17).
    public class ImplicitAuthFlow : OpenApiOAuthSecurityFlows

    {

        private const string AuthorisationUrl =

            “https://login.microsoftonline.com/{0}/oauth2/v2.0/authorize”;

        private const string RefreshUrl =

            “https://login.microsoftonline.com/{0}/oauth2/v2.0/token”;
        public ImplicitAuthFlow()

        {

            var tenantId = Environment.GetEnvironmentVariable(“OpenApi__Auth__TenantId”);
            this.Implicit = new OpenApiOAuthFlow()

            {

                AuthorizationUrl = new Uri(string.Format(AuthorisationUrl, tenantId)),

                RefreshUrl = new Uri(string.Format(RefreshUrl, tenantId)),
                Scopes = { { “https://graph.microsoft.com/.default”, “Default scope defined in the app” } }

            };

        }

    }
Run the function app and check the Swagger UI page.

When you click the lock button, it asks you to enter the client ID value, redirecting you to sign in to Azure Active Directory. Then, you will get the access token.
The result shows the Authorization header with the access token in the JWT format.

That JWT is now decoded and verified for further processing.
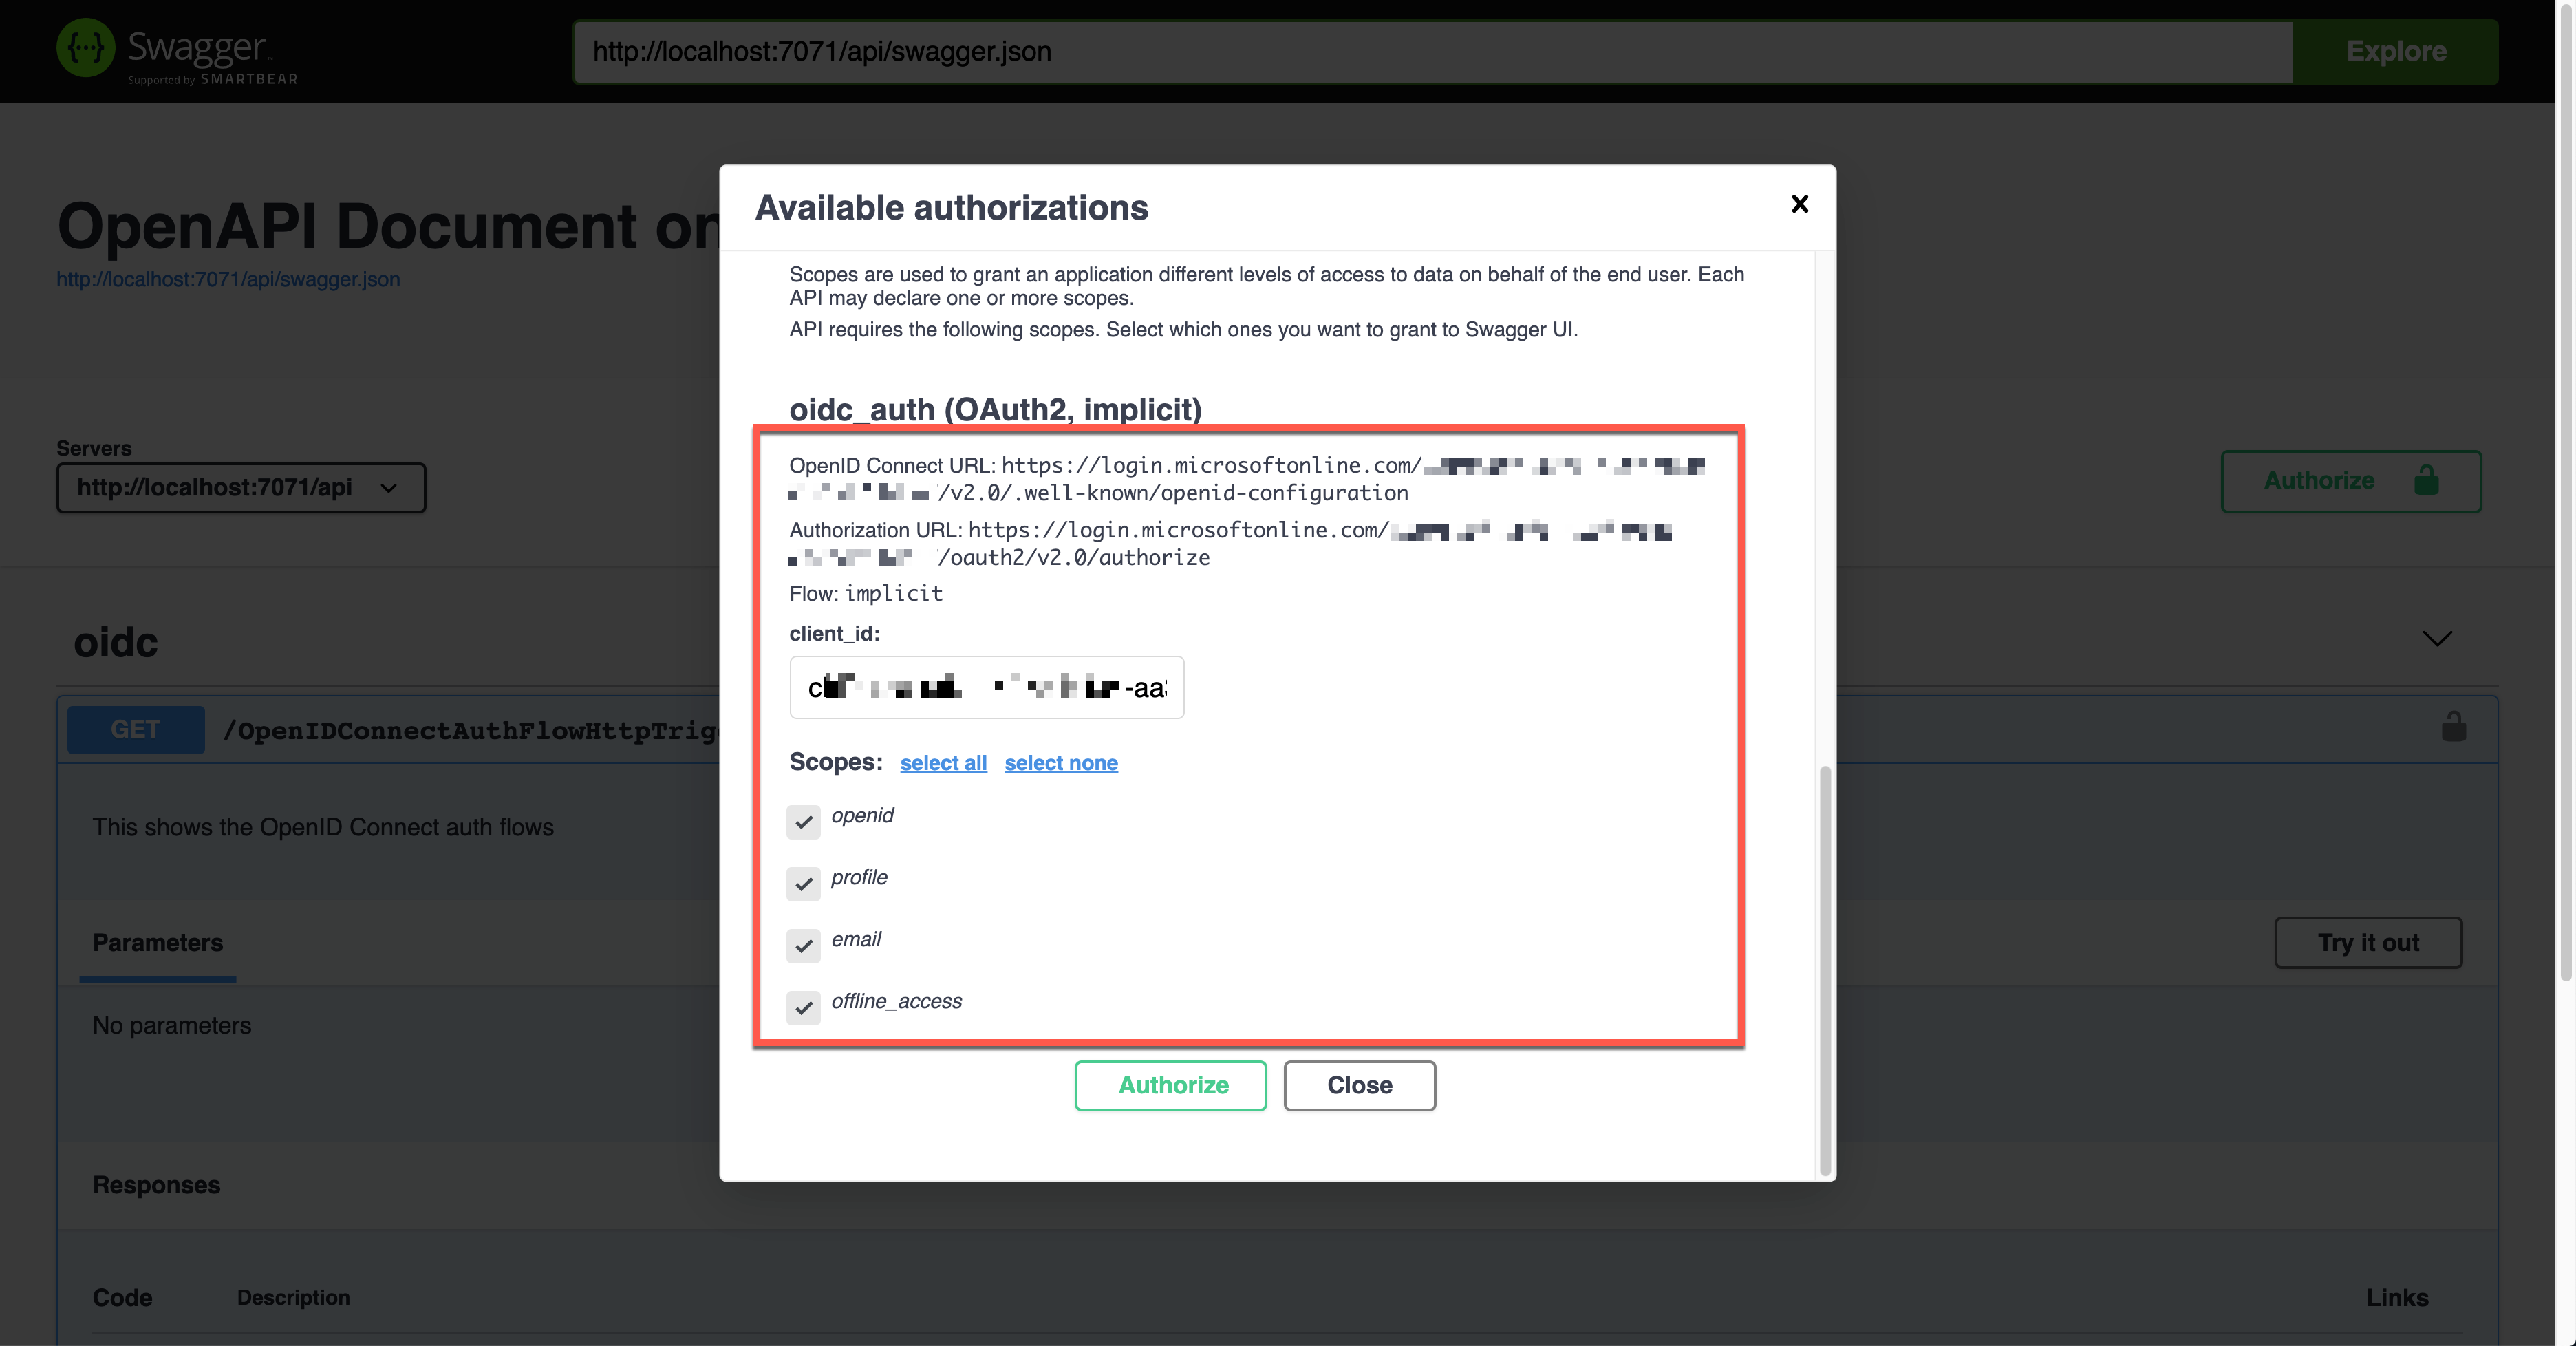
OpenID Connect Auth Flow
Finally, let’s use the OpenID Connect auth flow. OpenApiSecurityAttribute(…) contains the following definitions (line #6-9).
The {tenant_id} value, of course, should be replaced with the real tenant ID. With this OpenID Connect URL, it automatically discovers the OAuth2 auth flows. Then, set the auth level to Anonymous (line #12).
    public static class OpenIDConnectAuthFlowHttpTrigger

    {

        [FunctionName(nameof(OpenIDConnectAuthFlowHttpTrigger))]

        [OpenApiOperation(operationId: “openidconnect”, tags: new[] { “oidc” }, Summary = “OpenID Connect auth flows”, Description = “This shows the OpenID Connect auth flows”, Visibility = OpenApiVisibilityType.Important)]
        [OpenApiSecurity(“oidc_auth”,

                         SecuritySchemeType.OpenIdConnect,

                         OpenIdConnectUrl = “https://login.microsoftonline.com/{tenant_id}/v2.0/.well-known/openid-configuration”,

                         OpenIdConnectScopes = “openid,profile”)]
        [OpenApiResponseWithBody(statusCode: HttpStatusCode.OK, contentType: “application/json”, bodyType: typeof(IEnumerable), Summary = “successful operation”, Description = “successful operation”)]

        public static async Task Run(

            [HttpTrigger(AuthorizationLevel.Anonymous, “GET”, Route = null)] HttpRequest req,

            ILogger log)

        {

            log.LogInformation(“C# HTTP trigger function processed a request.”);
            var headers = req.Headers.ToDictionary(p => p.Key, p => (string) p.Value);

            var handler = new JwtSecurityTokenHandler();

            var token = handler.ReadJwtToken(headers[“Authorization”].Split(‘ ‘).Last());

            var claims = token.Claims.Select(p => p.ToString());

            var content = new { headers = headers, claims = claims };
            var result = new OkObjectResult(content);
            return await Task.FromResult(result).ConfigureAwait(false);

        }

    }
Run the function app and find the Swagger UI page.

Unlike other auth flows, this OpenID Connect auth flow shows two methods. The first one is the authentication code flow, and the other one is the implicit flow. Let’s use the second one and enter the client ID value. It will redirect you to Azure Active Directory to sign in and give you the access token.
Once execute the endpoint, the access token is passed through the Authorization header in the JWT format.
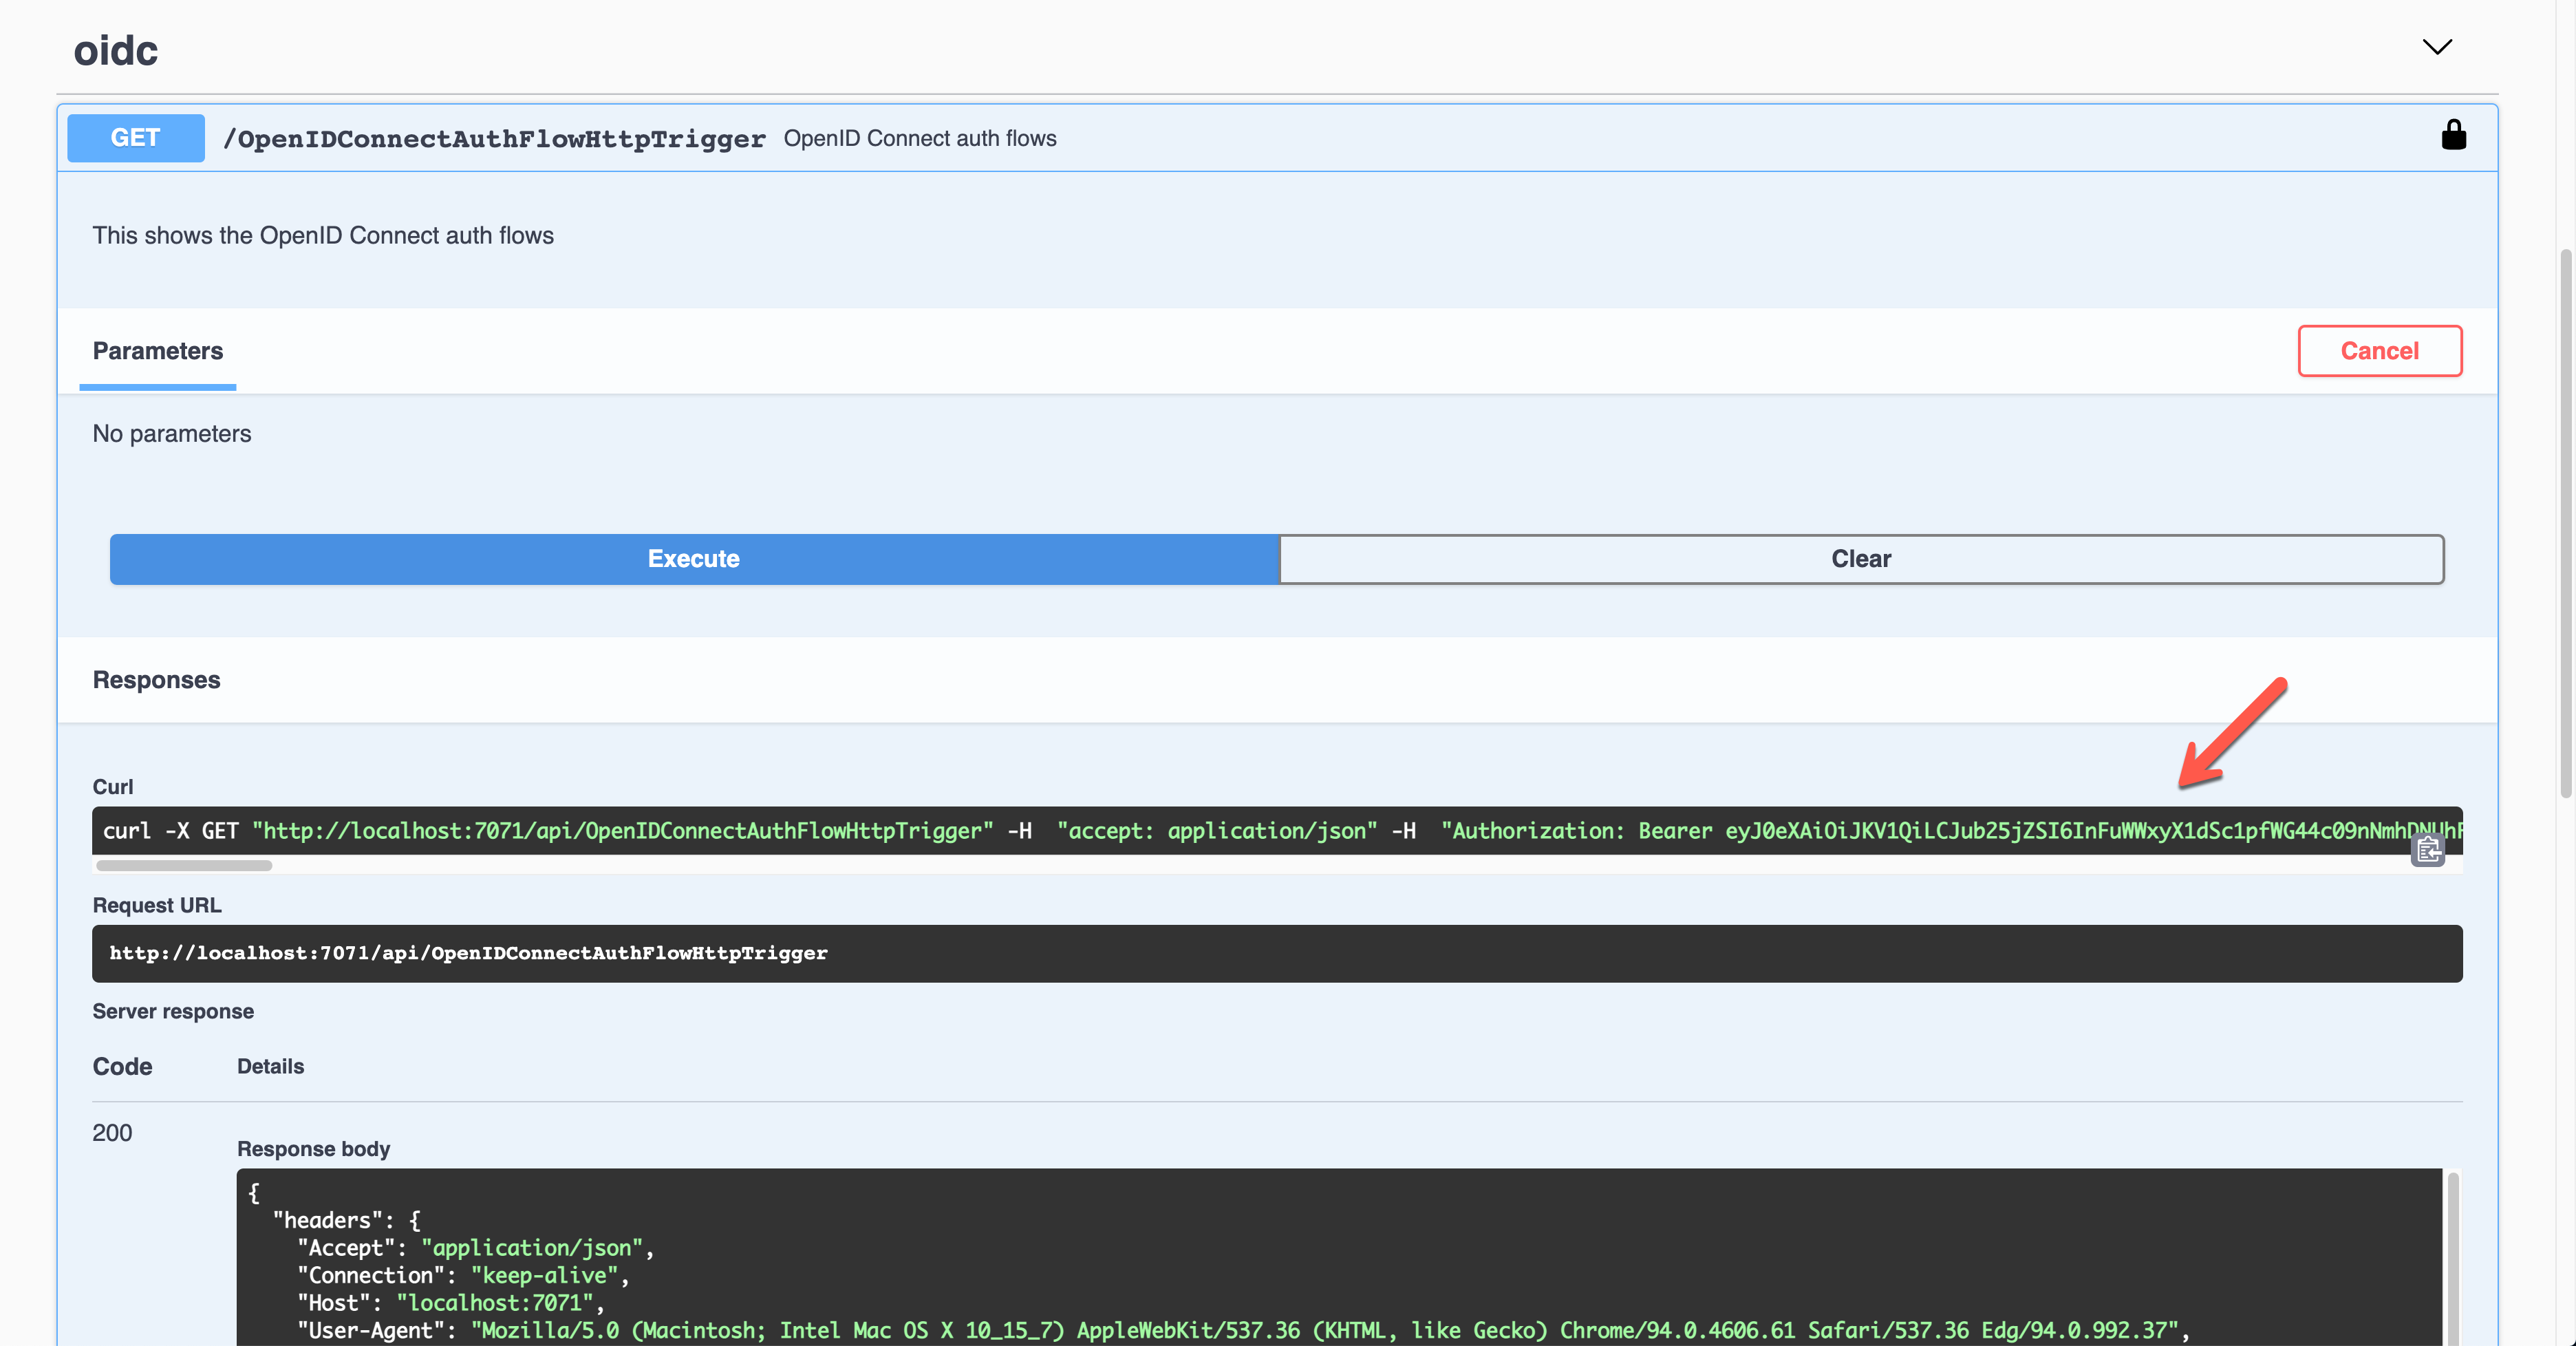
Decode and validate the token for further processing.
So far, we’ve covered six different ways to authenticate the HTTP trigger endpoints with the OpenAPI extension. These six ways are the most commonly used ones. Therefore, if you need, you can pick up one approach and implement it.
This article was originally published on Dev Kimchi.

Recent Comments