by Contributed | Nov 24, 2021 | Technology
This article is contributed. See the original author and article here.
Data warehouse, data integration, and big data analytics together are continuing to grow at planetary scale in enterprises. Azure Synapse Analytics provides limitless analytics services to query data using different compute engines and programming languages. Azure Synapse workspaces allow the data engineering, machine learning, and BI projects to coexist without creating silos in experiences, processes, and tools. As data continues to explode and be used, it’s more important than ever to fully govern the data.
The Azure Purview integration in Azure Synapse provides a comprehensive data governance solution with a single pane of glass for all analytics workloads. Organizations can run a variety of analytics projects and put data to work much more quickly, productively, and securely, generating insights from all data sources. The embedded data discovery experience in Azure Synapse powered by Azure Purview further increases data agility and time to insights.
In this blog, you will learn how to govern your Azure Synapse workspace by connecting to Azure Purview for automated data discovery and classifications in the Purview Data Map. You can further use the Purview Data Catalog to search enterprise data and use contextual gestures to build analytics workloads.
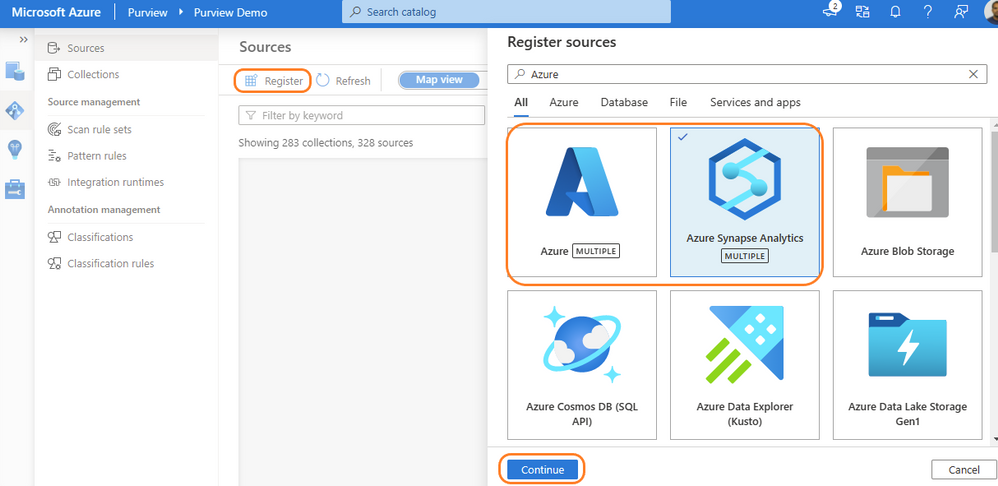
Register and scan in Azure Purview
Purview data source administrators can start by registering an Azure Synapse workspace under a collection of the Purview Data Map. Admins can choose to register individual workspaces or simply register the Azure Subscription containing all Azure Synapse workspaces. With a few clicks, a recurring scan can be set for automated data discovery of technical metadata and classifications. Azure Purview can support 200-plus classifications that look for sensitive and PII data while scanning. The admin can configure specific databases of a workspace and credentials managed in Azure Key vault for secured connection while scanning. Creating a private endpoint is supported for scanning Azure Synapse workspaces behind VNET. Read more details on how to register and scan Azure Synapse Analytics workspaces.
Register Azure Purview from Azure Synapse workspace
Azure Synapse contributors can register an Azure Purview account by navigating to Manage > External connections > Azure Purview. With a single click, the Azure Synapse workspace is integrated with Azure Purview for data governance. Azure Purview helps discover all data across your organization, track lineage of data, and create a business glossary wherever it is stored: on-premises, across clouds, in SaaS applications, and in Microsoft Power BI. Read step-by-step documentation to Connect Synapse workspace to Azure Purview.

Select a Purview account from the dropdown or enter the resource URI manually and click apply. To connect a Purview account behind VNET, read how to Access a secured Azure Purview account.

Once registration is complete, the connection and integration status are shown in the details section.

Search and use enterprise data
The search box in the Azure Synapse workspace menu bar is now powered by Azure Purview for the Data, Develop, and Integrate sections. Start typing the keyword in the search bar to let Purview’s intuitive search automatically complete and match the asset by relevance on name, classification, labels, contacts, and more.

Search results are displayed in a dedicated tab for Purview. The familiar search result page experience of Purview is retained inside the Azure Synapse workspace.

With a few clicks, narrow down the search results to exact assets in Purview.

Time to insights with contextual gestures
In the asset details page, Azure Synapse users can perform a variety of contextual gestures to connect for further analytics. Depending on the asset type discovered, users can use the following gestures:
- SQL Script experiences to query top 100 rows or create external table
- Notebook experiences to create a Spark table or load to DataFrame
- Data integration experiences such as new linked service, integration dataset, and development dataflows.


Data producers can directly edit the asset from the Azure Synapse workspace and curate by adding business glossary, description, classifications, and contact details.

Automated data lineage from Azure Synapse
Data lineage from Azure Synapse are automatically pushed to the connected Purview account for copy and data flow activity. Detailed documents are available for Metadata and lineage from Azure Synapse Analytics.
The lineage metadata is pushed to Purview in real time at the end of each pipeline run. It includes granular details such as column lineage, pipeline run status, row count, and additional metadata.

Lineage status is available from the pipeline run monitoring page of the Azure Synapse workspace.

Get started with Azure Purview today
- Quickly and easily create an Azure Preview account to try the generally available features.
- Read quick start documentation on how to connect an Azure Synapse workspace to an Azure Purview account
by Contributed | Nov 23, 2021 | Technology
This article is contributed. See the original author and article here.
Welcome to our new monthly blog series featuring the latest Security, Compliance, and Identity content updates on Microsoft Learn! This is our first post, and we’re highlighting recently released updates, including a new learning path we launched during Cybersecurity Awareness Month. Starting in January, we’ll highlight new learning paths, modules, and other content updates we make each month to give you the skills you need on your learning journey.
Read on to check out some of the latest updates from our Security, Compliance, and Identity portfolio.
Introduction to cybersecurity
Knowing the fundamentals of cybersecurity is a first step toward protecting against cyberthreats. Our new learning path—Describe the basic concepts of cybersecurity—delivers foundational knowledge about cybersecurity concepts including cryptography, authentication, and authorization, along with exploring ways to protect yourself and your business from cyberattacks.
AZ – 500: Microsoft Azure Security Technologies
This four-part series of learning paths will equip you with the knowledge you need to take Exam AZ-500.
This learning path will teach you how to secure Azure solutions with Azure Active Directory, implement hybrid identity, deploy Azure AD identity protection, and configure Azure AD privileged identity management.
This learning path will teach you how to lock down the infrastructure and network resources that are running in your Azure environment.
This learning path will teach you how to deploy and secure Azure Key Vault, configure application security features, implement storage security, and configure and manage SQL database security.
This learning path will teach you how to configure and manage Azure monitor, enable, and manage Azure Security Center, and configure and monitor Azure Sentinel.
You can take Exam AZ-500: Microsoft Azure Security Technologies once you have completed the learning path to earn a certification.
Microsoft Endpoint Configuration Manager
Microsoft Endpoint Configuration Manager—which is part of Microsoft Endpoint Manager—helps you protect the on-premises devices, apps, and data that the people at your organization use to stay productive. Our newest module, Understand co-management using Microsoft Endpoint Configuration Manager, provides an in-depth look at how to enable co-management based on the implementation path that best suits your organization. You’ll also:
- Learn about the benefits of co-management
- Understand the co-management prerequisites
- Learn about paths to implement co-management
We’re excited to hear how you use these updated resources on your journey to certification!
by Contributed | Nov 22, 2021 | Technology
This article is contributed. See the original author and article here.
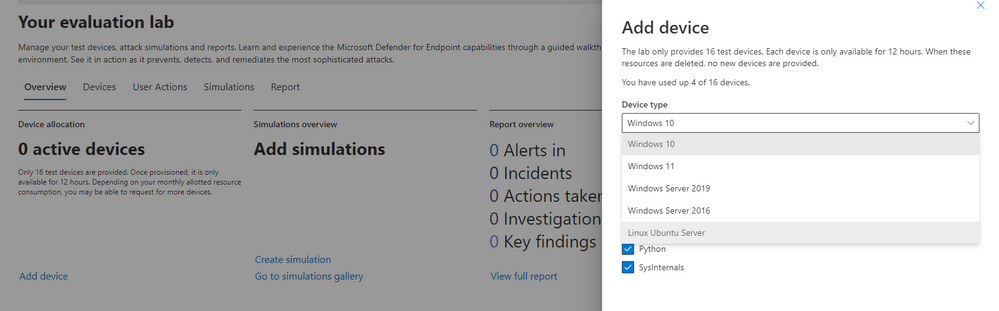
Microsoft Defender for Endpoint’s Evaluation Lab is an environment that allows security teams to seamlessly test their defense against threats. We are excited to share that the Evaluation Lab now supports adding Windows 11, Windows Server 2016, and Linux devices. In addition, we’d also like to announce a new partnership with Red Canary’s open-source simulation library, Atomic Red Team!
NOTE: Both updates are only available in the Microsoft 365 Defender portal at security.microsoft.com.
Expanded OS support
The evaluation lab now supports the following operating systems: Windows 10, Windows 11, Windows Server 2019, Windows Server 2016 and Linux (Ubuntu). To create a new device, simply select it within the “Add device” wizard. The new device will automatically be onboarded with no required additional steps.
Once created, you can connect to the device via RDP (Windows) or SSH (Linux). You can connect to a Linux device using any SSH client.

Atomic Red Team simulations
Powered by Red Canary, Atomic Red Team is an open-source library of tests that security teams can use to simulate adversarial activity in their environments. Atomic tests are simple – each test is mapped to a single MITRE ATT&CK® technique or sub-technique, most of them have no prerequisites, and many come with easy-to-use configuration and cleanup commands.
Evaluation Lab users can now use Atomic Red Team simulations to evaluate Microsoft Defender for Endpoint’s detection capabilities against both Windows and Linux threats. The simulations are provided as script files, so that security teams can choose to run them in the Evaluation lab or any other testing environment of their choice.

The first simulation, 2021 Threat Detection Report, executes tests according to Red Canary’s latest report of top Windows techniques associated with confirmed threats, as compiled from roughly 20,000 confirmed threats detected across customer environments.
The second simulation, Linux techniques, is a collection of simple tests compiled to allow security teams to evaluate Microsoft Defender for Endpoint’s detection capabilities against common Linux persistence, discovery, and defense evasion techniques.
We’re looking forward to you trying out the Evaluation Lab updates. Let us know your thoughts and feedback in the comments below or through the feedback tool in the portal!
by Contributed | Nov 21, 2021 | Technology
This article is contributed. See the original author and article here.
APIs are everywhere and there are many ways to host them in Azure! Let us see what are the different possibilities with the pros & cons of each. I am not going to discuss the bits and bytes about each possibility. The purpose of this post is to give you a rough idea of what is possible for a simple scenario (single region, high-availability and disaster recovery are out of scope). I will provide small diagrams for more advanced scenarios.
1) Function App – Consumption tier
Function Apps ship with HTTP-triggered functions. These can be suitable to expose tiny APIs.
Pros: Cost-friendly (economies of scale), Easy to deploy, Fully elastic with built-in auto-scaling from 0 to n instances.
Cons: Limited security controls. Network ACLs are the only way to limit public exposure. Data accessed by such functions must be public from a connectivity perspective. Cold start due to serverless tier. Limited execution time as well as per-execution resource consumption. No WAF (Web Application Firewall) features.
Use cases: Lab, PoC, Prototyping, Limited budgets, Basic API needs (ie: no catalog, no versioning, etc.), asynchronous APIs, Synchronous APIs that can live with the cold start, No strong compliance requirements.
2) Multi-Tenant App Service – Standard tier
Like functions, Web Apps are pretty neat and easy to get started with. Microsoft is managing everything for you under the hoods.
Pros: Cost-friendly (economies of scale) but fixed cost incurred (unlike functions on consumption tier), Easy to deploy, Auto-scaling plans. Resource is limited to the capacity you are willing to pay. No cold start!
Cons: Limited security controls. Network ACLs are the only way to limit public exposure. Data accessed by such apps must be public from a network perspective. No WAF.
Use cases: Lab, PoC, Prototyping, Limited budgets, Basic API needs (ie: no catalog, no versioning, etc.), No strong compliance requirements.
3) Azure Container Instances (ACI)
While Azure Container Instances can be used to host long-running services, I would advise against this idea and keep the ACIs for asynchronous job operations, short-lived executions and as the serverless (virtual kubelets) part of Azure Kubernetes Service.
Pros: Cost-friendly (pay per second of execution), providing the API is not constantly up and running.
Cons: Limited security controls with Windows Containers, better with Linux as Linux-based ACIs can integrate with virtual networks.
Use cases: Lab, PoC, Prototyping, Limited budgets, Basic API needs (ie: no catalog, no versioning, etc.), No strong compliance requirements. Lift & shift of plain old legacy Windows-based backend services.
4) Functions Apps Consumption tier or App Service standard+ Azure API Management (APIM) Consumption tier
In this setup, you intend to publish APIs through Azure API Management. The pros & cons of the underlying hosting option (app service or function apps) remain as explained earlier and are not repeated below.
Pros: Cost-friendly because the serverless flavor of APIM has no fixed cost. It will auto-scale with the actual demand. You can add features to your APIs such as enforcing policies (JWT validation, headers checks etc.) as well as version them.
Cons: More security controls but there is still a few major caveats: network ACLs remain the only way to limit public exposure of the backend and traffic cannot be forced through APIM because the consumption tier has no static IP so this can’t be used as a network ACL on the backend side. Data accessed by such apps must still be public from a network perspective. Still no WAF because APIM is a a PEP (Policy Enforcement Point) but not a WAF.
Use cases: Lab, PoC, Prototyping, Limited budgets, More advanced API needs (catalog, versioning, consistent way of exposing APIs etc.), No strong compliance requirements.
5) Functions Apps Consumption tier or App Service standard+ Azure API Management (APIM) Basic or Standard tier
In this setup, you intend to publish APIs (and enforce routing) through Azure API Management.
Pros: You benefit from APIM capabilities AND you can restrict traffic to the backend to your APIM instance because as of the basic tier, APIM comes with a static IP.
Cons: A bit more expensive (fixed cost for APIM). Manual scaling for the Basic tier (plans possible as of Standard). Data stores accessed by the backends must still be public from a network perspective. Still no WAF because APIM is a a PEP (Policy Enforcement Point) but not a WAF.
Use cases: Limited budgets, More advanced API needs (catalog, versioning, consistent way of exposing APIs etc.), No strong compliance requirements.
6) App Service (or Functions) on Premium tier+Private Endpoint+VNET Integration+WAF
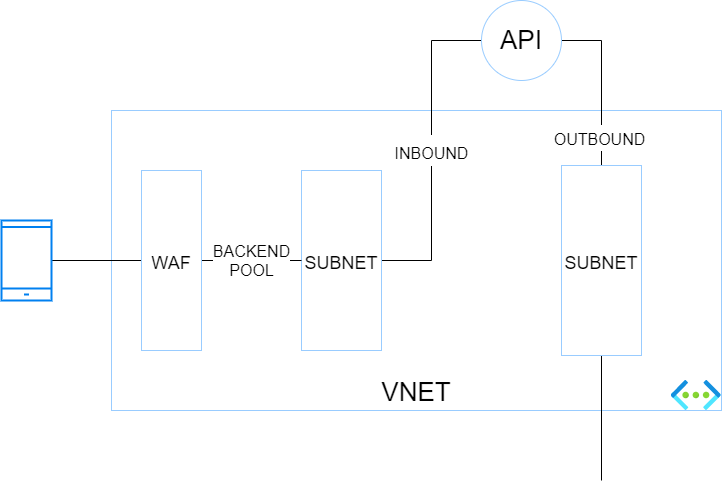
In this setup, you want isolate your backend services totally from internet and make them only accessible through a web application firewall (WAF). Because it is a little more complex, here is a small diagram showing the different blocs and their interactions.
The traffic flies from a caller (here a mobile device) to a WAF which has a public IP. The WAF has a backend pool targeting the endpoints defined in the corresponding private endpoint subnet. The app service is integrated with Azure Private Link (and private DNS zone) for the INBOUND traffic. VNET integration for the App Service (or function app) is enabled to handle the OUTBOUND traffic through another VNET’s subnet.
Pros: This hosting option is more secure than the preceding ones because the data stores can be firewalled thanks to the control over the outbound traffic of the API. The backend services are isolated from internet and proxied by a WAF.
Cons: This architecture is a bit convoluted and is not the best one to run at scale.
Use cases: Stronger focus on security. Basic API needs (no more APIM in the picture).
7) App Service (or Functions) on Premium tier+Private Endpoint+VNET Integration+WAF+APIM Premium
The purpose of this setup is the same as the previous one but you want to combine both WAF & APIM (how it should be) before hitting backend services.

Pros: Inbound traffic is more secure because it traverses a WAF and a PEP. Network ACLs can be set at backend level to only let the API gateway (which has a static IP) call the backend. Outbound traffic of the API gateway can be controlled by a NVA or Azure Firewall.
Cons: This architecture is a bit convoluted and is not the best one to run at scale. APIM premium is expensive but is required because at the time of writing (11/2021), only the Premium tier integrates with Virtual Networks.
Use cases: Stronger focus on security, advanced API needs and possible geo-distributed APIs setup.
WAF+APIM Premium+App Service Environment (ASE)
Before ASE v3, ILB ASEs had a rather bad reputation because of their cost (flat fees), and their complexity. It was indeed quite easy to break them with improperly configured firewall rules. ASE v3 are a breeze to setup and are less expensive (no more flat fee). Therefore ILB ASE comes back as a very interesting option because it offers the best-in-class security at an affordable price, at least from a backend hosting perspective.

Pros: Inbound and outbound traffic can be fully controlled by an NVA or Azure Firewall. Intra VNET traffic can be controlled with Network Security Groups. Backends are totally isolated from internet. This setup is scalable because the ASE can most tons of backends and functions. The underlying compute is based on a single-tenant architecture (Isolated tier).
Cons: Costs (incurred by the isolated tiers and APIM premium) and complexity. Although ASE v3 is a breeze compared to its predecessors, this setup is often part of a larger Hub & Spoke architecture, which involves a lot of networking and firewalling work. You do not get started with it over night!
Use cases: Stronger compliance requirements, advanced API needs and possible geo-distributed APIs setup. This setup is perfectly suitable as a Web Landing Zone that hosts tons of web apps and APIs.
WAF+APIM Premium+AKS
Kubernetes has become a first-class citizen everywhere and AKS is the Microsoft-managed K8s offering on Azure (By the way, Azure Arc also has a ton of handy features to manage K8s clusters at scale wherever they are hosted). So, with this in mind, I could not skip it. Here is a very simplified diagram showing the different building blocks:

Pros: Very similar to the previous architecture with regards to inbound and outbound, Hub & Spoke integration, etc.. although AKS adds a serious bits of extra complexity network-wise. AKS allows you to host nearly anything and has a very rich ecosystem. When I think AKS, I think all the benefits of VMs with all the benefits of cloud native architectures (Infrastructure as Code, increased resilience, zero downtime, releases during business hours, polyglot apps, etc.).
Cons: Costs incurred by APIM premium and the AKS node pools, which should involve at least 3 nodes but ideally 5 for a minimal production-grade setup. Another potential deal-breaker for some organizations is the complexity of K8s (AKS). App Services and Function Apps are way easier to work with and it is a Kubernetes lover who tells you this!
Use cases: Stronger compliance requirements, advanced API needs and possible geo-distributed APIs setup. This setup is perfectly suitable as a Web Landing Zone that hosts tons of web apps and APIs. Microservices architectures (K8s and its ecosystem, including service meshes, are very supportive of microservices architectures).
10) Container Apps
This new service (public preview in 11/2021) is very promising because it comes with some of the AKS promises without the complexity because Microsoft manages nearly everything for you. Container apps remind me to some extend Service Fabric Mesh, let’s hope they have a better future. However, at the time of writing, it is no way in line with typical enterprise needs (Hub & Spoke) but Microsoft is working on a BYO VNET feature. It is still a little early to come with pros & cons but here are a few of them.
Pros: Cost friendly since it scales from 0 to n, like Azure Functions. Easy to deploy and manage.
Cons: N/A (too early)
Use cases: right now, PoCs and protoyping only. In the future, microservices architectures, which is why this service has been built from the ground up.
by Contributed | Nov 20, 2021 | Technology
This article is contributed. See the original author and article here.
Before implementing data extraction from SAP systems please always verify your licensing agreement. |
OData services have become one the most powerful interfaces in SAP systems. In the last episode, we’ve built a simple pipeline that extracts business information from an OData service to a data lake and makes them available for further processing and analytics. We’ve created all required resources, including linked services and datasets, and we’ve used them to define the Copy Data activity. The extraction process run without any issues, and we were able to display data from the lake.
But imagine you’d like to change the data source. Instead of Sales Orders, you’d like to get information about Business Partners. To make such a change, you’d have to go through all resources and modify them. You’d have to alter the URL of the OData service, target location and entity. Quite a few changes! Alternatively, you could create a new set of objects, including the Copy Data activity. Both solutions are not ideal. As your project grows, maintaining a large set of resources can become a tremendous job. Not to mention the likelihood of making a mistake!
Fortunately, there is a solution! The Synapse Pipelines are highly customizable, and we can use dynamic parameters. Instead of hardcoding the URL of the OData service, we can use a parameter and provide the value before the pipeline starts. You can use the same approach also to customize the target directory or entity name. Pretty much everything can be parametrized, and it’s only up to you how flexible the pipeline will be.
Today I’ll show you how to use parameters to customize some of the resources. It is the first step towards making the pipeline metadata-driven. In the next episode, we’ll expand the solution even further and describe how to read parameters from an external service. This way you’ll be able to add or modify the OData service without making any changes to the pipeline.
DEFINING PARAMETERS
Parameters are external values that you use to replace hardcoded text. You can define them for every resource – a pipeline, a dataset or a linked service – they all accept external values. To assign parameters at the runtime, you can use expressions that I find very similar to Excel formulas. We will use this feature quite often in this blog series.
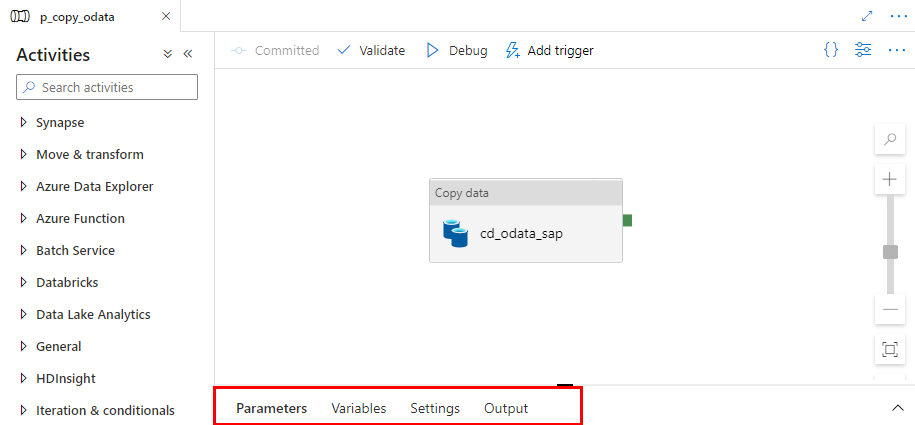
Let’s start by defining the initial set of parameters at the pipeline level. We will use them to set the URL, name and entity of the OData service. Open the pipeline we’ve built last time. At the bottom of the screen, you’ll notice four tabs. Click on the one named Parameters.
When you click the Parameters tab, the window enlarges, revealing the “New” button to define parameters. Add three entries:
Name |
Type |
URL |
String |
ODataService |
String |
Entity |
String |

You can use values that are passed to the pipeline as parameters in datasets and linked services. I want all files with extracted data to be saved in the directory named after the OData service. The directory structure should look as follows:
/odata/<OData_Service>/<Entity>
For example:
/data/API_SALES_ORDER_SRV/A_SalesOrder
That’s quite easy. You define the target file location in the data lake dataset – therefore the first step is to modify it to accept external parameters. Open the resource definition and go to the Parameters tab. Create a new entry:

Now we need to define the target location using the parameter. Open the Connection tab. Replace the current value in the directory field with the following expression to reference the Path parameter. The value that we pass to this parameter will be used as the directory name.
@dataset().Path

Dataset knows what to do with the value passed to the Path parameter. Now we have to maintain it. Open the Copy Data activity and go to the Sink tab. You’ll notice an additional field under Dataset properties that wasn’t there before. The parameter defined at the dataset level is now waiting for a value.
As my directory hierarchy should be <ODataService>/<Entity> I use the Concat expression to combine parameters defined at the pipeline level:
@concat(pipeline().parameters.ODataService, '/', pipeline().parameters.Entity)

The target dataset now accepts values passed from the pipeline. We can switch to the source dataset that points to the SAP system. Similarly as before, open the OData dataset and define two parameters. They will tell which OData service and Entity should be extracted.
Name |
Type |
ODataURL |
String |
Entity |
String |

The dataset can use the Entity parameter, which can replace the value in the Path field. But the OData URL parameter has to be passed to the underlying Linked Service. Provide the following expression to the Path field on the Connection tab:
@dataset().Entity

Adding parameters to the Linked Service is slightly more difficult, and it requires modifying the JSON definition of the resource. So far, we’ve only used the user interface. Choose Manage from the left menu and choose Linked Services. To edit the source code of the Linked Service, click the {} icon next to its name:

There are two changes to make. The first one is to define the parameter. Enter the following piece of code just under “annotations”:
"parameters": {
    "ODataURL": {
        "type": "String"
    }
},
The second change tells the Linked Service to substitute the URL of the OData service with the value of the ODataURL parameter. Change the value of “url” property with the following expression:
"@{linkedService().ODataURL}"
For reference here is the full definition of the Linked Service:
{
    "name": "ls_odata_sap",
    "type": "Microsoft.Synapse/workspaces/linkedservices",
    "properties": {
        "annotations": [],
        "parameters": {
            "ODataURL": {
                "type": "String"
            }
        },
        "type": "OData",
        "typeProperties": {
            "url": "@{linkedService().ODataURL}",
            "authenticationType": "Basic",
            "userName": "bjarkowski",
            "password": {
                "type": "AzureKeyVaultSecret",
                "store": {
                    "referenceName": "ls_keyvault",
                    "type": "LinkedServiceReference"
                },
                "secretName": "s4hana"
            }
        },
        "connectVia": {
            "referenceName": "SH-IR",
            "type": "IntegrationRuntimeReference"
        }
    }
}

Click Apply to save the settings. When you open the OData dataset you’ll notice the ODataURL parameter waiting for a value. Reference the dataset parameter of the same name:
@dataset().ODataURL

The only thing left to do is to pass a value to both of the dataset parameters. Open the Copy Data activity and go to the Source tab. There are two new fields that we use to pass a value to a dataset. To pass the address of the OData service I concatenate URL and ODataService parameters defined at the pipeline level. The Entity doesn’t require any transformation.
ODataURL: @concat(pipeline().parameters.URL, pipeline().parameters.ODataService)
Entity: @pipeline().parameters.Entity

Publish your changes. We’re ready for the test run! We’ve replaced three hardcoded values, and now we don’t have to modify the pipeline, or any of the resources, whenever we want to extract data from another OData service. It is a great improvement as it makes the process more generic and easy to scale.
EXECUTION AND MONITORING
To verify changes, run the pipeline twice, extracting data from two OData services. Previously, it would require us to make changes inside the pipeline. Now, whenever we start the extraction process, Synapse Studio asks us to provide the URL, OData service name and Entity. We’re not making any changes for the first run, and as before, we extract sales orders. For the second execution, use the API_BUSINESS_PARTNER OData service to get the full list of my customers.

A moment of uncertainty. Have we made all the required changes?
No surprise this time, everything works as expected. We were able to extract data from both OData services. The target directory structure looks correct, and as planned, it consists of the OData and Entity name.

The final test is to display extracted data.

Today you’ve learnt how to use parameters to avoid hardcoding values in the pipeline. We’ve used three parameters that allow us to customize the URL, OData name and the Entity. We will build on top of this next week to make the pipeline even more agile by creating a metadata database that stores all information about OData services to fetch.

Recent Comments