by Contributed | Mar 10, 2021 | Technology
This article is contributed. See the original author and article here.
By Jon Callahan – Senior Program Manager | Microsoft Endpoint Manager
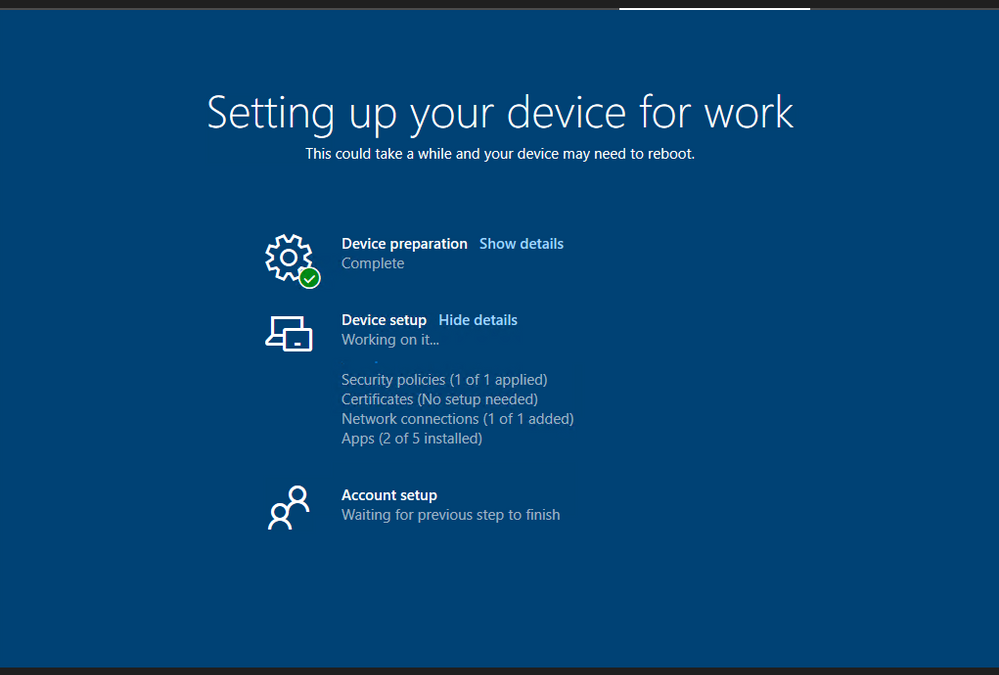
The Enrollment Status Page is a feature of Microsoft Endpoint Manager that displays progress of preparing the device for management, applying policies, and installing apps during the out-of-box experience (OOBE) of Windows Autopilot. An available configuration is the option to block device use until apps are installed – preventing the user from accessing the desktop for the first time until the device is in an expected state.
 Screenshot of the Enrollment Status Page
Those familiar with Windows operating system deployment using a custom “golden image” may want to block device use until all apps are installed. Blocking on all apps will most closely mimic what IT and users are familiar with in their existing deployment process where a fully configured device is delivered to the user. However, carry-over of this legacy approach comes with trade-offs that may compromise your goals of delivering a better user experience and simplified setup with Autopilot. Successful transition to Autopilot must begin with a careful evaluation of the approach and assumptions of “how” and “why” services are delivered by IT and requires making necessary changes to the experiences and expectations of both IT and users. This post will provide a simple framework for evaluating those trade-offs and discuss how to configure the Enrollment Status Page within Microsoft Intune to meet your goals.
Planning for the Enrollment Status Page
The following table can be useful in planning what apps should be configured to block use of the device during the Enrollment Status Page:
Block device use until required apps are installed
|
Required apps that can be installed as the device is used
|
Apps that can be installed later from Company Portal
|
- Critical apps that if missing would lead to an inability to be secure or access core services (ex: VPN, antivirus, etc.)
- Core productivity apps like Microsoft 365 Apps and Teams
- Important apps that are likely to be needed within the first 30 minutes to 1 hour of provisioning the device
|
- Important apps that may not be needed right away or take a long time to install (ex: CAD software)
|
|
These categories provide a simple framework for maximizing the value of the Enrollment Status Page. The rest of this post will discuss each category in detail and how to configure the desired behavior.
Configuring the Enrollment Status Page
The Enrollment Status Page can be configured to block until all apps are installed or a specific list of apps have been installed.
It is important to keep in mind that there are trade-offs to the number of required apps configured to block use of the device:
- User Experience – The Enrollment Status Page will take longer to complete as you increase the number of apps that can block the use of a newly provisioned device. Blocking on apps that are unlikely to be needed right away will unnecessarily delay the device becoming productive.
- Probability of issues – Every app that can block use of the device adds a chance for something to go wrong. Unforeseen app install issues like a network or power loss could prevent use of the device if these apps are configured to block use.
Block only on apps that are required for the device to be acceptable in your environment like critical security apps and important apps that will likely be needed within the first 30 minutes to 1 hour. Required apps not included in your list of blocking apps will continue to install in the background even after the Enrollment Status Page has finished. Any apps that failed to install will automatically try installing again.
Block device use until all required apps are installed
Blocking use of the device until all apps have been installed is useful in scenarios where you may have a limited number of required apps that will not take too long to install or for dedicated devices like kiosks where all apps must be installed prior to use.
This option is configured by setting Block device use until these required apps are installed if they are assigned to the user/device to All.
 Screenshot of the Block device use until all required apps are installed toggle
Block use until a specific list of apps are installed
Blocking use of the device until a specific list of apps are installed is the most common option and carefully planning this list will help create the best user experience. Not including your critical apps in this list might result in a device that is not yet ready for the user, but including too many apps can make users unhappy as they wait for their device to be ready. Both too few and too many apps in this list can result in unnecessary headaches and calls to the helpdesk.
The types of apps to consider blocking device use until they are installed:
- Critical apps – Apps that if missing can lead to an inability to be secure or access core services. These types of apps might include VPN clients, antivirus, or data protection and compliance software.
- Core productivity – Microsoft 365 Apps and Teams are likely the first apps to be opened on a device. Consider blocking device use on these apps to make sure users can read their emails, chat with colleagues, and access files stored in OneDrive for Business.
- Important apps – Core business or functional apps that are both necessary and important for the user. These are the apps that will likely be opened within the first 30 minutes to 1 hour of receiving the device, and if missing there will be a loss of productivity or ability to execute. This is likely a short list of apps.
This option is configured by setting Block device use until these required apps are installed if they are assigned to the user/device to Selected and adding apps to the Selected apps list.
 Screenshot of the Block device use until all required apps are installed toggle and Application list
Note that adding apps to this list does not mean that only those apps will install during the Enrollment Status Page:
- Apps do not install in any specific order – Adding apps to your list of blocking apps for the Enrollment Status Page does not mean that only those apps will install or that those apps will install first. Additional required apps may install in the background while the Enrollment Status Page is displayed that are not included in this list.
- Win32 app dependencies – App dependencies may install in the background before a Win32 app included in your blocking apps list. The Enrollment Status Page will block device use until the Win32 app and its required dependencies have been installed.
Apps that can be installed as the device is used
Do not block device use on apps that are unlikely to be needed immediately or can take a long time to download and install, like CAD software. Including these apps in your list would unnecessarily delay the device from becoming productive. Plug-ins, file viewer and utility apps, or business apps that are not used all the time are other examples of this type of app.
Required apps will install automatically in the background as the device is used. In most cases, these apps will already be installed by the time they are needed.
You may want to communicate to users in printed documentation included with their new device that not all apps will be installed when they first logon, but that they should be installed soon. This will help avoid unnecessary calls to the helpdesk.
Apps available in Company Portal
All other apps can be made available in Company Portal for the user to install as needed. Assigning apps as required that are not needed will waste disk space, increase overhead to manage and update the app overtime, and potentially increase the attack surface of a device if security vulnerabilities are later discovered.
Communicate to users that they can install additional apps from Company Portal without having to contact the helpdesk.
More info and feedback
For further resources on the Enrollment Status page, please see the links below.
Windows Autopilot Enrollment Status Page
Set up the Enrollment Status Page
Understand and troubleshoot the Enrollment Status Page
Let us know if you have any additional questions by replying to this post or reaching out to @IntuneSuppTeam on Twitter.
by Contributed | Mar 10, 2021 | Technology
This article is contributed. See the original author and article here.
If you’re looking for tips and tricks to help you optimize and simplify the way you manage your endpoints, we’ve got a great new series for you.
Over the years, my colleagues and I have worked one-on-one with IT pros and organizations all around the world. When it comes to managing devices, applications, and end users, there is no such thing as a standard approach. There are, however, some configurations, policies, and approaches that work better than others. That’s why I and my friend Steve Thomas are going to be working with our fellow colleagues in the Microsoft Endpoint Manager engineering and product teams to bring you deep dives into key areas of a successful endpoint management strategy.
First up: Modern policy management
- When is it? Friday, March 19th, 10:00-11:00 a.m. Pacific Time
- How do I add it to my calendar? Click here to save the date
- What’s the format? This event will take place on Teams Live Events and members of the engineering team will be standing by in the background to answer your questions.
- Will it be available on demand? Yes! This event will be recorded and available on Tech Community in the Video Hub 72 hours after the conclusion of the live event. We’ll update this post with a link for easy reference.
Stay tuned for details on future episodes
We’re already working on topics for future episodes. Have a preference on which we cover first? Leave a comment below!
- Device join strategies
- Device provisioning
- Application management
- Data-driven decisions
- Onboarding iOS devices to Microsoft Intune
Bookmark this blog post for updates on dates and times for future episodes—and links to calendar invitations!
by Contributed | Mar 10, 2021 | Technology
This article is contributed. See the original author and article here.
With MySQL 5.7 and lower versions, you may have noticed that response times increase when querying TEXT columns in Azure Database for MySQL. In this blog post, we’ll take a deeper look at this behavior and some of the best practices to accommodate these fields.
While processing statements, MySQL server creates internal temporary tables that are stored in memory rather than on disk, so they are faster to query. These temporary tables store the intermediate results of a query or an aggregation of tables that include UPDATES or UNION statements.
Note: For more information about scenarios in which the MySQL engine creates temporary tables, see Internal Temporary Table Use in MySQL.
Users can also create temporary tables to gather results from complex searches that involve multiple queries, or to serve as staging tables.
However, MySQL memory tables don’t support BLOB or TEXT datatypes. If temporary tables have instances of TEXT column in the result of a query being processed, they get stored as a temporary table on disk rather than in memory. Every disk access is an expensive operation and incurs a performance penalty.
Azure Database for MySQL uses remote storage to provide the benefits of data-redundancy, high-availability, and reliability. The MySQL physical data and log files are stored on Azure Storage, independently from the database server.
Follow the steps below to determine if your queries are resulting in temporary tables, and if so, whether those tables are being created on disk or in memory.
Is my query resulting in a temporary table?
To determine whether a query is resulting a temporary table, run an Explain plan on the query:
EXPLAIN <query>;
EXPLAIN select name, count(*) from new_table group by name;
If the Explain plan includes an Extra column displaying the text Using temporary, then the query is using a temporary table to compute the result.

Is my query resulting in a disk table?
Let’s take a look at how to determine whether a temporary table is being created on disk or in memory. Consider a table called new_table created using the following schema and add some data:
CREATE TABLE `new_table` (
  `id` int(10) unsigned NOT NULL,
  `name` text(500) NOT NULL,
  `address` text(500) NOT NULL
)
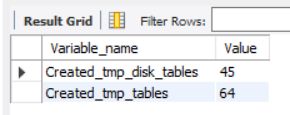
To obtain a table count of temporary tables, I’ll run the following query:
SHOW SESSION STATUS LIKE ‘created_tmp%tables’;
Note that there are currently 45 disk and 64 in-memory temporary tables.
Next, I’ll run the query I want to assess. In this case, the query performs a full-table scan on new_table and aggregates the number of times a particular name is present, where name is a column of TEXT datatype.
select name, count(*) from new_table group by name;

Now, I’ll rerun the query I used initially:
SHOW SESSION STATUS LIKE ‘created_tmp%tables’;

After rerunning the query, you’ll see that there disk temporary table count has increased to 46, so the query on new_table resulted in the creation of a disk table.
The best solution to improve query response times in such cases is to avoid using TEXT types unless you really need them. If you can’t avoid it, here are some remedial measures that can help reduce disk reads and improve performance.
MySQL version upgrade
MySQL 8.0 has an additional storage engine, named TempTable, which is the default engine for handling in-memory temporary tables. As of MySQL 8.0.13, the TempTable storage engine supports columns with BLOB-like storage – TEXT, BLOB, JSON or geometry types.
Let’s create a table with a similar schema as earlier and then run the tests to confirm the in-memory operation. Let’s look at the count of temporary tables before running the query.
SHOW SESSION STATUS LIKE ‘created_tmp%tables’;

Notice that there are currently 0 disk tables and 44 memory tables.
Now let’s run the query aggregating a TEXT column.
select name, count(*) from new_table group by name;

Let’s again look at the count of temporary tables.
SHOW SESSION STATUS LIKE ‘created_tmp%tables’;

As you can see, the memory table count increased by 1, but no disk tables were created. Eliminating disk access should greatly improve response times.
Migrating to 8.0.13 can remove the disk-access penalty with its support of in memory operations. Before migrating to version 8, though, be sure to evaluate the other effects of migrating via a detailed cost-benefit analysis. Azure Database for MySQL supports minor versions > 8.0.13 on both Single Server and Flexible Server. You can find the latest supported versions on this page.
Use of VARCHAR
CHAR and VARCHAR are the most common datatypes for string handling. The CHAR datatype supports up to 255 characters, while the maximum length supported by VARCHAR depends on the total row length, which includes all the columns in the table. A maximum row-size of 65,535 bytes is supported.
Unless most of your columns contain long strings, it will usually suffice to use VARCHAR instead of TEXT. VARCHAR data can get processed and temporary tables will be created in-memory, which should bring a significant improvement in query response times.
An easy way to determine whether all columns will fit within the row length is to convert all the TEXT columns to VARCHAR. Let’s reuse the schema from the “new_table” to create a table called new_table1, but this time we’ll use VARCHAR instead of TEXT. I’ve increased the width of name field to 50,000 characters and the address to 20,000 characters to analyzed the limits on the row-size.
CREATE TABLE `new_table1` (
  `id` int(10) unsigned,
  `name` varchar(50000),
  `address` varchar(20000)
) ENGINE=InnoDB CHARACTER SET latin1;


The query results show that the row size too large as it exceeds 65,535 characters.
If you encounter the above error, reassess each column length or look to convert some of the smaller TEXT fields to substrings, as discussed later in the article. To convert the fields from TEXT to VARCHAR, alter the datatype using the ALTER TABLE command, as shown below:
ALTER TABLE new_table MODIFY name VARCHAR(200);

Using SUBSTRINGS
If changing the table structure from TEXT to VARCHAR is not a possible solution, you can also try the following method of using SUBSTR (column, position, length) to convert the values to character strings. This will enable the creation of in-memory temporary tables, reducing the performance overhead.
Ensure that the result set of the substring operation fits within the max_heap_table_size. Otherwise, the engine will push the result set to disk, negating the performance benefit.
Let’s verify the behavior of using substrings. As earlier, let’s obtain the count of temporary tables.
SHOW SESSION STATUS LIKE ‘created_tmp%tables’;

There are 38 disk and 58 memory tables. I’ll run the same query that aggregates the number of times a particular name is available in the table where name is a TEXT field.
select name, count(*) from new_table group by name;

Now that I’ve received the result of the query, I’ll re-run the temporary table count to look more closely at the newly created tables.
SHOW SESSION STATUS LIKE ‘created_tmp%tables’;

Running this led to the creation of one disk table.
Next, I’ll run the query extracting a character string of the TEXT field “name”.
SELECT SUBSTR(name, 1, 500), COUNT(*) FROM new_table GROUP BY SUBSTR(name, 1, 500);

Running the query provides the same result set as it did earlier.
Let’s check the temporary table counts again.
SHOW SESSION STATUS LIKE ‘created_tmp%tables’;

The query computation did not create any disk table. As you’ll notice from the above queries, when I used substrings, the query was processes in-memory and didn’t require a DDL operation.
Conclusion
We hope you now have a better understanding of why temporary tables are created, their impact of query performance, and some work arounds that you can try to minimize the impact. If you have any feedback or questions, please leave a comment below or email us at AskAzureDBforMySQL@service.microsoft.com.
Thank you!
by Contributed | Mar 10, 2021 | Technology
This article is contributed. See the original author and article here.
Earlier this week, we kicked off the “March Ahead with Azure Purview” blog series that will be focused on helping you get the most out of your Azure Purview implementation. ICYMI, the first blog post was on Azure Purview support of the Apache Atlas APIs and how you could use this to unify all your data. Leave a comment on what other topics you would like us to cover.
Let’s get started. I want to go through the important topic of access management within Azure Purview today. Depending on your org structure, this can be complex or simple to set up on your own. Here’s how I intend to take you through this topic:
- Overview of Azure roles in control plane and data plane to deploy and manage Azure Purview.
- What roles and tasks are required in Azure control plane (in Azure Portal) to deploy an Azure Purview Account and prerequisites to be able to scan data sources later in Purview.
- Required Access Permissions to scan data in Azure Purview.
Azure operations can be divided into two categories: control plane and data plane:
- You can use the control plane to manage resources in your subscription. For Azure Purview, you need to perform some operations at control plane such as deploying an Azure Purview Account or creating secrets in an Azure Key Vault resource.
The common dashboard for control plane is Azure Portal.
In this post I am going to explain tasks you need to perform in control plane in order to deploy an Azure Purview Account and setup required access.
- You can use the data plane to use capabilities exposed by your instance of a resource type, for example reading data inside an Azure Storage Account or managing data assets inside a Purview Account.
The common tool to manage Azure Purview through data plane is Azure Purview Studio.
Review my next blog post to read about Azure Purview roles in data plane!
Azure RBAC helps you manage roles and access for both control plane and data plane for Azure Purview. Azure Purview has also built-in roles which are part of Azure Built-in Roles. Assigning roles in Azure Purview can be done in Azure Resource Manager. It is recommended to use the least privilege model with absolute minimum permissions necessary to complete the task.
What roles do you need to deploy Azure Purview and perform initial setups?
Register required Resource Providers inside your Azure Subscription.
What roles can perform this task?
Owner at Subscription or Management Group level or /register/action operation for the resource provider in your subscription.
Why do you need this?
In the subscription you are planning to deploy an Azure Purview Account, prior to the deployment, the following Resource Providers must be registered:
- Microsoft.Purview
- Microsoft.Storage
- Microsoft.EventHub
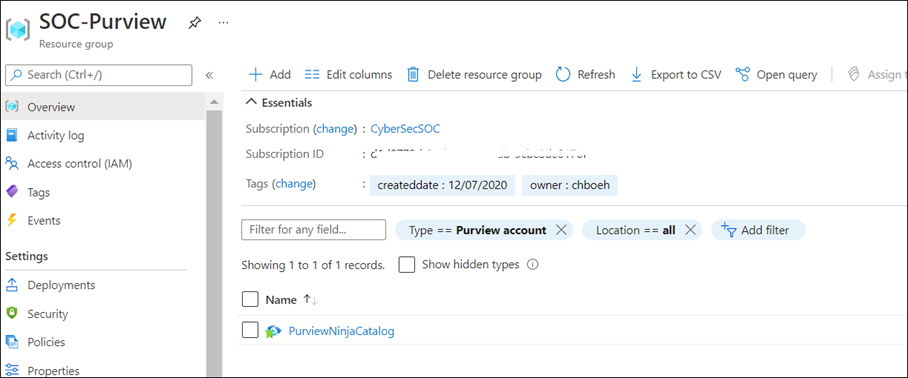
Create an Azure Purview Account inside your Azure Subscription.
What roles can perform this task?
Owner or Contributor in Management Group, Subscription or resource group
Why do you need this?
Azure Purview is an Azure resource; therefore, you would need to deploy an Azure Purview Account inside your Subscription in Azure. You can use Azure Portal to perform this operation.
As soon as Azure Purview Account is created, a system Managed Identity is created automatically in Azure AD tenant. Use PowerShell command to validate whether the MSI is created:
Get-AzADServicePrincipal -DisplayName PurviewCatalog
(Use your own Azure Purview account name instead of PurviewCatalog).

Setup source authentication in Azure Purview
What roles can perform this task?
Depending on data source type and required authentication method, you may need to work with different teams in your organization such as database owners and Infrastructure admins.
Why do you need this?
To scan data sources, Azure Purview requires access registered data sources. This is done by using a Credential. to A credential is an authentication information that Azure Purview can use to authenticate to your registered data sources.
There are few options to setup the credentials for Azure Purview:
- Option 1: Managed Identity
- Option 2: Key Vault Secret
- Option 3: Service Principal
Option 1: Use Managed Identity
Configure required role assignment for your Azure Purview Managed Identity. When you create an Azure Purview account a system Managed Identity is created for your Azure Purview Account in your Azure AD tenant. Depending on type of resource, specific RBAC role assignments are required for the Azure Purview MSI to perform the scans.
The higher scope you assign the role to Azure Purview MSI, the less administrative task is required when new data sources are added to your subscriptions.
If you use this option: Assign Azure Purview Account’s MSI with required RBAC assignment at Data Sources.

Note: If you have multiple data sources, for supported sources you can assign the role at higher level (for example at Subscription level) to reduce management overhead)
Option 2: Use Key Vault
To setup a credential for supported data sources, you can create Secrets inside an Azure Key Vault to store credentials so Azure Purview can reach your data sources securely using the secrets. A Secret can be a storage account key, SQL login password or a password.
If you use this option: You need to deploy an Azure Key Vault resource in your subscription and assign Azure Purview Account’s MSI with required access permission to Secrets inside Azure Key Vault.

Option 3: Use Service Principals
In this method you can create a new or use an existing service principal in your Azure Active Directory tenant. If you need to create a new service principal, it is required to register an application in your Azure AD tenant and provide access to Service Principal in your data sources. Your Azure AD Global Administrator or other roles such as Application Administrator can perform this operation.
In summary, currently Azure Purview supports the following authentication methods for data sources:
Data Source
|
Minimum Required Access Level
|
Supported Authentication Methods
|
Azure (Multiple sources)
· Azure Blob Storage
· Azure Data Lake Storage Gen1
· Azure Data Lake Storage Gen2
· Azure SQL Database
· Azure SQL Database Managed Instance
· Azure Synapse Analytics
|
As stated below for each data source
|
· Managed Identity
· Service Principal
|
Azure Blob Storage
|
Storage Blob Data Reader
|
· Managed Identity (Recommended method)
· Storage Account Key (Azure Storage Account key saved in Azure Key Vault as Secret)
· Service Principal
|
Azure Data Lake Gen 1
|
Read
Execute
|
· Managed Identity (Recommended method)
· Service Principal
|
Azure Data Lake Gen 2
|
Storage Blob Data Reader
|
· Managed Identity (Recommended Method)
· Storage Account Key (key saved in Azure Key Vault)
· Service Principal
|
Azure SQL Database
|
db_datareader
|
· SQL authentication (SQL login password saved in Azure Key Vault)
· Managed Identity
· Service Principal
|
Azure SQL Database Managed Instance
|
db_datareader
|
· SQL authentication (SQL login password saved in Azure Key Vault)
· Managed Identity
· Service Principal
|
Azure Cosmos DB
|
N/A
|
· Account Key (Cosmos DB Read-only key saved in Azure Key Vault)
|
Azure Data Explorer
|
AllDatabasesViewer
|
· Service Principal
|
Azure Synapse Analytics
|
db_owner
|
· Managed Identity (Recommended method)
· SQL authentication (SQL login password saved in Azure Key Vault)
· Service Principal
|
On-premises SQL Server
|
db_datareader
|
· SQL authentication (SQL login password saved in Azure Key Vault)
|
Power BI tenant – Portal
|
read-only Power BI admin APIs
|
· Managed Identity
|
Amazon S3
|
AmazonS3ReadOnlyAccess
|
· AWS ARN, bucket name, and AWS account ID.
|
SAP ECC / S/4HANA
|
User account with
· STFC_CONNECTION (check connectivity)
· RFC_SYSTEM_INFO (check system information)
|
· Basic authentication (username with a password stored in Azure Key Vault)
|
Teradata
|
Read access to Teradata source
|
· Basic authentication (username with a password stored in Azure Key Vault)
|
Oracle
|
Full Sys Admin
|
· Basic authentication (username with a password stored in Azure Key Vault)
|
Assign Azure Purview Roles to Data and Security team
What roles can perform this task?
Owner at Management Group, Subscription, Resource Group or Purview resource
Why do you need this?
Assign RBAC roles to your Data and Security teams across the organization so they can manage and use Azure Purview as data governance solution.
You can assign roles based on different data and security personas in your organization. For example, some roles such as Data Engineers may need to setup configuration in Azure Purview, meanwhile other roles such as Data Stewards and Data Officers need to search Data Catalog or review Insights Reports. I will explain what roles exist in Azure Purview and highlight some of the differences of these roles in my next blog.
It is recommended to evaluate what access level each team needs and always assign roles based on least privilege model.

Note: Currently Role assignment for a role with dataActions are not supported at Management Group level at this moment. If you need to assign roles at higher level, create the Azure Purview role assignments at the subscription scope instead.
Summary and next steps:
We discovered what roles and tasks are required to deploy an Azure Purview Account and setup credentials to scan data sources.
- Get started now and create your Azure Purview account!
- Define roles and responsibilities at control plan to deploy Azure Purview Account. Learn more about Azure RBAC Roles.
- We would love you hear your feedback and know how Azure Purview helped your organization Please provide us your feedback.
In my next blog I will explain Azure Purview roles to manage Azure Purview in data plane!
![[Event Recap] Mixed Reality @ Microsoft Ignite Spring 2021](https://www.drware.com/wp-content/uploads/2021/03/medium-206)
by Contributed | Mar 10, 2021 | Technology
This article is contributed. See the original author and article here.
Microsoft Ignite Spring 2021 is a wrap! Were you able to participate and tune in live this year? We hope you had a great experience! If you missed the sessions being played live, fret not as we’ve got you covered with this recap. Read on to all get caught up.
Technologists around the world once again virtually converged for a 48-hour event jam-packed with topics such as driving innovation with cloud, evolving into a new reality with mixed reality, adapting to hybrid work world, and more. The conference kicked off on a high note with Satya’s keynote, which spotlighted organizations such as Mt Sinai Hospital and Kruger using Dynamics 365 Mixed Reality business application solutions like Remote Assist and Guides respectively. Mixed Reality was also prominently featured front and center in Alex Kipman’s keynote on Microsoft Mesh that included impressive visuals that garnered strong enthusiasm from technologists and the press alike, gaining coverage on media including Forbes, The Verge, ZDNet and more.
Additionally, we hosted a slew of interactive D365 Mixed Reality Connection Zone live sessions which included topics like switching to a mixed reality career, exploring real-life applications in healthcare, and how mixed reality truly augments and enhances the way we work.
Microsoft Ignite: Day 1 (Tuesday, March 2)
Alex Kipman revealed how Microsoft is bringing mixed reality to collaboration through a first-of-its-kind immersive keynote experience, delivered through a new platform, Microsoft Mesh. Through an integration of Microsoft Mesh with other enterprise solutions such as Microsoft Teams and Dynamics 365, we can all envision a future that includes building a wide variety of new and exciting 3D experiences on Mesh.
Mixed Reality Connection Zone sessions proved to be highly popular as well, with thousands of attendees participating in real-time across both days. On Day 1, we kicked off with the So you want to switch to a career in Mixed Reality moderated by Mixed Reality BizApps Program Manager Amara Anigbo, who facilitated a meaningful dialog between four successful women in a variety of interesting MR-related roles across Microsoft. They shared tips and tricks on how to get started in switching to a career in mixed reality, in addition to sharing their own unique, personal journey into the MR world.

Speaker stories included:
- Amara Anigbo, a Mixed Reality Program Manager at Microsoft and a recent graduate of Dickinson College where she received her B.S. in Computer Science. Amara believes in empowering those around her to achieve more and aspire for greatness. Read her story here.
- Catherine Diaz, a software engineer that worked on the Mixed Reality Toolkit (MRTK) for Unity. She has contributed to various items in the MRTK such as Leap Motion support, Tap to Place and other mixed reality input related components.
- Archana Iyer, a Product Manager in the Mixed Reality team. Archana’s day job involves helping build the Mixed Reality Object Understanding offering. She has worked on other Mixed Reality cloud solutions such as Azure Spatial Anchors and Azure Remote Rendering as a developer. She also has experience with large scale services from her time spent in Office 365.
- April Speight, an author and developer advocate based in Beverly Hills, CA. In January 2020, she and a team of 4 ambitious developers created Spell Bound, a VR learning experience designed to help children with dyslexia and dysgraphia learn letter formation and word recognition. Their team won Best in Learning, Education and Research as well as Best in Health and Wellness + Medical at the MIT Reality Hack. She has since taken on a role as a Sr. Cloud Advocate with the Spatial Computing technology team at Microsoft helping to onboard beginners in the XR space.


Later in the evening, we were thrilled to hear from Xerxes Beharry, Niels Broekhaus, Alexander Meijers, and moderator Alexander Petty in the Blending Worlds: Empowering Humans through Mixed Reality. These speakers captivated the audience by explaining the power and potential of mixed reality changing the world. They share how they are leveraging mixed reality to solve complex problems, create positive social impact and empower humans.
Key highlights included:
- Each individual took a “leap of faith” on Mixed Reality. Each speaker took a risk by stepping into the Mixed Reality. For example, Niels Broekhaus started his career as a Nurse, inspired by working in Healthcare. He had his first experience with HoloLens, saw many opportunities, and began to find ways to innovate the healthcare market to be more sustainable, contemporary and efficient.
- They also shared their community resources and how to get started in Mixed Reality. Xerxes recommended inclusive design resources and expresses the importance of accessibility to all humans. He recommends Microsoft’s Inclusive Design toolkit. Alexander also recommended using the MRTK for Unity as a quick developer tool, an open-source, cross-platform development kit for mixed reality applications.
- The speakers also talked about how to bring awareness to Mixed Reality and how important it is to engage future innovators and students. Alexandra shared about a ongoing student project group in Amsterdam that will be focusing on Dynamics 365 Remote Assist usage in healthcare. Alexander Meijers also shared about the importance of personally experiencing the HoloLens firsthand, and how essential it is to the future of MR.
- Lastly, they shared about their human experiences with MR/HoloLens and what was so memorable about involving others in the process.


Microsoft Ignite: Day 2 (Wednesday, March 3)
We continued the excitement on Day 2 with the session, Intro to Mixed Reality Business Apps + Real-Life Use Cases in Healthcare, featuring Katie Glerum, a Global Health Program Manager at Mount Sinai Health System, and Payge Winfield, a Mixed Reality solutions architect at Microsoft. Payge kicked off the conversation by sharing how you can get started infusing mixed reality into your everyday life and build confidence with Mixed Reality Business Apps like Remote Assist. She also walks us through core Mixed Reality deployment steps and best practices:

You can also read her comprehensive Remote Assist Best Practices Deployment Guide here.
Katie Glerum then shared about her first-hand experience of how Microsoft tech has helped enable global shared surgery across both the Mt. Sinai Hospital New York and their counterparts in Uganda. She shared the sobering statistic that currently over 5 billion people worldwide do not have access to safe and affordable surgery. In Uganda, 84% of the population lives in a rural area and over 75% must travel more than 2 hours for basic/essential surgical care. She shared about how Mt Sinai Hospital is using Microsoft technologies such as Dynamics 365 Remote Assist on HoloLens and Microsoft Teams to conduct critical, life-saving surgery and enabling real-time collaboration and knowledge sharing between New York City and Uganda:


Mixed Reality HoloLens + Dynamics 365 Remote Assist enables knowledge share from surgeon in NYC to surgeons in Uganda, making surgical care to accessible to their community.
To wrap up the event, we had an engaging community table talk on Mixed Reality Business Applications. This was an informal way to chat with technologists and MR enthusiasts about all things MR Biz Apps across Dynamics 365 and Power Platform with Business Applications MVPs Mary Angiela Cerbolles, Daniel Christian, and Microsoft Indonesia Mixed Reality consultant Adityo Setyonugroho.
We are truly humbled and excited to share the future of tech in the mixed reality space with thousands of attendees on a global scale. We hope you will join us at the next Microsoft Ignite event this fall!
Catch the sessions above on-demand! Recording links below:
Share your Microsoft Ignite experience with us:
- What was favorite Mixed Reality session at Microsoft Ignite? Why?
- What do you hope to see from us at the next virtual conference?
Can’t wait till the next Microsoft Ignite? Join us at our next Mixed Reality x Microsoft Reactor session where we’re bringing back Anj Cerbolles, Daniel Christian and Adityo Setyonugroho on March 18 @ 8am PT once again to chat about Mixed Reality in Dynamics 365 and Power Platform.
Register now (it’s free!): https://aka.ms/LearnRA
We hope you enjoyed the Mixed Reality BizApps sessions @ Microsoft Ignite as much as we did.
See you in the fall!
#MixedReality
#Dynamics365
#MSIgnite

Recent Comments