by Contributed | Mar 17, 2021 | Technology
This article is contributed. See the original author and article here.
Hi everyone, welcome to the post-Ignite edition of the Azure CLI blog. Today I will share with you a list of the latest features we released in the Azure CLI supporting various announcements for Microsoft Ignite. However Microsoft Ignite is not just about the major announcements. We also released several updates to Azure CLI commands based on customer asks surfacing improvements to our core platform services during the Ignite timeframe. Here are some of the announcements and updates.
Announcements
Azure Arc-enabled Kubernetes is now generally available. This allows organizations to connect, manage and govern any Kubernetes cluster across datacenters, multicloud and edge from Azure. You can reap the benefits of Azure Arc-enabled Kubernetes by connecting an existing Kubernetes cluster to Azure Arc using the Azure CLI via the az connectedk8s connect command. (Learn more at Connect an existing Kubernetes cluster to Azure Arc)
Azure Resource Mover, which provides portability between Azure regions and is unique to the Azure platform, is now generally available. Azure Resource Mover allows new customers to create applications in existing regions and migrate them upon new region launch or move into regions with availability zones (AZs) if not planned for their region. This service can now be accessed from the Azure CLI via az resource-mover. We would love to hear your feedback about managing this new service via the Azure CLI.
Mongo v4.0 server support in Azure Cosmos DB API for Mongo DB is now generally available. This makes it easier for developers using MongoDB v4.0 to migrate to Azure Cosmos DB. Support for Mongo v4.0 can now be leveraged from the Azure CLI via the az cosmosdb mongodb commands.
Azure Managed Instance for Apache Cassandra is a new service that automates deployment, scaling, and management operations for open-source Apache Cassandra datacenters. It is an ideal service if you want to create hybrid deployments that can extend the capacity in your existing on-premises or cloud datacenters. Customers can now create a managed instance cluster as well as connect to the cluster via az managed-cassandra (Learn more at Use CLI to create Azure Managed Instance for Apache Cassandra cluster)
Azure Cosmos DB Continuous Backup and Point-in-Time is now available in preview. This provides ongoing backups and enables customers to recover and restore data from any point within the past 30 days. To provision an API for MongoDB or SQL API account with continuous backup, an extra argument –backup-policy-type Continuous should be passed along with az cosmosdb create. You can also use commands with restorable- prefix to enumerate restorable resources; like az cosmosdb mongodb restorable-database list. (Learn more at Use Azure CLI to configure continuous backup and point in time restore ).
Azure Virtual Machine Scale Sets flexible orchestration mode is now available in preview. Customers may now change VM sizes without redeploying their scale set, resulting in greater operational agility. Customers will also be able to mix Spot Virtual Machines and pay-as-you-go VMs within the same scale set to optimize costs. Customers can now create VM Scale Sets in this mode via the Azure CLI using az vmss create –orchestration-mode Flexible.
Security updates to Storage
Preventing authorization with shared keys is now in preview. Every secure request to an Azure Storage account must be authorized. By default, requests can be authorized with either Azure Active Directory (Azure AD) credentials, or by using the account access key for Shared Key authorization. Of these two types of authorization, Azure AD provides superior security and ease of use over Shared Key, and is recommended by Microsoft. So we are more secure by default and require Azure AD to authorize requests, disallowing requests to the storage account that are authorized with Shared Key. For accounts that still need to use shared keys, you will need to explicitly enable this at the account level using az storage account create/update with the new –allow-shared-key-access flag. (Learn more at Prevent authorization with Shared Key (preview) )
Encryption scopes (preview) enable you to manage encryption at the level of an individual blob or container. An encryption scope isolates blob data in a secure enclave within a storage account. You can use encryption scopes to create secure boundaries between data that resides in the same storage account but belongs to different customers. You can create an encryption scope using Microsoft managed keys or customer managed keys (in a key vault or managed HSM) based on –key-source in the az storage account encryption-scope create command. (Learn more at Create and manage encryption scopes (preview) ). In addition, you can rewrite a blob with a specified encryption scope using az storage blob rewrite with –encryption-scope. This will change the encryption used to protect a blob’s content (Learn more at Encryption scopes for Blob storage (preview) )
Customers who require higher levels of assurance that their data is secure can enable 256-bit AES encryption at the Azure Storage infrastructure level. When infrastructure encryption is enabled, data in a storage account is encrypted twice — once at the service level and once at the infrastructure level — with two different encryption algorithms and two different keys. Double encryption of Azure Storage data protects against a scenario where one of the encryption algorithms or keys may be compromised. In this scenario, the additional layer of encryption continues to protect your data. To set this up, create a general-purpose v2 storage account by calling the az storage account create command with –kind StorageV2 and include the –require-infrastructure-encryption option which enables infrastructure encryption and double encrypts your data.
IP address related updates to Networking
Azure Public IP SKU upgrade is now generally available. This allows customers to upgrade and retain the same IPs without management overhead or notices to their end customers and now supports the ability to upgrade from Basic to Standard SKU using the Azure CLI az network public-ip update with –sku Standard. Optionally first updating the Basic SKU IP using az network public-ip update with –allocation-method Static. (Learn more at Upgrade public IP addresses ).
Standard SKU IPs can be zone-redundant (advertised from all 3 zones). This can be configured using az network public-ip create with –zone 1 2 3. (Learn more at Public IP addresses in Azure ) You can also indicate if a Standard SKU IP address is “anycast” from multiple regions (Global) using –tier Global. Note that a “Global Tier” IP is only utilized for the cross-region Load Balancer.
Finally, speaking of IP addresses, Azure ExpressRoute supports IPv6 addresses for peering using az network express-route peering create with –ip-version ipv6
Azure CLI core updates
We recently blogged about our AI-powered az next commands, and are eager to know what you think (Learn more at https://techcommunity.microsoft.com/t5/azure-tools/az-next-ai-powered-interactive-assistant/ba-p/2118582)
We also need your valuable feedback on our Azure CLI Beta which is setup for customers to try out the breaking changes that our shift to the Microsoft Authentication Library (MSAL) from the Azure Active Directory Authentication Library (ADAL) will require. (Learn more at Azure CLI Beta release notes )
Looking forward to all of your feedback on these updates and anything else you would like to see. Thanks a lot for your continued support!
![[Customer Story] Enabling an Event Driven Architecture with DevTest Labs](https://www.drware.com/wp-content/uploads/2021/03/large-1115)
by Contributed | Mar 16, 2021 | Technology
This article is contributed. See the original author and article here.
SharePoint Online (SPO) is Microsoft’s enterprise-class document management service for Microsoft365. The SharePoint Online (SPO) team at Microsoft has created a solution, built on Azure DevTest Labs (DTL), to make SPO testing environments readily available to SharePoint engineers, leveraging the strengths of DevTest Labs and Azure. This is the second in a series of blog entries enabling anyone to build, configure and run a similar system using Azure and DTL. For part 1, see How the SharePoint Online Team Leverages DevTest Labs.
In this blog post, two use cases of the solution’s expected VM lifecycle are described. A simple architecture is proposed that involves hooking up an Azure Function App to DevTest Lab Events by way of Azure Event Grid to implement the two use cases. There is a brief walk-through of the implementation intended to be used by other Azure customers to build similar solutions. If you are building an event-driven DTL application, consider using Azure Functions and Event Grid as the SPO team did. This article is of interest to you!
Scenario
As introduced in Part 1 of this blog series, environments in Azure DevTest Labs are a natural fit for SPO integration testing. SPO engineers can claim test environments that are miniaturized data centers, with all components shrunk down and interacting on a single Azure VM inside DTL. Pools of these VMs are made available for SPO engineers so that test environments are readily available at any time. When finished, they unclaim them.
There are two features that the SPO team has built on top of existing DevTest Labs Claim/Unclaim operations:
Feature 1 – Tag a Claimed VM
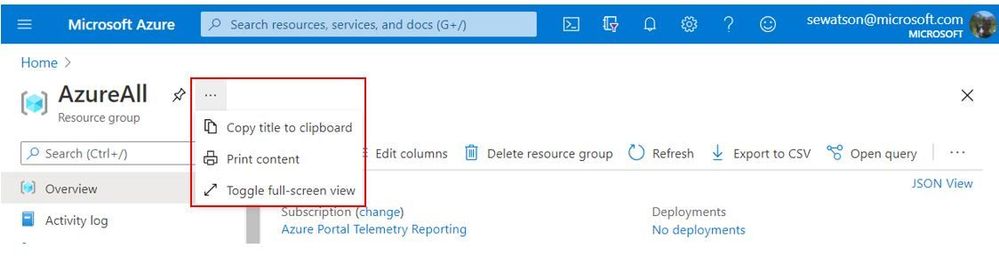
By default, DTL does not allow an easy way for the admin to know the ownership of claimed VMs. A common way to do this is to add an “Owner” tag to the VM using Azure Tags. Tags are flexible and allow lab admins to easily organize Azure resources and make them easy to query, for example, to list VMs assigned to a given user or set of users. In this solution, when a user claims a VM, an event is fired, and the handler attaches an “Owner” tag, with associated user name as data, to the VM. The tag shows up in the VM’s properties in the Azure Portal.
Feature 2 – Delete an Unclaimed VM
In SPO’s use case, VMs are not re-usable. Once a VM is claimed by a lab user, the state on the VM may change in such a way as to make the VM unsuitable for future users’ needs. For example, users can change the state of one of the SharePoint web applications, or introduce state into SharePoint by simply adding a document to a document library as part of a test. (For a better understanding of SharePoint’s document libraries, try: What is a document library?) The engineer may also update the code running on the VM, which can change behavior in a way undesirable for other engineers.
In general, once a VM is assigned to a lab user, its validity as a clean test environment can no longer be trusted. With this use case in mind, VMs in the SPO solution are single-use. Once unclaimed, they are deleted.
Note: Replenishment of the pool of available VMs is described in a future blog entry in this series, entitled “Maintaining a Pool of Claimable VMs”.
Both of these features can be added to DevTest Labs using Azure Event Grid, with an Azure Function listening and handling events. The solution is simple and elegant; please read on to see how this is configured.
Event Handling with Azure Functions
Azure Functions are a flexible, serverless computing platform in Azure. Functions can be configured to trigger when an Azure event fires, and DevTest Labs fires “Claim” and “Unclaim” events when VMs are claimed or unclaimed, respectively. When configured properly through Event Grid, events are dispatched to an Azure Function subscriber.
For simplicity and brevity, the solution described herein implements a single Azure function to handle both Claim and Unclaim events. The function is written in PowerShell and implements the tagging and delete business logic for these events. It is deployed in a Function App, triggered when events fire, in accordance with this table:
DevTestLab Event
|
Event Name
|
Action
|
Claim
|
microsoft.devtestlab/labs/virtualmachines/claim/action
|
Add an “Owner” tag to the VM
|
Unclaim
|
microsoft.devtestlab/labs/virtualmachines/unclaim/action
|
Delete the VM
|
Note: You can find a complete list of DevTestLab events here: DevTest Lab Events. There are several useful ones that, when paired with the technique described in this post, can be used to solve other event-driven scenarios using the template given here.
Solution Architecture
This solution builds on the ideas presented in the article Use Azure Functions to extend DevTest Labs. A key difference is how the events are triggered: In the article, the Functions are triggered via an HTTP call. In this example, Claim/Unclaim events are generated from the DevTest Lab and routed via Event Grid to the function app. We will also be building on the coding concepts in Azure Event Grid trigger for Azure Functions.
Walkthrough
The following solution assumes a pre-created Azure DevTest Lab, such as one created using the steps in Create a lab in Azure DevTest Labs. In this example, the Lab has been freshly deployed with name “PetesDTL” and resource group “PetesDTL_rg” with no VMs yet created.
Step 1: Create a Function App
Use the “Create a Resource” UI and find “Function App” in your Azure subscription, and hit “Create”. Select the resource group for your DevTest Lab. This is optional but is a convenience for grouping your app with the other resources for your Lab. In this example, the Name of the app is “PetesFnApp” and is in the “PetesDTL_rg” resource group with a Runtime stack that is PowerShell Core. PowerShell Core is a flexible, operating system independent control language that is easy to get to work with Azure.

Leaving the majority of the settings with their defaults, hit “Review + create”, then “Create” to deploy the function app after the verification step.
Step 2: Create the FnDTLClaimUnclaim Function
Navigate to the newly-deployed Function App, hit “Functions” and then “+ Add” to add a new function to the App. Leave the “Development environment” to be “Develop in portal” and select “Azure Event Grid trigger” for the template. In this example, the new function is named “FnDTLClaimUnclaim”. The name indicates that this Powershell Core function is dual-purpose and will handle both the “Claim” and “Unclaim” events from the DevTest Lab. Click “Add”.

Step 3: Add logic to the function
Navigate to the newly-created function, and hit “Code + Test”. There is some sample code in the edit window, which you can replace with the following code:
param($eventGridEvent, $TriggerMetadata)

$operationName = $eventGridEvent.data["operationName"]

# Apply an Owner tag to a VM based on passed-in claims
function ApplyOwnerTag($vmId, $claims) {
    # Get the VM
    $dtlVm = Get-AzResource -ResourceId $vmId -ErrorAction SilentlyContinue

    # Fetch user.
    # Prefer user specified in claims, then owner, then createdBy
    $claimPropName = $claims.keys | Where-Object {$_ -like "*/identity/claims/name"}
    if ($claimPropName) {
        $user = $claims[$claimPropName]
    }
    if (-not $user) {
        $user = $dtlVm.Properties.ownerUserPrincipalName
    }
    if (-not $user) {
        $user = $dtlVm.Properties.createdByUser
    }

    $tags = $dtlvm.Tags
    if ($tags) {
        if (-not $tags.keys.Contains("Owner")) {
            $tags.Add("Owner", $user)
        }
    }
    else {
        $tags = @{ Owner=$user }
    }

    # Save the VM's tags
    Set-AzResource -ResourceId $vmId -Tag $tags -Force | Out-Null
}

# Event      Action
# ------------------------------------------
# Claim      Add "owner" tag to the VM
# Unclaim    Delete the VM

$claimAction = ($operationName -eq "microsoft.devtestlab/labs/virtualmachines/claim/action")
$unclaimAction = ($operationName -eq "microsoft.devtestlab/labs/virtualmachines/unclaim/action")

if ($claimAction -or $unclaimAction) {
    $vmId = $eventGridEvent.subject

    Connect-AzAccount -Identity

    $dtlVm = Get-AzResource -ResourceId $vmId -ErrorAction SilentlyContinue

    if ($claimAction) {
        if (-not $dtlVm.Properties.allowClaim) {
            ApplyOwnerTag $vmId $eventGridEvent.data.claims
        }
    }
    else {
        if ($dtlVm.Properties.allowClaim) {
            Remove-AzResource -ResourceId $vmId -Force -ErrorAction SilentlyContinue
        }
    }
}
Click “Save” to save the function.
The code snippet contains an ApplyOwnerTag function and a main body. The ApplyOwnerTag function gets the user from variety of sources, preferring first the identity from the passed-in claims, then looking at the owner or created-by user from the DevTestLabs VM. Once it has a valid user name, it adds the “Owner” tag to the VM.
The main body of the Azure Function first determines which event is being handled. On a Claim event, the ApplyOwnerTag function is called to add the “Owner” tag to the given VM. On Unclaim, the VM is removed. This logic implements the behavior desired for the SharePoint Online application for these two events.
Step 4: Assign an Identity and Role for the Azure Function
The Azure function has a call to Connect-AzAccount, which requires that the function app uses a System-assigned identity. (User-assigned identities can also be configured, however for simplicity this example uses a System-assigned identity.) Further, the identity in question needs access to resources in the subscription in order to add tags and to delete VMs. To configure this, click on the Function App, then Identity. Change the Status to “On”.

Next, Click on “Azure role assignments” to configure role-based access control for this Function App. In this example, Contributor role is assigned for the entire Azure subscription. While it’s possible to configure more fine-grained access to the Identity, this example in order to keeps things simple.

The resultant role assignment should look like this:

Step 5: Create an Event Subscription for the Function App
At this point we have logic ready to handle the DevTestLabs events, but the Function App is not configured to subscribe to those events. Azure Event Grid is infrastructure for mapping Azure events to logic and can be used to create rich applications. To get deeper into Azure Event Grid, please check out Azure Event Grid Overview.
Navigate to the subscription, then click Events. Under “Get Started”, click on “Azure Function”:

Enter “DTLEventSub” as the name. Use “ClaimUnclaimVM” for the System Topic Name. For Endpoint Type select “Azure Function” with Endpoint “FnDTLClaimUnclaim”.

Hit Create. This will create the ClaimUnclaimVM Topic and the Event Subscription.
Step 6: Test the Claim functionality
Navigate to the DevTest Lab in your subscription, “PetesDTL” in this example, and click “+ Add” to create a new VM. The type of VM you choose is not relevant for this example – you can select the operating system and resources that are appropriate for your application. In this example the VM is named “petesvm001”.
In “Advanced Settings”, select “Yes” for “Make this machine claimable” under “Claim options”, then in “Basic Settings” click “Create”. The reason is that we expect to Claim the VM through the UI to trigger the tagging behavior. Later, when we Unclaim the VM, we will expect to see the VM being deleted.

After the VM is created (this may take several minutes, perhaps tens of minutes, to complete) it should show in the “Claimable virtual machines” section of the DevTest Labs UI:

Note that this VM does not have an “Owner” tag yet, since it has not yet been claimed:

Now, click the ellipsis (…) on the VM in the Claimable virtual machines, and select “Claim”. This operation will also take several tens of minutes before the VM is successfully claimed and the Azure event has made its way through the Event Grid infrastructure and called our Azure Function. You can monitor when your Function has been called by selecting the Function in the Function App UI and seeing Total and Successful Execution Count in the Overview section:

You can also see what the Azure Function logs in near real-time by using the “Code + Test” UI and opening the Logs popup at the bottom:

After several minutes, the Function is called, and the ApplyOwnerTag PowerShell function adds the current user’s name in the Owner tag, as expected:

Now navigate to “My virtual machines” in the DevTest Labs UI, click the ellipsis (…) and select “Unclaim”:

Once again, it will take several minutes for the event to make its way through Azure to call FnDTLClaimUnclaim, but when it does the Remove-AzResource call will ensure the VM gets deleted:

This completes the full Claim/Unclaim cycle that a SharePoint Online user would experience and demonstrates the two features built on top of DevTest Labs.
Some Notes on Performance
The Azure Function App used in this example uses the PowerShell Core runtime. PowerShell was chosen for its strength as a simple control language for Azure, and its amenability to concise code samples. However, there is overhead to the boot time and resource consumption for PowerShell-based Function Apps over, say, C#-based Apps that should not be overlooked for performance-sensitive applications.
Eventing in Azure has its own set of performance characteristics, and you will notice with these samples delays of minutes and sometimes up to tens of minutes for events to fire and be handled by the Function App. This can be improved somewhat by upgrading from a Consumption Plan to an Dedicated App Service Plan, but one should bear in mind that there is always inherent and unavoidable latency due to the Azure’s eventing model, and this should be accounted for in the design of the Azure application.
What’s Next?
The next blog post will describe how the SharePoint team built an Azure VPN that complements the DevTest Lab, securing the connection between lab users and the VMs they connect to. If you are interested in securing your environment, this is not one you will want to miss!
If you run into any problems with the content, or have any questions, please feel free to drop a comment below this post and we will respond. Your feedback is always welcome.
– Pete Harwood, Principal Engineering Manager, OneDrive and SharePoint Engineering Fundamentals at Microsoft
by Contributed | Mar 16, 2021 | Technology
This article is contributed. See the original author and article here.
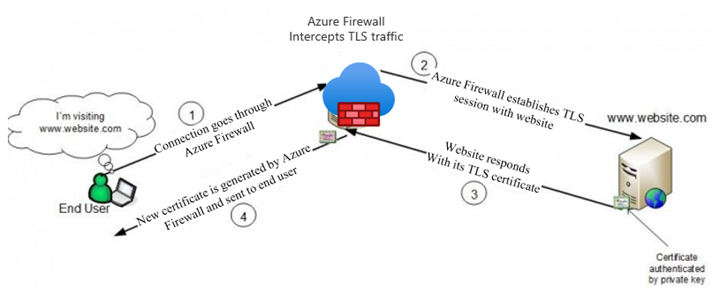
Azure Firewall Premium, which entered Public Preview on February 16th, introduces some important new security features, including IDPS, TLS termination, and more powerful application rules that now handle full URLs and categories. This blog will focus on TLS termination, and more specifically how to deal with the complexities of certificate management.
There is an overview of the TLS certificates used by clients, websites, and Azure Firewall in a typical web request that is subject to TLS termination in our documentation (diagram below). In summary, a Subordinate (Intermediate) CA certificate needs to be imported to a Key Vault for Azure Firewall to use. To ensure a seamless experience for clients, they all must trust the certificate issued by Azure Firewall.
The rough steps for enabling TLS Inspection are:
- Issue and export a subordinate, or intermediate, CA certificate along with its private key.
- Save the certificate and key in a Key Vault.
- Create a Managed Identity for Firewall to use and allow it to access the Key Vault.
- Configure your Firewall Policy for TLS Inspection.
- Ensure that clients trust the certificate that will be presented by Azure Firewall.
The rest of the blog will walk through the different ways to accomplish steps 1 and 5.
General Certificate Requirements
From our docs, the certificate issued must conform to the following:
- It must be a single certificate, and shouldn’t include the entire chain of certificates.
- It must be valid for one year forward.
- It must be an RSA private key with minimal size of 4096 bytes.
- It must have the KeyUsage extension marked as Critical with the KeyCertSign flag (RFC 5280; 4.2.1.3 Key Usage).
- It must have the BasicContraints extension marked as Critical (RFC 5280; 4.2.1.9 Basic Constraints).
- The CA flag must be set to TRUE.
- The Path Length must be greater than or equal to one.
These requirements can be fulfilled by either generating self-signed certificates on any server, or by using an existing Certificate Authority, possibly as part of a Private Key Infrastructure (PKI). Public Certificate Authorities will not issue a certificate of this type because it will be used to issue other certificates on behalf of the root or issuing CA. Since most public CAs are trusted by default on client operating systems, allowing others to issue certificates on behalf of those would be a major security risk.
Self-Signed Certificates
The quickest and easiest method of generating a certificate for use on Azure Firewall is to generate root and subordinate CA certs on any Windows, Linux, or MacOS machine using openssl. This is the recommended method to use for testing environments, due to its simplicity.
There are scripts in our documentation that make this process very easy. If you are using these certificates in a production environment, be sure to secure the root CA certificate by storing it in a Key Vault.
Establishing Trust
If the certificate used on Azure Firewall is not trusted by the client making a web request, they will be met with an error, which would disrupt normal operations. The best way to establish trust is to add the Root CA that issued the Firewall certificate as a Trusted Root CA on every client device that will be sending traffic through the Firewall. You will need an exported .cer file from your Root CA.
Using Ubuntu as the example for Linux, this can be done using update-ca-certificates.
On Windows, you can use the UI or import using Powershell.
This process can be scripted and run remotely if the environment allows it.
PKI
A Private Key Infrastructure can be used by organizations to manage trust within an enterprise. There are several advantages to using this approach rather than self-signed certificates, including:
- CA infrastructure may already be in place in some environments, especially hybrid ones.
- Enterprise Root CA is automatically trusted by all domain-joined Windows computers. No extra steps are needed to establish trust.
- Certificate rotation and revocation can be done centrally via Group Policy, so changes are more easily managed.
Using PKI, you will not have to import your certificate on your Windows clients, since they will all automatically trust your Enterprise Root CA. The full process of generating, exporting, and configuring Azure Firewall to use a PKI certificate is documented in a new article here.
Intune
Intune does not generate certificates, but it can be a great tool to manage them on clients. If your Azure VMs are managed by Intune, you can use certificate profiles to add your chosen CA as trusted.
Custom Images
If your environment is not connected to or managed by Active Directory, Intune, MEM, or any other client management tool, you still have an option to deploy certificates at scale. Using custom images, you can install the trusted Root CA certificate, capture an image, and use that image to deploy or re-deploy your VM instances.
This process works best in environments where servers are treated as “cattle” rather than “pets,” meaning that they are spun up and down often and automatically configured, rather than manually configured and maintained for long periods of time.
Summary
This has been an overview of some different methods available to create certificates for use on Azure Firewall Premium and establish trust for those certificates on your clients. This is certainly not an exhaustive list of the options out there, so we would like to hear more from you. Please leave a comment telling us what methods you are currently using or would like to use. We will use your feedback to create more documentation and other instructional content.


Recent Comments