Best practices for migrating detection rules from ArcSight, Splunk and QRadar to Azure Sentinel

Best practices for migrating detection rules from ArcSight, Splunk and QRadar to Azure Sentinel

This article is contributed. See the original author and article here.


Overview


As the world’s first cloud-native SIEM with built-in SOAR and UEBA capabilities, Azure Sentinel has experienced a tremendous uptake in the market since its September 2019 launch. Today, Azure Sentinel is recognized as a Leader in the Forrester Wave’s Security Analytics Platforms report for Q4, 2020.


A key task that faces customers who continue to migrate from other SIEM solutions to Azure Sentinel is translating existing detection rules into rules that map to Azure Sentinel as accurately as possible. However, Azure Sentinel offers significant advantages around the analytics rules pillar that make SIEM migrations a worthwhile effort. Some of these features include four built-in rule types (discussed later in this blog), alert grouping, event grouping, entity mapping, evidence summary, and a powerful query language that can be used across other Microsoft solutions such as Microsoft Defender for Endpoint and Application Insights.


Event Grouping


This is one of the features in Azure Sentinel that will help you reduce alert noise. It accomplishes this by allowing you to determine how alerts are generated-either based on each event or based on several events for which you define the event threshold needed to trigger an alert. It can be useful to the SOC team if they are interested in tracking a particular entity across Azure Sentinel as they investigate an incident associated with it.


Alert Grouping


Like Event Grouping, Alert Grouping has the same fundamental goal of reducing alert fatigue. The feature allows you to group up to 150 alerts occurring within a given timeframe and offer three options for the grouping, i.e., if all entities match, by all alerts triggered by the scheduled rule, or if matches of specific entities are found.


Entity mapping


With the entity mapping features, SOC engineers can define entities which they would like to show up as part of the evidence to be tracked during the investigation. This also makes it possible for SOC analysts to take advantage of the intuitive Investigation Graph feature that significantly reduces investigation effort compared to legacy SIEMs.


Evidence summary


Once an analytics rule creates an incident, the evidence gathered is presented in an easy-to-use summary. This feature is within the incident preview pane and surfaces events, alerts, and any bookmarks associated with a particular incident. Additionally, entities and tactics also show up in the incident pane. This makes it much easier to conduct triage as the incident page provides a snapshot of essential details needed by an analyst to judge how to begin a particular investigation.


Kusto Query Language (KQL)


KQL is based on read-only requests to process data and return results. The request is sent to a Log Analytics database and is stated in plain text, using a data-flow model designed to make the syntax easy to read, author, and automate. Azure Sentinel stores data within a Log Analytics workspace. Given that several other Microsoft services also store data in Log Analytics or Azure Data Explorer, the learning curve needed to query or correlate with Log Analytics data, regardless of its source, is of significant benefit.


To help facilitate the migration journey for our customers and partners, this blog combines a range of resources to provide as much guidance as possible for migrating existing rules from ArcSight, QRadar, and Splunk into the analytics rules used by Azure Sentinel.


This blog discusses the important steps and best practices recommended when migrating your detection rules from ArcSight, Splunk, and QRadar (referred to from now on as third-party SIEMs) to Azure Sentinel. We share these steps and best practices hoping that they will facilitate your migration process in a structured and planned manner.


Components of a detection rule


Before we dive into the rule migration process, let’s discuss the components that make up a detection rule at a high-level. For example, let’s review the terminology differences between other SIEMs and Azure Sentinel. This section will help you understand how the terms you are familiar with in your previous SIEM translate into Azure Sentinel terminology.


This section is NOT a feature comparison between the SIEMs, but rather a mapping of terminology between Azure Sentinel and other SIEMs.


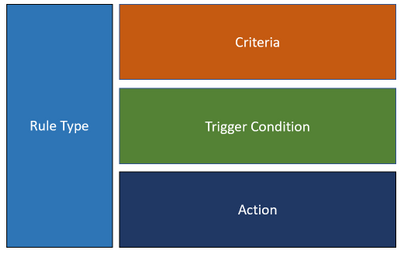
In general, a rule consists of the following main components:


1.png


 Figure 1


Because every SIEM is different, the terminology and usage for each of the components are different too. Below is a summary of how each component maps into Azure Sentinel, ArcSight, QRadar, and Splunk.  This mapping should help to clarify the concept of a rule in Azure Sentinel compared to other SIEMs.


2.png


Figure 2


Rule migration flow


Rule migration across SIEMs is not a trivial task. It requires a clear strategy and a detailed implementation plan to achieve business goals while reducing the security risk of not having enough detection coverage.


The following rule migration process flow should help you identify the key elements in the migration, understand the interrelationships among the various steps, and evaluate the decision points.  This will help you better strategize and prepare for the migration.


3.png


Figure 3


The steps in the migration process have the following categories:


  • Planning / Assessment tasks.

  • Tasks to be performed in third-party SIEM.

  • Tasks to be performed in Azure Sentinel.


i ) “Planning and assessment tasks provides a list of checklists and important points to consider before you begin with the rule migration steps. They also include useful resources to help you prepare for the journey.


ii ) “Tsks to be performed in third party SIEM” mainly captures the rule content. These steps are important to ensure the rules’ accuracy and quality to eliminate any discrepancies once they are moved to Azure Sentinel.


iii ) “Tasks to be performed in Azure Sentinel is mainly related to creating the rule itself in Azure Sentinel.


As every SIEM works differently in terms of detection rules, we have provided sample rule mappings to help you understand the key differences and how a particular rule type in your legacy SIEM would look like in Azure Sentinel.


Keep in mind that the flow shown above is applicable to rule migration and for creating a new custom threat detection in Azure Sentinel.


Let’s dive into the process flow and discuss each step in detail.


Planning/ Assessment task 


a) Preliminary considerations


There are a few key points to consider before making the effort to migrate your existing detection rules.


Azure Sentinel has built-in detection templates available, which users can enable with the pre-defined detection logic. Azure Sentinel also uses machine learning analytics to produce high fidelity and actionable incidents. Therefore, it is very likely that some of your existing detections are not required anymore because machine learning can do a better job (we will discuss the built-in detection templates in step b). Always review your rules, and be careful not to be too obsessed about getting all the rules or exact rule content migrated.


Below are some of the main considerations when migrating analytics to Azure Sentinel:


1.  Do NOT migrate all the rules blindly. Focus on the quality of the rules, not quantity.


2.  Avoid Reinventing the Wheel by leveraging available resources.


▪  Review all the Azure Sentinel built-in rules to identify out-of-the-box rules that can address your use-cases.


▪  Explore community resources such as SOC Prime Threat Detection Marketplace.


▪  We will discuss the above in more detail under steps b and c.


3.  Confirm connected data sources and review data connection methods.


▪  Revisit data collection conversations to ensure data depth and data breadth across the use cases you plan to detect.


4.  Build a candidate list of rules that have a high true positive rate.  Use the following guidance as your checklist:


▪  Select use cases. To select use cases that justify rule migration, consider the question: What problems are we trying to solve? Consider use cases in terms of business priority.


▪  Review the detection efficacy of existing rules before deciding to migrate them into Azure Sentinel.


▪  Review your SOC metrics and consult your SOC team to identify alerts they routinely ignore without consequence.


▪  Review rules that haven’t triggered any alerts in the last 6 to 12 months to determine whether they are still relevant.


▪  Eliminate some of the low-level threats or alerts you routinely ignore. The more you can weed out alerts that you don’t act upon, the more likely the higher-value alerts will be acted upon.


5.  Prepare a validation process.


▪  Define test scenarios and build a test script to be used for rule validation.


Here is the summarized checklist for your reference:


No


Item


Check Box


1


Review all the Azure Sentinel built-in rules to identify out-of-the-box rules that can address your use-cases. If there are built-in rules you can use, you’ll need to migrate fewer rules from your current SIEM.


2


Explore community resources, such as the SOC Prime Threat Detection Marketplace, for additional rules you can use instead of migrating your current rules.


3


Confirm connected data sources and review data connection methods.


4


Identity and prioritize use cases to be migrated These should answer the question – What problems are we trying to solve?


Consider use cases in terms of business priority.


5


Review the detection efficacy of existing rules before deciding to migrate them into Azure Sentinel. Only migrate those rules that are truly useful.


6


Review your SOC metrics and consult your SOC team to identify alerts they routinely ignore without consequence.


7


Review rules that haven’t triggered any alerts in the last 6 to 12 months to determine whether they are still relevant.


8


Eliminate some of the low-level threats or alerts you routinely ignore. The more you can weed out alerts that you don’t act upon, the more likely the higher-value alerts will be acted upon.


9


Define test scenarios and build a test script to be used for rule validation.


b) Review built-in templates


Azure Sentinel provides out-of-the-box detection templates based on various data source types, which you can leverage to create alerts and respond to threats in your environment. Detection templates currently include the following types:


  • Microsoft security


Microsoft security templates automatically create Azure Sentinel incidents from the alerts generated in other Microsoft security solutions in real-time. Use Microsoft security rules as templates to create new rules with similar logic. For more information about security rules, see Automatically create incidents from Microsoft security alerts.


  • Fusion


Based on Fusion technology, advanced multistage attack detection in Azure Sentinel uses scalable machine learning algorithms. These can correlate many low-fidelity alerts and events across multiple products into high-fidelity and actionable incidents. Fusion is enabled by default. Because the logic is hidden and therefore not customizable, you can only create one rule with this template.


  • Machine learning behavioral analytics (Public Preview)


These templates are based on proprietary Microsoft machine learning algorithms, so you cannot see the internal logic of how they work and when they run. Because the logic is hidden and therefore not customizable, you can only create one rule with each template of this type.


  • Scheduled


Scheduled analytics rules are based on built-in queries written by Microsoft security experts. You can see the query logic and make changes to it. You can use the scheduled rules template and customize the query logic and scheduling settings to create new rules.


Review the following templates to eliminate the number of rules or use-cases needed to migrate.


c) SOC Prime TDM and other community sources


SOC Prime Threat Detection Marketplace is a SaaS content platform that provides actionable threat detection content, including security rule packs for Azure Sentinel (some content is subject to a subscription plan).


You can deploy rules and hunting queries directly from SOC Prime TDM to Azure Sentinel by using the SOC Prime – Azure Sentinel integration. SOC Prime also has a free translation tool (uncoder.io), which helps convert rules from any SIEM and Sigma to Kusto Query Language (KQL). KQL is the query language used in Azure Sentinel’s analytics and hunting. We will discuss the tool further in the next step.


We also recommend that you watch the Microsoft Tech Community Azure Sentinel blog, which may include articles about use cases that are relevant to you. Besides that, here is another link to some additional use cases for your reference.


d) Uncoder.io translator


Uncoder.io is SOC Prime’s online conversion tool for SIEM search language. Uncoder.io can convert rules in Sigma or queries from other SIEMs to Azure Sentinel without the need to access the SIEM.


Once you get the translated query, you must review and test the query before using it on the analytics rule. This is to prevent queries that are not optimized or poorly written from being migrated. You can test the query by running it in your Azure Sentinel workspace (Logs page) with your data. Also, make sure to review the query against the below KQL optimization guides. 


KQL optimization guides :


e) Learning resources for KQL


Azure Sentinel is built on top of the Log Analytics workspace, which uses Kusto Query Language (KQL). KQL is an integral part of Azure Sentinel, as you use KQL to create custom detection, hunting, visualization rules, and many more. If you are new to KQL, we recommend learning the basics before proceeding with the rule migration journey. In general, the language is not complex, and the logs interface is easy to use.


To help you with your learning journey, we have compiled a list of KQL learning resources below ordered by proficiency level. Whether you are a beginner or an experienced user, you should find content that suits you.


No


Level


Resources


1


Entry-level


Threat detection with Azure Sentinel analytics – Learn | Microsoft Docs


Create custom analytics rules to detect threats with Azure Sentinel | Microsoft Docs


KQL Online Course: The Basics of Kusto Query Language | Pluralsight


2


Intermediate


Managing and Responding to Security Events Using Azure Sentinel | Pluralsight


3


Advanced


Azure Sentinel webinar: Deep-dive on Correlation Rules – YouTube


Azure Sentinel correlation rules: the join KQL operator – Microsoft Tech Community


Implementing Lookups in Azure Sentinel – Microsoft Tech Community


Approximate, partial, and combined lookups in Azure Sentinel – Microsoft Tech Community


Handling sliding windows in Azure Sentinel rules – Microsoft Tech Community


Tasks to be performed in third party SIEM


After you’ve gone through the planning/assessment steps, you should have identified a list of third-party SIEM rules that you want to migrate to Azure Sentinel.


Before you start creating the analytics rules in Azure Sentinel, you must gather information about your rules, such as the rule condition, entities, actions, and other relevant details for you to configure in Azure Sentinel.


Let’s revisit the flow diagram on the steps involved:


4.png


 Figure 4


1.  Identify Data Sources.


The first step is to identify the data sources of your rules, such as Windows events, firewall logs via Common Event Format, and so on. Knowing the data source allows you to target the correct table when constructing the KQL for your detection rules in Azure Sentinel. You’ll also need to ensure that the specific data source is being collected in Azure Sentinel.


Azure Sentinel is built on top of the Log Analytics workspace and contains multiple tables. Each table is defined by a unique set of columns for each data source.


Refer to the Azure Monitor security table reference for a list of built-in table names, schemas, and data structure.


5.png


 Figure 5


The table where data is stored for a specific data type also depends on the collection method. For example, Windows Security events collected by the Log Analytics/Azure Monitor agent are stored in the SecurityEvent table. However, if you use Logstash to collect Windows Security events, they are stored in a user-defined custom table.


To help you map between the data source and table, we have compiled a list of common data sources-table mappings in the following link. The mappings include the collection method for each data source.


2.  Identify attributes/fields/entities used.


Next is to identify the attributes/fields used in your third-party SIEM rules, such as rule name, description, severity, the fields used for filtering, and so on. After you’ve identified the field names, find the corresponding columns in the Log Analytics table reference. You will use the Log Analytics columns in your KQL query when creating the rule.


You must also identify the entity types related to your rules, such as the user account and computer, if you are monitoring logon events. This allows you to configure entity mapping in Azure Sentinel and use the Azure Sentinel Investigation graph to display entity relationships across different data sources during an incident investigation.


3.  Identify your rule criteria/logic.


Rule criteria are considered the most crucial part of the rule as it defines what to detect.


  • Both Azure Sentinel and Splunk have the rule criteria defined in the query.

  • ArcSight and QRadar configure their detection logic in the Rule Condition and Test Condition, which are UI-based settings.


Due to the differences between SIEMs, it can be challenging for SOC engineers to convert the rule criteria from a third-party SIEM to Azure Sentinel, especially from ArcSight and QRadar.


The following rule criteria mapping samples aim to guide how to convert some of the common logic found in ArcSight and QRadar to Azure Sentinel.


As Splunk is also a query-based SIEM, the following link shows sample queries in Splunk’s Search Processing Language (SPL) and their KQL equivalents for some of the commonly used operators.


4.  Identify the trigger condition.


After you’ve identified the rule criteria, the next step is to determine the trigger condition. This is usually associated with the minimum requirement for the rule to trigger an action. For example, the number of matching events within X timeframe to generate an alert.


(We discuss Actions in the next step).


In Azure Sentinel, the minimum number of matching events is referred to as the threshold, while the X timeframe is the lookback period for the KQL query to search.


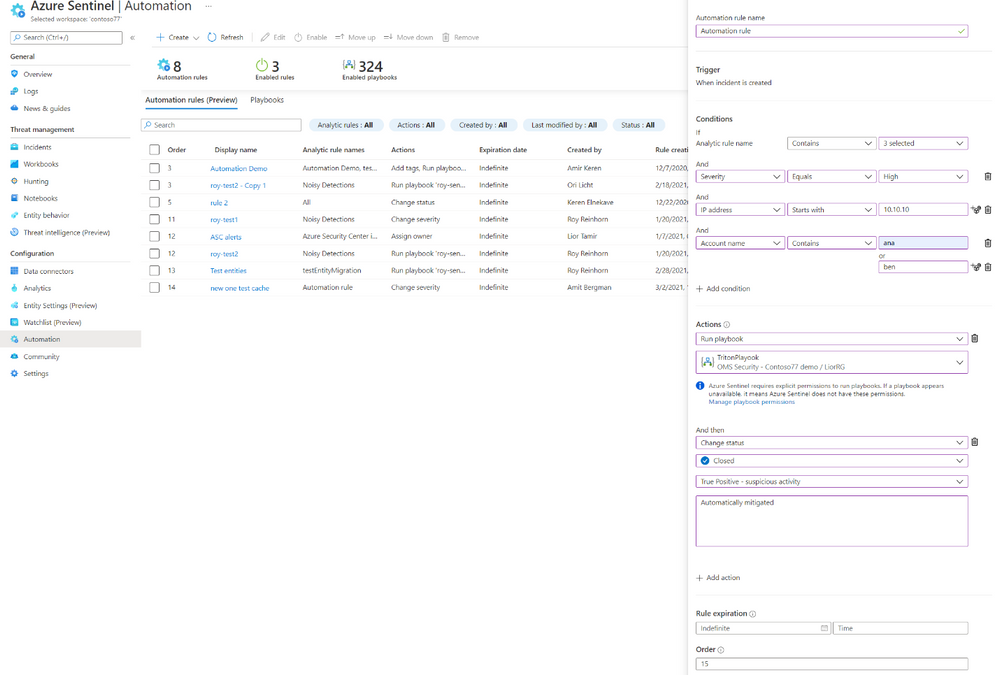
5.  Identify your rule action.


The final information to collect is the action to take when your rule criteria match the trigger condition.


The default actions in Azure Sentinel are to create alerts, and optionally, incidents. You can also automate your responses or security orchestration with Playbooks by leveraging Azure Logic Apps.


Azure Logic Apps is Azure Sentinel’s automation and orchestration solution and provides a highly extensible architecture that enables scalable automation as new technologies and threats emerge. To build playbooks with Azure Logic Apps, choose from a growing gallery of built-in playbooks or from the Azure Sentinel Github repository.


One of the common actions is adding suspicious hosts to your Active List/Reference Set/Lookup (the terminology depends on the SIEM you are using). The equivalent in Azure Sentinel is the Watchlist. Here is a sample Playbook for adding a host to Watchlist.


Tasks to be performed in Azure Sentinel


We will focus on the KQL, analytics rules, and Playbooks for your migration rules in the next few steps. By the time you arrive at this stage, you should already have accomplished one of the following:


  • Identified a list of third-party rules to migrate and gathered the relevant information about the detections. If you don’t yet have the KQL for your rules, proceed to step 6.

  • Your rules are available in Azure Sentinel’s built-in templates. If this is the case, proceed to step 7.

  • You found your use cases in SOC Prime TDM’s rule packs or community resources. If you have the KQL for your rules, proceed to step 7.

  • You have the KQL query translated from the Uncoder.io conversion tool. If you have the KQL for your rules, proceed to step 6.


6.png


 Figure 6


6.  Construct/review the KQL and test with data.


At this step, you will mainly work on the KQL for your rules. If you have completed step 5, you will be constructing the KQL based on the samples in step 3 and KQL learning resources in step in Figure 3.


If you are here coming from step d, you should have the KQL from the Uncoder.io conversion.


Test your queries with data. In the Azure Sentinel Logs page, run log searches and tune accordingly. Before you finalize your detection queries, you must review the KQL to improve query performance. Although Azure Sentinel is a cloud-native SIEM that automatically scales resources as you need, it’s best to optimize your KQL queries.


Optimized queries will:


  • Run faster, reduce the overall duration of the query execution.

  • Have a smaller chance of being throttled or rejected.


As mentioned earlier, refer to the following links for KQL optimization guides :


7.  Create/update the analytics rule.


Now it is time to create scheduled analytics rules or enable rule templates (from step b in Figure 3). This step includes automatically creating incidents from Microsoft security alerts.


When creating scheduled rules, you must specify the information that you gathered earlier, such as the KQL, entity mappings, threshold, and so on. Leverage the alert grouping feature to reduce alert noise.


8.  Test the rule with use cases.


The newly created/enabled rules must be tested sufficiently to assess the outcome. It is important to define test scenarios and use cases to determine whether the rules met the requirements.


If a rule doesn’t fire any alert as expected, revisit the KQL query (step 6 in Figure 3) and the rule’s settings to ensure you have configured them correctly. Similarly, perform the same if your rule is too noisy.


9.  Create a Playbook for rule action.


If a Playbook is part of the requirements (from step 5 in Figure 3), proceed with the Playbook creation by leveraging Azure Logic Apps.


Be sure to check out our extensive list of Playbook samples in the Azure Sentinel GitHub repository.


Summary


In this blog, we covered the preliminary considerations to make before undertaking a rule migration project, identified the key components that make up detection rules across ArcSight, Splunk, and Qradar, and then proposed a detailed roadmap for the conversion process.


A key takeaway is to always start by focusing on business priorities, which should define your use-cases. After you have use-cases clearly understood, the resources provided have a better chance of leading to a successful rule migration outcome.


We hope the steps and resources shared in this blog provide the guidance you need to simplify your migration journey into Azure Sentinel.


We welcome your suggestions and any feedback for further improvement, especially any input based on experiences using the resources described in this guide.


Note: Check out our webinar on this – Azure Sentinel webinar: Best Practices Converting Detection Rules


This blog and migration guidance resources were put together by Jeremy Tan, Innocent Wafula, and Naomi Christis.


With support from Javier Soriano, Younes Khaldi, and  Hesham Saad.


Reviewers: Ofer Shezaf, Nicolas DiCola, and Batami Gold


Artifact/resource contributors: Kara Cole, Yaniv Shasha, Cristhofer Munoz, Rafik Gerges – Microsoft and Orhan Moye and Brett Kilroe from our partner – Cyberproof

MVP Women In Tech: The Untold Stories

MVP Women In Tech: The Untold Stories

This article is contributed. See the original author and article here.

Women only hold one-quarter of all tech jobs. Despite international conversations about gender diversity in tech, women are still underrepresented, underpaid, and often discriminated against in the tech industry.


The stories of women in tech remain largely untold – and it is in this context that a group of MVP women are making their voices loud and clear. MVP Women In Tech: The Untold Stories is a new monthly series where members can share their stories, interview women in the industry and discuss the process of becoming a woman Microsoft MVP.


The series began as the brainchild of Business Applications MVP ​Shannon Mullins, who soon asked Business Applications MVPs Mary Thompson and Kristen Hosman to join as co-hosts. Shannon says the inspiration came from the many stories and social media posts that reflect a lack of gender diversity in tech.


“I have not attended MVP Summit yet, but have heard the female ratio was low. I felt it was time to help make a difference and encourage other women to be bold enough to know they are good enough to be an MVP and encourage other women to get into tech,” Shannon says.


“It is so important to be honest, raw and real. As women, we tend to hold in our emotions and feelings and bottle them up. If you bottle up your emotions, change will never happen. I feel that we as a community of women and the men supporting us can come together and try to bridge the gap of what is really happening in our daily lives as MVPs and Women in Tech. We truly hope to inspire those who don’t feel they are good enough!”


“I think as we continue to have a voice and share our stories that other women will be brave enough to do the same,” Kristen adds. “So many women are told to ‘hush’ or to ‘remember a situation differently’ to keep their job. I want every woman to feel comfortable to share their story, good or bad.”


Business Applications MVP Kelly Gustafson, who spoke at February’s webinar, says it is vital that women have a place where they can connect and share their experiences. “I have been fortunate in my success and have worked very hard to be where I am in my career. I want to be a role model for women and an advocate for other women’s success!”


Importantly, these women are not alone in elevating their untold stories. Business Applications MVPs Steve Endow and Ed Gonzalez are but two of the group’s male members and say it is vital to give these stories an audience.


“Having more of the individual journeys shared will better illuminate the obstacles encountered,” Ed says. “This, in turn, will improve the odds of those obstacles being minimized, if not removed entirely.”


“Also, I hope to learn as much as I can. Not only about the trials faced by women in everyday business, but I also want to hear the successes as momentum builds around new, and better, gender paradigms.”


For more, visit the group’s MeetUp and Twitter.


women in tech untold.jpg

What’s new: Automation rules

What’s new: Automation rules

This article is contributed. See the original author and article here.

Security teams are often burdened with a growing number and complexity of security incidents. Automation offers a path to handling the long series of repetitive tasks involved in incident triage, investigation and response, letting analysts focus on the most important incidents and allowing SOCs to achieve more with the resources they have.


Automation rules are a new concept in Azure Sentinel, which allows you to manage the automation of incident handling centrally. Besides letting you assign playbooks to incidents from every source, automation rules also allow you to automate responses for multiple analytics rules at once, automatically tag, assign, or close incidents without the need for playbooks, and control the order in which actions are executed. Automation rules are meant to simplify automation use in Azure Sentinel while allowing you better control and visibility.


What are automation rules?


Automation rules are comprised of several parts:


  • Trigger – automation rules are triggered when an incident is created.

  • Conditions – a comprehensive set of conditions on the incident and entity details to control if the actions should be executed.

  • Actions – actions that will be executed, in order, if the conditions are met. The actions supported now are:

    • Running a playbook

    • Changing the status of an incident

    • Changing the severity of an incident 

    • Assigning an incident to an owner

    • Adding a tag to an incident 


Automation rules are executed in an order defined by the user and can also be set to expire after a defined period. More triggers, conditions, and actions will be introduced in the future.


Ely_Abramovitch_0-1615983311344.png


Sample use cases and scenarios


Incident suppression


Automatically resolve incidents that are known false or benign positives without the use of playbooks. For example, when running penetration tests, doing scheduled maintenance or upgrades, or testing automation procedures, many false-positive incidents may be created that the SOC wants to ignore. A time-limited automation rule can automatically close these incidents as they are created while tagging them with a descriptor of their generation’s cause.


Playbook management


View all playbooks that are triggered by analytic rules and assign playbooks to multiple analytic rules centrally. For example, if all your incidents are exported to an external system, you can define it once and apply it to all rules.


Incident-triggered automation


Until now, only alerts could trigger an automated response using playbooks. With automation rules, incidents can now trigger an automated response as well.


Automatic assignment


You can assign incidents to the right owner automatically. If your SOC has an analyst specializing in a particular platform, any incidents relating to that platform can be automatically assigned to that analyst.


Multiple sequenced playbooks/actions in a single rule


You can now control the order of execution of actions and playbooks and the execution of the automation rules themselves. This allows you to greatly simplify your playbooks, reducing them to a single task or a small, straightforward sequence of tasks, and combine these small playbooks in different combinations in different automation rules.


Developing amazing educational apps with Microsoft Graph

This article is contributed. See the original author and article here.

This week we announced the Get started with Microsoft Graph Toolkit module is available on Microsoft Learn for all learners.  


The Microsoft Graph Toolkit is for developers interested in building web-based productivity and collaboration solutions in a simple way. Basically, Microsoft Graph Toolkit is a set of HTML components and authentication providers that help you build a complete experience with three lines of code. 


One of the biggest issues many institutions have faced when teaching student Microsoft Graph is permissions and providing access to institutional Microsoft Graph resources. 

Well this is no longer a problem, as you can now get a FREE Microsoft 365 Tenant 


Step 1: Get a free tenant from Microsoft 365 Developer Program 


The Microsoft 365 Developer Program provides a free Microsoft 365 tenant for everyone! The program provides a free sandbox, tools, and resources to build solutions for the Microsoft 365 platform. 


1. Go to the Microsoft 365 Developer Program website and select JOIN NOW.


2. Login with a Microsoft account (work, school or personal). Once logged in, you will be directed to a page to fill out the following details: 


  1. Country/Region

  2. Company

  3. Language Preferences


3. Make sure to select Terms & Conditions and click Next


4. When your profile is successfully created you will be directed to the program page. Select SET UP E5 SUBSCRIPTION to create your free tenant 


5. Fill in the following details and select Continue


  1. Username

  2. Domain – must be globally unique

  3. Password


6. Add a phone number for security purposes and select Set up.


7. Congratulations! Your tenant and administrator account are successfully created. 


Now you can use your Administrator account to build and test your solutions for Microsoft 365 Platform.


Step 2: Install Visual Studio Code 


You will use Visual Studio Code while working on practice units in the learn module. Install Visual Studio Code by visiting: https://code.visualstudio.com/download.  


Step 3: Install Visual Studio Code Live Server 


You will need the Visual Studio Code Live Server extension to run and test your project at the end of each practice unit in the Microsoft Learn module. Install the Visual Studio Code Live Server extension from the Marketplace: https://marketplace.visualstudio.com/items?itemName=ritwickdey.LiveServer 


Let’s start your journey with Microsoft Graph Toolkit!


Now that you have all the pre-requisites squared away…are you ready to begin your journey with Microsoft Graph Toolkit? Visit the Get started with Microsoft Graph Toolkit module and start learning how to build productivity & collaboration solutions today.


Want to learn more about Microsoft Graph Toolkit?


Join us for a 2-hr livestream event on April 14 to learn together, more information coming soon via aka.ms/learntogether-graph!


Showcasing the solution built using Microsoft Graph Toolkit?


Over the next few weeks I will be showcasing some of the amazing projects students at University College London have been working on around Microsoft Graph.

If you have students building applications on Graph please reach out as we would love to showcase your curricula or student project activities.

CLI for Microsoft 365 v3.7

CLI for Microsoft 365 v3.7

This article is contributed. See the original author and article here.

banner-cli-m365.png


We’ve just published a new version of the CLI for Microsoft 365 with new commands for working with and managing Microsoft 365 tenants and SharePoint Framework projects on any platform.


Manage Microsoft 365 and SharePoint Framework projects on any platform


CLI for Microsoft 365 is a cross-platform CLI that allows you to manage various configuration settings of Microsoft 365 and SharePoint Framework projects no matter which operating system or shell you use.


While building solutions for Microsoft 365 expands beyond the Windows operating system, managing many of the platform settings is possible only through PowerShell on Windows. As more and more users work on non-Windows machines, it’s inconvenient for them to have to use a Windows virtual machine to configure their tenants. With the CLI for Microsoft 365, you can configure your tenant no matter which operating system you use. Additionally, using CLI for Microsoft 365, you can manage your SharePoint Framework projects.


New version of CLI for Microsoft 365 – v3.7


With the release of SharePoint Framework v1.12, we release this new version of CLI for Microsoft 365 to help you upgrade your projects. Along with it, we included some new commands and improvements. Here are some of the most noteworthy additions. For the full list of changes, see our release notes.


Upgrade SharePoint Framework projects to v1.12


Microsoft has just released a new version of SharePoint Framework v1.12. The most notable improvements are support for Node@12, including custom Teams manifests and support for building Teams meetings apps. For the full list of features, see the documentation.


Upgrading SharePoint Framework projects goes beyond updating dependencies to the latest version. Often, there are changes to the different files in the project. To help you upgrade your SPFx project to the latest version and benefit from the latest improvements, we offer you a one-command upgrade.


To get a list of changes necessary to upgrade your project to the latest version of the SharePoint Framework, execute in the folder of your SharePoint Framework project:


m365 spfx project upgrade –output md > report.md


This will generate a Markdown report with all findings. From the summary section of the report, you can copy a complete set of commands to run to update all packages.


If you want to better understand what’s changed and where, I’d recommend you use the CodeTour report, which you can get by executing:


m365 spfx project upgrade –output tour

When you open your SharePoint Framework project in VSCode, you will get an interactive tour of all the locations in your project that needs an update.


Ensure that you have all prerequisites for building apps using SharePoint Framework v1.12


SharePoint Framework v1.12 comes with a new set of prerequisites. To build apps on SPFx v1.12, you need to be using Node v12 and Gulp v4. To help you double check that you have all prerequisites and won’t hit any errors, we offer the spfx doctor command.


To check if your machine has all prerequisites for building apps using SPFx v1.12, install the SharePoint Framework Yeoman generator v1.12 and run:


m365 spfx doctor


The command will check if your machine for all prerequisites and tell you if there is anything missing.


Configure CLI to your personal preferences


As more and more people use CLI for Microsoft 365, we get more feedback about what they’d prefer CLI to work. Some of our users, prefer for example to automatically get command help when running the command fails. Others, prefer to see help only when they explicitly ask for. When you use CLI for building scripts, you might want it to use the JSON output by default. On the other hand, if you use it for quickly looking things up, you’d prefer to use the text mode.


Because the only person knowing best how to work is you, we want to give you the ability configure CLI to your personal preferences. In this release we introduce support for configuring CLI. The first option that you can set, is to choose if you want to automatically see help when running command failed. It’s turned on by default, and to turn it off you can run:


m365 cli config set –key showHelpOnFailure –value false


We’re planning to introduce the ability to configure the default output mode next. And if there are other things that you’d like to be able to configure, please let us know.


List application permissions for SharePoint sites


Recently, Microsoft released a new way of granting apps access to SharePoint sites. Rather than having apps access all sites, you can let them access selected sites only.


In this version of CLI for Microsoft 365, we introduce support for retrieving app permissions set on a specific site.


To get the list of permissions granted to apps on a specific site, execute:


m365 spo site apppermission list –siteUrl https://contoso.sharepoint.com/sites/project-x


To get more information about a specific site app permission, execute:


m365 spo site apppermission get –siteUrl https://contoso.sharepoint.com/sites/project-x –permissionId aTowaS50fG1zLnNwLmV4dHw4OWVhNWM5NC03NzM2LTRlMjUtOTVhZC0zZmE5NWY2MmI2NmVAZGUzNDhiYzctMWFlYi00NDA2LThjYjMtOTdkYjAyMWNhZGI0


In the future versions of CLI for Microsoft 365, you can expect more commands allowing you to manage app permissions for SharePoint sites.


Changes


We’ve continued improving CLI, building upon the changes we’ve introduced in the previous version.


Improved managing SharePoint pages and sites


CLI for Microsoft 365 is a great tool for automating managing your Microsoft 365 tenant and SharePoint Framework projects. It’s also great as an engine to build other tools on top!


Elio Struyf has build a static site generator for SharePoint named Doctor. If you want to author product documentation or a knowledgebase in Markdown but publish it to SharePoint, Doctor is the tool for the job! As Elio is extending Doctor with new capabilities, he’s contributed a number of enhancements to managing pages and sites with CLI for Microsoft 365.


Added Remote Development container


One of the things that often stand in the way of contributing to open source projects is setting up the dev environment. Often, specific projects require specific tools and sometimes even specific versions of them. If you’re not using the particular stack in your daily work, it can be cumbersome to even get started.


To help you contribute to CLI for Microsoft 365, we’d like to introduce a Remote Developer container. Using GitHub Codespaces, it allows you to get up and running your dev environment in minutes, without worrying about installing dependencies. We’ll provide instructions on how to get started using the Remote Development container shortly.


Sample scripts


CLI for Microsoft 365 is a great tool both for quick adjustments to the configuration of your Microsoft 365 tenant as well as automating more complex tasks. Because CLI for Microsoft 365 is cross-platform you can use it on any OS and in any shell. To help you get started using the CLI for Microsoft 365 for automation scenarios, we started gathering some sample scripts.


If you have any scripts that you use frequently, please share them with us so that we can learn more about the common automation scenarios.


Provision a Team with channels and assign a custom icon


A sample script which creates a Microsoft 365 Group, associates a logo to it and some members. Afterward, it teamyfies the Group and creates two public channels.


List site collections and their lists


This script helps you to list and export all site collection and their lists SharePoint Online sites, ideal for getting insights into the size of your environment.


List all external users in all site collections


This script helps you to list all external users in all SharePoint Online sites. It provides insights in who the users are, and if available who they where invited by.


Delete all Microsoft 365 groups and SharePoint sites


There are so many different ways to create Microsoft 365 groups. Teams, Planner, SharePoint team sites, etc. — you can accumulate a lot of them very fast. Use this script to delete the ones you no longer need.


Contributors


This release wouldn’t be possible without the help of (in alphabetical order) Aakash Bhardwaj, Luise Freese, Patrick Lamber, Michaël Maillot, Waldek Mastykarz, Arjun Menon, Abderahman Moujahid, Nanddeep Nachan, Albert-Jan Schot, Elio Struyf, Fredrik Thorild, Garry Trinder and Rabia Williams. Thank you all for the time you chose to spend on the CLI for Microsoft 365 and your help to advance it!


Work in progress


Here are some things that we’re currently working on.


More commands, what else


Microsoft 365 is evolving and new capabilities are being released every day. With CLI for Microsoft 365, we aim to help you manage your tenant on any platform in a consistent way, no matter which part of Microsoft 365 you interact with. While we keep adding new commands to CLI for Microsoft 365 each release, we still barely scratched the surface with what’s possible in Microsoft 365. In the upcoming versions of the CLI for Microsoft, you can expect us to add more commands across the different workloads in Microsoft 365.


Improved managing SharePoint pages


Microsoft keeps investing in modern SharePoint pages continuously introducing new capabilities to let us publish rich content. We’re looking into extending our support for managing modern SharePoint pages to let you use them to their full potential.


Improved creating Azure AD apps


Recently, we’ve introduced a command to easily create Azure AD app registrations. Because they’re backbone of every app you’d build on Microsoft 365, we think you should be able to create them as easily as possible. So with CLI for Microsoft 365, you can create a fully configured Azure AD app for the most common scenarios with just one line of code.


In the future versions of CLI for Microsoft 365 you can expect us extend the capabilities with additional scenarios and features supported by Azure AD.


Script examples


In every release of the CLI for Microsoft 365, we introduce new commands for managing Microsoft 365. With over 350 commands across the different Microsoft 365 services, the CLI for Microsoft 365 has become a powerful tool, not just for managing your tenant but also for automating your daily work.


We’d love to show you how you can use the CLI for Microsoft 365 to build automation scripts in PowerShell Core and Bash. If you have any scripts using SPO or PnP PowerShell that you use frequently, please share them with us so that we can learn more about the common automation scenarios.


ensure commands


We’ve just shipped our first ensure command – an easy way to help you that a site with specific settings exists. If it doesn’t, CLI creates it for you, if it does, CLI ensures it has the right properties. All in one line of code. We’d love to hear from you how you like it and if it’s something you’d like us to implement for other commands as well.


Try it today


Get the latest release of the CLI for Microsoft 365 from npm by executing in the command line:


npm i -g @pnp/cli-microsoft365


Alternatively, you can get the latest release from Docker by executing in the command line:


docker run –rm -it m365pnp/cli-microsoft365:latest


If you need more help getting started or want more details about the commands, the architecture or the project, go to aka.ms/cli-m365.


If you see any room for improvement, please, don’t hesitate to reach out to us either on GitHub or twitter.