by Contributed | Mar 17, 2021 | Technology
This article is contributed. See the original author and article here.
Do you have experience performing proactive and preventive work to increase the value of your customers’ investment? Are you able to identify opportunities to solve business problems? Do you promote organizational health in your engagements? If this describes you, why not start the path of earning the Microsoft Power Platform Solution Architect Expert certification?
To pursue this expert level certification, you must have experience leading successful implementations and an ability to focus on solutions that address the broader business and technical needs of an organization. You should have functional and technical knowledge of Microsoft Power Platform, Dynamics 365 customer engagement apps, related cloud solutions from Microsoft, and third-party technologies. In addition to having experience across Microsoft Power Platform, you should be able to facilitate design decisions across development, configuration, integration, infrastructure, security, availability, storage, and change management.
Are you ready for this beta exam? Can you:
- Initiate solution planning and identify Microsoft Power Platform components?
- Identify organization information and metrics?
- Evaluate an organization’s enterprise architecture?
- Capture requirements and perform gap analysis?
- Architect a solution?
- Lead the design process, and use Power Automate in your automation strategy?
- Design integrations?
- Identify opportunities to integrate and extend Microsoft Power Platform solutions by using Azure?
- Design the data and security models?
- Validate the solution design?
- Support and troubleshoot the solution as it goes live?
If you answered ‘yes’ to these questions (or most of them), you may be ready to earn the new Microsoft Certified: Microsoft Power Platform Solution Architect Expert certification. It has one exam that is currently in beta: PL-600: Power Platform Solution Architect.
To receive the 80% discount*, use code PL600Sunny when prompted for payment.
This is NOT a private access code. You can use this code to register for and take the exam on or before April 14, 2021.
*The first 300 people who register can take these exams for an 80% discount! (Why beta exams are no longer free.) The seats are offered on a first-come, first-served basis. You must register for the exam on or before April 14, 2021. Take the exam as soon as possible, so we can leverage your comments, feedback, and exam data in our evaluation of the quality of the questions.
Preparing for Beta Exams
Taking a beta exam is your chance to have a voice in the questions we include on the exam when it goes live. The rescore process starts on the day that exams go live, and final scores are released approximately 10 days later. For updates on when the rescore is complete, follow me on Twitter (@libertymunson). For questions about the timing of beta exam scoring and live exam release, see the blog posts The Path from Beta Exam to Live Exam and More Tips About Beta Exams.
Remember, the number of spots is limited, so when they’re gone, they’re gone. You should also be aware that there are some countries where the beta code will not work (including Turkey, Pakistan, India, and China). You will not be able to take the beta exam in those countries.
Also keep in mind that these exams are in beta, which means that you will not be scored immediately. You will receive your final score and passing status after your exam is live.
Related announcements
Skill up and stand out, with new role-based training and certification!
New role-based certification and training is here, and we’re just getting started!
Catching up: continuing our journey with new role-based certifications and training
MB-600 Exam retiring

by Contributed | Mar 17, 2021 | Business, Microsoft 365, Technology
This article is contributed. See the original author and article here.
In a time of hybrid work business leaders want to empower people to come together and share their best ideas. We want to help with solutions that are fluid, dynamic, and cloud powered to enable collaboration from anywhere. Over the past year, we’ve learned a lot about working remotely, but recognize that spontaneous creativity and…
The post How to use Office apps with Microsoft Teams to collaborate and create today appeared first on Microsoft 365 Blog.
Brought to you by Dr. Ware, Microsoft Office 365 Silver Partner, Charleston SC.
by Contributed | Mar 17, 2021 | Business, Microsoft 365, PowerPoint, Technology
This article is contributed. See the original author and article here.
PowerPoint Presenter Coach now available on all platforms We love hearing feedback from our customers, and we’re excited to announce that PowerPoint Presenter Coach is now available on all platforms. PowerPoint Presenter Coach was first introduced in PowerPoint for the web, and both students and professionals have been utilizing this feature to become more confident…
The post Improve your presenting skills with additional platforms and new features for PowerPoint Presenter Coach appeared first on Microsoft 365 Blog.
Brought to you by Dr. Ware, Microsoft Office 365 Silver Partner, Charleston SC.
by Contributed | Mar 17, 2021 | Technology
This article is contributed. See the original author and article here.
The Service Broker component of Azure SQL Managed Instance allows you to compose applications from independent services, by providing native support for reliable and secure message exchange between the databases attached to the services.
Thanks to the support for cross-instance message exchange, which is in preview as of March 2021, Azure SQL Managed Instance can host a data tier of applications that distribute work across multiple instances that may reside in different Azure regions.
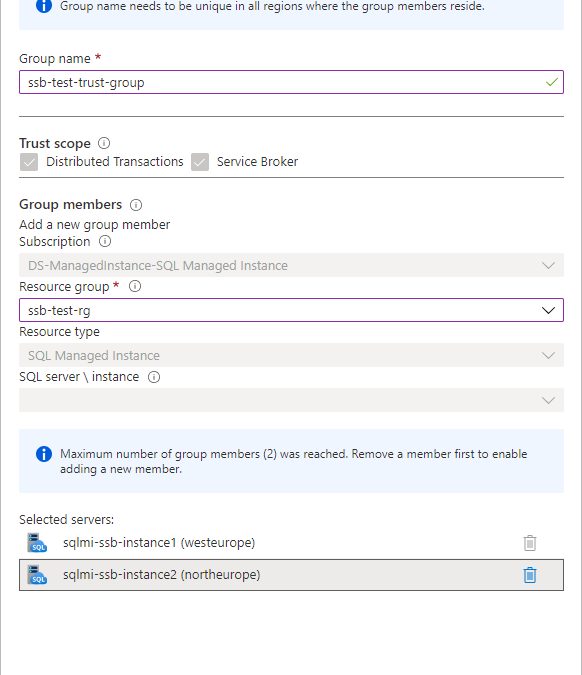
Establishing trust between instances
For two instances to be able to send messages to each other using Service Broker, you must exchange public keys of the certificates linked to their local Service Broker endpoints first. Installing a certificate with public key by authorized person constitutes a statement of trust in the other instance that holds the corresponding private key.
Traditionally, exchanging certificates between the instances of SQL Server was a manual operation that consisted of extracting the public key, providing it to the other instance in a secure way, and installing it on the other instance. With Managed Instance this process has been significantly simplified thanks to the Server Trust Groups.
You establish the trust between the instances by creating server trust group starting from one instance and adding another instance to the group. It’s as simple as that.

To establish trust among multiple instances, create new server trust group for each pair of instances. During the preview of server trust group feature, maximum number of members of group is limited to two.
Allowing network traffic between the instances
If your instances reside in the same virtual network subnet, there are no actions needed to allow the Service Broker traffic between them. If they are placed in different virtual network subnets, you need to enable both the inbound and outbound traffic between the subnets on a set of ports.
Service Broker connections always use redirect connection policy regardless of the connection type configured on the managed instance. Instance initiating the connection reaches to the gateway within the target instance’s subnet to obtain actual IP address and port of the target instance, and subsequent traffic flows directly to the target instance bypassing the gateway.
Gateway listens for incoming Service Broker connections on port 4022 which is default port for Service Broker endpoints. Connection is routed to gateway because the DNS name of managed instance from the Service Broker route resolves to the IP address of the gateway. Gateway then redirects connection to the actual IP address of instance and its automatically assigned port from the range 11000-11999. You cannot change the port used by gateway or instance for service broker traffic. To allow Service Broker traffic between the instances, port 4022 and port range 11000-11999 must be allowed both for the inbound and outbound traffic in both subnets.
Creating Service Broker objects
If you are working with Service Broker for the first time, you may be surprised by how many different objects you must create to be able to send a message. No worries, the entire concept is intuitive, and you will quickly adopt it. If you’d like to explore specific aspects of the feature, I’d strongly recommend you to start from here.
In this article we will cover the simplest case of message exchange between two instances that have trust relation already established and network traffic allowed.
Let’s start from creating the necessary objects on the first instance sqlmi-ssb-instance1:
--Create the message types
CREATE MESSAGE TYPE [//BothDB/2InstSample/RequestMessage]
       VALIDATION = NONE;
CREATE MESSAGE TYPE [//BothDB/2InstSample/ReplyMessage]
       VALIDATION = NONE;
GO

--Create the contract
CREATE CONTRACT [//BothDB/2InstSample/SimpleContract]
      ([//BothDB/2InstSample/RequestMessage]
         SENT BY INITIATOR,
       [//BothDB/2InstSample/ReplyMessage]
         SENT BY TARGET
      );
GO

--Create the initiator queue and service
CREATE QUEUE SQLMIQueue1;

CREATE SERVICE [//SQLMIDB1/2InstSample/SQLMIService]
       ON QUEUE SQLMIQueue1
       ([//BothDB/2InstSample/SimpleContract]);
GO

--Grant the access to the service to a specific user, or public for quick testing:
GRANT SEND
      ON SERVICE::[//SQLMIDB1/2InstSample/SQLMIService]
      TO [public]
GO

--Create route:
CREATE ROUTE SQLMIRoute1
WITH SERVICE_NAME = N'//SQLMIDB2/2InstSample/SQLMIService',
     ADDRESS = N'TCP://sqlmi-ssb-instance2.50d0d943a5ad.database.windows.net:4022';
Create the corresponding objects on the second instance sqlmi-ssb-instance2:
--Create the message types
CREATE MESSAGE TYPE [//BothDB/2InstSample/RequestMessage]
       VALIDATION = NONE;
CREATE MESSAGE TYPE [//BothDB/2InstSample/ReplyMessage]
       VALIDATION = NONE;
GO

--Create the contract
CREATE CONTRACT [//BothDB/2InstSample/SimpleContract]
      ([//BothDB/2InstSample/RequestMessage]
         SENT BY INITIATOR,
       [//BothDB/2InstSample/ReplyMessage]
         SENT BY TARGET
      );
GO

--Create the initiator queue and service
CREATE QUEUE SQLMIQueue2;

CREATE SERVICE [//SQLMIDB2/2InstSample/SQLMIService]
       ON QUEUE SQLMIQueue2
       ([//BothDB/2InstSample/SimpleContract]);
GO

--Grant send to [public] - because there is no remote service binding
GRANT SEND
      ON SERVICE::[//SQLMIDB2/2InstSample/SQLMIService]
      TO [public]
GO


--Create route
CREATE ROUTE SQLMIRoute2
WITH SERVICE_NAME = N'//SQLMIDB1/2InstSample/SQLMIService',
     ADDRESS = N'TCP://sqlmi-ssb-instance1.50d0d943a5ad.database.windows.net:4022';
Sending and receiving messages
Now we can finally send the message from the first instance:
--Send message:
DECLARE @InitDlgHandle UNIQUEIDENTIFIER;
DECLARE @RequestMsg NVARCHAR(100);

BEGIN TRANSACTION;

BEGIN DIALOG @InitDlgHandle
     FROM SERVICE [//SQLMIDB1/2InstSample/SQLMIService]
     TO SERVICE N'//SQLMIDB2/2InstSample/SQLMIService'
     ON CONTRACT [//BothDB/2InstSample/SimpleContract]
     WITH
         --ENCRYPTION = ON;
		 ENCRYPTION = OFF;
SELECT @RequestMsg = N'<RequestMsg>Hello other world!</RequestMsg>';

SEND ON CONVERSATION @InitDlgHandle
     MESSAGE TYPE [//BothDB/2InstSample/RequestMessage]
     (@RequestMsg);

SELECT @RequestMsg AS SentRequestMsg;

COMMIT TRANSACTION;
GO
Receive message on the second instance and reply to the first instance:
DECLARE @RecvReqDlgHandle UNIQUEIDENTIFIER;
DECLARE @RecvReqMsg NVARCHAR(100);
DECLARE @RecvReqMsgName sysname;

BEGIN TRANSACTION;

WAITFOR
( RECEIVE TOP(1)
    @RecvReqDlgHandle = conversation_handle,
    @RecvReqMsg = message_body,
    @RecvReqMsgName = message_type_name
  FROM SQLMIQueue2
), TIMEOUT 1000;

SELECT @RecvReqMsg AS ReceivedRequestMsg;

IF @RecvReqMsgName = N'//BothDB/2InstSample/RequestMessage'
BEGIN
     DECLARE @ReplyMsg NVARCHAR(100);
     SELECT @ReplyMsg =
        N'<ReplyMsg>Hello from the other world!</ReplyMsg>';

     SEND ON CONVERSATION @RecvReqDlgHandle
          MESSAGE TYPE [//BothDB/2InstSample/ReplyMessage]
          (@ReplyMsg);
END

SELECT @ReplyMsg AS SentReplyMsg;

COMMIT TRANSACTION;
GO
Specificities and limitations of Service Broker in SQL Managed Instance
Service Broker endpoint is automatically enabled on every Azure SQL Managed Instance and cannot be disabled.
Message forwarding cannot be enabled.
Port specified on every route created needs to be 4022
Route address cannot specify ‘TRANSPORT’
Remote service binding cannot be created
Resources
Server trust groups
Service broker documentation
by Contributed | Mar 17, 2021 | Technology
This article is contributed. See the original author and article here.
Introduction
In SPFx many times we have a requirement like break permissions for the list, list items and etc for the particular users. for eg., we want to break permission of the list item for XYZ user.
so in this article, we will see how to implement break permission of the list items using PnP js so we can use this in SPFx.
Implementation
For the testing purpose of our PnP js query, we can use the SP Editor extension for chrome. After installation, you can check it in the developer tool.
So open developer tool(F12) > SharePoint Tab > PnP Js Console > At here you can write pnp queries and using ctrl + D we can test it.
![]()
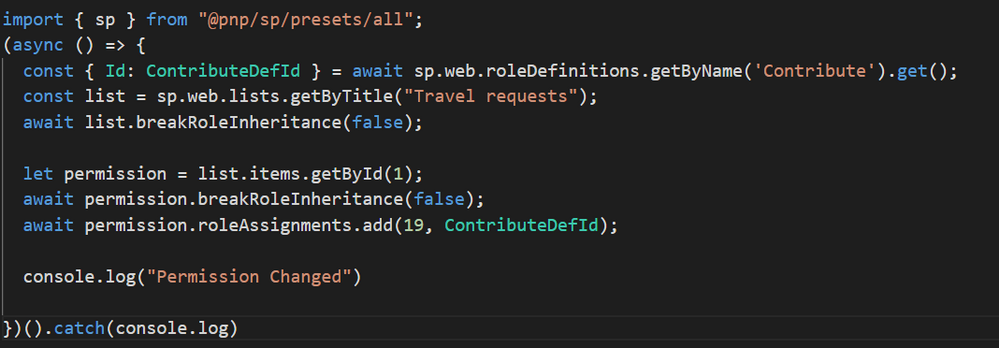
Now we will implement the logic for break permission as below,
- For eg. I want to set “Contribute” permission so we have to get a Role definition Id. you can set it as per your requirement. for more details to refer to this article.
- Then get list by title and break list permission.
- Get list item by id.
- Break list item permission and then set permission. To add permission we require two parameters UserId and Role definition ID. The meaning of this method is to give permission to a specific user.
Setting list item permission to one user:
Setting list item permission to multiple users:

Here logic will be the same as above. just have to add one array with required user IDs and then will iterate this array and set the permissions.
Output
After successfully running the query now we will check the permission. so first select the list item and click on the details panel from the right corner second last icon (above the list title). you can see the panel as below,
Click on manage access and then click on Advanced as below,
It will open another tab and in this, you can see all the list item level permission as below,
Summary
In this article, we have seen how to break and add permission to list items using PNP js.
Hope this helps! If it is helpful to you then share it with others. Give your valuable feedback and suggestions in the comments section below.
Sharing is caring!


Recent Comments