This article is contributed. See the original author and article here.
The Microsoft 365 PnP Team would love to invite you to the Watch Party that we are hosting for the Learn Together: Building apps with Microsoft Graph event.
The event is a 2 hour live stream and is offered live twice to accommodate the global audience:
April 14, 2021 8:30 am PDT 10:30 am PDT (North America & Europe Regions)
For the North America & Europe Regions live stream, we will host a Teams meeting to connect and collaborate while we are watching the live stream on our own devices. There will be games, popcorn, G-raphs ? and much more.
My dear Sharing Is Caring friend David Warner made a short video to explain it in his own words!
This article is contributed. See the original author and article here.
Why?
Ever since I saw the postSource code files for Canvas appsfrom Microsoft, I thought this might come in handy for some of my Canvas Apps. As a non-coding Citizen Developer, I just thought that day would be more in the future. A day when this feature would not be experimental anymore but general available :beaming_face_with_smiling_eyes:.
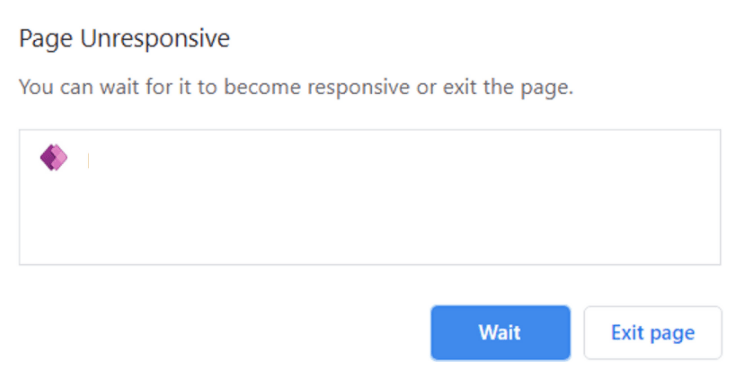
One of my customers created a Power App with too many screens, too many data sources and too many controls referencing each other. The result was a Power Apps Studio with aPage Unresponsiveerror when when opening specific screens:
This left us with no way to clean up the latest version of the Canvas App through the Studio anymore :cross_mark::face_without_mouth::cross_mark:.
What?
This post adds information on how to edit Power Apps source code for Canvas Apps. It will also show you that GitHub it is not per se needed.
How?
I still recommend to read the Microsoft post first. There is a lot of potential in using GitHub as your code repository. There are also some Youtube video’s on how to perform most of the steps explained in further detail. This post just focuses on how to use the toolingwithout a GitHub setup.
1) First step is to download the .msapp file of your Canvas App. The .msapp file is like a bundled package of multiple kind of files (.json, .xml and .yaml), making up your whole Power App :woman_technologist:.
You can download your .msapp file by opening the Power App in the online Studio. Then selecteSave asand selectThis computeras your destination. A popup should appear that offers you to download the .msapp file: Save your .msapp file to a local destination
Another option is to Export the whole Power App package from the Power Apps as a ZIP file.
Export your Power App as a packaged ZIP file
In this option you need to unzip the downloaded file and find the .msapp files in a sub folder.
2) I then move the .msapp file to a folder within my Downloads folder making the file path:
3) Make sure that you install the required .NET Core SDK version as mentioned in the Microsoft post. Then download the Power Apps Language Tooling locally to your Downloads folder:
Download the Power Apps Language Tooling tool from GitHub locally
Unzip this file and save the unzipped folder in a local place of your computer. I chose to store it next to my .msapp file so the directories would be near each other:
Please note that your directory path may be different at the beginning, but from the last PowerApps-Langauage-Tooling-master section it should be the same. The PASopa file is where the magic happens.
5) Now open the default Windows Command Prompt and Run as adminisrator:
Run Command Prompt as administrator
6) Have a folder prepared where you want to store the unpacked .msapp files. I chose a folder next to the .msapp file again:
Note that the first directory is that of the .msapp file. The second directory is that of the folder where we want to unpack the separate files. Warnings may occur because of checksums built in by the developers. However in the end, the folder with the unpacked .msapp file will have a default content structure:
With a tool like Notepad++ or my personal favorite Visual Studio Code, you can edit the individual files. This is how you edit Power Apps source code of Canvas Apps. I prefer Visual Studio Code because you can open up a whole folder in one go:
Visual Studio Code opening a whole Folder and Sub Folders to edit individual files
9) Now you can remove frozen screens, rename controls in bulk, update variables in bulk or any other action which in Power Apps Studio would be a hassle.
When this is all done, you can just repack the files with a command like:
If you are more observant than I was, you will have noticed that this command does not give an output directory… so where did the new repacked .msapp file go?? It gives you the new .msapp file in the PASopa directory:
The repacked ZIP file can be imported in the online Studio. This import will then update the existing Power App to a new version. Never thought I would say this as if I know how to develop code but –> happy coding :flexed_biceps::nerd_face::thumbs_up:!
This article is contributed. See the original author and article here.
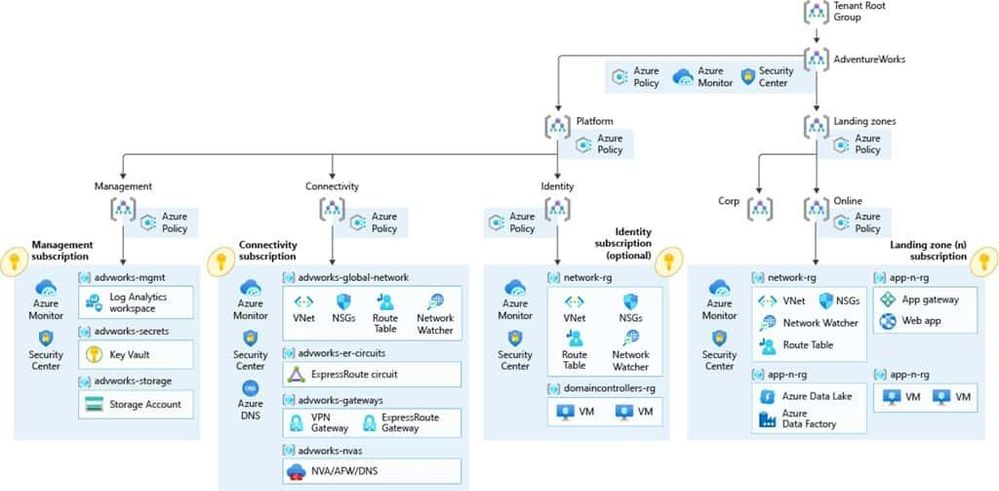
If you are starting with your cloud journey, there are many things you need to think of to set up your cloud environment and your Azure cloud architecture . Things like networking, subscription management, security, governance, and many more, can be fairly complex. That is where the Cloud Adoption Framework for Azure can deliver proven guidance to help you with your Azure cloud journey. And with Enterprise-scale landing zones, you even get an architectural approach and a reference implementation that enables effective construction and operationalization of landing zones on Azure, at scale. I had the chance to collaborate with Sarah Lean (Azure Cloud Advocate) on an enterprise-scale series of blog posts to show how our fictional company Tailwind Traders can leverage the Cloud Adoption Framework and Azure Landing Zones to accelerate their cloud journey.
You can find our Enterprise-Scale landing zones blog series on the Azure.com blog:
Microsoft Azure Cloud Adoption Framework Enterprise-Scale
The Microsoft Cloud Adoption Framework for Azure is proven guidance that’s designed to help you create and implement the business and technology strategies necessary for your organization to succeed in the cloud. It provides best practices, documentation, and tools that cloud architects, IT professionals, and business decision makers need to successfully achieve short-term and long-term objectives. By using the Microsoft Cloud Adoption Framework for Azure best practices, organizations can better align their business and technical strategies to ensure success.
Next to our Enterprise-Scale landing zones blog series, we will also host a livestream on April 7.
We will be exploring Tailwind Traders and their cloud adoption journey using enterprise-scale architecture in future blog posts. However, if you’d like to learn more about enterprise-scale landing zones then please join Sarah Lean and Thomas Maurer on the 7th April at 8am PST/3pm GMT on LearnTV where we will be doing a Q&A and deployment of an Enterprise-Scale Landing Zone live!
This article is contributed. See the original author and article here.
Issue: Unable to configure and use On-Premise data gateway when user is having personal account (*.gmail.com/*.yahoo.com etc) or work/school account belongs to multiple tenants by design.
Workaround: We can follow the below steps to install, configure and create on-premise data gateway on on-premise as well as on Azure with below steps.
Creating user in Azure AD tenant:
Create new user in the destined Azure Active directory. You can refer this doc CreateNewUser .
Provide contributor access at subscription or Resource Group (where you want to create the Azure data gateway) level
Sign-out from the portal and sign-in with new user created above . It will ask you to change password, update the password and check if you are able to login to portal.
Install and Configure On-Premise data gateway on On-Premise machine:
Now, you can download and install the on-premise data gateway on your On-Premise machine. You can refer to the link for downloading and installing gateway logic-apps-gateway-install .
Once the gateway is successfully installed, it pops up for the sign-in to configure the gateway.
Use the new user created in the Azure Active directory to sign-in and configure gateway. Follow the steps mentioned n above link. install-data-gateway
Verify Gateway Cluster in Power Platform center:
You can verify whether the gateway clustered configured is available in the power platform portal (log in with new Azure AD user) Manage DataGateways.
You need to select region in which you configured gateway in portal, option is available on the top right side.
Creating On-Premise data gateway in Azure:
Sign-in to azure portal with new Azure AD user used to configure the data gateway on on-premise machine
Create new Azure On-Premise data gateway resource in respective resource group where user has access. you can follow this doc on how to create azure On-premise data gateway resource. Create-azure-gateway-resource
Note:
This can be an extra effort for managing the new user we created in Azure AD tenant.
This article is contributed. See the original author and article here.
The 10th cumulative update release for SQL Server 2019 RTM is now available for download at the Microsoft Downloads site. Please note that registration is no longer required to download Cumulative updates. To learn more about the release or servicing model, please visit:
Starting with SQL Server 2017, we adopted a new modern servicing model. Please refer to our blog for more details on Modern Servicing Model for SQL Server


Recent Comments