by Contributed | Apr 29, 2021 | Technology
This article is contributed. See the original author and article here.
The FastTrack for Azure SAP Team would like to share the new Getting Started Guide for SAP on Azure with Azure DevOps.
This Getting Started Guide is always pointing to official SAP on Azure documentation which outlines best practises, supported configurations together with hints to SAP requirements (SAP notes). The guide however will help filter the information that is needed for a specific project and scenario.
This guide helps you create a project pre-populated with tasks and filtered links to all key documentation for a particular scenario at no additional license cost using the Azure DevOps Generator here.
Generating a project in Azure DevOps allows you to assign tasks and steps to teams and users with all relevant information for deploying SAP on Azure successfully. The project is always linked to the latest Microsoft documentation and contains queries for specific scenarios for SAP infrastructure, and integration topics.
Project Creation
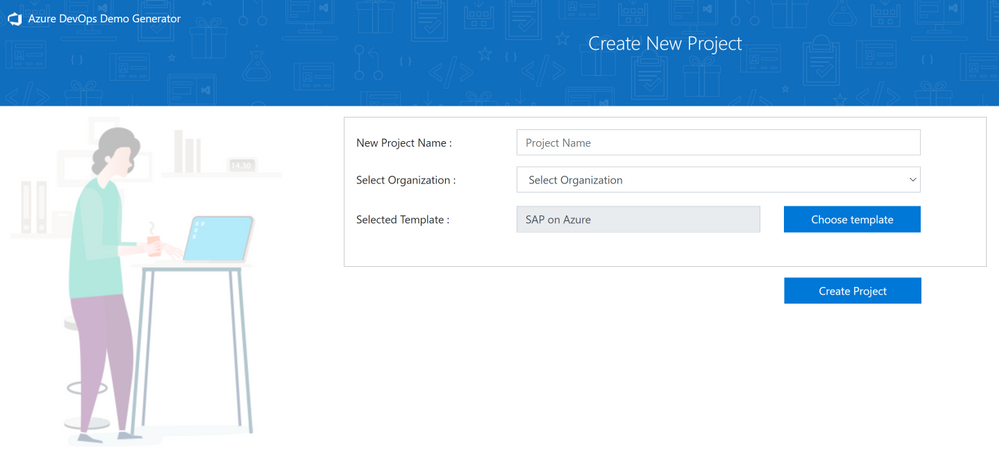
To create a project in Azure DevOps you will need a valid user and organization. Details on how to create a user, organisation and project in Azure DevOps Generator can be found here.
Once the user and organization has been created and you have signed in you can create a new project using the SAP on Azure template.
Enter a Project Name, select your organization and then choose the SAP on Azure template.

Create Project. After a short progress update the project, team and AzureDevOps elements will be provisioned ready for use.

Using AzureDevOps
Selecting Navigate to project will take you directly into Azure DevOps to begin reviewing Boards, Backlogs and Queries for your project team.

Selecting Backlogs on the main menu will show the full SAP on Azure Getting Started guide covering all topics by User Story and Task.

This list can be filtered on your own SAP on Azure project by selecting Queries and then All to view Shared Queries for different scenarios. As an example, you can select SAP on SQL Server and then Run Query from the action menu to only see the Stories and Tasks that apply the deploying SAP on Azure using the Microsoft SQL Server database.

The filtered list allows different action items to be assigned to team members and provides a checklist of the different tasks which also can be used as project plan.
To get the most out of using AzureDevOps for your SAP on Azure project please review the main documentation here.
by Contributed | Apr 29, 2021 | Technology
This article is contributed. See the original author and article here.
The Azure Sphere 21.04 feature release includes the following components:
- Updated Azure Sphere OS
- Updated Azure Sphere SDK for Windows and for Linux
- Updated Azure Sphere extensions for Visual Studio and for Visual Studio Code
There’s also a new version of the reference development board (RDB) design, new or updated samples, and a new Application note on Wi-Fi configuration options.
If your devices are connected to the internet, they will receive the updated OS from the cloud. You’ll be prompted to install the updated SDK on next use, or you can install it now. To install the latest SDK, see the installation Quickstart for Windows or Linux:
New and changed features in the 21.04 release
Peripheral configuration locking
Azure Sphere chips now have the ability to lock a peripheral configuration. This prevents an attacker from reassigning peripherals even if code is compromised. Thus, peripheral configuration locking adds another layer of security.
Time sync changes
The 21.04 release changes the client ports used by the Azure Sphere device. Previously, the device always used client source port 124. After this release it will use a random UDP client source port between 32678-61000. If this port fails, Azure Sphere then attempts to use port 124 as the UDP client source port.
Ethernet enabled by default
The 21.04 release changes the way the ethernet interface is enabled. Previously, a developer needed to call the Networking_SetInterfaceState command to enable ethernet. After this release, ethernet will automatically be enabled on first reboot after an ethernet board configuration is loaded.
Wi-Fi improvements
The Wi-Fi client performs background scanning at regular intervals. In some cases the client could disconnect when the wi-fi background scan occurred at the same time that a device registered a “beacon lost” signal. We have introduced an offset in the two signals so the system will now listen for beacon signals beyond the scan time.
Delete a product or device group with the CLI
CLI support for deleting a product is now available using the azsphere product delete command.
CLI support for deleting a device group is now available using the azsphere device-group delete command.
View statistics on total memory usage
The azsphere device app show-memory-stats command returns memory usage statistics on total memory usage, user mode usage, and peak user-mode usage for applications running on an attached device. The device must have the appDevelopment device capability configured to run this command.
Support for crash data collection
Optional diagnostic data can now be configured using the CLI to collect a full Linux core dump when an application or system service crashes. You can give consent to enable crash dump collection by using the –allow-crash-dumps-collection parameter in the azsphere device-group update command.
Write capabilities added to Azure Sphere Explorer for Visual Studio or Visual Studio Code
Azure Sphere Explorer for Visual Studio now has the ability to create and update products and device groups. Other changes were made to both the Visual Studio and Visual Studio Code versions of Azure Sphere Explorer to make them functionally equivalent.
Multiple device support in Azure Sphere Explorer for Visual Studio or Visual Studio Code
Azure Sphere Explorer now supports multiple connected devices. One device can be chosen as the active device for a given project. Deployment and debugging of the project is then done on the active device.
New and updated samples, code snippets, and Gallery items
The 21.04 release includes a refactored Azure IoT sample, a new code snippet, and several new items in the Azure Sphere Gallery.
Refactored Azure Sphere sample app for connecting to Azure IoT
Updates to the Azure IoT sample include:
- Dedicated guidance (READMEs) for each starter scenario (connect to Azure IoT Hub or Azure IoT Central) and for each add-on scenario (connecting via the device provisioning service and/or via Azure IoT Edge).
- Refactored codebase with smaller, easier-to-assemble pieces.
- Support for Azure IoT Plug and Play (PnP) – so that the device’s data model “template” is auto-populated when using Azure IoT Central or a PnP-aware client connected to Azure IoT Hub.
- Updated best practice for using the Azure IoT C SDK, in particular to enable connections via the device provisioning service to be established asynchronously.
New code snippet on memory usage
A new code snippet on memory usage demonstrates how to detect and handle unexpected memory usage.
Github gallery samples
More than 10 new projects added to the Azure Sphere Gallery GitHub repository, including:
- tools to evaluate networks’ compatibility with Azure Sphere OS.
- tools to use the littlefs file system.
- a complete design of a realtime demo device (balancing robot), including software, hardware, and mechanical designs.
Hardware reference design changes
Changes to the hardware design of the MT3620 reference development board (RDB) have been made for version 1.7. These changes have been identified through extensive use of the board (both internally and via customer feedback) and as a result of software changes that have enabled features such as Power Down that were not supported at the time the board was originally designed.
The MCU programming and debugging interface has been modified to include a second schematic showing a circuit that enables the PC and reset button to bring a device out of Power Down mode. This is a backwards-compatible change with no changes required to the SDK.
For more information on the 21.04 release, please see the What’s new in Azure Sphere in the customer documentation. To learn about Azure Sphere OS feeds and setting up an evaluation device group, see Azure Sphere OS feeds and Set up devices for OS evaluation.
For self-help technical inquiries, please visit Microsoft Q&A or Stack Overflow. If you require technical support and have a support plan, please submit a support ticket in Microsoft Azure Support or work with your Microsoft Technical Account Manager. If you would like to purchase a support plan, please explore the Azure support plans.
by Contributed | Apr 29, 2021 | Technology
This article is contributed. See the original author and article here.
In our previous installment of Understanding Pipeline Failures and Error Handling, we introduced the difference between TRY-CATCH logic and DO-IF-ELSE logic.
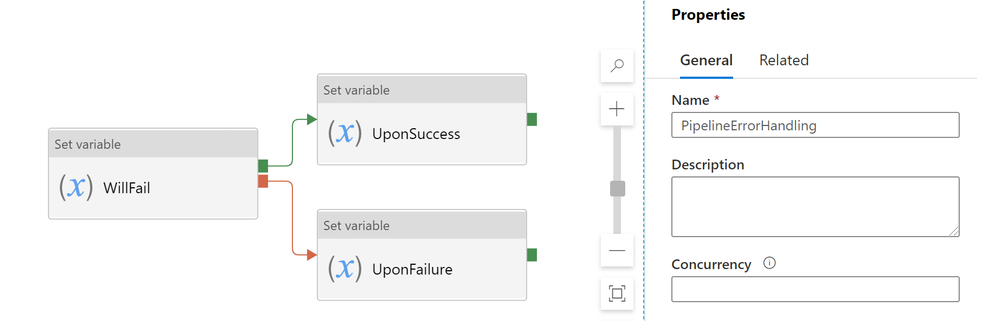
Just a memory refresher, DO-IF-ELSE logic defines both Upon_Success and Upon_Failure paths
If we execute this pipeline, with WillFail activity failing, the whole pipeline will be marked as Failed, as expected

Sometimes users may want a more elegant error handling in their pipeline: despite branching activity (WillFail in this case) failed, I do not want to mark the whole pipeline as Failed, maybe because
- I do not want to block downstream dependent tumbling windows, in case of tumbling window dependency
- branching activity is used to look up a control table, and sometimes it is expected to return empty results and throw an error
To implement the desired behavior, customers may consider DO-IF-SKIP-ELSE block: adding a dummy UponSkipped to the end of the UponSuccess path, like this

If we run this pipeline, WillFail will still fail, but the pipeline will be marked as SUCCESS

In the monitoring view, you can see the difference a dummy UponSkipped activity can make. Notice that PipelineErrorHandlingSuccess is defined with the addition dummy activity, while PipeErrorHandling is not. (And the additional pipeline duration comes from the extra 5 seconds in the dummy wait activity)

Technical reasons for the difference is that, Azure Data Factory defines pipeline success and failures as follows:
- Evaluate outcome for all leaves activities. If a leaf activity was skipped, we evaluate its parent activity instead
- Pipeline result is success if and only if all leaves succeed
Here is an expanded table summarizing the difference:
Approach |
Error Handling Defines |
When Activity Succeeds |
When Activity Fails |
TRY-CATCH |
Only Upon Failure path |
Pipeline shows Success |
Pipeline shows Success |
DO-IF-ELSE |
Upon Failure paths
+
Upon Success path
|
Pipeline shows Success |
Pipeline shows Failure |
DO-IF-SKIP-ELSE |
Upon Failure paths
+
Upon Success path (with a dummy Upon Skipped activity at the end)
|
Pipeline shows Success |
Pipeline shows Success |
by Contributed | Apr 29, 2021 | Technology
This article is contributed. See the original author and article here.
Here is an example Power Automate solution where we query a real SharePoint List acting as a Quiz Leader Board on my dev tenant and bring the contents to this very blog post (at the bottom of the page). Using the Power Automate and the HTTP trigger we can retrieve, embed and display content from our Office 365 environments.
The competition is rife at the top of this Leader Board. The aim is to get 100% and it is ordered by last completed to give everyone a chance to be top, albeit I am sorry to say that there is no official badge for this one.
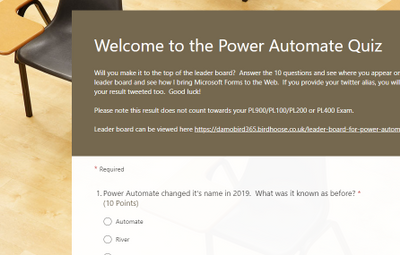
Want to test your Power Automate knowledge? Click Here
For the first flow of two, using Microsoft Forms and Power Automate I have built a pretty standard process. The user completes the quiz, the form gives them feedback on how well they have done and I capture the answers to a SharePoint List – seen below.

I use the when a new [form] response is submitted trigger and during the next couple of actions I calculate their score again (based on their answers) as the score is not passed back to the Cloud Flow via the Response Body.

What’s the Score?
In order to calculate the score I have created an array via a compose action and used the equals expression. If the response equals the answer, it will return true. I then use a filter action on the item() of each output from the select and filter on true. This will leave me with an array of true values. During the create item score field and tweet action, I use the length() expression (i.e. length of array from 10 possible true answers) to return the number of answers equaling true and multiply by 10 to get the percentage correct.

The final stage of this flow is a condition where I check to see if the user has supplied a twitter handle. If it’s not empty I tweet out their score. The only disappointment here is that Twitter will not let you tag users due to spamming  any attempt to include an @ result in it being stripped out.
The Leader Board
The interesting piece though, is the second flow, using the HTTP trigger action to present the leader board to the web and seen below (at least until my premium trial has not expired). Using the trigger we can run an action to get items, prepare HTML table rows using a select action and send back a response to the website in a fraction of a second. The end user loading the website almost doesn’t know it’s happening, albeit there is a slight delay for the flow to run, i’ll admit. Did you notice the delay in this page loading?

The reponse to the embedded IFrame on my Blog and indeed this article which is simply calling the url provided by the HTTP Request trigger is an HTML table. I create the table header and then using the select action body, I use the join() expression to join the elements of the array with ” into a string and complete the HTML table.

I’m not a web developer and I am sure that there will be slicker ways to embed the results of the http response into your site and for that I would be grateful to hear from those with experience but what do you think of this idea? Are you on the leader board yet?
As things stand – here is the leader board. Can you resist not talking part? Click Here
Tweets with your result will be posted via my twitter handle DamoBird365
Meanwhile, if you are looking for a certificate for your efforts, fill out my form here
Happy quizzing 
by Contributed | Apr 29, 2021 | Technology
This article is contributed. See the original author and article here.
This post will guide you through the process of how to use the Power Apps Language Toolkit to extract a Power Apps .msapp file.
why would you want to have the source code files?
To make your app reusable, so that more people can benefit from it, you will want to share the source code files. Unfortunately, when you save your Canvas App from Power Apps Studio, it is saved in one opaque .msapp file. To be able to get the source files, you will need to use the Power Apps Language Toolkit to extract all files from the .msapp file. This way,
- developers can not only open the source code in their code editor of choice but can effectively manage the code of a Canvas app in GitHub or Azure DevOps. This makes a huge difference as we can’t look into .msapp files.
- makers can still open the .msapp file to easily import an app sample into their environment
Prerequisites
To be able to use the Power Apps Language Toolkit, you will need to
- install Visual Studio Code
- install .NET Core 3.1.x (x64)
- download the Power Apps Language Toolkit
- extract the Power Apps Language Toolkit to a local folder
- open that local folder
- locate the build.cmd file
- rightclick, Run as Administrator
- in the Pop up Window, select more info
- select Run anyway
Please note, that command Prompt will open, show a few lines and then close automatically again.
Please also not, that you can now find a bin folder in the local folder you extracted the PowerApps Language Toolkit to. In this bin folder, you will find a Debug folder and inside of the Debug folder you will find a PASopa folder.
Download the .msapp file
- go to [make.powerapps.com](https://make.powerapps.com)
- log in
- open your app in edit mode
- select File
- select Save as
- select This Computer
- select Download
- move the downloaded .msapp file to your folder in which you extracted the PowerApps Language Toolkit as well
unpack .msapp file
- Now that we have the .msapp file of the app:
- press the WINDOWS key on your keyboard and search for Command Prompt (first few letters should do)
- run as an Administrator
- copy the path of the PASopa folder
- type in Command Prompt `cd <your PASopa path>`
- copy the path of the .msapp file
- create a new folder in your app folder
- copy the path of that new folder
- type in Command Prompt `pasopa -unpack <your msappfile path> <new folder path>`
Please note that you will now find all source code files in that new folder. You can open the folder in a code Editor of your choice, for example Visual Studio Code.
submit as a sample
Well done! If you like to contribute with your app to the PnP Power Apps sample gallery , you can submit your app with these source code files here. To do so, follow these steps:
Now you can submit these source code files as a sample. Please
Please do not forget to provide as well a `README.md` file which explains what your sample is about.
If this all sounds confusing to you and you are new on GitHub – you are more than welcome to attend the Sharing Is Caring sessions, where we guide you through using GitHub and making your first PR.
Sharing Is Caring :sparkling_heart:

Recent Comments