by Contributed | May 20, 2021 | Technology
This article is contributed. See the original author and article here.
Overview
In 2021, there will be a blog covering the webinar of the month for the Low-code application development (LCAD) on Azure solution.
LCAD on Azure is a solution that integrates the robust development capabilities of low code Microsoft Power Apps and the Azure products such as Azure Functions, Azure Logic Apps, and more.
This month’s webinar is ‘Increase Efficiency with Azure Functions and Power Platform’.
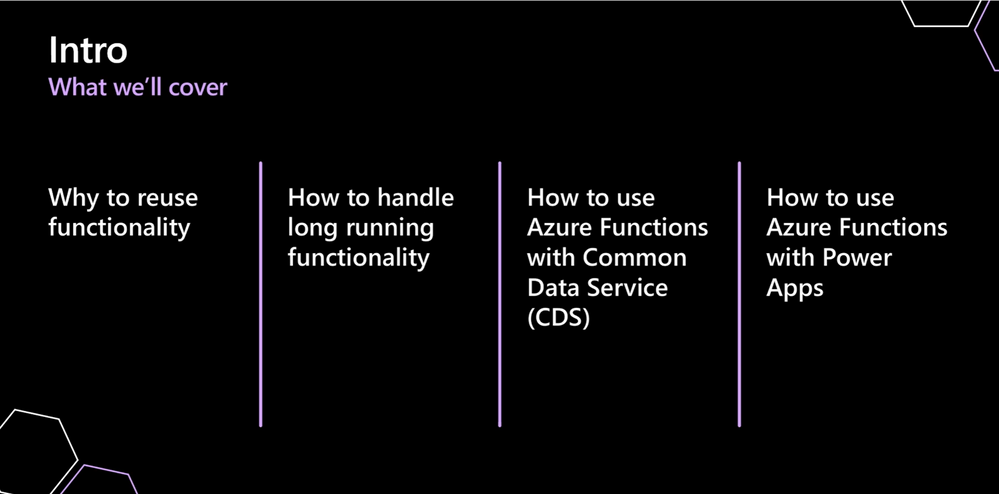
This blog will briefly recap Low-code application development on Azure, provide an overview of Azure Functions reusability, Durable Functions, and how to integrate Functions across the Power Platform.
This is a helpful blog for those new to Azure Functions and those who want to start integrating Azure Functions into their Power Platform build cases.
What is Low code application development on Azure?
Low-code application development (LCAD) on Azure was created to help developers build business applications faster with less code.
Leveraging the Power Platform, and more specifically Power Apps, yet helping them scale and extend their Power Apps with Azure services.
For example, a pro developer who works for a manufacturing company would need to build a line-of-business (LOB) application to help warehouse employees track incoming inventory.
That application would take months to build, test, and deploy. Using Power Apps, it can take hours to build, saving time and resources.
However, say the warehouse employees want the application to place procurement orders for additional inventory automatically when current inventory hits a determined low.
In the past that would require another heavy lift by the development team to rework their previous application iteration.
Due to the integration of Power Apps and Azure a professional developer can build an API in Visual Studio (VS) Code, publish it to their Azure portal, and export the API to Power Apps integrating it into their application as a custom connector.
Afterwards, that same API is re-usable indefinitely in the Power Apps’ studio, for future use with other applications, saving the company and developers more time and resources.
To learn more about possible scenarios with LCAD on Azure go through the self-guided tour.

Azure Functions Reusability
Why should you reuse functionality? There are four key reasons: shorter development time, consistency, easier testing, and live proven code.

The shorter development time is driven by not having to build code again.
For example, if you’re validating a phone number with your application you don’t want to have to re-write the code for each nuanced small scenario, such as rebuilding a web app, then a portal, etc.
Not re-writing code even if it is being plugged into a new app enables shorter development time.
Additionally, this ties into greater consistency in your code creating a much cleaner user experience across platforms and devices.
Reuse of functionality also enables easier testing.
When reusing functionality you can automate tests, however if you write new code each time, for each iteration you must manually test the code, subsequently increasing development time.
However, if you reuse functionality, once set up and spun up, every time you test apps down the line, all you need to do is check the Azure Function connection rather than starting from scratch.
Lastly, is the advantage of live proven code, which can’t be overstated. The separate aspects of functionality are already proven to work, therefore speeding up the application development lifecycle.
Durable Functions
Durable Functions are an extension of Azure Functions, that let you write stateful functions in a serverless environment. The durable extension manages state, checkpoints and restarts out of the box.
Durable Functions allow the creation of workflow activities like Logic Apps but are completely customizable and scalable.
Durable Functions can be called both synchronously and asynchronously. Output from Functions can be saved to local variables and used later in execution.
State and executions are managed within an Azure Table using the Event Sourcing Pattern and can be queried if needed.

For example, if you want to fill in a field on a form and need to check input information across multiple databases, the orchestration capabilities of Durable Functions enable that functionality.
Moreover, if you need all the tasks to happen at the same time or need them to happen in different patterns, you could build that functionality in Power Automate or Logic apps.
Leveraging Durable Functions enables greater detail and options for functionality.
Lastly, these Functions scale rapidly to meet demand levels, however when inactive they rest until called upon again.
Functions Integration across the Power Platform
Power Apps
There are 3 types of Power Apps available to integrate with Azure Functions. Note that this blog will be covering JavaScript, however you can write Azure Functions in any language.
First, there are Dataverse forms. Dataverse forms are used within Model Driven applications that can contain JavaScript Functions that fire on load or property change. These functions can call out to Azure Functions for long running queries. Thus, enabling your colleagues to leverage your Azure Function.
Second, are Power Component Framework controls (PCFs). They are a web packet that you can put in both model-driven app forms and canvas apps. The code can be called from either place, if used to call out an Azure Function it creates a double layer of reusability and can separate deployment for use across your business.
Third, are Power Apps Portals. These scripts are very similar to Dataverse forms and can be embedded into a portal to call any web API and call an Azure Function from the portal. Security will have to be handled differently for public facing portals than internal applications.

Power Automate
In the webinar Lee Baker covers the stages of when and how to connect a Power Automate flow to an Azure Function.
When? You can start when a record is selected in a model driven app, hitting the on-demand flow button, pushes those records to Power Automate. Or you can use standard Dataverse triggers when creating, reading, updating, and deleting (CRUD).
How? HTTP request actions from Power Automate or Logic Apps, can put data or URLs incorporate and get payloads back to use in Azure Functions, or you can build a custom connector.
You would build a custom connector because HTTP requests are often blocked by data loss policies in Power Platform environments but can circumnavigate policies.
Custom connectors can be created in accordance with data loss policies but pull the HTTP request directly into the canvas application via Azure Functions for a secure and streamlined approach.

Conclusion
This is just the beginning of what is possible with the integration of APIs into Power Apps via Azure Functions. To learn more about the integration of Azure Functions and Power Apps watch the webinar covered in this blog titled “Increase Efficiency with Azure Functions and Power Platform”.
To get hands on experience creating a custom connector and extending a Power App with custom code as covered in this blog, start with the new learning path “Transform your business applications with fusion development”.

After completing the learning path, if you want to learn even more about how extend your low code applications with Azure and establishing a fusion development team in your organization read the accompanying e–book “Fusion development approach to building apps using Power Apps”.

by Contributed | May 20, 2021 | Technology
This article is contributed. See the original author and article here.
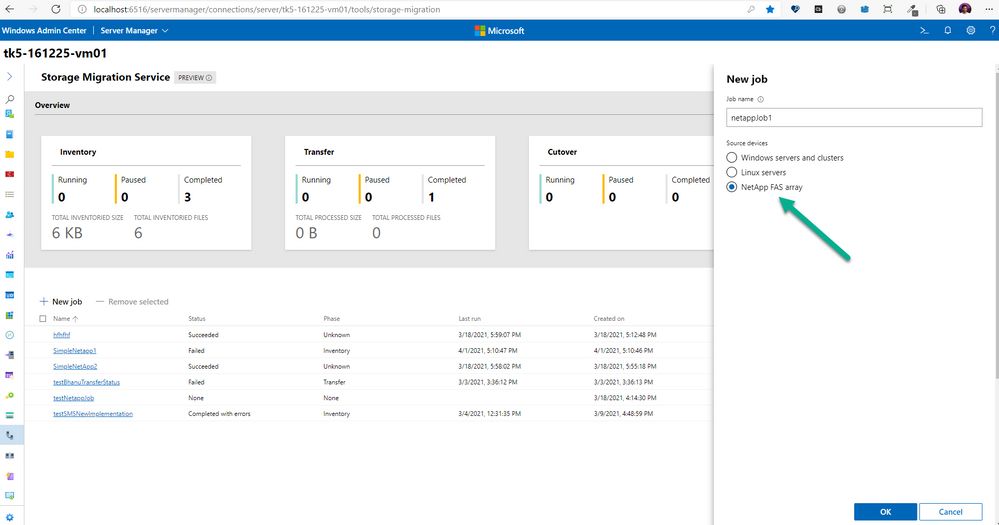
Heya folks, Ned here again. Eagle-eyed readers may have noticed in the April 22, 2021-KB5001384 monthly update for Windows Server 2019 – and now in the May 2021 Patch Tuesday – we added support for migrating from NetApp FAS arrays onto Windows Servers and clusters. I already updated all our SMS documentation on https://aka.ms/storagemigrationservice so you’re good-to-go on steps. There’s a new version of the Windows Admin Center SMS extension that will also automatically update to support the scenario.
We tried to make this experience change as little as possible from the previous scenarios of migrating from Windows Server and Samba. The one big thing to know – and we reiterate this in the docs and WAC – is that you must have a NetApp support contract, because you need to install the NetApp PowerShell Toolkit, which is only available behind that licensed customers-only support site.
You’ll see the new option once you patch your orchestrator server with the May monthly update, update your WAC SMS extension, and install the NetApp PowerShell toolkit on your orchestrator:
After you create a new job and see the new Prerequisites helper screen, you simply give the network info and creds for your NetApp FAS array and we’ll find all the CIFS (SMB) SVMs running. It’s actually a bit easier than Windows Server sources; since there is a known host array to enumerate, we save you typing in all the SMB servers.

Then you provide the Windows admin source credentials just like usual, and pick which CIFS (virtual) servers you want to migrate.

After that, the migration experience is almost exactly the same as you’re used to with Windows and Samba source migrations. You still perform inventory, transfer, cutover just like before with exactly the same steps. The one difference is that since NetApp CIFS servers don’t use DHCP, you will choose to assign static IP addresses or use NetApp “subnets” before you start cutover. Voila.
I’ll get a video demo of the experience up here when I find the time. Busy bee with many new things coming soon, eating up my blogging time. :D
– Ned “NedApp” Pyle
by Contributed | May 20, 2021 | Technology
This article is contributed. See the original author and article here.
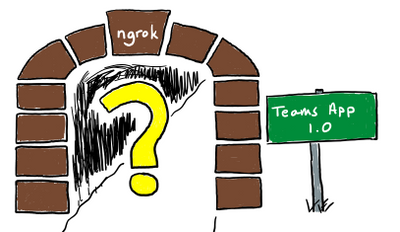
If you’ve started down the path of developing applications for Microsoft Teams, you may have seen a tool called ngrok as a prerequisite in various tutorials and lab exercises. It’s also integrated with a number of tools such as the Microsoft Teams Toolkit and the yo teams generator; even the Bot Framework Emulator has an ngrok option.
This article will explain what ngrok is, why it’s useful, and what to do instead if you or your company are uncomfortable using it. Also, please check out the companion video for this article, which includes live demos of Teams development with and without ngrok.
Grokking ngrok
First the shocking truth: Microsoft Teams applications don’t run in Teams. OK maybe it’s not shocking, but it’s true. Teams applications are made up of regular web pages and web services that you can host anywhere on the Internet. Teams tabs and task modules (dialog boxes) are just embedded web pages; bots and messaging extensions are web services. This allows developers to use their choice of web development stack, and to reuse code and skills.
Web developers typically host a small web server on the same computer where they edit their code to run and debug their applications. For Microsoft Teams developers in particular, ngrok is very handy in this situation. Here’s why:
ngrok provides the encryption needed for https, which is required for Teams applications. It’s set up using a trusted TLS certificate so it just works immediately in any web browser.
ngrok provides a tunnel from the Internet to your local computer which can accept incoming requests that are normally blocked by an Internet firewall. The requests in this case are HTTP POSTs that come from the Azure Bot Service. Though tunneling is not required per se, there has to be some way for the Azure Bot Service to send requests to the application.
ngrok provides name resolution with a DNS names ending in ngrok.io, so it’s easy to find the public side of the Internet tunnel.
ngrok makes mobile device testing easier since any Internet-connected phone or tablet can reach your app via the tunnel. There’s no need to mess with the the phone’s network connections; it just works.
These conveniences have made ngrok the darling of many Microsoft Teams developers. It lets them compile, run, and debug software locally without worrying about any of these details.
The tunneling part, however, lacks the guard rails expected by many IT professionals, especially if they’re managing a traditional corporate network that relies on a shared firewall or proxy server for security. While ngrok only provides access to the local computer where it’s run, an insider “bad actor” could launch attacks from such a machine. For that reason, some IT departments block all access to ngrok.
Many colleagues have suggested other tunneling applications such as Azure Relay or localtunnel. While they may do the job, they still open a tunnel from the public Internet to your development computer, and thus the same security concerns usually arise. This article will only consider approaches that don’t involve tunneling from the Internet.
Tunneling explained
Most computers that are connected to the Internet aren’t connected directly. Network traffic passes through some kind of firewall or NAT router to reach the actual Internet. The firewall allows outgoing requests to servers on the Internet but blocks all incoming requests. This is largely a security measure, but it has other advantages as well.

A typical web developer runs some kind of web server on their local computer. They can access that web server using the hostname localhost, which routes messages through a “loopback” service instead of sending them out on the network. As you can see in the picture, these messages don’t go through the Internet at all.
But what if, in order to test the application, it needs to get requests from the Internet? Bots are an example of this; the requests come from the Azure Bot service in the cloud, not from a local web browser or other client program. Another place this comes up is when implementing webhooks such as Microsoft Graph change notifications; the notifications are HTTP(s) requests that come from the Internet.
The problem is these incoming requests are normally blocked by the firewall. If you’ve ever opened a port on your home router to allow a gadget to receive incoming connections, this is the same situation.
With ngrok running, the incoming requests go through the ngrok service and into your locally running copy of the ngrok application. The ngrok application calls the local server, allowing the developer to run and debug the web server locally.

In the case of Teams development, tabs and task modules only require a local loopback connection, whereas bots and messaging extensions have to handle incoming requests from the Internet. Each is explained in more detail later in this article.
Using ngrok
ngrok is a command line program that works on Windows, Mac OS, Linux and FreeBSD.
Suppose your local web server is at http://localhost:3978 (the default for bots). Then run this ngrok command line:
You will then see a screen like this:

The “Forwarding” lines show what’s happening. Requests arriving at http://(something).ngrok.io or https://(something).ngrok.io will be forwarded to http://localhost:3978 where your bot code is running. At this point you would put the “something.ngrok.io” address into your Azure bot configuration, Teams app manifest etc. as the location, and leave the command running while you debug your application.
ngrok url
The external ngrok url will always look like this:
https://(something).ngrok.io
With the free ngrok service, the value of (something) is different every time you run ngrok, and you’re limited to an 8-hour session. Every time you get a new hostname you need to update your configuration; depending on what you’re doing and how many places you had to enter the hostname, this can be a chore. The paid plans allow you to reserve names that will persist, so you can just start ngrok and and you’re ready to go.
Hint: If you’re doing a tutorial using the free version of ngrok, make a note of every place you use the ngrok URL. That way you can easily remember where to update it when it changes.
The example above assumes that your local server is running http on the specified port. If your local server is running https you need a different command or it won’t connect:
ngrok http https://localhost:3978
Host header rewriting
The HTTP(s) protocol includes a header called Host, which should contain the host (domain) name and port of the web server. This is used for routing requests to the right server, and for allowing a single web server to serve multiple web sites and services.
If your debug server ignores the host header, you can ignore this section. But some servers will require the header to match the host name, such as localhost:3978. The challenge is that if the request was sent to 12345.ngrok.io, the originator will probably put that in the host header when the server is expecting localhost:3978. To handle this, ngrok provides a command line argument that replaces the host headers with the local host name. Simply add the -host-header command switch to enable this.
For example,
ngrok http -host-header=localhost:3978 3978
If you see the messages go through to your local web server but it doesn’t respond, it may be expecting a specific host header.
All the command options are detailed in the ngrok documentation.
Network tracing
You might notice that the ngrok screen shows a trace of requests that went through the tunnel; in this case they’re HTTP POST requests from the Azure Bot Service, and the local server returned a 200 (OK) response. This is handy because you can see a 500 error from your server code by just glancing at the ngrok screen.
You might also notice the “Web interface” url on the ngrok screen. It provides a full network trace of what went through the tunnel, which can be very helpful in debugging.

Developing Tabs and Web-Page based Teams features
Some Teams application features are based on web pages provided by your application:
- Tabs and Tab Configuration Pages
- Task Modules (dialog boxes)
- Connector Configuration Pages
These features are backed by ordinary web pages that are displayed in an IFrame within the Microsoft Teams user interface. Tabs using the Azure Active Directory Single Sign-On (SSO) option also need to implement a web service to do a token exchange. Accessing these via localhost is no problem; no tunnel is required.

However Teams does require the web server to use a trusted https connection or it won’t display. ngrok translates trusted https requests into local http requests, so it just works. But if you’d rather not have a tunnel to the Internet as part of your setup, you can do this all locally. It’s just more work.
Setting up a trusted https server
On a NodeJS server, you can usually enable https by editing the .env file and setting the HTTPS property to true. For .NET projects in Visual Studio, under project properties on the “Debug” tab, check the “Enable SSL” box to enable https.
But alas, just turning on the https protocol is generally not enough to satisfy this requirement; the connection must be trusted. Trust is established by a digital certificate; if the certificate comes from a trusted authority, is up-to-date, and matches the hostname in the URL, the little padlock in your web browser lights up and all is well. If not, you get errors that you can bypass in most web browsers, but not in Microsoft Teams.
The people over at ngrok acquired their certificate from a trusted authority, and it’s set to match hostnames ending in ngrok.io, so it just works without any fuss. The local web server, on the other hand, will most likely have a self-signed, untrusted certificate. So the trick is to get your browser and/or Microsoft Teams to trust it.
An option that often works is to browse to the local server from a regular web browser, click the security error, and tell the browser to trust the certificate. You can then run Teams in the same browser and bypass the issue. If the Teams client shares the same certificate store as your browser, it will also work. However these default certificates generally expire after a month or so, and the process will need to be repeated.
A better option is to generate your own certificate and tell your computer to trust it. That way you can control the expiration date and reuse the certificate on multiple projects, so you only need to do the setup once. This is explained in the article, Setting up SSL for tabs in the Teams Toolkit for Visual Studio Code. The instructions are for a Create React App application using the Teams Toolkit but they shouldn’t be too difficult to adapt to other tool chains since the certificate creation and trust parts are the same regardless.
Mobile device testing
It’s prudent to test Teams applications using the mobile versions of Teams (iOS and Android) to make sure everything looks good and works properly. ngrok makes this a breeze; since your local service is exposed on the public Internet, you can test using any device with an Internet connection, no special setup required.
If you’d prefer not to expose your local server to the Internet, you can always connect your phone locally using wifi and leave the Internet out of it. This picture shows two phones; phone 1 is connected via ngrok and phone 2 is connected locally.

To set up local access you’ll need a server name other than localhost, and you’ll need to open a path on the local network from your phone to your local web server. Here are the high-level steps; the details vary depending on your phone OS, development computer OS, and network configuration.
- Connect your mobile device via wifi to the same network as your development computer.
- Open an incoming port on your development computer’s built-in firewall (port 3000, 3978, 8080, or whatever your local web server is using).
- Determine the local IP address of your development computer; ideally reserve it so it doesn’t change. This can be accomplished in the DHCP section of most home routers or by using a fixed IP address.
- Set up a
hosts entry (phones have them too!) or local DNS name to point to your development computer. Again, many home routers have the ability to register a local DNS name so you don’t have to configure it in each device.
- Make sure the https certificate is for this same hostname and not just
localhost, and install it as a trusted certificate on your phone.
While this might not seem easy, it is possible! And it’s a one-time setup that you can use over and over. But you can see that ngrok makes it a whole lot easier.
Developing Bots and Messaging Extensions with and without ngrok
Several features of Teams applications are based on a web service within your application that is called from the cloud. These are:
All of these are implemented as REST services and could be built with any tool chain, but the requests will come from the cloud, so you need to have a port listening on the Internet to receive those requests.

For this reason there’s currently no local debugging option in Microsoft Teams that doesn’t involve opening a port on the Internet or using some sort of tunnel, ngrok or otherwise. The same is true for outgoing webhooks, which are outgoing from Teams to your app).
If ngrok isn’t on your road map, don’t worry, there are still options available!
Option 1. Use the Bot Framework Emulator
If you’re building a bot, consider using the Bot Framework Emulator, which allows you to run bots locally without using the Azure Bot Service. Instead of running your bot in Teams, you run it in the emulator. The drawback is that the emulator doesn’t currently understand some Teams-specific features such as messaging extensions or other Invoke activities. However it does a great job running conversational bots! Adaptive cards work as well, though Invoke card actions do not.
If your bot isn’t too Teams-specific, consider using the Bot Framework Emulator for most debugging and just do final integration testing in Teams, perhaps when the bot deployed in a staging environment which is set up for handling incoming requests.
Option 2. Don’t debug locally
Another approach is to move away from the strategy of local debugging entirely. For example, you could publish your app to Microsoft Azure app service and use the remote debugger. Here are the instructions for Visual Studio Code (NodeJS) and Visual Studio 2019 (.NET).
You could even set up a development virtual machine (VM) in Azure or your cloud service of choice and open an incoming port for the Azure Bot Service. Or just run ngrok in the VM, away from the concerns of a corporate network.
How many services do you have?
Teams applications generated by the yo teams generator have a single web server, so if your app has a combination of features – say, tabs and a bot – you can use one ngrok tunnel or one for all your application features.
Teams applications generated by the Microsoft Teams Toolkit generate multiple web servers (one for tabs, another for bots, and a third for the SSO web service if you use it). If you want to use ngrok, you’ll need a tunnel for each one. This requires the paid service and you’ll have to start up multiple copies each time you begin debugging. Another option is to use a single ngrok tunnel for your bot, potentially with the free service, and then use local connections for the tab and SSO web service.
Of course you don’t have to use either of these tools; they’re really just a convenience! You can use any tools you wish and create the Teams application package in App Studio or by editing your own manifest.json file and zipping it up with a couple icons.
Summary
While ngrok isn’t a requirement for Teams development, it does make it a lot easier. However if you can’t or don’t want to open up a tunnel from the Internet, there are other strategies. Many of these, such as local https servers with self-signed certificates, have been around for a long time and may already be familiar.
There is nothing magic about Teams development! It was designed to use standard web tooling, and you can use the same tools that you’d use for any web development project. Trust your knowledge of web development to come up with a configuration that works for you. Just be aware of which services will be called from the Internet and plan accordingly.
References
![[Guest Blog] Inspiring Youth – Adventures in TechGirlz Workshops](https://www.drware.com/wp-content/uploads/2021/05/fb_image-143.jpeg)
by Contributed | May 20, 2021 | Technology
This article is contributed. See the original author and article here.
This blog was written by David Patrick, Office Apps & Services MVP. David and his daughter, Sarah, share their adventures in teaching young women a variety of computer related technologies. Through a program called TechGirlz, David and Sarah have been running workshops designed to inspire the next generation of young women to get and stay interested in STEM, to help bridge the gender gap that exists in these fields today.
DSA’s TechGirlz Team
TechGirlz is an organization whose mission is to inspire girls to explore the possibilities of technology. My daughter Sarah has a geeky Dad (me) who always knew that she could do anything that she wanted to do. But Sarah and I realized that there are many girls out there that are interested in technology, but as they get older, lose confidence in their technology skills and thus lose interest in the technology field. We wanted to help these young women keep and build their confidence in using technology. We wanted them to be inspired to pursue their interest in technology and give them role models to look up to. By volunteering for TechGirlz, we have been able to help these young women with their journeys in tech.
The TechGirlz organization provides “TechShopz in a Box”, which are freely available STEM based activities that volunteers like my daughter and I use to run workshops for the girls. There are many workshops to choose from, building websites, podcasting, hardware exploration, game design and many more!
For the last five years, Sarah and I, along with several professional women from my company, DSA, Inc. have been conducting these TechGirlz workshops, originally face to face at the Harford County Boys & Girls Clubs, and more recently virtually using Microsoft Teams to anyone from around the world.
 Sarah E Patrick leads our first TechGirlz workshop
Sarah kicked off our first afterschool program back in April 2016 by presenting the TechGirlz workshop called “Make a Website Using WordPress”. Sarah had the girls build unique and custom websites. Despite our initial fears of the workshops being perceived as extra homework, that first session was a smashing success! Girls were excited by the power they had to design their own websites from the ground up. Some created websites about their passions, like sports and music, others geared towards making money, and even one about social injustice. The level of excitement that the girls displayed was surprising and it not only showed how inspired they were, but their enthusiasm was truly infectious and it inspired us!
We realized that these young ladies had no fear of technology once they were introduced to it and shown the many possibilities of what it can do. The toughest part was stopping these young ladies from continuing their work when the workshop ended. They wanted so badly to keep going!
Other workshops we ran included “What’s in a Computer”, where the girls tore apart computers to see what makes them tick. It was awe-inspiring to see these girls at first, very tentative and afraid that they might get electric shocked or that they might break something, but then, once we reassured them and explained the safety measures taken, they dove in headfirst, sometimes literally, to explore and discover and learn what the hardware components were and how computers worked at this level. Again, the girls had to be pulled back and stopped when the workshop was over because they were so energized by the learning and discovery.
 TechGirlz explore a computer
TechGirlz has been a very fulfilling program to run. Seeing the girls go from unsure to enthused really made us feel like we were doing something important.
The ironic thing is this, I wanted to help the girls to not be afraid of technology, but in fact, I was afraid. Afraid that the tasks I perform in my daily job might not matter in the big picture. I was afraid that my life might not be meaningful. But by helping these girls overcome their fear, I also, have overcome mine.
The TechGirlz workshops help everyone, the girls, the volunteers, and the future employers who will get these valuable assets to help them build great things. I am hopeful we can continue to do these workshops and can spread the word to others about how beneficial they are and get more volunteers involved.
So here’s our Call to Action. Volunteer! Help out! Check out the volunteer opportunities and see if you can inspire courage, not only in others, but also in yourself.
www.techgirlz.org/volunteer
I know now that the things I do matter and make a difference. Helping these girls has helped me immensely. And my daughter Sarah, well, she also has grown a ton and learned a lot from the girls. She has become more confident in leading workshops, giving talks, and organizing her own events. Going forward, we have exciting plans to run more workshops, summer and winter camps, and we are even developing our own workshops. One workshop we have already finished is called “Intro to Collaboration with Microsoft Teams”, where we teach the girls how to collaborate virtually using Microsoft Teams. We completed this workshop and delivered it a few times right before the pandemic hit in March 2020. Since then, we have had to pivot from our in-person workshops to fully virtual workshops and this workshop helped prepare our girls with using tools like Teams. It was amazing how quickly the girls were able to learn to use Teams for meeting and chatting so that they can continue their learning of STEM technologies virtually.
Inspiring others truly ends up inspiring yourself.
To hear more from me and Sarah and our different perspectives around tech, check out our new video series, Patrick Perspective!
by Contributed | May 20, 2021 | Technology
This article is contributed. See the original author and article here.
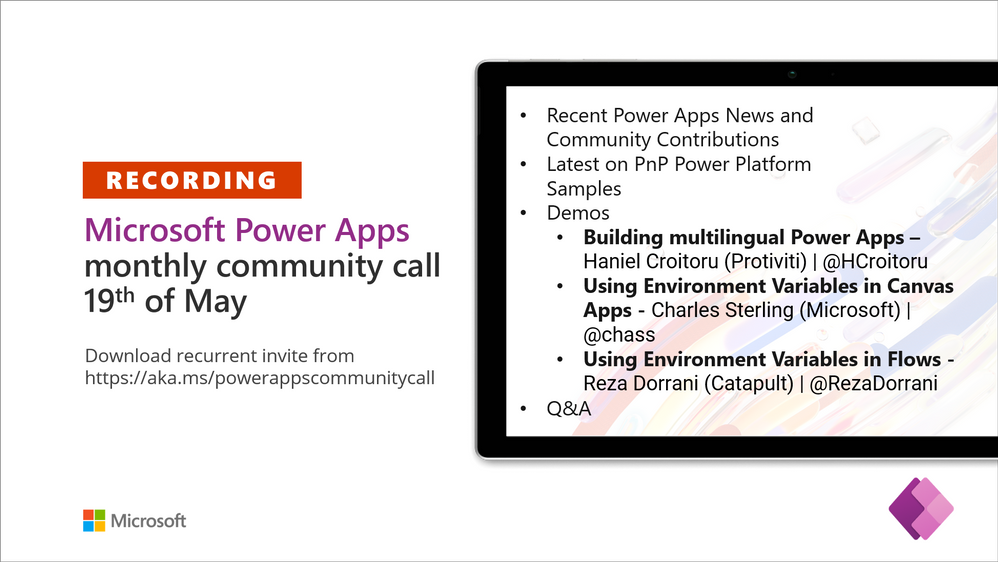
Call Summary:
Topics covered in this month’s community call include – Building multilingual Power Apps, Using Environment Variables in Canvas Apps, Using Environment Variables in Flows, Recent Power Apps News and Community Contributions and Latest on PnP Power Platform Samples Contributions. Demo Extravaganza 2021. Entries accepted now, Finalist voting starts – June 1st, Finalist voting ends – June 30th, Finals / Winner(s) to be Announced – July 21, 2021 at 08:00 PT. This session included Q&A in chat. The call was hosted by Todd Baginski (Canviz). Demo presenters included Haniel Croitoru (Protiviti), Charles Sterling (Microsoft), and Reza Dorrani (Catapult). This call was recorded on May 19, 2021. Thank for attending the call or viewing it on demand.
Demos:
Building multilingual Power Apps – a high-level architecture for multilingual forms supported by one or more SharePoint lists (containing language terminology) in back-end. Multiple apps/forms can pull from same lists. Leverages native SharePoint functionality – lookups to pull data. Picks up chosen language from computer Office 365 settings, so renders on all device platforms. Uses basic SharePoint and Office 365 connectors in Power apps. Easy to update, ensures consistency across apps.
Using Environment Variables in Canvas Apps and in Power Automate Flows – create Environment Variables (to connect to SharePoint sites/data) and add them to Power Apps Solutions. Within your Canvas Apps, Flows, and Bots, select to incorporate your Environment Variables. Environment variables simplify moves from Dev to Test to Prod environments by handling environment configuration updates to Flows, Bots, and Apps. See how Environment Variables are created, added to an App and a Flow.
Recent News & Cool Stuff:
Actions:
Call Agenda:
Referenced in this session:
Learn more:
Stay connected:

Recent Comments