by Contributed | Aug 11, 2021 | Technology
This article is contributed. See the original author and article here.
Having a background in education, I do a lot of work with education customers who are looking to improve on their information protection capabilities. Building a business case for sensitivity labelling and related features can be difficult without first understanding the existing information protection issues and the risks that labelling can help to address. Towards this, I’ve put together a series of points backed up with education-specific examples to demonstrate why information protection should be high on our list of priorities. I hope this might be useful in helping organisations understand the need for these capabilities and allow them to better articulate this back to business stakeholders.
If you haven’t come across Sensitivity Labelling before, it’s just what its name implies. Its most basic form allows us to apply a label to sensitive information to mark it as such (this is probably more traditionally referred to as classification, but we’ll avoid using this terminology). Once we have our sensitive information labelled, there are various things that we can do with it. Below, we’ll explore some of these possibilities and the risks that the configuration can help to mitigate.
Decisions, decisions…
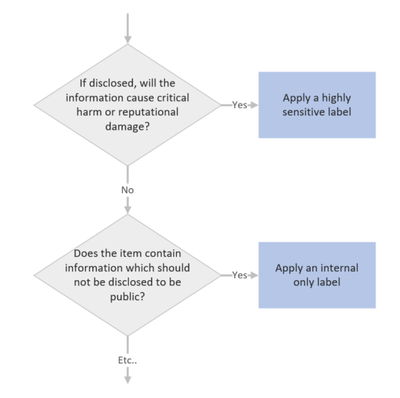
There’s a lot to be said for the simple and utterly non-technical process of applying sensitivity labels to information. When we’re required to apply a label, there’s a mental process that we put ourselves through to determine which label might be appropriate. It’s easy to draw this process up into a decision tree with decreasing levels of sensitivity:
When we implement sensitivity labelling, we’re asking users to consider the risk of information. We’re educating them to consider which information may or may not be appropriate for certain audiences. This process, which over time becomes second nature, will do a lot to help organisations secure their data as it instils users with a practice of continual information risk assessment. This is useful, not only in a work context, but also in staff personal lives as people who often think about information security will be more likely to stop and think before falling for a phishing campaign or oversharing risky details on social media.
I find these differences in staff mentality evident as I move between customer environments delivering security workshops. Customers with staff who continually apply classifications to information, such as those in the government sector, will typically have a much higher awareness of information risk. Non-government customers may have similar privacy requirements documented in their policies which, if they’re lucky, staff might read during onboarding but are unlikely to think about during their day-to-day work activities. By implementing labelling we’re bringing these policies to the forefront and requiring staff to continually assess information risk which will help to build a more risk-aware organisational culture.
Business Case Point 1: Implementing sensitivity labelling will help to instil a culture of information protection.
Back it up with automation
So, when we implement labelling, we can expect that we may have some disruption on day 1 as we’re asking staff to stop and think before selecting a label. This will fairly quickly become second nature for most users, however, we’re all human and we have to expect that occasionally someone might select the wrong label. We also have to allow for unengaged users and new staff that haven’t been provided with training. To help ensure accurate labelling we have auto-labelling capabilities that can be enabled to assist with label selection. With auto-labelling policies, we can check for what are referred to as ‘Sensitive Information Types’, which are pieces of information that can help us to make a decision on the sensitivity of an item. If we see an item that contains student Personally Identifiable Information (PII), then we can either automatically set the item to ‘Confidential’ or help to educate the user by suggesting that they choose the ‘Confidential’ label. Sensitive information types are quite powerful and we can create some really granular rules checking, for example, the proximity between a code and a keyword that is required for an item to be considered a match. This can help us to weed out false positives and ensure label accuracy.
Within Education, we’d typically be configuring student numbers, staff employee ID’s, student email addresses, records numbers and anything that might relate to medical information as sensitive information types. In addition to this, a standard deployment would look for bank details, credit card numbers, medical details, tax file numbers, social security numbers, etc. If we detect any of these information types in a file or email, then we would either automatically set a label or recommend an appropriate label to the user.

Auto-labelling is a great way of helping to educate staff on correct label usage, ensuring label accuracy and dealing with what I like to refer to as the ‘lazy staff factor’. The example that I typically give, bearing in mind that I have no data to back this up, is that via manual labelling we may achieve 70% label accuracy. When we supplement the approach up with targeted training and auto-labelling, we should be able to hit 90-100% label accuracy, which is great because we can then start capitalizing on this via the following features.
Where is your sensitive information?
Such a simple question that will, and should, terrify a lot of people. I think that this is also something that is commonly overlooked as an advantage to labelling implementation. I’m sure most of us have worked in environments with data sprawled across a range of mapped drives, network shares, portable USB drives, personal email accounts and various cloud services.
With data spread around like this, how can we be sure that we aren’t leaking information? Identifying the items that contain sensitive information across these locations is probably unrealistic due to the amount of effort required, is the best way to turn this around because once implemented we can ensure that all new information is labelled, we can monitor, warn or block the flow of sensitive information inside and outside of our organisation, helping to keep information in the intended location. We can even browse each of our services by a label to, for example, see where all ‘Restricted’ files are stored across SharePoint and Teams (Note also that there are ways to apply labels to legacy data locations, but we’ll save that one for another day).

Business Case Point 2: Sensitivity Labelling will allow us to find all of our sensitive information.
Sensitivity Indicator
This is one of the most straightforward configurations available to labelling and yet so important. Once a label has been applied to an item, anyone viewing that item will instantly get a visual indication of its sensitivity. A watermark, header or footer can give readers a clear statement that an item is sensitive without them needing to read it in full. This could be as simple as a watermark or a big red ‘Confidential’ across the top of a page or email.

We need to be extremely careful when dealing with student information, but particularly with information of a personal nature such as student medical information. There may be situations where we need to pass these types of information on to a third party, for example, when we need to advise an external event organizer of a student’s medical condition. Marking these types of correspondence as ‘Confidential’ may remind the staff member to double-check the recipient’s address before sending the email and remind the recipient of their obligation to keep this information private.
Business Case Point 3: Sensitivity Labelling will provide information readers with a clear visual representation of the item’s sensitivity.
Monitor and Control the Flow of Sensitive Info
Let’s assume by this point that we’ve decided to implement labelling and are now applying a label to indicate the sensitivity of all new documents and emails. The next component that we might want to configure is Data Loss Prevention (DLP). With this tool, we’re able to implement policies to monitor the flow of sensitive information and apply rules to block or caution users when they try to send it to inappropriate audiences. Let’s think about the various situation where these capabilities might be useful:
- A staff account is compromised by an external attacker who then exfiltrates all student information from the student management system.
- An internal discussion regarding a student’s welfare and possible issues in their home environment is accidentally sent to the parent.
- An executive staff member’s account is compromised via target phishing and used to ask administrative staff for bank account login details. Funds are then transferred out of the bank account.
- An office staff member who is not aware of organisational policy saves parent credit card details to a file where they may be later accessed. The file is in a shared location and is accessed by other users.
Sadly, a lot of these situations are quite common in Education and organisations are unaware that they can be prevented with some very simple configuration. In each of the above situations, DLP policies could be put in place to:
- Warn users that the action may be against policy,
- Alert the user (which may be relevant for compromised accounts) and administrators that a policy violation has occurred, and
- Block the transmission, sharing or saving of sensitive information.

Business Case Point 4: Sensitivity Labelling will help to prevent sensitive information from being passed to unauthorized users.
The High Cost of Data Breach
Here in Australia, we have some fairly stringent laws which require us to advise a government body and those affected whenever we make a significant breach of privacy. These data breaches can come with fines, can be costly in terms of resources required to remediate them and can damage the reputation of our institutions. For private education organisations and universities, loss of reputation has the potential to impact enrollments. Universities are often in competition for research grants and a data breach may impact grant eligibility which could have a flow-on impact on the institution’s financial viability. Lastly, information breaches may come with a high legal cost as those that the information was about may choose to take legal action against the offending organisation. The data loss prevention methods that I mentioned in the previous section can do a lot to help protect organisations from significant data breaches.
Business Case Point 5: Sensitivity Labelling will help to protect reputation by reducing the likelihood of data breaches.
Containerisation
A relatively new capability that we can implement via labelling is the labelling of locations within our environment. The way this works is that we treat a Team or a SharePoint site as a ‘container’ and we assign a label to it which signifies the highest sensitivity of items that should exist within it. If an item with greater sensitivity than permitted for the container is moved there then we let the user know that the location is not safe and, if desired, kick off remediation activities.
The most obvious example of how this can be useful in education is to help prevent sensitive ‘Staff Only’ data from being saved to student accessible locations. This could be academic information, student medical info, quiz answers, etc. It doesn’t really matter what it is, if it’s considered sensitive then students probably shouldn’t be accessing it. Containerisation is one of the best ways that we can keep these types of information out of student reach (Note, however, that at the time of writing, there is still some lack of support for this within class
templated teams).

Business Case Point 6: Sensitivity Labelling will help to keep sensitive information out of student reach.
Safe External Collaboration
There’s one more important use for containerisation which relates to guest access. Guest access is a way that we can allow external users, such as those from other organisations (or just anyone with an email address depending on the configuration), into our environment so that we can collaborate with them. We might, for example, have volunteers, parents, school committee members or other members of the public, that we want to give access to an internal service (e.g., a web portal), involve in school-based discussion, or work on files with. Via the more traditional approaches to collaboration, we might create full accounts for them, which will have a licensing cost and will probably result in them gaining more access than they really require (to internal directories for example). Alternatively, we may email them copies of documents which still slow down our collaboration, not to mention result in us potentially sending sensitive information outside of our environment rather than keeping it inside where access can be controlled.
For universities or customers that have a separate Office 365 tenant per organisation, a common use of guest access is to enable project collaboration with another educational institution. When used in this way, users from both organisations can discuss and work on a single set of documents within a Team.
Guest access is a great way to make all of the collaboration capabilities that Microsoft 365 offers to internal users also available in interactions with external users, but if the correct governance practices are not applied then it can introduce some risks. For example, a guest could be accidentally added to a Team that includes students, enabling guest to student interaction. It may be hard for us to maintain the duty of care in such a situation as a staff member may not always be available to screen channel discussion, so we probably need to look at locking guests out of student accessible Teams. This is another capability that labelling enables as we can apply policies to restrict guests from accessing Teams with certain labels (No support for class templated teams with this yet but it’s possible to work around via ‘AllowToAddGuests’ in PowerShell. Additional blog post on the way.).
Business Case Point 7: Sensitivity Labelling will allow for guest collaboration to be enabled without compromising student safety.
Lock up the Guests
Regarding guest access to information stored in sensitive locations, there are two additional risks that we need to consider:
- A case of mistaken identity might mean that a guest is added to a team that contains sensitive information.
- Sensitive files could accidentally be saved to a location where guests have been given access.
As covered under the previous point, with sensitivity labelling we are able to lock guests out of certain teams which will also help to protect our sensitive information from cases of mistaken identity. Additionally though, because we’re likely to restrict guest access to our most sensitive labels and labelled locations, when a high sensitivity file is saved to a low sensitivity, guest accessible location, we’ll warn users and potentially kicking off remediation activities. So, we’re helping to keep guest users out of sensitive files and locations.
Business Case Point 8: Sensitivity Labelling will allow us to keep guest users out of sensitive files and locations.
Restrict Access to Files
The last category of capabilities that I want to mention is around access restriction. Most of the benefits and controls that I’ve mentioned to this point assume that your sensitive information is stored within your Office 365 environment. It’s much easier to have control of your information when it’s housed in a well-governed platform. But what about situations where:
- We have very sensitive information that we need to ensure won’t be accessed by unauthorized users, regardless of their location.
- We need to make sure that only the intended recipient of an email can access it.
- We need to set up highly secure communication with a partner organisation that we need to share sensitive information with.
This is where encryption comes into play. The most straightforward use of encryption in sensitivity labelling is to apply it to all items that have a particular label. When we do this, only users which we’ve specified in our label configuration are able to access it. The perfect example of this would be a ‘Staff-only’ label which is only accessible to the staff group.
If a document with this label applied was copied elsewhere or misplaced via a lost USB drive, then it wouldn’t matter as anyone attempting to open the file that isn’t on the list of approved users will not be given access. Encryption has typically come with some downsides, particularly with regard to collaboration as encrypting a file would prevent document co-editing, but there are some amazing new preview capabilities now available which eliminate these disadvantages and which will lead to this configuration being much more commonplace.

Within education, label-based encryption might be useful for blocking access to the most sensitive of information. Data relating to child protection matters, HR or ongoing police investigation may be good candidates for this. Universities may want to consider applying encryption to highly confidential research data, intellectual property or other information assets that, if breached could result in financial loss.
Business Case Point 9: Sensitivity Labelling will allow us to lock unauthorized users out of highly sensitive information regardless of their location.
Secure Correspondence with Partner Organisations
We may have a need to send sensitive information to an external recipient. Email is generally considered a fairly unsafe platform. There’s the risk that mail may be intercepted along the way or forwarded to an unintended recipient. Mail encryption protocols are also opportunistic and if you’re sending to an organisation that doesn’t have a handle on their mail security then there’s risk that your sensitive email may be transmitted in plain text making it a lot easier to intercept.
Via labelling, there are a few things that we can do to ensure that our sensitive correspondence can’t be intercepted or passed on to an undesired recipient. Via a service called Office Message Encryption (OME) we can implement a rule which would encrypt all emails with a particular label applied. If the email is destined for an organisation that is also running Office 365, then the encryption is seamless and the recipient will see the fully encrypted email as they would any other, with the addition of your sensitivity markings and other warning tooltips.
For universities and larger education providers, we can use this to enable the secure transfer of sensitive information with our partners, which could be other school districts, universities or government authorities.

Business Case Point 10: Sensitivity Labelling will enable the secure transfer of sensitive information with partner organisations.
Secure Messaging to Parents and Students
Building on the previous topic, what if the recipient is using another mail platform or an anonymous email account, then the experience isn’t quite as seamless. How OME works in these situations is that Exchange Online will send the recipient a message with a link to a portal. When the recipient accesses the portal, it will require them to either verify their identity or, if it’s their first visit, set up Multi-Factor Authentication so that their identity can be better verified next time around. The recipient can then read and interact with the message from within the web portal.

There are many uses for this style of secure communication within education. A ‘Recipient Only’ label which applies message encryption could be added to all sensitive school to parent correspondence. This would keep the correspondence secure regardless of the security of the parent’s email account or home computer. For universities, this can be a great way to enable secure communication with new or potential students who might not yet have access to a university email account.
Business Case Point 11: Sensitivity Labelling will provide a method for the sending of secure correspondence to parents or students.
Summary
There are a lot of benefits and a lot of different ways that sensitivity labelling can help secure the sensitive information of educational institutions. In this article, I’ve covered what I see as the key points and items that should be the focus of a business case. However, there are many other capabilities that will also be applicable; trainable classifiers, exact data match, purview, conditional access and endpoint DLP to name a few but we’ll need to save those for another time.
In conclusion, implementing sensitivity labelling will:
- Help to instil a culture of information protection.
- Allow us to find all of our sensitive information.
- Provide information readers with a clear visual representation of an item’s sensitivity.
- Help to prevent sensitive information from being passed to unauthorized users.
- Help to protect reputation by reducing the likelihood of data breaches.
- Help to keep sensitive information out of student reach.
- Allow for guest collaboration to be enabled without compromising student safety.
- Allow us to keep guest users out of sensitive files and data locations.
- Allow us to lock unauthorized users out of highly sensitive information regardless of its location.
- Enable the secure transfer of sensitive information with partner organisations.
- Provide a method for the sending of secure correspondence to parents or students.
If you’re interested in learning more about sensitivity labelling and other Microsoft Information Protection features, I recommend the following links:

by Contributed | Aug 10, 2021 | Technology
This article is contributed. See the original author and article here.
There is some good news for those of you wanting to shard your Postgres database in the cloud, so that as your data grows you have an easy way to scale out your Postgres database. I’m delighted to announce that Citus 10—the latest open source release of the Citus extension to Postgres—is now generally available in Hyperscale (Citus).
Hyperscale (Citus) is a built-in option in the Azure Database for PostgreSQL managed service, which has been around for a couple of years to help those of you who would rather focus on your application—and not on spending cycles managing your database.
Newly GA features in Hyperscale (Citus) on Azure
Back in May we announced the preview of quite a few major features in Hyperscale (Citus)—including Postgres 12 and 13 support, Citus 10 with columnar compression, and read replicas to name a few. You can find all of the details are in my previous “What’s new” blog post, but here’s a quick bulleted list:
Current & upcoming region availability for Citus 10
Citus 10 and all the features above are now generally available in Hyperscale (Citus) in the East US, Germany West Central, and Korea Central regions.
This means that when you provision a new Hyperscale (Citus) server group in one of those regions, you are going to get access to all these features (and more). In the coming weeks, we will gradually roll out these new GA features in all Azure regions where Hyperscale (Citus) is available.
And if you have an existing Hyperscale (Citus) cluster: once Citus 10 and the rest of these newly GA’d features are rolled out to your region, you can expect us to plan and then update your existing server groups to give you access to the new GA features, over the course of a couple of months. We will include this update as a part of a scheduled maintenance event for your server group. Updates during scheduled maintenance are performed using failover and require a short downtime, in most cases under 60 seconds. And if you can’t wait for regular maintenance and want access to Citus 10 and the rest of these GA features sooner, we can update your server groups on demand as soon as this update reaches your region. Just ask us via e-mail.
Basic tier gives you the ability to shard Postgres on a single node
If your Postgres database doesn’t need the power of multiple nodes yet, you can select Basic tier when you first provision your Hyperscale (Citus) instance. Basic tier is what we call the new “single-node Citus” feature and it allows you to shard your Postgres tables on a single node. With Basic tier, you can be “scale-out-ready” by using a distributed data model from the start—and you can easily graduate to Standard tier and add nodes later. Or you can use Basic tier as a handy way to try out Citus. You can find more details about Basic tier in the docs.
How to get started scaling out Postgres with Hyperscale (Citus)
To figure out if Hyperscale (Citus) in Azure Database for PostgreSQL is right for you and your app, here are some ways to roll up your sleeves and try it out.

Figure 1: Watch this short video demo of Hyperscale (Citus) that showcases some of the new Citus 10 features, including Basic tier (aka single-node Citus) and columnar compression. The demo also showcases the type of performance improvements you can get by scaling out Postgres.
by Contributed | Aug 9, 2021 | Technology
This article is contributed. See the original author and article here.
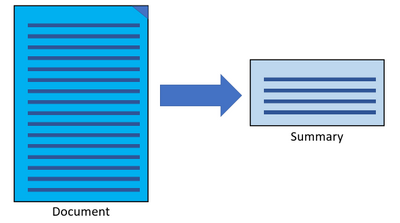
Text Analytics extractive summarization is in public preview!
The extractive summarization feature in Text Analytics uses natural language processing techniques to locate key sentences in an unstructured text document. These sentences collectively convey the main idea of the document. This feature is provided as an API for developers. They can use it to build intelligent solutions based on the relevant information extracted to support various use cases.
In the public preview, extractive summarization supports 10 languages. It is based on pretrained multilingual transformer models, part of our quest for holistic representations. It draws its strength from transfer learning across monolingual and harness the shared nature of languages to produce models of improved quality and efficiency. The 10 languages are English, Spanish, French, Italian, German, Chinese (Simplified), Japanese, Korean, Portuguese (Portugal), and Portuguese (Brazilian).
Learn more about Text Analytics extractive summarization
References:
Quickstart offers an easy way to get started with any of the Text Analytics offerings.
Text Analytics v3.1 GA Announcement
by Contributed | Aug 8, 2021 | Technology
This article is contributed. See the original author and article here.
CIS Benchmarks from the Center for Internet Security (CIS) provide organizations with configuration best practices for securing operating systems. Using these standards which have been defined by cybersecurity industry experts and research institutions, can help ensure that your organization’s devices are configured securely from day one using Azure Defender for IoT.
What are the CIS Benchmarks?
Without the right configuration, operating systems are highly vulnerable and include many opportunities for attackers to penetrate the organization. The CIS security Benchmarks program provides the best practices and industry-agreed standards to secure devices against cyber threats. The benchmarks include security recommendations for operating systems, network devices, cloud hosting services and more.
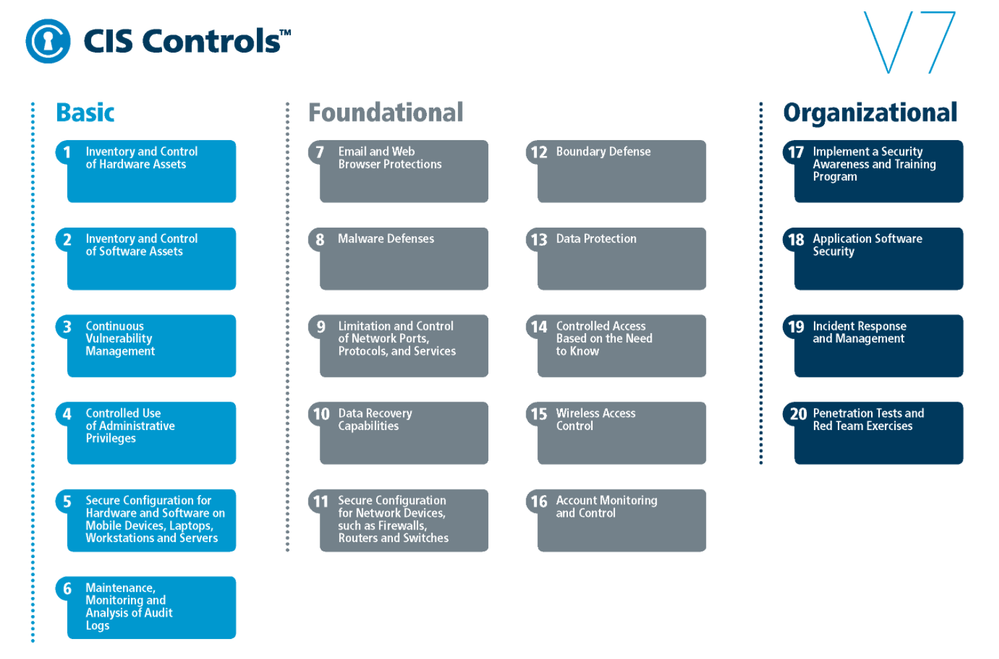
CIS Benchmarks can be used to implement CIS controls which are a prioritized set of safeguards to mitigate the most prevalent cyber-attacks against systems and networks.
Fig. 1 CIS Benchmarks controls
The top 5 most impactful controls from the OS CIS Benchmarks to implement are:
- Secure Configuration for Hardware and Software on Mobile Devices, Laptops, Workstations, and Servers – As delivered by manufacturers and resellers, the default configurations for operating systems are not security-oriented. Botnets brute force attacks for example, can be avoided if the defaults of the device are changed.
- Maintenance, Monitoring and Analysis of Audit Logs – Without solid audit logs, attackers can hide their activities on victim machines. Manage audit logs of events to help detect an attack.
- Limitation and Control of Network Ports, Protocols, and Services – Manage processes on your networked devices to prevent attackers from exploiting services that are installed by software packages automatically without alerting the user.
- Controlled Access Based on the Need to Know – In many attacks the victim is not aware that sensitive data is leaving their system as they were not monitoring data movement. Manage your data flow to minimize its exposure to attackers.
- Account Monitoring and Control – Inactive accounts can be exploited to impersonate legitimate users making the discovery of attacker behavior difficult. The lifecycle of all accounts should be monitored to minimize opportunities for attackers to leverage them.
How can Azure Defender for IoT help you comply with CIS Benchmarks?
Azure Defender for IoT is a comprehensive IoT/OT security solution for discovering IoT/OT devices, identifying vulnerabilities, and continuously monitoring for threats. It is available in both agentless and agent-based architectures, and is tightly integrated with Azure Sentinel, Microsoft’s cloud-native SIEM/SOAR platform. The solution also integrates with third-party SOC solutions such as Splunk, IBM QRadar, and ServiceNow.
In this blog we focus on the agent-based solution that device builders can include in their devices – a lightweight micro agent that allows them to build security directly into your new IoT devices and Azure IoT projects. The micro agent provides endpoint visibility into security posture management, threat detection, and integration into Microsoft’s other security tools for unified security management.
Because each Benchmark can include hundreds of configurations that touch different parts of the OS, such as network configurations, authentication, authorization, maintenance, and others. Reviewing all the checks and ensuring the company is compliant, is a complex and time-consuming task. Defender for IoT helps organizations to automate this process while constantly identifying any existing weak links in their OS security posture.
As soon as the agent is activated, the Azure Defender for IoT micro agent automatically runs all relevant benchmark checks on your devices. The results are then populated into IoT Hub interface under the Defender for IoT Security console as a recommendation.

Fig. 2 CIS Benchmarks recommendations as seen in the recommendation page under the IoT Hub
All vulnerable devices are then displayed including the number of failed checks on each device.

Fig. 3 Vulnerable devices and the results of checks
You can view a specific device and see all the reasons the checks failed and the exact mitigation steps needed to configure the devices correctly using Log analytics, a tool in the Azure portal used to edit and run log queries.

Fig. 4 CIS Benchmarks result and the appropriate mitgation steps for a single device
Currently, the feature is available for Debian and Ubuntu Linux distributions, we are working towards adding more checks for additional OSs in the future.
The CIS Benchmark can also be used to implement the NIST (National Institute of Standards and Technology) Framework for Improving Critical Infrastructure Cybersecurity. The NIST Framework is a U.S Department of Commerce initiative that defines industry standards and best practices in order to help organizations manage their cybersecurity risks.
For customers that need to comply with NIST Cybersecurity Framework (CSF), you can use the CIS controls v7.1 mapping to NIST CSF document that has all the necessary controls, between the two systems mapped out for you.
Thank you for reading and we hope this information proves helpful. To learn more about Azure Defender for IoT can benefit enterprises and device builders check out the following:
by Contributed | Aug 6, 2021 | Technology
This article is contributed. See the original author and article here.
If you’re migrating your data estate to Azure, as is normal considering Azure is an enterprise cloud that can be the home for all data, including Oracle, you may wonder what storage solutions there are to support these types of IO heavy workloads. Maybe you didn’t realize how important storage was to Oracle in the cloud. Most customers we word with are focused on what vCPU and memory are available in Azure, but for 95% of Oracle workloads, it’s IO that makes the decision on the infrastructure we choose and of that IO, its throughput, (MBPs) that is most often the deciding factor in the final VM sizes and storage type.
This post isn’t going to be about promoting one storage vendor or any solution over another, but hopefully help you understand that each customer engagement is different and that there is a solution for everyone, and you can build out what you need and meet every IO workload with Oracle, (or any other heavy IO workload) in Azure.
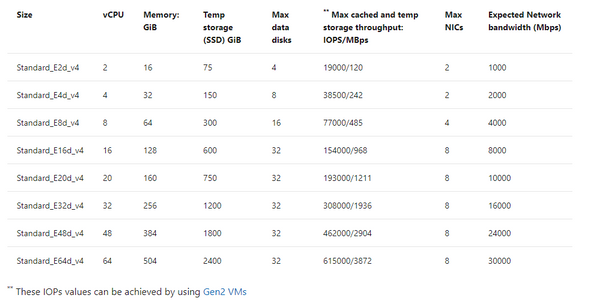
There are limits on storage, but more importantly, there are limits per each VM on storage and Network that must be considered. When choosing a VM, don’t just match the amount of vCPU and memory, but can the VM handle the throughput demands your workload will place on it. One of our favorite VMs types is the E-series ds v4. This sku series offers us the ability to have premium SSD for the OS disk, constrained vCPU versions if we need to have a larger “chassis” and memory with lesser vCPU for licensing constraints and higher throughput than we see with many others with similar configurations.
If you inspect the specifications by SKU size, you will see displayed the max cached IOPS/MBPs and Network bandwidth for the E ds v4 series:
Table 1, E-series, ds v4 VMs in Azure specifications
The above table will result in both premium disk and ultra disk being held to both storage and network limits displayed, or for solutions such as ANF, Silk, Excelero or Flashgrid, we’re held to only the network limits shown. As I stated earlier that throughput, MBPs is the biggest headache, not IOPs, (i.e., the number of requests) you can understand why the latter solutions come in handy with IO heavy workloads such as Oracle in Azure.
If you have sized out the Oracle workload for Azure properly, then you will know what you require in Azure IaaS to run it and can then choose the best VM, and storage needed. If you’re then puzzled by storage solutions, let’s take a deeper look and especially for Exadata, demonstrate what options there are.
Don’t Guess
I can’t stress enough, if you haven’t sized out the Oracle workload from an AWR that shows considerable database workload activity from the customer’s environment, you’re just guessing. Do NOT try to lift and shift the infrastructure, especially from an Exadata- you are AGAIN, wasting your time. An Exadata is an engineered system and there are infrastructure components that can’t be shifted over and more often is quite over-provisioned.
I also run into pushback on going through the sizing exercise. Many will want to simply take the existing hardware and lift and shift it to the cloud. This is one of the quickest ways to pay two or more times for Oracle licensing. I’m not going to argue with sales people who pushback with me on this, but chalk the deal or migration up as lost and go spend my time on a migration that’s going to be successful from the beginning.
Fight Me
So I know what the documentation says for storage IaaS VMs–

Table 2, Storage Options for IaaS VMs in Microsoft Docs.
Reality of what is best for Oracle on Azure may not agree with what is in this table and I’m going to tell you now, I don’t agree with the above table. Ultra disk may look appealing for Oracle, but we simply haven’t found the limitations vs. the cost for Oracle worthy, where for other uses, such as redo logs, it’s a fantastic win, (along with non-Oracle opportunities.) Ultra is still limited by the storage and network limit per VM, and this means that we can’t gain the throughput that we require for most heavy Oracle workloads with 2000+ MBPs.
Using example workloads, I can begin to direct and “evolve” our storage solution and the levels we use with real customer use cases:
Storage Name
|
Storage Type
|
Use
|
Standard HDD
|
Native
|
Not for use with Relational Databases
|
Standard SSD
|
Native
|
Less than acceptable for Oracle workloads or Oracle VM OS Disks
|
Premium SSD
|
Native
|
Standard Oracle Workloads and OS Disk, With Datafiles, always turn on ReadOnly host caching.
|
Ultra Disk
|
Native
|
Redo Logs, rarely for datafiles due to limitations.
|
Azure NetApp Files
|
Native with 1st Party Partnership
|
High IO Oracle Workloads, some Exadata
|
Silk
|
Third Party Partnership
|
High IO Oracle + Workloads, especially Exadata
|
Excelero NVMesh
|
Third Party Partnership
|
High IO Oracle + Workloads
|
Flashgrid Storage Fabric SW
|
Third Party Partnership
|
High IO Oracle + Workloads
|
NetApp Cloud Volume OnTap (CVO)
|
Third Party Partnership
|
High IO Oracle + Workloads, especially Exadata
|
Table 3, Storage options most common for Oracle in Azure
As you look at the table above, you realize that there are a few options at the lower IO workload levels and many at the higher ones. This is where knowledge of your workload and demands, along with unique features of each will come in handy when deciding.
Premium Disk
It is going to be very, very rare day that we place an Oracle workload on standard SSD. A P10 disk will be recommended practice for the OS Disk for each VM Oracle will be running on and then we need to start allocating storage for the datafiles, redo logs, etc.
We rarely, if ever come across Oracle databases that don’t need the IO horsepower for anything but Premium. With that, we get significant performance gain from ReadOnly host caching so the P40/P50, (minus that last 1Gb to leave it inside the limit for ReadOnly host caching of 4095 TiB) disks are our favorite and meet the needs of many Oracle workloads. For the smallest Oracle database workloads, we may use smaller premium SSD or stripe premium disk, as we can use multiple disks with a single ASM diskgroup. Always pay attention when choosing your VM size, there is a max number of data disks that can be attached, so this will also determine what storage you choose, (refer to table 1.)
ReadOnly host caching is only available on certain VM series/skus, as well as mid to high range premium SSD and limited to 4095 TiB. If you allocate a disk larger than that, the host caching will automatically be disabled. We hear a lot from Infra folks about “disk bursting”, either credit or On-demand versions with IO in Azure premium SSD storage. I haven’t had a customer workload that really could make use of it, but for smaller workloads, upwards of 30 minutes of bursting could be beneficial. For P40-P80, there is an unlimited bursting that can be an option at 1000 MBPs. Many customers batch loads in Oracle are just too intensive and too long to take advantage of credit-based bursting and On-demand or changing performance tier is too expensive or too inconsistent in performance for many. For relational database workloads, consistency in performance really is key. Most customers choose to stripe disks to get the max throughput from storage for most Oracle databases or choose higher tier storage, skipping bursting options all together.
Using the table below, you can see the size and the IO max for each premium storage, which tells you what you will be limited to for a single disk unless you stripe-
|
|
|
|
Premium Disk Size
|
Storage Amount
|
IOPs Max/Bursting
|
MBPs Max/Bursting
|
P10
|
128
|
500/3500
|
100/170
|
P20
|
256
|
1100/3500
|
125/170
|
P30
|
512
|
2300/3500
|
150/170
|
P40
|
1024
|
5000/30000
|
250/1000
|
P50
|
2048
|
7500/30000
|
250/1000
|
P60
|
8192
|
16000/30000
|
500/1000
|
P70
|
16384
|
18000/30000
|
750/1000
|
P80
|
32767
|
20000/30000
|
900/1000
|
When striping, again, you must be cognizant of the max number of disks you’re allowed per VM, remembering that the OS disk is counted as one.
Ultra Disk
We like Ultra disk, but it has numerous limitations when we start pricing out what it will take to run a database on it, realizing that it will be limited at the storage, not just the network limit per VM, that we have no volume snapshot mechanism or availability zone solution using it and the complicated pricing model, it ends up being a solution with limited use with Oracle. That use is redo logs when a database resides on premium disk and experiencing redo log latency.
More often a better option is to stripe premium disks to achieve upwards of 2000 MBPs, use Azure Backup volume snapshots to eliminate excess IO created by large RMAN backups and no need to spend more money on Ultra Disk.
Azure NetApp Files (ANF)
Many folks think this is a third-party solution, but it’s really a native solution in Azure in partnership with NetApp, and might need a rename to something like, “Azure Enterprise Files”. It’s a first tier storage for high IO workloads and is only limited by the network per VM. An ANF capacity pool is storage built at the region level, has HA built into the solution and can be allocated to multiple VMs, offering the ability to meet numerous workloads that other native solutions can’t. Along with robust cloning capabilities, shared volume snapshots across capacity pools even across regions, which can be used to bring up a second Oracle environment in a short order and avoid additional licensing that would be required if Oracle Data Guard was present.
ANF is also an excellent choice for datacenter migrations where a native storage solution is required or strict, Azure certified storage with high IO capabilities are needed.
Silk
As I work almost primarily on Exadata migrations, I spend a lot of time with Silk data pods. This is a third-party solution that uses a number of patented features to build out a Kubernetes data pod inside Azure, out of compute nodes, (D-series VMs) and management nodes, (L-series VMs) using the NVMe storage to accomplish fast IO. They have compression and dedupe that simplifies some of the additional “decoupling” I’d have to do with the loss of Hybrid Columnar Compression, (HCC) in Exadata. As the IO would grow considerably without HCC, I commonly use additional partitioning and Oracle Advanced Compression to try to make up for that loss.
Another feature that I love about Silk is it’s thin cloning. The ability to create a read/write clone and not have a storage cost is beneficial for E-Business Suite (EBS) and other Oracle applications that require consistent copies across multiple stage environments and the ability to save on storage while doing this, plus doing it quickly is fantastic. Anyone who’s used sparse clone on Exadata would love to have the thin clone in Silk, too.
The Rest
Excelero NVMesh I’ve only been working with for a short while and same with Flashgrid Storage Fabric. While both, like Silk, use VMs and the local storage to creation high IO solutions with the only per VM limitation at the Network layer, they don’t have some of the additional features such as compression/dedupe, thin cloning and volume snapshots. I’ve also been introduced to NetApp Cloud Volume OnTap,(CVO) which marries the best of onprem OnTap storage with Azure in a third-party solution that is closer in features to Silk and can benefit Exadata workloads that rely on HCC, thin cloning and snapshot backups.
The How
When deciding what solution to go through, it’s important to identify the following:
- The vCPU and memory requirements
- The IO, both IOPs and MBPs, especially the latter limit for the VM
- Using the size of the database, along with IOPS/MBPs, then choose the type of storage, (premium or high IO)
- The business’ SLA around Recovery Point Objective (RPO) and Recovery Time Objectcive (RTO) will tell you then which solution will be best that meets the IO needs.
- A secondary service can be added to create additional functionality, (as an example, we add Commvault to ANF to add additional cloning features at a low cost).
So let’s take a few example and look at what kind of combinations you might choose:
Example Oracle Workload #1
- 16 vCPU
- 128G of RAM
- IOPS 22K
- MBPs 212M
- DB Size: 5TB
- Backup Size: 23TB
- RPO/RTO of 15 min/8 hrs
I know this may seem limited on all that you might need to size it out, but we are assuming a sizing assessment has been done from an AWR and from this we can come up with the following recommendations:
Recommended VM: E16ds v4
Storage Option A
- 1 Premium P10- OS Disk
- 6 Premium P40 Disks- Datafiles and Redo Logs
- 24 TiB of Azure Blob Storage- Backups
- Backup strategy: RMAN
Storage Option B
- 1 Premium P10- OS Disk
- 5 Premium P40 Disks- Datafiles
- 40G Ultra Disk- Redo Logs
- 24 TiB of Azure Premium Blob Storage- Backups
- Backup Strategy: Azure Backup for Oracle
Example Oracle Workload #2
- 32 vCPU
- 480G RAM
- IOPs 100K
- MBPS 2800M
- DB Size 8TB
- Backup Size 28TB
- RPO/RTO of 15 min/2 hrs
Due to the limited RTO, I would use Oracle Data Guard to support the 2 hr RTO, as an RMAN recovery from storage wouldn’t meet the requirements for the DR on it’s own.
Recommended VM: E64-32ds v4 constrained vCPU VM
- 1 Premium P10- OS Disk
- Storage Option A: ANF with capacity pool and snapshot taken every 10 minutes to secondary capacity pool in separate region.
- Storage Option B: Excelero with Oracle Data Guard secondary in second Availability Zone, using Fast-start Failover and Observer/DG Broker and RMAN backups to Premium file storage.
Example Oracle Workload #3
- 16 vCPU
- 85G of Ram
- IOPs 300K
- MBPs 4500M
- DB Size 12T
- Backup Size: Using ZDLRS from Oracle
- RPO/RTO of 5 min/1 hr
- Using Exadata features HCC, smart scans, storage indexes, flash cache and flash logging
Recommended VM: E16ds v4, (extra memory will come in handy with the SGA and PGA grows post migration)
- 1 Premium P10- OS Disk
- Storage Option A: Silk with Data Guard, thin cloning, and volume snapshot and their compression/dedupe. Lessen post migration optimization that will need to be done.
- Storage Option B: ANF with Data Guard, volume snapshot for backups to eliminate some of the overhead of IO from RMAN, add Oracle advanced compression and partitioning, along with build out a partitioning strategy to assist with increased IO with loss of HCC.
With the examples above, I stuck to the E-series, ds v4 type VMs, as again, these are some of our favorite skus to work with Oracle on Azure in IaaS. Realize that we do have options for each type of workload, but that depending on the IO, there are different solutions that will meet the customer’s requirements and it’s important to have the right data.

Recent Comments