by Contributed | Nov 10, 2021 | Technology
This article is contributed. See the original author and article here.
We announce here that Microsoft’s Automated Machine Learning, with nearly default settings, achieves a score in the 99th percentile of private leaderboard entries for the high-profile M5 forecasting competition. Customers use Automated Machine Learning (AutoML) for ML applications in regression, classification, and time series forecasting. For example, The Kantar Group leverages AutoML for churn analysis, allowing clients to boost customer loyalty and increase their revenue.
Our M5 result demonstrates the power and effectiveness of our Many Models Solution which combines classical time-series algorithms and modern machine learning methods. Many Models is used in production pipelines by customers such as AGL, Adamed, and Oriflame for demand forecasting applications. We also use our open-source Responsible AI tools to understand how the model leverages information in the training data. All computations take place on our scalable, cloud-based Azure Machine Learning platform.
The M5 Competition
The M5 Competition, the fifth iteration of the Makridakis time-series forecasting competition, provides a useful benchmark for retail forecasting methods. The data contains historical daily sales information for about 3,000 products from 10 different Wal-Mart retail store locations. As is often the case in retail scenarios, the data has hierarchical structure along product catalog and geographic dimensions. Data features like sales price, SNAP (food stamp) eligibility, and calendar events are provided by the organizers in addition to historical sales. The accuracy track of the competition evaluates 28-day-ahead forecasts for 30,490 store-product combinations. With submissions from over 5,000 teams and 24 baseline models, the competition provides a rich set of comparisons between different modeling strategies.
Modeling Strategy
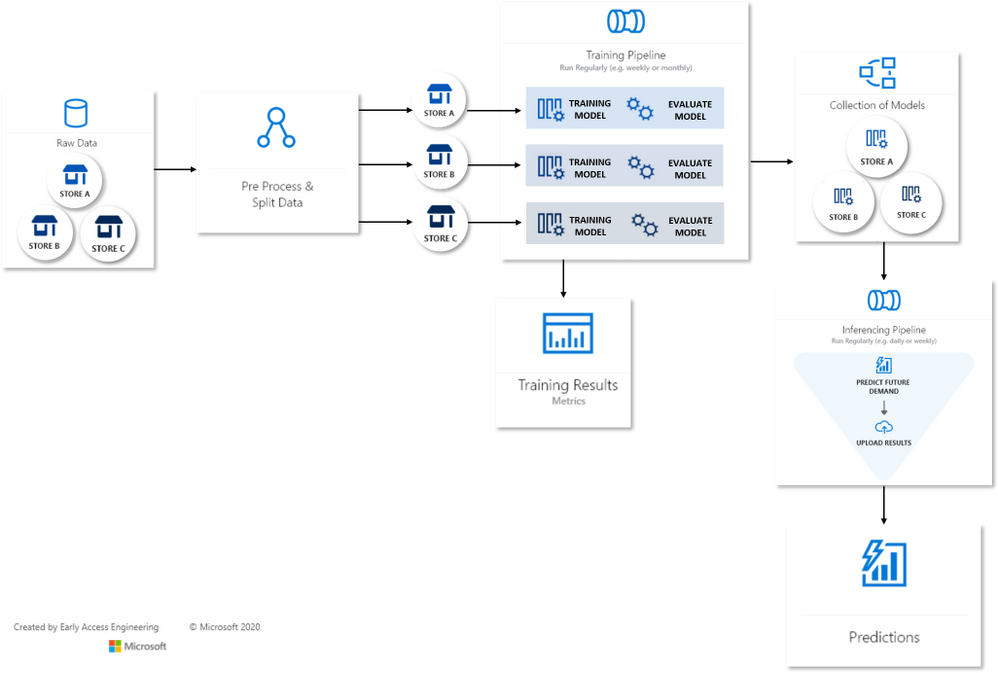
There are myriad approaches to modeling the M5 data, especially given its hierarchical structure. Since our goal is to demonstrate an automated solution, we executed what we considered the most simple strategy: build a model for each individual store-product combination. The result is a composite model with 30,490 constituent time-series models. Our Many Models Solution, born out of deep engagement with customers, is precisely suited to this task.
Many Models Flow Map
The Many Models accelerator runs independent Automated Machine Learning (AutoML) jobs on each store-product time-series, creating a model dictionary over the entire dataset. In turn, each AutoML job generates engineered features and sweeps over model classes and hyperparameters using a novel collaborative filtering algorithm. AutoML then selects the best model for each time-series via temporal cross-validation. Training and scoring are data-parallel operations for Many Models and easily scalable on Azure-managed compute resources.
Understanding the Final Model
The final composite model is a mix of three model types: classical time-series models, machine learning (ML) regression models, and ensembles which can contain multiple models from either or both of the first two types. AutoML creates the ensembles from weighted combinations of top performing time-series and ML models found during sweeping. Naturally, the ensemble models are often the best models for a given store-product combo.

The chart above shows that two-thirds of the selected models are ensembles, with classical time-series and ML models making up approximately equal portions of the remainder.
We get a more detailed view of the composite model by breaking into model sub-types. AutoML sweeps over three ML regression subtypes: regularized linear models, tree-based models, and Facebook’s Prophet model. Classical algorithms include Holt-Winters Exponential Smoothing, ARIMAX (ARIMA with regressors), and a suite of “Naive”, or persistence, models. Ensembles are weighted combinations of these sub-types.

The proportions of subtypes in the full composite model are shown above, where ensemble weights are used to apportion subtypes from each ensemble. Tree-based models like Random Forest and XGBoost that are capable of learning complex, non-linear patterns are a plurality. However, relatively simple linear and Naive time-series models are also quite common!
Feature Importance
Most of AutoML’s models can make use of the data features beyond the historical sales, so we find yet more insight into the composite model by examining the impact, or importance, of these features relative to the model’s predictions. A common way to quantify feature importance is with game-theoretic Shapley value estimates. AutoML optionally calculates these for the best model selected from sweeping, so we make use of them here by aggregating values over all models in the composite.

In the feature importance chart, we distinguish between features present in the original dataset, such as price, and those engineered by AutoML to aid model accuracy. Evidently, engineered features associated with the calendar and a seasonal decomposition make the most impact on predictions. The seasonal decomposition is derived from weekly sales patterns detected by AutoML. Price is the most important of the original features which is expected in retail scenarios given the likely significant effects of price on demand.
The Value of AutoML and Many Models
Our automatically tuned composite model performs exceedingly well on the M5 data – better than 99% of the other competition entries. Many of these teams spent weeks tuning their models. Despite this excellent result, it is important to note that no single modeling approach will always be the best. In this case, we achieved great accuracy with an assumption that the product-store time-series could be modeled independently of one another. This implies that the dynamics driving changes across sales at different stores and products may vary widely. We’ve learned from several successful engagements with our enterprise customers that the Many Models approach achieves good accuracy and scales well across other forecasting scenarios as well.
Special thanks to Sabina Cartacio for contributing text and editorial guidance.
by Contributed | Nov 8, 2021 | Technology
This article is contributed. See the original author and article here.
TLDR; Using minimal API, you can create a Web API in just 4 lines of code by leveraging new features like top-level statements and more.
Why Minimal API
There are many reasons for wanting to create an API in a few lines of code:
- Create a prototype. Sometimes you want a quick result, a prototype, something to discuss with your colleagues. Having something up and running quickly enables you to quickly do changes to it until you get what you want.
- Progressive enhancement. You might not want all the “bells and whistles” to start with but you may need them over time. Minimal API makes it easy to gradually add what you need, when you need it.
How is it different from a normal Web API?
There are a few differences:
- Less files. Startup.cs isn’t there anymore, only Program.cs remains.
- Top level statements and implicit global usings. Because it’s using top level statements,
using and namespace are gone as well, so this code:
 using System;
   namespace Application
   {
        class Program
        {
            static void Main(string[] args)
            {
                Console.WriteLine("Hello World!");
            }
        }
   }
is now this code:
Console.WriteLine("Hello World!");
- Routes Your routes aren’t mapped to controller classes but rather setup with a
Map[VERB] function, like you see above with MapGet() which takes a route and a function to invoke when said route is hit.
Your first API
To get started with minimal API, you need to make sure that .NET 6 is installed and then you can scaffold an API via the command line, like so:
dotnet new web -o MyApi -f net6.0
Once you run that, you get a folder MyApi with your API in it.
What you get is the following code in Program.cs:
var builder = WebApplication.CreateBuilder(args);
var app = builder.Build();

if (app.Environment.IsDevelopment())
{
    app.UseDeveloperExceptionPage();
}

app.MapGet("/", () => "Hello World!");

app.Run();
To run it, type dotnet run. A little difference here with the port is that it assumes random ports in a range rather than 5000/5001 that you may be used to. You can however configure the ports as needed. Learn more on this docs page
Explaining the parts
Ok so you have a minimal API, what’s going on with the code?
Creating a builder
var builder = WebApplication.CreateBuilder(args);
On the first line you create a builder instance. builder has a Services property on it, so you can add capabilities on it like Swagger Cors, Entity Framework and more. Here’s an example where you set up Swagger capabilities (this needs install of the Swashbuckle NuGet to work though):
builder.Services.AddEndpointsApiExplorer();
builder.Services.AddSwaggerGen(c =>
    {
        c.SwaggerDoc("v1", new OpenApiInfo { Title = "Todo API", Description = "Keep track of your tasks", Version = "v1" });
    });
Creating the app instance
Here’s the next line:
var app = builder.Build();
Here we create an app instance. Via the app instance, we can do things like:
- Starting the app,
app.Run()
- Configuring routes,
app.MapGet()
- Configure middleware,
app.UseSwagger()
Defining the routes
With the following code, a route and route handler is configured:
app.MapGet("/", () => "Hello World!");
The method MapGet() sets up a new route and takes the route “/” and a route handler, a function as the second argument () => “Hello World!”.
Starting the app
To start the app, and have it serve requests, the last thing you do is call Run() on the app instance like so:
app.Run();
Add routes
To add an additional route, we can type like so:
public record Pizza(int Id, string Name);
app.MapGet("/pizza", () => new Pizza(1, "Margherita"));
Now you have code that looks like so:
var builder = WebApplication.CreateBuilder(args);
var app = builder.Build();

if (app.Environment.IsDevelopment())
{
    app.UseDeveloperExceptionPage();
}

app.MapGet("/pizza", () => new Pizza(1, "Margherita"));
app.MapGet("/", () => "Hello World!");

public record Pizza(int Id, string Name);

app.Run();
Where you to run this code, with dotnet run and navigate to /pizza you would get a JSON response:
{
  "pizza" : {
    "id" : 1,
    "name" : "Margherita"
  }
}
Example app
Let’s take all our learnings so far and put that into an app that supports GET and POST and lets also show easily you can use query parameters:
var builder = WebApplication.CreateBuilder(args);
var app = builder.Build();

if (app.Environment.IsDevelopment())
{
    app.UseDeveloperExceptionPage();
}

var pizzas = new List<Pizza>(){
   new Pizza(1, "Margherita"),
   new Pizza(2, "Al Tonno"),
   new Pizza(3, "Pineapple"),
   new Pizza(4, "Meat meat meat")
};

app.MapGet("/", () => "Hello World!");
app.MapGet("/pizzas/{id}", (int id) => pizzas.SingleOrDefault(pizzas => pizzas.Id == id));
app.MapGet("/pizzas", (int ? page, int ? pageSize) => {
    if(page.HasValue && pageSize.HasValue)
    {
        return pizzas.Skip((page.Value -1) * pageSize.Value).Take(pageSize.Value);
    } else {
        return pizzas;
    }
});
app.MapPost("/pizza", (Pizza pizza) => pizzas.Add(pizza));

app.Run();

public record Pizza(int Id, string Name);
Run this app with dotnet run
In your browser, try various things like:
Learn more
Check out these LEARN modules on learning to use minimal API
by Contributed | Nov 7, 2021 | Technology
This article is contributed. See the original author and article here.
Intelligent video applications built using existing cameras or newer smart cameras, and edge gateways are at the core of a massive wave of innovation benefiting our customers.
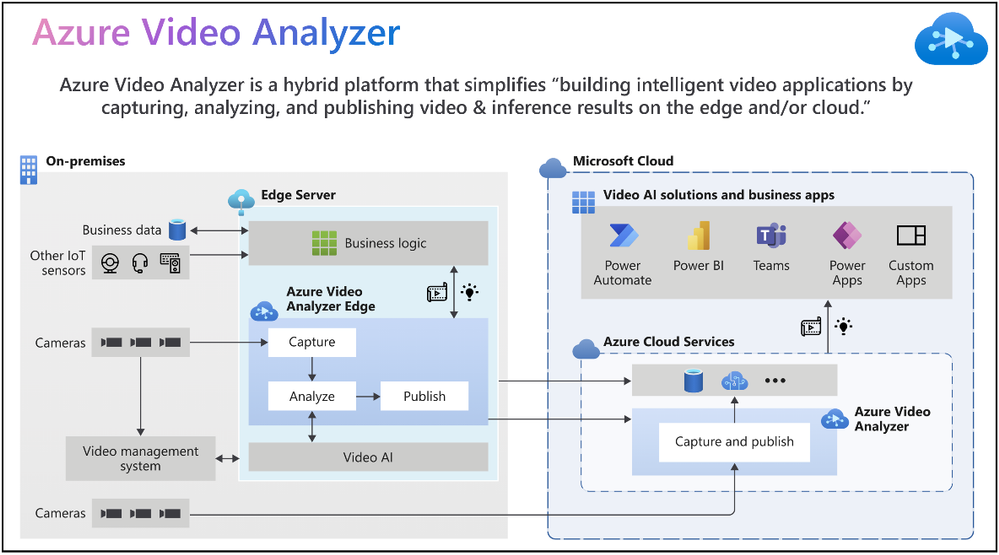
According to the IoT Signals report, the vast majority of companies with a video AI solution strategy see it as an integral part of their IoT solution. Yet, the reality is that building such a solution can be complicated. Azure Video Analyzer is an Azure Applied AI service that greatly reduces the effort needed to build intelligent video applications by capturing, analyzing, and publishing video & inference on the edge or the cloud.
“Vision and AI capabilities on edge devices are helping companies create companies create breakthrough applications,” said Moe Tanabian, Vice President, and General Manager of Azure Edge Devices, Platform & Services, Microsoft. With the latest updates to Azure Video Analyzer, we are making it easier than ever for our customers to build comprehensive AI-powered solutions with actionable insights from videos”
Figure 1: Azure Video Analyzer overview
New Azure Video Analyzer innovations available as of Microsoft Ignite 2021
Since its introduction earlier this year, Azure Video Analyzer capabilities have grown significantly to meet your needs. The Ignite 2021 (November) release provides you with the following new capabilities and enhancements:
- Cloud-native video management solutions
- Visualization of insights from intelligent video applications
- Windows devices optimized for Video AI
The following illustration provides an overview of both existing Azure Video Analyzer capabilities and the new capabilities made available for Ignite 2021.

Figure 2: Azure Video Analyzer capabilities
1. Cloud-native video management solutions
Video Surveillance as a Service (VSaaS) solutions have the convenience of ease of use coupled with the scalability and manageability of cloud computing, making them attractive to enterprises adopting cloud-native solutions. Such solutions offer the same benefits as other cloud services, such as managed infrastructure for IT teams, easy customization, and integration, and remote access from anywhere. Our customers can take advantage of the following features to achieve the desired outcome in these areas.
- Azure Video Analyzer enables you to build a VSaaS system to record, store, view, and export video clips from cameras. You can connect RTSP cameras directly to the cloud or via a lightweight gateway device for network isolation. There’s no need to be on-site to view footage and investigate issues; end users can simply log into a cloud-based dashboard via a web browser or mobile app and view the video stream in near real-time (~2 sec latency).

Figure 3: Camera to Azure Video Analyzer Cloud (with or without gateway)
- Azure Video Analyzer makes it effortless to create actionable events along with video clips that can be shared with relevant end users quickly & securely via the cloud. Customers are always in control of the video by defining access policies to meet regulatory requirements.
- Not every video needs to be processed in real-time at the edge or cloud. With the recent updates to the platform, customers can export a portion of the pre-recorded video stream. This enables scenarios related to long-term storage of relevant snippets, exported clips for AI model training, and video evidence management scenarios.

Figure 4: Azure Video Analyzer low latency video playback
“Safety, security and productivity are essential elements for the growth and sustainability of every society and business. Together Axis Communications and Azure Video Analyzer are empowering developers with the tools to rapidly build and deploy AI-powered solutions that improve operational agility, optimize business efficiency and enhance safety and security” Fredrik Nilsson, Vice President, Americas, Axis Communications
2. Visualization of insights from Intelligent video application
Visualization of AI inference data is necessary to make sense of data generated from Video AI systems. Customers need data visualization to detect anomalies or trends, and so on. With this objective in mind:
- You can use widget player npm (node package manager) to customize and readily embed into Power BI or other business intelligence systems or Power Apps or custom applications.
- It can be time-consuming to obtain coordinates required to build an intelligent video application (i.e., crossing line, zone). The video player widget also provides an easy tool to draw lines and zones.
- This release also marks a significant milestone in our innovations with Azure’s Computer Vision for spatial analysis. Customers can leverage new capabilities like tracking a person’s speed and ground orientation and display them with our widget player.
- During upcoming updates, we will enable customers
- To overlay lines/zones for easy visualization while viewing the video from the camera
- To define user attributes (i.e., vests, helmets, bags) and use them with the spatial analysis AI service.
These product investments in Azure Video Analyzer will enable you to visualize actionable insights quickly.

Figure 5: Azure Video Analyzer insights visualization
“We were impressed with the comprehensiveness of the Azure Video Analyzer to build out solutions quickly. The integrations between the Azure Video Analyzer and Scenera’s Platform as a Service will help our customers gain valuable business insights using the solution’s scene-based event analytics..” Andrew Wajs, CTO & Founder of Scenera
3. Windows devices optimized for Video analytics
Manageability of Windows devices and the necessity to run Linux-based containers are key drivers for our investments with “Edge For Linux On Windows” EFLOW. We now guide our developer ecosystem through the PowerShell experience of running EFLOW with Azure Video Analyzer to strengthen this commitment further.

Figure 6: Azure Video Analyzer + EFLOW powering inventory management solution
Finally, use the following resources to learn more about the overall product and services capabilities.
Please contact the Azure Video Analyzer product team at videoanalyzerhelp@microsoft.com for feedback and deeper engagement discussions.

by Contributed | Nov 6, 2021 | Technology
This article is contributed. See the original author and article here.
We recently announced the preview of Azure Private Link support for the Hyperscale (Citus) option in our Azure Database for PostgreSQL managed service.
Private Link enables you to create private endpoints for Hyperscale (Citus) nodes, which are exhibited as private IPs within your Virtual Network. Private Link essentially brings Hyperscale (Citus) inside your Virtual Network and allows you to have direct connectivity from your application to the managed database service.
With Private Link, communications between your Virtual Network and the Hyperscale (Citus) service travel over the Microsoft backbone network privately and securely, eliminating the need to expose the service to the public internet.
If you’re not familiar, Hyperscale (Citus) is an option in the Azure Database for PostgreSQL managed service that enables you to scale out your Postgres database horizontally. Hyperscale (Citus) leverages the Citus open source extension to Postgres, effectively transforming Postgres into a distributed database.
As with all the other Azure PaaS services that support Azure Private Link, the Private Link integration with Hyperscale (Citus) in our PostgreSQL managed service implements the same battle-tested Azure Private Link technology, provides the same consistent experiences, and has the following features:
- Private access from Virtual Network resources, peered networks, and on-premise networks.
- In-built data exfiltration protection for Azure resources.
- Predictable private IP addresses for PaaS resources.
- Consistent and unified experience across PaaS services.
To learn more about Private Link technology and PaaS services that support Private Link functionality, you can review the general Azure Private Link documentation.
 Figure 1: Architecture diagram depicting the secure and private connectivity to Hyperscale (Citus) in the Azure Database for PostgreSQL managed service—when using Private Link
In this “how to” blog post about the Private Link preview1 for Hyperscale (Citus), you can learn how to bring your Hyperscale (Citus) server groups inside your Virtual Network, by creating and managing private endpoints on your server groups. You will also get to know some of the details to be aware of when using Private Link with Hyperscale (Citus).
Let’s take a walk through these 4 scenarios for using Azure Private Link with Hyperscale (Citus):
Prerequisites
Before you can create a Hyperscale (Citus) server group with a private endpoint—or add a private endpoint for an existing Hyperscale (Citus) server group—you first need to setup a resource group and a virtual network with a subnet that has enough available private IPs:
- The resource group will hold your Hyperscale (Citus) server group.
- The virtual network is used to allocate private IPs for your private endpoints.
How to create a Hyperscale (Citus) server group with a Private Endpoint
As the database admin or owner, you can create a private endpoint on the coordinator node when you are provisioning a new Hyperscale (Citus) server group. For help on how to provision a Hyperscale (Citus) server group, take a look at this tutorial.
In the “Networking” tab (Figure 2 below), select by clicking the “Private access” radio button for the “Connectivity method”.
 Figure 2: Screen capture from the Azure portal showing the option to create a Hyperscale (Citus) server group with private access connectivity
A “Create private endpoint” screen will appear (Figure 3 below). If this screen doesn’t appear, or you close it accidentally, you can manually re-open it by clicking “+ Add private endpoint” in the “Networking” tab showing above.
 Figure 3: Screen capture from the Azure portal showing the “Create private endpoint” screen when “Private access” is selected as the connectivity method
Select appropriate resource group, location, name, and networking values for your private endpoint. If you are just experimenting with Citus on Azure, the default values should work for most cases.
Please pay special attention to the Networking configurations. The networking configurations specify the Virtual Network and Subnet for the private IP from which the new private endpoint will be allocated. For example, you need to make sure there are enough private IPs available in the selected subnet.
The rest of the steps are exactly the same as in the tutorial for creating a Hyperscale (Citus) server group.
How to add a Private Endpoint for an existing server group via the Networking blade
You can also create a private endpoint on a node in an existing Hyperscale (Citus) server group.
In fact, if you need to create a private endpoint on a worker node in a cluster, you must first create the database cluster and then subsequently add the private endpoint to the worker node.
There are two places you can do this, and the first place is through the “Networking” blade for the Hyperscale (Citus) server group.
1. Navigate to the “Networking” blade for the Hyperscale (Citus) server group (Figure 4 below), click “+ Add private endpoint”.
 Figure 4: Screen capture from the Azure portal showing the “+ Add Private Endpoint” button in the Networking blade for Hyperscale (Citus) in the Azure Database for PostgreSQL managed service
2. In the “Basics” tab (Figure 5 below), select the appropriate “Subscription”, “Resource group”, and “Region” information where you want your private endpoint to be created, and enter a meaningful “Name” for the private endpoint, e.g., you can use a naming convention like “ServerGroupName-NodeName-pe”. Select “Next: Resource >”.
 Figure 5: Screen capture from the Azure portal showing the “Basics” tab for the “Create a private endpoint” flow
3. In the “Resource” tab in the screenshot below (Figure 6 below), choose the target node of the Hyperscale (Citus) server group. Generally, “coordinator” is the desired node unless you have reasons to access to the Hyperscale (Citus) worker nodes. (If you need private endpoints for all the worker nodes, you will need to repeat this process for all target sub-resources). Select “Next: Configuration >”.
 Figure 6: Screen capture from the Azure portal showing the “Resource” tab for the “Create a private endpoint” flow
4. In the “Configuration” tab below (Figure 7 below), choose the “Virtual network” and “Subnet” from where the private IP for the private endpoint will be allocated.
It’s not required, but highly recommended to create all your private endpoints for the same Hyperscale (Citus) server group using the same Virtual Network / Subnet.
Select the “Yes” radio button next to “Integration with private DNS zone” to have private DNS integration.
 Figure 7: Screen capture from the Azure portal showing the “Configuration” tab for the “Create a private endpoint” flow
5. Finish the rest of the steps by adding any tags you want, reviewing the settings and selecting “Create” to create the private endpoint.
How to add a Private Endpoint for an existing server group via Private Endpoint resource creation
If you need to create private endpoints for more than one Hyperscale (Citus) server group—or for multiple Azure managed services, perhaps you also manage other databases besides Postgres—you can choose to create a private endpoint using the generic private endpoint creation process provided by the Azure Networking team.
You might also want to use generic private endpoint resource creation if you don’t have access to the Hyperscale (Citus) server group, e.g., you are network admin instead of database admin, or you need to create a private endpoint to a database in another subscription you don’t have access to.
1. From the home page of Azure portal, select the “Create a resource” button and search for “Private Endpoint”. Click “Create” button (Figure 8 below) to start creating a private endpoint.
 Figure 8: Screen capture from the Azure portal showing the “Create” page for “Create a resource” of Private Endpoint
2. All the rest of the steps should be the same as illustrated in the section above, except for the “Resource” tab step (Figure 9 below).
For the “Resource” tab step, you will need to select the “Connection method” based on your permission to the Hyperscale (Citus) server group on which you want to create a private endpoint. You can learn more in the “Access to a private link resource using approval workflow” docs.
- “Connect to an Azure resource in my directory”: if you own or have access to the Hyperscale (Citus) server group (e.g., you are the server group admin), you can choose “Connect to an Azure resource in my directory”. For the “Resource Type” field, please select “Microsoft.DBforPostgreSQL/serverGroupsv2” from the dropdown; for the “Resource” field, you can browse to find the server group on which you want to create a private endpoint.
- “Connect to an Azure resource by resource ID or alias”: if you don’t own or don’t have access to the Hyperscale (Citus) server group, you will need to choose “Connect to an Azure resource by resource ID or alias.” Please obtain the resource ID for the Hyperscale (Citus) server group from the Hyperscale (Citus) server group owner.
 Figure 9: Screen capture from the Azure portal showing the “Resource” tab for the “Create a private endpoint” flow when you are using Private Endpoint resource creation
How to manage a Private Endpoint Connection
As mentioned above, there are different connection and approval methods based on your permission on the Hyperscale (Citus) server group.
- Automatic approval: the private endpoint connection will be approved automatically if you own or have permission on the server group.
- Manual approval: the private endpoint connection request will go through the manual-approve workflow, if you don’t have the permission required and would like to connect to the server group.
As the Hyperscale (Citus) server group owner or admin, you can manage all the private endpoint connections created on your server group.
- Pending connections: if the “Connection state” for a private endpoint connection is “Pending”, you will be able to “Approve”, “Reject”, or “Remove” the connection.
- Approved connections: if the “Connection state” for a private endpoint connection is “Approved”, you will be able to “Reject” or “Remove” the connection.
Just like adding a Private Endpoint for an existing server group, there are two places you as the Hyperscale (Citus) server group admin can manage the private endpoint connections.
The 1st place is again using the Hyperscale (Citus) server group’s “Networking” blade (Figure 10 below).
 Figure 10: Screen capture from the Azure portal showing management options for a Private Endpoint Connection in the Networking blade for Hyperscale (Citus) in the Azure Database for PostgreSQL managed service
The 2nd place you can manage the private endpoint connections is the “Private Link Center”. Search “Private Link” services from the Azure portal, and you will be navigated to the “Private Link Center”.
1. The “Pending connections” blade (Figure 11 below) in the “Private Link Center” lists all the private endpoints that are in “Pending” state. You can filter based on “Subscription”, “Name”, and “Resource Type” to the private endpoints you want to manage.
 Figure 11: Screen capture from the Azure portal showing all “Pending connections” in the “Private Link Center”
2. The “Private endpoints” blade (Figure 12 below) in the “Private Link Center” lists all the private endpoints in all connection state. Again, you can filter based on “Subscription”, “Name”, and “Resource Type” to the private endpoints you want to manage.
 Figure 12: Screen capture from the Azure portal showing all “Private endpoints” in the “Private Link Center”
Private Link is now in preview for Hyperscale (Citus) in our PostgreSQL managed service
With the preview of the Azure Private Link for Hyperscale (Citus), you are now empowered to bring your Hyperscale (Citus) server groups—new or existing—into your private Virtual Network space. You can create and manage private endpoints for any of or all the Hyperscale (Citus) database nodes.
If you want to learn more about using Hyperscale (Citus) to shard Postgres on Azure, you can:
Your feedback and questions are welcome. You can always reach out to our team of Postgres experts at Ask Azure DB for PostgreSQL.
Footnotes
At the time of publication, Private Link is in preview in many Hyperscale (Citus) regions and will be rolling out to the rest of the Hyperscale (Citus) in the upcoming months.

Recent Comments