by Contributed | Jun 27, 2022 | Technology
This article is contributed. See the original author and article here.
Over the last few years, organizations have increasingly adopted cloud-native SaaS applications to meet changing agility and productivity needs. While the growth of SaaS apps has enabled cost savings and other gains for organizations, it has also raised a significant challenge for security teams. Ensuring a secure way to use essential productivity-enhancing tools has become a critical strategic priority for security teams. Today, we are thrilled to announce the public preview of SaaS Security Posture Management capabilities in Microsoft Defender for Cloud Apps that will enable you to view, identify, and remediate misconfigurations across your applications to improve your organizational security.
Lack of visibility, misconfigurations, and sophisticated attacks are some of the common threats that put your sensitive data and users of SaaS apps at risk. In today’s threat landscape, customers need a new approach to:
- Proactively strengthen the security posture of SaaS apps enabled in your enterprise.
- Detect any breach/attack on these applications and respond quickly.
- Prevent any sensitive data leakage even in the case of an attack.
Microsoft Defender for Cloud Apps is designed to help secure your SaaS applications and protect sensitive data in your organization against evolving threats. Empower your security teams with enhanced visibility and assessment tools to identify usage patterns, assess risk and business levels, and manage more than 31,000 SaaS applications to defend against threats.
For each application, you have visibility into its users, their IPs, and their traffic volumes to detect anomalous behavior. Further, you can view the security, compliance, and legal risk levels (e.g. SOC2, ISO27001, GPDR, encryption protocol, etc.) of every application in your organization. After approving specific apps, access deeper protections to ones containing sensitive information with tools to detect attack attempts, suspicious behaviors, and potential data leakages.
New integrated SaaS security posture management with Microsoft Secure Score
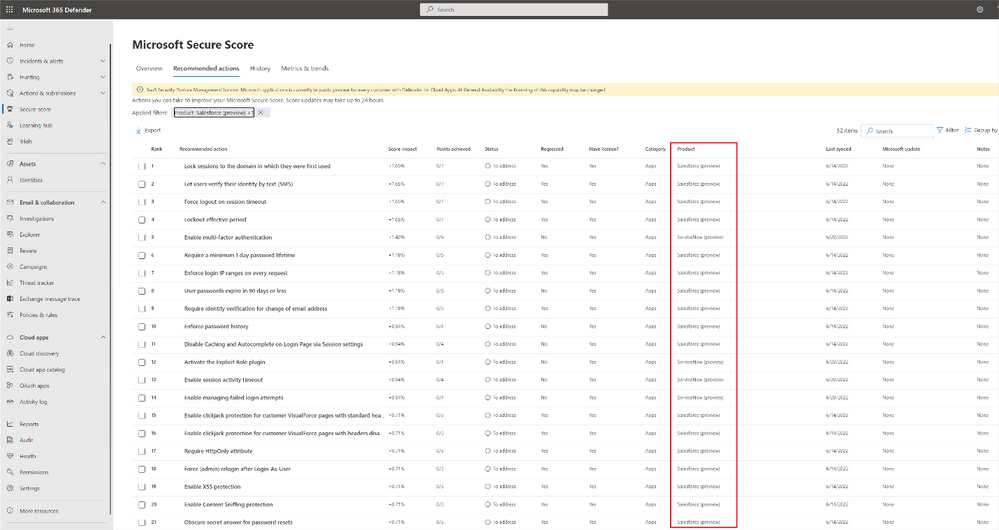
It’s not enough to only know which SaaS apps are being run in your environment – for security teams, understanding best practices and managing the configurations across your organization’s SaaS apps are of equal importance. Microsoft Defender for Cloud Apps not only helps you discover all the SaaS apps in your environment but with new security posture management (SSPM) capabilities, you can also get deeper visibility and automatically identify misconfigurations and gaps in each app. Today, you can access security posture insights across Office 365, Salesforce (preview), and ServiceNow (preview), with additional SaaS apps to be added in the coming months. This experience is integrated into the Microsoft 365 Defender dashboard to enable security teams to see their holistic security posture across the enterprise with Microsoft Secure Score.
Figure 1 Microsoft Defender for Cloud apps enables you to manage your security posture of apps such as Salesforce directly within Microsoft Secure Score.
Within the Microsoft Secure Score blade, your security teams can identify misconfigurations and get a step-by-step remediation guide for every risky security configuration in your environment for the related SaaS apps.
Start today
Defender for Cloud Apps helps you gain visibility of your cloud apps, discover shadow IT, protect sensitive information anywhere in the cloud, enable protection against cyber threats, assess compliance, and manage your security posture across cloud apps. In addition to Azure and Office 365 applications, Microsoft Defender for Cloud Apps enables you to protect your assets across the use of many applications including Atlassian, Box, Dropbox, Google Workspace, OneLogin, Okta, Cisco WebEx, Salesforce, Slack, ServiceNow, DocuSign, NetDocuments, GitHub, Zoom (preview), Workplace by Meta (preview), Egnyte (Preview), and more. With Defender for Cloud Apps’ extensive coverage, gain the right visibility tools to detect and prevent attacks and data leakages.
If you are already using Defender for Cloud Apps, you can start using the new SSPM security posture management capabilities by connecting Salesforce or connecting ServiceNow (if you already have an existing connector to Salesforce or ServiceNow, you can immediately use the new capabilities). Security assessments and recommendations will be shown automatically in Microsoft 365 Defender portal under security recommendations.
To learn more about Defender for Cloud Apps, read our documentation and start a trial here.
by Contributed | Jun 26, 2022 | Technology
This article is contributed. See the original author and article here.
Hi folks! My name is Felipe Binotto, Senior Azure Customer Engineer, based in Australia.
The purpose of this article is to demonstrate how you can have different Backup Tiers for your VMs and how you can automate the backup configuration leveraging Azure Tags and Azure Automation.
The prerequisites are:
- Automation Account
- Az.ResourceGraph module must be installed
- Az.RecoveryServices module > 5.4.0 must be installed
- Runtime version 5.1 (it should also work with 7.1 but it was not tested)
- Recovery Services Vault with system or user managed identity
- If you have many Recovery Services Vaults, you should create a user managed identity so it can be used across all of them, and you just have to set permissions to one identity
- This identity should be assigned Backup Operator and Virtual Machine Contributor roles
Now you are thinking, why do I need multiple Backup Tiers?
Imagine you have two workloads. Workload-1 is business critical, and it can only afford losing up to 4 hours of data and it should be fully recovered in no longer than 24 hours. Backups should be retained for a minimum of 90 days. Workload-2 is important but not that critical so it can afford losing up to 12 hours of data and it should also be fully recovered in no longer than 24 hours. Backups should be retained for a minimum of 30 days.
So, what do you do? You create two Backup Policies. One for each workload based on their requirements. Each workload has its own RPO/RTO and retention requirements.
Let’s say you have analysed all your workloads and established that most of them will fit in one of the following tiers.
Tier
|
RPO
|
RTO
|
Retention
|
TIER-1
|
4 hours
|
1 day
|
90 days
|
TIER-2
|
6 hours
|
1 day
|
60 days
|
TIER-3
|
12 hours
|
1 day
|
30 days
|
TIER-4
|
24 hours
|
2 days
|
15 days
|
Note: although we are specifying RTO in this example, the focus is RPO and Retention, because RTO will depend on other factors such as size of backup (the larger the backup the longer it will take to restore) and backup availability (LRS vs ZRS vs GRS).
Azure Backup for VMs
Virtual Machines in Azure can be backed up to Recovery Service Vaults. When you are preparing the VM for backup, you must select a Backup Policy which defines how often the VM should be backed up, what is the retention period and other settings.
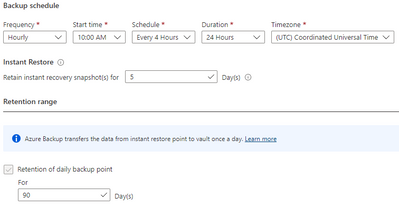
Until recently, you could only configure a Backup Policy to perform the backup once a day. However, now you can use the new Enhanced type of Backup Policy, currently in public preview, to set backups to be performed up to 6 times a day (every 4 hours).
The figure below provides an example on how an Enhanced Backup Policy would be configured to fulfill the requirements of TIER-1.
Backup Policies
OK, we have defined all the basics. Now let’s create all the required Backup Policies. You can download the script from my Github Repo. This script will iterate through all Recovery Services Vaults in all subscriptions and create three Enhanced and one Standard Backup Policies according to the requirement of each tier. Policies are named as per the Tier names.
The table below provides details about the policies created after the script is executed.
Policy Name
|
Frequency
|
Start Time
|
Schedule
|
Duration
|
Timezone
|
Daily retention
|
TIER-1
|
Hourly
|
6:00AM
|
4 hours
|
24 hours
|
UTC
|
90 days
|
TIER-2
|
Hourly
|
6:00AM
|
6 hours
|
24 hours
|
UTC
|
60 days
|
TIER-3
|
Hourly
|
6:00AM
|
12 hours
|
24 hours
|
UTC
|
30 days
|
TIER-4
|
Daily
|
6:00AM
|
N/A
|
N/A
|
UTC
|
15 days
|
You should see the new Backup Policies in each of your Recovery Services Vaults as per the figure below.

VM Tag
Next step is to tag the VMs to be backed up. There are a few points to be considered as follows:
- VMs without tags will not be backed up
- VMs which are already backed up and are not tagged will remain with their existing backup configuration
- VMs which are not backed up and are tagged will be backed up
- VMs which are backed up and are tagged will have a new Backup Policy assigned if using the incorrect policy.
We will tag the VMs with a tag named BackupTier.
The code below will retrieve the VM objects and tag them.
$vm = Get-AzVM -Name Workload-1 -ResourceGroupName VMs
New-AzTag -Tag @{BackupTier='TIER-1'} -ResourceId $vm.id
$vm = Get-AzVM -Name Workload-2 -ResourceGroupName VMs
New-AzTag -Tag @{BackupTier='TIER-3'} -ResourceId $vm.id
Once you tag the Workload-1 and Workload-2 VMs they will look like the figures below.

Azure Automation
Before we get to the last piece of the puzzle, let me clarify something that may be in your mind. You may be wondering why using Azure Automation and PowerShell instead of using the built-in Azure Policies for Azure Backup. A few reasons for that:
- The Azure Policies for Azure Backup cannot be applied at Management Group level
- Depending on the number of subscriptions and tiers you use in your solution, you could end up with hundreds or even thousands of Azure Policy Assignments
- The built-in policies must be customized to change an existing backup policy. By default, they just enable backup based on a tag
- A policy remediation is required to enable backup for existing VMs and to change the backup policy of VMs when tag values are changed.
OK, now that we have cleared that up, let’s get started with the Azure Automation account.
Now to the last piece of the puzzle. You need to create a new Runbook and copy the code from this script in my Github Repo.
You need to provide values for the following three variables:
- accountId – the object ID for the Automation Account managed identity
- vaultRGName – the resource group name for the Recovery Services Vault
- vaultName – the Recovery Services Vault name
The last step is to run the Runbook. Don’t forget about the prerequisites listed in the beginning of the article. It will not work without those in place.
After the runbook completes successfully, you should see the following in the Output tab.

Once you are satisfied the Runbook works as expected, create a schedule based on your requirements and link it to the Runbook.
A couple last comments about the runbook:
- If the backup of a VM is in a Soft-Delete state, it will fail, and the reason will be displayed in the Outputs tab
- If the VM is using Shared Disks, it will not try to back it up as it is an unsupported scenario
Feel free to fork the repo or do pull requests if you have new features or bug fixes to be incorporated into the code.
I hope this was informative to you and thanks for reading. Add your experiences or questions in the comments section.
Disclaimer
The sample scripts are not supported under any Microsoft standard support program or service. The sample scripts are provided AS IS without warranty of any kind. Microsoft further disclaims all implied warranties including, without limitation, any implied warranties of merchantability or of fitness for a particular purpose. The entire risk arising out of the use or performance of the sample scripts and documentation remains with you. In no event shall Microsoft, its authors, or anyone else involved in the creation, production, or delivery of the scripts be liable for any damages whatsoever (including, without limitation, damages for loss of business profits, business interruption, loss of business information, or other pecuniary loss) arising out of the use of or inability to use the sample scripts or documentation, even if Microsoft has been advised of the possibility of such damages.
by Contributed | Jun 24, 2022 | Technology
This article is contributed. See the original author and article here.
Just a reminder that Exchange Server 2013 reaches End of Support on April 11, 2023. That’s a little more than 9 months from now. After that date, Microsoft will no longer provide:
- Technical support for problems that may occur
- Bug fixes for issues that are discovered and that may impact the stability and usability of the server
- Security fixes for vulnerabilities that are discovered and that may make the server vulnerable to security breaches
- Time zone updates
Exchange Server 2013 will continue to run after this date, of course; however, due to the risks listed above, we strongly recommend that you migrate from Exchange Server 2013 as soon as possible. If you haven’t already begun your migration from Exchange Server 2013 to Exchange Online or Exchange Server 2019, now’s the time to start planning.
In order to stay supported you can:
If you are upgrading to Exchange Server 2019, learn about what you need in your environment.
If you’re migrating to Exchange Online, you might be eligible to use our Microsoft FastTrack service. FastTrack provides best practices, tools, and resources to make your migration to Exchange Online as seamless as possible. Best of all, you’ll have a support engineer walk you through from planning and design to migrating your last mailbox. For more information about FastTrack, see Microsoft FastTrack.
For more information on what this means and what your options are, see Exchange 2013 end of support roadmap.
–The Exchange Team
by Contributed | Jun 24, 2022 | Technology
This article is contributed. See the original author and article here.
Hello MTC-ers and welcome to the first Weekly Roundup of summer! Hope everyone is staying cool, at least in the Northern hemisphere anyways.
MTC Moments of the Week
This week we had an AMA with the Windows 365 team, featuring @Tristan Scott , @Scott Manchester , @Christiaan_Brinkhoff , and @Philip_Gerity and moderated by @Heather Poulsen One good question came from @Todd Godchaux around the game plan to make migrating GPOs to CSPs easier.
We also had a new blog post from @Martin Nothnagel about new capabilities for Servicing profiles that customers have been asking for. Make sure to check it out!
This week, we had a good question from @abo999 around Microsoft Project and how to display start/finish times in two different time zones, and @John-project came to the rescue with the right formula.
Unanswered Questions – Can you help them out?
@JuanRojas01 is having trouble getting users’ changed PC password to sync to Outlook. Has anyone run into this before?
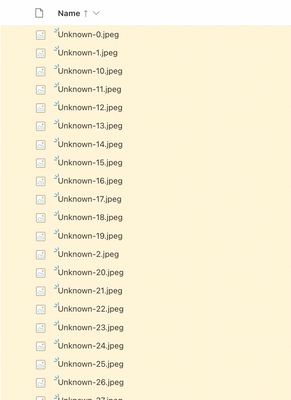
Meanwhile @Anthony-123 wants to know if there is a way to change SharePoint’s… ahem… inconvenient way of displaying numerical file names:
Next Week
June 22 – AMA: Microsoft Defender for Identity
by Contributed | Jun 23, 2022 | Technology
This article is contributed. See the original author and article here.
“The tyranny of the default” has been a phrase that has worried many a security professional over the years; the constant struggle to make sure their systems are configured for optimal security, which often requires them to examine each feature individually.
To help security teams keep on top of monitoring where these configurations are, we are happy to report that we are adding a new identity-based security assessment called “Unsecure domain configurations” to the growing list of Microsoft Defender for Identity posture assessments.
Why are we adding this assessment?
Configuring Active directory optimal security has always been top of mind for the Microsoft Defender for Identity team and its research them, recent attacks, such as KrbRelayUp, had repeatedly shown us how certain, often default, settings can be used against their intended purpose and result in an identity compromise.
What configurations are we evaluating first?
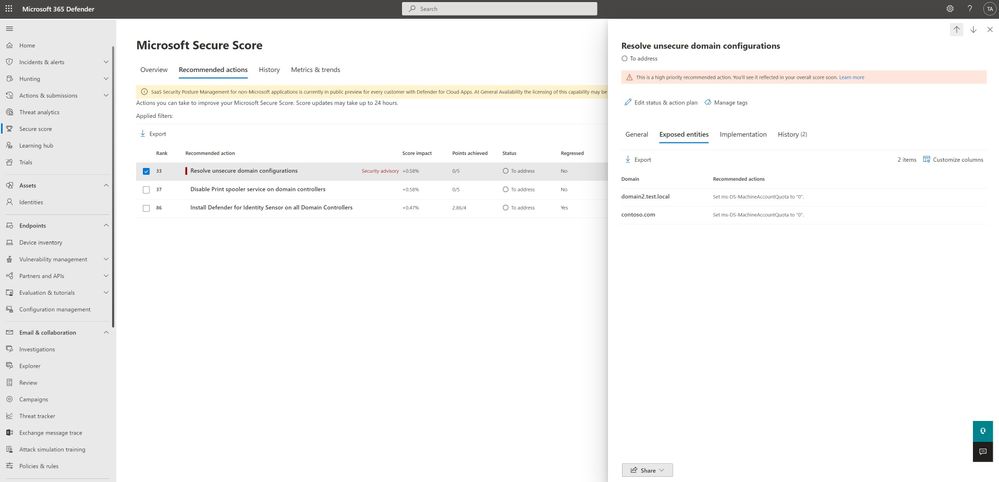
We will be evaluating two distinct configurations as part of this assessment
- Set ms-DS-MachineAccountQuota to “0” – Limiting the ability of non-privileged users to register devices in domain.
- You can learn more about this particular property and how it affects device registration here
- This evaluation will be available from launch, today.
- Enforce LDAP Signing policy to “Require signing” – Unsigned network traffic is susceptible to man-in-the-middle attacks
- This evaluation will be available in the next two weeks
This new assessment is part of our existing effort to secure your identity infrastructure alongside existing assessments such as the recommendation to disable the print spooler service on domain controllers
How do I use this security assessment?
- This new security assessment will be part of Microsoft Defender for identity list of improvement actions under Secure Score, you can click on the assessment and evaluate the list of affected domains and their configurations.
If you have the appropriate permissions to view the identity posture assessments, you can directly access this assessment on your tenant using this link.
- Take appropriate action on the affected domain, you can learn more here
We are working on adding more configurations to this Defender for Identity security posture assessments to help customers proactively secure their environments from exploitation, stay tuned!
For more information about Identity Security Posture assessments and Microsoft secure score, see
Or Tsemah, Senior Product Manager, Microsoft Defender for Identity.

Recent Comments