by Contributed | Sep 22, 2022 | Technology
This article is contributed. See the original author and article here.
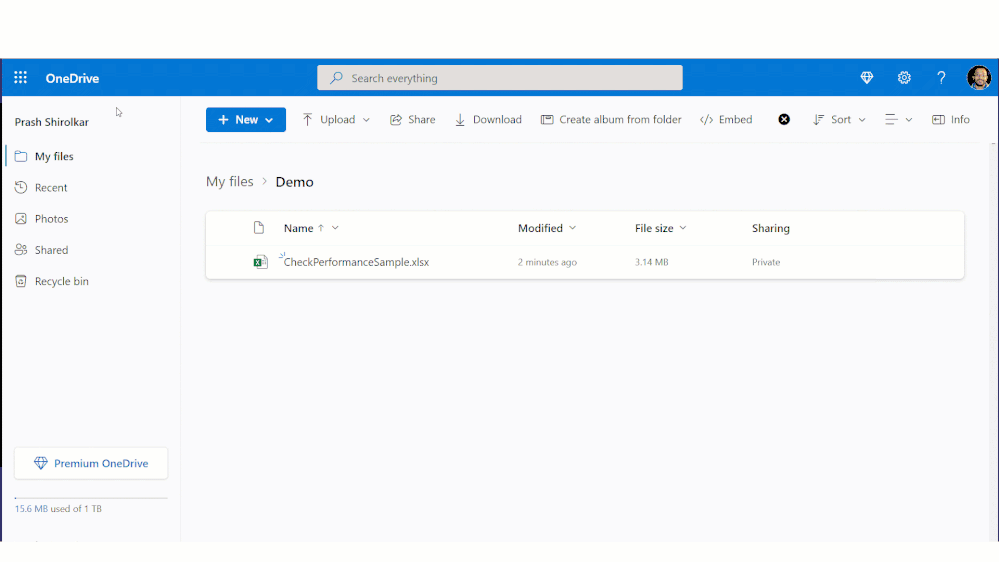
Hey Folks – Do you have slow workbooks due to size bloat? If so, then I am super excited to unveil Excel Performance team’s new capability to detect and remove unwanted size bloat and speed up such workbooks.
At Excel, customer focus is at the core of what we do; often this uncovers new or improved innovations in features and other times in fundamentals like Performance. In this case, we observed that over time, a workbook can collect cells that have no data but still contain hidden information of little or no use anymore. These cells may have had data and formatting to start with, however now they do not have any data, but still take up space because they contain formatting. Consequently, too many of these cells can cause your workbook to slow down or become unresponsive.
And so, we’ve enabled you to detect and remove these cells slowing down your workbooks, with “Check Performance” in Excel for the Web!
Try Check Performance with Excel for the Web and send us feedback
When you open your workbook, Excel now detects whether your workbook contains too many of these unwanted formatted cells. If it does, Excel shows a business bar to launch the “Check Performance” feature. You can manually launch the feature from Review > Check Performance, as well.
Once launched, there are two ways to remove these cells:
- By navigating to a sheet in the task pane to review each range of these cells to optimize, and then pressing the “Optimize Sheet” button, OR
- By pressing the “Optimize All” button to remove all unwanted cells from all sheets in the workbook.
This is illustrated in the demo below, wherein Check Performance reduces a 3.14 MB file down to 17.5 KB, by detecting and removing more than a million unwanted formatted cells. Check Performance: Detects and removes unwanted formatted cells
Now, you may ask, why doesn’t Excel remove these cells in the background without alerting me? This is because, even though the cell has no data, removing its formatting may result in visible changes. For example, removing yellow fill from a cell may reset its fill to “No Color”, as illustrated in the demo above. We do not want any Excel users to be surprised by visual changes by doing this in the background without alerting.
Check Performance is available for Excel M365 subscribers in the Web! Please keep in mind features are enabled gradually to more and more users over time as we build confidence in the success of it working correctly. And so, if you do not see the “Check Performance” button in the “Review” Menu Tab, then the feature may not be enabled for you, yet. That said, we are working hard to enable it for all as soon as we can. When you see it, please try it out! We’d love to hear from you whether this meets your expectations or not. Please send us feedback by clicking Help > Feedback!
Finally, our upcoming plans are to enable Check Performance in Excel Windows and Mac. Also, we are investigating other areas contributing to size bloat that we can integrate into Check Performance’s detection and removal capability. We’d love to hear from you, and so once again please send us feedback by clicking Help > Feedback! Learn more on Check Performance here.
Got other feedback? Want to learn more about upcoming Excel features?
Do you have an idea to make Excel better? If yes, we’d love to hear about it. Go to the Excel forum in Microsoft Feedback to submit your idea or vote for other ideas. You can also click the Feedback button in Excel and choose “I have a suggestion”.
Want to know more about Excel? See What’s new in Excel and subscribe to our Excel Blog to get the latest updates. Stay connected with us and other Excel fans around the world – join our Excel Community and follow us on Twitter. We look forward to hearing from you.
Thank You!

by Contributed | Sep 22, 2022 | Business, Microsoft 365, Technology
This article is contributed. See the original author and article here.
Today, we’re announcing the expansion of Microsoft Viva with new apps and services that help companies address the three business imperatives from our latest Work Trend Index Pulse Report, to empower and energize employees to do meaningful work in an uncertain economic environment.
The post Empower and energize employees with Microsoft Viva appeared first on Microsoft 365 Blog.
Brought to you by Dr. Ware, Microsoft Office 365 Silver Partner, Charleston SC.
by Contributed | Sep 21, 2022 | Technology
This article is contributed. See the original author and article here.
Some of the main goals for adopting DevOps culture in our organization are the reduction of failures in new deployments, be able to update our solutions frequently, improving deployments time, among others.
Implementing DevOps processes into your Team requires trust and responsibility, because as Uncle Ben said, “With great power comes great responsibility.” It’s very common to have elevated access to perform almost or sometimes all actions in an environment. With an Elevated Account or Service Principal, there are some important aspects that we need to consider in order to prevent a disaster.
In this case, I focus on Azure Data Factory (ADF) because it has a special treatment when integrating automatization deployments in Azure DevOps.
Here is the official documentation: Automate continuous integration using Azure Pipelines releases
As described, to deploy changes that were built into our ADF we have to use “ARM Template Deployment” task which is used to deploy all kind of ARM templates into our environment, but this task has an important and very powerful option, which is “Deployment mode”.
Deployment mode can be “Incremental”, “Complete” and “Validation only”. To see information about what these modes do, you can click the little “i” symbol. Incremental mode will deploy, and update resources described in the ARM template. Validation only will make sure there is access and that the template and parameters are well formed. The option most people don’t need, that is dangerous is “Complete mode”. Complete mode says to make an environment (Management Group, Subscription, or Resource Group) look EXACTLY like the provided ARM template. That means that any resource not defined will be deleted. In ADF deployments, if you have other resources in the same resource group that aren’t in the ADF ARM template, they will be deleted.
There are ways to help mitigate this in case that happened.
- Lock or add a policy in the Resource Group to avoid deletion
Lock your resources to protect your infrastructure
Tutorial: Create and manage policies to enforce compliance
- Integrate Infrastructure as Code
What is infrastructure as code (IaC)?
Other General considerations
- Fully define your environments and components in Infrastructure as Code so that you can quickly recreate environments either for testing or for Disaster Recovery
- Test things in multiple environments first
Repeatable Infrastructure
Security is a priority. In all aspects of a solution. Have a plan for (BC/DR) Business Continuity / Disaster Recovery from the beginning. That includes testing deployments in environments and having ways to recreate your environment. Make sure that you understand how ARM templates are deployed if using them for deployments. Thank you and please consider these recommendations.
by Contributed | Sep 20, 2022 | Technology
This article is contributed. See the original author and article here.
Microsoft is pleased to announce the release of the security baseline package for Windows 11, version 22H2!
Please download the content from the Microsoft Security Compliance Toolkit, test the recommended configurations, and customize / implement as appropriate.
This release includes numerous changes to further assist in the security of enterprise customers. Changes have been made for additional protections around hardware and driver security, credential theft, printers, DNS, and account lockout.
Kernel Mode Hardware Enforced Stack Protection
A new feature has been added to the setting located in SystemDevice GuardTurn On Virtualization Based Security called Kernel Mode Hardware Enforced Stack Protection. This new setting is applicable to Windows 11, version 22H2 and above, and provides additional security enhancement for kernel code.
Notes:
- This was first discussed in a blog post back in March of 2020 (Understanding Hardware-enforced Stack Protection – Microsoft Tech Community).
- There is a hardware dependency for this new feature that requires Intel Tiger Lake and beyond or AMD Zen3 and beyond.
- This setting has a dependency on HVCI (Virtualization Based Protection of Code Integrity). There shouldn’t be any issues as long as enterprises are following the baselines but, if the organization deviates from HVCI, then Kernel Mode Hardware Enforced Stack Protection cannot be enabled.
- In enforcement mode, the security baseline configures this setting to Enabled.
Important: If the hardware platform does not support it, then no enforcements are enabled.
- While compatibility concerns are unlikely, customers are encouraged to test compatibility to ensure an incompatible driver doesn’t lead to instability.
Additional documentation on this feature is pending. For preliminary documentation, see the Developer Guidance for Hardware-enforced Stack Protection – Microsoft Tech Community blog post.
Enhanced Phishing Protection
New in Windows 11, version 22H2, are a set of features to better protect enterprise users who still rely on a username and password for Windows authentication.
These new features, located in Windows ComponentsWindows Defender SmartScreenEnhanced Phishing Protection, ensure that enterprise credentials cannot be used for malicious or unintended purposes. Related user activity is logged in the Microsoft Defender for Endpoint portal.
- Because this is an end-user option, the security baseline enforces enablement of the service (the Service Enabled setting) to ensure that the enterprise credentials used in the system are appropriately monitored and audited.
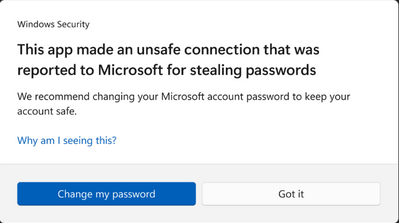
Based on Microsoft Defender SmartScreen’s robust security infrastructure, when a user enters their credentials into a known phishing or malicious site, the service alerts the user as illustrated below. In this scenario, the setting Notify Malicious is set to Enabled.
- Should an enterprise user re-use their corporate credentials in another application or website, a notification is displayed and logged, as illustrated below. In this scenario, the setting Notify Password Reuse is set to Enabled.

- Should the user decide to save their passwords in Notepad, WordPad, or other Office applications, this activity is logged with Microsoft Defender for Endpoint and the user is notified of the activity, as illustrated below. In this scenario, the setting Notify Unsafe App is set to Enabled.

Depending on your userbase, incoming support calls may question why the prompts are occurring. Microsoft advises that organizations inform security personnel and end users about the feature and how it helps keep credentials protected.
Printers
It is critical to continue to protect enterprise customers in print scenarios. With Windows 11, version 22H2, several new settings under Administrative TemplatesPrinters are enabled to further protect enterprises, including the following:
- Support for RedirectionGuard is added to the print service. RedirectionGuard is a security measure that prevents the use of non-administratively created redirection primitives from being followed within a given process. The setting Configure Redirection Guard is now Enabled as part of the baseline.
- Historically, Named Pipes were allowed with Print Spoolers. The use of TCP for the settings Configure RPC connection and Configure RPC listener is now enforced.
- Configure RPC over TCP port ensures that the incoming and outgoing connections default to a dynamic TCP port.
Note: This setting typically requires a boundary (firewall) change to allow for a successful connection.
- Manage processing of queue-specific files (also called CopyFilesPolicy) was first introduced as a registry key in response to CVE-2021-36958 in September of 2021. This setting allows standard color profile processing using the inbox mscms.dll executable and nothing else. The security baseline is to configure this setting to Enabled with the option of Limit queue-specific files to color profiles.
- Limit print driver installation to Administrators was introduced to the security baselines as part of the SecGuide.ADMX before an inbox policy was available. This policy is now contained within the OS, and the MS Security Guide setting is deprecated. However, since both settings write to the same location, the configured values still appear in both locations. The explanatory text in the MS Security Guide is updated to point users to the new location.
- Configure RPC packet level privacy setting for incoming connections has been added to SecGuide.ADMX as a result of CVE-2021-1678 and is set to Enabled as part of the baseline. The work of creating and deploying registry keys is now included in the security baseline until the setting becomes inbox to Windows.
DNS Hardening
The setting Configure DNS over HTTPS (DoH) name resolution, located under Administrative TemplatesNetworkDNS Client, was added as part of Windows 11 and Windows Server 2022. It is not yet part of the security baseline because it is too early to mandate encrypted DNS. Enterprises that wish to use encrypted DNS may take the following steps to implement it:
- Deploy their own Secure DNS over HTTPS (DoH) server infrastructure, whether self-managed or provided by a vendor.
- Configure Windows to use these DoH resolvers.
- When DoH servers cannot be reached, enterprises may require their endpoints to hard fail using encryption should the threat model requires this activity.
Note: This requirement breaks scenarios such as captive portals, so it is not a recommended general practice.
The security baseline will adopt this setting in a future release. See Secure DNS Client over HTTPS (DoH) for additional information on DoH.
Configure NetBIOS settings
The setting Configure NetBIOS settings, located under Administrative TemplatesNetworkDNS Client, is configured to Enabled with a sub value of Disable NetBIOS name resolution on public networks. If applicable for your enterprise, optionally adjust this setting to Disable NetBIOS name resolution. In a future release of the security baseline, all name resolution over NetBIOS will be disabled.
Credential Theft Protection
Windows allows the use of custom security support providers and authentication providers to extend the authentication capabilities available during the login flow beyond those supported natively by Windows. These providers are loaded into Local Security Authority Subsystem Service (LSASS). Although they can provide a legitimate function, custom security packages can also be abused by attackers to gain persistence or to access and steal credentials stored in Windows. A new setting has been added to protect against this scenario:
- The setting Allow Custom SSPs and APs to be loaded into LSASS, located under SystemLocal Security Authority, restricts the loading of custom security packages.
- We recommend that you disable loading custom packages unless the custom package you are using is known.
Additional Local Security Authority (LSA) protection provides defense by running LSA as a protected process. LSA protection was first introduced in the Windows 8.1 security baseline, as part of the original Pass-the-Hash mitigations.
- A new setting Configure LSASS to run as a protected process, located under SystemLocal Security Authority, is now included inbox with Windows 11, version 22H2.
- The new setting is not backported. Therefore, all previous operating systems should continue to use the MS Security Guide setting LSA Protection, contained in SecGuide.ADMX. The security baseline continues to enforce the value of Enabled with UEFI Lock but does add a new configuration option that allows for LSA protection without UEFI lock. This brings it into parity with other features that support UEFI lock, like Credential Guard and Hypervisor-Protected Code Integrity, and allows more flexibility.
The legacy Multiple Provider Router (MPR) provides notifications to registered credential managers or network providers when there is a logon event or a password change event. MPR was created so that providers that need a user’s password can collect and store credentials. This functionality is used by legitimate applications, but it can also be abused by attackers to harvest logon credentials.
- A new setting Enable MPR notifications for the system, located under Windows ComponentsWindows Logon Options is used to disable MPR notifications.
- We recommend that you configure this setting to block password disclosure to providers.
Attack Surface Reduction
A new rule Block abuse of exploited vulnerable signed drivers is now included as part of the operating system baselines as part of the Microsoft Defender Antivirus GPO. This rule applies across both client and server and helps prevent an application from writing a vulnerable signed driver to disk.
For additional information, see the topic Attack surface reduction rules reference | Microsoft Docs.
Account Lockout Policies
A new policy Allow Administrator account lockout, located under Security SettingsAccount PoliciesAccount Lockout Policy is added to mitigate brute-force authentication attacks. The recommended values for the policies Account lockout duration and Reset account lockout counter after are adjusted to be consistent with the defaults for out-of-the-box Windows installations.
Existing Windows installations, including upgrades to Windows 11, version 22H2, have not configured by default the Allow Administrator account lockout or other account lockout policies.
Other Changes
Corrected in this release was a mismatch between the security baseline documentation and the accompanying Group Policy for Microsoft Defender Antivirus settings. The documentation stated that Windows ComponentsMicrosoft Defender AntivirusReal-time ProtectionTurn on behavior monitoring should be set to Enabled, but the actual GPO remained in a Not Configured state. This is corrected in this release.
Please let us know your thoughts by commenting on this post or through the Security Baseline Community.
by Contributed | Sep 20, 2022 | Business, Microsoft 365, Technology
This article is contributed. See the original author and article here.
Today, Microsoft announced the general availability of Windows 11 2022 Update, the first major update to the operating system that secures your hybrid work. This update includes some critically important new features designed to keep your organization safe in an ever-changing threat landscape without compromising the Windows experiences that help your employees collaborate and do their best work.
The post Work safer and smarter with the Windows 11 2022 Update appeared first on Microsoft 365 Blog.
Brought to you by Dr. Ware, Microsoft Office 365 Silver Partner, Charleston SC.

Recent Comments