This article is contributed. See the original author and article here.
Hello folks … I recently presented at the VMware UserCon for Florida and Carolina. If you didn’t get a chance to attend and want to check it out, here is the video.
This article is contributed. See the original author and article here.
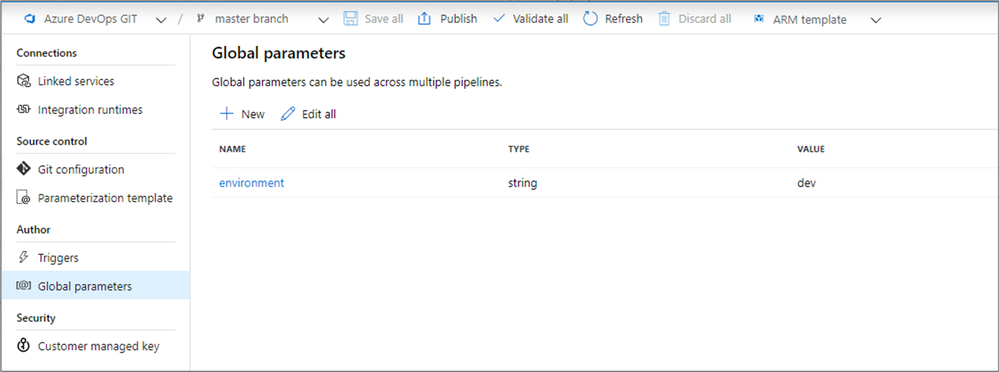
Global parameters are now generally available in Azure Data Factory. Global parameters are constants across a data factory that can be consumed by a pipeline in any expression. They are useful when you have multiple pipelines with identical parameter names and values.
Creation and management of global parameters is done in the management hub.
In any pipeline expression or dynamic content, global parameters can be referenced by pipeline().globalParameters.<parameterName>.
When promoting a data factory using the continuous integration and deployment process (CI/CD), you can override these parameters in each environment.
This article is contributed. See the original author and article here.
If you haven’t been following along as we explore a Maya pyramid in the middle of the uncharted jungle, it’s not too late! Join us as weexplorethe pyramid.
The following content contains spoilers about gameplay!
In part 1 of the Azure Maya Mystery, we discovered the meaning of many glyphs to gain access to the pyramid. Amongst others, we learned symbols with familiar imagery: ‘jaguar’, ‘macaw’, and ‘snake’
as well as more esoteric glyphs: ‘earth’, ‘wind’, and ‘tree’
Art by Dana Moot II
Winding our way around the pyramid’s base and finally up its steps, we used our new knowledge to gain entrance. We also learned the meaning of one of the parts of the temple’s name by launching a chat app on anAzure Static Web Appto talk to the goddess to whom the pyramid is dedicated.
But when the floor suddenly gives way underfoot, the intrepid explorer has to wait until Part 2 of the Maya Mystery to learn more!
That time is now.
In this part of the Mystery, you will continue your exploration of the deepest part of the pyramid, an underground cenote, a natural sinkhole that the ancient Maya sometimes used for sacrificial offerings. Your job? dive in and gather broken glyphs that careless prior explorers have tossed in to the cenote, restoring them to their former place. In the process, you will learn more glyph meanings and the second part of the pyramid’s name.
While exploring, you will also launch a shopping experience to acquire the gear you need to successfully complete your mission. Learn more about the Node.js code you need to launch by visiting anew Microsoft Learnlearning path all about the topic!
Are you prepared to continue your exploration? Haven’t joined us yet? It’s not too late! CompleteLevel 1, or skip right toLevel 2.
This article is contributed. See the original author and article here.
The Azure Data team at Microsoft recently launched FOUR new ways for you to learn Azure SQL. They’ll show you how to translate your existing SQL Server expertise to Azure SQL including Azure SQL Database and Azure SQL Managed Instance through all-new content on YouTube, GitHub, and Microsoft Learn. After completing the video series, learning path, or workshop, you will have a foundational knowledge of what to use when, as well as how to configure, secure, monitor, and troubleshoot Azure SQL. In this episode, Bob Ward, Anna Hoffman, and Marisa Brasile share the details of their all-new content and how to get started.
This article is contributed. See the original author and article here.
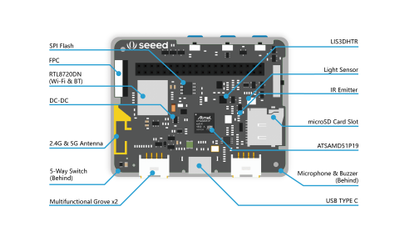
It’s been a few months now since I started playing with the Wio Terminal from Seeed Studio. It is a pretty complete device that can be used to power a wide range of IoT solutions—just look at its specifications!
Cortex-M4F running at 120MHz (can be overclocked to 200MHz) from Microchip (ATSAMD51P19) ;
192 KB of RAM, 4MB of Flash ;
Wireless connectivity: WiFi 2.4 & 5 GHz (802.11 a/b/g/n), BLE, BLE 5.0, powered by a Realtek RTL8720DN module ;
It is important to mention that this sample application is compatible with IoT Plug and Play. It means that there is a clear and documented contract of the kind of messages the Wio Terminal may send (telemetry) or receive (commands).
You can see the model of this contract below—it is rather straightforward. It’s been authored using the dedicated VS Code extension for DTDL, the Digital Twin Description Language.
When connecting to IoT Hub, the Wio Terminal sample application “introduces itself” as conforming to the dtmi:seeed:wioterminal;1 model.
This allows you (or anyone who will be creating IoT applications integrating with your device, really) to be sure there won’t be any impedence mismatch between the way your device talks and expects to be talked to, and what your IoT application does.
A great example of why being able to automagically match a device to a corresponding DTDL model is useful can be illustrated with the way we used the Azure IoT Explorer earlier. Since the device “introduced itself” when connecting to IoT Hub, and since Azure IoT Explorer has a local copy of the model, it automatically showed us a dedicated UI for sending the ringBuzzer command!
Azure SDK for Embedded C
In the past, adding support for Azure IoT to an IoT device using the C programming language required to either use the rather monolithic (ex. it is not trivial to bring your own TCP/IP or TLS stack) Azure IoT C SDK, or to implement everything from scratch using the public documentation of Azure IoT’s MQTT front-end for devices.
The Azure SDK for Embedded C is designed to allow small embedded (IoT) devices to communicate with Azure services.
The Azure SDK team has recently started to put together a C SDK that specifically targets embedded and constrained devices. It provides a generic, platform-independent, infrastructure for manipulating buffers, logging, JSON serialization/deserialization, and more. On top of this lightweight infrastructure, client libraries for e.g Azure Storage or Azure IoT have been developed.
You can read more on the Azure IoT client library here, but in a nutshell, here’s what I had to implement in order to use it on the Wio Terminal connected:
As the sample uses symmetric keys to authenticate, we need to be able to generate a security token.
The token needs to have an expiration date (typically set to a few hours in the future), so we need to know the current date and time. We use an NTP library to get the current time from a time server.
The token includes an HMAC-SHA256 signature string that needs to be base64-encoded. Luckily, the recommended WiFi+TLS stack for the Wio Terminal already includes Mbed TLS, making it relatively simple to compute HMAC signatures (ex. mbedtls_md_hmac_starts) and perform base64 encoding (ex. mbedtls_base64_encode).
The Azure IoT client library helps with crafting MQTT topics that follow the Azure IoT conventions. However, you still need to provide your own MQTT implementation. In fact, this is a major difference with the historical Azure IoT C SDK, for which the MQTT implementation was baked into it. Since it is widely supported and just worked out-of-the-box, the sample application uses the PubSubClient MQTT library from Nick O’Leary.
And of course, one must implement their own application logic. In the context of the sample application, this meant using the Wio Terminal’s IMU driver to get acceleration data every 2 seconds, and hooking up the ringBuzzer command to actual embedded code that… rings the buzzer.
Conclusion
I hope you found this post useful! I will soon publish additional articles that go beyond the simple “Hey, my Wio Terminal can send accelerometer data to the cloud!” to more advanced use cases such as remote firmware upgrade. Stay tuned! :)
Let me know in the comments what you’ve done (or will be doing!) with your Wio Terminal, and also don’t hesitate to ask any burning question you may have. Of course, you can also always find me on Twitter.
Wireless connectivity, extensibility, processing power… on paper, the Wio Terminal must be the ideal platform from IoT development, right? Well, ironically, one thing it doesn’t do out-of-the-box is to actually connect to an IoT cloud platform!
You will have guessed it by now… In this blog post, you’ll learn how to connect your Wio Terminal to Azure IoT. More importantly, you will learn about the steps I followed, giving you all the information you need in order to port the Azure IoT Embedded C libraries to your own IoT device.
Connecting your Wio Terminal to Azure IoT
I have put together a sample application that should get you started in no time.
You will need a Wio Terminal, of course, an Azure IoT Hub instance, and a working Wi-Fi connection. The Wio Terminal will need to be connected to your computer over USB—kudos to Seeed Studio for providing a USB-C port, by the way!—so it can be programmed.
Here are the steps you should follow to get your Wio Terminal connected to Azure IoT Hub:
If you don’t have an Azure subscription, create one for free before you begin.
Cloneand open the sample repository in VS Code, making sure you have the PlatformIO extension installed.
Update the application settings (include/config.h) file with your Wi-Fi, IoT Hub URL, and device credentials.
Flash your Wio Terminal. Use the command palette (Windows/Linux: Ctrl+Shift+P / macOS: ⇧⌘P) to execute the PlatformIO: Upload command. The operation will probably take a while to complete as the Wio Terminal toolchain and the dependencies of the sample application are downloaded, and the code is compiled and uploaded to the device.
Once the code has been uploaded successfully, your Wio Terminal LCD should turn on and start logging connection traces. You can also open the PlatformIO serial monitor to check the logs of the application (PlatformIO: Serial Monitor command).
> Executing task: C:Userskartben.platformiopenvScriptsplatformio.exe device monitor <
--- Available filters and text transformations: colorize, debug, default, direct, hexlify, log2file, nocontrol, printable, send_on_enter, time
--- More details at http://bit.ly/pio-monitor-filters
--- Miniterm on COM4  9600,8,N,1 ---
--- Quit: Ctrl+C | Menu: Ctrl+T | Help: Ctrl+T followed by Ctrl+H ---
Connecting to SSID: WiFi-Benjamin5G
......
> SUCCESS.
Connecting to Azure IoT Hub...
> SUCCESS.
Your device should now be sending its accelerometer sensor values to Azure IoT Hub every 2 seconds, and be ready to receive commands remotely sent to ring its buzzer.
It is important to mention that this sample application is compatible with IoT Plug and Play. It means that there is a clear and documented contract of the kind of messages the Wio Terminal may send (telemetry) or receive (commands).
You can see the model of this contract below—it is rather straightforward. It’s been authored using the dedicated VS Code extension for DTDL, the Digital Twin Description Language.
When connecting to IoT Hub, the Wio Terminal sample application “introduces itself” as conforming to the dtmi:seeed:wioterminal;1 model.
This allows you (or anyone who will be creating IoT applications integrating with your device, really) to be sure there won’t be any impedence mismatch between the way your device talks and expects to be talked to, and what your IoT application does.
A great example of why being able to automagically match a device to a corresponding DTDL model is useful can be illustrated with the way we used the Azure IoT Explorer earlier. Since the device “introduced itself” when connecting to IoT Hub, and since Azure IoT Explorer has a local copy of the model, it automatically showed us a dedicated UI for sending the ringBuzzer command!
Azure SDK for Embedded C
In the past, adding support for Azure IoT to an IoT device using the C programming language required to either use the rather monolithic (ex. it is not trivial to bring your own TCP/IP or TLS stack) Azure IoT C SDK, or to implement everything from scratch using the public documentation of Azure IoT’s MQTT front-end for devices.
The Azure SDK for Embedded C is designed to allow small embedded (IoT) devices to communicate with Azure services.
The Azure SDK team has recently started to put together a C SDK that specifically targets embedded and constrained devices. It provides a generic, platform-independent, infrastructure for manipulating buffers, logging, JSON serialization/deserialization, and more. On top of this lightweight infrastructure, client libraries for e.g Azure Storage or Azure IoT have been developed.
You can read more on the Azure IoT client library here, but in a nutshell, here’s what I had to implement in order to use it on the Wio Terminal connected:
As the sample uses symmetric keys to authenticate, we need to be able to generate a security token.
The token needs to have an expiration date (typically set to a few hours in the future), so we need to know the current date and time. We use an NTP library to get the current time from a time server.
The token includes an HMAC-SHA256 signature string that needs to be base64-encoded. Luckily, the recommended WiFi+TLS stack for the Wio Terminal already includes Mbed TLS, making it relatively simple to compute HMAC signatures (ex. mbedtls_md_hmac_starts) and perform base64 encoding (ex. mbedtls_base64_encode).
The Azure IoT client library helps with crafting MQTT topics that follow the Azure IoT conventions. However, you still need to provide your own MQTT implementation. In fact, this is a major difference with the historical Azure IoT C SDK, for which the MQTT implementation was baked into it. Since it is widely supported and just worked out-of-the-box, the sample application uses the PubSubClient MQTT library from Nick O’Leary.
And of course, one must implement their own application logic. In the context of the sample application, this meant using the Wio Terminal’s IMU driver to get acceleration data every 2 seconds, and hooking up the ringBuzzer command to actual embedded code that… rings the buzzer.
Conclusion
I hope you found this post useful! I will soon publish additional articles that go beyond the simple “Hey, my Wio Terminal can send accelerometer data to the cloud!” to more advanced use cases such as remote firmware upgrade. Stay tuned! :)
Let me know in the comments what you’ve done (or will be doing!) with your Wio Terminal, and also don’t hesitate to ask any burning question you may have. Of course, you can also always find me on Twitter.
This article is contributed. See the original author and article here.
Final Update: Thursday, 06 August 2020 13:30 UTC
We’ve confirmed that all systems are back to normal with no customer impact as of 8/6, 13:00 UTC. Our logs show the incident started on 8/06, 10:00 UTC and that during the 3 hours that it took to resolve the issue customers could have experienced a delay in alerting.
Root Cause: The failure was due to some backend dependencies.
Incident Timeline:3 Hours – 8/06, 10:00 UTC through 8/06, 13:00 UTC
We understand that customers rely on Azure Monitor as a critical service and apologize for any impact this incident caused.


Recent Comments