by Scott Muniz | Jul 20, 2020 | Alerts, Microsoft, Technology, Uncategorized
This article is contributed. See the original author and article here.
The Azure Service Fabric 7.1 second refresh release includes bug fixes, and performance enhancements for standalone, and Azure environments has started rolling out to the various Azure regions. The updates for .NET SDK, Java SDK and Service Fabric Runtime is available through Web Platform Installer, NuGet packages and Maven repositories in 7-10 days within all regions.
- Service Fabric Runtime
- Windows – 7.1.428.9590
- Ubuntu – 7.1.428.1
- Service Fabric for Windows Server Service Fabric Standalone Installer Package – 7.1.428.9590
- .NET SDK
- Windows .NET SDK – 4.1.428
- Microsoft.ServiceFabric – 7.1.428
- Reliable Services and Reliable Actors – 4.1.428
- ASP.NET Core Service Fabric integration – 4.1.428
- Java SDK – 1.0.6
Key Announcements
Potential 7.1 Deployment Failures:
- Cause: SF 7.1 introduced a more rigorous validation of security settings; in particular, requiring that settings ClusterCredentialType and ServerAuthCredentialType have matching values. However, existing clusters may have been created with ‘x509’ for the ServerAuthCredentialType and ‘none’ for the ClusterCredentialType.
- Impact: In the case mentioned above, attempting an upgrade to SF71CU1 will cause the upgrade to fail.
- Workaround: No workaround exists for this issue, as the ClusterCredentialType is immutable. If you are in this situation, please continue using SF70 until the SF71CU2 release becomes available.
For more details, please read the release notes.
by Scott Muniz | Jul 20, 2020 | Uncategorized
This article is contributed. See the original author and article here.
Creating and managing delegated access as a Managed Security Service Provider (MSSP) is an essential business requirement. But the overhead of granting, controlling, and auditing access into distributed customer environments reduces available resources from protection and response. As MSSPs grow their customer portfolios, time required to manage access expands.
Using the features of Azure Identity Governance: Entitlement Management, MSSPs are able to provision and establish secure connections into their end customer’s Microsoft Defender Advanced Threat Protection (ATP) environments. This approach enables automated access life cycle management, access review compliance, and least privilege security rights assignment. It empowers the customer to delegate new access approval, further streamlining the customer experience while maintaining a high security bar.
Most importantly, the delegated access model scales with the growth of MSSPs.
What is delegated access?
|
Delegated access gives the ability for a user or application to act on behalf of an organization. In MSSP terms, the end customer has delegated security monitoring and response to the MSSP Security Operations Center (SOC) analysts.
For more additional authentication details, please see “Delegation Flow” to the right.
|
|
 |
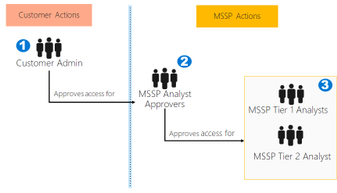
The following will take you through implementing your first solution and provide a baseline approach.Please review the best practices prior to deploying. Implementing as per the steps below results in users of the MSSP analyst tenant being enabled to access and work in a customer Microsoft Defender ATP tenant. Approval for access occurs in two areas:
1: MSSP Analyst Approver access package is provisioned, with approval to join confirmed by Customer Admin (or delegated contact)
2: Analyst access to the customer is managed by members of the “MSSP Analyst Approvers” access package.
The Approach
Implementing a multi tenant delegated access solution takes 3 concepts.
- Enable Role Based Access Control (RBAC) in Microsoft Defender ATP and connect with Active Directory (AD) groups
- Configure Governance Access Packages for access request and provisioning
- Manage access requests and audits in Microsoft M##yaccess
Enabling Role Based Access controls in Microsoft Defender ATP
- Create access groups for MSSP resources in Customer AAD: Groups
These groups will be linked to the Roles you create in Microsoft Defender ATP. To do so, in the customer AD tenant, create 3 groups:
Tier 1 Analyst
Tier 2 Analyst
MSSP Analyst Approvers
- Create Microsoft Defender ATP roles for appropriate access levels in Customer Microsoft Defender ATP
|
 |
To enable RBAC in the customer Microsoft Defender Security Center, access Settings : Permissions : Roles and “Turn on roles”, from a user account with Global Administrator or Security Administrator rights.
Then, create RBAC roles to meet MSSP SOC Tier needs. Link these roles to the created user groups via “Assigned user groups”.
Two possible MDATP RBAC roles:
Tier 1 Analysts
Perform all actions except for “Live Response” and “Manage Security Settings”
Tier 2 Analysts
Tier 1 capabilities with the addition of “Live Response”
For more information see, Use role-based access control on Microsoft Defender ATP RBAC.
Configure Governance Access Packages
- Add MSSP as Connected Organization in Customer AAD: Identity Governance
Adding the MSSP as a connected organization will allow the MSSP to request and have accesses provisioned.
To do so, in the customer AD tenant, access Identity Governance: Connected organization. Add a new organization and search for your MSSP Analyst tenant via Tenant ID or Domain. It is recommended to create a separate AD tenant for your MSSP Analysts (See below)
- Create a resource catalog in Customer AAD: Identity Governance
Resource catalogs are a logical collection of access packages, created in the customer AD tenant.

To do so, in the customer AD tenant, access Identity Governance: Catalogs, and add “New Catalog”. In our example, we will call it “MSSP Accesses”.
Further details on catalogs here
- Create access packages for MSSP resources Customer AAD: Identity Governance
Access packages are the collection of rights and accesses that a requester will be granted upon approval.
To do so, in the customer AD tenant, access Identity Governance: Access Packages, and add “New Access Package”. Create an access package for the MSSP approvers and each analyst tier. For example, the following Tier 1 Analyst configuration creates an access package that:
- Requires a member of the AD group “MSSP Analyst Approvers” to authorize new requests
- Has annual access reviews, where the SOC analysts can request an access extension
- Can only be requested by users in the MSSP SOC Tenant
- Access auto expires after 365 days

For more information, see Create a new access package.
|
4. Provide access request link to MSSP resources from Customer AAD: Identity Governance
The My Access portal link is used by MSSP SOC analysts to request access via the access packages created. The link is durable, meaning the same link may be used over time for new analysts. The analyst request goes into a queue for approval by the “MSSP Analyst Approvers”
The link is located on the overview page of each access package.
|
 |
Manage Access
- Review and authorize access requests in Customer and/or MSSP myaccess
Access requests are managed in the customer My Access, by members of the MSSP Analyst Approvers group.
To do so, access the customer’s myaccess using:
https://myaccess.microsoft.com/@<Customer Domain >.
Example: https://myaccess.microsoft.com/@M365x440XXX.onmicrosoft.com#/
Then approve or deny requests in the “Approvals” section of the UI.
At this point, analyst access has been provisioned, and each analyst should be able to access the customer’s Microsoft Defender Security Center: https://securitycenter.Microsoft.com/?tid=<CustomerTenantId>
Recommended Best Practices
There are two implementation recommendations that I would like to mention, a dedicated MSSP AD tenant and restriction of guest powers in the customer tenant.
Dedicated MSSP AD tenant
Separating corporate user accounts from MSSP accounts used customer environment access provides additional security from attack pivots. In a situation where a corporate account has been compromised, attackers do not gain immediate access into the customer portfolio.
The MSSP accounts also further limit the personally identifiable information being projected into customer AD tenants. Select a username format that is appropriate for your level of risk acceptance. For example, a username of a-JoshX (where x increments) allows user identification without projecting the entire analyst’s identifier into each customer tenant.
https://docs.microsoft.com/en-us/azure/active-directory/develop/quickstart-create-new-tenant

Guest powers
Ensure limiting of capabilities for the Guest account type in customer AD tenant. Doing so will remove the ability for MSSP analysts to invite other guest users and remove access to the customer Azure Administration portal.
Locate and disable the following settings in the customer Administration portal.
Users : User Setting : “Restrict Access to Azure Administration portal”
And
Users : User Setting : External Collaboration Settings : “Guests can Invite”

Things to consider prior to implementing
Admin Access Required
To implement this methodology, you must have an account with global administrator rights on the Customer Tenant. To minimize threat surface, consider using a temporary account created just for this activity. Remove the account once complete
Microsoft Defender ATP RBAC enablement caution
Initially, only those with Azure AD Global Administrator or Security Administrator rights will be able to create and assign roles in Microsoft Defender Security Center, therefore, having the right groups ready in Azure AD is important.
Turning on role-based access control will cause users with read-only permissions (for example, users assigned to Azure AD Security reader role) to lose access until they are assigned to a role.
Users with admin permissions are automatically assigned the default built-in Microsoft Defender ATP global administrator role with full permissions. After opting in to use RBAC, you can assign additional users that are not Azure AD Global or Security Administrators to the Microsoft Defender ATP global administrator role.
After opting in to use RBAC, you cannot revert to the initial roles as when you first logged into the portal.
Further information: RBAC access in Microsoft Defender ATP
Entitlement Management requires AAD P2
Entitlement Management is an Azure Active Directory (AAD P2) functionality. AAD P2 customers using Microsoft 365 E5, Microsoft E5 security, and Enterprise Mobility + Security (EMS) E5 have this included. If customers are not yet able to upgrade the E5 Suites, they need to purchase 1 AAD P2 license per every 5 MSSP soc analyst accounts.
A formula like this may help determine your P2 needs:
(analysts(current) + proj additional (12 month)) +[(analysts(current) + proj additional(12 month))) * .5 ]
5
For example, if your SOC has 20 analysts, and you project an analyst growth rate of 20 analysts every 12 months, then recommending a minimum of 12 P2 Licenses allows for 60 guest accounts in the customer AAD. This accounts for the 40 analysts projected per year + 50% scale capability.

Authentication Flow
The analyst user accounts authenticate against the MSSP Active Directory tenant. The tenant responds with a bearer authentication token that the analyst browser then provides access to the customer’s Microsoft Defender Security Center. The customer validates the token and provides access as defined. This means the analyst credentials remain within the MSSP AD tenant.
Please see below for an authentication breakdown
Microsoft Defender ATP MSSP reference architecture
Please see below for a reference architecture for Microsoft Defender ATP in MSSP environments. Extending additional services such as Teams channels, log analytics, and SharePoint collaboration all securely expand capabilities with customers.

Special Thanks
We want to acknowledge and thank Michael Shalev, Avi Sagiv, Efrat Kliger, Josh Michaels, and Richard Diver for their great work and contributions to the Managed Security Service Providers delegated access solution.

by Scott Muniz | Jul 20, 2020 | Uncategorized
This article is contributed. See the original author and article here.
Hi all – Jeremy here with an interesting case where Windows Server 2016 systems in one of my customer’s enterprise environments couldn’t complete installation of the Latest Cumulative Update (LCU). As a Premier Field Engineer, it’s my responsibility to troubleshoot/diagnose issues related to Microsoft Platform technologies and I’m often reminded to look at all factors in the environment that could influence the success or failure of ‘normal’ processes. When attempting to install the LCU, it didn’t matter what steps were taken to resolve the issue using known KB articles, Microsoft Docs, Tech Community suggestions, or Microsoft Forums…the updates would rollback at 99% completion upon system restart. So, when you’ve done everything Microsoft suggests to resolve a problem and the issue still occurs, Microsoft might not be the problem. Proving that theory can be difficult, and sometimes you need to eliminate all possibilities to discover a root cause. This article will take you through the troubleshooting steps performed that led me to the conclusion that third-party software was the culprit.
Environment Details:
- Windows Server 2016
- Operating system hardened with DoD-recommended and custom security baselines.
- Third-party AV/Firewall/Host Intrusion Prevention/DLP
- Patches deployed through System Center Configuration Manager (SCCM)
At first, I was like a “bull in a china shop” …haphazardly troubleshooting with some of the known ‘easy’ fixes when experiencing problems with updating Windows systems. Steps taken to fix:
- WSUS component reset – FAIL
- Sfc /scannow – FAIL
- Dism /online /cleanup-image /restorehealth – FAIL
- Attempt to apply the patch manually – FAIL
- Delete pending.xml and migration.xml (sure, deleting stuff always works) – FAIL
Hmmm…after each attempt I tried installing the LCU, but the rollbacks still occured at 99% after restart. I wonder if there is something in the Update package that’s not signed…or corrupt. Let’s try disabling some of the security controls:
- Disable Driver Signature Enforcement – FAIL
- Disable SmartScreen – FAIL
Then it hit me…of course!! It’s Group Policy…one of the System Admins made a change without telling anyone and it’s causing a problem with the Windows Server 2016 systems! I’ll just temporarily move the machine to an OU with no GPOs applied…aaannd FAIL.
You can begin to see a trend here with my troubleshooting attempts…
Okay, it was time for a sanity check, so I decided to “phone a friend” by reaching out to our internal community. What was the advice given? …The evidence is in the logs!! (oh, right…duh)
So, when I was done beating the system with a virtual hammer to get the installs working, I pulled out my ‘IT scalpel’, took the sound advice offered by my colleagues and began to analyze the logs (I know…should have started here first).
Logs analyzed:
- Setup Event Log
- *Windows Update log
- setupAPI.dev.log
- SCCM logs
- CBS logs
Indicators
Here’s what I found:
The Windows Setup Event Log confirmed that the patch was indeed staged with a target state of ‘installed’, but then rolling back upon restart and reverting to a ‘failed’ state (Figure 1.).
 Figure 1. Setup Event Log example.
The *Windows Update Log was no help because all entries were ‘unknown’ with a system date of 1600/12/31 (insert picture here). Because the system is disconnected from the Internet, running Get-WindowsUpdateLog in PowerShell requires Symbol files to merge and de-code the new ‘.ETL’ Windows Update log binary format couldn’t be downloaded. There are steps available to create an offline manifest referenced in this link, but I decided to press on.
SCCM logs were helpful because they showed that the system was targeted for the update, but after restart showed the update as failed/pending install.
The setupAPI.dev.log didn’t reveal any clues so I moved on to the CBS logs located under C:WindowsLogsCBS
The CBS.log (and CbsPersist_[timestamp].log) gave the most useful information.
- The Windows CBS (Component Based Servicing) log is a file that includes entries for components when they get installed or uninstalled during updates.
- Observed (Figure 2.) were ‘access denied’ errors in the log, created at the time of update rollback. The denied access errors indicated that a component of the update was attempting to update Windows boot files in the EFI System Partition (ESP).
- Because all Windows Server 2016 systems are formatted with a GUID partition table (GPT), there must be a system partition (the ESP), usually stored on the primary hard drive that is used for device boot. The minimum size of this partition is 100 MB and must be formatted using the FAT32 file format. This partition, referenced in this link, is managed by the operating system and should not contain any other files.
 Figure 2: CBS Log example.
Something is blocking access to the ESP…what could it be? We’ve already checked the Windows logs and security controls with no indicators of anything blocking.
“The Lightbulb Moment”
I described the operational environment at the beginning of this article and mentioned a third-party AV/Firewall/Host Intrusion Prevention/DLP application. The application is managed by another group, so we initiated a ticket to investigate the issue. Without going too far into the details, research of the third-party logs confirmed that the DLP (Data Loss Prevention) application had a rule blocking Fat32 partitions because they were deemed to be a security risk. Once documentation regarding the ESP and an explanation for its purpose was delivered, an exception was created.
When the exception took effect on our server, we attempted once again to apply the LCU…SUCCESS!
Conclusion
In this case I could have saved a lot of time and headaches if I would have included the third-party application administrators, but sometimes exercising due diligence to eliminate all possible sources is necessary to prevent ‘finger-pointing’ and accusations. Fortunately, after providing evidence that Windows wasn’t the culprit the problem was resolved.
Happy troubleshooting! Out for now…
by Scott Muniz | Jul 20, 2020 | Alerts, Microsoft, Technology, Uncategorized
This article is contributed. See the original author and article here.
In this installment of Zero to Hero with App Service, learn how to migrate your existing applications to App Service. If you followed parts one, two, and three then you already have an application on App Service, and you can continue to the next article.
Overview
There are multiple ways to migrate a web application to Azure App Service:
- Redeploy code using CI/CD Pipelines, Web Deploy, or the REST APIs
- Containerize your web application and deploy from a container registry
- Use App Service Migration Assessment Tool to migrate your ASP.NET, PHP web applications and Linux containers
App Service Migration Assessment Tool assesses whether your web site can be moved to Azure App Service. If your web site is public, you can simply provide your URL on this website to run the assessment. You can also download and run the assistant if your web site is hosted in a private environment. Post assessment App service Migration Assessment tool allows quick and easy migration of ASP.Net & PHP web applications running on IIS, and containerized web applications running on Linux operating systems to Azure App Service.
Step by Step Guidance
Please refer to Test Deployment and Migration Instructions for step-by-step instructions on migrating a sample ASP.NET web application to Azure App Service.
You can also refer to the Microsoft learn module for more information on how to migrate an on-premises web application App Service.
How the Tool Works
Please read How the Assistant Works for detailed information.
Readiness Checks
The App Service Migration Assessment Tool runs multiple readiness checks. The results of the readiness checks are used to decide if your app can migrate to Azure App Service. A comprehensive list of the checks is shown below.
IIS Server Site Checks
- Port Bindings
- Protocol
- Certificates
- Location Tags
- ISAPI Filters
- Application Pools
- Application Pool Identity
- Authentication Type
- Application Settings
- Connection Strings
- Framework
- Virtual Directories
For detailed information on readiness checks and possible remediation steps, see this article.
Linux Container Checks
- Linux Platform
- Container Volume
- Exposed Ports
- HTTP Traffic
Please read Linux Container Checks for detailed information on readiness checks and possible remediation steps.
Database Migration and Hybrid Connections
App Service Migration Assistant migrates the web application and associated configurations only, it does not migrate databases. There are multiple ways to migrate databases to Azure. Some options are listed below.
Your web application on Azure App service can also connect to an existing, on-premises database using Hybrid Connections.
Hybrid Connections allow your web application to securely access resources in other networks – in this case, an on-premises database. The migration tool configures and sets up Hybrid Connections for you, allowing you to migrate your site while keeping your database on-premises. You can then migrate your database later.
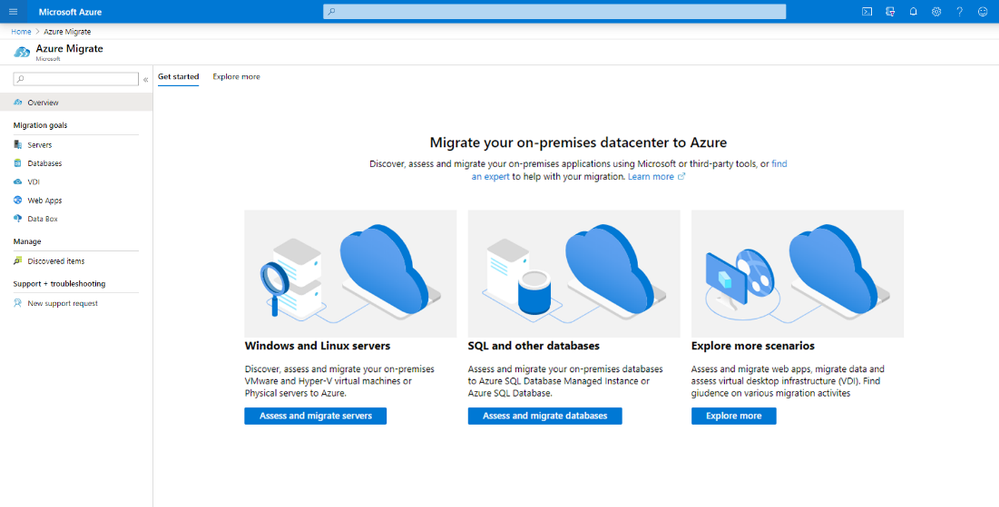
Azure Migrate Hub Integration
Azure Migrate provides a centralized hub to assess and migrate on-premises servers, infrastructure, applications, and data. The Migration assessment tool allows you to sync assessment data with Azure Migrate Hub for both successful migrations and migrations with blockers.

Summary
Using these resources, you can easily assess the migration feasibility of your .NET, PHP, and Linux containers. Once your migration assessment is complete, use the assistant’s step-by-step instructions to complete the migration to App Service. For more information, see the links below.
Helpful Resources
- App Service Migration Assistant Tool Website
- Migration checklist when moving to Azure App Service
- Linux Notes
- Release Notes
- Known Issues
- Azure CLI
by Scott Muniz | Jul 20, 2020 | Uncategorized
This article is contributed. See the original author and article here.
Hello everyone, here is part 11 of a series focusing on Application Deployment in Configuration Manager. This series is recorded by @Steve Rachui, a Microsoft principal premier field engineer. These tutorials are from our library and uses Configuration Manager 2012 in the demos, however the concepts are still relevant for Configuration Manager current branch.
This session focuses on task sequencing as a mechanism for deploying applications. It presents three task sequence demonstrations of deploying dependencies, supercedence and requirement rules along with spending some time in the smsts log and discusses task sequence flow.
Next in the series Steve will give an overview of App-V.
Posts in the series
Go straight to the playlist
by Scott Muniz | Jul 20, 2020 | Uncategorized
This article is contributed. See the original author and article here.
> This is a set of tutorials that was just released on the topic of Node.js. It takes you from the very beginning of your developer journey with Node.js to tell you the what and whys of Node.js to teaching you debugging, file management, dependency management, and even web development.
The full path is found here LEARN module path on Node.js
-1- Introduction to Node.js
This is a great primer if you are considering to use Node.js. It will explain the why but also show you can use it from the command-line.
This module teaches you the following:
- Explain what Node.js is
- Describe how Node.js works
- Identify when to use Node.js
- Create and run a Node.js script from the command line
Introduction to Node.js
-2- Create a new Node.js project and work with dependencies
Node.js has a rich ecosystem of packages that you can install and use in your app. Once installed these packages becomes dependencies that you need to learn how to manage as they will be with the project for a while. This module, therefore, teaches dependency management but also everything that goes with it like:
- Initialize Node.js projects
- Understand what the manifest file package.json consist of and use it to your advantage
- Add and remove packages to your Node.js project
- Manage your package dependencies and update them in a predictable way
Manage dependencies
-3- Work with files and directories
Working with files and directories is a great skill to have regardless of the programming language used. This module takes you through a lot of things that are good to know when dealing with input and output.
Sample:
const fs = require('fs').promises;
const items = await fs.readdir("stores");
console.log(items); // [ 201, 202, sales.json, totals.txt ]
This module teaches you the following:
- Work with directories
- Create and delete files
- Read from files
- Write to files
- Parse data in files
Work with files and directories
-4- Debugging
Being able to debug efficiently can save you a lot of time. This module takes you through all that you might possibly need to know to be really good at debugging in Node.js. The module covers the following topics:
- Use VS Code debugger with a Node.js program.
- Create breakpoints and run your code step by step to find issues.
- Inspect your program state at any execution step.
- Rewind the call stack to find the source of an exception.
Debugging module
-5- Use Express to build a Web App
Sample:
const express = require('express');
const app = express();
app.get('/', (req, res) => res.send('Welcome to the app'))
app.listen(8000, () => console.log('Server up and running'))
This module teaches you the following:
- Describe the core concepts of the web framework Express
- Configure middleware to control how a request is handled
- Respond to HTTP requests with different types of content like text and JSON
- Send data to an Express endpoint
Build web apps
by Scott Muniz | Jul 20, 2020 | Uncategorized
This article is contributed. See the original author and article here.
We are super excited to share the recent highlights that are now available!
- Advanced eDiscovery and Advanced Audit now rolling out to GCC, GCC High and DOD
- Yammer now fully available for eDiscovery including threaded review
- Improvements in search performance and reliability including:
- Search reliability improved significantly to 99.95%
- Search performance achieved an 83% reduction in time to complete large searches
- Collection throughput increased 5X to 50GB/HR
- Bulk-add custodians to manage custodians in bulk
- Advanced Indexing for non-custodial data sources
- Expanded review set limits 3x (now 300GB per load and 3M docs per set)
- Export improvements including support for direct-download model where content is zipped and available via browser (removed dependency on azure storage explorer), and enabled export to PST
- Custodian picker performance improved 10X to sub-second response
by Scott Muniz | Jul 20, 2020 | Uncategorized
This article is contributed. See the original author and article here.
This post was authored by @Pawel Partyka from the Office 365 ATP Customer Experience Engineering team, and Vipul Pandey from the Office 365 ATP PM team.
1 – Introduction
Office 365 Advanced Threat Protection provides several built-in security alerts to help customers detect and mitigate potential threats. In many large enterprises there is often a need to integrate these alerts with a SIEM platform or other case management tools to enable a Security Operations Center (SOC) team to monitor the alerts. The Office 365 Management Activity API provides these SOC teams the ability to integrate O365 ATP alerts with other platforms.
One of the challenges that organizations often face, particularly large enterprises, is the ever-increasing volume of alerts that the SOC needs to monitor. This at times makes it important to integrate and onboard only specific alerts to the monitoring and case management platforms or SIEM.
Let’s take an integration scenario that we worked on recently. As part of effort to deal with phishing related threats, one of our large enterprise customers wanted to fetch and integrate “user-reported phishing alerts”. However, they only wanted to their SOC to get those alerts that have already been processed by an Automated Investigation and Response (AIR) playbook to reduce false positives and focus on real threats.
Our engineering team worked on a solution which efficiently fetches only the relevant alerts using the Office 365 Management API and integrates them with the SIEM and case management platform. Below is the solution and the reference architecture. This could potentially be used to fetch and integrate other relevant alerts from Office 365 ATP.
2 – Azure Components
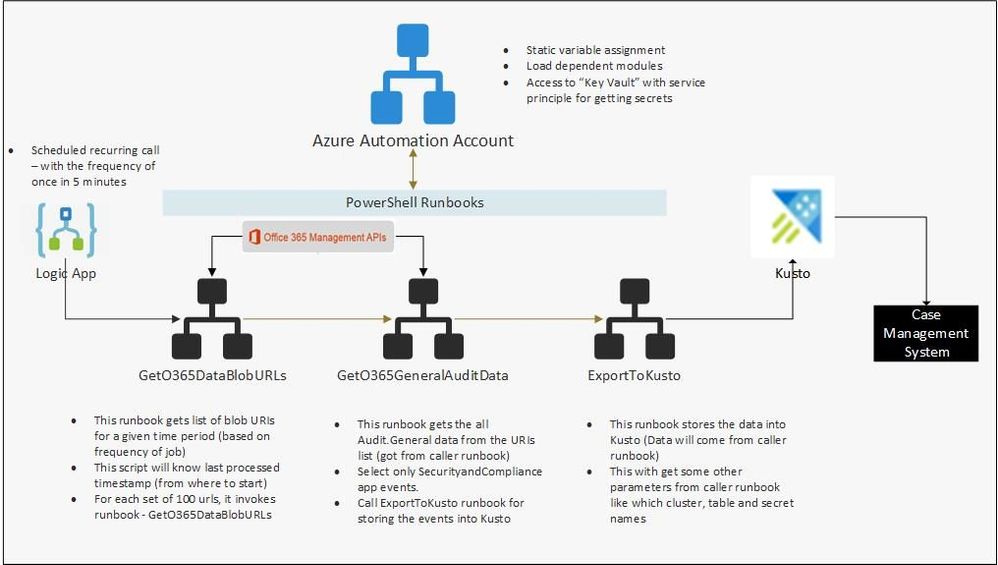
As mentioned in the introduction, we have used the Azure cloud to set up end-to-end infrastructure for getting O365 audit events and storing the required filtered data for near real-time security monitoring and historical analysis. After evaluating and analyzing various combinations of Azure services, we have decided to use following Azure components.
- Azure Data Explorer (Kusto) for final storage, which gives us real-time querying capabilities for data analysis.
- Azure blob containers – As a staging area and for data archival.
- Azure automation account – For deploying and automating the PowerShell scripts we used to fetch audit data using the Office 365 Management API.
- Azure Logic app – For scheduling and calling the PowerShell runbooks.
- Azure Key Vault – For storing the secrets required for accessing the Management API.
The architecture diagram below depicts the end-to-end setup.
 Figure 1: Architecture diagram
3 – Setting up the Azure Active Directory application
To access audit data from the O365 Management API, we’ll configure access though an Azure Active Directory (AAD) application. Create an AAD application using the steps below, and get access to this AAD application from the tenant admin. Once you have access, keep a note of the Client Id and secret key of this application, because we will need these details later.
3.1 – Azure AD app registration
- Navigate to the Azure AD admin portal.
- Click “New registration”.
- Enter a name for your app (for example “Management Activity API”). Leave the “Accounts in this organizational directory only” option selected.
- Select “Web” and click “Register”.
 Figure 2: Registering an Azure AD application
- Click “API permissions” from left navigation menu.
- Click “Add a permission” and then “Office 365 Management APIs”.
 Figure 3: Requesting API permissions
- Click “Application permissions”. Expand “ActivityFeed” and select “ActivityFeed.Read”, expand “ServiceHealth” and select “ServiceHealth.Read”.
 Figure 4: Configuration of API permissions
- Click Add permissions.
- Refresh the list of permissions. Click “Grant admin consent for <your organization’s name>”. Click Yes.
- On the App screen click “Overview” and copy “Application (client) ID” to the clipboard. You will need this later when configuring the ClientIDtoAccessO365 Automation Account variable value.
- Click “Certificates & secrets”. Click “New client secret”. Assign a name to the secret. Click Add.
 Figure 5: Certificates & secrets
- After the secret is generated, copy the secret to the clipboard by clicking on the “copy” icon next to the secret value. You will need this later when configuring the ClientSecrettoAccessO365 Automation Account variable value.
 Figure 6: Client secrets
4 – Setup storage account
We need to set up a storage account for data storage, which we will use as a staging area. We can retain data here for longer term, to be used for historical data analysis. Below is the step-by-step process for setting up the storage account.
- Note: Use the same “Resource Group Name” for all the resources we are setting up, so that we can track all the resources easily.
- Make a note of the name of the blob storage account and name of the container, because we will need to assign this to a variable in the automation account.
Once we create the container, we can see the container like below when we navigate to “Container” section inside the storage account.
Steps to create Storage Account
- Navigate to “Storage account” service in the Azure portal and select “Add new” to create a new storage account.
 Figure 7: Storage accounts
 Figure 8: Create storage account
- Once we have a storage account created, click on “Containers” to create one container.
 Figure 9: Create a container
- Click “Container” to add a new container.
- Provide name for the container. Make sure that “Private” access is selected.
- For more details, refer to these steps to create a blob storage account.
5 – Create a file share in the storage account
We will use Azure File share to store the .dlls needed by Azure Data Explorer for the ingestion process. Follow the step-by-step process as described to create an Azure file share in the storage account. We can create this file share under the same storage account, which we have created in previous step.
- Navigate to the storage account we have created above and select “File share”.
 Figure 10: File shares
- Click “File share” to create new file share. Provide a name for the file share and allocate a 1GB quota.
 Figure 11: Creating a file share
- Keep a note on the storage account and file share name, we will require them in the Automation Account.
6 – Setting up Azure Data Explorer (Kusto) Data store
Create an Azure Data Explorer cluster and database by following this step-by-step guide or the steps given below. Once the cluster is created, copy the details of cluster and database which we’ll need when inputting the Azure Automation Account variables.
For writing data into Azure Data Explorer we will use “Service Principal / AAD application” access (using the service principal secret). We will need “Admin” permissions during the first run of the script to create a table in the Kusto database. After the table is successfully created, permissions can be reduced to “Ingestor” permissions.
- Login to the Azure portal. Search for the service “Azure Data Explorer”. Click “Add” to create a new cluster.
 Figure 12: Azure Data Explorer Clusters
- Provide the required details and create the cluster.
 Figure 13: Create an Azure Data Explorer Cluster
- Once we have the Azure Data Explorer Cluster created, we need to create a database under this cluster. Navigate to the cluster we have created and click “Add database”.
 Figure 14: Create new database
- Navigate to Azure Data Explorer Clusters.
- Open the cluster that you have created in previous step.
- Open the database created under Kusto cluster. Click “Permissions”.
 Figure 15: Database Permissions
- Click Add. Make sure the “Admin” role is selected. Click “Select principals”. In the New Principals fly-out, paste the Application ID of the Run As Automation account. Select the Application ID entity. Click “Select” and click “Save”.
 Figure 16: Add Permissions
- To find the Azure Run As Account Application ID follow these steps: On the Automation Accounts page, select your Automation account from the list. In the left pane, select Run As Accounts in the account settings section. Click Azure Run As Account. Copy the Application ID.
 Figure 17: AzureRunAs account
7 – Upload Kusto library to file share
We need to upload Kusto libraries to the Azure Storage Account File Share.
- Download Microsoft.Azure.Kusto.Tools Nuget package Here. https://www.nuget.org/packages/Microsoft.Azure.Kusto.Tools/
- The downloaded NuPKG file is just an archive file. Extract the files from “tools” folder NuGet package, to any folder on your computer.
- In the web browser navigate to the “File share” created in chapter 5. Open the file share.
 Figure 18: File Shares
- Click “Add directory”. Enter a name for the directory: “Microsoft.Azure.Kusto.Tools”
- Enter the newly created folder and click “Upload”. Select all the files extracted from “tools” folder package in step 2 and upload them. After the upload completes you should see following list of files in the folder:
 Figure 19: Uploaded files
8 – Setup Automation Account
- In the Azure Portal, navigate to the Automation Accounts service and select to create new.
 Figure 20: Automation Accounts
- Provide an Automation Account name, Azure subscription, and Resource group.
 Figure 21: Add Automation Account
- Once we create the account, we can see the Automation Account in the Azure portal.
 Figure 22: Created Automation account
- For more details refer this document for creating the automation account.
9 – Setup Azure Key Vault and store secrets
Setup Azure Key Vault and store the required secrets. Key vault name and secret names will be used in PowerShell runbooks.
- StorageAccountforBlobstorageAccessKey
- StorageAccountforFileShareAccessKey
- ClientSecrettoAccessO365
- KustoAccessAppKey
Make sure that Run-as account of Automation account has access to the Key Vault (Read – Get Keys and Secrets).
- Navigate to key vault from the portal and select access policies and add policy.
 Figure 23: Key Vault Access Policies
- Select “Get” and “List” secret permissions.
 Figure 24: Add Access policy
- In the “Select principal” field enter the name of your Azure Automation Account Run As Account. You can find it by navigating to your Automation Accounts. On the Automation Accounts page, select your Automation account from the list. In the left pane, select Run As Accounts in the account settings section. Click Azure Run As Account
 Figure 25: Azure Run As Account
10 – Get dependent modules to Automation accounts
- We require the following modules. If these are not available, we need to import these into the automation account.
- For importing a new module, navigate to automation account and select “Modules” from the menu.
 Figure 26: Modules
- Select “Browse gallery” and search for the required modules.
 Figure 27: Browse Gallery
- Click on Import and select OK to import to the automation account.
 Figure 28: Import module
- Repeat the same steps for all required modules.
11 – Adding Runbooks in automation account (PowerShell Runbooks)
We have broken down our PowerShell scripts into 3 different runbooks to achieve the following.
- Segregation of duties
- Parallelism
- Add plug-and-play capability
Deploy 3 runbooks into the automation account by following the steps below.
- Navigate to the Automation account we have created above and select “Runbooks”.
 Figure 29: Runbooks
- Click on “Import Runbook”, choose the file from local system, and provide runbook type as “PowerShell”
- We have the following 3 PowerShell scripts, which need to be imported. Make sure to provide the names of the runbooks as we have specified in below table, otherwise scripts execution may fail.
- Download the zip file from here. Once you unzip, you can find the following 3 files.
Table 1: Runbook scripts
|
Name of the runbook (Provide the same as below while importing)
|
Type of Runbook
|
PowerShell Script to import
|
|
GetO365DataBlobURLs
|
PowerShell
|
GetO365DataBlobURLs.ps1
|
|
GetO365GeneralAuditData
|
PowerShell
|
GetO365GeneralAuditData.ps1
|
|
ExporttoKusto_O365AuditGeneralData
|
PowerShell
|
ExporttoKusto_O365AuditGeneralData.ps1
|
12 – Adding variables in the automation account
- Navigate to the automation account and select variables from the menu.
 Figure 30: Variables
- The following table lists the variables to be added. Add variables by selecting “Add a Variable”. Make sure to select “encryption/hiding” in case of secrets.
Table 2: Variables
|
Variable Name
|
Data Type
|
Value description
|
|
AutomationAccountName
|
String
|
Name of the Automation Account created in chapter 8
|
|
AutomationAccountResourceGroupName
|
String
|
Name of Resource Group which Automation Account was created in.
|
|
BlobStorageContainerName
|
String
|
Name of Container created in chapter 4
|
|
ClientIDtoAccessO365
|
String
|
Azure AD application ID created in chapter 3.1
|
|
ClientSecrettoAccessO365
|
String (encrypted or from KeyVault)
|
Azure AD application secret created in chapter 3.1
|
|
FileShareNameinStorageAccount
|
String
|
Name of the file share created in chapter 5
|
|
KeyVaultName
|
String
|
Name of the Azure Key Vault created in chapter 9
|
|
KustoAccessAppId
|
String
|
Azure Run As Account application ID. Steps to find it are described in chapter 12.1
|
|
KustoAccessAppKey (optional)
|
String (encrypted or from KeyVault)
|
Not required if access key is stored in Azure Key Vault in KustoAccessAppKey
|
|
KustoClusterName
|
String
|
Azure Data Explorer cluster name created in chapter 6
|
|
KustoDatabaseName
|
String
|
Azure Data Explorer database name created in chapter 6
|
|
KustoIngestionURI
|
String
|
|
|
KustoTableName
|
String
|
Name of the Azure Data Explorer table that PowerShell script will create.
|
|
MicrosoftLoginURL
|
String
|
https://login.microsoftonline.com
|
|
O365ResourceUrl
|
String
|
https://manage.office.com/.default
|
|
O365TenantDomain
|
String
|
Default domain name of the tenant
|
|
O365TenantGUID
|
String
|
This is the ID of the Office 365 tenant where alerts and investigation will be pulled out from. Follow this article to locate tenant ID. https://docs.microsoft.com/en-us/onedrive/find-your-office-365-tenant-id
|
|
PathforKustoExportDlls
|
String
|
Name of the folder created in the file share in chapter 5.
|
|
RunbookNameforExportDatatoKusto
|
String
|
ExporttoKusto_O365AuditGeneralData
|
|
RunbookNameforGetAuditDataBlobURIs
|
String
|
GetO365DataBlobURLs
|
|
RunbookNameforGetAuditDataFromURIs
|
String
|
GetO365GeneralAuditData
|
|
StorageAccountforBlobstorage
|
String
|
Name of the storage account created in chapter 4
|
|
StorageAccountforBlobstorageAccessKey
(optional)
|
String (encrypted or from KeyVault)
|
Not required if access key is stored in Azure Key Vault in StorageAccountforBlobstorageAccessKey (default configuration)
|
|
StorageAccountforFileShare
|
String
|
Storage account created in chapter 4
|
|
StorageAccountforFileShareAccessKey
(optional)
|
String (encrypted or from KeyVault)
|
Not required if access key is stored in Azure Key Vault in StorageAccountforFileShareAccessKey (default configuration)
|
|
TenantIdforKustoAccessApp
|
String
|
This is the ID of the Azure AD tenant where Azure Run As Account is provisioned. Follow this article to locate tenant ID. https://docs.microsoft.com/en-us/onedrive/find-your-office-365-tenant-id
|
12.1 – Finding the Azure Run As Account application ID.
You can find the KustoAccessAppId by navigating to your Automation Accounts. On the Automation Accounts page, select your Automation account from the list. In the left pane, select Run As Accounts in the account settings section. Click Azure Run As Account. Copy Application ID and paste it as KustoAccessAppId variable value.
 Figure 31: Copy the Application ID
13 – Querying the data
After data is successfully imported by the scripts you can query it using KQL.
In the Azure Portal navigate to Azure Data Explorer Clusters. Click on the cluster name. Click on Query.
 Figure 32: Query the data
Example query to verify that data is ingested:
KustoAuditTable
| extend IngestionTime=ingestion_time()
| order by IngestionTime desc
| project Name,Severity,InvestigationType,InvestigationName,InvestigationId,CreationTime,StartTimeUtc,LastUpdateTimeUtc,EndTimeUtc,Operation,ResultStatus,UserKey,ObjectId,Data,Actions,Source,Comments,Status
And finally, after all this effort an example of the output:
 Figure 33: Data Output
14 – Final Remarks
- Use the following article to create a schedule to run scripts periodically (for example every hour). It is enough to create a schedule for the GetO365DataBlobURLs runbook.
- During the first execution of the PowerShell scripts, a Kusto table will be created with its entire schema. Afterwards permissions of the Azure Run As Account can be lowered from “Admins” to “Ingestor”.
- Data ingestion is delayed by approximately 5 minutes. Even after the script successfully completes, data may not show up immediately in the Azure Data Explorer cluster. This is caused by the IngestFromStreamAsync method used to ingest data to the Azure Data Explorer cluster.
- After Alerts and Investigations data is ingested into the Azure Data Explorer cluster you will notice some empty columns in the table. This is deliberate to accommodate for data coming from other workloads if you wish to ingest them as well.
Special thanks to @Satyajit Dash, Anki Narravula, and Sidhartha Bose for their contributions.
by Scott Muniz | Jul 20, 2020 | Uncategorized
This article is contributed. See the original author and article here.
We’re excited to introduce a new blog series that explores the concept of continuous learning across different audiences, and will start with releasing five blogs within the next couple months to discover the learning journeys of our future generation, customers, partners, and employees. Today, we kick off the series with a peek into how Microsoft is working with universities and colleges around the world to help skill future generations using Microsoft technologies.
In the East Midlands of England, you cannot miss a small, picturesque cathedral town, originally settled in the Roman age. With a population of 100,000, the city of Lincoln features well-known landmarks, such as Lincoln Cathedral, the tallest building in the world for over 200 years, and the 11th-century Lincoln Castle. It is also home to the University of Lincoln, a public research university, recently named number 17 in the prestigious, annual Guardian University League Table 2020. As of May 2020, the school also holds another important distinction: one of the first educational institutions in the world to certify a group of students on Microsoft Azure fundamentals.
Lincoln is one of 16 higher education institutions that joined the global program to help skill future innovators, launched by Microsoft to kick off its ‘Future Skills Initiative.’ This work and the lesson from it informed the recently-announced Microsoft Learn for Educators program. The skills initiative has one simple goal, according to Rachel Wortman Morris, Ph.D., Business Program Manager at Microsoft: empower students with Microsoft technology skills.
“We kicked off our initiative in January to test out what it means to skill-up students and certify them to be future-ready on Microsoft technologies through their existing classes and with their own faculty members at colleges and universities around the globe,” said Wortman Morris. “This effort helped us learn how we best support faculty members and their students who want innovative with hands-on, technical content from Microsoft as a part of their curriculum.”
University of Lincoln: Certification success in times of COVID-19
Lincoln is one of six universities spread out over the United Kingdom (UK) that participated in the program. And despite the challenges posed to professors and students by the imposed restrictions in the country due to the Corona Virus pandemic outbreak, Lincoln succeeded in skilling more than 100 participating students in Microsoft Azure fundamentals. The cohort used online lectures, workshops and created a group channel on Microsoft Teams to all work together virtually and ask questions.
“Adding certification opportunities for our students on top of their degree is a unique selling point for Lincoln, as not many universities in the UK offer this,” said Lincoln professor Derek Foster, who taught the Azure Fundamentals course for the first time this past semester. “This is extra-curricular study for our students but takes them a step beyond the Microsoft Technology Associate certifications that we already offer. We’re planning to expand this program in the next few years and offer a package with additional certification opportunities in AI, Power Platform and Data fundamentals.”
University of Cincinnati: Student learning to supply tech demand
But Lincoln was not alone in their early certification success. Across the pond, back in The United States, another key participant in the program was a much larger institution that has also taken a unique approach to skilling their technology students; the University of Cincinnati (UC). Founded in 1819, UC is the oldest institution of higher education in the city with an annual enrollment of over 44,000 students and a university IT program, which has also partnered early with Microsoft to get students certified on Microsoft Azure fundamentals.
“We are taking a wholistic approach, viewing this as an integrated supply chain to provide students with more than just a degree,” said David Adams, Chief Innovation Officer at the University of Cincinnati. “We’ve developed relationships with businesses in the region to deeply understand their current, future, and on-going ‘talent needs’ and are leveraging our university’s experienced-based and educational resources to deliver. We essentially see ourselves as a developer of talent and, as with any supply chain, are seeking to do this is the most efficient and agile manner possible to meet the needs of the market.
Enter the University of Cincinnati partnership with Microsoft to bolster its Cooperative Education (Co-Op) program, which delivers thousands of Co-Op placements each year in over 1,300 companies in 44 states and 22 countries around the globe. The University of Cincinnati founded the Co-Op program, ranked #1 in the US for experiential learning. and students generated in excess of $75M in personal income last year. As the Chief Innovation Officer and architect of the recently announced Cincinnati Innovation District, Adams looks at Co-Op as a foundation to make the region around Cincinnati a global technology hub, much like he has seen in other parts of the country.
The UC program has expanded the offering of Microsoft training curriculum beyond the traditional technology degrees to promote a concept Adams calls ‘digital fluency’ for non-technical career paths. Not only is it one of the first universities to successfully certify 90% of the inaugural class of students on Microsoft Azure fundamentals, UC has partnered with 30 school districts across the state of Ohio and currently have 1300 high school students enrolled in classes through the Early College IT program. Students can start classes on-line or in person as early as their freshman year, earning one year of college credit as they graduate, free of charge, which eliminates the affordability and access barriers to college.
“The partnership with Microsoft helps UC integrate technology certifications for both the high school programs and the Information Technology bachelor program,” adds Bunty Ranu, a cloud solutions architect at Microsoft, who recently returned to his alma mater to teach and augment the Azure Fundamentals course at UC. “Our vision is that Microsoft will partner with UC across programs in all facets of IT, from development to database to networking, and provide better content, while adding more certifications over time.”
Microsoft Learn for Educators
Microsoft’s initial engagements spanned across five continents (Africa, Asia, Europe, North America, South America) with a goal of training 30 professors to educate about 1000 students worldwide. Microsoft Learn for Educators has taken the learnings and feedback from the initial program, expanding global partnerships with additional colleges and universities to create new learning paths with Microsoft fundamentals training content to inform future curriculum.
Microsoft also added a new series of learning paths to inspire and challenge students to build with social impact and responsibility in addition to the foundational developer paths designed especially for students. The curriculum is designed to help to make these courses easy to teach for faculty, as the student population in universities become more and more diverse as digital transformation forces traditional companies to cross the technology chasm.
“As a mature student coming back to school after a 25-year career in manufacturing engineering, I thought it was a fantastic opportunity,” said Garry Clawson, one of the students who recently was certified in Microsoft Azure fundamentals at the University of Lincoln. “There is a group of mature students in this course and learning new technologies is becoming essential. The idea of getting a degree when you’re 21 and working nonstop is just not going to happen anymore with technology moving so fast. In today’s world you have to constantly change and relearn. It’s a mindset shift for sure.”
by Scott Muniz | Jul 20, 2020 | Uncategorized
This article is contributed. See the original author and article here.
Bring the new Yammer styling and capabilities to your modern intranet. At Microsoft Ignite 2019, we announced that the Yammer Conversations web part for SharePoint Online would be updated with the new Yammer experience. Now, we are excited to announce that it is generally available, meaning that you get all the new Yammer experiences on your SharePoint pages, news articles, and SharePoint sites.
Add the power of community to your sites
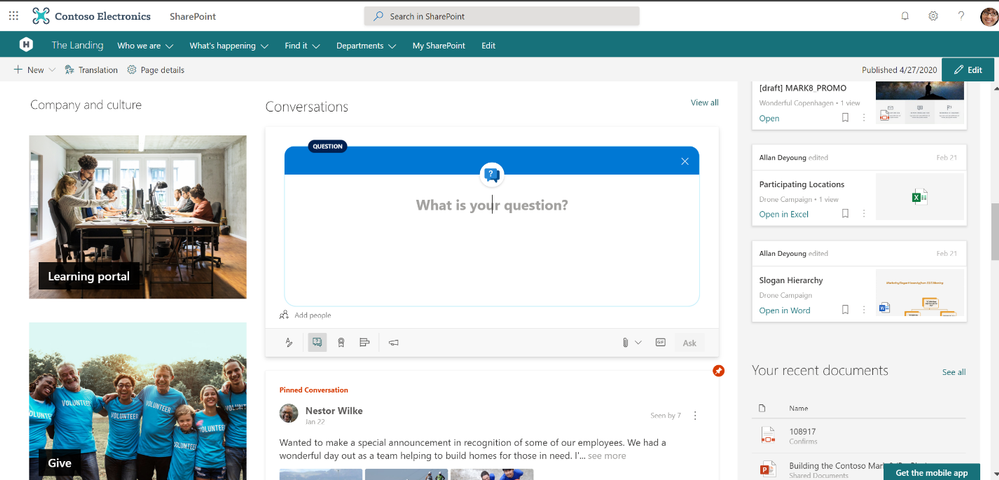
The updated Yammer Conversations web parts integrates conversations from any Yammer community, topic, user, or home feed, so you can stay connected to the discussions happening across your organization and add social conversations while still in SharePoint. Starting today, it automatically replace the previous Yammer conversations web part without any action needed from site admins.
What’s New
- The new Yammer look including rich previews for media and visual treatment for questions, praise, and polls.
- The Yammer publisher with functionality like
- creation of any type of Yammer post directly from SharePoint – questions, polls, praise, etc.
- upload of images and files into new conversations and replies directly from SharePoint.
- usage of rich text on messages created from SharePoint Online.

- Yammer management actions such as Close Conversation, Mark Best Answer to a Question, and Pin a conversation, etc.

- An improved more relevant Home feed including the ability to start a conversation in any communit when configured to this mode.
- Customize it to view from 2 conversations to 12 conversations.
How to get the new web part
Sites that are already using the Yammer Conversations web part will be updated with the new experience. To add Yammer Conversations to new sites, just visit the web part gallery and select Yammer Conversations and Get Started. Then, you can filter your Community, User, Topic, or Home, and search for your source. Customize the number of conversations to display and select Republish to see and engage with your new Yammer Conversations web part.
Whether you are looking to bring engaging conversations between employees and leaders to your Leadership sites, or allow employees to ask and resolve questions with key services on Employee Service Sites like IT, HR, Travel, or other Community Sites, the updated web part experience enables you to bring rich, social conversations to all of your SharePoint intranet.
 Add Yammer community discussions to your leadership page.
 Share news and announcements directly from the web part.
 Leverage Yammer communities to share knowledge and best practices alongside helpful resources.
Yammer Everywhere
We’re continuing to build solutions that integrate Yammer communities and conversations into the apps that you use every day. Check out our latest Outlook integration and our Communities app for Microsoft Teams and stay tuned into our public roadmap and blog.


Recent Comments