by Scott Muniz | Jul 26, 2020 | Uncategorized
This article is contributed. See the original author and article here.
Kafka Connect
In a normal Kafka cluster a producer application produces a message and publishes it to Kafka and a consumer application consumes the message from Kafka.
In these circumstances it is the application developer’s responsibility to ensure that the producer and consumers are reliable and fault tolerant.
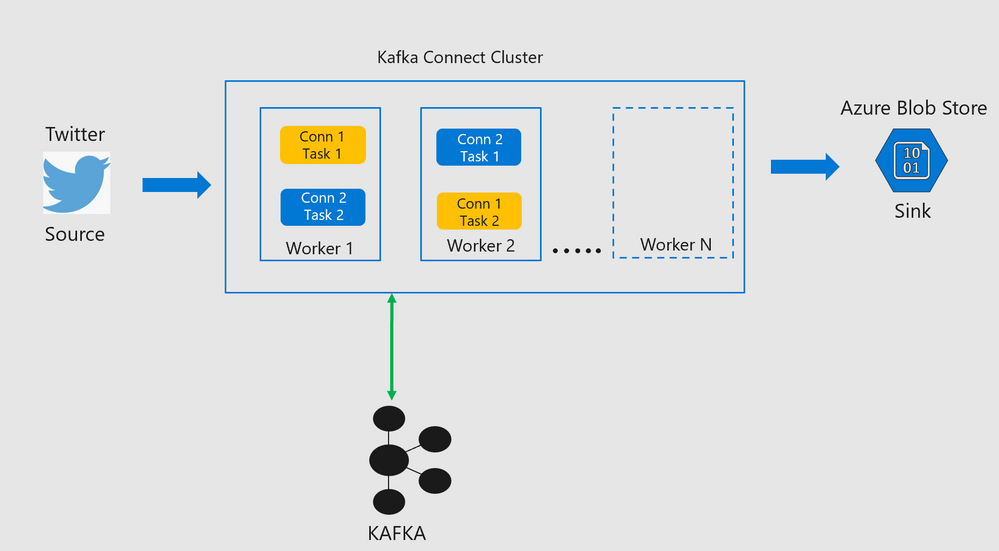
Kafka Connect is a framework for connecting Kafka with external systems such as databases, storage systems, applications , search indexes, and file systems, using so-called Connectors, in a reliable and fault tolerant way.
Kafka Connectors are ready-to-use components, which can help import data from external systems into Kafka topics and export data from Kafka topics into external systems. Existing connector implementations are normally available for common data sources and sinks with the option of creating ones own connector.
A source connector collects data from a system. Source systems can be entire databases, applications or message brokers. A source connector could also collect metrics from application servers into Kafka topics, making the data available for stream processing with low latency.
A sink connector delivers data from Kafka topics into other systems, which might be indexes such as Elasticsearch, storage systems such as Azure Blob storage, or databases.
**Most connectors are maintained by the community, while others are supported by Confluent or its partners at Confluent Connector Hub. One can normally find connectors for most popular systems like Azure Blob ,Azure Data Lake Store, Elastic Search etc.
Every connector spawns tasks which are then distributed across workers in the Kafka Connect cluster.
Kafka Connect Architecture


Lab Objectives
- This lab explores ways to use Kafka Connect on an HDInsight Managed Kafka Cluster in both Standalone Mode and Distributed Mode.The connect cluster in both the setups would ingest messages from twitter and write them to an Azure Storage Blob.
Standalone Mode
- A single edge node on an HDInsight cluster will be used to demonstrate Kafka Connect in standalone mode.
Distributed Mode
-
Two edge nodes on an HDInsight cluster will be used to demonstrate Kafka Connect in distributed mode.
-
Scalability is achieved in Kafka Connect with the addition of more edges nodes to the HDInsight cluster either at the time of creation or post creation.
-
Since the number of edge nodes can be scaled up or down on an existing cluster , this functionality can be used to scale the size of the Kafka Connect cluster as well.
Deploy a HDInsight Managed Kafka with Kafka connect standalone
In this section we would deploy an HDInsight Managed Kafka cluster with two edge nodes inside a Virtual Network and then enable Kafka Connect in standalone mode on one of those edge nodes.
- Click on the Deploy to Azure Button to start the deployment process
Deploy to Azure
-
On the Custom deployment template populate the fields as described below. Leave the rest of their fields at their default entries
- Resource Group : Choose a previously created resource group from the dropdown
- Location : Automatically populated based on the Resource Group location
- Cluster Name : Enter a cluster name( or one is created by default)
- Cluster Login Name: Create a administrator name for the Kafka Cluster( example : admin)
- Cluster Login Password: Create a administrator login password for the username chosen above
- SSH User Name: Create an SSH username for the cluster
- SSH Password: Create an SSH password for the username chosen above
-
Check he box titled “I agree to the terms and conditions stated above” and click on Purchase.
-
Wait till the deployment completes and you get the Your Deployment is Complete message and then click on Go to resource.


- On the Resource group explore the various components created as part of the Deployment . Click on the HDInsight Cluster to open the cluster page.

- On the HDInsight cluster page click on the SSH+Cluster login blade on the left and get the hostname of the edge node that was deployed.


- Using an SSH client of your choice ssh into the edge node using the sshuser and password that you set in the custom ARM script.
Note: In this the Kafka Connect standalone mode you will need to make config changes on a single edge node.

- In the next sections we would configure the Kafka Connect standalone on a single edge node.
Configure Kafka Connect in Standalone Mode
Acquire the Zookeeper and Kafka broker data
- Set up password variable. Replace
PASSWORD with the cluster login password, then enter the command
export password='PASSWORD'
- Extract the correctly cased cluster name
export clusterName=$(curl -u admin:$password -sS -G "http://headnodehost:8080/api/v1/clusters" | jq -r '.items[].Clusters.cluster_name')
- Extract the Kafka Zookeeper hosts
export KAFKAZKHOSTS=$(curl -sS -u admin:$password -G https://$clusterName.azurehdinsight.net/api/v1/clusters/$clusterName/services/ZOOKEEPER/components/ZOOKEEPER_SERVER | jq -r '["(.host_components[].HostRoles.host_name):2181"] | join(",")' | cut -d',' -f1,2);
- Validate the content of the
KAFKAZKHOSTS variable
echo $KAFKAZKHOSTS
- Zookeeper values appear in the below format . Make a note of these values as they will be used later
zk1-ag4kaf.q2hwzr1xkxjuvobkaagmjjkhta.gx.internal.cloudapp.net:2181,zk2-ag4kaf.q2hwzr1xkxjuvobkaagmjjkhta.gx.internal.cloudapp.net:2181
- To extract Kafka Broker information into the variable KAFKABROKERS use the below command
export KAFKABROKERS=$(curl -sS -u admin:$password -G https://$clusterName.azurehdinsight.net/api/v1/clusters/$clusterName/services/KAFKA/components/KAFKA_BROKER | jq -r '["(.host_components[].HostRoles.host_name):9092"] | join(",")' | cut -d',' -f1,2);
- Check to see if the Kafka Broker information is available
echo $KAFKABROKERS
- Kafka Broker host information appears in the below format
wn1-kafka.eahjefyeyyeyeyygqj5y1ud.cx.internal.cloudapp.net:9092,wn0-kafka.eaeyhdseyy1netdbyklgqj5y1ud.cx.internal.cloudapp.net:9092
Configure Kafka Connect in standalone mode
-
To run Kafka Connect in standalone mode one needs to look at two important files.
-
connect-standalone.properties : Located at /usr/hdp/current/kafka-broker/bin
-
connect-standalone.sh : Located at /usr/hdp/current/kafka-broker/bin
Note : The reason we create two copies of the connect-standalone. properties file below is to separate the rest.port property to different ports. If you do not do this , you will run into a rest.port conflict when you try creating the connectors.
- Copy the
connect-standalone.properties to connect-standalone.properties-1 and populate the properties as shows below.
sudo cp /usr/hdp/current/kafka-broker/config/connect-standalone.properties /usr/hdp/current/kafka-broker/config/connect-standalone-1.properties
bootstrap.servers=<Enter the full contents of $KAFKABROKERS>
key.converter.schemas.enable=true
value.converter.schemas.enable=true
offset.storage.file.filename=/tmp/connect.offsets1
offset.flush.interval.ms=10000
rest.port=8084
plugin.path=/usr/hdp/current/kafka-broker/connectors/jcustenborder-kafka-connect-twitter-0.3.33,/usr/hdp/current/kafka-broker/connectors/confluentinc-kafka-connect-azure-blob-storage-1.3.2
- Copy the
connect-standalone.properties to “connect-standalone.properties-2` and edit the properties as below( Note the changed rest.port )
sudo cp /usr/hdp/current/kafka-broker/config/connect-standalone.properties /usr/hdp/current/kafka-broker/config/connect-standalone-2.properties
bootstrap.servers=<Enter the full contents of $KAFKAZKHOSTS>
key.converter.schemas.enable=true
value.converter.schemas.enable=true
offset.storage.file.filename=/tmp/connect.offsets1
offset.flush.interval.ms=10000
rest.port=8085
plugin.path=/usr/hdp/current/kafka-broker/connectors/jcustenborder-kafka-connect-twitter-0.3.33,/usr/hdp/current/kafka-broker/connectors/confluentinc-kafka-connect-azure-blob-storage-1.3.2
Deploy the Kafka Connect Plugins

- Create a new folder path on the edge node and set its properties
   sudo mkdir /usr/hdp/current/kafka-broker/connectors
   sudo chmod 777 /usr/hdp/current/kafka-broker/connectors


Configure Kafka Connect plugin for streaming data from Twitter to Kafka
Create a Twitter App and get the credentials
- Go to https://dev.twitter.com/apps/new and log in, if necessary
- Enter your Application Name, Description and your website address. You can leave the callback URL empty.
- Accept the TOS, and solve the CAPTCHA.
- Submit the form by clicking the Create your Twitter Application
- Copy the below information from the screen for later use in your properties file.
twitter.oauth.consumerKey
twitter.oauth.consumerSecret
twitter.oauth.accessToken
twitter.oauth.accessTokenSecret

Update the Kafka Connect plugin for Twitter properties file
- Navigate to the folder path
/usr/hdp/current/kafka-broker/connectors and create a new properties file called twitter.properties
cd /usr/hdp/current/kafka-broker/connectors/
sudo vi twitter.properties
- Insert the below Twitter Connect plugin properties into the properties file.
"name": "Twitter-to-Kafka",
"connector.class": "com.github.jcustenborder.kafka.connect.twitter.TwitterSourceConnector",
"tasks.max": 1,
"kafka.status.topic":"twitterstatus",
"kafka.delete.topic":"twitterdelete",
"topic": "twitter1",
"twitter.oauth.consumerKey":"<twitter.oauth.consumerKey>",
"twitter.oauth.consumerSecret":"<twitter.oauth.consumerSecret>",
"twitter.oauth.accessToken":"<twitter.oauth.accessToken>",
"twitter.oauth.accessTokenSecret":"<twitter.oauth.accessTokenSecret>",
"filter.keywords":"keyword1,keyword2 ,...",
"process.deletes":false
Configure Kafka Connect plugin for Azure Blob Storage Sink connector
-
Create a regular Azure Blob storage account and a container on Azure and note the storage access keys
-
Navigate to the folder path /usr/hdp/current/kafka-broker/connectors and create a new properties file called blob.properties
cd /usr/hdp/current/kafka-broker/connectors/
sudo vi blob.properties
- Insert the below Azure Blob Storage Sink plugin properties into the properties file
name=Kafka-to-Blob
connector.class=io.confluent.connect.azure.blob.AzureBlobStorageSinkConnector
tasks.max=1
topics=twitterstatus
flush.size=3
azblob.account.name=<Azure Blob account Name>
azblob.account.key=<security key>
azblob.container.name=<container name>
format.class=io.confluent.connect.azure.blob.format.avro.AvroFormat
confluent.topic.bootstrap.servers=<Enter the full contents of $KAFKAZKHOSTS>
confluent.topic.replication.factor=3
Start source tasks and sink tasks
- From the edge node run each of the below in a separate session to create new connectors and start tasks.
Start Source connector
- In a new session start the source connector
sudo /usr/hdp/current/kafka-broker/bin/connect-standalone.sh /usr/hdp/current/kafka-broker/config/connect-standalone-1.properties /usr/hdp/current/kafka-broker/connectors/twitter.properties
- If the connector is created and tasks are started you will see the below notifications

- Message ingestion from Twitter will start immediately thereafter.

- One other to way to test if Twitter Messages with the keywords are indeed being ingested is to start a console consumer in a fresh session and start consuming messages from topic twitterstatus .In a new session , launch a console consumer. (Make sure $KAFKAZKHOSTS still holds values of Kafka brokers)
/usr/hdp/current/kafka-broker/bin/kafka-console-consumer.sh --bootstrap-server $KAFKAZKHOSTS --topic twitterstatus
- If everything is working , you should see a stream of relevant Twitter Messages on the console with specified keywords.
Start Sink Connector
- In a new session start the sink connector
sudo /usr/hdp/current/kafka-broker/bin/connect-standalone.sh /usr/hdp/current/kafka-broker/config/connect-standalone-2.properties /usr/hdp/current/kafka-broker/connectors/blob.properties
- If the connector is created and tasks are started you will see the below notifications

- Messages from the Kafka Topic twitterstatus will be written to container on the Azure Blob Store

- Authenticate into your Azure portal and navigate to the storage account to validate if Twitter Messages are being sent to the specific container.


- This ends the section for Kafka Connect in standalone mode.
Deploy an HDInsight Managed Kafka cluster with a Kafka Connect cluster in distributed mode.
In this section we would deploy an HDInsight Managed Kafka cluster with two Edge Node inside a Virtual Network and then enable distributed Kafka Connect on both of those edge nodes.
- Click on the Deploy to Azure Button to start the deployment process
Deploy to Azure
-
On the Custom deployment template populate the fields as described below. Leave the rest of their fields at their default entries
- Resource Group : Choose a previously created resource group from the dropdown
- Location : Automatically populated based on the Resource Group location
- Cluster Name : Enter a cluster name( or one is created by default)
- Cluster Login Name: Create a administrator name for the Kafka Cluster( example : admin)
- Cluster Login Password: Create a administrator login password for the username chosen above
- SSH User Name: Create an SSH username for the cluster
- SSH Password: Create an SSH password for the username chosen above
-
Check he box titled “I agree to the terms and conditions stated above” and click on Purchase.
- Wait till the deployment completes and you get the Your Deployment is Complete message and then click on Go to resource.
- On the Resource group explore the various components created as part of the Deployment . Click on the HDInsight Cluster to open the cluster page.
- Log into Ambari from the cluster page to get the Hostnames(FQDN) of the edge nodes . They should appear in the below format
ed10-ag4kac.ohdqdgkr0bpe3kjx3dteggje4c.gx.internal.cloudapp.net
ed12-ag4kac.ohdqdgkr0bpe3kjx3dteggje4c.gx.internal.cloudapp.net

- On the HDInsight cluster page click on the SSH+Cluster login blade on the left and get the hostname of the edge node that was deployed.
- Using an SSH client of your choice ssh into the edge node using the sshuser and password that you set in the custom ARM script. You will notice that you have logged into edge node
ed10
Note: In this lab you will need to make config changes in both the edge nodes ed10 and ed12 . To log into ed12 simply ssh into ed12 from ed10
sshuser@ed10-ag4kac:~$ ssh ed12-ag4kac.ohdqdgkr0bpe3kjx3dteggje4c.gx.internal.cloudapp.net
- In the next sections we would configure the Kafka Connect distributed on both the edge nodes.
Configure Kafka Connect in Distributed Mode
Acquire the Zookeeper and Kafka broker data
- Set up password variable. Replace
PASSWORD with the cluster login password, then enter the command
export password='PASSWORD'
- Extract the correctly cased cluster name
export clusterName=$(curl -u admin:$password -sS -G "http://headnodehost:8080/api/v1/clusters" | jq -r '.items[].Clusters.cluster_name')
- Extract the Kafka Zookeeper hosts
export KAFKAZKHOSTS=$(curl -sS -u admin:$password -G https://$clusterName.azurehdinsight.net/api/v1/clusters/$clusterName/services/ZOOKEEPER/components/ZOOKEEPER_SERVER | jq -r '["(.host_components[].HostRoles.host_name):2181"] | join(",")' | cut -d',' -f1,2);
- Validate the content of the
KAFKAZKHOSTS variable
echo $KAFKAZKHOSTS
- Zookeeper values appear in the below format . Make a note of these values as they will be used later
zk1-ag4kaf.q2hwzr1xkxjuvobkaagmjjkhta.gx.internal.cloudapp.net:2181,zk2-ag4kaf.q2hwzr1xkxjuvobkaagmjjkhta.gx.internal.cloudapp.net:2181
- To extract Kafka Broker information into the variable KAFKABROKERS use the below command
export KAFKABROKERS=$(curl -sS -u admin:$password -G https://$clusterName.azurehdinsight.net/api/v1/clusters/$clusterName/services/KAFKA/components/KAFKA_BROKER | jq -r '["(.host_components[].HostRoles.host_name):9092"] | join(",")' | cut -d',' -f1,2);
- Check to see if the Kafka Broker information is available
echo $KAFKABROKERS
- Kafka Broker host information appears in the below format
wn1-kafka.eahjefyeyyeyeyygqj5y1ud.cx.internal.cloudapp.net:9092,wn0-kafka.eaeyhdseyy1netdbyklgqj5y1ud.cx.internal.cloudapp.net:9092
Configure the nodes for Kafka Connect in Distributed mode
Create the topics you will need
- Create the Offset Storage topic with a name of your choice . Here we use agconnect-offsets
/usr/hdp/current/kafka-broker/bin/kafka-topics.sh --create --replication-factor 3 --partitions 8 --topic agconnect-offsets --zookeeper $KAFKAZKHOSTS
- Create the Config Storage topic with a name of your choice. Here we use agconnect-configs
/usr/hdp/current/kafka-broker/bin/kafka-topics.sh --create --replication-factor 3 --partitions 8 --topic agconnect-configs --zookeeper $KAFKAZKHOSTS
- Create the Status topic with a name of your choice. Here we use agconnect-status
/usr/hdp/current/kafka-broker/bin/kafka-topics.sh --create --replication-factor 3 --partitions 8 --topic agconnect-status --zookeeper $KAFKAZKHOSTS
- Create the Topic for storing Twitter Messages. Here we use twitterstatus
/usr/hdp/current/kafka-broker/bin/kafka-topics.sh --create --replication-factor 3 --partitions 8 --topic twitterstatus --zookeeper $KAFKAZKHOSTS
Deploy the Kafka Connect Plugins

-
Note: The below step needs to be repeated for both ed10 and ed12 edge nodes
- Create a new folder path on the edge node
   sudo mkdir /usr/hdp/current/kafka-broker/connectors
   sudo chmod 777 /usr/hdp/current/kafka-broker/connectors
-
Using WINSCP or any other SCP tool of your choice upload the Kafka Connect Plugins into folder path created in the last step


- Transfer the files to ed12 using the below command. Make sure that folders have the right permissions for this operation.
rsync -r /usr/hdp/current/kafka-broker/connectors/ sshuser@<edge-node12-FQDN>:/usr/hdp/current/kafka-broker/connectors/
Note: The below steps needs to be repeated for both ed10 and ed12 edge nodes
Configure Kafka Connect
-
To run Kafka Connect in distributed mode one needs to look at two important files.
-
connect-distributed.properties : Located at /usr/hdp/current/kafka-broker/bin/conf
-
connect-distributed.sh : Located at /usr/hdp/current/kafka-broker/bin/
-
In distributed mode, the workers need to be able to discover each other and have shared storage for connector configuration and offset data. Below are some of important parameters we would need to configure.
group.id : ID that uniquely identifies the cluster these workers belong to. Make sure this value is not changed between the edge nodes.config.storage.topic: Topic to store the connector and task configuration state in.offset.storage.topic: Topic to store the connector offset state in.rest.port: Port where the REST interface listens for HTTP requests.plugin.path: Path for the Kafka Connect Plugins
-
Edit the connect-distributed.properties file sudo vi /usr/hdp/current/kafka-broker/conf/connect-distributed.properties
-
In the connect-distributed.properties file, define the topics that will store the connector state, task configuration state, and connector offset state. Uncomment and modify the parameters in connect-distributed.properties file as shown below. Note that we use some of the topics we created earlier.
bootstrap.servers=<Enter the full contents of $KAFKABROKERS>
group.id=agconnect-cluster

key.converter=org.apache.kafka.connect.json.JsonConverter
value.converter=org.apache.kafka.connect.json.JsonConverter

key.converter.schemas.enable=true
value.converter.schemas.enable=true

offset.storage.topic=agconnect-offsets
offset.storage.replication.factor=3
offset.storage.partitions=25

config.storage.topic=agconnect-configs
config.storage.replication.factor=3

status.storage.topic=agconnect-status
status.storage.replication.factor=3
status.storage.partitions=5

offset.flush.interval.ms=10000

rest.port=8083

plugin.path=/usr/hdp/current/kafka-broker/connectors/jcustenborder-kafka-connect-twitter-0.3.33,/usr/hdp/current/kafka-broker/connectors/confluentinc-kafka-connect-azure-blob-storage-1.3.2
- Start Kafka Connect in distributed mode in the background on the Edge Node .
nohup sudo /usr/hdp/current/kafka-broker/bin/connect-distributed.sh /usr/hdp/current/kafka-broker/conf/connect-distributed.properties &
- Repeat the same steps on other edge node to start Kafka Connect in distributed mode
Note : A file nohup.out is created in the same folder from where it is executed. If you are interested in exploring the startup logs simply cat nohup.out
Kafka Connect REST API
Note : In distributed mode, the REST API is the primary interface to the Connect cluster. Requests can be made from any edge node and the REST API automatically forwards requests. By default REST API for Kafka Connect runs on port 8083 but is configurable in connector properties
- Use the below REST API calls from any edge node to verify of Kafka Connect is working as expected on both the nodes
curl -s http://<edge-node-FQDN>:8083/ |jq

curl -s http://<edge-node-FQDN>:8083/ |jq
- If Kafka Connect is working as expected each of the REST API calls will return an output like below
{
  "version": "2.1.0.3.1.2.1-1",
  "commit": "ded5eefdb4f63651",
  "kafka_cluster_id": "W0HIh8naTgip7Taju7G7fg"
}

-
In this section we started Kafka Connect in distributed mode alongside an HDInsight cluster and verified it using the Kafka REST API.
-
In the next section we would use Kafka REST API’s to start separate connector instances for running Source Tasks and Sink Tasks.
Create connectors and start tasks
Create a Twitter App and get the credentials
- Go to https://dev.twitter.com/apps/new and log in, if necessary
- Enter your Application Name, Description and your website address. You can leave the callback URL empty.
- Accept the TOS, and solve the CAPTCHA.
- Submit the form by clicking the Create your Twitter Application
- Copy the below information from the screen for later use in your properties file.
twitter.oauth.consumerKey
twitter.oauth.consumerSecret
twitter.oauth.accessToken
twitter.oauth.accessTokenSecret

Source Task
- From any edge node run the below to create a new connector and start tasks. Note that the number of tasks can be increased as per the size of your cluster.
curl -X POST http://<edge-node-FQDN>:8083/connectors -H "Content-Type: application/json" -d @- <<BODY
  {
      "name": "Twitter-to-Kafka",
      "config": {
          "name": "Twitter-to-Kafka",
          "connector.class": "com.github.jcustenborder.kafka.connect.twitter.TwitterSourceConnector",
          "tasks.max": 3,
          "kafka.status.topic":"twitterstatus",
          "kafka.delete.topic":"twitterdelete",
          "twitter.oauth.consumerKey":"<twitter.oauth.consumerKey>",
          "twitter.oauth.consumerSecret":"<twitter.oauth.consumerSecret>",
          "twitter.oauth.accessToken":"<twitter.oauth.accessToken>",
          "twitter.oauth.accessTokenSecret":"<twitter.oauth.accessTokenSecret>",
          "filter.keywords":"<keyword>",
          "process.deletes":false
      }
  }
BODY
- If the connector is created , you will see a notification like below.

- Use the Kafka REST API to check if the connector
Twitter-to-Kafkawas created
curl -X GET http://ed10-ag4kac.ohdqdgkr0bpe3kjx3dteggje4c.gx.internal.cloudapp.net:8083/connectors
["local-file-source","Twitter-to-Kafka"]

- One way to test if Twitter Messages with the keywords are being ingested is to start a console consumer in a different session and start consuming messages from the topic twitterstatus .
/usr/hdp/current/kafka-broker/bin/kafka-console-consumer.sh --bootstrap-server $KAFKAZKHOSTS --topic twitterstatus
-
If everything is working , you should see a stream of relevant Twitter Messages on the console with specified keywords.
-
Try pausing the tasks in the connector , this should also pause the Twitter Stream on the console producer.
curl -X PUT http://<edge-node-FQDN>:8083/connectors/Twitter-to-Kafka/pause
- Try resuming the tasks in the connector , this should also resume the Twitter Stream on the console producer.
curl -X PUT http://<edge-node-FQDN>:8083/connectors/Twitter-to-Kafka/resume
Sink Task
-
Create a regular Azure Blob storage account and a container on Azure and note the storage access keys
-
From any edge node run the below to create a new connector and start tasks. Note that the number of tasks can be increased as per the size of your cluster.
curl -X POST http://<edge-node-FQDN>:8083/connectors -H "Content-Type: application/json" -d @- <<BODY
  {
      "name": "Kafka-to-Blob",
      "config": {
          "connector.class": "io.confluent.connect.azure.blob.AzureBlobStorageSinkConnector",
          "tasks.max": 1,
          "topics":"twitterstatus",
          "flush.size":3,
          "azblob.account.name":"<Storage-account-name>",
          "azblob.account.key":"<Storage-accesss-key>",
          "azblob.container.name":"<Container-name>",
          "format.class":"io.confluent.connect.azure.blob.format.avro.AvroFormat",
          "confluent.topic.bootstrap.servers":"Enter the full contents of $KAFKAZKHOSTS",
          "confluent.topic.replication.factor":3

      }
  }
BODY
- If the connector is created , you will see a notification like below.

- Use the Kafka REST API to check if the connector
Kafka-to-Blobwas created. You should see both the source and sink connectors.
curl -X GET http://<edge-node-FQDN>:8083/connectors
["local-file-source","Twitter-to-Kafka","Kafka-to-Blob"]

Authenticate into your Azure portal and navigate to the storage account to validate if Twitter Messages are being sent to the specific container.
- In this section we saw how the source and sink connectors were created . In the next section , we will explore some Kafka REST API’s to control Kafka Connect.
Kafka REST APIs
Commonly used REST APIs for Kafka Connect
curl -s http://<edge-node-FQDN>:8083/ |jq
curl -X GET http://<edge-node-FQDN>:8083/connector-plugins | jq
- Get list of connectors in the cluster
curl -X GET http://<edge-node-FQDN>:8083/connectors
curl -X GET http://<edge-node-FQDN>:8083/connectors/<connector-name>
curl -X GET http://<edge-node-FQDN>:8083/connectors/<connector-name>/tasks
curl -X POST http://<edge-node-FQDN>:8083/connectors/<connector-name>/restart
curl -X DELETE http://<edge-node-FQDN>:8083/connectors/<connector-name>/
curl -X PUT http://<edge-node-FQDN>:8083/connectors/<connector-name>/pause
curl -X PUT http://<edge-node-FQDN>:8083/connectors/<connector-name>/resume
by Scott Muniz | Jul 26, 2020 | Alerts, Microsoft, Technology, Uncategorized
This article is contributed. See the original author and article here.
This is the third post of a series dedicated to the implementation of automated Continuous Optimization with Azure Advisor Cost recommendations. For a contextualization of the solution here described, please read the introductory post for an overview of the solution and also the second post for the details and deployment of the main solution components.
Introduction
If you read the previous posts and deployed the Azure Optimization Engine solution, by now you have a Log Analytics workspace containing Advisor Cost recommendations as well as Virtual Machine properties and performance metrics, collected in a daily basis. We have all the historical data that is needed to augment Advisor recommendations and help us validate and, ultimately, automate VM right-size remediations. As a bonus, we have now a change history of our Virtual Machine assets and Advisor recommendations, which can also be helpful for other purposes.
So, what else is needed? Well, we need first to generate the augmented Advisor recommendations, by adding performance metrics and VM properties to each recommendation, and then store them in a repository that can be easily consumed and manipulated both by visualization tools and by automated remediation tasks. Finally, we visualize these and further recommendations with a simple Power BI report.
Anatomy of a recommendation
There isn’t much to invent here, as the Azure Advisor recommendation schema fits very well our purpose. We just need to add to this schema some other relevant fields:
- Confidence score – each recommendation type will have its own algorithm to compute the confidence score. For example, for VM right-size recommendations, we’ll calculate it based on the VM metrics and whether the target SKU meets the storage and networking requirements.
- Details URL – a link to a web page where we can see the actual justification for the recommendation (e.g., the results of a Log Analytics query chart showing the performance history of a VM).
- Additional information – a JSON-formatted value containing recommendation-specific details (e.g., current and target SKUs, estimated savings, etc.).
- Tags – if the target resource contains tags, we’ll just add them to the recommendation, as this may be helpful for reporting purposes.
Generating augmented Advisor recommendations
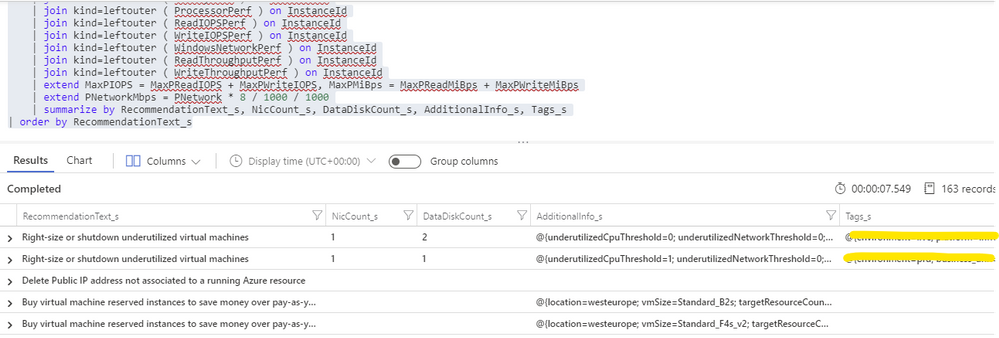
Having in the same Log Analytics repository all the data we need makes things really easy. We just need to build a query that joins Advisor recommendations with VM performance and properties and then automate a periodic export of the results for additional processing (see sample results below). As Advisor right-size recommendations consider only the last seven days of VM performance, we just have to run it once per week.

For each exported recommendation, we’ll then execute a simple confidence score algorithm that decreases the recommendation confidence whenever a performance criterion is not met. We are considering these relatively weighted criteria against the recommended target SKU and observed performance metrics:
- [Very high importance] Does it support the current data disks count?
- [Very high] Does it support the current network interfaces count?
- [High] Does it support the percentile(n) un-cached IOPS observed for all disks in the respective VM?
- [High] Does it support the percentile(n) un-cached disks throughput?
- [Medium] Is the VM below a given percentile(n) processor and memory usage percentage?
- [Medium] Is the VM below a given percentile(n) network bandwidth usage?
The confidence score ranges from 0 (lowest) to 5 (highest). If we don’t have performance metrics for a VM, the confidence score is still decreased though in a lesser proportion. If we are processing a non-right-size recommendation, we still include it in the report, but the confidence score is not computed (remaining at the -1 default value).
Bonus recommendation: orphaned disks
The power of this solution is that having so valuable historical data in our repository and adding other sources to it will allow us to generate our own custom recommendations as well. One recommendation that easily comes out of the data we have been collecting is a report of orphaned disks – for example, disks that belonged to a VM that was meanwhile deleted (see sample query below). But you can easily think of others, even beyond cost optimization.

Azure Optimization Engine reporting
Now that we have an automated process that generates and augments optimization recommendations, the next step is to add visualizations to it. For this purpose, there is nothing better than Power BI. To make things easier, we have meanwhile ingested our recommendations into an Azure SQL Database, where we can better manage and query data. We use it as the data source for our Power BI report, with many perspectives (see sample screenshots below).
The overview page gives us a high-level understanding of the recommendations’ relative distribution. We can also quickly see how many right-size recommended target SKUs are supported by the workload characteristics. In the example below, we have many “unknowns”, since only a few VMs were sending performance metrics to the Log Analytics workspace.

In the exploration page, we can investigate all the available recommendations, using many types of filters and ordering criteria.

After selecting a specific recommendation, we can drill through it and navigate to the Details or History pages.

In the Details page, we can analyze all the data that was used to generate and validate the recommendation. Interestingly, the Azure Advisor API has recently included additional details about the thresholds values that were observed for each performance criterion. This can be used to cross-check with the metrics we are collecting with the Log Analytics agent.

In the History page, we can observe how the confidence score has evolved over time for a specific recommendation. If the confidence score has been stable at high levels for the past weeks, then the recommendation can likely be implemented without risks.

Each recommendation includes a details URL that opens an Azure Portal web page with additional information not available in the report. If we have performance data in Log Analytics for that instance, we can even open a CPU/memory chart with the performance history.

Deploying the solution and next steps
Everything described so far in these posts is available for you to deploy and test, in the Azure Optimization Engine repository. You can find there deployment and usage instructions and, if you have suggestions for improvements or for new types of recommendations, please open a feature request issue or… why not be brave and contribute to the project? ;)
The final post of this series will discuss how we can automate continuous optimization with the help of all the historical data we have been collecting and also how the AOE can be extended with additional recommendations (not limited to cost optimization).
Thank you for having been following! See you next time! ;)
by Scott Muniz | Jul 26, 2020 | Alerts, Microsoft, Technology, Uncategorized
This article is contributed. See the original author and article here.
Hello folks,
Last month I presented a session during the “Windows Server webinar miniseries – Month of Cloud Essentials”. The session was on how to create highly available apps with Azure VMs. Following the session I was asked about setting up traditional Windows Server Clusters.
During that conversation I stated my belief that if you are building modern apps that can run in an active-active model, a traditional cluster might not be needed.
You can achieve the same results with Azure Availability Set/Zones, Azure Load Balancers and virtual machine. However, if your migrating or deploying an app that requires the traditional Windows cluster, or shared storage. Our story was not the best. Up to now, you had to deploy an additional VM that would “host” the Cluster Shared Volumes.
That changed last week with 2 announcements…
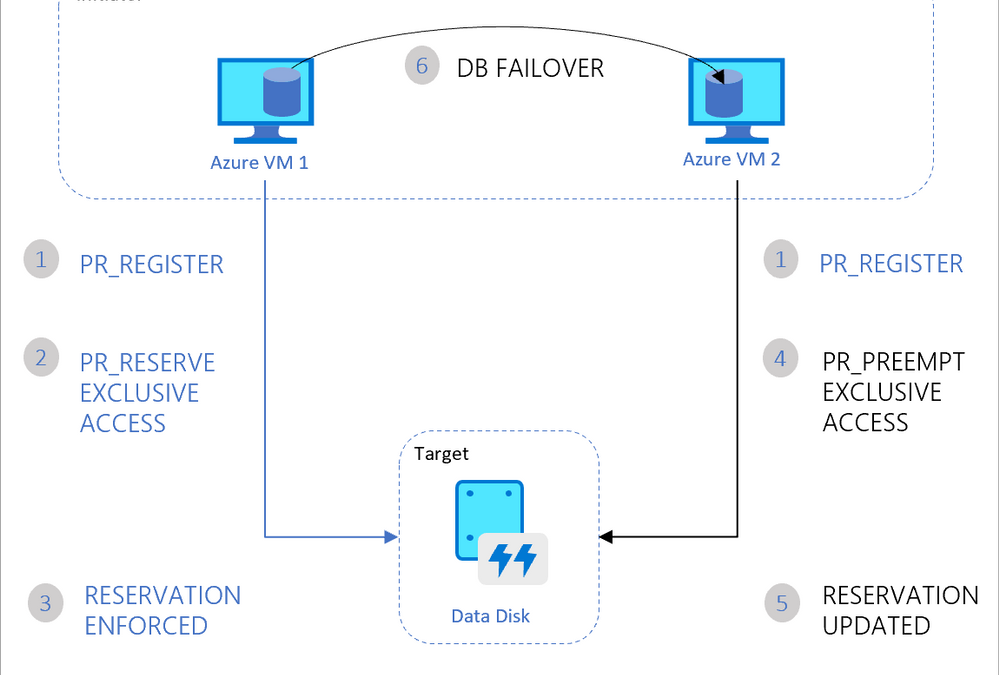
The first announcement was about Announcing the general availability of Azure shared disks and new Azure Disk Storage enhancements. The general availability of shared disks on Azure Disk Storage will now enable enterprises to easily migrate your existing on-premises Windows and Linux-based clustered environments to Azure. This is a new feature for Azure managed disks that allows you to attach a managed disk to multiple virtual machines (VMs) simultaneously. Therefore, allowing you to either deploy new or migrate existing clustered applications to Azure.
VMs in the cluster can read or write to their attached disk based on the reservation chosen by the clustered application using SCSI Persistent Reservations (SCSI PR). The shared disks are exposed as logical unit numbers (LUNs) and look like direct-attached-storage (DAS) to your VM.

The second interesting announcement is Windows Admin Center version 2007 is now generally available!. The new version comes with multiple new improvements but one in particular caught my attention. New Cluster deployment experience and capabilities.
Windows Admin Center now provides a graphical cluster deployment workflow. It allows you to deploy multiple cluster types based on the operating system that runs on their choice of servers.

Together these two announcements are enabling the deployment of traditional Windows or Linux Clusters without the need for an additional VM to host the CSV. Therefore, simplifying your deployments and making them more cost efficient since you save the cost of the additional VM.
Our Story is getting better all the time and Hybrid is built into it.
Cheers!
Pierre Roman
by Scott Muniz | Jul 25, 2020 | Uncategorized
This article is contributed. See the original author and article here.
In this episode of One Ops Question, Sarah answers the question “What’s the Microsoft Adoption Framework?”
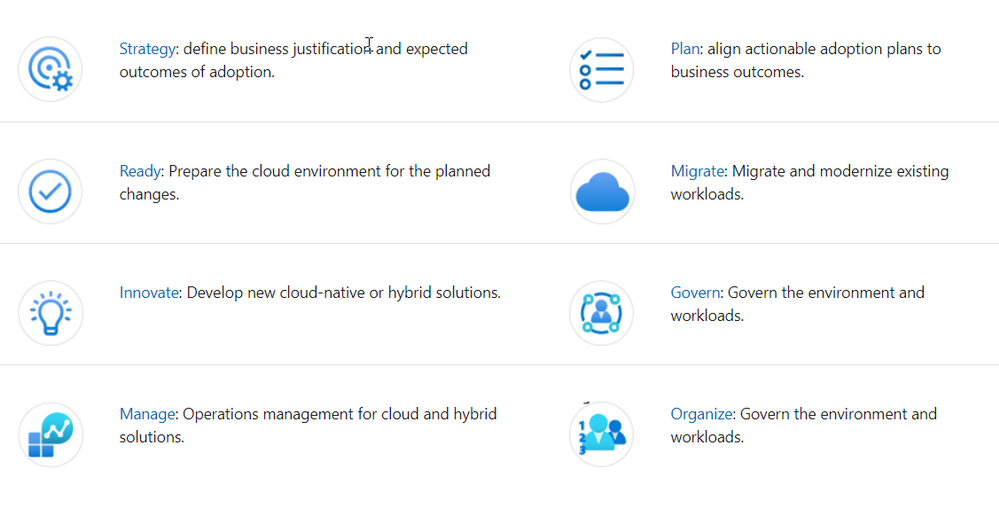
The Microsoft Adoption Framework is a set of guidelines and advice that has been pulled from multiple sources, such as Microsoft employees, partners and customers to help others with their Cloud Adoption Journey. It pulls together proven practices and strategies from Microsoft, partners, and customers. It provides a set of tools and guidance to help shape technology, business, and people strategies achieving your desired business outcomes.
This guidance aligns to the following phases of the cloud adoption lifecycle:

To get started with the Cloud Adoption Framework, review these common scenarios:
I hope this helps.
Cheers!
Pierre

by Scott Muniz | Jul 24, 2020 | Uncategorized
This article is contributed. See the original author and article here.

#JulyOT
This is part of the #JulyOT IoT Tech Community series, a collection of blog posts, hands-on-labs, and videos designed to demonstrate and teach developers how to build projects with Azure Internet of Things (IoT) services. Please also follow #JulyOT on Twitter.
Operating Systems and ARM architectures supported
This tutorial has been tested with .NET Core applications running on Raspberry Pi OS and Ubuntu 20.04 (including Ubuntu Mate 20.04) for both 32bit (ARM32) and 64bit (ARM64). The projects also include build tasks for Debug and Release configurations.
Source Code
The source and the samples for this tutorial can be found here.
Get started
Get started, head to Raspberry Pi .NET Core Developer Learning Path
Learn how to build .NET Core C# and F# apps, connect hardware with the .NET Core IoT library, send telemetry to Azure IoT and IoT Central, control the device with device twins and direct method.
Tips and Tricks for setting up Ubuntu 20.04 on a Raspberry Pi
Check out the following Raspberry Pi Tips and Tricks to boot Ubuntu from USB3 SSD, how to overclock, enable WiFi, and support for the Raspberry Pi Sense HAT.
Raspberry Pi Hardware
.Net Core requires an AMR32v7 processor and above, so anything Raspberry Pi 2 or better and you are good to go. Note, Raspberry Pi Zero is an ARM32v6 processor, and is not supported.
| The Raspberry Pi 3a Plus is a great device for .NET Core. |
I’m super happy with my Raspberry Pi 4B 4GB and 8GB devices seen here dressed in a heatsink case. |
 |
 |
Why .NET Core
It used by millions of developers, it is mature, fast, supports multiple programming languages (C#, F#, and VB.NET), runs on multiple platforms (Linux, macOS, and Windows), and is supported across multiple processor architectures. It is used to build device, cloud, and IoT applications.
.NET Core is an open-source, general-purpose development platform maintained by Microsoft and the .NET community on GitHub.
Learning C#

There are lots of great resources for learning C#. Check out the following:
- C# official documentation
- C# 101 Series with Scott Hanselman and Kendra Havens
- Full C# Tutorial Path for Beginners and Everyone Else
The .NET Core IoT Libraries Open Source Project
The Microsoft .NET Core team along with the developer community are building support for IoT scenarios. The .NET Core IoT Library is supported on Linux, and Windows IoT Core, across ARM and Intel processor architectures. See the .NET Core IoT Library Roadmap for more information.
System.Device.Gpio
The System.Device.Gpio package supports general-purpose I/O (GPIO) pins, PWM, I2C, SPI and related interfaces for interacting with low-level hardware pins to control hardware sensors, displays and input devices on single-board-computers; Raspberry Pi, BeagleBoard, HummingBoard, ODROID, and other single-board-computers that are supported by Linux and Windows 10 IoT Core.

Iot.Device.Bindings
The .NET Core IoT Repository contains IoT.Device.Bindings, a growing set of community-maintained device bindings for IoT components that you can use with your .NET Core applications. If you can’t find what you need then porting your own C/C++ driver libraries to .NET Core and C# is pretty straight forward too.
The drivers in the repository include sample code along with wiring diagrams. For example the BMx280 – Digital Pressure Sensors BMP280/BME280.

Get started
Get started, head to Raspberry Pi .NET Core Developer Learning Path
Learn how to build .NET Core C# and F# apps, connect hardware with the .NET Core IoT library, send telemetry to Azure IoT and IoT Central, control the device with device twins and direct method.
Have fun and stay safe and be sure to follow us on #JulyOT.

by Scott Muniz | Jul 24, 2020 | Uncategorized
This article is contributed. See the original author and article here.
How Together mode in Microsoft Teams is bringing fans back to the NBA arena.
The post Reimagining how NBA fans and teams experience the game of basketball with Together mode in Microsoft Teams appeared first on Microsoft 365 Blog.
Brought to you by Dr. Ware, Microsoft Office 365 Silver Partner, Charleston SC.
by Scott Muniz | Jul 24, 2020 | Uncategorized
This article is contributed. See the original author and article here.
In the Windows world, a Windows Server Failover Cluster (WSFC) natively supports multiple subnets and handles multiple IP addresses via an OR dependency on the IP address. On Linux, there is no OR dependency, but there is a way to achieve a proper multi-subnet natively with Pacemaker, as shown by the following. You cannot do this by simply using the normal Pacemaker command line to modify a resource. You need to modify the cluster information base (CIB). The CIB is an XML file with the Pacemaker configuration.
That’s the comment from https://docs.microsoft.com/en-us/sql/linux/sql-server-linux-configure-multiple-subnet?view=sql-server-ver15
However, the steps of modifying CIB is not correct. MS will revise the steps soon.
Here is an example to create a SQL Server Linux Availability group in 4 nodes in 3 subnets in RHEL 7.6

If you are already familiar with the AG Group setup process, please just jump to step 16.
1.Register your subscription on for all servers (red1,red2,red3 and red4 in this case)
subscription-manager register
2.List all available subscription, pick the one with High Availabiilty , notedown the pool id
subscription-manager list –available –all
3.Register the subscription for all nodes (red1,red2,red3 and red4 in this case)
sudo subscription-manager attach –pool=xxxxx
4.Enable the repository(red1,red2,red3 and red4 in this case)
sudo subscription-manager repos –enable=rhel-ha-for-rhel-7-server-rpms
5.Install Pacemaker packages on all nodes. (red1,red2,red3 and red4 in this case)
sudo yum install pacemaker pcs fence-agents-all resource-agents
6.Install SQL Server resource agent (red1,red2,red3 and red4 in this case)
sudo yum install mssql-server-ha
7.Set the password for the default user that is created when installing Pacemaker and Corosync packages. All the password should be exactly same (red1,red2,red3 and red4 in this case)
sudo passwd hacluster
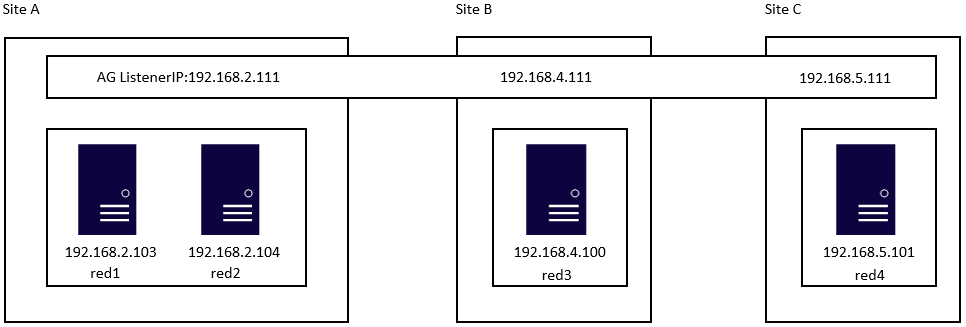
8.Update /etc/hosts file in all servers, add IP and node name. All the servers should have the same entries.
192.168.2.103 red1
192.168.2.104 red2
192.168.4.100 red3
192.168.5.101 red4
9.Run following commands to Enable and start pcsd service and Pacemaker in all nodes. (red1,red2 and red3 and red4 in this case)
sudo systemctl enable pcsd
sudo systemctl start pcsd
sudo systemctl enable pacemaker
10.Run following commands to Create Cluster in primary replica node (red1 in this case)
sudo pcs cluster auth red1 red2 red3 red4 -u hacluster -p YouPasswordUsedinStep7
sudo pcs cluster setup –name sqlcluster1 red1 red2 red3 red4
sudo pcs cluster start –all
sudo pcs cluster enable –all
11.Run following command to Enable cluster feature in all nodes(red1,red2 , red3 and red4 in this case)
sudo /opt/mssql/bin/mssql-conf set hadr.hadrenabled 1
sudo systemctl restart mssql-server
Create AG and Listener
1.Run following queries in red1 to create certificate
use master
go
CREATE MASTER KEY ENCRYPTION BY PASSWORD = ‘**<Master_Key_Password>**’;
go
CREATE CERTIFICATE dbm_certificate WITH SUBJECT = ‘dbm’;
go
BACKUP CERTIFICATE dbm_certificate TO FILE = ‘/var/opt/mssql/data/dbm_certificate.cer’
WITH PRIVATE KEY (
FILE = ‘/var/opt/mssql/data/dbm_certificate.pvk’,
ENCRYPTION BY PASSWORD = ‘**<Private_Key_Password>**’
);
2.Run following commands in red1 to copy the certificate to rest of the servers(red2,red3 and red4 in this case)
cd /var/opt/mssql/data
scp dbm_certificate.* root@red2:/var/opt/mssql/data/
scp dbm_certificate.* root@red3:/var/opt/mssql/data/
scp dbm_certificate.* root@red4:/var/opt/mssql/data/
3.Give permission to the mssql user to access the certificate files in rest of the servers(red2,red3 and red4 in this case)
cd /var/opt/mssql/data
chown mssql:mssql dbm_certificate.*
4.Run following T-SQL queries to create the certificate in rest of the nodes by restoring the certificate backup file (red2,red3 and red4 in this case)
use master
go
CREATE MASTER KEY ENCRYPTION BY PASSWORD = ‘**<Master_Key_Password>**’
go
CREATE CERTIFICATE dbm_certificate
FROM FILE = ‘/var/opt/mssql/data/dbm_certificate.cer’
WITH PRIVATE KEY (
FILE = ‘/var/opt/mssql/data/dbm_certificate.pvk’,
DECRYPTION BY PASSWORD = ‘**<Private_Key_Password>**’
)
5.Create endpoint in all servers (red1,red2,red3 and red4)
CREATE ENDPOINT [Hadr_endpoint]
AS TCP (LISTENER_PORT = 5022)
FOR DATABASE_MIRRORING (
ROLE = ALL,
AUTHENTICATION = CERTIFICATE dbm_certificate,
ENCRYPTION = REQUIRED ALGORITHM AES
);
ALTER ENDPOINT [Hadr_endpoint] STATE = STARTED;
6.Run following query in primary replica (red1) to create Availability group(Please note, it works for SQL 2019. If you are using SQL 2017, you need to change AVAILABILITY_MODE of one the replica to ASYNCHRONOUS_COMMIT)
CREATE AVAILABILITY GROUP [ag1]
WITH (DB_FAILOVER = ON, CLUSTER_TYPE = EXTERNAL)
FOR REPLICA ON
N’red1′
WITH (
ENDPOINT_URL = N’tcp://red1:5022′,
AVAILABILITY_MODE = SYNCHRONOUS_COMMIT,
FAILOVER_MODE = EXTERNAL,
SEEDING_MODE = AUTOMATIC) ,
N’red2′
WITH (
ENDPOINT_URL = N’tcp://red2:5022′,
AVAILABILITY_MODE = SYNCHRONOUS_COMMIT,
FAILOVER_MODE = EXTERNAL,
SEEDING_MODE = AUTOMATIC),
N’red3′
WITH (
ENDPOINT_URL = N’tcp://red3:5022′,
AVAILABILITY_MODE = SYNCHRONOUS_COMMIT,
FAILOVER_MODE = EXTERNAL,
SEEDING_MODE = AUTOMATIC),
N’red4′
WITH (
ENDPOINT_URL = N’tcp://red4:5022′,
AVAILABILITY_MODE = SYNCHRONOUS_COMMIT,
FAILOVER_MODE = EXTERNAL,
SEEDING_MODE = AUTOMATIC)
ALTER AVAILABILITY GROUP [ag1] GRANT CREATE ANY DATABASE;–grant create any database permission
- Join the AG group, run the following T-SQL queries in all the secondary servers (red2,red3 and red4 in this case)
ALTER AVAILABILITY GROUP [ag1] JOIN WITH (CLUSTER_TYPE = EXTERNAL);
ALTER AVAILABILITY GROUP [ag1] GRANT CREATE ANY DATABASE
8.Run following T-SQL Queries to create database and add it to AG group in primary replica (red1 in this case).
CREATE DATABASE [db1];
ALTER DATABASE [db1] SET RECOVERY FULL;
BACKUP DATABASE [db1] TO DISK = N’/var/opt/mssql/data/db1.bak’;
BACKUP log [db1] TO DISK = N’/var/opt/mssql/data/db1.trn’;
GO
ALTER AVAILABILITY GROUP [ag1] ADD DATABASE [db1];
9.Create SQL login pacemaker in all servers (red1,red2,red3 and red4 in this case).
CREATE LOGIN [pacemakerLogin] with PASSWORD= N’ComplexP@$$w0rd!’
GO
ALTER SERVER ROLE [sysadmin] ADD MEMBER [pacemakerLogin]
10.Run following bash command in red1
sudo pcs property set stonith-enabled=false
- In all SQL Server Linux servers , run following bash commands to save the credentials for the SQL Server login.(red1,red2,red3 and red4) (The password is as same as the one used in step 9)
echo ‘pacemakerLogin’ >> ~/pacemaker-passwd
echo ‘ComplexP@$$w0rd!’ >> ~/pacemaker-passwd
sudo mv ~/pacemaker-passwd /var/opt/mssql/secrets/passwd
sudo chown root:root /var/opt/mssql/secrets/passwd
sudo chmod 400 /var/opt/mssql/secrets/passwd # Only readable by root
12.Create availability group resource at cluster level, run following command on any one of the nodes (just in one server and run just one time).
sudo pcs resource create ag_cluster1 ocf:mssql:ag ag_name=ag1 meta failure-timeout=60s master notify=true
##check the status

13.Run following bash command in primary replica red1 to create one virtual IP resources. The resource name is ‘vip1’, and IP address is 192.168.2.111
sudo pcs resource create vip1 ocf:heartbeat:IPaddr2 ip=192.168.2.111

##check the status

- Create Availability group listener for Availability group ag1. Run following T-SQL query in primary replica (red1 in this case).
ALTER AVAILABILITY GROUP [ag1]
ADD LISTENER ‘aglistener’ (WITH IP
(
(‘192.168.2.111′,’255.255.255.0’),
(‘192.168.4.111′,’255.255.255.0’),
(‘192.168.5.111′,’255.255.255.0’)
),PORT = 1433);

- Run following bash commands to create constraints:
sudo pcs constraint colocation add vip1 ag_cluster1-master INFINITY with-rsc-role=Master
sudo pcs constraint order promote ag_cluster1-master then start vip1

16.Run following bash command to export the CIB.(you can run the command in any node)
sudo pcs cluster cib <filename>

17.You will find following similar entries
<primitive class=”ocf” id=”vip1″ provider=”heartbeat” type=”IPaddr2″>
<instance_attributes id=”vip1-instance_attributes”>
<nvpair id=”vip1-instance_attributes-ip” name=”ip” value=”192.168.2.111″/>
</instance_attributes>
<operations>
<op id=”vip1-monitor-interval-10s” interval=”10s” name=”monitor” timeout=”20s”/>
<op id=”vip1-start-interval-0s” interval=”0s” name=”start” timeout=”20s”/>
<op id=”vip1-stop-interval-0s” interval=”0s” name=”stop” timeout=”20s”/>
</operations>
</primitive>
18.Here is the modified version
<primitive class=”ocf” id=”vip1″ provider=”heartbeat” type=”IPaddr2″>
<instance_attributes id=”vip1-instance_attributes”>
<rule id=”Subnet1-IP” score=”INFINITY” boolean-op=”or”>
<expression id=”Subnet1-Node1″ attribute=”#uname” operation=”eq” value=”red1″/>
<expression id=”Subnet1-Node2″ attribute=”#uname” operation=”eq” value=”red2″/>
</rule>
<nvpair id=”vip1-instance_attributes-ip” name=”ip” value=”192.168.2.111″/>
</instance_attributes>
<instance_attributes id=”vip1-instance_attributes2″>
<rule id=”Subnet2-IP” score=”INFINITY”>
<expression id=”Subnet2-Node1″ attribute=”#uname” operation=”eq” value=”red3″/>
</rule>
<nvpair id=”vip1-instance_attributes-ip2″ name=”ip” value=”192.168.4.111″/>
</instance_attributes>
<instance_attributes id=”vip1-instance_attributes3″>
<rule id=”Subnet3-IP” score=”INFINITY”>
<expression id=”Subnet3-Node1″ attribute=”#uname” operation=”eq” value=”red4″/>
</rule>
<nvpair id=”vip1-instance_attributes-ip3″ name=”ip” value=”192.168.5.111″/>
</instance_attributes>
<operations>
<op id=”vip1-monitor-interval-10s” interval=”10s” name=”monitor” timeout=”20s”/>
<op id=”vip1-start-interval-0s” interval=”0s” name=”start” timeout=”20s”/>
<op id=”vip1-stop-interval-0s” interval=”0s” name=”stop” timeout=”20s”/>
</operations>
</primitive>
- Run following command to import the modified CIB and reconfigure Pacemaker.
sudo pcs cluster cib-push <filename>

Here are the takeaway points:
1).All nodes in same subnet should be in the same <Instance_attributes>

2).If there are more than one servers in the subnet, the keyword ‘boolean-op=”or”’ is a must

3).The IP address of Alwayson Listener is addressed in <nvpair> .

4).The value of id property does not matter, you can specify any value as long as the value is unique.

Optional, you can create three entries for the three IP addresses in the DNS server.

Here is an screenshot of using SQLCMD to connect the AGListener

by Scott Muniz | Jul 24, 2020 | Uncategorized
This article is contributed. See the original author and article here.
In the Windows world, a Windows Server Failover Cluster (WSFC) natively supports multiple subnets and handles multiple IP addresses via an OR dependency on the IP address. On Linux, there is no OR dependency, but there is a way to achieve a proper multi-subnet natively with Pacemaker, as shown by the following. You cannot do this by simply using the normal Pacemaker command line to modify a resource. You need to modify the cluster information base (CIB). The CIB is an XML file with the Pacemaker configuration.
That’s the comment from https://docs.microsoft.com/en-us/sql/linux/sql-server-linux-configure-multiple-subnet?view=sql-server-ver15
However, the steps of modifying CIB is not correct. MS will revise the steps soon.
Here is an example to create a SQL Server Linux Availability group in 4 nodes in 3 subnets in RHEL 7.6
If you are already familiar with the AG Group setup process, please just jump to step 16.
1.Register your subscription on for all servers (red1,red2,red3 and red4 in this case)
subscription-manager register
2.List all available subscription, pick the one with High Availabiilty , notedown the pool id
subscription-manager list –available –all
3.Register the subscription for all nodes (red1,red2,red3 and red4 in this case)
sudo subscription-manager attach –pool=xxxxx
4.Enable the repository(red1,red2,red3 and red4 in this case)
sudo subscription-manager repos –enable=rhel-ha-for-rhel-7-server-rpms
5.Install Pacemaker packages on all nodes. (red1,red2,red3 and red4 in this case)
sudo yum install pacemaker pcs fence-agents-all resource-agents
6.Install SQL Server resource agent (red1,red2,red3 and red4 in this case)
sudo yum install mssql-server-ha
7.Set the password for the default user that is created when installing Pacemaker and Corosync packages. All the password should be exactly same (red1,red2,red3 and red4 in this case)
sudo passwd hacluster
8.Run following commands to Enable and start pcsd service and Pacemaker in all nodes. (red1,red2 and red3 and red4 in this case)
sudo systemctl enable pcsd
sudo systemctl start pcsd
sudo systemctl enable pacemaker
9.Run following commands to Create Cluster in primary replica node (red1 in this case)
sudo pcs cluster auth red1 red2 red3 red4 -u hacluster -p YouPasswordUsedinStep7
sudo pcs cluster setup –name sqlcluster1 red1 red2 red3 red4
sudo pcs cluster start –all
sudo pcs cluster enable –all
10.Run following command to Enable cluster feature in all nodes(red1,red2 , red3 and red4 in this case)
sudo /opt/mssql/bin/mssql-conf set hadr.hadrenabled 1
sudo systemctl restart mssql-server
Create AG and Listener
1.Run following queries in red1 to create certificate
use master
go
CREATE MASTER KEY ENCRYPTION BY PASSWORD = ‘**<Master_Key_Password>**’;
go
CREATE CERTIFICATE dbm_certificate WITH SUBJECT = ‘dbm’;
go
BACKUP CERTIFICATE dbm_certificate TO FILE = ‘/var/opt/mssql/data/dbm_certificate.cer’
WITH PRIVATE KEY (
FILE = ‘/var/opt/mssql/data/dbm_certificate.pvk’,
ENCRYPTION BY PASSWORD = ‘**<Private_Key_Password>**’
);
2.Run following commands in red1 to copy the certificate to rest of the servers(red2,red3 and red4 in this case)
cd /var/opt/mssql/data
scp dbm_certificate.* root@red2:/var/opt/mssql/data/
scp dbm_certificate.* root@red3:/var/opt/mssql/data/
scp dbm_certificate.* root@red4:/var/opt/mssql/data/
3.Give permission to the mssql user to access the certificate files in rest of the servers(red2,red3 and red4 in this case)
cd /var/opt/mssql/data
chown mssql:mssql dbm_certificate.*
4.Run following T-SQL queries to create the certificate in rest of the nodes by restoring the certificate backup file (red2,red3 and red4 in this case)
use master
go
CREATE MASTER KEY ENCRYPTION BY PASSWORD = ‘**<Master_Key_Password>**’
go
CREATE CERTIFICATE dbm_certificate
FROM FILE = ‘/var/opt/mssql/data/dbm_certificate.cer’
WITH PRIVATE KEY (
FILE = ‘/var/opt/mssql/data/dbm_certificate.pvk’,
DECRYPTION BY PASSWORD = ‘**<Private_Key_Password>**’
)
5.Create endpoint in all servers (red1,red2,red3 and red4)
CREATE ENDPOINT [Hadr_endpoint]
AS TCP (LISTENER_PORT = 5022)
FOR DATABASE_MIRRORING (
ROLE = ALL,
AUTHENTICATION = CERTIFICATE dbm_certificate,
ENCRYPTION = REQUIRED ALGORITHM AES
);
ALTER ENDPOINT [Hadr_endpoint] STATE = STARTED;
6.Run following query in primary replica (red1) to create Availability group(Please note, it works for SQL 2019. If you are using SQL 2017, you need to change AVAILABILITY_MODE of one the replica to ASYNCHRONOUS_COMMIT)
CREATE AVAILABILITY GROUP [ag1]
WITH (DB_FAILOVER = ON, CLUSTER_TYPE = EXTERNAL)
FOR REPLICA ON
N’red1′
WITH (
ENDPOINT_URL = N’tcp://red1:5022′,
AVAILABILITY_MODE = SYNCHRONOUS_COMMIT,
FAILOVER_MODE = EXTERNAL,
SEEDING_MODE = AUTOMATIC) ,
N’red2′
WITH (
ENDPOINT_URL = N’tcp://red2:5022′,
AVAILABILITY_MODE = SYNCHRONOUS_COMMIT,
FAILOVER_MODE = EXTERNAL,
SEEDING_MODE = AUTOMATIC),
N’red3′
WITH (
ENDPOINT_URL = N’tcp://red3:5022′,
AVAILABILITY_MODE = SYNCHRONOUS_COMMIT,
FAILOVER_MODE = EXTERNAL,
SEEDING_MODE = AUTOMATIC),
N’red4′
WITH (
ENDPOINT_URL = N’tcp://red4:5022′,
AVAILABILITY_MODE = SYNCHRONOUS_COMMIT,
FAILOVER_MODE = EXTERNAL,
SEEDING_MODE = AUTOMATIC)
ALTER AVAILABILITY GROUP [ag1] GRANT CREATE ANY DATABASE;–grant create any database permission
- Join the AG group, run the following T-SQL queries in all the secondary servers (red2,red3 and red4 in this case)
ALTER AVAILABILITY GROUP [ag1] JOIN WITH (CLUSTER_TYPE = EXTERNAL);
ALTER AVAILABILITY GROUP [ag1] GRANT CREATE ANY DATABASE
8.Run following T-SQL Queries to create database and add it to AG group in primary replica (red1 in this case).
CREATE DATABASE [db1];
ALTER DATABASE [db1] SET RECOVERY FULL;
BACKUP DATABASE [db1] TO DISK = N’/var/opt/mssql/data/db1.bak’;
BACKUP log [db1] TO DISK = N’/var/opt/mssql/data/db1.trn’;
GO
ALTER AVAILABILITY GROUP [ag1] ADD DATABASE [db1];
9.Create SQL login pacemaker in all servers (red1,red2,red3 and red4 in this case).
CREATE LOGIN [pacemakerLogin] with PASSWORD= N’ComplexP@$$w0rd!’
GO
ALTER SERVER ROLE [sysadmin] ADD MEMBER [pacemakerLogin]
10.Run following bash command in red1
sudo pcs property set stonith-enabled=false
- In all SQL Server Linux servers , run following bash commands to save the credentials for the SQL Server login.(red1,red2,red3 and red4) (The password is as same as the one used in step 9)
echo ‘pacemakerLogin’ >> ~/pacemaker-passwd
echo ‘ComplexP@$$w0rd!’ >> ~/pacemaker-passwd
sudo mv ~/pacemaker-passwd /var/opt/mssql/secrets/passwd
sudo chown root:root /var/opt/mssql/secrets/passwd
sudo chmod 400 /var/opt/mssql/secrets/passwd # Only readable by root
12.Create availability group resource at cluster level, run following command on any one of the nodes (just in one server and run just one time).
sudo pcs resource create ag_cluster1 ocf:mssql:ag ag_name=ag1 meta failure-timeout=60s master notify=true
##check the status

13.Run following bash command in primary replica red1 to create one virtual IP resources. The resource name is ‘vip1’, and IP address is 192.168.2.111
sudo pcs resource create vip1 ocf:heartbeat:IPaddr2 ip=192.168.2.111
##check the status
- Create Availability group listener for Availability group ag1. Run following T-SQL query in primary replica (red1 in this case).
ALTER AVAILABILITY GROUP [ag1]
ADD LISTENER ‘aglistener’ (WITH IP
(
(‘192.168.2.111′,’255.255.255.0’),
(‘192.168.4.111′,’255.255.255.0’),
(‘192.168.5.111′,’255.255.255.0’)
),PORT = 1433);
- Run following bash commands to create constraints:
sudo pcs constraint colocation add vip1 ag_cluster1-master INFINITY with-rsc-role=Master
sudo pcs constraint order promote ag_cluster1-master then start vip1
16.Run following bash command to export the CIB.(you can run the command in any node)
sudo pcs cluster cib <filename>
17.You will find following similar entries
<primitive class=”ocf” id=”vip1″ provider=”heartbeat” type=”IPaddr2″>
<instance_attributes id=”vip1-instance_attributes”>
<nvpair id=”vip1-instance_attributes-ip” name=”ip” value=”192.168.2.111″/>
</instance_attributes>
<operations>
<op id=”vip1-monitor-interval-10s” interval=”10s” name=”monitor” timeout=”20s”/>
<op id=”vip1-start-interval-0s” interval=”0s” name=”start” timeout=”20s”/>
<op id=”vip1-stop-interval-0s” interval=”0s” name=”stop” timeout=”20s”/>
</operations>
</primitive>
18.Here is the modified version
<primitive class=”ocf” id=”vip1″ provider=”heartbeat” type=”IPaddr2″>
<instance_attributes id=”vip1-instance_attributes”>
<rule id=”Subnet1-IP” score=”INFINITY” boolean-op=”or”>
<expression id=”Subnet1-Node1″ attribute=”#uname” operation=”eq” value=”red1″/>
<expression id=”Subnet1-Node2″ attribute=”#uname” operation=”eq” value=”red2″/>
</rule>
<nvpair id=”vip1-instance_attributes-ip” name=”ip” value=”192.168.2.111″/>
</instance_attributes>
<instance_attributes id=”vip1-instance_attributes2″>
<rule id=”Subnet2-IP” score=”INFINITY”>
<expression id=”Subnet2-Node1″ attribute=”#uname” operation=”eq” value=”red3″/>
</rule>
<nvpair id=”vip1-instance_attributes-ip2″ name=”ip” value=”192.168.4.111″/>
</instance_attributes>
<instance_attributes id=”vip1-instance_attributes3″>
<rule id=”Subnet3-IP” score=”INFINITY”>
<expression id=”Subnet3-Node1″ attribute=”#uname” operation=”eq” value=”red4″/>
</rule>
<nvpair id=”vip1-instance_attributes-ip3″ name=”ip” value=”192.168.5.111″/>
</instance_attributes>
<operations>
<op id=”vip1-monitor-interval-10s” interval=”10s” name=”monitor” timeout=”20s”/>
<op id=”vip1-start-interval-0s” interval=”0s” name=”start” timeout=”20s”/>
<op id=”vip1-stop-interval-0s” interval=”0s” name=”stop” timeout=”20s”/>
</operations>
</primitive>
- Run following command to import the modified CIB and reconfigure Pacemaker.
sudo pcs cluster cib-push <filename>
Here are the takeaway points:
1).All nodes in same subnet should be in the same <Instance_attributes>
2).If there are more than one servers in the subnet, the keyword ‘boolean-op=”or”’ is a must
3).The IP address of Alwayson Listener is addressed in <nvpair> .
4).The id property must be unique
Optional, you can create three entries for the three IP addresses in the DNS server.
Here is an screenshot of using SQLCMD to connect the AGListener

by Scott Muniz | Jul 24, 2020 | Uncategorized
This article is contributed. See the original author and article here.
A huge THANK YOU to everyone who has expressed interest and applied to be a Humans of IT Community Ambassador. We are truly so humbled by the overwhelming support and enthusiasm we’ve seen in this community by real-life Humans of IT who are passionate about doing good and spreading kindness in tech.
After careful evaluation of all applications, we’re thrilled to announce our inaugural batch of Humans of IT Community Ambassadors for FY21! Please join us in a round of (virtual) applause for these amazing individuals who will be advocating for Humans of IT around the world (literally!) and furthering our mission to make the tech industry a welcoming and inclusive place for all – no matter your background or experience in tech:
 FY21 Humans of IT Community Ambassadors
This year, we are also thrilled to be partnering with FIVE Historically Black Colleges and Universities (HBCUs) including Dillard University, Xavier University, Southern University – Baton Rouge, Southern University – New Orleans and Grambling State University to support budding technologists in these schools! Our Humans of IT Community Ambassadors will be actively involved in mentoring Humans of IT student ambassadors (soon to be announced!) from these schools, with full support from the universities’ Computer Science faculty and deans. They will also get the opportunity to do larger scale, 1:many mentoring sessions with future technologists in the Microsoft Learn Student Ambassador program to help them develop their career paths in tech and dive into tech for good projects.
If you live in or near a region where our Community Ambassadors are located, we strongly encourage you to reach out to them with ideas and initiatives on how to leverage #TechforGood. Together, we can achieve incredible things all around the world.
We can’t wait to see all the positive social impact we can create with YOU in FY21!
#HumansofIT
#TechforGood
by Scott Muniz | Jul 24, 2020 | Uncategorized
This article is contributed. See the original author and article here.
This week, there was several key announcements from Microsoft Inspire. A few include: the new Yammer being available worldwide, new Microsoft Teams capabilities and a new meeting/calling experience from them as well.
@Natalia Nemkovich is our member of the week, and has been a fantastic contributor especially in the Yammer community and recent Yammer AMA.
View the Weekly Roundup for July 20-24 in Sway and attached PDF document.

Recent Comments