by Scott Muniz | Jul 24, 2020 | Uncategorized
This article is contributed. See the original author and article here.
In today’s post, I want to discuss how to move away from using legacy user profile technologies and leverage more cloud-friendly, time-tested solutions for Windows 10 roaming settings.
Over the past few months, IT pros around the world have been increasingly tasked with managing devices while end users are working remotely. Early priorities focused on securing corporate devices, securing application access, and ensuring the continuity of ongoing manageability. With these pillars now in place, we have seen many organizations shift greater focus towards user experience and productivity.
In addition, many organizations have realized that ensuring business continuity moving forward will require both user and device flexibility. Some users may continue to work remotely on a mix of portable/mobile devices and remote corporate workstations. Others may return to the office, including those returning on a part-time basis and working in a hybrid scenario where devices may be on-premises at times and remotely connected at others.
Securing access to corporate applications and data is paramount in ensuring that users remain productive throughout this transition. In addition to managing application and data access, ensuring the preservation and roaming of user state data, specifically application preferences and shell settings, is critically important as it is often very personalized and tailored to individual users. In some cases, some of these settings might also be mandated by policy.
Avoid roaming for full user profile data
There has never been a better opportunity to stop traditional Windows user profile management than now. Profile bloat is not something to be desired. IT pros need to avoid profile/settings traffic traveling over any connection, even VPN connections, as much of that data is not pertinent to the majority of the user’s work. Even then, important state data is not needed until an application tied to that data is used. When connectivity is limited and coupled with potential app growth, downloading and uploading full user profile data results in longer logons and logoffs, and the potential for wholesale profile corruption increases, generating more problems that are then further complicated for help desks to remediate without potential state data loss.
Microsoft has two technologies available for offering both more granular user and application state roaming of settings and preferences that can take advantage of the cloud for settings storage and roaming: Enterprise State Roaming and User Experience Virtualization (UE-V.) If you have an Azure AD Premium License or Enterprise Mobility + Security (EMS) license, you can already leverage Enterprise State Roaming. If you have Windows 10 Enterprise or Education, you already have UE-V available to you as well. Both Enterprise State Roaming and UE-V have been around for quite a while and have matured into feature complete solutions. Note that both solutions (designed to roam different types of shell and app settings) can leverage the cloud to roam settings storage.
Modern roaming settings for Windows
Many of our enterprise customers are leveraging Enterprise State Roaming with Azure AD Premium today to roam user state data. In this scenario, settings and data are roamed via your cloud tenant and in a much more granular and streamlined way. Data is processed on demand through specific triggers. You do not have to manage the storage or files as Azure AD and the cloud will take care of that for you. For more information, see Windows 10 roaming settings reference.
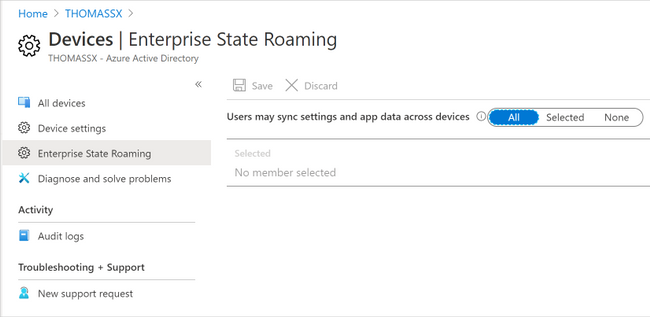
To ensure that users can synchronize settings using the cloud across Windows 10 devices in your organization, you will need to:
- Sign in to Azure AD admin center.
- Select Azure Active Directory > Devices > Enterprise State Roaming.
- Select Users may sync settings and app data across devices. For more information, see how to configure device settings.
 Enterprise State Roaming settings in Azure AD
For a Windows 10 device to use the Enterprise State Roaming service, the device must authenticate using an Azure AD identity. For devices that are joined to Azure AD, the primary sign-in identity for the user is their Azure AD identity, so no additional configuration is required. For devices that use on-premises Active Directory, you must first Configure hybrid Azure Active Directory joined devices.
Users can also enable synchronization of Windows 10 settings by selecting the Start button, then selecting Settings > Accounts > Sync your settings. When Sync settings is turned on, Windows syncs the settings you choose across all your Windows 10 devices that you have signed in to with your Azure AD account. If you need to enable specific policies for Enterprise State Roaming, you can do so using Group Policy (although you will find it likely that this might not be needed.) You can also control use via security groups and monitor device sync status per user in the portal.
 Sync settings options in Windows 10
You do not need to worry about server-side management of storage data, as that all happens automatically. Enterprise State Roaming data is hosted in one or more Azure regions that best align with the country/region value set in the Azure Active Directory instance. Enterprise State Roaming data is partitioned based on three major geographic regions: North America, EMEA (Europe, Middle East, and Africa), and APAC (Asia-Pacific.)
Roaming settings for Modern UWP apps
In addition to key Windows 10 browser and shell components, Enterprise State Roaming can facilitate roaming settings for modern Universal Windows Platform (UWP) applications as well including system, inbox, and Store apps. To view a more comprehensive listing of system and inbox apps, see Understand the different apps included in Windows 10.
Both Universal Windows applications and packaged desktop line-of-business (LoB) applications in MSIX can write settings data to a roaming folder and any data written to this folder will automatically be synced. Your experience may vary, as it is up to the individual developer to design an application to take advantage of this capability. Likewise, for desktop applications repackaged into MSIX packages, this data may not natively write to this folder, and a Package Support Framework (PSF) fixup may be required. For more information about how to develop a Universal Windows app that uses roaming, see the AppData Storage API and the AppData Roaming Developer Guidance.
Roaming settings for classic Win32 applications
Most LOB applications in the enterprise running on Windows are still running predominantly as traditional Win32 applications. Since there may be a lot of variance and non-standard approaches to user preference management, you can still use the UE-V Template Generator to capture those settings and designate for roam in an XML template those file and registry settings that will need to be stored as user state for that application.
UE-V can be enabled via PowerShell (the Enable-UEV cmdlet,) through Group Policy, and through Microsoft Endpoint Configuration Manager. You can also use any of the options to enable the inbox templates, which are, by default, located at C:ProgramDataMicrosoftUEVInboxTemplates) and register custom templates either using a custom path or leveraging the default (C:ProgramDataMicrosoftUEVTemplates.
In order to roam settings for custom applications, you first need to download the Windows 10 ADK and install the UE-V Template Generator. From there, run the template generator to capture the settings and preferences available for each application. For guidance around capturing settings and preferences and generating custom templates for your applications, see Working with custom UE-V templates and the UE-V template generator.
 User Experience Virtualization (UE-V) template generator
You can then leverage group policy or the register-uevtemplate cmdlet to register the custom template.
UE-V and roaming for additional legacy shell Items
In addition to roaming registered templates that might be customized for your LOB Win32 applications, UE-V can roam other legacy shell items that are still supported in Windows 10. For a list of items UE-V roams by default via its inbox templates, please see User Experience Virtualization (UE-V) for Windows 10 overview.
|
Note: Some of these items might not be directly applicable in mobile scenarios; however, items such as credential roaming, and legacy explorer preferences may be useful.
|
Roaming UE-V settings storage in the cloud
Traditionally, many enterprises over the years used UE-V to roam settings using an on-premises file share option. UE-V can also be configured to use an external sync source such as OneDrive. Additional enhancements over the past couple of years to OneDrive, such as Files On-Demand, means you can have your settings available during first-time launch of the application.
UE-V has a few sync methods, but for cloud scenarios, including OneDrive, you will want to select the “External” option. This configuration method specifies that if UE-V settings are written to a local folder on the user computer, then any external sync engine (such as OneDrive for Business, Work Folders, SharePoint, or Dropbox) can be used to apply these settings to the different computers that users access. If you were configuring this via policy, you can assign the %USERNAME% variable when assigning the local folder (i.e. C:Users%USERNAME%OneDriveSettings.)
 Configuring UE-V sync using Group Policy
Putting it all together
Combining Enterprise State Roaming with UE-V gives your organization the capability to provide more user flexibility and portability across multiple devices, and allows those settings to travel with your end users wherever they might be working. We recommend that you take advantage of these two solutions to roam settings if you have Windows 10 Enterprise and have also enabled OneDrive and Azure Active Directory. The chart below is a quick reference to help understand and manage the differences between roaming options.
|
Item
|
Solution
|
Settings Storage
|
|
Common Windows 10 Items
|
Enterprise State Roaming
|
Automatically roamed via Azure AD
|
|
Modern Shell Items
|
|
Windows 10 Inbox and UWP Apps
|
|
Packaged Apps via MSIX
|
|
Legacy Shell items
|
UE-V
|
Recommendation is to configure an external cloud sync host (OneDrive)
|
|
Win32 Apps
|
by Scott Muniz | Jul 24, 2020 | Uncategorized
This article is contributed. See the original author and article here.
This week, Caripros HR Analytics shared a great tip on using a date picker add-in with forms, MrExcel.com showed you how to use the TODAY function with charts to illustrate current data, and Creative Venus brought in some top-notch design skills to deliver a sleek, modern table, complete with space for including your own branding. If you find these helpful, be sure to check out their channels!
Learn more about the Microsoft Creators Program.
See more from Caripros HR Analytics
See more from MrExcel.com
See more from Creative Venus
by Scott Muniz | Jul 24, 2020 | Alerts, Microsoft, Technology, Uncategorized
This article is contributed. See the original author and article here.
As discussed in my two previous posts, Azure Sentinel provides a variety of methods for importing threat intelligence directly into the ThreatIntelligenceIndicator Logs table where it can be used to power Analytics, Workbooks, Hunting, and other experiences.
However, Azure Sentinel also allows you to leverage massive repositories of external intelligence data as enrichment sources to enhance the triage and investigation experience of security incidents. Using the built-in automation capabilities of Azure Sentinel you can take any incident created through Azure Sentinel analytics rules, and retrieve additional context about the entities from third party sources, and make this context readily available to your security operations personnel to aid triage and investigation.
Today, we are announcing the availability of the RiskIQ Intelligence Connector for Azure Sentinel which allows you to tap into petabytes of external threat intelligence from RiskIQ’s Internet Intelligence Graph. Incidents can be enriched automatically using Azure Sentinel Playbooks, saving time and resources for your security responders. This blog will walk you through the setup, configuration, and show you how the rich context from the new RiskIQ Intelligence Connector playbooks is surfaced in Azure Sentinel security incidents.
Installation
Each RiskIQ enrichment playbook leverages one or more RiskIQ Security Intelligence Service APIs to provide up to the minute threat and contextual information. To learn more about the service and request a trial key, see the API documentation.
The set of RiskIQ Intelligence Connector playbooks are located in the Azure Sentinel GitHub repository.
In this blog we’ll use the Enrich-SentinelIncident-RiskIQ-IP-Passive-DNS playbook as an example.
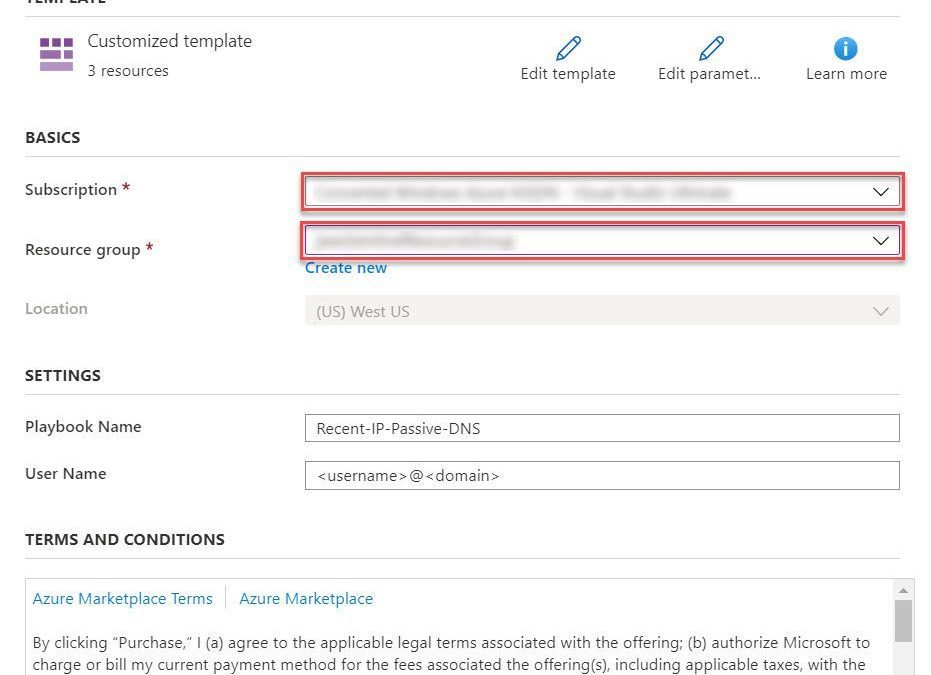
- Select the Deploy to Azure button on the playbook page in GitHub

- This will bring you to the Azure portal, Custom Deployment page. Input the Subscription and Resource Group values corresponding to your Azure Sentinel instance, and select the terms and conditions check box

- Select the Purchase button at the bottom of the page
- You will receive an Azure notification when the deployment has completed

Configuration
Once the playbook has been imported into your Azure Sentinel instance your will need to edit the playbook to configure the connections. Certain playbook actions require additional connection information to function, most commonly these are in the form of credentials for actions that require connecting to APIs. In this example, the playbook requires two connections, one for Azure Sentinel to read security alerts and the second for RiskIQ APIs to query for enrichment context for entities found in alerts.
- In the Azure portal, navigate to your Azure Sentinel workspace where you imported the playbook
- Select Playbooks from the Azure Sentinel navigation menu
- Select the Recent-IP-Passive-DNS playbook by selecting the playbook name
- Select Edit from the top menu of the playbook
- There are four steps in this playbook requiring you to configure connections

- Select a Connection from one of the steps requiring configuration and configure a new connection. For the connections to Azure Sentinel the user specified when establishing the connection must have sufficient permissions in the Azure Sentinel workspace to read the security alerts. For the RiskIQ connection, enter your RiskIQ API token and secret obtained from RiskIQ.
- Select Save from the top menu of the playbook to save the playbook
Use the RiskIQ playbook to enrich security incidents
Now that the Recent-IP-Passive-DNS playbook is installed and configured you can use it with the built-in Azure Sentinel automation framework in your analytics rules. Let’s take a look at how to associate this playbook with an analytic rule to enrich security incidents and give your security responders additional context for triage and investigation.
- Navigate to your Azure Sentinel Analytics page and select an existing analytics rule or template item you wish to add the playbook automation. Select Edit for an existing rule or Create rule for a new rule.
- The Recent-IP-Passive-DNS playbook works with analytics rules which map IP address entities so make sure you are working with such a rule. For simple testing of the playbook automation you can use rule logic as shown below to force an alert creation with a specific IP address.
AzureActivity
| take 1
| extend IPCustomEntity = "144.91.119.160"
- Navigate to the Automated response tab and place a check mark in the box for the Recent-IP-Passive-DNS playbook which will enable the playbook to run each time the analytic rule generates security alerts
- Select Save to finish and return to the Analytics page
The Recent-IP-Passive-DNS playbook queries the RiskIQ passive DNS database and retrieves any domains from the last 30 days associated with the IP address found in the security alert. It then adds this enrichment information to the resulting security incident so your security responders can easily access this additional context with triaging the incident. Let’s take a look at this experience for your security responders.
- Navigate to your Azure Sentinel Incidents page
- Locate the incident generated from the analytic rule configured to run the Recent-IP-Passive-DNS playbook automation and select Full details from the information pane
- Select the Comments tab to see the enrichment added by the Recent-IP-Passive-DNS playbook automation. You can also view the information in the RiskIQ portal by following the link provided at the bottom of the comment

Summary
In this post you learned how to obtain, configure, and associate the RiskIQ Intelligence Connector playbooks with analytics rules to enrich security incidents with additional context. Azure Sentinel, when combined with RiskIQ, has the potential to reshape how security teams operate, seamlessly integrating the most comprehensive external visibility with the advanced threat detection, AI, and orchestration found in Azure Sentinel.
by Scott Muniz | Jul 24, 2020 | Uncategorized
This article is contributed. See the original author and article here.
Windows 10, version 20H2 release will not bring updates to the Windows Hardware Compatibility Program and follow the same pattern as 19H2. Given below are more details with respect to all related WHCP activities.
Windows Hardware Compatibility program(WHCP) activities:
- WHCP requirements – No change. Windows 10, version 2004 requirements remain applicable for Windows 10, version 20H2 release.
- Hardware Lab kit – No change. Since WHCP requirements will persist in Windows 10, version 20H2, HLK will also remain the same. There will not be new HLK release in Windows 10, version 20H2. While both Windows 10, version 2004 and 20H2 OS can be used for Windows 10, version 2004 qualification, they will be recognized as meeting the Windows 10, version 2004 qualification.
- Errata – No change. All Windows 10, version 2004 errata will continue to be valid for Windows 10, version 20H2 release.
- HLK playlist – No change. HLK version 2004 playlist can be used for both Windows 10, version 2004 and 20H2 release.
- Driver signature – No change. Drivers meeting all the applicable Windows 10, version 2004 requirements, will be digitally signed with same signature attributes.
- Submission – No change. Both Windows 10, version 2004 and 20H2 OS can be used for WHCP submission.
- WHCP qualification – Windows 10, version 2004
- Required OS version – Either Windows 10, version 2004 or 20H2
- HLK version – HLK version 2004
by Scott Muniz | Jul 24, 2020 | Alerts, Microsoft, Technology, Uncategorized
This article is contributed. See the original author and article here.
Hi, all! Rod Trent here. I am a Cybersecurity CE/Consultant at Microsoft and work with Azure Sentinel literally every waking hour, so I see and hear a lot of unique and interesting things in relation to this fantastic product. I also blog for our Secure Infrastructure Blog and have quite a few Azure Sentinel articles posted there already.
Did you know that the Log Analytics agent requires an Internet connection no matter if it’s installed on an on-premises system or as an extension on a virtual machine stored in Azure? It may seem a bit quirky, but it’s true. Yes, even though an Azure VM has been spun up in the same cloud that the Log Analytics Workspace resides in, the agent still checks to see if there’s a valid Internet connection – well, actually it checks for a specific port (443) to be accessible, but the return error message is that an Internet connection is required.
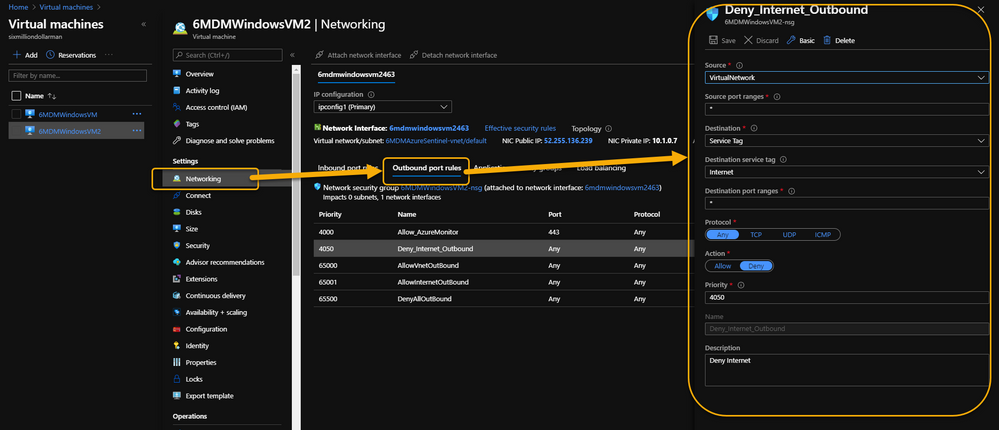
As a security precaution, some customers spin up VMs in Azure and disable all outbound Internet access. This is done through an Outbound rule (VM => Networking => Outbound port rules => Deny Internet) similar to what is shown in the following image:
 VM => Networking => Outbound port rules => Deny Internet
However, the same customer may also want to monitor potential threats against these VMs using Azure Sentinel. Azure Sentinel, of course, requires a Log Analytics workspace which requires the Log Analytics agent extension to be installed which, yeah…you guessed it…requires the outbound Internet connection already discussed.
Even more interesting is that the Log Analytics agent extension will deploy perfectly. And, unless it’s monitored obsessively, all seems just fine. Well, that is, until it’s realized that the newly installed agent isn’t sending its data to Azure Sentinel’s Log Analytics Workspace.
 Log Analytics Agent cannot connect due to a blocked port
If it’s required that the Azure VM remains Internet disconnected, the solution is to create a new Outbound rule for the VM to provide the necessary port to trick the agent into thinking it has the required Internet connection. The new Outbound rule also needs to have a higher priority than the blocker, otherwise the port will never be exposed.
The new Outbound rule should look like the following:
 Enable a new Outbound Rule specifically for AzureMonitor
The details:
Create a new Outbound rule with a higher priority than the Deny Internet rule with the following information:
- Source: VirtualNetwork
- Secure port ranges: *
- Destination: ServiceTag
- Destination service tag: AzureMonitor
- Destination port ranges: 443
- Protocol: Any
- Action: Allow
- Priority: (set it higher than the Deny Internet rule)
- Description: (I always recommend being very verbose when describing something you create – just in case you have a tendency to forget later on)
Summary
This technique ensures that the Virtual Machine doesn’t have Internet access according to policy, and that security can still be managed and monitored through Azure Sentinel. Disabling full Internet access for each Virtual Machine may seem a rare occurrence, but as I noted in my opening statement, I regularly work with scenarios that are sometimes uncommon. And, if I see it once, it’s most likely going to happen again. Sharing makes us all smarter.
A use case example where this makes perfect sense is for Windows Virtual Desktops (WVD). Disabling the Internet completely for a compromised WVD, ensures that the device is effectively quarantined from the other VMs in the WVD pool while still maintaining the ability to kick-off a malware scan through an Azure Sentinel Playbook because the Azure Monitor port is still open.
NOTE: In the future, you can Use Azure Private Link to securely connect networks to Azure Monitor.
For additional knowledge in relation to Azure Sentinel-specific role access components, see the following:
Granting Access to Specific Azure Sentinel Playbooks for Specific Analysts: https://secureinfra.blog/2020/06/19/granting-access-to-specific-azure-sentinel-playbooks-for-specific-analysts/
Controlling access to Azure Sentinel Data: Resource RBAC: https://techcommunity.microsoft.com/t5/azure-sentinel/controlling-access-to-azure-sentinel-data-resource-rbac/ba-p/1301463
Table Level RBAC In Azure Sentinel: https://techcommunity.microsoft.com/t5/azure-sentinel/table-level-rbac-in-azure-sentinel/ba-p/965043
Permissions in Azure Sentinel: https://docs.microsoft.com/en-us/azure/sentinel/roles
* Check out my other blog for more Azure Sentinel content: Rod Trent at the Secure Infrastructure Blog
* Follow me on Twitter: https://twitter.com/rodtrent
by Scott Muniz | Jul 24, 2020 | Uncategorized
This article is contributed. See the original author and article here.
At the end of August, Outlook for Android will roll out support for the new device password complexity functionality included within Android 10 and later.
With each operating system version release, Google includes new APIs in which apps can target for supporting new functionality offered in the operating system release. Until apps target those APIs, they are not able to take advantage of that functionality. When Google announced Android 10 and its latest API (API 29), they also announced deprecation of Device Admin. Prior to targeting Android 10, Outlook for Android used Device Admin to manage device password settings defined in an Exchange mobile device mailbox policy; for more information see, Managing Outlook for iOS and Android in Exchange Online.
With Outlook for Android targeting Android 10, when a user launches Outlook on Android 10 and later devices, Outlook queries the device’s (or the work profile’s) screen lock complexity. Android 10’s password complexity levels are defined as:
|
Password complexity level
|
Password requirements
|
|
None
|
No password requirements are configured
|
|
Low
|
Password can be a pattern or a PIN with either repeating (4444) or ordered (1234, 4321, 2468) sequences
|
|
Medium
|
Passwords that meet one of the following criteria:
– PIN with no repeating (4444) or ordered (1234, 4321, 2468) sequences with a minimum length of 4 characters
– Alphabetic passwords with a minimum length of 4 characters
– Alphanumeric passwords with a minimum length of 4 characters
|
|
High
|
Passwords that meet one of the following criteria:
– PIN with no repeating (4444) or ordered (1234, 4321, 2468) sequences with a minimum length of 8 characters
– Alphabetic passwords with a minimum length of 6 characters
– Alphanumeric passwords with a minimum length of 6 characters
|
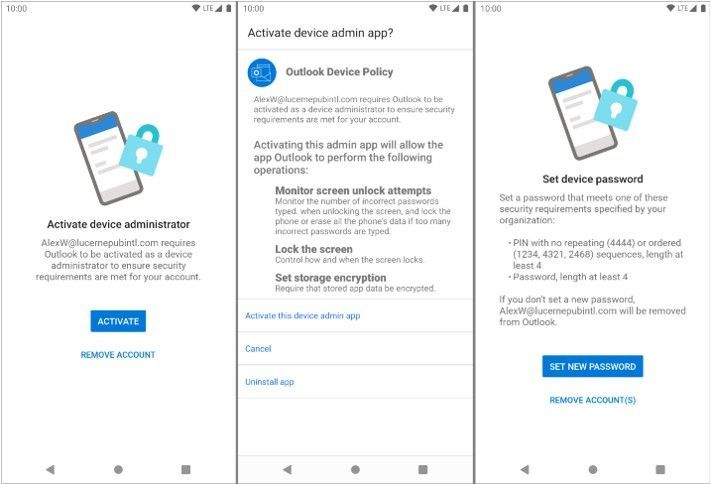
If Android determines that Outlook requires a stronger screen lock, then Outlook directs the user to the system screen lock settings, allowing the user to update the security settings to become compliant:

At no time is Outlook aware of the user’s password; the app is only aware of the password complexity level.
The specific password complexity criteria and conversion logic used for translating Exchange mobile mailbox device policy password settings to Android 10 password complexity levels is below, but is also documented in Mobile device mailbox policies in Exchange Online:
|
Mobile device mailbox policy setting
|
Android password complexity level
|
|
Password enabled = false
|
None
|
|
Allow simple password = true
Min password length < 4
|
Low
|
|
Allow simple password = true
Min password length < 6
|
Medium
|
|
Allow simple password = false
Alphanumeric password required = true
Min password length < 6
|
Medium
|
|
Allow simple password = true
Min password
|
High
|
|
Allow simple password = false
Alphanumeric password required = true
Min password length >= 6
|
High
|
The change associated with Android 10 will go into effect immediately once the version of Outlook for Android that targets Android 10 is updated at the end of August. For devices that are not upgraded to Android 10 (Android 9 and below), Device Admin will continue to be in use for managing the device’s password and there are no changes to Outlook’s use of Device Admin from a user experience perspective.
What do I need to do to prepare for this change?
There is nothing you need to prepare for this change. This may be a good time to review your current password policies for mobile devices and mobile apps. Our recommendation is to consult with your Microsoft account team on the right security solution for your organization. Depending on whether your devices are company owned or BYOD, the recommendation will vary. Our recommendation is that administrators do not rely on Exchange mobile device mailbox policies, but instead use a mobile management solution such as Microsoft Intune to set access requirement conditions appropriate for your organization. To learn more visit https://aka.ms/startoutlookmobile.
We also recommend that your users upgrade to the latest version of Android that is supported on your users’ phones and tablets.
Additional resources
Ross Smith IV

by Scott Muniz | Jul 24, 2020 | Uncategorized
This article is contributed. See the original author and article here.

ASP.NET MVC: CRUD OPERATIONS FOR FULL CALENDAR JQUERY PLUGIN
Asma Khalid is an Entrepreneur, ISV, Product Manager, Full Stack .Net Expert, Community Speaker, Contributor, and Aspiring YouTuber. Asma counts more than 7 years of hands-on experience in Leading, Developing & Managing IT related projects and products as an IT industry professional. Asma is the first woman from Pakistan to receive the MVP award three times, and the first to receive C-sharp corner online developer community MVP award four times. See her blog here.

Deploy WordPress on Azure Kubernetes Service
Dave Rendón has been a Microsoft Azure MVP for 6 consecutive years. As an IT professional with more than 10 years of experience, he has a strong focus on Microsoft technologies and moreover on Azure since 2010. He supports the business developers and sales teams at Kemp from a technical level. I also support the account managers by developing a firm understanding of their customer’s technical dilemma(s) and providing a sound technical solution. Follow him on Twitter: @DaveRndn

Building microservices through Event Driven Architecture part 12: Continuous Integration
Gora Leye is a Solutions Architect, Technical Expert and Devoper based in Paris. He works predominantly in Microsoft stacks: Dotnet, Dotnet Core, Azure, Azure Active Directory/Graph, VSTS, Docker, Kubernetes, and software quality. Gora has a mastery of technical tests (unit tests, integration tests, acceptance tests, and user interface tests). Follow him on Twitter @logcorner.

#Microsoft Windows Admin Center and Azure Backup Management #WAC #Azure
James van den Berg has been working in ICT with Microsoft Technology since 1987. He works for the largest educational institution in the Netherlands as an ICT Specialist, managing datacenters for students. He’s proud to have been a Cloud and Datacenter Management since 2011, and a Microsoft Azure Advisor for the community since February this year. In July 2013, James started his own ICT consultancy firm called HybridCloud4You, which is all about transforming datacenters with Microsoft Hybrid Cloud, Azure, AzureStack, Containers, and Analytics like Microsoft OMS Hybrid IT Management. Follow him on Twitter @JamesvandenBerg and on his blog here.

How can you prepare for Project Cortex?
Marijn Somers is an MVP for Office Apps and Services who has been active in various roles to help clients deliver successful collaboration and content management solutions for more than 14 years. These roles include project manager, presales engineer, evangelist, SPOC (Single-Point-Of-Contact), trainer, analyst and administrator. Marjin is the founder and owner of Balestra, an outfit which focuses on Microsoft Office 365 and specializes in governance and user adoption for collaboration and document management. Follow him on Twitter @MarjinSomers
by Scott Muniz | Jul 23, 2020 | Uncategorized
This article is contributed. See the original author and article here.
Digital clutter is an ever-increasing challenge. It’s one of the reasons why modern life feels so busy and chaotic. Microsoft To Do is committed to providing a complete task management solution that keeps people at the center. To Do helps people focus on and keep track of what matters, in work and in life. Our 3 key promises are: 1) collect tasks from different sources, 2) show urgent and important tasks, and 3) help users complete them (coming soon).
To fulfil our first promise, we’re integrating To Do with the Microsoft 365 suite of applications and making it available in key user workflows. Following up on the full Outlook/To Do integration, Tasks in Teams is rolling out this August. With this launch, To Do is now available in Microsoft Teams .
To Do is already integrated with Planner – tasks assigned to you in Planner boards show up in the “Assigned to you” list. To Do is also available in Microsoft Launcher and any task added via Cortana gets added to To Do. By Q121, we will support @mentions in Excel, Word, and PowerPoint, which means that whenever someone @mentions you, the tasks you’re mentioned in will automatically appear in your “Assigned to you” smart list. We’re also working on adding your reading lists from Edge as tasks. More integrations are on the way to make To Do the place for all your tasks.
 Tasks in Teams provide consolidated view of your To Do and Planner tasks
To Do is much more than a to-do list organizer. It’s an intelligent fabric that collects and connects tasks across the Microsoft 365 suite of applications. For example, the Insights add-in program for Outlook extracts important commitments or follow-ups from your Outlook messages and, with a click, adds them to To Do. In addition, the My Day smart list has task suggestions collected from across Microsoft 365 to help you prioritize and complete important tasks for your day. Moreover, you can also share lists with coworkers to get more done together. You can easily switch to your personal account and organize your tasks outside of work.
To Do is built on the Microsoft Exchange platform, and it meets all security and privacy standards by design like your Outlook inbox. Organization admins can easily grant or remove access to To Do for their employees. We imagine a future where all your tasks in Microsoft 365 apps are collected automatically in To Do so you can focus on what matters and save time every day.
 To Do complies with information governance and eDiscovery features of Office 365
We’ll post updates just like this on the Tech Community blog to let you know about new features that you can try in To Do. Check back here for regular posts and check out our Release Notes for more information about updates and fixes. In the meantime, we want to hear from you! Tell us what you think about the Teams integration and let us know what you’re looking forward to next via UserVoice or write to us (todofeedback@microsoft.com).
by Scott Muniz | Jul 23, 2020 | Uncategorized
This article is contributed. See the original author and article here.
Kafka Schema Registry provides serializers that plug into Kafka clients that handle message schema storage and retrieval for Kafka messages that are sent in the Avro format. Its used to be a OSS project by Confluent , but is now under the Confluent community license . The Schema Registry additionally serves the below purposes
- Store and retrieve schemas for producers and consumers
- Enforce backward/forward /full compatibility on Topics
- Decrease the size of the payload sent to Kafka
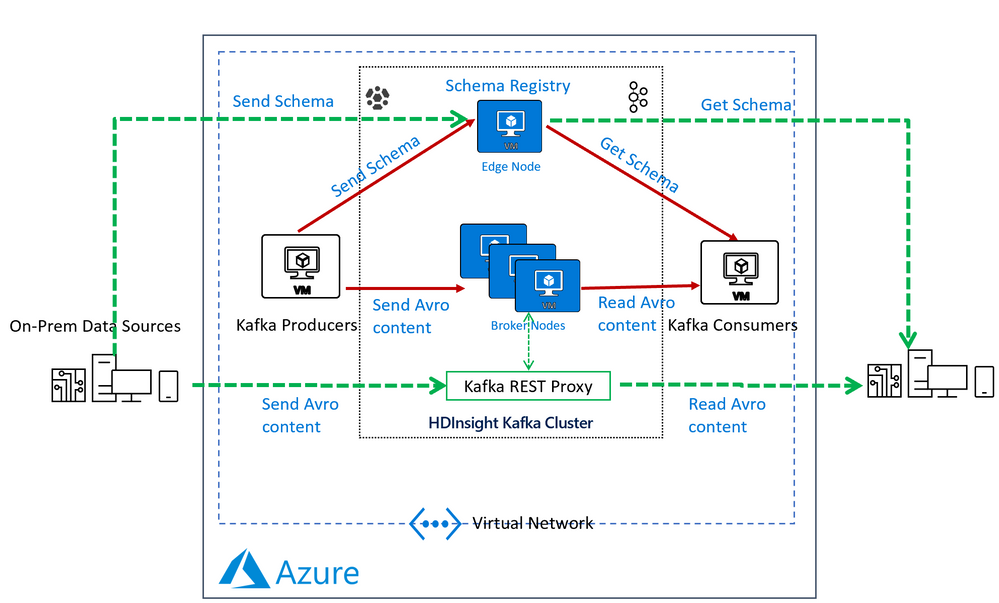
In an HDInsight Managed Kafka cluster the Schema Registry is typically deployed on an Edge node to allow compute separation from Head Nodes.
Below is a representative architecture of how the Schema Registry is deployed on an HDInsight cluster. Note that Schema Registry natively exposes a REST API for operations on it. Producers and consumers can interact with the Schema Registry from within the VNet or using the Kafka REST Proxy.

Deploy a HDInsight Managed Kafka with Confluent Schema Registry
In this section we would deploy an HDInsight Managed Kafka cluster with an Edge Node inside a Virtual Network and then install the Confluent Schema Registry on the Edge Node.
- Click on the Deploy to Azure Link to start the deployment process
Deploy to Azure
-
On the Custom deployment template populate the fields as described below. Leave the rest of their fields at their default entries
- Resource Group : Choose a previously created resource group from the dropdown
- Location : Automatically populated based on the Resource Group location
- Cluster Name : Enter a cluster name( or one is created by default)
- Cluster Login Name: Create a administrator name for the Kafka Cluster( example : admin)
- Cluster Login Password: Create a administrator login password for the username chosen above
- SSH User Name: Create an SSH username for the cluster
- SSH Password: Create an SSH password for the username chosen above
-
Check he box titled “I agree to the terms and conditions stated above” and click on Purchase.

- Wait till the deployment completes and you get the Your Deployment is Complete message and then click on Go to resource.

- On the Resource group explore the various components created as part of the Deployment . Click on the HDInsight Cluster to open the cluster page.
- On the HDInsight cluster page click on the SSH+Cluster login blade on the left and get the hostname of the edge node that was deployed.

-
Using an SSH client of your choice ssh into the edge node using the sshuser and password that you set in the custom ARM script.
-
In the next section we would configure the Confluent Kafka Schema Registry that we installed on the edge node
Configure the Confluent Schema Registry
The confluent schema registry is located at /etc/schema-registry/schema-registry.properties and the mechanisms to start and stop service executables are located at the /usr/bin/ folder.
The Schema Register needs to know the Zookeeper service to be able to interact with HDInsight Kafka cluster. Follow the below steps to get the details of the Zookeeper Quorum.
- Set up password variable. Replace
PASSWORD with the cluster login password, then enter the command
export password='PASSWORD'
- Extract the correctly cased cluster name
export clusterName=$(curl -u admin:$password -sS -G "http://headnodehost:8080/api/v1/clusters" | jq -r '.items[].Clusters.cluster_name')
- Extract the Kafka Zookeeper hosts
export KAFKAZKHOSTS=$(curl -sS -u admin:$password -G https://$clusterName.azurehdinsight.net/api/v1/clusters/$clusterName/services/ZOOKEEPER/components/ZOOKEEPER_SERVER | jq -r '["(.host_components[].HostRoles.host_name):2181"] | join(",")' | cut -d',' -f1,2);
- Validate the content of the
KAFKAZKHOSTS variable
echo $KAFKAZKHOSTS
- Zookeeper values appear in the below format . Make a note of these values as they will be used later
zk1-ag4kaf.q2hwzr1xkxjuvobkaagmjjkhta.gx.internal.cloudapp.net:2181,zk2-ag4kaf.q2hwzr1xkxjuvobkaagmjjkhta.gx.internal.cloudapp.net:2181
- To extract Kafka Broker information into the variable KAFKABROKERS use the below command.
export KAFKABROKERS=$(curl -sS -u admin:$password -G https://$clusterName.azurehdinsight.net/api/v1/clusters/$clusterName/services/KAFKA/components/KAFKA_BROKER | jq -r '["(.host_components[].HostRoles.host_name):9092"] | join(",")' | cut -d',' -f1,2);
Check to see if the Kafka Broker information is available
echo $KAFKABROKERS
- Kafka Broker host information appears in the below format
wn1-kafka.eahjefyeyyeyeyygqj5y1ud.cx.internal.cloudapp.net:9092,wn0-kafka.eaeyhdseyy1netdbyklgqj5y1ud.cx.internal.cloudapp.net:9092
- Open the Schema Registry properties files in edit mode
sudo vi /etc/schema-registry/schema-registry.properties
- By default the file would contain the below parameters
listeners=http://0.0.0.0:8081
kafkastore.connection.url=zk0-ohkl-h:2181,zk1-ohkl-h:2181,zk2-ohkl-h:2181
kafkastore.topic=_schemas
debug=false
- Replace the kafastore.connection.url variable with the Zookeeper string that you noted earlier. Also replace the debug variable to true . If set to true true, API requests that fail will include extra debugging information, including stack traces. The properties files now looks like this.
listeners=http://0.0.0.0:8081
kafkastore.connection.url=zk1-ag4kaf.q2hwzr1xkxjuvobkaagmjjkhta.gx.internal.cloudapp.net:2181,zk2-ag4kaf.q2hwzr1xkxjuvobkaagmjjkhta.gx.internal.cloudapp.net:2181
kafkastore.topic=_schemas
debug=true
cd /bin
$ sudo schema-registry-start /etc/schema-registry/schema-registry.properties
- Schema Registry Starts and starts listening for requests.
...
...
[2020-03-22 13:24:49,089] INFO Adding listener: http://0.0.0.0:8081 (io.confluent.rest.Application:190)
[2020-03-22 13:24:49,154] INFO jetty-9.2.24.v20180105 (org.eclipse.jetty.server.Server:327)
[2020-03-22 13:24:49,753] INFO HV000001: Hibernate Validator 5.1.3.Final (org.hibernate.validator.internal.util.Version:27)
[2020-03-22 13:24:49,902] INFO Started o.e.j.s.ServletContextHandler@40844aab{/,null,AVAILABLE} (org.eclipse.jetty.server.handler.ContextHandler:744)
[2020-03-22 13:24:49,914] INFO Started NetworkTrafficServerConnector@33fe57a9{HTTP/1.1}{0.0.0.0:8081} (org.eclipse.jetty.server.NetworkTrafficServerConnector:266)
[2020-03-22 13:24:49,915] INFO Started @2780ms (org.eclipse.jetty.server.Server:379)
[2020-03-22 13:24:49,915] INFO Server started, listening for requests... (io.confluent.kafka.schemaregistry.rest.SchemaRegistryMain:45)
-
With the Schema Registry running in one SSH session , launch another SSH window and try out some basic commands to ensure that Schema Registry is working as expected.
-
Register a new version of a schema under the subject “Kafka-key” and note the output
$ curl -X POST -i -H "Content-Type: application/vnd.schemaregistry.v1+json"
    --data '{"schema": "{"type": "string"}"}'
   HTTP/1.1 200 OK
Date: Sun, 22 Mar 2020 16:33:04 GMT
Content-Type: application/vnd.schemaregistry.v1+json
Content-Length: 9
Server: Jetty(9.2.24.v20180105)
- Register a new version of a schema under the subject “Kafka-value” and note the output
curl -X POST -i -H "Content-Type: application/vnd.schemaregistry.v1+json"
    --data '{"schema": "{"type": "string"}"}'
HTTP/1.1 200 OK
Date: Sun, 22 Mar 2020 16:34:18 GMT
Content-Type: application/vnd.schemaregistry.v1+json
Content-Length: 9
Server: Jetty(9.2.24.v20180105)
- List all subjects and check the output
curl -X GET -i -H "Content-Type: application/vnd.schemaregistry.v1+json"
    http://localhost:8081/subjects
HTTP/1.1 200 OK
Date: Sun, 22 Mar 2020 16:34:39 GMT
Content-Type: application/vnd.schemaregistry.v1+json
Content-Length: 27
Server: Jetty(9.2.24.v20180105)

["Kafka-value","Kafka-key"]
Send and consume Avro data from Kafka using schema registry
- Create a fresh Kafka Topic
agkafkaschemareg
/usr/hdp/current/kafka-broker/bin/kafka-topics.sh --create --replication-factor 3 --partitions 8 --topic agkafkaschemareg --zookeeper $KAFKAZKHOSTS
-
Use the Kafka Avro Console Producer to create a schema , assign the schema to the Topic and start sending data to the topic in Avro format. Ensure that the Kafka Topic in the previous step is successfully created and that $KAFKABROKERS has a value in it.
-
The schema we are sending is a Key: Value Pair
Key : Int
Value
{
  "type": "record",
  "name": "example_schema",
  "namespace": "com.example",
  "fields": [
    {
      "name": "cust_id",
      "type": "int",
      "doc": "Id of the customer account"
    },
    {
      "name": "year",
      "type": "int",
      "doc": "year of expense"
    },
    {
      "name": "expenses",
      "type": {
        "type": "array",
        "items": "float"
      },
      "doc": "Expenses for the year"
    }
  ],
  "doc:": "A basic schema for storing messages"
}
- Use the below command to start the Kafka Avro Console Producer
/usr/bin/kafka-avro-console-producer --broker-list $KAFKABROKERS --topic agkafkaschemareg --property parse.key=true --property key.schema='{"type" : "int", "name" : "id"}' --property value.schema='{ "type" : "record", "name" : "example_schema", "namespace" : "com.example", "fields" : [ { "name" : "cust_id", "type" : "int", "doc" : "Id of the customer account" }, { "name" : "year", "type" : "int", "doc" : "year of expense" }, { "name" : "expenses", "type" : {"type": "array", "items": "float"}, "doc" : "Expenses for the year" } ], "doc:" : "A basic schema for storing messages" }'
- When the producer is ready to accept messages start sending the messages in the predefined Avro schema format. Use the Tab key to create spacing between the Key and Value.
1 TAB {"cust_id":1313131, "year":2012, "expenses":[1313.13, 2424.24]}
2 TAB {"cust_id":3535353, "year":2011, "expenses":[761.35, 92.18, 14.41]}
3 TAB {"cust_id":7979797, "year":2011, "expenses":[4489.00]}

- Try entering random non schema data into the console producer to see how the producer does now allow any data that does not conform to predefined Avro schema.
1       {"cust_id":1313131, "year":2012, "expenses":[1313.13, 2424.24]}
2       {"cust_id":1313131,"cust_age":34 "year":2012, "expenses":[1313.13, 2424.24,34.212]}
org.apache.kafka.common.errors.SerializationException: Error deserializing json {"cust_id":1313131,"cust_age":34 "year":2012, "expenses":[1313.13, 2424.24,34.212]} to Avro of schema {"type":"record","name":"example_schema","namespace":"com.example","fields":[{"name":"cust_id","type":"int","doc":"Id of the customer account"},{"name":"year","type":"int","doc":"year of expense"},{"name":"expenses","type":{"type":"array","items":"float"},"doc":"Expenses for the year"}],"doc:":"A basic schema for storing messages"}
Caused by: org.codehaus.jackson.JsonParseException: Unexpected character ('"' (code 34)): was expecting comma to separate OBJECT entries
 at [Source: java.io.StringReader@3561c410; line: 1, column: 35]
        at org.codehaus.jackson.JsonParser._constructError(JsonParser.java:1433)
        at org.codehaus.jackson.impl.JsonParserMinimalBase._reportError(JsonParserMinimalBase.java:521)
        at org.codehaus.jackson.impl.JsonParserMinimalBase._reportUnexpectedChar(JsonParserMinimalBase.java:442)
        at org.codehaus.jackson.impl.ReaderBasedParser.nextToken(ReaderBasedParser.java:406)
        at org.apache.avro.io.JsonDecoder.getVaueAsTree(JsonDecoder.java:549)
        at org.apache.avro.io.JsonDecoder.doAction(JsonDecoder.java:474)
        at org.apache.avro.io.parsing.Parser.advance(Parser.java:88)
        at org.apache.avro.io.JsonDecoder.advance(JsonDecoder.java:139)
        at org.apache.avro.io.JsonDecoder.readInt(JsonDecoder.java:166)
        at org.apache.avro.io.ValidatingDecoder.readInt(ValidatingDecoder.java:83)
        at org.apache.avro.generic.GenericDatumReader.readInt(GenericDatumReader.java:511)
        at org.apache.avro.generic.GenericDatumReader.readWithoutConversion(GenericDatumReader.java:182)
        at org.apache.avro.generic.GenericDatumReader.read(GenericDatumReader.java:152)
        at org.apache.avro.generic.GenericDatumReader.readField(GenericDatumReader.java:240)
        at org.apache.avro.generic.GenericDatumReader.readRecord(GenericDatumReader.java:230)
        at org.apache.avro.generic.GenericDatumReader.readWithoutConversion(GenericDatumReader.java:174)
        at org.apache.avro.generic.GenericDatumReader.read(GenericDatumReader.java:152)
        at org.apache.avro.generic.GenericDatumReader.read(GenericDatumReader.java:144)
        at io.confluent.kafka.formatter.AvroMessageReader.jsonToAvro(AvroMessageReader.java:213)
        at io.confluent.kafka.formatter.AvroMessageReader.readMessage(AvroMessageReader.java:200)
        at kafka.tools.ConsoleProducer$.main(ConsoleProducer.scala:59)
        at kafka.tools.ConsoleProducer.main(ConsoleProducer.scala)
- In a different screen start the Kafka Avro Console Consumer
sudo /usr/bin/kafka-avro-console-consumer --bootstrap-server $KAFKABROKERS --topic agkafkaschemareg --from-beginning
- You should start seeing the below output
{"cust_id":1313131,"year":2012,"expenses":[1313.13,2424.24]}
{"cust_id":7979797,"year":2011,"expenses":[4489.0]}
{"cust_id":3535353,"year":2011,"expenses":[761.35,92.18,14.41]}

by Scott Muniz | Jul 23, 2020 | Uncategorized
This article is contributed. See the original author and article here.
I was working on this case last week with permission error on the spark notebook, so basically the scenario was:
1. Loading data from another database to DB container.
2. Loading Data from Datawarehouse using Spark Notebook
When the second step was executed the error bellow was throw:
Error: java.sql.SQLException: com.microsoft.sqlserver.jdbc.SQLServerException:User does not have permissions to perform this action
So the error message is pretty clear: This is a permission error. The solution was also simple as the message.
We created a SQL User on the Db for this process specific. As this process requires only data reader permission that was the one given to the user.
---Run on Master DB
CREATE LOGIN loginmame    WITH PASSWORD = Lalala!0001'

GO


---Run on SQL DW DB
CREATE USER username

FOR LOGIN loginname

WITH DEFAULT_SCHEMA = dbo

GO


-- Add user to the database role

EXEC sp_addrolemember N'db_datareader', N'username'

GO

GRANT CONNECT TO username;
After that we changed the notebook process to run using the SQL User/Password that we just created. As it follows.
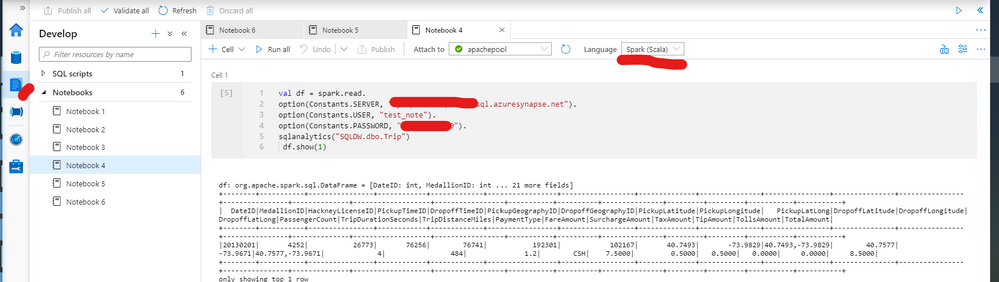
Spark script using SQL User to be executed on the notebook (spark Scala):
val df = spark.read.

option(Constants.SERVER, "Workspacename.sql.azuresynapse.net").

option(Constants.USER, "user ").

option(Constants.PASSWORD, "password").

sqlanalytics("Databasename.dbo.tablename")

 df.show(1)
Also as figure 1 exemplifies:

That is it!
Liliam Leme
UK Engineer

Recent Comments