by Scott Muniz | Jul 30, 2020 | Uncategorized
This article is contributed. See the original author and article here.
When advising on Microsoft 365 projects, I’m asked by my clients, “What does good look like on Yammer?” As Yammer caters to a variety of purposes, my usual answer is, it depends. It is important to first have clarity of what your organisation, a community or a group want to achieve from engaging our workforce.
When we break it down into several scenarios, we can explore what good looks like from the perspective of these three: senior leadership engagement, connecting fristline workers and active communities.
1: Senior leadership engagement
This is a common scenario for successful adoption of Yammer. Yammer’s success is particularly dependent on digital leadership: the visibility of senior leaders, managers and influencers to set the tone and the agenda.
Leaders can move beyond just broadcasting their messages to listening to employees. One of the most important behaviours of a leader on Yammer is to listen. It’s a place for conversations, discussions, and stories. Leaders listening and responding to the employees conversations, tends to lead to a more engaged employee.
We need leaders to be involved in Yammer to help get others talking. A leader responding or liking a post really makes an impact, their presence matters and sets the tone of the Yammer network.
As this research from SWOOP Analytics shows, if a senior leader recognises a post by liking or responding, the person affected increased their activity per day by over 50%. This is incredibly significant – this shows the power of leaders to engage us rather than simple to tell us.
Here’s what good looks like for leaders:
- Respond more than you post. This shows you are listening and actively engaging with the workforce.
- Ask questions. A question is the most powerful tool in digital conversations: it breaches the barrier between leadership and the workforce, it is a way of admitting that we don’t have all of the answers, it helps get answers in complex systems. And most importantly of all, a question starts a conversation.
- Be human. Where leaders are open, honest and are themselves, they invite empathy and build trust. And what is the biggest barrier to people engaging with social tools, both enterprise and personal? In my experience, it’s a lack of trust.
- Set goals. If we want to tap into the voice of the crowd – and want focused and relevant contributions – then let’s set some goals. What are we, as an organisation or department, focusing on? Visibility of our priorities means we get more helpful contributions and less cats.

2. Engaging with firstline workers
Yammer is one of my favourite ways of engaging firstline workers with the activities and, most importantly, people of the wider organisation. Firstline workers, often without access to corporate systems, are typically well out of the loop, relying on their managers to communicate matters.
Yammer provides a simple way to both connect and facilitate full circle of two way engagement. Organizations can get the perspectives from all roles, which becomes essential if we really want to get a handle on change and innovation in complex working environments.
If firstline workers experience a disconnect from head office and their colleagues, Yammer can be where they can connect with both. Yammer gives them a platform to share and to be seen – and most importantly, being encouraged to be heard.
Here’s what good looks like for firstline workers:
- Activity is more than just views and likes. Yammer gives firstline workers a place to have a voice – not just connecting with leadership, but also with each other.
- Engagement is seen not just between individuals, but between locations. Having conversations between individual locations and regions can create a sense of belonging. This can be done by running challenges on a location basis, such as campaigns run by KFC to improve safety incident reporting in stores by encouraging a competitive approach.
- Being invited to contribute to organisation-wide programs. The crowd-sourcing of ideas based on the day-to-day experienced by firstline workers opens up huge opportunities denied to us by closed communications channels. Such programs, if carried out properly, can realise huge savings, such as this campaign run by Centrica which resulted in savings of £5 million.
- Real-time knowledge is shared within communities. Posts are made based on observations from the firstline, often containing uploads of photos from mobile devices. Firstline workers –access to a huge amount of information that can be valuable to their colleagues back in the office, such as a change in local conditions or a new hazard that has been experienced. Reporting these back through Yammer gives real-time knowledge which can be far more valuable than submitting into a closed reporting process – by which time it may be too late.

3. Community Managers
Communities are the bread and butter of Yammer. And with Yammer groups being rebranded as communities, this reflects the natural position of Yammer as a place for community conversations, as opposed to specific team and project-based conversations.
Very simply, communities are where people come together through a common need or connection/ There is one single thing that everyone has in common. With large and distributed workforces, Yammer is often the only place where we can all get together.
Once a need arises, communities can be incredibly powerful due to the diverse nature of people they comprise. Work-focused communities, ideally, are made up of individuals from completely different teams and business units who have a common interest or need.
The success of a community, however, depends largely on one thing: A community manager. The activity spreader, the network glue, the conversation catalyst.
Here’s what good looks like for community managers on Yammer:
- Members span the across the organization. Community members are from different parts of the organisation and are not working together as a team or on a project.
- Membership is open to all – it’s not closed for ‘secret stuff’.
- The purpose of the community is clear – there is an obvious need or problem to solve that is known by all members.
- Building community management early on. Communities may need some active management from community managers, such as inviting in relevant people and building conversations, such as by using @mentions
- Communities have an even spread of activity. Conversations are not dominated by a small number of individuals, but rather are equally distributed among a diverse group of people.
- New posts are written as questions as much as statements. Communities are great places to share experiences and ideas, but they are also perfect for getting help. Asking a question also generates 150% more replies – a great conversation starter if you want to build a thread
- More than 25% of members are active. Anything less, and it largely becomes a forum for a small number of people to broadcast their thoughts.

Example network map from SWOOP Analytics of a Yammer community showing well distributed conversations, with most members responding to each-other relatively frequently.
So how are you doing?
You may only need a few tweaks to what you are currently doing to help evolve your conversations and communities in Yammer. By listening and learning from one another, you’ll be able to use Yammer as a tool to meet the needs of your organisations using their most powerful asset – their people.
And that’s what good looks like.
A diverse group of people meeting their needs and the organisation’s needs in one place.

I’m Andrew Pope, and my passion is helping medium and large organisations connect their technology with their people – finding new and important ways of work that meet everyone’s needs.
I help improve collaboration and make digital working safe and purposeful through facilitation, strategy development and virtual card games. If you’d like a chat, please ping me at andrew@innosis.eu
by Scott Muniz | Jul 30, 2020 | Uncategorized
This article is contributed. See the original author and article here.
2020 has been wild. COVID-19 has reached all corners of the world, impacting and interrupting the way educators teach, students learn, parents support learners, and how we lead our daily lives. Microsoft Teams for Education has been right there alongside educators, students, and families during these often challenging times with new changes and improvements announced in June and July to help schools adapt to learning during a pandemic.
Thank you for sharing your feedback, triumphs, and difficulties with us along the way. We’re humbled by the ingenuity you bring to improving student outcomes every day and the trust you extend to Microsoft Teams as a part of your learning community. Each new and improved feature we design is inspired by you, and for you.
Now, we’re thrilled to share even more Teams updates for those headed into a new school year or those in the middle of their year. Whether your school is learning remotely, adopting hybrid learning, or adjusting plans week-to-week, we’ve got you covered to:
1) Run engaging classes through online meetings
2) Maintain student safety with control of meetings and classrooms
3) Easily deploy and manage Teams for your school or institution
4) Do more with Assignments in Teams
5) Keep learners engaged and collaborating in the classroom
6) Nurture social and emotional wellbeing outside of the classroom
7) Train yourself in Teams with additional resources
Let’s dive in! (If you’re just looking for a list without extra description, click here to jump.)
1) Run engaging classes through online meetings
Different choices on how to see each other and engage in online classes
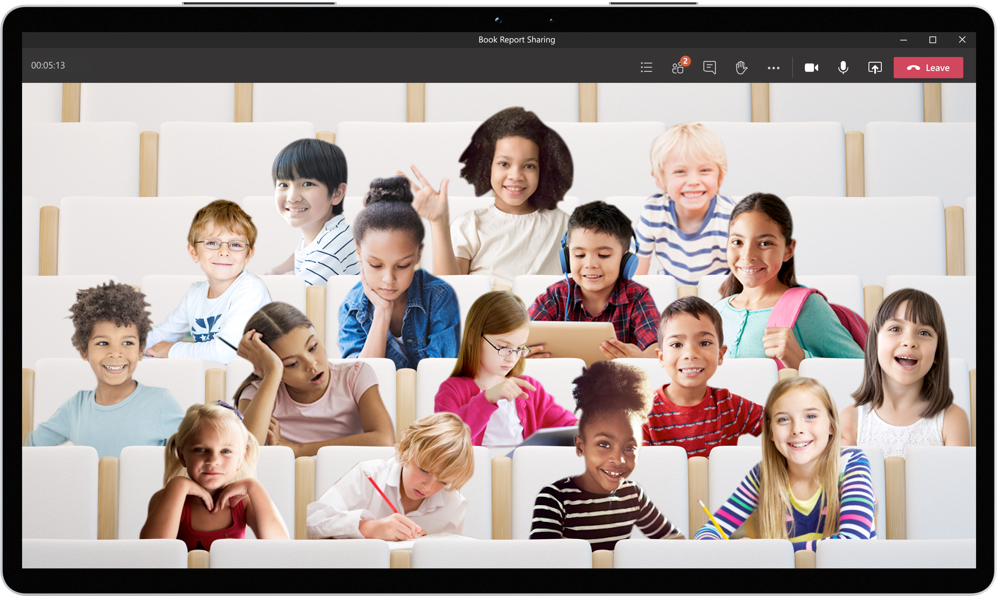
Not every class or discussion has the same needs. That’s why you’ll have different options to view your class on desktop and mobile. Turn on Large Gallery view (aka a 7×7 video grid) to see everyone all at once, Together Mode for classroom discussions (read more about the science and use cases here), or Dynamic view to easily track the content or person currently speaking in class. And if a student is signing in from a mobile device, they’ll be able to see more videos on iOS or Android devices, such as 2×4 and 3×3, too.
When: Expected in August
 (small).png") Together Mode makes it easier for students to focus on body language and nonverbal cues.
Together Mode makes it easier for students to focus on body language and nonverbal cues.
 Dynamic view gives a responsive layout for participants and content.
Updated Attendance Report option
Educators will soon have the new option to download Attendance Reports after a class meeting is over in the meeting chat and channel thread. Only the meeting organizer has access to the Attendance Report, which will cover Join Time and Leave Time, Email Addresses, along with the Duration so educators can more easily track student attendance as well as engagement. This feature is not on by default now and must be enabled first by IT Admins. Learn how to enable Attendance Reports in the Admin Portal here.
When: Expected in early September
Real-time visual collaboration in online classes, with control over when students can add to the whiteboard
Visual collaboration tools can make meetings and teaching environments more effective and inclusive. Whiteboard in Teams now has new features including faster load times, sticky notes, text, and drag-and-drop capabilities. These features enable students who don’t have access to a touch or pen device to participate in whiteboarding sessions during Teams meetings. Plus, educators will also have the option to present the digital whiteboard without students having access to drawing on the board during class.
When: Available now
 Whiteboard in Teams for Education gives educators a digital whiteboard for real-time drawing and collaboration.
Allow more students to join large lectures
Starting this month, Teams meetings are now available for up to 300 attendees (up from 250). By the close of 2020, Teams meetings will grow to support up to 1,000 students. When you want to bring in more students or faculty to watch a presentation or discussion, Teams will also support a view-only meeting experience for up to 20,000 participants.
When: Available now and later this year
Break into collaboration with virtual breakout rooms
We heard lots of requests for this one and we’re listening. Educators hoping to split students into smaller groups and discussions for collaborative learning can begin using virtual breakout rooms early in the final quarter of 2020. Educators will be able to pick the number of breakout rooms they’d like, either randomly or manually assign students, move students from one room to the other, send announcements to each breakout group, and bring students back all at once to the main class they’re ready. Breakout rooms will be available in non-channel meetings like scheduled meetings or meet-now.
When: Early in the final quarter of 2020
2) Maintain student safety with controls in meetings and classrooms
Have more control before, during, and after an online class
Students have a way of finding the loopholes, including in online synchronous learning. With Hard Audio Mute, educators can keep collaboration to the right moments and mute students when it’s time to focus. Meeting options will be in place to prevent attendees from unmuting themselves. Mute all participants directly from the Participant pane and control students’ ability to mute and unmute their audio.
When: Early September
 Hard audio mute helps educators keep collaboration to the right moments.
IT Admins will soon have the option to control when students can join meetings by policy. This helps keep classrooms and student-to-student interaction secure to designated, supervised time. (For this policy to work, students must have an updated version of Teams.) To help educators have time to prepare their virtual classroom and prevent students joining without permission, Student Lobby gives educators control over when students are admitted to a scheduled meeting.
When: Student Lobby is available now and meeting policies for IT Admins are coming in August.
 Student Lobby gives educators time to set up their class and prevents students from joining a meeting until the educator is ready for them.
And finally, although there are some pretty awesome #MicrosoftEDU custom video backgrounds, IT admins now have the opportunity to create a custom video background policy (click here for specifics on the policy).
When: Available now
For more Teams online meeting safety guidance, visit these resources for educators and administrators.
Team owners can delete a cross-post
If a student gets a little too enthusiastic and posts inappropriate content across multiple channels, a team owner can now delete cross-posts. Classroom management in just a few clicks.
When: Available now
3) Easily deploy and manage Teams for your school or institution
Simplify grading with SDS and OneRoster compliant SIS
Say goodbye to the old copy-and-paste routine for grades. With the new GradeSync to OneRoster API, Teams automatically sends grades entered by educators in Assignments to their OneRoster compliant SIS.
When: Early August
Easier Teams policy management for all of your users
Using Group policy assignment, IT Admins can save time and reduce the complexity of managing groups of students or faculty. Instead of changes done student-by-student or in batches, IT Admins will be able to use groups (first-graders or fifth-graders, for example) and implement multiple policy definitions at the same time. If a user is in more than one group, the order that the policies take effect can be ranked. This is great for users who may have mixed roles, such as a university student who is also a part-time employee at their university. And there’s no script involved! The starting six policies (Calling, Call Park, Channel, Meeting, Messaging, Meeting Broadcast) will be available in the Microsoft Teams Admin Center. Read more about group policy assignment and ranking.
When: Early August
 Group policy assignments in the Microsoft Teams Admin Center.
More class team creation and management control
Soon, there will be even more (and even more awesome) options for team creation. First, School Data Sync (SDS) is adding back automatic class team creation! Admins can once again automatically bulk-create both M365 Group and class teams for their educators, saving their time and focus for teaching. Even though classes are created automatically, educators maintain control over when students are admitted and can view class content. This allows educators additional time and control to set up their classes before admitting their students into the class team. To schedule Class Team Deployment Assistance with the EDU Customer Success Team, complete the form at https://aka.ms/sdssignup.
When: August
Educator-led team creation is another great deployment option that alleviates work for educators while still granting them control over which classes they want to create and use. Admins can create M365 groups for classes based on student and educator roster information, and the educator will be notified of their suggested class teams. The educator can then decide whether or not to create teams for their suggested classes. This provides flexibility and prevents class teams from being automatically created and turned on when they aren’t needed. This solution is recommended for large tenants (>500,000 teams). To learn more about this feature, please visit the Create a team from suggested class tab.
When: August
 Educator-led team creation gives educators control and flexibility over team creation for class.
The Early Class Access API gives additional control to IT Admins to support and create teams with educators. First, IT Admins decide whether or not a class team will be “locked” for early educator access or give immediate student access. Next, Admins use a query to see which teams are active or not activated yet. Then, if needed, IT Admins can activate the class team on the educator’s behalf. Please refer to this documentation for more information about Early Access Class Teams.
When: August
For more information, please read these recommended methods and best practices for creating class teams.
4) Do more with Assignments in Teams
View assignments across all classes and get to them quickly (again)
Being able to see what’s upcoming, whether you’re an educator or student, is super important to getting a handle on your week…month…or year. Soon, both educators and students will once again be able to view upcoming and turned in assignments by class or view them across all classes. Just visit Assignments in your app bar on the left hand side of Teams to view assignments across all classes.
When: August
Quickly preview a linked resource
In addition, when an educator adds a link as an assignment resource, students will be able to see a thumbnail preview before clicking to the site or resource.
When: August
More flexibility and settings for educators
Tackle unconscious bias and even the playing field in class with Anonymous Grading. When enabled in the assignment detail view, students’ names are anonymized and avatars are temporarily removed, presenting a random list of students. This allows educators to review work with identities hidden, no shuffling of paper involved.
When: August
 Anonymous Grading helps remove unconscious bias and even the playing field in class.
Instead of setting things up on an assignment-by-by-assignment basis, educators can now manage a set of Assignments settings in the Assignments tab. Assignment settings allow educators to set default due times, set preferences of what happens when a new student is added to the class, change where notifications for the assignment will be posted (like an Assignments specific channel), and turn off turn-in celebrations if they’re not age-appropriate for older students. (Settings changes will apply to new assignments created after the settings have been saved.)
When: August
 Assignment settings allow educators to set preferences.
More languages supported in Assignments
Assignments is growing even more globally inclusive with additional languages supported including Croatian, Estonian, Greek, Hungarian, Indonesian, Latvian, Lithuanian, Romanian, Slovenian, Ukrainian, and Vietnamese.
When: Available now
Overall improvements to make Assignments better
Kicking off with simplified terms and an icon refresh, several changes will be made to improve readability and functional association for educators. Assignments will soon be able to support larger file sizes (up to 500MB) and more than 10 attachments at a time. There will also be large class UI improvements that improve the speed of viewing and creating assignments for classes of up to 200 students. Lastly, we’re making it easier to tell when students are no longer enrolled in the class and ensuring that they don’t receive assignments after they leave the class.
When: Large class UI improvements available now, others in August
5) Keep learners engaged and collaborating in the classroom
Class Materials is now available on Android
With students working from a variety of devices, including many mobile devices, it’s important that they have access to the core curriculum. To make learning more equitable, the Class Materials folder is now available on Android.
When: Available now
More reasons to feel pretty great about turning in an assignment
If your students are already fans of the dangling pizza slice or swinging sloth animation that play after they click Turn in, they’ll feel extra celebratory after they experience the new turn-in celebrations launching this August. Turning in work is a big deal. We’ve heard from students that Teams’ whimsical animations bring a ‘lil sprinkle of magic to their school day, granting some extra motivation to meet due dates and influence student outcomes. At a time when students may feel disconnected from their vibrant classroom life, the surprise of, say, a disco ball spinning down to sparkle on their screen reminds them to pause and pat themselves on the back for a job well done.
When: August
New Assignment turn-in celebrations sprinkle a little magic into the school day
D2L’s Brightspace Course Connector
D2L’s Brightspace is a learning management system for K12 and higher education teaching. With the D2L Brightspace Course Connector for Microsoft Teams, educators will be able to sync rosters, create private channels for course sections and link back to their course homepage through a tab in Microsoft Teams.
When: August
6) Nurture social and emotional wellbeing outside of the classroom
Gather reflections on how students are feeling and doing in real-time
Emotions are a big part of life at school. How students feel impacts their readiness to learn, their mental wellbeing, and their behavior toward their teachers and their peers.
To communicate in emotionally supportive ways, we rely on many nonverbal cues and real-life opportunities for interaction. If your school is learning remotely, in a hybrid model, or somewhere in between, it can be harder to pick up on the social cues of how students and faculty are feeling.
The Reflect messaging extension gives educators and staff another social and emotional connection with their students and colleagues. Through quick check-in questions and polls, students and colleagues can share how they are feeling in general, or about a specific topic, such as learning from home, an assignment, current events, or a change within their community. Using Reflect to check in with others can help you better understand wellbeing and open a dialogue for social-emotional learning (SEL) with your students by giving them an opportunity to practice self-expression and naming their emotions.
Educators can choose to make the reflection fully anonymous, private to them, or viewable to the entire class. IT administrators can install the Reflect extension from GitHub and then make it available to educators in their organization in the message extension menu. Once installed, the extension provides suggested check-in questions and the ability to add custom questions that students can respond to in a poll-like experience. Check for more scenarios and use cases here.
When: Early August
 Reflect messaging extension helps educators stay connected to students’ wellbeing.
7) Train yourself in Teams with additional resources
Learn about Teams and how to get started:
- Quickly learn about Teams and common classroom scenarios with clickable interactive demos for educators, families, and IT Admins (in English).
- Check out the Quick Start Guides if you’re an Educator (PDF), Student (PDF), or IT Admin.
- Train yourself with Professional Development with the popular Microsoft Educator Community course, Transform Learning with Microsoft Teams.
- Watch helpful “how-to” videos with Teams Quick Tip videos on YouTube (or pick from a different Teams video playlist here).
- Sign up for the live Microsoft Teams for Edu digital readiness event for both educators or IT Admins on August 11 and 12 that dives into common scenarios, use cases, and how to get ready for the school year at https://aka.ms/TeamsEDULive. (In English, sessions will be recorded.)
Plus, check out these additional resources:
- Resources for parents, guardians or family members looking to support student learning: https://education.microsoft.com/resource/755e5a8b
- Teams online meeting safety guidance for educators and administrators.
- The Teams help homepage. You can also click Help in your Teams app at any time for extra how-tos and support!
And for those that love lists, here’s a quick review of all the features we shared along with their launch dates:
1) Run engaging classes through online meetings
Large Gallery view (aka 7×7) – expected in August
(New) Together Mode – expected in August
(New) Dynamic view – expected in August
(New) See more videos on iOS or Android devices – expected in August
(New) Attendance Report post-meeting download – expected in early September
(New) Whiteboard in Teams features – available now
(New) Digital Whiteboard without student access – available now
(Update) Teams meetings now 300 interactive participants – available now
(New) Teams meetings up to 1,000 interactive participants – coming in the last quarter of 2020
(Update) Virtual Breakout rooms – no later than early Q4 2020
2) Maintain student safety with control of meetings and classrooms
(New) Hard Audio Mute – expected in early September
(New) Control when students can join meetings – expected in August
(New) Students Wait in Lobby – available now
(New) Custom video background policy – available now
(New) Delete cross posts – available now
3) Easily Deploy and manage Teams for your school or institution
(New) GradeSync to OneRoster API – expected in August
(New) Group policy assignment – coming soon
(Update) SDS adding back team creation– expected in August
(New) Educator-led team creation – expected in August
(New) Early Class Access API – expected in August
4) Do more with Assignments in Teams
(Update) View assignments across all classes (again) – expected in August
(New) Link thumbnail preview – expected in August
(New) Anonymous Grading/Marking – expected in August
(New) Assignment settings – expected in August
(New) Four additional overall improvements – expected in August
(New) New Assignment languages supported – available now
5) Keep learners engaged and collaborating in the classroom
(New) Class Materials on Android – available now
(New) New Turn-in celebrations – expected in August
(New) D2L’s Brightspace Course Connector – expected in August
6) Nurture social and emotional wellbeing outside of the classroom
(New) Reflect messaging extension – expected in early August
You’ve got this. And we’re right here if you need us.


.jpg")


.jpg")


.jpg")
.jpg")


Recent Comments