
by Scott Muniz | Aug 7, 2020 | Alerts, Microsoft, Technology, Uncategorized
This article is contributed. See the original author and article here.
Another week, another ton of Azure to share. Here are some of the headlines we’re covering this week: SOC operational metrics now available in Azure Sentinel, Azure Monitor for containers with Azure Portal now supports Kubernetes resource view, Azure AD My Sign-Ins goes GA, Selective disks backup for Azure Virtual Machine is in public preview, and Microsoft Authenticator app lock now enabled by default.
SOC operational metrics now available in Azure Sentinel
Azure Sentinel incident data is now available within the Log Analytics workspace. The data can be used to report on metrics within the Security Operations Center (SOC). Typical SOC metrics include incidents created over time, mean time to triage, mean time to closure, etc. Administrators will now be able to run queries to get the metrics that are operationally important for the SOC via the new Security Incident table now available in Log Analytics. In addition, Microsoft has added the Security Operational Efficiency workbook into your templates, so you have a pre-built SOC metrics workbook out-of-the-box for use.
Azure Monitor for containers with Azure Portal now supports Kubernetes resource view
With the public preview of Azure portal providing Kubernetes resource view, administrators can use point and click navigation to see live, in-depth details of the workloads they have access to. The public preview includes multiple resource types (including deployments, pods, and replica sets) and supports the following key capabilities:
- Workloads running on a cluster, including the ability to filter resources by namespace
- Find the node an application is running on and their Pod IP address
- See pods in the replica set, ready status of each pod, and images associated with each
- Drill down to individual deployments to see live status and specification details
- Execute on the fly changes to YAML to validate dev/test scenarios
With Azure Monitor for containers enabled, users can view deployment hierarchy, insights such as CPU usage and memory usage in the Kubernetes resources view, and seamlessly transition to Azure monitor for more in-depth insights.
Azure AD “My Sign-In’s” is now Generally Available
In public preview, this new Identity feature allowed Enterprise users to review their sign-in history to check for any unusual activity. They could see:
- If anyone is trying to guess their password.
- If an attacker successfully signed into their account from a strange location.
- What apps the attacker accessed.
My Sign-Ins has just moved to General Availability and now allows end users to report “This wasn’t me” or “This was me” on unusual activities.
Selective disks backup for Azure Virtual Machine is in public preview
Microsoft recently announced the public preview of selective disks backup and restore capability for Azure Virtual Machines. Using the selective disks backup functionality, provides an option to back up a subset of the data disks in a VM. Each recovery point contains only the disks that are included in the backup operation which further allows you to have a subset of disks restored from the given recovery point during the restore operation. This applies to both restore from snapshot and vault.
Microsoft Authenticator app lock now enabled by default
Some time ago, Microsoft released the App Lock feature in response to feedback that organizations wanted to make sure apps they used were secured by a PIN or biometric. Last month, Microsoft expanded App Lock’s protection. Now, if App Lock is enabled, when you approve any notification, you’ll also have to provide your PIN or biometric. In the latest release, App Lock will be enabled by default if you’ve set up a PIN or biometric on your device.
MS Learn Module of the Week
Strengthen authentication (conditional access) with Azure Active Directory
Learn about modern authentication and the security benefits it provides to your organization, such as enabling multi-factor authentication (MFA) and a passwordless environment.
This module will detail how to:
- Define modern authentication.
- Understand how to enable multi-factor authentication.
- Explain how passwordless authentication improves security.
Let us know in the comments below if there are any news items you would like to see covered in next week show. Az Update streams live every Friday so be sure to catch the next episode and join us in the live chat.
by Scott Muniz | Aug 7, 2020 | Uncategorized
This article is contributed. See the original author and article here.
The Workplace Analytics team is excited to announce our feature update for August 2020. (You can see past blog articles here). This month’s update gives you a preview of something to come!
Coming soon
- Workweek Span and Person and Person-to-Group Network Metrics will now include Teams chat and data
Coming soon: Teams metrics
With the recent shift to remote work, large numbers of users are relying on Teams for much of their remote collaboration. In other words, communication over Teams is at an all-time high. To improve the accuracy of metrics within Workplace Analytics, we are soon adding Teams chat and call data to Workplace Analytics metrics.
Data about calls and chats will now be reflected in several metrics, including Workweek Span. This will improve the quality of data that’s available to analysts by more truthfully delineating the actual workweek span of users. Here is the complete list of metrics that are being updated:
|
Metric
|
Brief description
|
|
Internal network size
|
The number of people within the company with whom the person had at least two meaningful interactions in the last four weeks.
|
|
Networking outside organization
|
The number of distinct organizations within the company that the person had at least two meaningful interactions with in the last four weeks.
|
|
Networking outside company
|
The number of distinct external domains outside the company a person has had at least two meaningful interactions in the last four weeks.
|
|
Workweek span
|
The time between the person’s first and last sent email, IM, Teams call, or meeting attended for each day of the workweek.
|
|
Network size
|
The number of people in the collaborator group who had at least two meaningful interactions in the last four weeks with the time investor.
|
Note: For complete definitions of these metrics, see Metric descriptions for Workplace Analytics.
By using these new metric values, you’ll be able to more accurately analyze connectedness across the company, analyze changes in the workweek span, gauge the effect of Teams in improving organizational connectivity, and support Business Continuity scenarios.
To request early access
We are planning to release this change on August 20, 2020. If you want early access to the updated metric values complete the Teams metric changes preview form and we’ll activate the new metric values for your organization. It might take up to four business days to activate the new metric values and we will send you a confirmation email after they’ve been activated.
Note that these new metrics will not affect any of the results of your previously saved queries. But they will go into effect for all new queries (including any queries that auto-refresh) retroactively.
by Scott Muniz | Aug 6, 2020 | Alerts, Microsoft, Technology, Uncategorized
This article is contributed. See the original author and article here.
You can find the new blog here: https://aka.ms/azsdk/blog

by Scott Muniz | Aug 6, 2020 | Alerts, Microsoft, Technology, Uncategorized
This article is contributed. See the original author and article here.
Have you been following along with all the changes in Azure Active Directory (AD)-land and the various Microsoft Identity branded things?
(Especially since my epic series on all things Azure AD B2C?)
The changes and new features are amazing but change can be confusing. So let’s have a little chat about Azure AD and Microsoft Identity.
The Quick Tour
OK – so I’m going to level with you… the way things are named in Microsoft’s Identity Platform is a little bit… well, confusing.
I just illustrated my own point – I said Microsoft Identity Platform without introducing it first. What in the world does that even mean?
Microsoft uses the term Microsoft Identity Platform as the next evolution to the Azure Active Directory Developer Platform. It’s the all encompassing term for building apps with Azure AD.
The official Microsoft Identity Platform docs are good. Surprisingly good. But, you still need to know what you’re talking about before really grabbing and retaining info from the docs.
So let’s take the quick tour around Azure AD and Microsoft Identity XXX and try to remove any confusion around process and terms.
Azure AD Sign-In Overview
The super high level overview of Azure AD is that it is an Identity Provider (or IdP).
It verifies your users are who they say they are – and one way can be by username and password.
After it successfully verifies the user, it returns two tokens. A Token is a Base64 encoded string (also known as a JSON Web Token (JWT), which is just a standard) that has information in it about the user.
That info is known as Claims.
Think of it as… a user signs in, Azure AD verifies they are who they say they are, and returns 2 tokens full of information that Azure AD claims is true about that user.
Oh – and those 2 token flavors? One is known as an Identity token. And the other is an Access token. An Identity token has information about the user. And an Access token is used to gain access to other resources – like a Web API.

There’s more to it than that – but that’s the gist. And those are also the standard terms you’ll see docs and blogs throw around when talking about signing in users.
Communicating with Azure AD
This is where we could get deep, deep into the details – so I’ll do my best not to.
There are industry standards that Azure AD implements that allow your app to talk to it.
You’ve probably heard of some of them before – like OpenID Connect or OAuth.
For our discussion, these aren’t important other than to know Azure AD supports them.
Supporting them means somebody else can write an SDK to abstract away all the intricacies of implementing the standard yourself to do the communication. That’s a big deal, you don’t want to mess up people signing in to your app.
Specifically, the sign-in request to Azure AD will be directed at an endpoint. And this is where things get confusing.
There used to be v1 endpoints. Now there are v2 endpoints. And you may even hear folks talk about Microsoft Identity Platform endpoints.
But endpoints are really a part of Azure AD Applications…
Azure AD Applications
You can think of an Azure AD Application as a representation of your “real” app in Azure AD.
So let’s say you had a todo list application. That application has a web app, mobile app, and a web API.
Within Azure AD, you would have 2 applications. One to model the frontend apps. The other to model the web API.
Why a separate one to model the web API?
This goes back to those access tokens from before.
The user of the frontend app will authenticate with Azure AD and get an access token that will be passed to the web API to get access to it.
That access is granted by a Scope. It’s a portion of the backend’s functionality that is scoped out for other application’s to use.
So through the Azure AD portal, you create (or expose) a scope (or API permission as it will sometimes be called) for the backend’s Azure AD Application.
Then the frontend application is granted permission to that scope (again through the portal).
When the user signs in – they will be asked to Consent to the backend scope being used.
If you’ve ever used your Twitter credentials to signup for an account on another service, you’re already familiar with the consent screen. It’s the “Application ABCD wants to read your timeline”.
Your code is responsible for asking for the particular scope needed when signing-in to the frontend. And on the backend, your code is responsible for checking any authorization. Scopes tell you what’s going to happen, but leave the implementation details up to you.
Azure AD Application Types and Endpoints
Ok, to make Azure AD Applications a bit more confusing, there are a bunch of different types of them.
V1, V2, and Microsoft Identity Platform applications.
To get this out of the way – V2 and Microsoft Identity Platform applications are exactly the same thing. Just a rebranding, if you will.
V2 applications are a newer version of Azure AD Applications than V1.
They support more functionality, such as the ability to sign-in with corporate, personal (hotmail or xbox), or even Azure AD guest credentials. (And there’s a bunch more).
If you’re doing anything new – you pretty much don’t have a choice but to use V2 applications. And that’s a good thing.
If you’re supporting V1 apps – that’s fine too! Just know that when you start reading about the functionality and features of Azure AD applications, you need to know which version you’re on.
And which SDKs you can use depends on the Azure AD Application version – we’ll get to that.
Sometimes you’re going to hear about V1 and V2 endpoints. Well, a V1 application calls V1 endpoints and a V2 application calls V2 endpoints.
The functionality of what V1 and V2 applications can do really is dictated by the endpoints.
So you’ll hear Azure AD Application and Azure AD Endpoint versions mentioned interchangeably.
You do need to tell the SDK about the endpoint’s address. And there’s a couple variations of that (which will be covered in the next article). But know that you don’t have to invoke it directly – the SDK will take care of that for you.
And that brings us to…
The SDKs
If the various different types of Azure AD Applications and Endpoints and the terms that different but mean the same thing didn’t scare you off – wait until you see the SDKs.
First off – the SDKs are Amazing with a capital A. You can get down and dirty with the low-level specifics of handling authentication – or keep it nice and easy. Your choice.
But with choice comes… confusion?
First off – the folks who are developing the SDKs are awesome and creating them for all types of platforms. iOS, Android, .NET, JavaScript, even Python and Ruby.
Here’s what you need to know.
There’s a library called ADAL. It’s used for V1 applications. But… You don’t need to use it any longer. It still works, but if you can transition off it, may as well.
That’s because…
There’s another library called MSAL. This is for both V1 and V2 applications. It’s modern. Actively being developed. Open-sourced. Works for Azure AD and B2C (I know, we didn’t even talk about B2C – ON PURPOSE!).
You can get low-level with MSAL and it’ll do whatever you need.

But if you don’t need to get super duper low level (and you’re developing web apps)…
There’s yet another library called Microsoft.Web.Identity. This is brand new and is still in preview at the time I’m going to publish this article.
This library wraps a lot of the functionality that’s present in MSAL and it just works in tandem with ASP.NET Core.
There are even dotnet new templates for it that install the appropriate NuGets and boilerplate code.
Microsoft.Web.Identity uses MSAL under-the-hood. It’s just abstracted away.
The Talk…
That’s it!
Everything demystified, right?
Azure AD is amazingly powerful, we only touched the tip of the tip of the tip of the iceberg here. But it should give you enough info to start digging into the documentation and blogs and have a level-set of what they’re talking about.
If not – and you have questions – is there a better way for me to explain it – leave a comment! DM me on Twitter. This stuff can be confusing and having a plain ‘ol talk is the best way to lay it all out.
There’s going to be a couple of follow-up posts to this one.
The first will be creating an Azure AD Application for a .NET web app using `Microsoft.Identity.Web` and signing in.
The next will be gaining access from that app to a web API.
Then use a SPA to get access to that same web API.
Until then…
by Scott Muniz | Aug 6, 2020 | Uncategorized
This article is contributed. See the original author and article here.
The 14th cumulative update release for SQL Server 2016 SP2 is now available for download at the Microsoft Downloads site. Please note that registration is no longer required to download Cumulative updates.
To learn more about the release or servicing model, please visit:
• CU14 KB Article: https://support.microsoft.com/en-us/help/4564903
• Microsoft® SQL Server® 2016 SP2 Latest Cumulative Update: https://www.microsoft.com/download/details.aspx?id=56975
• Update Center for Microsoft SQL Server: https://docs.microsoft.com/en-us/sql/database-engine/install-windows/latest-updates-for-microsoft-sql-server
by Scott Muniz | Aug 6, 2020 | Uncategorized
This article is contributed. See the original author and article here.
Controlling the number of recipients per message that your users can send to is one of several measures email admins can use to help curtail the risk of email abuse and spamming from compromised accounts. Earlier this year the Exchange Online Transport team introduced customizable Recipient Limits in Exchange Online. With it you can customize the setting on a mailbox or mail user object, you can bulk edit multiple existing mailboxes or mail users at the same time, and you can even set the default for new ones. Yet, that update didn’t offer a single, master tenant-wide setting. It gave Exchange Online admins more control than they had before, but it still wasn’t as comprehensive as what Exchange Server on-premises offers.
Today we’re announcing the immediate availability of a super useful extension of the mailbox customizable recipient limits feature that helps deliver a more complete solution: The ability to use Remote PowerShell to customize a tenant-wide recipient limit with the MaxRecipientEnvelopeLimit property on the TransportConfig object (Set-TransportConfig -MaxRecipientEnvelopeLimit).
Similar to how it works in Exchange Server on-premises, the MaxRecipientEnvelopeLimit property is the authoritative or fall back setting for recipient limits when a mailbox’s or mail user’s RecipientLimits property is set to “Unlimited”. Now, just because it says ”Unlimited” doesn’t mean that it is. It actually means “fall back to the next higher level setting,” which for a mailbox or mail user is to fall back to the value on the tenant-level setting, the tenant’s TransportConfig MaxRecipientEnvelopeLimit setting. And “Unlimited” on the tenant-level setting, in turn, means to “fall back to the Exchange Online service-level setting” – which in the Exchange Online multi-tenant environment is currently 1,000 recipients.
Here are the guiding principles in pseudo-code style that the Exchange Online service uses to determine the maximum number of recipients a sender can send to per message:
- If the mailbox or mailuser RecipientLimits property value
- Is a numeric value then
- Use that value as the maximum number of recipients a sender can send to per message
- Else if the mailbox or mailuser RecipientLimits value is “Unlimited” then
- Use the tenant-level setting (the value on the MaxRecipientEnvelopeLimit property on the tenant’s TransportConfig) instead
- If the tenant-level setting is also “Unlimited” then
- Use the Exchange Online service-level setting (1000 as of this writing)
Note: It’s easy to fall into the mistake of thinking that the tenant-level setting is the most-restrictive setting regardless of what the mailbox or mailuser setting is. But that’s not true. As shown above, the only time the tenant-level setting is used is if the mailbox or mailuser setting is “Unlimited.” This is the same as how it works in Exchange Server on-premises.
Here are several examples of how this works:
|
Mailbox Setting
|
TransportConfig Setting
(tenant-level)
|
Behavior
|
Explanation
|
|
Set-Mailbox Mailbox1
-RecipientLimits 50
|
Set-TransportConfig
-MaxRecipientEnvelopeLimit 1000
|
Mailbox1 can send to a maximum of 50 recipients per message.
|
The mailbox setting is authoritative because the rule is if the mailbox setting is a numeric value (it’s 50) then use that. The tenant-level setting for this mailbox is thus ignored.
|
|
Set-Mailbox Mailbox1
-RecipientLimits 50
|
Set-TransportConfig
-MaxRecipientEnvelopeLimit 10
|
Mailbox1 can send to a maximum of 50 recipients per message.
|
The mailbox setting is authoritative because the rule is if the mailbox setting is a numeric value then use that. The mailbox setting is 50, so that’s the value that’s used. The tenant-level setting for this mailbox is ignored, even though it’s more restrictive than the mailbox setting.
|
|
Set-Mailbox Mailbox2
-RecipientLimits Unlimited
|
Set-TransportConfig
-MaxRecipientEnvelopeLimit 500
|
Mailbox2 can send to 500 recipients per message.
|
The mailbox setting is “Unlimited” so the rule is to use the tenant-level setting (500).
|
|
Set-Mailuser User1
-RecipientLimits Unlimited
|
Set-TransportConfig
-MaxRecipientEnvelopeLimit Unlimited
|
User1 mail user can send to 1000 recipients.
|
The Exchange Online setting (1000) is authoritative because both the mail user and tenant-level settings are “Unlimited” and thus fall back to the service level setting, 1000 recipients as of this writing.
|
So, managing recipient limits in Exchange Online now works pretty much like it does in Exchange Server on-premises. Do note that one significant difference is that while the default MaxReceipientEnvelopeLimit for new tenants in Exchange Online will still be “Unlimited”, the allowable range for customizing it in Exchange Online is 1 to 1000, while in Exchange Server on-prem the allowable range is from 0 to 2147483647.
While it might appear to be a minor update, we believe this change will prove to be quite valuable for email admins so they can more simply and flexibly manage and control a variety of recipient limits scenarios. It’s a new Exchange Online capability that continues to demonstrate our commitment to delivering more control, more “knobs and dials,” to manage your organization’s mail flow. Let us know what you think!
Kevin Shaughnessy
by Scott Muniz | Aug 6, 2020 | Alerts, Microsoft, Technology, Uncategorized
This article is contributed. See the original author and article here.
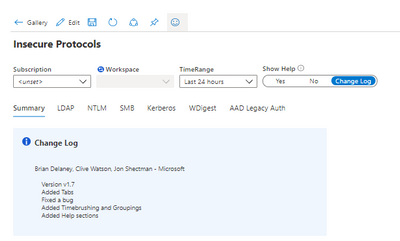
This blog is authored by Brian Delaney and Jon Shectman — with hearty thanks to our collaborator and pal Clive Watson.
In this article, we’ll share significant, functional enhancements we’ve made to the Insecure Protocols Workbook (IP Workbook) and we’ll detail how you can leverage these improvements to mitigate with speed, accuracy, and efficiency. If you’re new to the IP Workbook, we suggest starting with the implementation guide, which covers basic configuration steps, and sets you up for success in usage. Once you’ve completed the steps there, pop back over here to learn how to best use the recent enhancements and features.
One of the first things you’ll notice in the new release is the new Show Help section in the top menu. By sliding the toggle, you can display Help for each protocol section. You can also display the Change Log.

By comparing your workbook version to the version in the Azure Sentinel Workbook Templates section, it’s easy to ensure you’re using the newest version. (At the time of this writing, Version 1.7 is the latest.)
We have also reimagined the navigation experience by adding Tabs. Tabs mean you no longer need scroll down to the protocol data you want to research; gone are the days of a single linear page.

Clicking a tab hides all of the other protocol pages, making available only the protocol data that you wish to research at that given moment.

This way, there is no confusion about which protocol data you are viewing, and you can clearly display a mitigation success (e.g. a data void) when you have removed a particular protocol from your estate. Tabs should make for a visually simpler, more actionable data comprehension experience.
Next, let’s examine Timebrushing and Groupings. Groupings is a back-end feature that will be largely transparent to you. Groupings maximizes efficiency in the way that each set of queries runs, making them load faster and with more efficiency. You should see better performance, with fewer lags for data paging as your workbook sections populate.
Timebrushing is one of the most significant functional changes we have introduced with this update to the IP workbook. As its name implies, Timebrushing allows you to “paint” a particular slice of time in a graphical interface and to export that parameter to filter your subsequent queries.

The value here is that Timebrushing allows for very specific, precise data analysis. Put differently, it allows us to filter our data to zero in on a specific activity that might have happened during a specific time. By way of example, let’s examine how we might use Timebrushing and several other filters to research Insecure LDAP.
The Insecure LDAP tab features one of two starting points to parse our data: Account or IP addresses. In this example, we’ll start by filtering by Account. Let’s filter on the most active account, svc1:

This outputs the query parameter (e.g. display only accounts containing the value svc1) in the subsequent filters. Then let’s say I want to understand how svc1 was used during a time of heavy activity in the logs.
From the time graph, I can see that there’s a particularly heavy, sustained usage of svc1 to make insecure LDAP calls from about 3:50am through about 6:50am. Let’s Timebrush that slice and examine the data further:

And here a story emerges. Because of time binning (necessary to group the data into understandable chunks), we get a nice breakdown of the Insecure LDAP activity that can be sorted by BindingType, count or TimeGenerated (as I have done here). In other words, we see that during this time slice, svc1 made significant numbers of Insecure LDAP calls each and every (time binned) hour. I can then drop down on the page and take what I’ve just learned (e.g. that svc1 is being used in an insecure manner) and I can research it by Source IP address.

Here I can fill in the blanks in the story from the account. svc1 made Insecure LDAP calls during multiple slices of time from a computer with IP address 192.168.2.74. Instead of having to sift through thousands of log files or (worse yet) try mitigating Insecure LDAP without a solid understanding of its presence in the environment, we now have a place to focus our mitigation activities. And, of course, once we have mitigated all of our Insecure LDAP in the environment, we will configure our domain controllers to no longer accept it at all — thereby effectively mitigating significant business risk to the organization.
The final enhancement that you’ll see in examining the IP Workbook is the Help section I mentioned earlier.

Each Help section is tab-specific, as you can see while moving between tabs with the Help toggle switch turned on.

The Help sections mainly follow the same format and contain sections that provide insight into each insecure protocol:
- Protocol Risk: risk of having the protocol active
- Auditing Settings: how to populate the data in the IP Workbook
- Mitigation Planning: concrete, actionable steps to take in order to remove the protocol from your estate
- Data Filters: available data filters on the particular tab
By way of example, let’s examine the Help file for Azure Active Directory Legacy Authentication (AAD Legacy Auth Tab). From the start, Protocol Risk gives us some compelling reasons to remove these insecure, outdated protocols.

The AAD tab is the only tab that does not include Auditing Settings, since we simply use AAD Sign-in logs here (e.g. this is a cloud-native SaaS data source). Instead, this tab lists the Legacy Authentication Protocols that you should consider as in-scope for this project.

The Mitigation Planning and Data Filters sections will look familiar from other tabs and once you start using the IP Workbook’s Help section frequently. Of course, once you’re familiar with each protocol, you can and should toggle off the Help section in order to maximize your screen real estate and to focus on understanding your data.

In this article, we covered enhancements to the IP Workbook, discussed how to leverage them to aid your data understanding, and drilled a bit deeper into the Timebrushing and Help features. Let us know how the IP Workbook is working for you and especially if you have ideas for enhancements. And until then, as always, happy auditing.
by Scott Muniz | Aug 6, 2020 | Alerts, Microsoft, Technology, Uncategorized
This article is contributed. See the original author and article here.
Hello folks … I recently presented at the VMware UserCon for Florida and Carolina. If you didn’t get a chance to attend and want to check it out, here is the video.
by Scott Muniz | Aug 6, 2020 | Alerts, Microsoft, Technology, Uncategorized
This article is contributed. See the original author and article here.
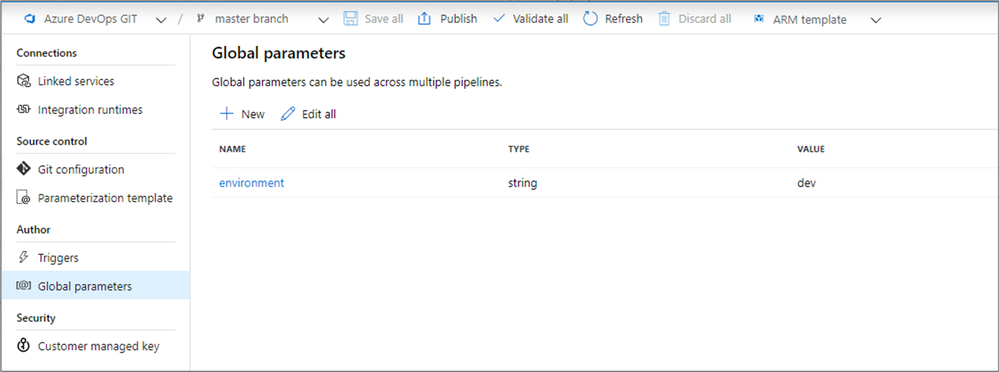
Global parameters are now generally available in Azure Data Factory. Global parameters are constants across a data factory that can be consumed by a pipeline in any expression. They are useful when you have multiple pipelines with identical parameter names and values.
Creation and management of global parameters is done in the management hub.

In any pipeline expression or dynamic content, global parameters can be referenced by pipeline().globalParameters.<parameterName>.

When promoting a data factory using the continuous integration and deployment process (CI/CD), you can override these parameters in each environment.
For more information, see the global parameters documentation.
by Scott Muniz | Aug 6, 2020 | Uncategorized
This article is contributed. See the original author and article here.
Hi, everyone!
I’m Pablo Veramendi, Global Program Director for the new Microsoft Learn Student Ambassadors. Today, I’m thrilled to congratulate our first group of Student Ambassadors on their acceptance! I and the rest of the team are so excited to welcome you all, and we can’t wait to see where you take this opportunity.
As Student Ambassadors, you’re in a unique position to solve real-world problems, establish yourselves as mentors and leaders in your communities, and amplify your impact. And now, your experience is fully online with support for students in virtual learning, making it easier than ever to build on your knowledge while you make a difference. Microsoft Learn is where everyone comes to learn—and as Student Ambassadors, you’re everywhere, learning new skills and helping others do the same.
You’re joining a global online network to collaborate with Leagues that are focused on specific issues and technologies that you’re passionate about. You’ll also be able to:
- Connect directly with experts and mentors at Microsoft.
- Learn the skills that will help you land your dream job.
- Earn recognition and build your reputation as a tech insider and leader.
- Pay it forward by sharing your expertise, creating opportunities for other students, and making meaningful progress on issues—not just locally, but globally.
You and other university students who share your passion will contribute to creating the future that you want for your communities, yourselves, and the world.
“Being a Student Ambassador also means being a mentor. It’s really fulfilling to help other students learn skills that will help them reach their career goals.”
—Althani, Philippines
Make a difference with like-minded peers from around the world
Find your virtual community and make a real difference. The global community of Learn Student Ambassadors is at the heart of the program, and as a participant, you’re connected to them all on Microsoft Teams. Within that community, you’ll find Leagues—groups of students who are excited to apply their skills and make progress on a meaningful issue or technology like green tech, healthcare, or AI. Then apply your League’s work to local and global challenges with opportunities like the Microsoft Imagine Cup and student hackathon events.
Expand your impact and pay it forward. Build your reputation, résumé, and influence by creating and sharing your own videos and blog posts, which could be amplified through Microsoft social channels. Create opportunities for others by offering your guidance and encouraging them to learn and grow through opportunities like virtual coding boot camps. Provide your expertise to other students at your university and beyond who are interested in technology. And because Microsoft stands for empowering everyone on the planet to achieve more, you can proudly share your Learn Student Ambassadors affiliation on and off campus.
Grow your skills and build your reputation as a tech insider
Learn and grow on a guided path. Expand your skills at your own speed with online courses through Microsoft Learn, master a topic that you’re passionate about, and share that knowledge with other students. Earn a free certification by completing steps like a Microsoft Learn path, writing a blog post, or recording a video tutorial that helps others learn from your passion for technology.
Make a name for yourself with support from Microsoft. Take advantage of unique access to Microsoft experts through the virtual community on Teams. They can offer remote mentorship, guide your League’s efforts, and provide opportunities for you to be part of the team while you prepare for graduation. These experts are also here to help you plan and run events, including virtual live events.
Score opportunities to attend Microsoft events. As a Learn Student Ambassador, you may be invited to join Microsoft at sponsored events online. You might even get a chance to share your knowledge at one of these events. For example, Microsoft Build 2020 included several Student Zone sessions that were led by Student Ambassadors.
Become a leader in your local tech community and empower your peers
Collaborate remotely and build your big dream. Learn Student Ambassadors get free access to best-in-class Microsoft 365 apps like PowerPoint and Excel, cloud services like OneDrive and Microsoft Teams, and all of the development tools in Visual Studio. As you achieve your milestones, you can use the Azure credit that comes with your Visual Studio Enterprise subscription to explore new services and build a proof of concept for your idea.
Develop leadership skills and amplify your influence. Dive deep into organization, teamwork, public speaking, and social communication—leadership skills that set you up for success and influence throughout your life and career. Then amplify your influence by taking advantage of free tools offered by Microsoft technology partners. Use the built-in advanced image editing features of Techsmith Snagit screen capture software, and create polished, professional-looking videos using the Camtasia screen recorder and video editor.
“The truth is, you don’t have to be an expert. What’s important is something that we all share: a passion for technology and passion for our community.”
—Sharif, Mexico
Onward and upward
I’m excited to see the impact our new Student Ambassadors will have across the globe. And for those of you who are passionate about using technology to make a difference and haven’t yet explored becoming a Student Ambassador, I hope you’ll consider joining us in the future.
Find more information and learn how to apply
Applications are open all year, and new students are accepted quarterly. Explore the program.

Recent Comments