by Scott Muniz | Aug 20, 2020 | Uncategorized
This article is contributed. See the original author and article here.
Microsoft Teams can help people stay connected while working apart with capabilities like chat, meetings, and calling, but users often ask how it can help streamline the work they do. Fortunately, Teams and Microsoft Power Automate work seamlessly together to simplify how you and your team work – whether you’re on the Sales team, the Product team, the HR team, or just the office ping pong team.
Power Automate allows you to create low-code workflow automation for yourself and your entire team using logic-based building blocks, starting with a trigger that sets one or more actions in motion. The new “for a selected message” trigger is unlocking new ways to drive business processes, starting from a message in Teams. Below are four examples of how teams are doing this, but the possibilities are endless. Templates are now available for each of these scenarios to help you get started right away!
1. Sales teams: Convert a chat to a Sales opportunity
“Create an opportunity from a message” template
Creating a customer opportunity is a critical step in any Sales process, and often that opportunity starts with a conversation. Now Teams users can create an opportunity right from the conversation where it began.
When you build the workflow below using the “for a selected message” trigger, anyone in your team can easily create a Sales opportunity just by clicking the “…” on the right side of a message and selecting “Create Sales Opportunity”. Simply fill out a custom form, and the information you enter is automatically sent to your CRM system.

2. Project Management teams: Track project information where your team works
“Create an item from a message” template
A rich and open dialogue means that projects can happen faster, and nearly all projects require us to keep lists – whether that’s a project status, the plan for an event, or a list of materials to develop.
SharePoint lists are a great way to organize information and rich file types for you and your team, and now Teams users can easily add content to their SharePoint lists directly from chat with this new Power Automate trigger. Once the flow has been created, users can add critical data to their list right from a chat – for example, when they learn that a project deliverable has been received.

3. Product teams: Streamline product development
“Create a work item from a message” template
The product development process is complex and often relies on multiple teams working together. With so much collaboration and planning happening over chat, messages can be a great way to request or report new work items to your development team.
By combining the “for selected message” trigger with the Azure DevOps “create a work item” action, you can now use the message as the starting point to create a work item. All the necessary details can be added to Azure DevOps to provide more details for the work item.

4. Any team: Follow-up on important conversations
“Follow-up on a message” template
Many of us have been there – you receive an important message right as you’re about to start a meeting or are in the flow of important work. Now it’s easy to remind yourself to follow-up on an important message from a colleague at a later time, like after your Teams meeting or once you’ve finish working on an important document.
Building a simple “follow-up” flow will allow anyone on the team to create a custom message reminder just by clicking the “…” on the right-hand side of a message and specifying when they want to be reminded. The Flow bot will send a reminder and a link to the message right in Teams.

Check out the “for a selected message” documentation to learn more about this new capability. Of course the examples above are just scratching the surface of what is possible for you and your team to automate, so check out the Power Automate templates for Teams and learn to build your own flows to achieve even more. We’re excited to hear about what you build!
by Scott Muniz | Aug 20, 2020 | Uncategorized
This article is contributed. See the original author and article here.
The August 2020 Cumulative Update Preview for Windows includes the follow Daylight Savings Time (DST) changes:
- Yukon currently follows the Windows time zone “(UTC-08:00) Pacific Time (US & Canada)”. Beginning with the August 2020 Cumulative Update Preview, Yukon customers will now move to a new Windows time zone, “(UTC-07:00) Yukon”.
- Starting on November 1, 2020, Yukon will continue to remain on local time and will not adjust its clock to move back by an hour.
- This change is for customers running the following Windows 10 versions:
- Windows 10, version 1809
- Windows 10, version 1903
- Windows 10, version 1909
- Windows 10, version 2004
- Yukon customers running other, supported versions of Windows will see the relevant changes in the September monthly quality update.
For Microsoft’s official policy on DST and time zone changes, please see Daylight saving time help and support. For information on how to update Windows to use the latest global time zone rules, see How to configure daylight saving time for Microsoft Windows operating systems.
by Scott Muniz | Aug 20, 2020 | Azure, Microsoft, Technology, Uncategorized
This article is contributed. See the original author and article here.
The Azure Sphere 20.08 OS quality release is now available in the Retail feed. This update includes enhancements and bug fixes in the Azure Sphere OS including a security update that represents a critical update to the OS. Because of this, the retail evaluation period has been shortened.
In addition, 20.08 includes new Sample applications; It does not include an updated SDK.
The following changes are included in the 20.08 OS release:
- Upgrades to incorporate a critical security update. This update addresses a CVE that has not yet been assigned an ID. We will update this post to provide more information when available. Please check back for updates.
- Resolution of a problem that caused Ethernet-enabled devices to receive a non-random MAC address after OS recovery to 20.07 (via the azsphere device recover command).
- Resolution of an issue with the system time not being maintained with RTC and battery.
- Changes to WifiConfig_GetNetworkDiagnostics to return AuthenticationFailed in a manner consistent with 20.06 and earlier. This change fixes the issue mentioned for the 20.07 release.
- Improvements to Networking_GetInterfaceConnectionStatus to more accurately reflect the ConnectedToInternet state.
- Updated the Linux kernel to 5.4.54.
For hardware manufacturers:
The 20.08 release also contains important improvements for hardware manufacturers. These changes support greater flexibility in the manufacturing process and improved stability for customers.
We’ve updated the EEPROM configuration file , which is used with the command-line FT_PROG tool, to:
- Disable Virtual COM ports to improve the stability of device-to-PC communications and reduce the number of PC crashes.
- Supply unique serial numbers that start with ‘AS’ to distinguish Azure Sphere devices from other USB Serial Converters that may be present on the same PC.
We strongly recommend that you use the updated configuration file to program your devices.
The documentation now also shows how to program the FTDI EEPROM on multiple boards in parallel. See the MCU programming and debugging interface topic for details.
Sample Applications
We are also releasing three new sample applications on Friday, 8/21. We will update this post to provide a direct link when they are available. Please check back on Friday.
- wolfSSL Sample for client-side TLS APIs – demonstrates using wolfSSL for SSL handshake in a high-level application.
- Low power MCU-to-cloud reference solution –demonstrates how you might connect an external MCU to an Azure Sphere device and send data to IoT Central. This reference solution is optimized for low power scenarios.
- Error reporting tutorial – demonstrates how to use error reporting features on the Azure Sphere platform.
For more information
For more information on Azure Sphere OS feeds and setting up an evaluation device group, see Azure Sphere OS feeds.
If you encounter problems
For self-help technical inquiries, please visit Microsoft Q&A or Stack Overflow. If you require technical support and have a support plan, please submit a support ticket in Microsoft Azure Support or work with your Microsoft Technical Account Manager. If you would like to purchase a support plan, please explore the Azure support plans.
![[Guest Blog] Navigating my own journey in tech](https://www.drware.com/wp-content/uploads/2020/08/medium-79)
by Scott Muniz | Aug 20, 2020 | Uncategorized
This article is contributed. See the original author and article here.
This article was written by Microsoft Ignite 2020 Humans of IT student ambassador Ebonee Swann, a Computer Information Systems graduating senior from Grambling State University. This is the second article in a series featuring this year’s student ambassadors. Ebonee shares about how she is currently navigating her personal career journey in tech.
Meet Ebonee – this is her story:
 Ebonee Swann – Grambling State University Computer Information Systems undergraduate and Microsoft Ignite 2020 Student Ambassador
I always knew at a very young age that I craved a passion for technology. The small things such as troubleshooting the Wi-Fi at my Mom’s house would excite me. It was something that I looked forward to outside of school and going to cheer practice. Everyone in my household knew if they had a tech problem, they could count on me. I knew growing up that was the direction I wanted to take, but I just didn’t know how I would get there. Eventually life began to hit, and it was time to choose the college that would give me the tools I needed for success.
What changed my aspirations on life?
Nelson Mandela once said, “It always seems impossible until it’s done”. This has been my personal mantra since my high school graduation in 2016. I never knew where I would end up or which college I would attend until I tried my luck at Alabama State University. I started off as a computer science major and quickly knew that it was NOT the major for me. After a few classes, I realized that I was unhappy there, and that I wasn’t going in the right direction. I decided it was best if I sat out a semester. During this time, I evaluated my life goals and decided to come up with another plan.
After tedious research I just knew that the college I transferred to next would be my last – I did not want to have to keep transferring and become unsettled each time. The college I decided to attend was Grambling State University – enrolling as a computer science freshman. I know what you’re thinking: why was I once again going down the same road I was before I left school the first time? I did not what my options were, but I knew it was time to make a change for my life and break generational curses.

Once I enrolled, I began looking at different options to change my major and sought the help of friends who were Computer Information Systems majors and ultimately helped lead me in the right direction. It was a big adjustment since it was a major that includes marketing, management, and accounting. After the first semester of changing my major I saw the change within myself. I started to take school more seriously, gained valuable connections and built positive relationships with my professors. Grambling State’s motto is, “Where everybody is somebody“, and I never really understood the full meaning until I started to take my career plan more seriously. I knew at that very moment I was finally gaining the keys to success and would do everything to make the best out of it. I fell in love with my school and professors more because they started to pour into my life more. I then learned about the importance of networking and setting goals for a real tech career after college. Now that I had the tools, I needed it was time to put them into action.
I’m not going to sugarcoat it – the journey is not easy: I went through numerous interviews and rejections. However, I always viewed them as stepping stones for my next opportunity. I knew I had to be patient and remain humble even on days when I wanted to give up.

Today, I am now a graduating senior at the phenomenal Grambling State University. I have been given so many amazing opportunities that will stick with me for a lifetime. Being chosen for the Microsoft Ignite Student Ambassador is an opportunity that I would never imagine getting and it shows me that other people see and value my hard work.
I want to leave you with these words as you think about your own tech journey, no matter what stage you are in life: Never give up on your dreams even if someone says they are too big.
I want to give a huge thank you to my GSU family for molding me into a powerful and ambitious woman who will help shape the future of tech.
#HumansofIT
#StudentAmbassadors
#GramFam
#GramFam
#Igntite2020
by Scott Muniz | Aug 20, 2020 | Azure, Microsoft, Technology, Uncategorized
This article is contributed. See the original author and article here.
by Scott Muniz | Aug 20, 2020 | Uncategorized
This article is contributed. See the original author and article here.
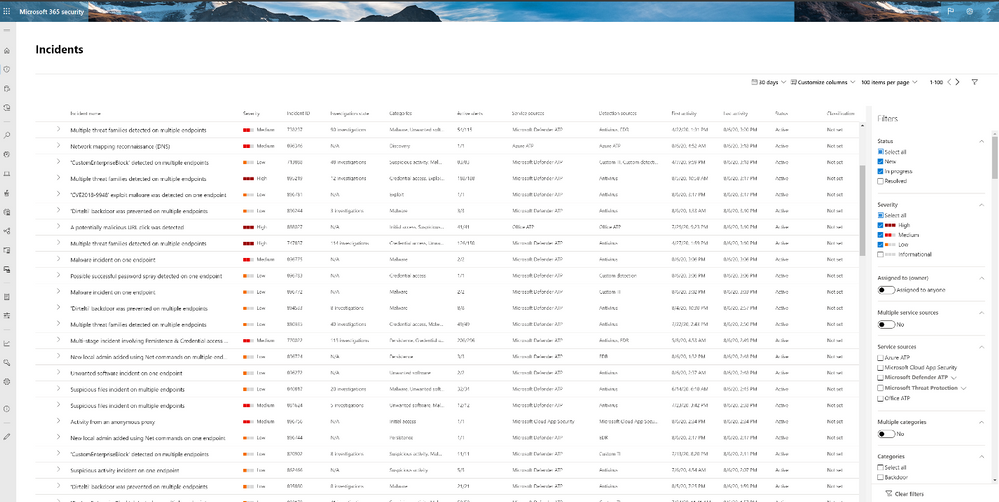
The new incident naming feature in Microsoft Threat Protection now lets you understand an incident’s scope at a glance!
When you are looking at the incident queue and need to determine which incident you should look at next, hints about the content of the incident play an important role in making this choice. Giving incidents automatic names is complex because it encompasses a variety of different suspicious activities.
Our researchers have developed a state-of-the-art algorithm that automatically describes incidents with comprehensive names, leveraging the MITRE ATT&CK® categories we have for each alert. Instead of having numerical incident names like Incident 1234, you now see incident names like Multi-stage incident involving Discovery & Collection reported by multiple sources.

Now, analysts can quickly understand the scope of the incident right from the Microsoft Threat Protection incident queue. Having the incidents name and supporting data (like the number of endpoints affected, users affected, detection sources, categories, and more) in one view, analysts can make faster decisions based on the nature of the incident. This improvement saves analysts time and effort better spent investigating and remediating high-priority threats.
Here are some examples of incident names developed with the new algorithm:
- ‘Dirtelti’ backdoor was prevented on multiple endpoints
- Office process dropped and executed a PE file on multiple endpoints
- Multi-stage incident involving Initial access & Execution on one endpoint reported by multiple sources
- Ransomware activity
- Multi-stage incident involving Discovery & Command and control on one endpoint
To learn more about incident in Microsoft Threat Protection go to the following links:
by Scott Muniz | Aug 20, 2020 | Uncategorized
This article is contributed. See the original author and article here.
With back to school coming in much of the world, we wanted to make sure that educators have the tools they need to be successful, whether they are working in a hybrid learning environment, remote learning, or in person. We’ve been listening to OneNote-loving educators and students around the world, and as always, we try and ensure that their needs are met with our tools.
1) More inclusive with OneNote Live Captions
As announced at the BETT conference earlier this year, OneNote will be adding a Live Captions feature which allows any student to connect OneNote to Microsoft Translator captions via a Join Code and receive the translation stream directly into the OneNote app. This allows captions from the educator speaking to flow directly into OneNote for reading, while still allowing the student to take notes. In addition, the student can pause the captions, highlight portions, and then have the entire transcription saved as a page into OneNote. This feature will benefit all learners but especially those who may be hard of hearing or speak a different native language than the educator. The private education-only preview rolls out in OneNote web next week to our Education Insider program.
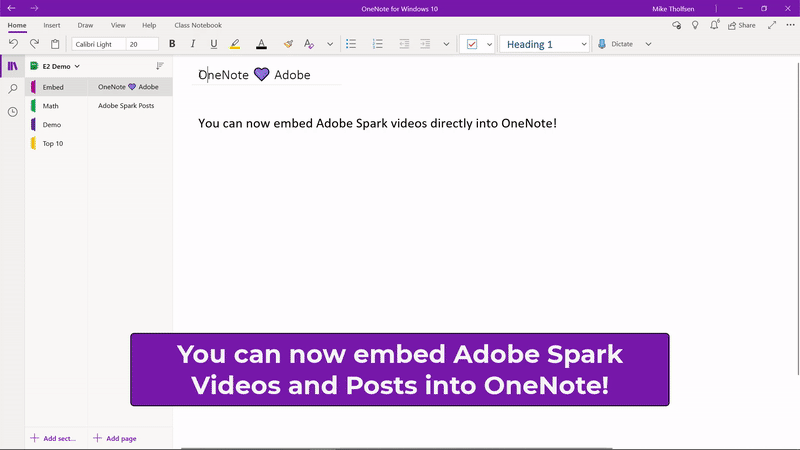
2) Embed Adobe Spark Videos and Posts into OneNote
Educators love Adobe Spark, and they also love OneNote! Adobe Spark lets students and educators transform their ideas into stunning visual stories. Today we are excited to announce support for embedding Adobe Spark Videos and Posts directly into OneNote. This will allow educators and students to interactively engage with the content. We look to add additional Adobe Spark product support to embed in OneNote in the future.
Note: Adobe Spark posts currently work on OneNote Windows 10, OneNote Online, OneNote iPad and Mac. OneNote 2016 support will come in the future

You can find the entire list of OneNote Embed partners here.
3) Class Notebook and Microsoft Teams Updates
So many educators today are using Microsoft Teams in their in-person or virtual classroom, so ensuring the OneNote Class and Staff Notebook is a core part of that experience is critical. Today we are excited to announce a set of improvements for OneNote inside of Teams.
Roster updates from School Data Sync automatically update the Class Notebook roster
In the past, when School Data Sync made roster updates from the students in the class, these updates would not happen until the educator went and clicked on the “Class Notebook” tab in the Class Team, which was a big complaint and time water. Now, these SDS updates automatically flow to the OneNote Class Notebook, and the educator saves a bit of time!
Set Channels to create sections in Collaboration Space or Content Library
This feature was inspired directly from Dr. David Kellermann of UNSW in Australia. For the past few years, when creating a new channel, all Sections are created in the Collaboration Space, with no other option. Dr. Kellerman teaches his classes by using Teams channels as units, and always wanted to have any channel he created make a read-only Section in the Content Library of his Class Notebook. With this new update, the educator has the option to choose where new Sections go. THanks to Dr. Kellermann for the inspiration! This update will be found in a new option under “Manage Notebook” inside of Teams, and rolls out in late August.

A better First Run Experience for then “Notes” section in a Channel
To make it easier and more obvious that the “Notes” section in a new Channel is part of the Class Notebook or Staff, we’ve added a first run page that explicitly explains the link between the

Create a new OneNote page in the “New File” dialog of Assignments
When educators are creating assignments, or students are attaching work, it’s handy to be able to create a New File on the fly. Currently, Teams Assignments supports creating a new Word, Excel or PowerPoint document. We will be adding the ability to also create a blank OneNote page, that can easily be filled out, through the New File dialog.

Page Distribution speed improvements
One of the top requests we’ve had is to speed up Page Distribution when using the OneNote Class Notebook toolbar. Our engineers have been hard at work over the summer, and we’ve made a large set of improvements that speed up page distribution on average by 65%! Mileage may vary, but overall educators and students should experience a significant performance improvements when distributing pages. Also be sure to follow out OneNote Best Practices when using the Class Notebook toolbar.
Students and Educators get a notification when a page is distributed
A great benefit of using the Class Notebook inside of Teams is the Class Notebook bot. We are making a new update that will allow any Educator using Page Distribution in the OneNote client, to ensure that all students get a notification in Teams after the page is distributed! This has been a top UserVoice request that we are glad to take care of. This notification will work for educators using the Class Notebook Toolbar in OneNote Windows 10, iPad, Web and Mac.
The “Teacher Only” Section Group is enabled by default now
A common request from educators is to just enable the “Teacher Only” section group by default. It takes extra clicks to go and do this after the Class or Staff Notebook is set up. So we’ve recently made a change do this will always be enabled by default, and save educators a few less clicks.
For those of you that like lists, here are the updates in list format, with the dates as well:
- Roster updates from School Data Sync automatically update the Class Notebook roster – live now
- Page Distribution speed improvements – live now
- The “Teacher Only” Section Group is enabled by default now – live now
- A better First Run Experience for then “Notes” section in a Channel – live now
- Embed Adobe Spark Videos and Posts into OneNote – live now
- OneNote Live Captions – private beta rollouts to our Education Insiders this week
- Set Channels to create sections in Collaboration Space or Content Library – end of August
- Create a new OneNote page in the “New File” dialog of Assignments – early September
- Students and Educators get a notification when a page is distributed – September
We hope you enjoy these new OneNote updates! Don’t hesitate to reach out with any questions or comments.
Mike Tholfsen
Principal Product Manager
Microsoft Education
@mtholfsen
by Scott Muniz | Aug 20, 2020 | Uncategorized
This article is contributed. See the original author and article here.
Hi Everyone! Sujay here from the Program Management team for System Center Data Protection Manager (DPM) and Microsoft Azure Backup Server (MABS)
While talking to DPM and MABS customers I come across many questions around the tiered storage requirement for storage pool. With this blog post I will try to answer the most important question Why tiered storage? and some of the frequently asked questions (FAQs) about using the tiered storage.
This post is going to be a long one, but I promise to be worth your time. And if you are looking for tldr version; Use tiered storage for DPM storage pool, period. 
Before I jump into the questions, I recommend you to get yourself familiarize with the following terminologies I have referenced multiple times in my blog.
Note: I might use DPM at many places but everything in this blog is applicable for MABS as well. Make sure you are using MABS v3 with UR1.
Let’s get started.
Why the backup jobs take longer time on Modern Backup Storage over the period?
During the backup process one of the important steps is to take snapshot of the replica on the DPM server to create Recovery Point. This is done using block cloning feature of ReFS. Over a period of time, as daily/weekly backup jobs run and snapshots are taken, it causes increased fragmentation of the replica. Also, with each clone operation the size of the metadata is increases The block cloning operation is metadata intensive. During each block cloning operation, the files metadata and global ref count table would be read from the disk to the memory. This would result in high amount of I/O operations to underlying storage.
Let’s take an example of 400GB replica size (the replica contains the backup data stored on DPM server for specific data source). We observed that with the worst possible fragmentation, the metadata size can go up to 4% of the replica size, which would be 16GB in this case. This would result to read of 16GB of metadata during every cloning operation. If we assume ReFS cluster size of 4K, total I/O operations required for single cloning operation would be around 4 million. With the standard disk (HDD) of around 200 IOPS, this can take almost 20K seconds or around 5 hours to just clone the replica. This is the worst-case scenario – we are assuming all IOPS are random and worst possible fragmentation. This may not be always the case with your environment.
How does the tiered storage solve this problem?
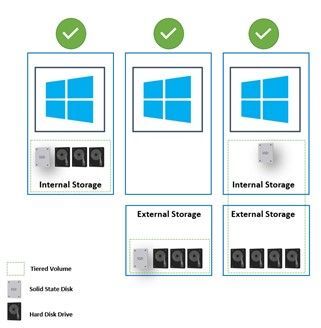
With DPM 2019, we enhanced MBS to take advantage of hybrid storage aka Tiered Storage feature in ReFS configured using Storage Spaces. ReFS divides volume into two logical storage known as tiers. These tiers can have their own drive and resilience types, allowing each tier to optimize for either performance or capacity. Once these tiers are configured, ReFS uses them to deliver fast storage for hot data and capacity-efficient storage for cold data. DPM uses this in a slightly different way to improve the overall backup performance.
DPM (with the help of ReFS), uses the performance tier (SSD) to store entire file system metadata which is required for block cloning operation. This improves the cloning performance to a great extent. If we take the same example as above and take the cheapest SSD available in the market, it offers 10K IOPS. The cloning time would cut down drastically to around 6 to 7 minutes. The tiered storage is the cost-efficient solution offered by ReFS to cater to high IOPS demanding application and DPM makes the most out of it by using just the small size of SSD.
What should be the size of SSD tier and Why?
As mentioned above in the worst possible fragmentation scenario the metadata size of the file system can grow up to 4% of the replica size. And since DPM requires SSD tier to store only ReFS metadata (which is required for cloning operation) the SSD size of 4% of total DPM storage is recommended.
Do I need to upgrade my server or external storage if it doesn’t support SSD?
The storage for DPM pool could be directly attached storage (Internal) or the external storage like SAN storage.
If you are using internal storage you need to connect SSD to the DPM server and if your server doesn’t have provision for SSD you can also use PCIe based SSDs.
If you are using external storage (like SAN device) and if your storage supports SSD you can add the SSD to external storage. If that’s not possible you can still use the SSD connected directly to the DPM server (including PCIe based SSD) in combination with HDDs from external storage to create tiered storage.

What if my DPM server is running on Virtual Machine? Can I use tiered storage on VM?
Yes. Configuring tiered storage using Windows Storage Spaces is supported on Virtual Machine.
The VM should have virtual SSD carved out of Physical SSD on the Hyper-V host. The Hyper-V host can have the physical SSDs connected locally or from external storage. While configuring the Windows Storage Space on Virtual Machine, you need to make sure that Media Type for the disk are configured correctly.
Use the following command to set the appropriate Media Type:
Set-PhysicalDisk -UniqueId <UniqueId String> -MediaType <HDD|SSD>

How can I configure the tiered storage?
Please refer to our documentation here which provides the step by step guidance to configure tiered storage. Additionally, I strongly recommend you to review the pre-requisites for Storage Spaces here.
What resiliency option can be configured for tiered volume in DPM?
DPM supports all the resiliency option supported by Windows Storage Spaces: Simple, Mirror and Parity. The Storage Space pre-requisites document explains the pros and cons of each option here.
For DPM, you can also use the combination of the resiliency option to optimize performance or capacity.
|
Performance tier
|
Capacity tier
|
|
Mirrored SSD
|
Mirrored HDD
|
|
Mirrored SSD
|
Parity HDD
|
Note: When you are configuring Storage Spaces, you should not configure any resiliency (RAID) at hardware layer. This is pre-requisite for the Storage Spaces.
What is the recommended sector size for tiered storage?
We strongly recommend keeping the sector size to 4096. And to avoid multiplexing / demultiplexing of IO operations, the sector size should be consistent across all the layers from ReFS to storage hardware.
Why is Windows Server 2019 recommended to install DPM 2019 or MABS v3?
As you know DPM is highly dependent on Resilient File System (ReFS). Windows Server 2019 brings various enhancements to ReFS which are not available with Windows Server 2016. Also, it is important that you always install the latest Cumulative Update for Windows Server 2019 which brings additional fixes to ReFS. For example, recently the January 23, 2020—KB4534321 update had performance improvement for ReFS block cloning operation.
Is there any alternative to improve the backup job performance?
Although we highly recommend you to migrate to tiered storage, there is another way which can help you to improve the backup performance. If the backup jobs are taking longer time only for specific data sources, to reduce the fragmentation, you can move the data source to another volume where you have enough free space. This will allow to store the replica in more contiguous space which should result in reduced fragmentation. Remember having enough free space on the volume is important to get contiguous space. While this should improve the performance but over the period as the fragmentation increases you might see degraded performance.
With DPM 2019 UR2, you can use optimized migration to migrate only active replica to new volume while retaining the older recovery points on the existing volume. Read more about how to migrate data source to new volume here.
How do I know the current fragmentation status of the replica?
We have added –CheckReplicaFragmentation parameter to Copy-DPMDatasourceReplica PowerShell cmdlet. This allows you to check the fragmentation status of the replica for the Data Source.
Note: To use this cmdlet you need to have at least UR1 for DPM 2019 or UR9 for DPM 2016.
I hope this was helpful information and now you know why using tiered storage for DPM storage will improve the backup job performance. So, start using tiered storage and let us know how your experience is. While I have tried to cover most frequently asked questions in this blog, I am sure there will be still more questions. Please post your questions in the comments and I will try to answer them as best as I can.
-Sujay and rest of the DPM team at Microsoft
by Scott Muniz | Aug 20, 2020 | Uncategorized
This article is contributed. See the original author and article here.

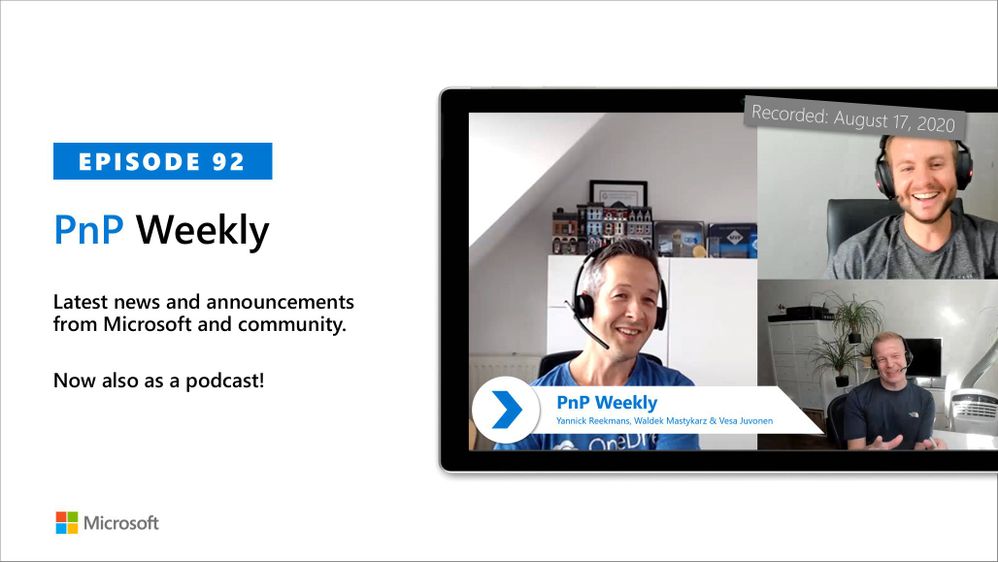
In this weekly discussion of latest news and topics around Microsoft 365, hosts – Vesa Juvonen (Microsoft), Waldek Mastykarz (Rencore), are joined by Yannick Reekmans – MVP, Microsoft 365 Solution Architect and developer at Qubix.
Topics raised during this session:
- Customers’ shifting priorities, Microsoft’s shifting product capabilities, and Partner monetization opportunities.
- Discussion on purpose-built apps vs delivering experiences
- Teams vs SharePoint extensibility
- Value-add vs branded UI and strategies for Customer migration to cloud and for staying up-to-date on latest technologies.
- Fundamental approach – lead with Teams and add SharePoint for news and Intranet.
In this episode, 19 recently released articles from Microsoft and the PnP Community are highlighted.
This episode was recorded on Monday, August 17, 2020.
Did we miss your article? Please use #PnPWeekly hashtag in the Twitter for letting us know the content which you have created.
As always, if you need help on an issue, want to share a discovery, or just want to say: “Job well done”, please reach out to Vesa, to Waldek or to your PnP Community.
Sharing is caring!
by Scott Muniz | Aug 20, 2020 | Uncategorized
This article is contributed. See the original author and article here.
Microsoft Teams usage has increased greatly during the current pandemic. All types of organizations are using the communications tool to stay connected with its employees and customers alike. The increase of use has also resulted in an increase of demand of system administrator’s time to manage Microsoft Teams. Everything from adding users and groups to managing policies of said users and groups can be managed via PowerShell. This post will highlight the foundations to get started and provide links to continue your automation through script writing journey.
Let’s begin …
Step 1: Getting started
- Launch PowerShell and run the following command
Install-Module -Name MicrosoftTeams
- With the Microsoft Teams cmdlet installed, use the following to login into your Microsoft Teams tenant
Connect-MicrosoftTeams
Note: This will also work if multi-factor authentication is enabled and you will be asked for your Office 365 credentials to sign in
- Use the following command to see a list of available Microsoft Teams cmdlets
Get-TeamHelp
Step 2: Choose your MS Teams cmdlet adventure
There is a plethora of cmdlets available as listed by the previous step. Here is a list of the cmdlets you will use most often:
Step 3: Managing Microsoft Teams policies
Policies within Microsoft Teams govern over a user’s or team’s abilities within teams and channels. Policies can enforce on behalf of a single user or an entire organization. The automation that PowerShell provides allow the Microsoft Teams administrator the ability to assign custom policies to multiple users as required.
In this example, the following script assigns the Human Resources Management Policy to all users in the Human Resources group. The script begins by getting the GroupObjectId of the group. Once acquired, it then finds the members of that group and assigns the policy to all users in the group.
$group = Get-AzureADGroup -SearchString "Human Resources group"
$members = Get-AzureADGroupMember -ObjectId $group.ObjectId -All $true | Where-Object {$_.ObjectType -eq "User"}$members | ForEach-Object { Grant-CsTeamsChannelsPolicy -PolicyName "Human Resources Management Policy" -Identity $_.UserPrincipalName}
As always, please share your comments below on bettering the above script or any questions you may have.

Recent Comments