This article is contributed. See the original author and article here.
According to Microsoft Threat Intelligence Report, one of the most common attacks against IaaS VMs in Azure is the RDP brute-force attack. This attack usually take places for VMs that are exposing the RDP port (TCP 3389). Although RDP is the primary source, there are also brute-force against SSH (TCP 22).. Nowadays with COVID-19, with more employees working from home more often, threat actors are taking advantage of the increase of management ports open, which includes RDP and SSH. Users with weak passwords and without MFA enabled, are more susceptible to be compromised by and RDP brute force attack.. Keep in mind that compromising a server via RDP brute force is just the initial foothold, once the threat actors gain access to target machine, it will continue conducting malicious activities which may include coin mining and even ransomware type of attack.
One way to reduce the likelihood that your machine will be compromised via RDP brute-force is by reducing the exposure, in other words, limiting the amount of time that a port is open by securing your management ports using Just-in-time access, capability available in ASC Standard Tier.
This blog explain how to leverage automation to block traffic of specific IP to a VM in the NSG as a response to a Brute-force alert detected by Azure Security Center.
How does the automation work?
When Azure Security Center detects a Brute-force attack, it triggers an alert to bring you awareness that a brute force attack took place. The automation uses this alert as a trigger to block the traffic of the IP by creating a security rule in the NSG attached to the VM to deny inbound traffic from the IP addresses attached to the alert. In the alerts of this type, you can find the attacking IP address appearing in the ‘entities’ field of the alert.
The Logic App uses a system-assigned Managed Identity. You need to assign Contributor permissions or Security Reader and Network Contributor permissions to the Logic App’s Managed Identity so it is able to create an NSG rule once there is an attack detected. You need to assign these roles on all subscriptions or management groups you want to monitor and manage resources in using this playbook. Note: You can assign permissions only if your account has been assigned Owner or User Access Administrator roles, and make sure all selected subscriptions registered to Azure Security Center.
Refer to the Readme file in our GitHub Repository for detailed procedure.
Deployment process and details
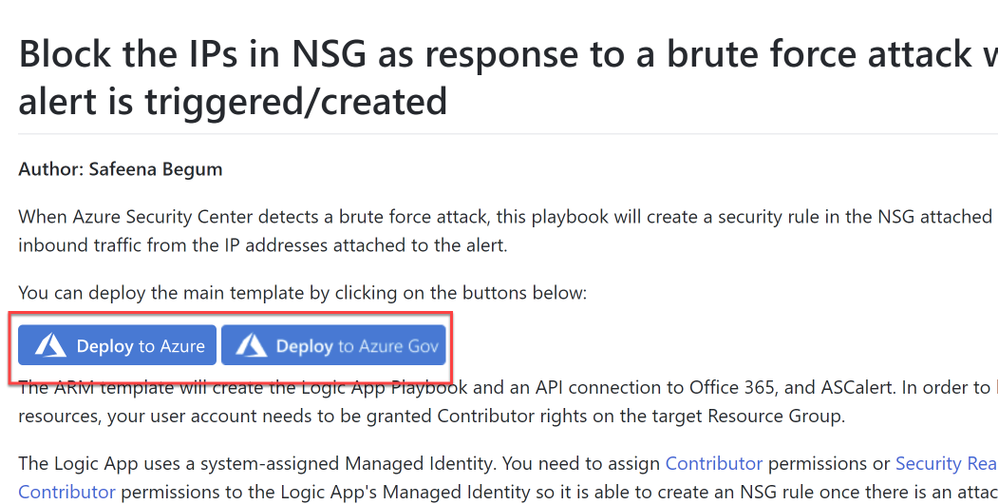
Navigate to Azure Security Center GitHub repository and select “Deploy to Azure” or “Deploy to Azure Gov”, as shown in Image 1:
Image 1: Git Hub repository
Once you have clicked on ‘Deploy’ option in the screen above, you should automatically be redirected to the Azure portal Custom deployment page where you can fill in the details of requirement as shown in Image 2, as shown below:
Image 2: Azure portal, Custom Deployment
The ARM template will create the Logic App Playbook and an API connection to Office 365, and ASCalert.
You need to authorize the Office 365 API connection so it can access the sender mailbox and send the email notification from there.
Once you review and create from Image 2, you would notice below resources created from the ARM template (Refer Image 3)
Image 3: Summary of the resources created from the ARM template
Define when the Logicapp should automatically run:
Workflow automation feature of Azure Security Center can trigger Logic Apps on security alerts and recommendations. For example, you might want Security Center to email a specific user when an alert occurs. When you add the workflow automation and trigger conditions as show in Image 4, the triggers will initiate this automatic workflow. In this example, you want the Logic App to run when a security alert that contains “bruteforce” is generated.
When a Bruteforce attack is detected by Azure Security Center as shown in Image 5, this would automatically apply the automation and blocks the traffic of the IP by creating a security rule in the NSG attached to the VM to deny inbound traffic from the IP addresses attached to the alert as shown in Image 6
Image 5: Brute force attack alert
Image 6: IP blocked by ASC
You would receive an email notification on the alert details as shown in Image 7:
Image 7: Email notification from the logicapp
This logic app as well as many other can be found here:
Most organizations lack the time and expertise required to respond to these alerts so many go unaddressed. Having this type of automation can address the threat immediately. I hope you enjoy reading this article and implementing, testing it as much as I enjoyed writing it.
Reviewer
Special thanks to:
Yuri Diogenes, @Yuri Diogenes, Senior Program Manager (CxE ASC Team)
This article is contributed. See the original author and article here.
Applying security policies to the computers in your organization is a foundational security practice. It’s especially important now that more employees are using these devices away from the office. To make it easier for you to protect your organization’s devices, we’ve added a new setup experience to the Microsoft 365 admin center that allows you to establish a security baseline for all of the Windows 10 PCs in your organization in just a few clicks.
This new experience is available to customers with Microsoft 365 Business Premium. It has begun rolling out and will reach all eligible customers within the next few months. Let’s take a closer look at what’s new.
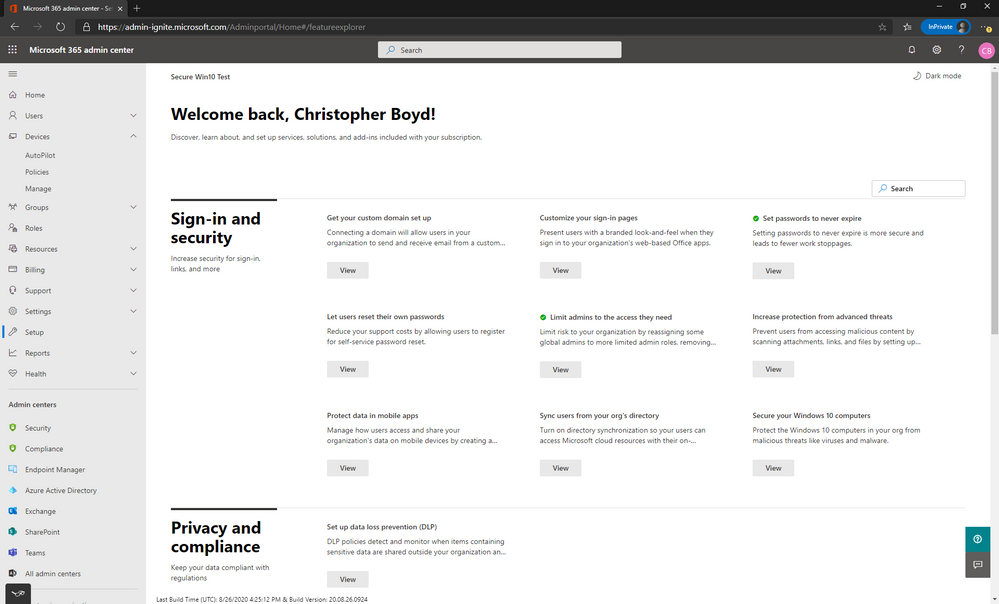
To access these new capabilities, in the Microsoft 365 Admin Center, open Setup on the left menu.
In the Sign-up and Security section, find Secure your Windows 10 computers, and click the View button.
On the Secure your Windows 10 computers page, you can read about the streamlined process for securing Windows 10 devices and access relevant documentation. As the page notes, this experience is built with small and medium-sized businesses in mind. It simplifies the process of setting up Intune-powered devices policies. Larger enterprises and advanced users can go to the Endpoint Manager admin center instead. Click the Get Started button to continue.
The pane that appears on the right side shows the five policies recommended for applying a security baseline. The policies that you can enable here are a lightweight set designed to elevate your protection while minimizing user impact and limiting management complexity. They were selected based on input from IT partners who serve small and medium sized businesses, telemetry on the most commonly applied Intune policies, and feedback from customers.
The recommended security settings are:
Help protect PCs from viruses and other threats using Windows Defender Antivirus: Requires that Windows Defender Antivirus is turned on to protect PCs from the dangers of being connected to the internet.
Help protect PCs from web-based threats: Turns on settings in that help protect users from malicious sites and downloads. It also prevents the launching off applications with Microsoft Office.
Prevent network access to potentially malicious content on the Internet: Network protection helps to prevent employees from using any application to access dangerous domains that may host phishing scams, exploits, and other malicious content on the internet.
Help protect files and folders on PCs from unauthorized access with BitLocker: BitLocker Drive Encryption is a data protection feature that integrates with the operating system and addresses the threats of data theft or exposure from lost, stolen, or inappropriately decommissioned computers.
Turn off device screen when idle for this amount of time: Makes sure that company data is protected if a user is idle. A user may be working in a public location, like a coffee shop, and step away or be distracted for just a moment, leaving their device vulnerable to random glances. This setting lets you control how long the user can be idle before the screen shuts off.
When you click Apply Settings, the system will create these policies in Intune. For these policies to actually take effect, the conditions noted in the gray box must be true.
The most important of these is that the user’s computer must be enrolled in Intune. That is how the computer knows to check the cloud to see which settings should be applied. For information about Intune enrollment in an environment where PCs are joined to an on-premises Active Directory domain, see Enable domain-joined Windows 10 devices to be managed by Microsoft 365 Business Premium, an article that we recently improved based on customer feedback.
Note: You typically will not need to change Azure Active Directory settings noted in the gray box unless you have previously customized them.
After the policy setup is complete, you can access and modify the policies at any time by clicking Devices and then Policies.
The policy called “Device Policy for Windows 10” is the one created in the setup experience. You can modify that policy or create additional ones.
When you edit the settings, you’ll notice the original settings plus additional ones you can activate; related to keeping devices up to date, allowing users to download apps from the Microsoft store, and so on.
Advanced users who are familiar with Intune can also edit these policies and create others in the Endpoint Manager admin center, which is accessible in the left navigation.
We’re rolling these capabilities out right now, and are eager for you to put them to work to secure the devices in your organization. If you have questions about the new setup experience, or feedback for the team, let us know here in the Tech Community.
This article is contributed. See the original author and article here.
In part one of this three-part series, Vasiya Krishnan introduces Azure SQL Edge and its features that make it the optimized database engine for IoT Scenarios. In part two, Vasiya will review customer examples and use cases, and in part three, she’ll conclude with a demo that demonstrates how to use Azure SQL Edge to build smarter renewable resources.
This article is contributed. See the original author and article here.
This month, we’re releasing new features in Microsoft Teams to help users automate more of their workflow, ideate on digital whiteboards more easily, help improve readability while browsing the web, and more.
This article is contributed. See the original author and article here.
As part of our blog series on the value of training and certification, we’re talking with some of our top Learning Partners who deliver Microsoft training and who currently offer training for Business Applications. We kicked off the series with a post based on a conversation with representatives of Global Knowledge, the 2019 Microsoft Learning Partner of the Year. Today’s post focuses on Koenig Solutions and is based on a conversation with Subodh Kumar Chaudhary, Group Manager, Alliance and Corporate Sales (India), and Neeraj Sharma, Group Technical Manager, Dynamics 365 (India), both of Koenig.
Koenig Solutions has been partnering with Microsoft for 22 years, and in 2014 it was recognized as a Gold Partner. The company offers training for all major Microsoft Certifications, including Microsoft Dynamics 365 and Microsoft Power Platform, with a focus on financials. “Koenig works with more than 25 vendors,” Chaudhary notes, “but Microsoft holds a special place for the company.” This is due in part, he explains, to the fact that its Microsoft trainings are its biggest revenue generator. But more importantly, “We greatly appreciate our working relationship with Microsoft.” Microsoft has a “genuine partner-centric approach that enables us to work together as a true team.”
Here’s one example of how that collaboration works. Every year in July, Koenig representatives attend the Partners Conference, so they can find out what’s new, track changes, discover technical approaches, and create new training or adjust existing training. After learning about Dynamics and the Microsoft emphasis on CRM at the 2006 conference in Boston, Koenig launched a CRM training program. At the time, it was the only Microsoft partner in India that was delivering CRM training. And the first instructor of Koenig’s Dynamics course was Sharma. Over the years, as Dynamics grew and became Dynamics 365, Sharma built a team that led Koenig’s journey as a Dynamics specialist. Today, Sharma is Practice Head for the Dynamics team, and most of his 15-member team members have been working with him for seven or eight years. “Koenig is in love with Dynamics,” he says. “Our practice with Dynamics is always evolving.”
Koenig offers Microsoft training in 182 countries, including Greenland, Norway, and the United States and on every continent (“Except Antarctica!” Chaudhary jokes. “No training there yet.”) With 170+ in-house instructors and 200,000 people trained, it’s one of the largest global training organizations. The commitment to retaining all in-house trainers and not hiring freelance trainers is one of its strengths and provides many benefits to the instructors, the learners, and the quality of the training it offers. It means, for instance, that Koenig can ensure a great work-life balance for its instructors. Each year since 2010, Koenig has been certified as a “Great Place to Work” by the Great Place to Work Institute in India. Why is its staff’s “happiness quotient” so consistently high? “Because we recognize that we’re in the service industry,” Chaudhary says, “and that human resources, our trainers, play a big role.” That’s why Koenig doesn’t overload its instructors. It keeps them operating at about 70 percent, leaving them enough time to learn and upgrade their own skills, which is essential for their motivation. That also means they don’t burn out and their motivation and excitement for teaching remains high. This translates to a great retention rate for the company and consistently engaging instruction for learners.
Using only in-house trainers also helps Koenig respond to three common industry challenges. First, in cases where an instructor cancels the day before a course is to begin, Koenig can supply another trainer, so the course proceeds as planned and learners don’t lose out. Second, it gives the company the flexibility to start courses when it suits the market—not based on the availability of a freelance instructor. Third, it helps keep costs in check. With a group of in-house trainers, some training many students at a time and others only a few, the cost of instruction can be spread out. This benefits students, as well. They can count on every course being offered as scheduled. All Koenig courses are “guaranteed to run,” which means that if three students sign up for a course, or even one, it will be offered. Koenig does not cancel classes, so students can depend on the fact that the training they plan and sign up for will take place.
Another benefit of using only in-house trainers is the ability to develop and maintain excellence in instruction. As practice head for Dynamics, one of Sharma’s tasks is to support the instructors. He meets regularly with them, to make sure they’re keeping up their technical skills and to hear and respond to any grievances. And the company maintains a shared repository of content that instructors can contribute to and consult to help them develop and improve the way they teach their courses. For instance, they can add case studies and other supporting content to the repository. And other instructors can use those resources to get up to speed fast—for example, if they’re teaching Microsoft Power Platform or Microsoft Dynamics 365 for an industry they’re not as familiar with.
Having in-house trainers also means Koenig can operate more cooperatively than competitively with other training organizations. If a freelance instructor is unable to teach a scheduled course for another organization, that organization can call Koenig and hire one of its instructors. This is especially important now that all classes are online.
Over the past several years, Koenig has invested in more online training. “Online training is not traditional in India,” Chaudhary explains. ”People want face-to-face, instructor-led training.” Three years ago, however, it started offering 5 percent of its trainings online, to help defray the cost of travel for companies and to accommodate international companies’ teams with members that work in different time zones. Ever since then, its online offerings have been steadily growing, so that just before the COVID-19 pandemic hit, 25 percent of its trainings were virtual instructor-led training (VILT). Now, during the pandemic, all of its trainings are online.
This is actually a good development, Chaudhary emphasizes. Rohit Aggarwal, CEO and founder of Koenig Solutions, notes one reason for this: “COVID has made the world flat for us as a training organization. Previously, distance, visas, and flights often limited access for some customers. Not anymore. Now all the world’s a stage. Thus, even specialized skills like those in Microsoft Dynamics 365 can now become truly big for us.” Moving everything online has brought other improvements as well, Chaudhary explains. Though reluctant at first to investigate more online training, the company now finds that virtual instructor-led training—with the delivery methods put in place by Koenig—is as good as in-person training. The company’s organization, along with several changes made to the delivery method, enabled it to transition so successfully.
First, he says, “When you have in-house trainers, you can efficiently make changes in delivery methods across the board.” Second, Koenig asked its learners what pain points they experienced in online learning, and in all learning, and then implemented changes to respond to those. For example, now that people are working from home, they find they’re not able to concentrate for eight hours or even to sit uninterrupted for eight hours. Learners also reported, and research confirmed, that their ability to absorb knowledges declines after four hours. So Koenig now gives learners two options: they can take a course for four hours a day for 10 days (in the afternoon or morning) or eight hours a day for five days. The company’s name for this is spaced learning, and it has found that with spaced learning the rate of knowledge absorption improves.
Koenig supports its learners in multiple ways. Learners reported that they were reluctant to take exams because of the fear of failing. Since passing the exams validates the skills they’ve learned and earns them certification, Koenig steps in to help allay learners’ fears. It designed a simple set of questions in-house that learners can answer to see whether they’re ready for the official exam. If they get 70–75% correct, they’re ready for the exam. It works like a “small test engine,” says Chaudhary. “It’s a great morale booster.” One more way it supports learners is by offering Doubt Clearing. Once you’ve attended a training, you get the opportunity to attend a Doubt Clearing session without cost. Learners can go to the session to practice their knowledge and to ask questions of trainers about issues that they’ve encountered using the software in their workplace.
Though its Azure trainings are among the most popular, due to demand for cloud skills, Koenig offers 86 Dynamics 365 trainings. As more and more companies have adopted Dynamics 365 and Microsoft Power Platform, it has continued to add training. These trainings cover all the major areas of Dynamics 365—sales, marketing, customer service, field service, and supply chain management—but they have a special emphasis on finance and Microsoft Power Platform, because of customer demand. “Every customer needs expertise in these two areas,” Chaudhary explains, “no matter which industry they’re in.” That’s borne out by popularity.
The Koenig Dynamics team works hard to keep its training up to date with the fast pace of Dynamics 365 changes. The team “actively watches” Microsoft Docs and Microsoft Learn, taking note of any updates. “It’s our routine practice,” Sharma says, “to keep us on our toes.” The skills expectations and help available on Microsoft Learn are “just great,” Chaudhary adds. Team members also try out exams themselves, so they can design better training. Another way Koenig “stays vigilant” about the changes is by having its instructors routinely talk with subject matter experts, especially in Azure, Dynamics 365, and Microsoft Power Platform.
Commitment to staying ahead of the curve is evident in the new courses the Koenig Dynamics team is working on—trainings in the latest Dynamics 365 offerings, Business Central, and Dynamics 365 Commerce. Though certification for Business Central was just announced and certification for Commerce is on the way, Koenig is ready to help learners learn and validate these skills. “There’s lots of material on Microsoft Learn and Microsoft Docs,” Sharma says, “and our team has been preparing courses that may launch as early as August of this year.”
Koenig’s record of partnership with Microsoft and its commitment to that close, ongoing teamwork at all levels are summed up well by Chaudhary when he says, “We love delivering Dynamics training, and all our Microsoft trainings, with pride.”
This article is contributed. See the original author and article here.
As an IT admin you plan to ship new devices to end users which can join the on-premises AD (Active Directory) by leveraging Autopilot with Intune for device management.
This post is a walkthrough of evaluating the Autopilot Hybrid join over VPN scenario in a lab environment hosted in Azure.
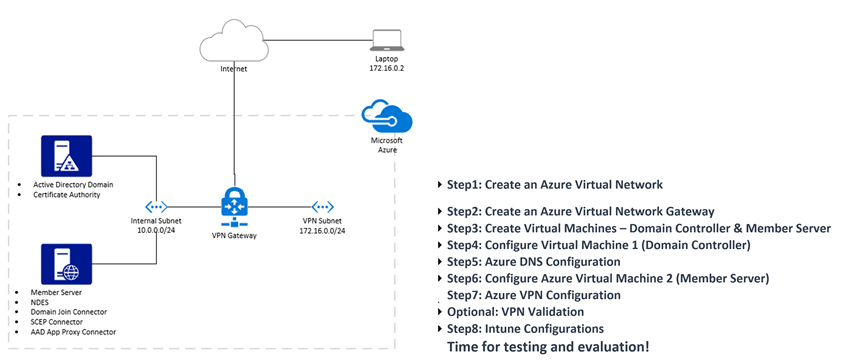
Infrastructure
I have added steps to build the configurations and dependencies along the post, this can get complicated due to the number of components involved. Here is an agenda for this post along with a high-level network configuration of the setup:
Click Create a resource and look for Virtual Machine under Compute to create one each by repeating the steps twice one for the Domain Controller and the other for the Member Server.
Choose your appropriate Azure Subscription.
Select the Resource Group from previous exercise.
Specify a Name of the VM
Region is auto populated based on the region you selected from step2.
Leave the default availability option. (No infrastructure redundancy required.)
From the Image drop-down choose a Windows Server OS
Leave the Azure spot instance default to No
Choose a size as appropriate. (I am leaving the default suggested by Azure)
Specify a Username and a password.
Leave the default inbound ports for RDP.
Leave default licensing.
Click Review + Create.
The wizard automatically chooses the Networking from the same resource group we selected. Feel free to make any changes as desired.
Click Create to complete the process.
Once both the VM’s are successfully created, move to the next steps in configuring them.
Create Certificate Templates for SCEP Profiles by following the instructions from this blog post for setting up NDES for SCEP certificate deployments. We will reference this blog post at various phases during the setup.
Client Authentication Certificate – For NDES Server (VM2) you can even merge this with the Web Server Certificate by adding Client Auth. Capabilities instead of creating a new template.
On the second VM we will install a list of roles and features for our solution. One of the primary reasons for building this VM2 is the fact that you cannot co-locate both NDES and CA on the same server.
Browse the Virtual NetworkGateway resource you created earlier we called it Contoso-VPN
Click the User VPN Configuration from the menu and click Configure now.
Specify an Address pool for the VPN clients to connect.
Under Tunnel type specify IKEv2
For Authentication type, leave Azure certificate.
Under Root Certificates specify a name (example Root) and for Public Certificate Data:
Make sure that you exported the root certificate as a Base-64 encoded X.509 (.cer) file. You need to export the certificate in this format so you can open the certificate with text editor.
Open the certificate with a text editor, such as Notepad. When copying the certificate data, make sure that you copy the text as one continuous line without carriage returns or line feeds. You may need to modify your view in the text editor to ‘Show Symbol/Show all characters’ to see the carriage returns and line feeds. Copy only the following section as one continuous line:
Save the configuration.
Note: This may take 10 minutes or up to complete.
Click Download VPN Client and save for later use.
Optional: VPN Validation
To reduce the complexity, it is a good idea to validate the VPN connection outside Intune configuration.
Build a Windows 10 VM or use a physical machine (meeting OS Prerequisites) which is not joined to the Domain we created above.
Copy the VPN client we downloaded in the previous exercise.
Instead of executing the installer of the VPN client, we will manually create the VPN configuration from the Generic folder with the file name called VPNSettings.xml
Use the following PowerShell cmdlet to manually create the VPN connection. Replace the highlighted values.
Import a Client-Auth cert for this device with Common Name = Computer Name
For this step you may want to generate a Certificate Template with Computer Authentication capability with Name supply in request and the option to export the private key.
Connect VPN and try to ping/rdp/network-share or even join the machine to Domain.
Step8: Intune Configurations
Now that your base infrastructure configuration is complete, you can proceed with the Intune configuration.
Create Autopilot Deployment Profile for Hybrid VPN Join and assign to the above AAD-Group, preferably to All Devices.
Capture hardware hash import device and assign profile. Get-WindowsAutoPilotInfo. The sample below will capture the hash, upload in Intune, add to a group and assign to the deployment profile.
Specify the Subject name format as CN={{FullyQualifiedDomainName}}
Create a VPN Configuration Profile and assign to the same AAD-Group. Refer the configuration settings from the VPN Client you downloaded under the folder named Generic with the file name called VPNSettings.xml
Specify a Connection Name
Under Servers Description, specify a Name.
For Ip Address or FQDN, specify the VPNServer info from VPNSettings.xml
Set Default server to True.
Enable Register IP address with internal DNS
Choose the Connection type as IKEv2
Choose Always On to Enable
Set the Authentication method to Machine Certificates.
Under Authentication certificate choose the SCEP Certificate profile you created before.
Enable Device Tunnel
Leave the following sections to defaults:
Apps and Traffic Rules
Conditional Access
Customize the DNS Settings by adding:
Add the Domain name as your DNS Suffix.
Add Name Resolution Policy table (NRPT) rule by specifying:
Domain
DNS Server IP
Leave the Proxy settings to defaults.
Under Split Tunneling:
Enable the configuration.
Under Destination prefix and Prefix size specify the subnet address under <Routes> by referring the VPNSettings.xml
Deploy to the AAD-Device group and proceed with testing/validation on a device.
This article is contributed. See the original author and article here.
My customer wanted to lock down their Azure SQL access very, very tightly. The server should have no public endpoints whatsoever, and the only access to it should be from a specific set of trusted IP addresses. This is a common requirement, especially for customers in heavily-regulated industries such as finance and healthcare.
Instead of relying on the firewall built in to Azure SQL Server, which is specific that that instance, they preferred to rely on the Conditional Access Policy (CAP) capabilities within Azure Active Directory (AAD). This would allow them to ensure that authentication requests for all Azure resources could be validated and controlled from a single place, that being, AAD.
This article will describe the challenges of setting up this environment and provide at least one architecture to solve it. I’ll show how to have an Azure VM running SQL Server Management Studio (SSMS) that authenticates against AAD and accesses Azure SQL via a Private Endpoint. None of these services will have internet access.
Note that “Locations” in AAD entail IP ranges in CIDR format. Fully qualified domain names (FQDN) are not allowed.
One thing to remember: all network traffic that flows from one Azure service to another, whether it’s in the same region or different, flows across the private Microsoft network. For example, if a VM in one region accesses an Azure SQL Server in another region via the latter’s public IP, that traffic occurs across private Microsoft fiber, even though a “public Internet IP” is used on the Azure SQL instance.
Locking Down Azure SQL
Even though traffic between an Azure VM and Azure SQL on a public IP will stay within the Microsoft network backbone, that public IP is not guaranteed to be static. Customers are therefore encouraged to access Azure SQL Server via its FQDN only, not via the underlying IP address.
Since Locations in AAD require IPs and not FQDNs, we cannot specify our Azure SQL Server instance as a Trusted Location in AAD. We will have to use the Private Endpoint capabilities of Azure SQL Server to tie it down to a Virtual Network (VNet).
I created one VNet (10.0.0.0/16) with two subnets:
SQLServer (10.0.0.0/24)
VMs (10.0.1.0/24)
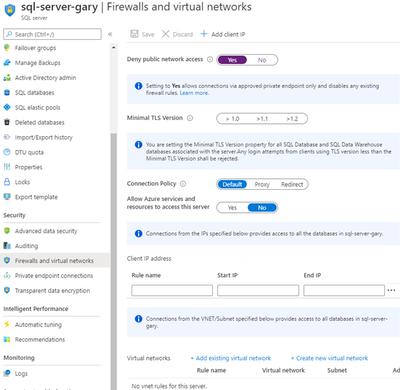
I then configured a Private Endpoint to be present in the SQLServer subnet. Lastly, I set “Deny public network access” to “Yes.”
One thing to note: DNS with Private Link can be tricky. I did it the easy way: by letting Private Link automatically create an Azure Private DNS Zone that was associated with the VNet. That way the SSMS VM could find the SQL Server on its private endpoint via its FQDN: “sql-server-gary.database.windows.net.” Donotuse its internal FQDN of “sql-server-gary.privatelink.database.windows.net.”
This was easy. Just disassociate the public IP from the IP configuration of the VM’s network interface. To access, I just created a jump box in the same subnet (VMs). Our SSMS VM now has access only to the internal VNet.
In addition, I added a “deny internet” outbound rule on the SMSS VM’s Network Security Group (NSG) near the top of the priority list. Before it I added a rule to allow Azure Active Directory outbound flow.
Please note that the rules in this NSG are only used as examples for this specific use case. Your application will undoubtedly have additional requirements that you should consider. The goal should be to deny all traffic except that which is mandatory, and then only between the necessary components.
Locking Down AAD
In addition to controlling access via user sign on with multi-factor authentication (MFA), the customer wanted to make sure that no rogue agent was able to access from a public IP. Therefore, they created a CAP with the following configuration:
1. All users included.
2. All locations included.
3. Trusted locations excluded.
4. Azure SQL Database included.
5. Block access.
I added the VNet’s CIDR (10.0.0.0/16) as a Trusted Location in AAD. Of course, I could have chosen “All Cloud Services” instead of just “Azure SQL Database” to provide protection to even more resources.
Allowing Access from VNet to AAD
Lastly, it’s necessary to allow requests for authentication tokens to flow from our VNet to AAD.
Azure uses an internal IP for this. Unfortunately, this IP is not static, and can change at any time.
To make the IP static we will take advantage of theNAT Gatewayservice. This will fix the range of IPs used for outbound traffic. I associated the NAT Gateway with both of my subnets: SQLServer and VMs.
The “IP prefix” CIDR range should be added as a Trusted Location in AAD. This will allow the token request from our VNet to AAD to flow.
Conclusion
Here is a diagram to tie it all together. In this case I don’t have a jump box in Azure, but rather access is made from an on-premises computer via a private ExpressRoute connection.
This approach is attractive for several reasons:
It adds another layer of protection to your cloud security. Redundancy is often desirable.
Controlling access at the Azure Active Directory layer, where authentication tokens are provided, provides a single place to add new trusted locations, as opposed to doing so for each individual service.
This article is contributed. See the original author and article here.
Initial Update: Thursday, 27 August 2020 11:54 UTC
We are aware of issues within Log Search Alerts and are actively investigating. Some customers may experience issues with missed or delayed Log Search Alerts.
Work Around: None
Next Update: Before 08/27 16:00 UTC
We are working hard to resolve this issue and apologize for any inconvenience. -Subhash
This article is contributed. See the original author and article here.
Welcome to part two of this video series. On part one, we covered how to use Web Deploy to extract the web application from IIS and Windows Admin Center to containerize the application. Now it’s time to look at how to push the container image created with Windows Admin Center to Azure Container Registry (ACR).
ACR is Microsoft Azure’s solution for centralizing the storage of container images and other OCI compliant assets. With ACR you have a dedicated registry on which your company can store container images that are not publicly available, so only users with the right credentials can use it. Since ACR is a cloud service, you can pull images from it from container hosts running on-premises, in the cloud, or even directly to other Azure services – such as Azure Container Instances, as we show on the video.
Also, in the video, we quickly go over the creation of a new registry to be used on Windows Admin Center. You can find more details on ACR, how to deploy and use, and many other features that we don’t cover in this video here. If you’re looking for more details on Azure Container Instances, you can also find it here.
Finally, in the video we show the integration of Windows Admin Center with Azure, which allows you to quickly see which registries are available by just securely logging with your Azure account. If you’d like to use the new functionality on the Containers extension for Windows Admin Center, you can find the details on that here.
We hope you like video two. Next week on video three, we’ll cover the final portion of our series by showing how to prepare an Azure Kubernetes Services environment and YAML file to deploy our Windows Container. Let us know what you think!
This article is contributed. See the original author and article here.
Sync Upis your monthly podcast hosted by the OneDrive team taking you behind the scenes of OneDrive, shedding light on how OneDrive connects you to all your files in Microsoft 365 so you can share and work together from anywhere. You will hear from experts behind the design and development of OneDrive, as well as customers and Microsoft MVPs. Each episode will also give you news and announcements, special topics of discussion, and best practices for your OneDrive experience.
Episode 12, “Back to school with OneDrive”focuses on remote learning and how OneDrive and Microsoft 365 play a critical role in helping students and teachers stay connected and engaged. This month co-hostsAnkita KirtiandJason Mooretalk withErdina Francillon, who is a Microsoft 365 Education Solution Specialist and is supporting universities and school districts with their modern work and learning needs. She helps us with guidance on the transition to remote learning and sheds light on how Microsoft 365 empowers teachers, students and admins to communicate broadly, share and find information and assignments quickly and easily, and collaborate seamlessly .
This month’s special topic is the importance of recharging ourselves for work and life outside of work.
Also, hear about everyone’s most memorable childhood cartoon — just in time for after-school.
Tune in!
Meet your show hosts and guests for the episode:
Jason Mooreis the principal group program manager for OneDrive and the Microsoft 365 files experience. He loves files, folders, and metadata. Twitter:@jasmo
Ankita Kirtiis a product manager on the Microsoft 365 product marketing team responsible for OneDrive for Business. Twitter:@Ankita_Kirti21
Erdina Francillon is a Microsoft 365 Education Specialist supporting universities and school districts across the MidAtlantic with their modern work and learning needs from identity, security, collaboration, automation and of course storage. She loves helping customers envision future of work. Twitter: @erdinaf
Be sure to visit our show page to hear all the episodes, access the show notes, and get bonus content. And stay connected to the OneDrive community blog where we’ll share more information per episode, guest insights, and take any questions from our listeners and OneDrive users. We, too, welcome your ideas for future episodes topics and segments. Keep the discussion going in comments below.
As you can see, we continue to evolve OneDrive as a place to access, share, and collaborate on all your files in Office 365, keeping them protected and readily accessible on all your devices, anywhere. We, at OneDrive, will shine a recurring light on the importance of you, the user. We will continue working to make OneDrive and related apps more approachable. The OneDrive team wants you to unleash your creativity. And we will do this, together, one episode at a time.
Thanks for your time reading and listening to all things OneDrive,


Recent Comments