by Scott Muniz | Aug 31, 2020 | Uncategorized
This article is contributed. See the original author and article here.
In the dazzling array of services among the Microsoft cloud offerings, the rollout of TLS 1.0/1.1 deprecations is not being done all at once. This has lead to some confusion and questions around which endpoints are dropping the older TLS support and when.
Here I want to provide some dates and times of the endpoints, along with some .NET code guidance on how to use the newer TLS protocol (1.2), with some more information on TLS across the Microsoft Cloud.
So to begin, here are some of the endpoints that we know of.
| Service |
end date |
Release |
| Office 365 (Exchange/SharePoint/etc) |
|
|
| Office 365 Dod/GCC |
1/1/2020 |
|
| Office 365 consumer |
10/15/2020 |
|
| Graph |
|
|
| Graph Government |
8/5/2020 |
|
| Graph Consumer |
10/15/2020 |
|
| Azure |
|
|
| Azure Guest OS images |
1/1/2019 |
Family 6 release |
| Azure Application Proxy |
1/31/2019 |
|
| Azure intra-service traffic |
1/1/2020 |
|
| Azure SQL DB managed instance (pre SQL 2016) |
1/1/2020 |
|
| Azure Cosmos DB |
7/29/2020 |
|
| Azure File Sync |
8/1/2020 |
|
| Azure AD registration service in all sovereign clouds (GCC High, DoD etc.) |
8/31/2020 |
|
| Azure Automation |
9/1/2020 |
|
| Azure AD registration service in all commercial clouds |
10/30/2020 |
|
| Azure App Services (Web apps/functions/etc.) no announced timeline, can be set by admin still. |
?? |
|
If you are not sure about a particular endpoint, you can use this powershell to test the endpoint to see which versions of TLS it supports-
<#
Created by: whall
Date Created: 3/25/2020

Product Area Tags: Connectivity

Technology Tags: SSL TLS

Use Case:
Shows which version(s) of TLS is supported for a URL

Description:
When you run this, it checks each TLS type connection to see if it is supported.


Parameters:
-url this is the URL of the site you are testing against

Keywords: sockets secure https

Code Example Disclaimer:
Sample Code is provided for the purpose of illustration only and is not intended to be used in a production environment. THIS SAMPLE CODE AND ANY RELATED INFORMATION ARE PROVIDED 'AS IS'
-This is intended as a sample of how code might be written for a similar purpose and you will need to make changes to fit to your requirements.
-This code has not been tested.  This code is also not to be considered best practices or prescriptive guidance.
-No debugging or error handling has been implemented.
-It is highly recommended that you FULLY understand what this code is doing  and use this code at your own risk.

#>

#TLS check
param([Parameter(Mandatory=$true)][string]$url)

function TLSAvailable([string]$url){


    Write-Host =======================
    Write-Host $url
    Write-Host =======================

    [System.Net.ServicePointManager]::SecurityProtocol = "Tls"

    try{
    $resp1 = Invoke-WebRequest -uri $url -Method GET -DisableKeepAlive
    if($resp1.StatusCode -eq 200){
        Write-Host "TLS/SSL 1.0 supported" -ForegroundColor green
    }
    }catch {
        Write-Host "TLS/SSL 1.0 not supported" -ForegroundColor Red
        #$_.Exception
    }

    [System.Net.ServicePointManager]::SecurityProtocol = "Tls11"
    try{
    $resp2 = Invoke-WebRequest -uri $url -Method GET -DisableKeepAlive
    if($resp2.StatusCode -eq 200){
        Write-Host "TLS/SSL 1.1 supported" -ForegroundColor green
    }
    }catch {
            Write-Host "TLS/SSL 1.1 not supported" -ForegroundColor Red
            #$_.Exception
    }

    [System.Net.ServicePointManager]::SecurityProtocol = "Tls12"

    try{
    $resp3 = Invoke-WebRequest -uri $url -Method GET -DisableKeepAlive
    if($resp3.StatusCode -eq 200){
        Write-Host "TLS/SSL 1.2 supported" -ForegroundColor green
    }
    }catch{
            Write-Host "TLS/SSL 1.2 not supported" -ForegroundColor Red
            #$_.Exception
    }
    Write-Host =======================

}

TLSAvailable -url $url
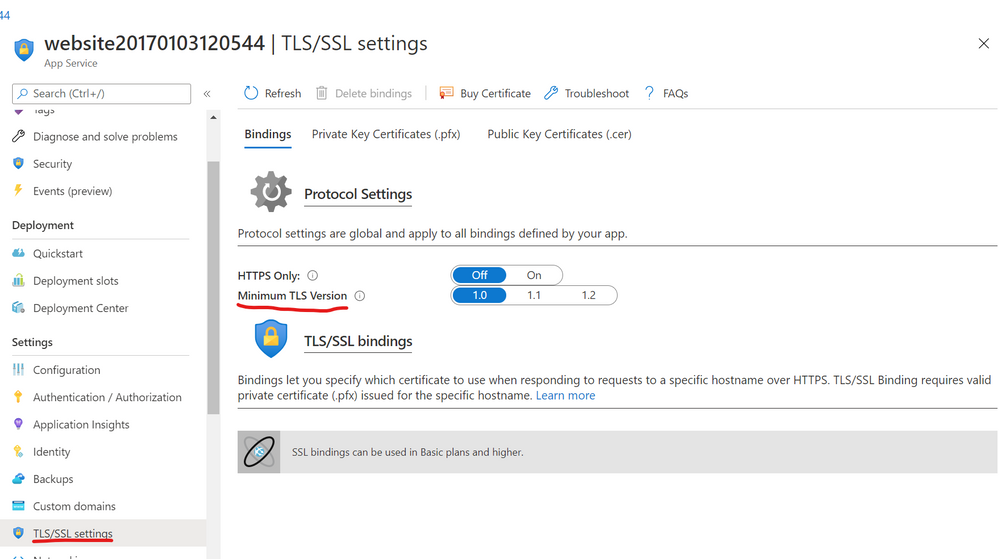
Azure Web Application Services
If you are running a .NET web application in the Azure web application services, you can set the TLS level under the application settings as below-

.NET Framework Code
If you are compiling your code for .NET framework 4.7 (4.7.1 for WCF apps) or later, it will use the default TLS version for the OS.
If you complied to a previous .NET framework version, it will use older versions of TLS unless you apply the right patch, and use one of the following methods-
- Set a registry setting to force all .NET code to use strong cryptography
- Set a config setting for the app context overrides to use the strong cryptography
- Add a line of code to change the TLS version used for HTTPS calls
Method 1 (System wide registry change)-
This enables something called strong cryptography which makes .NET use the strongest cryptography available currently. This affects all .NET applications with one registry change (per CLR version).
Enable strong cryptography for .NET CLR 4 versions (64 bit)-
Windows Registry Editor Version 5.00
[HKEY_LOCAL_MACHINESOFTWAREMicrosoft.NETFrameworkv4.0.30319]
“SchUseStrongCrypto”=dword:00000001
[HKEY_LOCAL_MACHINESOFTWAREWow6432NodeMicrosoft.NETFrameworkv4.0.30319]
“SchUseStrongCrypto”=dword:00000001
Enable strong cryptography for .NET CLR 2 versions (64 bit)-
Windows Registry Editor Version 5.00
[HKEY_LOCAL_MACHINESOFTWAREMicrosoft.NETFrameworkv2.0.50727]
“SchUseStrongCrypto”=dword:00000001
[HKEY_LOCAL_MACHINESOFTWAREWow6432NodeMicrosoft.NETFrameworkv2.0.50727]
“SchUseStrongCrypto”=dword:00000001
Method 2 (Config file change)-
Add the following to your .NET config file
<runtime>
<AppContextSwitchOverrides value=”Switch.System.Net.DontEnableSchUseStrongCrypto=false” />
</runtime>
Method 3 (Hardcoded in the application)-
Use this line of C# code in your application during the initialization so that all web calls will use the newer TLS 1.2 protocol-
System.Net.ServicePointManager.SecurityProtocol = SecurityProtocolType.Tls12;
If you are using PowerShell you can use the same object with this-
[System.Net.ServicePointManager]::SecurityProtocol = "Tls12"
More on these here-
https://docs.microsoft.com/en-us/dotnet/framework/network-programming/tls
Browser Support (Edge/Chrome/Edge legacy/IE/Firefox/Safari)
The following clients are known to be unable to use TLS 1.2. Update these clients to ensure uninterrupted access to the service.
- Android 4.3 and earlier versions
- Firefox version 5.0 and earlier versions
- Internet Explorer 8-10 on Windows 7 and earlier versions
- Internet Explorer 10 on Windows Phone 8
- Safari 6.0.4/OS X10.8.4 and earlier versions
Edge chromium disabled 1.0 and 1.1 around July 2020 (ver 84).
For all supported versions of Internet Explorer 11 and Microsoft Edge Legacy (EdgeHTML-based), TLS 1.0 and TLS 1.1 will be disabled by default as of September 8, 2020.
TLS 1.3
The next version of TLS is already implemented in some browsers, and is just around that corner, but as of yet should not be causing issues since TLS 1.2 is just getting to the lowest mandatory version.
More information
For more information on the patches for various products and more details to some of the .NET settings related to TLS please see the following articles.
Azure
https://azure.microsoft.com/en-us/updates/azuretls12/
https://azure.microsoft.com/en-us/updates/?query=TLS
Windows/.NET/SQL/SharePoint (on-Prem)
SQL-
https://support.microsoft.com/en-us/help/3135244/tls-1-2-support-for-microsoft-sql-server
SharePoint (this covers .NET/windows/SQL/browsers as well)-
https://docs.microsoft.com/en-us/sharepoint/security-for-sharepoint-server/enable-tls-1-1-and-tls-1-2-support-in-sharepoint-server-2019
.NET 4.5-
https://docs.microsoft.com/en-us/sharepoint/security-for-sharepoint-server/enable-tls-1-1-and-tls-1-2-support-in-sharepoint-server-2019#34—enable-strong-cryptography-in-net-framework-45-or-higher
.NET 3.5 update for TLS 1.1/1.2 support-
https://docs.microsoft.com/en-us/sharepoint/security-for-sharepoint-server/enable-tls-1-1-and-tls-1-2-support-in-sharepoint-server-2019#35—install-net-framework-35-update-for-tls-11-and-tls-12-support
.NET programming guidance-
https://docs.microsoft.com/en-us/dotnet/framework/network-programming/tls
![[Guest Blog] My Microsoft Ignite Experience as a Humans of IT Student Ambassador](https://www.drware.com/wp-content/uploads/2020/08/large-1304-999x675.)
by Scott Muniz | Aug 31, 2020 | Uncategorized
This article is contributed. See the original author and article here.
This article was written by Microsoft Ignite 2020 Humans of IT student advisor Kiana Alikahedemi, a Computer Science PhD candidate at the University of Florida. Kiana was previously a Humans of IT student ambassador herself at Microsoft Ignite 2019 and is returning this year as a mentor to the incoming batch of new student ambassadors from five HBCUs. Kiana shares about her experience as a student ambassador, and excitement about this year’s Microsoft Ignite Humans of IT track. This is the third article in a series featuring this year’s Humans of IT student ambassadors and advisors.
Although I have been living and studying in the US for many years now, my childhood was spent growing up in the Middle East where there is a dire lack of diversity in the engineering workforce. Many women in my community do not earn degrees, falling victim to the belief that they can’t. I vividly remember how from a young age, I decided not to let this be my story. I was always interested in problem-solving and science concepts in school. My passion led me to choose Computer Science as a major. During my undergrad days, I consciously looked for mentors who were similarly passionate about tech and had experience in helping others build their careers. It didn’t stop at my bachelor’s degree. Shortly after, I was admitted into graduate school, which brought me closer to my dream job in the tech industry and academia.
A lack of diversity continues to be a prevalent issue in most regions – I, too, experienced a lot of bias and discrimination firsthand while in graduate school. Last year, my friend heard about the Humans of IT Student Ambassador program and nominated me as she knew my passion for diversity and equity. I decided to take the challenge and join the other students to promote inclusion in tech and adopt a “human-first” approach when it comes to technology. That’s how I first got involved with the Microsoft Humans of IT Community, which turned out as a valuable experience for me to connect with diverse and wonderful people in tech from all around the world, and celebrate our common humanity.
This is the team that helped me to shape one of the best experience I’ve ever had in tech:

During Microsoft Ignite, I participated in insightful and amazing talks. I had the pleasure to meet truly amazing and inspiring people such as Haben Girma, a Disability Rights Lawyer, Author, and Speaker, who I’ve always praised for her courage and persistence. I even got to talk to her in person during the conference, and received a signed copy of her book. It was truly the highlight of my entire week!
It was incredible to meet a diverse set of people who, like me, had experienced the similar discrimination or bias in school, at work, or within their communities and simply wanted to belong in tech. Furthermore, it was also rewarding to meet people like Microsoft’s Bryce Johnson who mindfully considers diversity, accessibility and user needs in every stage of their work (If you don’t know him, just search his name you will be amazed. Hint: one of the biggest technologies he helped developed – the Xbox adaptive controller – is in the next picture!).

The Microsoft Humans of IT community has taught me to be resilient and confident. All of the conversations and encounters made me feel like I was a part of a broader community with the vision to solve diversity issues and help empower all humans out there through technology. As a community, we will pave the way for others to realize that they are incredible humans who have earned their seat at the table and have valuable skills to offer. We pledge to use our technical skills for good, and to help solve challenging world issues.
I took away all the inspirations from Microsoft Ignite 2019 with me and applied in every single decision or experience I had since. Naturally, when I heard that it was time for Microsoft Ignite 2020 (coming up in just 22 days!), I immediately put my hand up to be a student ambassador again. Not only did the Humans of IT Community welcome me back as a student ambassador, I even got the chance to become a student advisor to this year’s inspiring batch of students from Historically Black Colleges and Universities (HBCUs) to help mentor the next generation of technologists!
Amidst a global pandemic, this is an amazing opportunity to show up, be present and demonstrate how we can better understand the importance of community. I cannot wait to share lessons, challenges, and obstacles I encountered in these hard times with my Microsoft Ignite community. Together, we will overcome challenges and become #StrongerTogether.
#HumansofIT
#StudentAmbassador
#MicrosoftIgnite2020
by Scott Muniz | Aug 31, 2020 | Uncategorized
This article is contributed. See the original author and article here.
BizTalk 2020 CU1 introduced support for dynamic send ports in the Office 365 Outlook adapters. In this post, we go over this improvement into more details.
Pre-requisites
Messages sent from a dynamic send port with transport type set to one of the Office 365 Outlook adapters require the UserTokenIdentifier context property. This identifier is created when the user signs in to Office 365, which is done in the transport properties of the Office 365 Outlook adapters as documented in Office 365 Outlook adapters in BizTalk.
Once a user is signed-in, the UserTokenIdentifier is retrieved from the bindings, as shown below, in the case of an exported Mail send port (placeholder nnnnnnnn-nnnn-nnnn-nnnnnnnnnnnn):
<SendPort Name="MailSendPort2" IsStatic="true" IsTwoWay="false" BindingOption="0" AnalyticsEnabled="false">
<Description xsi:nil="true" />
<TransmitPipeline
Name="Microsoft.BizTalk.DefaultPipelines.PassThruTransmit"
FullyQualifiedName="Microsoft.BizTalk.DefaultPipelines.PassThruTransmit, Microsoft.BizTalk.DefaultPipelines, Version=3.0.1.0, Culture=neutral,
PublicKeyToken=31bf3856ad364e35" Type="2" TrackingOption="None" Description="" />
<PrimaryTransport>
<Address>O365Mail://BizTalkTestAccount1@outlook.com</Address>
<TransportType Name="Office365 Outlook Email" Capabilities="11" ConfigurationClsid="48b96e09-bd96-4f46-95ef-57accc55f23d" />
<TransportTypeData><CustomProps><DefaultCC vt="8" /><UserTokenIdentifier vt="8">nnnnnnnn-nnnn-nnnn-nnnn-nnnnnnnnnnnn</UserTokenIdentifier><FileAttachments vt="8" /><DefaultTo vt="8">BizTalkTestAccount2@outlook.com</DefaultTo><EmailAddress vt="8">BizTalkTestAccount1@outlook.com</EmailAddress><AttachBizTalkMessageParts vt="11">0</AttachBizTalkMessageParts><DefaultSubject vt="8">Hi from BizTalkTestAccount1</DefaultSubject><DefaultImportance vt="8">Normal</DefaultImportance></CustomProps></TransportTypeData>
Note that the UserTokenIdentifier is tied to a signed-in account and a transport type. A static send port needs to be created for each Office 365 transport type in order to get an identifier for each. For a given sign-in, the value of the UserTokenIdentifier may be the same for all Office 365 transport types, but static send ports need to be created for each transport type nonetheless.
Other important points to be aware of:
- Static send ports can be deleted afterwards. They are not needed once the UserTokenIdentifiers are known.
- UserTokenIdentifiers remain valid regardless of whether a dynamic or static send port exists or not, and after port deletions.
- The same UserTokenIdentifier can be used by multiple ports.
Scenario
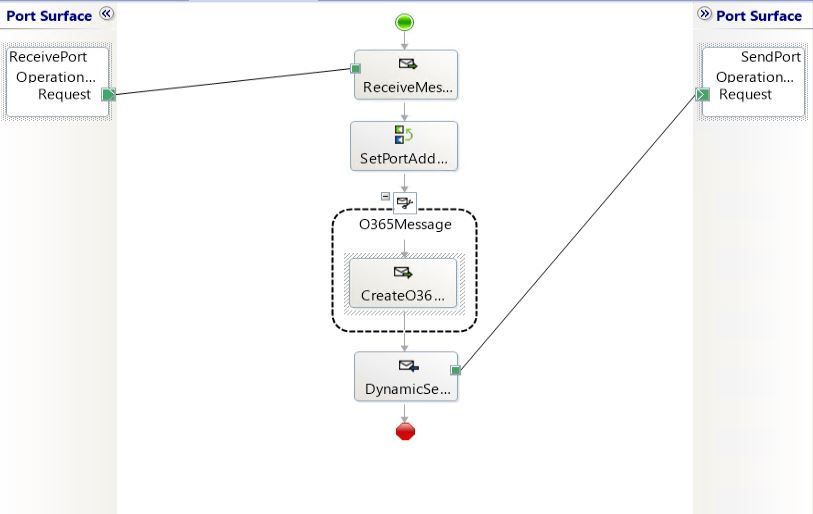
The demo scenario is based on a simple orchestration:

Received messages follow the schema:

|
Element
|
Description
|
|
UserTokenIdentifier
|
Value of the UserTokenIdenfier acquired ahead of time by exporting the static ports.
The UserTokenIdentifier is provided by received messages. In the general case, the UserTokenIdentifier can come from any source. For instance one could keep a mapping of email addresses to UserTokenIdentifiers and make this mapping available for lookup at runtime.
|
|
PortType
|
Name of the adapter transport type:
- Office365 Outlook Email
- Office365 Outlook Calendar
- Office365 Outlook Contact
|
|
PortAddress
|
Any unique identifier for the dynamic send port. Typically it is a user-friendly string. Since we’re using an Office 365 account, we used an email address (e.g., BizTalkAccount1@outlook.com).
|
|
To
|
(only for O365 Email) Email address to send mails to, if the transport type is Office 365 Outlook Email.
|
|
Subject
|
(only for O365 Email) Email subject .
|
|
Calendar
|
(only for O365 Calendar) Calendar where the calendar items are created, when using Office 365 Outlook Calendar transport type.
|
|
Payload
|
<![CDATA[content]] where content can be either:
- Email body
- Calendar item in XML according to the Office365OutlookCalendarSend.xsd provided in the BizTalk installation folder under SDKSchemas.
- Contact item in XML following the Office365OutlookContactSend.xsd in the same location.
CDATA is used to make the XML payloads (calendar and contact) opaque to XML parsers on the receive side. The payloads are used on the send side.
|
In the case of calendar and contact items, the payloads are based on the schemas provided in the BizTalk installation folder under C:Program Files (x86)Microsoft BizTalk ServerSDKSchemas (more info in Office 365 Outlook Adapters in Action).
Examples
|
Email
|
<ns0:Root xmlns:ns0="http://DynamicO365SendPort.ReceiveSchema">
    <UserTokenIdentifier>nnnnnnnn-nnnn-nnnn-nnnn-nnnnnnnnnnnn</UserTokenIdentifier>
    <PortType>Office365 Outlook Email</PortType>
    <PortAddress>BizTalkAccount1@outlook.com</PortAddress>
    <To>BizTalkAccount2@outlook.com</To>
    <Subject>Hello</Subject>
    <Payload><![CDATA[<?xml version="1.0" encoding="utf-8"?><EmailBody>body</EmailBody>]]></Payload>
</ns0:Root>
|
|
Calendar
|
<ns0:Root xmlns:ns0="http://DynamicO365SendPort.ReceiveSchema">
    <UserTokenIdentifier>nnnnnnnn-nnnn-nnnn-nnnn-nnnnnnnnnnnn</UserTokenIdentifier>
    <PortType>Office365 Outlook Calendar</PortType>
    <PortAddress>BizTalkAccount1@outlook.com</PortAddress>
    <To>BizTalkAccount2@outlook.com</To>
    <Subject>Hello</Subject>
    <Calendar>Calendar</Calendar>
    <Payload>
        <![CDATA[
            <ns0:Event xmlns:ns0="http://schemas.microsoft.com/BizTalk/Office365OutlookCalendar/Send">
                <subject>Let's meet</subject>
                <body><content>Info for the upcoming meeting</content></body>
                <start><dateTime>2020-06-25</dateTime><timeZone>Pacific Standard Time</timeZone></start>
                <end><dateTime>2020-06-25</dateTime><timeZone>Pacific Standard Time</timeZone></end>
                <attendees>
                    <emailAddress><address>BizTalkAccount2@outlook.com</address><name>BizTalkAccount2</name></emailAddress>
                </attendees>
           </ns0:Event>
        ]]>
    </Payload>
</ns0:Root>
|
|
Contact
|
<ns0:Root xmlns:ns0="http://DynamicO365SendPort.ReceiveSchema">
    <UserTokenIdentifier>nnnnnnnn-nnnn-nnnn-nnnn-nnnnnnnnnnnn</UserTokenIdentifier>
    <PortType>Office365 Outlook Contact</PortType>
    <PortAddress>BizTalkAccount1@outlook.com</PortAddress>
    <To>BizTalkAccount2@outlook.com</To>
    <Subject>Hello</Subject>
    <Payload>
        <![CDATA[
            <ns0:Contact xmlns:ns0="http://schemas.microsoft.com/BizTalk/Office365OutlookContacts/Send">
                <displayName>displayName_3</displayName>
                more contact fields
           </ns0:Contact>
        ]]>
    </Payload>
</ns0:Root>
|
Dynamic Send Port Configuration
To keep things simple, an XML document is created on the fly and properties are added. The message creation expression is:
XMLMessage = new System.Xml.XmlDocument();

// Payload from the CDATA section of received messages
XMLMessage.LoadXml(ReceivedMessage.Payload);

// Token identifier (required)
XMLMessage(OfficeMail.UserTokenIdentifier) = ReceivedMessage.UserTokenIdentifier;
XMLMessage(OfficeCalendar.UserTokenIdentifier) = ReceivedMessage.UserTokenIdentifier;
XMLMessage(OfficeContact.UserTokenIdentifier) = ReceivedMessage.UserTokenIdentifier;

// Transport type (required)
SendPort(Microsoft.XLANGs.BaseTypes.TransportType) = ReceivedMessage.PortType;

// Port address
SendPort(Microsoft.XLANGs.BaseTypes.Address) = PortAddress; // Generated in separate expression.

// Additional fields for Mail transport type
XMLMessage(OfficeMail.To) = ReceivedMessage.To;
XMLMessage(OfficeMail.Subject) = ReceivedMessage.Subject;
Note: Additional promoted are available for Mail transport type, such as CC, importance and attached files (see Office 365 Outlook Email Adapter).
The port address is generated from received messages by using the following expression:
if (ReceivedMessage.PortType == "Office365 Outlook Email")
{
    PortAddress = "O365Mail://" + ReceivedMessage.PortAddress;
}
else if (ReceivedMessage.PortType == "Office365 Outlook Calendar")
{
    PortAddress = "O365Calendar://" + ReceivedMessage.PortAddress + "/MyCalendars/" + ReceivedMessage.Calendar;
}
else if (ReceivedMessage.PortType == "Office365 Outlook Contact")
{
    PortAddress = "O365Contact://" + ReceivedMessage.PortAddress;
}
Putting it all together
The annotated view of the demo orchestration below illustrates the data flow. Received messages provide UserTokenIdentifiers and transport type to be used for the messages sent by the dynamic send port.

BizTalk code is attached to this post for reference.
by Scott Muniz | Aug 31, 2020 | Uncategorized
This article is contributed. See the original author and article here.
BizTalk 2020 CU1 introduced support for dynamic send ports in the Office 365 Outlook adapters. In this post, we go over this improvement into more details.
Pre-requisites
Messages sent from a dynamic send port with transport type set to one of the Office 365 Outlook adapters require the UserTokenIdentifier context property. This identifier is created when the user signs in to Office 365, which is done in the transport properties of the Office 365 Outlook adapters as documented in Office 365 Outlook adapters in BizTalk.
Once a user is signed-in, the UserTokenIdentifier is retrieved from the bindings, as shown below, in the case of an exported Mail send port (placeholder nnnnnnnn-nnnn-nnnn-nnnnnnnnnnnn):
<SendPort Name="MailSendPort2" IsStatic="true" IsTwoWay="false" BindingOption="0" AnalyticsEnabled="false">
<Description xsi:nil="true" />
<TransmitPipeline
Name="Microsoft.BizTalk.DefaultPipelines.PassThruTransmit"
FullyQualifiedName="Microsoft.BizTalk.DefaultPipelines.PassThruTransmit, Microsoft.BizTalk.DefaultPipelines, Version=3.0.1.0, Culture=neutral,
PublicKeyToken=31bf3856ad364e35" Type="2" TrackingOption="None" Description="" />
<PrimaryTransport>
<Address>O365Mail://BizTalkTestAccount1@outlook.com</Address>
<TransportType Name="Office365 Outlook Email" Capabilities="11" ConfigurationClsid="48b96e09-bd96-4f46-95ef-57accc55f23d" />
<TransportTypeData><CustomProps><DefaultCC vt="8" /><UserTokenIdentifier vt="8">nnnnnnnn-nnnn-nnnn-nnnn-nnnnnnnnnnnn</UserTokenIdentifier><FileAttachments vt="8" /><DefaultTo vt="8">BizTalkTestAccount2@outlook.com</DefaultTo><EmailAddress vt="8">BizTalkTestAccount1@outlook.com</EmailAddress><AttachBizTalkMessageParts vt="11">0</AttachBizTalkMessageParts><DefaultSubject vt="8">Hi from BizTalkTestAccount1</DefaultSubject><DefaultImportance vt="8">Normal</DefaultImportance></CustomProps></TransportTypeData>
Note that the UserTokenIdentifier is tied to a signed-in account and a transport type. A static send port needs to be created for each Office 365 transport type in order to get an identifier for each. For a given sign-in, the value of the UserTokenIdentifier may be the same for all Office 365 transport types, but static send ports need to be created for each transport type nonetheless.
Other important points to be aware of:
- Static send ports can be deleted afterwards. They are not needed once the UserTokenIdentifiers are known.
- UserTokenIdentifiers remain valid regardless of whether a dynamic or static send port exists or not, and after port deletions.
- The same UserTokenIdentifier can be used by multiple ports.
Scenario
The demo scenario is based on a simple orchestration:
Received messages follow the schema:
|
Element
|
Description
|
|
UserTokenIdentifier
|
Value of the UserTokenIdenfier acquired ahead of time by exporting the static ports.
The UserTokenIdentifier is provided by received messages. In the general case, the UserTokenIdentifier can come from any source. For instance one could keep a mapping of email addresses to UserTokenIdentifiers and make this mapping available for lookup at runtime.
|
|
PortType
|
Name of the adapter transport type:
- Office365 Outlook Email
- Office365 Outlook Calendar
- Office365 Outlook Contact
|
|
PortAddress
|
Any unique identifier for the dynamic send port. Typically it is a user-friendly string. Since we’re using an Office 365 account, we used an email address (e.g., BizTalkAccount1@outlook.com).
|
|
To
|
(only for O365 Email) Email address to send mails to, if the transport type is Office 365 Outlook Email.
|
|
Subject
|
(only for O365 Email) Email subject .
|
|
Calendar
|
(only for O365 Calendar) Calendar where the calendar items are created, when using Office 365 Outlook Calendar transport type.
|
|
Payload
|
<![CDATA[content]] where content can be either:
- Email body
- Calendar item in XML according to the Office365OutlookCalendarSend.xsd provided in the BizTalk installation folder under SDKSchemas.
- Contact item in XML following the Office365OutlookContactSend.xsd in the same location.
CDATA is used to make the XML payloads (calendar and contact) opaque to XML parsers on the receive side. The payloads are used on the send side.
|
In the case of calendar and contact items, the payloads are based on the schemas provided in the BizTalk installation folder under C:Program Files (x86)Microsoft BizTalk ServerSDKSchemas (more info in Office 365 Outlook Adapters in Action).
Examples
|
Email
|
<ns0:Root xmlns:ns0="http://DynamicO365SendPort.ReceiveSchema">
    <UserTokenIdentifier>nnnnnnnn-nnnn-nnnn-nnnn-nnnnnnnnnnnn</UserTokenIdentifier>
    <PortType>Office365 Outlook Email</PortType>
    <PortAddress>BizTalkAccount1@outlook.com</PortAddress>
    <To>BizTalkAccount2@outlook.com</To>
    <Subject>Hello</Subject>
    <Payload><![CDATA[<?xml version="1.0" encoding="utf-8"?><EmailBody>body</EmailBody>]]></Payload>
</ns0:Root>
|
|
Calendar
|
<ns0:Root xmlns:ns0="http://DynamicO365SendPort.ReceiveSchema">
    <UserTokenIdentifier>nnnnnnnn-nnnn-nnnn-nnnn-nnnnnnnnnnnn</UserTokenIdentifier>
    <PortType>Office365 Outlook Calendar</PortType>
    <PortAddress>BizTalkAccount1@outlook.com</PortAddress>
    <To>BizTalkAccount2@outlook.com</To>
    <Subject>Hello</Subject>
    <Calendar>Calendar</Calendar>
    <Payload>
        <![CDATA[
            <ns0:Event xmlns:ns0="http://schemas.microsoft.com/BizTalk/Office365OutlookCalendar/Send">
                <subject>Let's meet</subject>
                <body><content>Info for the upcoming meeting</content></body>
                <start><dateTime>2020-06-25</dateTime><timeZone>Pacific Standard Time</timeZone></start>
                <end><dateTime>2020-06-25</dateTime><timeZone>Pacific Standard Time</timeZone></end>
                <attendees>
                    <emailAddress><address>BizTalkAccount2@outlook.com</address><name>BizTalkAccount2</name></emailAddress>
                </attendees>
           </ns0:Event>
        ]]>
    </Payload>
</ns0:Root>
|
|
Contact
|
<ns0:Root xmlns:ns0="http://DynamicO365SendPort.ReceiveSchema">
    <UserTokenIdentifier>nnnnnnnn-nnnn-nnnn-nnnn-nnnnnnnnnnnn</UserTokenIdentifier>
    <PortType>Office365 Outlook Contact</PortType>
    <PortAddress>BizTalkAccount1@outlook.com</PortAddress>
    <To>BizTalkAccount2@outlook.com</To>
    <Subject>Hello</Subject>
    <Payload>
        <![CDATA[
            <ns0:Contact xmlns:ns0="http://schemas.microsoft.com/BizTalk/Office365OutlookContacts/Send">
                <displayName>displayName_3</displayName>
                more contact fields
           </ns0:Contact>
        ]]>
    </Payload>
</ns0:Root>
|
Dynamic Send Port Configuration
To keep things simple, an XML document is created on the fly and properties are added. The message creation expression is:
XMLMessage = new System.Xml.XmlDocument();

// Payload from the CDATA section of received messages
XMLMessage.LoadXml(ReceivedMessage.Payload);

// Token identifier (required)
XMLMessage(OfficeMail.UserTokenIdentifier) = ReceivedMessage.UserTokenIdentifier;
XMLMessage(OfficeCalendar.UserTokenIdentifier) = ReceivedMessage.UserTokenIdentifier;
XMLMessage(OfficeContact.UserTokenIdentifier) = ReceivedMessage.UserTokenIdentifier;

// Transport type (required)
SendPort(Microsoft.XLANGs.BaseTypes.TransportType) = ReceivedMessage.PortType;

// Port address
SendPort(Microsoft.XLANGs.BaseTypes.Address) = PortAddress; // Generated in separate expression.

// Additional fields for Mail transport type
XMLMessage(OfficeMail.To) = ReceivedMessage.To;
XMLMessage(OfficeMail.Subject) = ReceivedMessage.Subject;
Note: Additional promoted are available for Mail transport type, such as CC, importance and attached files (see Office 365 Outlook Email Adapter).
The port address is generated from received messages by using the following expression:
if (ReceivedMessage.PortType == "Office365 Outlook Email")
{
    PortAddress = "O365Mail://" + ReceivedMessage.PortAddress;
}
else if (ReceivedMessage.PortType == "Office365 Outlook Calendar")
{
    PortAddress = "O365Calendar://" + ReceivedMessage.PortAddress + "/MyCalendars/" + ReceivedMessage.Calendar;
}
else if (ReceivedMessage.PortType == "Office365 Outlook Contact")
{
    PortAddress = "O365Contact://" + ReceivedMessage.PortAddress;
}
Putting it all together
The annotated view of the demo orchestration below illustrates the data flow. Received messages provide UserTokenIdentifiers and transport type to be used for the messages sent by the dynamic send port.
BizTalk code is attached to this post for reference.
by Scott Muniz | Aug 31, 2020 | Uncategorized
This article is contributed. See the original author and article here.
The Project team has been focused on big features, which you can see listed here, or track in the Microsoft 365 Public Roadmap. You can let us know any new features you need on Microsoft UserVoice. Join an existing thread or create a new one to tell us how to make Project for the web better.
We love feedback! If you have feedback, submit it by using the ‘Feedback’ button in Project for the web. Make sure to include your email so we can contact you directly with any follow up questions or comments. We also monitor comments on all blog posts so let us know what you think about this or other articles!
New features:
- Group by Assigned: Starting this month, you can organize your tasks by assignee in the Board view. Get insight into what each person is working on!
Upcoming features:
- Share Projects with groups you don’t own: Starting next month, you can see all your added groups when you add a group to your project. Easily share your work with all the important people without creating new groups.
- Task Custom Fields: Use custom fields in Project for the web to ensure that all your information can live in one place.
- Project & Roadmap in Microsoft Teams: Coming soon, Project & Roadmap will have their own applications in Microsoft Teams. Chat with your teammates while viewing and updating your work. All features available in the web experience will be available in the Teams.
- Email notifications: Stay ahead of your work by creating email notifications for yourself and your teammates.
- Export to Excel: Leverage the power of Microsoft Project & Microsoft Excel together by exporting your project data into spreadsheets.
Answers to top questions:
Q: How can I share project information with non-project users?
A: Users that are assigned certain Office 365 licenses can access Project for the web and Roadmap in read-only mode. For a full list of licenses with read-only access to Project for the web, check out our documentation.
As noted above, we have an export feature planned for release in the fall.
by Scott Muniz | Aug 31, 2020 | Uncategorized
This article is contributed. See the original author and article here.
To monitor the overall health & reliability of Windows Machine learning feature, we have developed a new ecosystem measure that provide a view into the health of graphics drivers on machines using Windows Machine Learning.
- Percent of Device with WinML Runtime Error (https://docs.microsoft.com/windows-hardware/drivers/dashboard/pct-devices-winml-runtime-error-ecosystem) looks at devices using Windows Machine Learning that have reported a WinML runtime error
This measure is currently being evaluated and will be used to make accept/reject decisions starting September 30, 2020.

by Scott Muniz | Aug 31, 2020 | Uncategorized
This article is contributed. See the original author and article here.

Can you believe that it’s already the end of August? Check out the Healthcare and Life Science blog’s monthly wrap-up below:
HLS “Show Me How” Posts:
- 360′ Virtual Tours – Michael Gannotti, Principal Microsoft Teams Technical Specialist: In today’s fast-paced and virtual working environments, employee onboarding and facility training are two areas in which many of our organizations are struggling. These videos focus on the creation of immersive tours and training using SharePoint Spaces, in particular the 360′ Tour.
- Part 1: Find out how to set up a rich employee onboarding environment, how to enable SharePoint Spaces, and more.
- Part 2: Learn how to create easy user access to the space using SharePoint Online Navigation and its direct integration into Microsoft Teams.
- Did You Know? Tips for Word – Michael Gannotti, Principal Microsoft Teams Technical Specialist: When you think of Microsoft word, do you think of any of the following: researcher, ink-to-shape, dictate, inspect doc, check accessibility, transform, translate, read aloud, or add-files-from? Mike highlights these cutting edge productivity capabilities and more in this video.
Upcoming Webcasts and Events:
- How To Ensure Collaboration Security in Microsoft Teams: Do you want to ensure security for your users as they collaborate in Microsoft Teams? Join us for our next CollabCast with Microsoft’s Technical Specialist Sam Brown on Wednesday, September 30th at 12 Noon EST, where we are bringing in speakers Scott Gode and Brandon Long from our trusted partner Unify Square. They will dive in beyond the basic native Teams governance with third party specialty tools. Check out the event details here.
- Free Virtual Workshop – Data Strategy for Healthcare Systems: Interesting in learning more about planning and implementing a successful data strategy using Microsoft tools? Microsoft’s Senior Technical Specialist Greg Beaumont wants you to be aware of a free virtual workshop from Tail Wind Informatics, focusing on Healthcare Data Strategy and Analytics. Click here for registration and more information.
Industry Expert Posts:
- Confessions of Health Geeks Podcasts
- Year of the Nurse and Midwife 2020: The World Health Organization designated 2020 as the Year of the Nurse and Midwife to raise awareness of nurses and midwives’ significant and varied roles in healthcare.
Resources:
- Microsoft Security Matters Newsletter – July 2020 – Jeremy Windmiller, Enterprise Security Architect: Jeremy has been providing a newsletter to customers that consolidates resources for Microsoft Security Products and Services. Check out the July newsletter.
- Microsoft 365 Stream Resources for Administration and Security – Michael Gannotti, Principal Microsoft Teams Technical Specialist: After a great conversation with a progressive healthcare customer, Mike put together a list of resources regarding Stream architecture, administration and security and compliance here.
August’s HLS Blog Contributors:

Claire Bonaci, Director, Business Development, Health and Life Sciences

Michael Gannotti, Principal Technical Specialist, Microsoft Teams

Jeremy Windmiller, Microsoft Senior Technical Specialist, Security and Compliance

Greg Beaumount, Senior Technical Specialist, Microsoft Teams
Thanks for reading and let us know how else our Microsoft team can help!
.jpg")
Sam Brown, Technical Specialist, Microsoft Teams

by Scott Muniz | Aug 31, 2020 | Uncategorized
This article is contributed. See the original author and article here.
August welcomed some nice innovation, some to help get back to school, some to help you stay more informed, plus new ways to keep sharing and stay better connected.
This month brought: SharePoint site templates for Education, our timeline and support for the retiring of SharePoint 2010 Workflows, how to access Visio as a tab within Teams channels, sharing of moved files, and more. Details & screenshots below, including our audible companion: The Intrazone Roadmap Pitstop: August 2020 podcast episode – all to help answer, “What’s rolling out now for SharePoint and related technologies into Microsoft 365?”
In the podcast episode, I chat with Lincoln DeMaris (LinkedIn | Twitter), principal program manager at Microsoft who works on Microsoft Lists. We talked about the state of the Lists roll out, how it evolves from what we know as SharePoint lists, some of the early feedback, and tackle some of the most common frequently asked questions about Microsoft Lists.
![Lincoln DeMaris, principal program manager (Microsoft Lists / Microsoft) [Intrazone guest]](https://techcommunity.microsoft.com/t5/image/serverpage/image-id/215631i5811B30213AF8791/image-size/large?v=1.0&px=999 "IZ-RP-21_August-2020_022_001_Lincoln-DeMaris_profile.jpg") Lincoln DeMaris, principal program manager (Microsoft Lists / Microsoft) [Intrazone guest]
Lincoln DeMaris, principal program manager (Microsoft Lists / Microsoft) [Intrazone guest]
All features listed below began rolling out to Targeted Release customers in Microsoft 365 as of August 2020 (possibly early September 2020).
Inform and engage with dynamic employee experiences
Build your intelligent intranet on SharePoint in Microsoft 365 and get the benefits of investing in business outcomes – reducing IT and development costs, increasing business speed and agility, and up-leveling the dynamic, personalized, and welcoming nature of your intranet.
SharePoint site templates for Education
These are for schools and universities, made available via the Microsoft Look Book. Each brings together news, events, highlighted content, quick links and more, pre-configured and designed with a specific scope and audience for a variety of Education scenarios.
 SharePoint site template: “School home page” – across several screen sizes.
Here is a quick highlight of each of the four templates:
Azure CDN caching for SharePoint and OneDrive video
We are pleased to introduce improved support for videos; aka, better streaming performance for videos you store in SharePoint and OneDrive. Videos that are accesses often will be streamed from the Azure CDN closest to the user to optimize the playback experience. At all times data will remain within the Microsoft 365 compliance boundary.
This is a great area for growth that also paves the way for future innovation. Stay tuned to this space.
Retiring SharePoint 2010 Workflows
Since the release of SharePoint workflows, Microsoft has evolved workflow orchestration to not only encompass SharePoint, but all the productivity services you use with Microsoft 365 and beyond. With the continued investment in Power Automate as the universal solution to workflow, Microsoft is retiring SharePoint 2010 workflows. We recommend customers to move to Power Automate or other supported solutions.
Timeline:
- Starting August 1st, 2020, SharePoint 2010 workflows will be turned off for any newly created tenants.
- Starting November 1st, 2020, Microsoft will remove the ability to run, or create, and or execute SharePoint 2010 workflows from existing tenants.
 Planning to move from classic SharePoint Workflows to Power Automate flows.
Note: SharePoint 2013 workflows remain supported, although turned off by default for new tenants starting November 1st, 2020.
Resources:
Download SharePoint site usage data in Excel
Site owners, from the Site usage page, will be able to export their site’s 90-day usage data in an Excel report. You can then build out a process that works for you per your preferences or governance requirements, to download the data on a recurring basis and build out the analysis you desire in Excel, or take it beyond and visualize the data in Power BI.
 View information about how users interact with your site. Export the 90-days site usage data in an Excel file by going to the download button (downward facing arrow) on the upper-right corner of the Site usage page.
Abd to round out this section, two recent summary blogs for admins managing their intranet; both add a little context across several recent updates:
- “Migrate your content into Microsoft 365” [8/24/20]: https://techcommunity.microsoft.com/t5/microsoft-sharepoint-blog/migrate-your-content-into-microsoft-365/ba-p/1604587
- “Agile IT management of your SharePoint-powered intelligent intranet” [8/26/20]: https://techcommunity.microsoft.com/t5/microsoft-sharepoint-blog/agile-it-management-of-your-sharepoint-powered-intelligent/ba-p/1604914
Teamwork updates across SharePoint team sites, OneDrive, and Microsoft Teams
Microsoft 365 is designed to be a universal toolkit for teamwork – to give you the right tools for the right task, along with common services to help you seamlessly work across applications. SharePoint is the intelligent content service that powers teamwork – to better collaborate on proposals, projects, and campaigns throughout your organization – with integration across Microsoft Teams, OneDrive, Yammer, Stream, Planner and much more.
Updating the list and list item sharing experience
Site owners, members and visitors will now see a Share command when they are viewing a list, even when they do not have any list item selected. Site owners will be able to grant other users access to the list and can specify whether to give View-only, Edit, or Full Control permissions to the list. Other users (e.g. site members and visitors) cannot directly grant other users access to the list, but they can use the dialog to send an approval request to site owners if the site is set up to allow access requests (enabled by default).
 Sharing lists and list items, so that you can decide whether to let people edit or just view them, and whether the people you share with can share with others.
This update also brings sharing links to list items. When users select a list item and click Share, they will see the same Send Link sharing dialog that exists today with new options. Specifically, the “People in your organization with the link” and “Anyone with the link” options will be available based on the policy that your organization has configured.
All the sharing policies you have configured for files will apply to list items. For example, if you have set “People in your organization with the link” as the default link type then that will also apply to list items. Similarly, if you have disabled or restricted “Anyone links” then those will also be disabled or restricted when users are sharing list items.
SharePoint lists and libraries – improved image columns
It is much easier now to work with images in lists and libraries. Once an Image column is added to a list or library, users can add an image using the list or library form. They, too, can view, replace, or remove the image when viewing the item or file properties in the form. When users are browsing the list on a mobile device, they will be able to upload an image – including taking a photo with the device’s camera.
 Add an image to a list items using the improved Image column capabilities.
Move files, and keep sharing
Collaboration requires the flow of work access to go unbroken. When you move a file to a new location in Microsoft 365, you will have the option to continue sharing the file from its new destination. A simple pop-up to confirm and keep moving forward.
 When you move a file to a new location in Microsoft 365, you will have the option to continue sharing the file from its new destination.
The new link match permissions just like the source location and we send your collaborators an e-mail that notifies them that the file has been moved.
Learn more:
Related technology
Yammer discovery feed
One superpower of Yammer is discovery – discovering new communities and new conversations that help broaden your perspective. This is the place for you to catch up on conversations happening in the communities you belong to.
 Use the Yammer discovery feed to discover new communities and new conversations.
Note for admins: you can select specific conversations to be *Featured Conversations* for a specific date. These conversations will be highlighted at the top of the Home Feed for everyone, until they have been read by the user or the time passes, and new content gets highlighted.
Access Visio directly from a tab within Teams channels
As part of our commitment to make collaborating on Visio diagrams within Teams seamless, we have added the ability to have “Visio as a tab.” This brings co-authoring on a diagram in real time.
 Visio tabs in Teams allow team members to access services and content in a dedicated space within a channel or in a chat.
You can keep important processes at your fingertips – like giving your sales team a way to visualize specific steps to solve customer questions and concerns. Or simplify brainstorming on business diagrams like SWOT analysis, Venn diagrams, pyramid diagrams.
- Learn more: Visio tabs in Teams allow team members to quickly access content in a dedicated space within a channel or in a chat.
- Roadmap ID: 20886.
Microsoft 365 Network Connectivity Principles
Connectivity is one of the most critical decisions that customers should make to achieve best performance and delightful user experiences. We fine tune the Microsoft 365 for optimal features and connectivity, and there are several things you can do to optimize your network.
Microsoft has developed four *Network Connectivity* principles to help customers evaluate their existing network architectures and prepare or optimize readiness for Microsoft 365 – with security and privacy firmly intact.
The 4 principles:
- Optimize Microsoft 365 traffic from our endpoint and differentiate it from generic Internet traffic for more efficient routing.
- Enable local egress | Egress Microsoft 365 data connections through the Internet as close to your users as practical with matching DNS resolution.
- Enable direct connectivity | Avoid network hairpins and minimize network latency to Microsoft’s global network.
- Modernize security for SaaS | Avoid intrusive network security by bypassing proxies, traffic inspection devices, and avoid duplicating security controls already available in Microsoft 365.
And last, did you see OneDrive on the Surface Duo?
Panos Panay looking at photos in OneDrive: https://youtu.be/R1CNwBzYqRs?t=568 – spanning OneDrive on two screens and staying in the flow.
 Scroll through your OneDrive photo library on one screen, while viewing your selected photo on the other.
September 2020 teasers
Psst, still here? Still scrolling the page looking for the rolled out goodness? If so, here is a few teasers of what’s to come to production next month…
- Teaser #1: New *Integrate* menu for Microsoft Lists [Roadmap ID: 64869]
- Teaser #2: Manage how long guests can access SharePoint and OneDrive [Roadmap ID: 43797]
… shhh, tell everyone.
Helpful, ongoing change management resources
- Follow me to catch news and interesting SharePoint things: @mkashman; warning, occasional bad puns may fly in a tweet or two here and there.
Thanks for tuning in and/or reading this episode/blog of the Intrazone Roadmap Pitstop – August 2020 (blog/podcast). We are open to your feedback in comments below to hear how both the Roadmap Pitstop podcast episodes and blogs can be improved over time.
Engage with us. Ask questions. Push us where you want and need to get the best information and insights. We are here to put both our and your best change management foot forward.
Stay safe out there on the road’map, and thanks for listening and reading.
Cheers and thanks,
Mark Kashman – senior product manager (SharePoint/Lists) | Microsoft)
 The Intrazone Roadmap Pitstop – August 2020 graphic showing some of the highlighted release features.
by Scott Muniz | Aug 31, 2020 | Uncategorized
This article is contributed. See the original author and article here.
Azure Data Factory now enables Snowflake connector in Mapping Data Flow to expand Snowflake data integration support. You can read data directly from Snowflake for analysis, or write transformed data into Snowflake for seamless ETL. For other Snowflake data integration support in ADF, refer to the earlier blog.
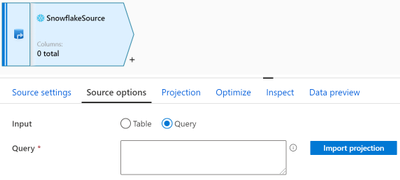
For example, when using Snowflake as a source in data flows, you are able to pull your data from a table or via custom query, then apply data transformations or join with other data.

Additionally, when using Snowflake as a sink, you can perform inserts, updates, deletes, and upserts so as to publish the analytics result set into the warehouse.

You can point to Snowflake data using either a Snowflake dataset or an inline dataset.
Learn more about Snowflake support in Azure Data Factory from Snowflake connector documentation.
by Scott Muniz | Aug 31, 2020 | Azure, Microsoft, Technology, Uncategorized
This article is contributed. See the original author and article here.
Hi, all! Rod Trent here. I am a Cybersecurity CE/Consultant at Microsoft and working with Azure Sentinel. I also blog for our Secure Infrastructure Blog and have quite a few Azure Sentinel articles posted there already.
Customers ask quite often how they can share their Workbooks with others outside of Azure Sentinel, i.e., give access to the valuable visualizations/reports to those that don’t need full Azure Sentinel access.
The solution is actually much easier than it might seem and involves a very simple method of using the pinning features of Workbooks and setting appropriate RBAC rights.
The most important piece is ensuring that the proper, least privilege rights are in place to enable viewing of the Workbook data on the Azure Dashboard. But, before digging into that, read my recent walkthrough for properly Pinning Entire Azure Sentinel Workbooks to Azure Dashboards.
After understanding how best to promote the Workbook data to an Azure Dashboard, now you just need to set the proper access rights.
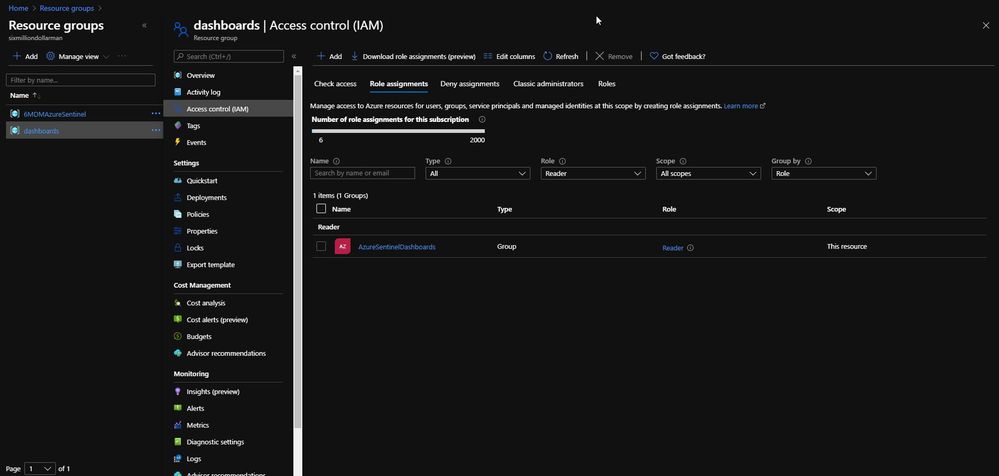
When you follow the instructions listed above, part of the pinning process is saving the dashboard to a resource group. By default, the resource group is dashboards, as shown in the next image.
The dashboards resource group (or whatever you rename it to) needs to have Reader role assignment in place for the individual or individuals that need access to the specific Dashboard. As shown below, I have an Azure Active Directory group called AzureSentinelDashboards with the Reader role on the dashboards resource group. As a best practice, you should always assign groups versus individual role assignments. The user I want to give Dashboard access to, Andre Rene Roussimoff, is a member of the AzureSentinelDashboards group. This gives Andre proper access to the dashboard but doesn’t yet give him access to the Azure Sentinel data. To do that, I have to also assign proper Log Analytics workspace access.

After the dashboards role has been assigned, I now need to assign access to the Log Analytics workspace for Azure Sentinel. This ensures that the user or users can view the data in addition to having access to the Azure Sentinel Workbook that has been pinned as a shared Azure Dashboard.
In the Access control for the Azure Sentinel Log Analytics workspace, I assign the AzureSentinelDashboards group as a Reader of the resource.

As shown in the next image, Andre now has access to the dashboard and also the Azure Sentinel Workbook data.

Summary
Keep in mind, though — this is simply Reader access. If Andre tries to click on any of the Workbook’s dynamic components, he’ll get an error message. But, still…this gives Azure Sentinel analysts a quick and easy way to make Workbooks and reporting data available to those that shouldn’t have full access to the Azure Sentinel console.
P.S. If you’ve been following along, I hope you’ve picked up that there’s a TV theme to my personal Azure Sentinel demo site. Any guess how Andre Rene Roussimoff plays into that TV theme?


Recent Comments