by Scott Muniz | Aug 31, 2020 | Uncategorized
This article is contributed. See the original author and article here.
We are happy to announce an update to our MSIX Training Labs for IT Pros. These labs contain a series of hands-on exercises geared at enabling people to become more familiar with different aspects of MSIX. From the MSIX packaging tool, to adding a package support framework, using MSIX Core to install an MSIX down level or just becoming familiar with some of the command line tools, the labs are a great place to get started for folks looking to learn more about MSIX.
The MSIX Labs GitHub repository is here http://aka.ms/msix-labs. Feel free to pitch in ideas for new exercises, add an issue or contribute to the project.
The MSIX Labs release 1.1 is available here https://github.com/microsoft/MSIX-Labs/releases.
Check it out and let us know what you think!
Credit to: Sahibi Miranshah (@sahibimiranshah) for all the hard work!
Also, stay tuned for some developer focused MSIX labs to come.
John Vintzel (@jvintzel)
Program Manager Lead, MSIX

by Scott Muniz | Aug 31, 2020 | Uncategorized
This article is contributed. See the original author and article here.
In my daily support work, I mostly deal with Exchange hybrid migrations (issues) from all our O365 native migration options (hybrid, cutover, staged, IMAP and G Suite). Seeing that no customer ever opened a support ticket if things were OK to tell us they are happy with the migration, yes, I mostly see various issues. Let’s talk about this (large) subject and then transition into troubleshooting!
What is an Exchange hybrid migration?
Exchange hybrid migrations are mailbox migrations between Exchange 2010 (or later) hybrid environment Internet facing Exchange servers on-premises and Exchange Online servers in Office 365. In many cases, those are done via our fantastic Hybrid Configuration Wizard (HCW) tool.
Exchange 2010 SP3 is the minimum required server version for a hybrid deployment (as of this writing) but you can have legacy Exchange servers (2003, 2007) in the environment. You can migrate mailboxes hosted on Exchange 2003 and Exchange 2007 through your Exchange 2010/2013 MRSProxy server to Exchange Online.
Note that during hybrid mailbox migrations, users can still access their mailboxes (those are online moves). An exception was when we had Exchange 2003 coexistence with Exchange 2010 hybrid and the mailbox you tried to migrate was hosted on an Exchange 2003 server; this was called an offline move. More info about this can be found here.
Hybrid migrations are also called Exchange remote moves. As the name implies, this is a move action, meaning we have just 1 (active) mailbox for the migrating user during the whole hybrid migration process and this mailbox is being moved either from:
- Exchange on-premises to Exchange Online (we call this ‘onboarding’ move)
- Exchange Online back to Exchange on-premises (‘offboarding’ move)
All hybrid mailbox migrations, for both onboarding and offboarding, are driven from Exchange Online side, through one of the following methods:
For onboarding, data is pulled from on-premises to the cloud; for offboarding, data is pushed from cloud to on-premises.
Onboard or offboard with PowerShell
Open Windows PowerShell (not Exchange Management Shell) and connect to Exchange Online.
ONBOARD
Run a cmdlet where User is an unique identifier for the migration user like ExchangeGuid but usually it is the display name or SMTP address for the account you want to move. ‘mail.contoso.com’ is the EWS endpoint that has MRSProxy enabled on-premises, and ‘contoso.mail.onmicrosoft.com’ is the routing domain used in Exchange Online. More details here.
New-MoveRequest –Identity ‘User’ -Remote -RemoteHostName ‘mail.contoso.com’ -RemoteCredential $opCred -TargetDeliveryDomain ‘contoso.mail.onmicrosoft.com’
Note that in modern hybrid configurations, the RemoteHostName is pointing to the Hybrid Agent, which is an URL like <GUID>.resource.mailboxmigration.his.msappproxy.net. You can find this on the (Get-MigrationEndpoint).RemoteServer:

OFFBOARD
Run a cmdlet where User is an unique identifier for the migration user like ExchangeGuid but usually it is the display name or SMTP address for the account you want to move. ‘mail.contoso.com’ is the EWS endpoint that has MRSProxy enabled on-premises, ‘contoso.com’ is the shared SMTP domain name, and ‘Mailbox Database Name’ is the name of the database you want to move the user to on-premises. More details here
New-MoveRequest –Identity ‘User’ -Remote -RemoteHostName ‘mail.contoso.com’ -RemoteCredential $opCred -TargetDeliveryDomain ‘contoso.com’ -RemoteTargetDatabase ‘Mailbox Database Name’
If you are offboarding a cloud mailbox, make sure that you have a corresponding mail user / remote mailbox object in on-premises Exchange with the cloud mailbox ExchangeGuid and matching SMTP.
Hybrid moves are usually preferred by our customers and admins because of the directory synchronization (users and passwords synced), as well as the Mailbox Replication Service (MRS) benefits like high fidelity in copying the content and metadata stored in the mailbox. With hybrid moves, there is no need to recreate Outlook profiles and re-download OST files.
Hybrid migration is almost completely seamless experience for the end-user with very little downtime. In the final incremental sync stage, MRS locks the source mailbox but this is usually about a couple of minutes in most of the cases. We will touch on final sync lock, in a later part of this blog series (where we will discuss issues with slow migrations).
Unlike IMAP migrations, in hybrid migrations, you cannot currently exclude certain folders from migration (not even the Dumpster); it’s all or nothing. You can however skip corrupted / bad items or large items.
Starting with Exchange 2010 on-premises environments, users can also have archive mailboxes. The following are archive scenarios currently supported with hybrid moves:
- Moving both primary and archive to Exchange Online as part of the same move request
- Move the primary only to Exchange Online if archive has already been onboarded to EXO
- Move the archive to Exchange Online or back from Exchange Online, while the primary mailbox remains on-premises
- Offboard both primary and archive mailboxes to Exchange on-premises
Note: Moving the primary mailbox to Exchange Online and the archive mailbox to on-premises is not supported at this time. When offboarding an archive back to on-premises, make sure auto-expanding archiving hasn’t been enabled on the cloud archive and the target Exchange on-premises server is minimum Exchange 2010 Server version. More info here.
The 3 supported scenarios for primary mailbox / archive mailbox setup in a Hybrid deployment:
|
Mailbox type
|
Scenario 1
|
Scenario 2
|
Scenario 3
|
|
Primary
|
On-premises
|
On-premises
|
EXO
|
|
Archive
|
On-premises
|
EXO
|
EXO
|
We recommend hybrid migrations in mostly all non-hosted Exchange on-premises environments (especially where we have minimum Exchange 2010 server version in the environment). Multi-On-premises Hybrid environments with single O365 tenant is also possible and we are making progress to enable support for full hybrid of a single on-premises organization to two or more tenants.
Minimal / express migration options in both classic and modern hybrid are a perfect substitute for traditional cutover or staged (which is a much more challenging migration method). Exchange 2003 and Exchange 2007 servers are very old, out of support lifecycle and if you plan on keeping directory sync, at least for now you need a more recent Exchange server for management purposes of dirsynced Exchange Online mailboxes. We don’t recommend IMAP migrations from Exchange on-premises as this only copies email data and folders, there is more user downtime and no coexistence during migration.
Here is an illustration that summarizes the above:

And a quick overview of hybrid migrations / deployments:
Full hybrid
- Enables all functionality available in a hybrid deployment
- Intended for a longer or permanent coexistence.
Minimal hybrid
- Enables minimum functionality necessary to migrate mailboxes and manage them after migration, with limited coexistence functionality.
- Can be used instead of staged migration, needs a minimum of Exchange 2010 SP3 in the environment
- Not recommended if more than 150 mailboxes or 10 servers
Express migration
- Migration option that leverages minimal hybrid
- Facilitates one-time directory synchronization via AADConnect which you are prompted to install during HCW
- Can be used instead of the traditional cutover migration
- Can’t be used if we already have / had DirSync enabled at the tenant level (use minimal)
More info on these hybrid migration options (full, minimal, express) and other hybrid benefits you can check here and here.
As already mentioned, hybrid migrations are Exchange remote moves (the migration endpoint for hybrid migrations is ExchangeRemoteMove type). This implies that we are moving mailboxes between different forests (different Exchange organizations). In contrast, when you do a mailbox move within your Exchange on-premises organization (move a mailbox from one server to another or to a different database on the same server) that is called a local move.
How does it all work?
Here is a quick overview of the components and services used in a hybrid remote move:
Microsoft Exchange Mailbox Replication Service (MRS)
Mailbox Replication Service (MRS) is responsible for processing MRS requests. Categories of requests: move requests (local and remote), sync requests (IMAP migrations in EXO), merge requests (EXO Outlook Anywhere migrations like staged and cutover), mailbox import requests (O365 PST import service), public folder mailbox migration requests (public folder migrations); basically anything that has the word “request” in it. Including mailbox restore requests.
This service is present in the Exchange Online datacenters and allows performing hybrid migrations to and from Exchange Online.
This service is also present on on-premises Exchange 2010/2013/2016/2019 servers and allows local moves or cross-forest moves between other on-premises Exchange forests.
For hybrid moves the communication is between MRS in Exchange Online and MRSProxy in the on-premises Exchange (which is an extension of the MRS on-premises service). You can find official documentation on hybrid remote moves here. In that article you will find information on how to create a migration endpoint, enable MRSProxy on-premises and how to perform the migration to Exchange online.
Migration Service
This is an orchestration engine on top of MRS. Migration service does not have an independent service running on the server, it is a part of Microsoft Exchange Service Host. This is present in Exchange Online and on-premises Exchange 2013/2016/2019 servers. Migration service invokes the actual MRS cmdlets like New-MoveRequest (hybrid migrations), New-SyncRequest (IMAP migrations), New-MergeRequest (Outlook Anywhere migrations) and is managed using “migration” commands like New-MigrationBatch, Set-MigrationUser, New-MigrationEndpoint etc.
It keeps tenant migration data in special system mailboxes. For example, when we create a migration batch, this service creates multiple messages in the migration arbitration mailbox. You can see this mailbox with Get-Mailbox -Migration cmdlet in Exchange Online PowerShell (reference on the switch here).
EXO tenant admins can do Test-MAPIConnectivity against this migration mailbox:

We can also see mailbox folder stats for this migration mailbox:

Migration Arbitration Mailbox
This mailbox holds the messages that represent migration service objects like migration endpoints, migration users, migration batches, etc.
System mailbox on the Exchange Online cloud database
This is where the MRS job is stored (MRS move jobs, MRS move reports and MRS sync states). You can find more info on how all of this looks, here. A specific cloud database system mailbox in Exchange Online environment might hold jobs for many different tenants (since users from many different tenants might exist on the same database), but the migration service arbitration mailbox will only hold migration service objects for one tenant. We can see this data in SyncMigration and SyncMigrationReports or Settings folders, using the following command:
Get-Mailbox -Migration | Get-MailboxFolderStatistics -IncludeAnalysis -FolderScope nonipmroot | where {$_.FolderPath -like “*Migration*” -or $_.FolderPath -eq “/Top of Information Store/Settings”} | FL folderpath,topsubject*,itemsinfolder

All migration types in EXO use batch architecture. This allows for easier creation and management of multiple mailbox moves. Typically, hybrid migrations are done through migration endpoints created in Exchange Online but sometimes customers just try New-MoveRequest directly in Exchange Online PowerShell to test connectivity to migration servers or in case they want to bypass migration service and batches process.
If you want to find out more on hybrid migration endpoints and how to troubleshoot them, please check out my other blog posts:
When moving mailboxes through migration batches, the migration service and the components depending on this service play an important part in the hybrid migration process.
Here are the main things that depend on the migration service where the hybrid migrations (managed through migration batches) could be affected:
- If migration service would be stopped in the Exchange Online (this would be an unusual situation)
- If migration arbitration mailbox would be offline or inaccessible (another unusual situation in Office 365)
- If there was a temporary issue in Office 365 that would affect the creation / starting of / management of migration batches (for example a bad parameter / value in New-MigrationBatch or Start-MigrationBatch cmdlet)
- If the credentials of the on-premises migration administrator expired and these are stored on the hybrid migration endpoint in Office 365 (this happens often)
- If the on-premises environment would not allow for connection the IP address of the Exchange Online mailbox server hosting the migration arbitration mailbox of the tenant, (common mistake made by filtering connections and not allowing all EXO IP addresses to connect to on-premises MrsProxy endpoints).
All the migrations created from the GUI (for example, Exchange Admin Center in Office 365) use the migration service and the migration batch architecture. However, administrator can create a move request directly from PowerShell and this action would bypass the migration service and the dependencies (migration batch / migration endpoint / migration arbitration mailbox). This could be useful when trying to narrow down issues, like for example when migration through EAC fails by throwing out a timeout exception (mailbox server outbound IP is blocked on-premises) but New-MoveRequest done by admin in PowerShell would be successful (the outbound IP of the backend server of the admin being allowed to connect to on-premises).
Here is an illustration of how all of this is connected:

When you start a migration via batches, the migration service does several things:
- Create a batch of users as per your inputs: the name of the migration batch, which users are to be migrated in a batch (based on CSV file or selection of people picker in the GUI), settings like bad and large items limit (we don’t recommend setting those anymore as they will be deprecated soon with the new Data Consistency Score model), and settings for manual or automatic startup / completion of the batch.
In the background, the cmdlet New-MigrationBatch <name of the migration batch> will create the batch containing the user identities to be migrated in that batch, ex: john@contoso.com, jane@contoso.com. The migration service will then create new migration user objects for each user identity from the migration batch that you can retrieve later with Get-MigrationUser and Get-MigrationUserStatistics cmdlets.
I wanted to mention here that directory synchronization is required in hybrid deployments and it’s the AADConnect tool that is responsible for synchronizing your users from on-premises Active Directory to cloud Azure Active Directory. This will ensure creation of mail users in Exchange Online with an ExchangeGuid that matches the on-premises mailbox.
The presence of a corresponding mail user in Exchange Online and the ExchangeGuid attribute is vital before starting the hybrid migration. In case you don’t see a mail user object in people picker UI when starting a migration for a specific user in EXO, ensure that the user is being synchronized from on-premises and it has the mail attributes present in on-premises AD where you are syncing from and that those attributes are also synced and brought correctly to Azure AD/ Exchange Online. Check Get-MsolUser /Get-AzureADUser (MSODS/Azure AD PowerShell) and Get-MailUser and Get-User (EXO PowerShell) before starting a hybrid migration and make sure the user is there, with the correct alias, proxy addresses and ExchangeGuid is stamped on it.
Having a mail user in Exchange Online without the ExchangeGuid for the on-premises mailbox will cause a number of issues during migration process. First, the migration process won’t be able to find the on-premises user to migrate and will thus fail. Second, if you assign an Exchange Online license to the mail user without ExchangeGuid, then you would end up with duplicate mailboxes for the same user because the cloud service is unaware that the user has a mailbox located on-premises. If the ExchangeGuid is correctly synced, when you assign the EXO license to the synced mail user with corresponding on-premises mailbox, you would see the expected warning on user properties:
This user’s on-premises mailbox hasn’t been migrated to Exchange Online. The Exchange Online mailbox will be available after migration is completed.
We recommend assigning an Exchange Online license before starting the hybrid migration so that you don’t forget to assign the license after migration and risk the mailbox loss after 30 day grace period. But again, assigning the EXO license on an incorrectly provisioned mail user will get you into the situation when the migration user would have a mailbox both in Exchange on-premises and EXO. If you get yourself into this situation, please follow this. If you are interested on how to provision EXO mailboxes in a hybrid deployment, please see this blog post.
Coming back to migration batches: hybrid migrations and G Suite migrations are the only ones where migration batches can be completed (Complete-MigrationBatch). And you should be aware that there is a 100 batches limit to help maintain the responsiveness of the migration service.
Migration batches are associated with migration endpoints. In hybrid deployments the migration endpoint is typically created automatically by HCW (based on the migration admin credentials inputted into the wizard) or by admin when starting a migration.
- Migration Service then invokes cmdlets specific for the migration type chosen (hybrid, cutover, staged, IMAP/G Suite), example New-MoveRequest john@contoso.com -Remote for a hybrid migration (Exchange remote move).
- The service then monitors the status of the migration user, periodically sending emailed reports to the configured email addresses to inform of progress.
The remote mailbox move process: combining the two services in practice
The following is an overview of the hybrid mailbox move process. Understanding the process at a basic level is important so you can become more proficient in identifying where the issues may be.
1. The New-MoveRequest cmdlet prompts MRS on the mailbox server in Exchange Online where the mailbox is located or will be located. Even though I’ve already mentioned this, I feel like underlining again the importance of this prerequisite as it saves a lot of time and avoids issues: Before you can create an onboarding move request (New-Moverequest), a corresponding mail-enabled user needs to exist in Office 365 for the mailbox you plan to move. This will have been created by AAD Connect tool in the directory synchronization phase. It is VERY important to make sure that the corresponding mail users are found in Exchange Online and that they were provisioned correctly, meaning they have the matching attributes like ExchangeGuid from on-premises mailboxes, they have a secondary smtp address matching user@tenant.mail.onmicrosoft.com and that we have accepted domains verified in EXO for their proxy addresses domains. If this is not done correctly, the migration will fail at validating user phase or the migration service won’t be able to inject the move request.
If all checks out, the new mailbox move request is Queued in Exchange Online and processed by the datacenter. The cmdlet (New-MoveRequest) updates the Active Directory information (attributes like msExchMailboxMove* e.g. msExchMailboxMoveRemoteHostName) and the system mailbox on the cloud database, depending on whether it is a push or pull move.
2. Now, an MRS instance is ready to act upon the request. To initiate the move, MRS in the Exchange Online forest communicates through MRSProxy in the on-premises forest.
The MRS server in EXO pulls the mailbox data from the mailbox server through the MRSProxy server on-premises to the mail-enabled user in Exchange Online. At this point, the status is In Progress.
3. When the mailbox move is almost complete (95% completion), MRSProxy locks the mailbox on-premises for a short time while final synchronization is completed. The status is still In Progress (completion in progress).
4. In Exchange Online, MRS converts the mail-enabled user to a mailboxIn the on-premises forest, MRSProxy converts the mailbox to a mail-enabled user of type ‘remote mailbox’ (Enable-RemoteMailbox), and the source (on-premises) mailbox is soft deleted. At this point, the status is Completed.
Note that when you migrate a mailbox hosted on Exchange 2007 or an Exchange 2010 pre-SP1 through a hybrid migration, the on-premises mailbox is permanently deleted (no soft-deletion here).
You can view soft-deleted mailboxes with the following cmdlets in on-premises Exchange Management Shell (EMS):
Get-MailboxDatabase | Get-MailboxStatistics | where {$_.DisconnectReason -eq ‘Disabled’ -OR $_.DisconnectReason -eq ‘SoftDeleted’} |FT displayname, mailboxguid, database,disconnectdate
Get-MailboxDatabase | FT name, guid, mailboxretention
Get-RemoteMailbox <user> |FL
Other AD updates during completion:
- The LegacyExchangeDN attribute is restamped to /ou=External
- The original LegacyExchangeDN is moved to an x500 proxy address in order to preserve the ability to receive replies to old emails
- A RemoteRoutingAddress / TargetAddress is set on the user object that points to the coexistence domain tenant.mail.onmicrosoft.com (in EMS: Get-RemoteMailbox <user> |FL RemoteRoutingAddress). This is needed for routing mail flow and Autodiscover requests from on-premises to cloud.
5. Optionally, the administrator clears the move request/ removes migration batch and with this process, the move information is cleared from Active Directory and from the system mailbox. Until the move request information is cleared, you can’t move the mailbox again. Sometimes, clearing the move request in EXO doesn’t succeed in clearing the AD attributes on-premises (for example if during the completion, the on-premises migration admin credentials expired).
When the migration is initially kicked off (step #1) , the move request may be queued and potentially throttled by Exchange Online for a number of reasons. One such reason is to enforce the Max Concurrent Migrations configured for the migration endpoint, or to back off when the on-premises MRSProxy declares that it is overloaded. It is important to understand that some delays are considered normal; the mailbox move process is considered to have a lower precedence than things like client connectivity and mail flow. Some of this information may be found in the MoveRequestStatistics logs and will be discussed in a later part of this blog series.
Mirela Buruiana
by Scott Muniz | Aug 31, 2020 | Uncategorized
This article is contributed. See the original author and article here.
As part of our commitment to provide the best in market endpoint protection to our customers, we strive to ensure that Microsoft Defender ATP for Mac evolves in lock step with the macOS platform. We are also committed to minimizing security agent related friction as organizations migrate to the next major macOS version. Apple is shifting away from kernel extensions, starting with macOS 11 Big Sur. In alignment with Apple’s strategy, public preview is now open for Microsoft Defender ATP for Mac implementation that leverages the new system extensions instead of kernel extensions.
How will the system extensions-based update be delivered?
The system extensions-based version of Microsoft Defender ATP for Mac will be delivered to all macOS devices via the existing Microsoft AutoUpdate (MAU) channel.
Refer to our system extensions-based update documentation for additional update related details and how to determine if a device is running the new version based on system extensions.
After successfully deploying and activating the update, the on-device experience will remain unchanged.
What devices are eligible for the system extensions-based update?
To experience the new system extensions-based implementation during public preview, you’ll need to have preview features turned on in the Microsoft Defender Security Center. If you have not yet opted into previews, we encourage you to turn on preview features in the Microsoft Defender Security Center today.
Prior to the general availability of macOS 11 Big Sur, the new system extensions-based code path can be activated on devices running macOS Catalina version 10.15.4 or later and registered for the InsiderFast MAU update channel.
Once macOS 11 Big Sur is generally available, the new system extensions-based implementation will be activated on all devices running macOS 11.
How to prepare for activation of the system extensions-based update
To ensure that the Microsoft Defender ATP for Mac system extensions-based update is delivered and applied seamlessly from an end-user experience perspective, a new remote configuration must be deployed to all eligible macOS devices before the new code path is activated. If the configuration is not deployed prior to the activation of the new Microsoft Defender ATP for Mac agent implementation, end-users will be presented with a series of system dialogs asking to grant the agent all necessary permissions associated with the new system extensions. Refer to our system extensions-based update documentation to learn in detail what to expect without applying the new remote configuration.
Benefits of taking action ahead of broader update applicability
The new Microsoft Defender ATP for Mac system extension-based implementation is currently only applicable to devices running macOS version 10.15.4 or later and in InsiderFast MAU ring. However, deploying configuration proactively across the entire macOS fleet ensures that all Mac devices are prepared for macOS 11 Big Sur on its release day. It also ensures that Microsoft Defender ATP for Mac continues protecting all macOS devices immediately post-upgrade to Big Sur. The new remote configuration is supplemental to any prior Microsoft Defender ATP for Mac configuration and will have no adverse effect on devices that still run the kernel extension-based version.
We invite you to monitor the What’s new in Microsoft Defender ATP for Mac page for upcoming announcements (including general availability of the system extensions-based update).
We welcome your feedback and look forward to hearing from you!
You can submit feedback by opening Microsoft Defender ATP for Mac on your device and navigating to Help > Send feedback. Another option is to submit feedback via the Microsoft Defender Security Center.
If you’re not yet taking advantage of Microsoft’s industry leading optics and detection capabilities, sign up for free trial of Microsoft Defender ATP today.
Helen Allas
Microsoft Defender ATP team
by Scott Muniz | Aug 31, 2020 | Uncategorized
This article is contributed. See the original author and article here.
In August, we saw updates in Microsoft Teams that continue to improve the meetings experience and new features that provide developers a rich canvas to build workflows to enhance personal productivity. We are excited to share new features this month across meetings, calling, devices, chat and collaboration, IT admin, and industry. Check out our new capabilities below.
What’s New: Meetings & Calling & Devices
We are continuing to transform the meetings experience in Teams to include new features, settings, and devices to create a better experience.
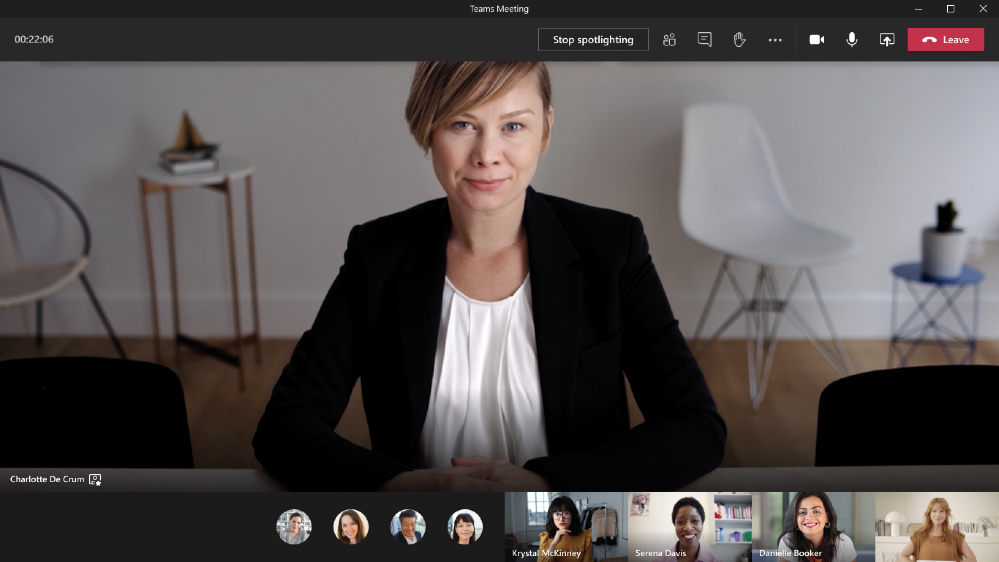
Spotlight
Meeting organizers and presenters will be able to lock their video as the main view for all meeting participants. This helps the presenter control the main video feed that a participant sees during the meeting. This is different from “Pin participant”, which allows an individual to pin a video feed for their own view but not for the view of all meeting participants. Spotlight will be available in the next few months.

Meeting recording storage for areas where Stream is not available
Teams meeting recordings are currently disabled for customers whose Teams data is stored in-country, if Microsoft Stream is not available in that country. A new admin setting will allow you to turn on meeting recordings if Microsoft Stream data residency is not yet in country. If this setting is turned on, Teams meeting recordings will be saved in the data center closest to the region.
Optimized Microsoft Teams Experience Now Available on VMware Horizon 8
With growing demand for collaboration tools to support remote workers, VMWare Horizon 8 now offers enhanced audio and video experience for Microsoft Teams. The optimization pack helps provide better user experience and improved productivity for those leveraging Microsoft Teams across Horizon virtual desktop (VDI) and published application environments.
Call Merge
Call Merge gives you the capability to merge several calls into a 1-1 call or another group call. This applies to Teams VOIP calls and PSTN calls.
New Teams devices to enhance collaboration and meetings
The Windows collaboration display by Avocor is the world’s first and only Windows collaboration display certified for both Microsoft Teams and Azure. Featuring an advanced interactive display, natural inking and innovative IoT sensor technologies, the AVW-6555 is designed to enhance collaboration and accelerate teamwork. Avocor’s AVW-6555 also provides seamless integration with Microsoft Teams video and audio-conferencing capabilities immediately with a Teams-enabled computer.

Logitech now offers Microsoft Teams Rooms powered by HP. Read more about the Logitech + HP bundles here.

Logitech Swytch adds a new way to use MTR for meetings on any video conferencing, webinar, or broadcasting service. Watch how Logitech Swytch works with Microsoft Teams Rooms here.
What’s New: Chat & Collaboration
We have added new chat and collaboration capabilities to keep everyone connected. Check out the new capabilities below.
Real time presence
Stay focused throughout the day with Microsoft Teams. Whether you are free for a quick chat or presenting in a meeting, real time presence increases the accuracy of your status so others know when to reach out.
Easily access and manage Visio files in Microsoft Teams
Visio tabs in Teams allow team members to quickly access content in a dedicated space within a channel or in a chat. Adding a tab in Teams is available to all Teams users, editing, however is only available for those with a Visio Plan 1 or Plan 2 subscription. We’re also releasing an enhanced set of multi-page operations in Visio for web, enabling you to view all the pages at once, reorder pages with drag and drop, insert pages at any position in the file, duplicate existing pages on a single click, and navigate non-sequential pages using the keyboard arrows.
What’s New: IT Admin
Changes in Incoming IP Video policy
We are updating our meeting policies to allow IT administrators more control over how video is managed in Teams Meetings. Current policy can only be set to prevent outgoing video. We are extending the Allow IP Video policy to prevent both outgoing and incoming video as needed. Tenant administrators can use this policy to manage bandwidth; This item has been updated to reflect changes to the original plan.
Skype for Business Online connector consolidating to Teams module
We are simplifying the Teams administration experience with a single PowerShell module that includes complete management capabilities for Microsoft Teams and Skype for Business Online, by introducing full functionality of Skype for Business Online Connector into the Teams Module.
This means that Skype for Business Online Connector in the Skype for Business Online PowerShell, which has been a separate product that contains many cmdlets needed to manage Microsoft Teams, now has been consolidated into a single PowerShell module.
What’s New: Developer & Platform
We are announcing new features to the Teams platform to continue to provide a rich canvas for developers to build, engage, and transform workflows.
Teams App Submission API
We are excited to announce that the Teams App Submission API is now generally available. This new Graph API allows all users at any organization to develop on the platform of their choice and submit their apps into Teams with zero friction. In turn, relieving the burden of discovering, approving, packaging, and deploying these apps by IT.

Graph Resource Specific Consent
Your Teams app can now call Teams Graph APIs from the BETA endpoint without needing admin consent. These APIs include creating, renaming, and deleting channels, reading channel messages, creating tabs, and adding/removing members from Teams. This capability will empower Team owners to install an app for their specific team and restrict the app’s scope and access to data to only that one team. This allows team owners to make decisions versus needing the global IT admin to provision access.
Support for native mobile device camera and location capabilities for tabs
Support for native mobile device capabilities for Teams apps using tabs is now generally available! Developers, including those building Teams apps through Power Apps, will be able to use device permissions to build richer experiences, such as capturing images through the camera or providing GPS coordinates. This experience had been supported for the Teams desktop client and is being introduced to the Teams mobile app via new APIs.

New Power Automate triggers for Teams
Power Automate is adding two new Teams triggers allowing you to simplify even more of your work. Now, using the “for a selected message” trigger, Teams users can create customized message actions to start a process directly from a message – for example, a chat about a customer can easily be used to automatically create a Sales opportunity in Dynamics. Additionally, when a team member is removed from a team, specific actions can be set in motion – for example, sending a message to the team owner.
New Power Automate actions for Teams
Power Automate is adding two new Teams actions. You can create a flow to automatically create a team, greatly simplifying the admin work of setting up teams. Flow builders can also automatically @mention a specific user when they incorporate this action into their flows, so they can be sure that important messages are seen by their intended recipients.
What’s New: Teams for Education
New expanded capabilities in Education Insights
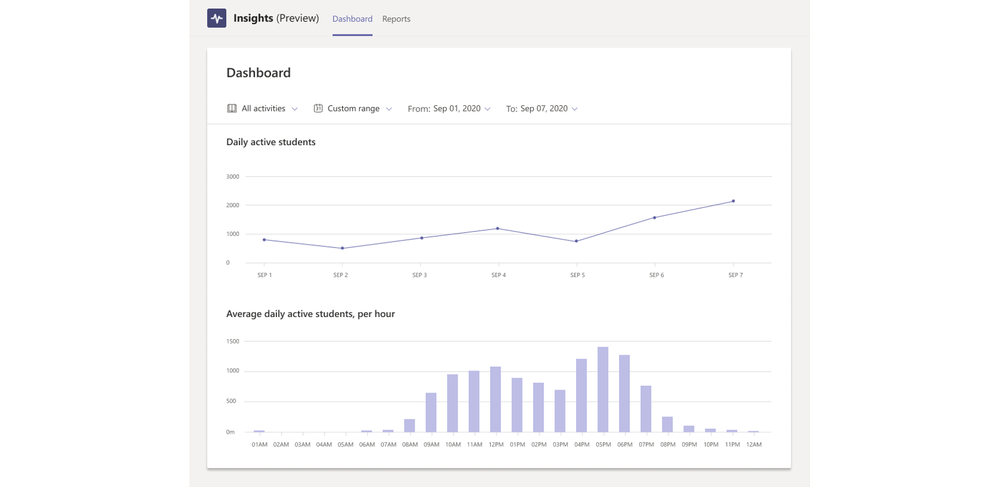
Insights in Microsoft Teams for Education now has a new view in public preview that allows administrators to monitor digital engagement from the student to the system level, and provides visibility into educator best practices in remote instruction. It’s designed to ensure equity and continuity of teaching in a remote world and comply with regulations for digital engagement reporting with a one-click data export.

To learn more about Insights and other new features and updates coming to Microsoft Teams for Education, visit the What’s New in Teams for Education | August 2020 post.
What’s New: Teams for US Government
We are here to support US Government clouds. Below are the new capabilities for the GCC, GCC High, and DOD environments.
New lobby setting: only the organizer joins the meeting directly for GCC
A new lobby setting is coming to Teams Meeting Options. We are adding “Only me” as an option to the “Who can bypass lobby?” setting. Once enabled, only the organizer will be able to join the meeting directly. Everyone else, including people from within the same organization, will be sent to the lobby.
New experience for launching instant channel meetings for GCC
Meet Now buttons in Teams channels will have a new home. You will soon find them in the Channel header where you can easily find and launch the meeting.
Improved Teams meeting join launcher experience for GCC
When you click on a Teams meeting join link, you will now see an optimized and improved join experience. You will be prompted with an option to join on the web, download the Teams client, or join with the native Teams client. This will result in faster and more confident meeting join.
New policy to prevent upload of profile picture for GCC, GCC High, and DoD
Teams desktop and web experiences will honor the Outlook on the Web mailbox policy setting that can control whether users are able change their profile pictures. This applies to GCC, GCC High, and DoD tenants.
See all the new ways to work together in Microsoft Teams
by Scott Muniz | Aug 31, 2020 | Uncategorized
This article is contributed. See the original author and article here.
This school year has kicked off with a bang. We’ve heard of schools starting with in-person, remote, or hybrid learning or quickly adjusting from one to another. Whether you’re doing a learning juggling act or deep into your school year, Microsoft Teams for Education has been right there with new changes and improvements announced in June, July and for back to school to help schools adapt to learning.
More and more stories are emerging of educators, students, families, and staff adapting and striving to make education work. Thank you for sharing your feedback, triumphs, and difficulties with us along the way. We know this is not easy, and we are grateful and humbled that you are choosing Microsoft Teams. Each new and improved feature we design is inspired by you, and for you.
For this month, we have Teams updates that will help make digital learning, collaboration, and engagement easier. No matter how your school is in session, we’ve got you covered to:
1) Use data insights to improve teaching and learning
2) Run engaging classes through online meetings
3) Do more with OneNote and Class Notebook in Teams
4) Maintain student safety with control of age-appropriate messaging and content
5) Build an interactive classroom with education apps
6) Train yourself in Teams with additional resources
Let’s dive in! (If you’re just looking for a list without extra description, click here to jump.)
1) Use data insights to improve teaching and learning
Gain insights into how your school is engaging in online learning
To ensure that school and system leaders also have a full view of the online learning activities of all their students, we’re pleased to announce the addition of new functionality in Education Insights available in preview today. This new Insights app in Microsoft Teams for Education enables leaders to closely track the engagement and progress of students over time in ways that identify the most effective approaches, directly inform teaching, and aid in bringing solutions to scale.
Insights for Leaders shows data to help leaders better understand the online learning activities of students and, intervene immediately if needed. It also supports one-click data export to comply with emerging state regulations that require mandatory reporting.
 New capabilities in Insights allow for broader views across classes, grades, and schools
With Insights, education leaders and teachers can stay in touch with how each one of their students is responding, and take action to ensure the best learning outcomes for individual students, and entire school districts.
When: available for preview now (and Insights is free for any schools with A1, A3, or A5 licenses while in preview)
2) Run engaging classes through online meetings
Spotlight the video of the educator or presenter
With Spotlight, educators will be able to lock their video for the whole class. This helps educators control the main video feed that a student sees during the meeting. It can only be enabled or disabled by the organizer or presenter. This is different from “Pin participant”, which allows an individual to pin a video feed for their own view but not for the view of all meeting participants.
 Students in class will see the spotlighted video of the educator
When: expected in the next few months
3) Do more with OneNote and Class Notebooks in Teams
Less work for you updating the roster
SDS updates now automatically flow to the OneNote Class Notebook. Before, when SDS made roster updates for students in the class, the updates wouldn’t appear until an educator clicked on the “Class Notebook” tab in the class team.
When: available now
Set channel specific collaboration and content spaces
Now an educator has the option to set Channels to create sections in Collaboration Space or Content Library, which is especially helpful for educators who like to use channels as separate units. While in a class team, go to the Class Notebook and click “Manage Notebook” to choose which channel a new Section will go. This allows the educator to create a “read-only” Content Library or student editable “Collaboration Space” specific to each unit and channel.
.png") Set a channel specific OneNote Content Library or Collaboration Space
Set a channel specific OneNote Content Library or Collaboration Space
When: available now
Easy OneNote page creation in Assignments
When educators are creating assignments or students are attaching work it’s helpful to be able to create a New File on the fly. Educators will be able to add a blank OneNote page while creating a new Assignment in Teams by clicking on “New File” (along with creating a new Word, Excel, or PowerPoint document).
.png") In Assignments, select a New File to create a new OneNote page
In Assignments, select a New File to create a new OneNote page
When: expected early September
Easy OneNote distribution notifications for educators and students
Benefit of using the Class Notebook inside of Teams? The Class Notebook bot. When an educator uses Page Distribution in OneNote all students will get a notification in Teams. The notification works for educators using the Class Notebook Toolbar in OneNote Windows 10, iPad, Web and Mac.
When: expected late September
Reduce clicks to get the “Teacher Only” area
Now in the OneNote Class Notebook or the Staff Notebook, the “Teacher Only” section group will be enabled by default. This saves some extra clicks for this more private view.
When: available now
For more about these and other awesome OneNote and Class Notebook updates, check out this post here.
4) Maintain student safety with control of age-appropriate messaging and content
Detect and delete inappropriate messages
Sometimes, students send inappropriate messages. To continue fostering a culture of inclusion and safety, IT admins can leverage communication compliance policies and AI models to automatically detect inappropriate content, then review and choose to delete. Messaging containing offensive or harassing language and adult, racy, or gory images can be automatically flagged then removed from the Teams chat or channel by the IT Admin. This is not supported in private channels or in communications sent by guest users. Learn more about using this and other communication compliance tools in Teams here.
 Automatically detect inappropriate messages and choose which ones to remove.
When: available now
5) Build an interactive classroom with education apps
With remote and hybrid learning, it’s more important than ever to find ways to keep students engaged and learning throughout the day. Here are just a few of the many education apps that support connected learning within Teams.
Step up your student engagement game
With Kahoot! teachers, professors, and fellow students can use the game-based learning platform to create quick and fun learning assignments or quizzes in minutes.
WooClap makes presentations fun and interactive for university and college students by turning smart phones and any connected device into a learning tool. Professors can create “find on image” questions, multiple choice questions, word clouds and view and interpret results in real time.
Try an easy Q&A platform that drives higher student participation with Piazza. University professors and students will have access to a wiki style format that builds a single, high quality answer for all and allows the professor to endorse an answer and let students know they’re on the right track.
Learn more about these and other engagement and communication apps.
Use, share and assign amazing visual resources and content collections
Quickly create engaging live or recorded class presentations with Prezi Video. Appear right alongside your content as you present and easily create or transform that content to your class needs.
Featuring an easy-to-use drag and drop interface, thousands of unique graphics and animations, and countless creation tools, Buncee makes it easy to create fun and engaging multimedia based content.
Wakelet allows students and teachers to save, organize and share content from across the web in a visually engaging way. Share collections of resources, create individualized playlists, set assignments and share newsletters.
Learn more about these and other content and curriculum apps here and here.
6) Train yourself in Teams with additional resources
Learn about Teams:
- Quickly learn about Teams and common classroom scenarios with clickable interactive demos for educators, families, and IT Admins (in English).
- Learn more about strategies to promote well-being among children during back-to-school. Sign up for the Microsoft + MindUP webinars at http://aka.ms/MindUpVirtual
- Check out the Quick Start Guides if you’re an Educator (PDF), Student (PDF), or IT Admin.
Get free training:
- Start on Professional Development with the popular Microsoft Educator Community course, Transform Learning with Microsoft Teams.
- Watch the recordings from the Microsoft Teams for Edu digital readiness event for both educators and IT Admins. These sessions dive into common scenarios, use cases to get ready for the school year at https://aka.ms/TeamsEduEvent.
- Watch helpful quick “how-to” videos with Teams Quick Tip videos on YouTube (or pick from a different Teams how-to video playlist here).
Check out these additional resources:
- Deploy class teams with these recommended methods and best practices for creating class teams.
- If you still need it, get resources and support to do a virtual orientation. Check out the blog here.
- Check out resources for parents, guardians or family members looking to support student learning: https://education.microsoft.com/resource/755e5a8b
- Sign up for free virtual field trips and learning activities for educators and parents looking to keep their kids engaged, like Roald Dahl day, International Dot Day, Drawing with the Minecraft Design team, and more.
- Learn about Teams online meeting safety guidance for educators and administrators.
- Check the Teams help homepage. You can also click Help in your Teams app at any time for extra how-tos and support!
And for those that love lists, here’s a quick review of all the features we shared along with their expected launch dates:
- Use data insights to improve teaching and learning
(Update) Education Insights for school leaders– available now in public preview
- Run engaging classes through online meetings
(New) Spotlight – expected in the next few months
- Do more with OneNote and Class Notebook in Teams
(New) SDS update to the OneNote Class Notebook – available now
(New) Set Channels to create Collaboration Space or Content Library – available now
(New) “Teacher Only” section group will be enabled by default – available now
(New) Add blank OneNote page in new Assignment – expected September
(New) Notification in Teams for OneNote Page Distribution – expected late September
- Maintain student safety with control of meetings and classrooms
(New) Detect and delete inappropriate messages – available now
And in case you missed it, here are features we announced in last month’s round-up that are coming soon:
Run engaging classes through online meetings
Dynamic view – expected later this year
Attendance Report post-meeting download – expected in September
Digital Whiteboard without student access – expected in September
Teams meetings up to 1,000 interactive participants – coming in the last quarter of 2020 (in Advanced Communications add-on option)
Virtual Breakout rooms – no later than early Q4 2020
Maintain student safety with control of meetings and classrooms
Hard Audio Mute – expected in September
Do more with Assignments in Teams
View assignments across all classes (again) – expected in September
Link thumbnail preview – expected in September
Anonymous Grading/Marking – expected in September
Larger file size and count support – expected in September
Icon refresh – expected in September
Support for students no longer enrolled – expected in September
Keep learners engaged and collaborating in the classroom
D2L’s Brightspace Course Connector – expected in August September
You’ve got this. And we’re right here if you need us.
by Scott Muniz | Aug 31, 2020 | Uncategorized
This article is contributed. See the original author and article here.
Learn how to exploit LogicApps to trigger a purge command on Azure Data explorer, both from a high-level view and step-by-step with reusable code.
Technologies
Azure Data Explorer is a fast, fully managed data analytics service for real-time analysis on large volumes of data streaming from applications, websites, IoT devices, and more.
Azure Logic Apps is a cloud service that helps you schedule, automate, and orchestrate tasks, business processes, and workflows when you need to integrate apps, data, systems, and services across enterprises or organizations.
Challenge
When using a Purge command in Azure Data Explorer, take care to know exactly what you are doing and why. See the official documentation on limitations and considerations:
one limitation is that “The predicate can’t reference tables other than the table being purged (TableName). The predicate can only include the selection statement (where). It can’t project specific columns from the table (output schema when running ‘table | Predicate’ must match table schema)“
The purge command structure should look like the following:
// Connect to the Data Management service
#connect "https://ingest-[YourClusterName].[region].kusto.windows.net"

.purge table [TableName] records in database [DatabaseName] with (noregrets='true') <| [Predicate]
An example of purge based on a where clause condition will look like this:
.purge table MyTable records in database MyDatabase <| where RelevantColumn in ('X', 'Y')
The list (‘X’,’Y’) must be explicit and cannot come from another table within the query (like a subquery or direct join). You can overcome this by exploiting two tasks of Logic Apps:
1. “Run query and visualize result” connecting it directly to the cluster
2. “Run control command and visualize results” connecting it to “https://ingest-[YourClusterName].[Region].kusto.windows.net”
Scenario
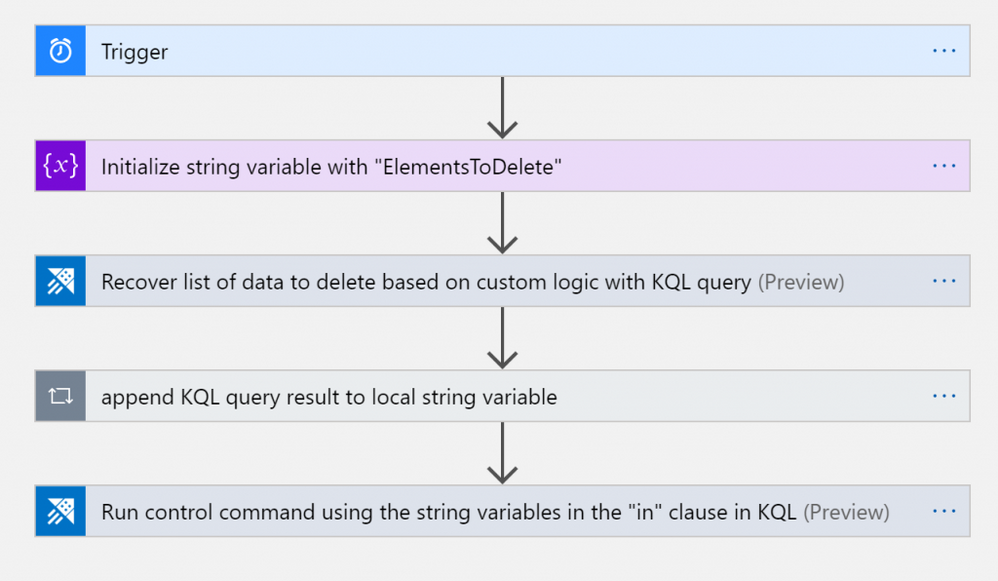
The example explained below will read a list of file names (stored in a FileDir column within a table ToDelete) and will purge data from table <TABLENAME> every 24h at 10pm, within <DATABASENAME> database.
Use these instructions to reproduce the LogicApps within the Azure Portal with the LogicApps source code provided at the end of the article. Adapt the names of tables, database, and connection strings as necessary.
The Logic App Designer View
Here how it will look like within the WebDesigner:
Tasks
- Trigger: in this case it’s scheduled with a 24 hours recurrence
- String Variable initialization: filled with an initial empty string <”>
- KQL query: used to retrieve the list of names of files to purge
- Filling the String Variable: insertion of the the list of file names within the local string variable
- Run purge command: setting and running the purge command inserting the variable in the predicate
Trigger

This step is needed for scheduling the LogicApps (it can be replaced with other task according to the business need)
Variable initialization
This step initializes the string variable with an empty string. Don’t leave it blank, as the empty string will be the first element of the list of names of files.
KQL Query and storing results within variable

Note: the “append KQL query result to local string variable” step is a FOR cycle because there is the need of reading all the names from the list: every name of the list needs to be surrounded with quotes and the entire liste has to be preceded by a comma to produce a final list of strings for the KQL purge predicate. The LogicApps array variable is not used because it would create an array defined within brackets “[” and “]”, and the KQL command requires defining a list with parenthesis as “(” and “)”.
The string variable has been initialized with a ” string, then for every FileDir a new element has been added. After the third iteration, the string will look like:
”,’elem1′,’elem2′,’elem3′.
Purge command using list of elements previously retrieved
At this stage, the final step will be to insert the list that was previously produced within the purge command, and surround it with parenthesis as shown below.

Done!
Every night the LogicApps will purge data from the table indicated. It is possible either to keep the recurrence as explained in this example, or you can just call the LogicApps via API and manage it via external code, replacing the first step with a callable endpoint.
The Logic App Code
Here the Logic App code that can be copy/pasted within the CodeView of the Logic App
{
    "definition": {
        "$schema": "https://schema.management.azure.com/providers/Microsoft.Logic/schemas/2016-06-01/workflowdefinition.json#",
        "actions": {
            "Initialize_string_variable_with_"ElementsToDelete"": {
                "inputs": {
                    "variables": [
                        {
                            "name": "ElementsToDelete",
                            "type": "string",
                            "value": "''"
                        }
                    ]
                },
                "runAfter": {},
                "type": "InitializeVariable"
            },
            "Recover_list_of_data_to_delete_based_on_custom_logic_with_KQL_query": {
                "inputs": {
                    "body": {
                        "cluster": "https://<CLUSTER>.<REGION>.kusto.windows.net",
                        "csl": "toDelete | limit 10 | project FileDir",
                        "db": "<DATABASENAME>"
                    },
                    "host": {
                        "connection": {
                            "name": "@parameters('$connections')['kusto']['connectionId']"
                        }
                    },
                    "method": "post",
                    "path": "/ListKustoResults/false"
                },
                "runAfter": {
                    "Initialize_string_variable_with_"ElementsToDelete"": [
                        "Succeeded"
                    ]
                },
                "type": "ApiConnection"
            },
            "Run_control_command_using_the_string_variables_in_the_"in"_clause_in_KQL": {
                "inputs": {
                    "body": {
                        "chartType": "Html Table",
                        "cluster": "https://ingest-<CLUSTERNAME>.<REGION>.kusto.windows.net",
                        "csl": ".purge table MYTABLE records in database <DATABASENAME> with (noregrets='true') <| where FileDir in (@{variables('ElementsToDelete')})",
                        "db": "DATABASENAME"
                    },
                    "host": {
                        "connection": {
                            "name": "@parameters('$connections')['kusto']['connectionId']"
                        }
                    },
                    "method": "post",
                    "path": "/RunKustoAndVisualizeResults/true"
                },
                "runAfter": {
                    "append_KQL_query_result_to_local_array_variable": [
                        "Succeeded"
                    ]
                },
                "type": "ApiConnection"
            },
            "append_KQL_query_result_to_local_array_variable": {
                "actions": {
                    "Append_to_string_variable": {
                        "inputs": {
                            "name": "ElementsToDelete",
                            "value": "'@{items('append_KQL_query_result_to_local_array_variable')?['FileDir']}'"
                        },
                        "runAfter": {},
                        "type": "AppendToStringVariable"
                    }
                },
                "foreach": "@body('Recover_list_of_data_to_delete_based_on_custom_logic_with_KQL_query')?['value']",
                "runAfter": {
                    "Recover_list_of_data_to_delete_based_on_custom_logic_with_KQL_query": [
                        "Succeeded"
                    ]
                },
                "type": "Foreach"
            }
        },
        "contentVersion": "1.0.0.0",
        "outputs": {},
        "parameters": {
            "$connections": {
                "defaultValue": {},
                "type": "Object"
            }
        },
        "triggers": {
            "Trigger": {
                "recurrence": {
                    "frequency": "Hour",
                    "interval": 24,
                    "startTime": "2020-06-25T22:00:00Z"
                },
                "type": "Recurrence"
            }
        }
    },
    "parameters": {
        "$connections": {
            "value": {
                "kusto": {
                    "connectionId": "/subscriptions/<SUBSCRIPTIONGUID>/resourceGroups/<RESOURCEGROUPNAME>/providers/Microsoft.Web/connections/kusto",
                    "connectionName": "kusto",
                    "id": "/subscriptions/<SUBSCRIPTIONGUID>/providers/Microsoft.Web/locations/<REGION>/managedApis/kusto"
                }
            }
        }
    }
}Note: The web designer makes it straightforward to implement the same solution without coding. In case you are choosing to reuse the code instead, after copying and pasting the above code, insert the appropriate values for Subscription, ResourceGroup, Cluster, Database, and Tables.
by Scott Muniz | Aug 31, 2020 | Uncategorized
This article is contributed. See the original author and article here.
Welcome to the third and final video/blog post in this series where we are modernizing a web application from Windows Server 2012 R2 running on-premises to Azure Kubernetes Services using Windows Containers. In case you missed it, here are part one and part two of the video series.
In this third part of our series we cover how to create an AKS cluster and how to deploy our containerized application on top of it. We start by using the Azure portal to create a new AKS cluster with most of the default options, but with key changes to include Windows Server worker nodes, and to ensure we have authentication set up against our Azure Container Registry, so the image we uploaded can be pulled into the nodes running our application. I highly recommend you check the AKS documentation to see more details on the deployment and operation options of AKS.
After creating the AKS cluster, we used this sample YAML file to describe how the application should be deployed. Finally, instead of connecting remotely using Kubectl, we used the recently announced feature (under preview) resource management from the Azure Portal. This new feature allows you to manage Kubernetes resources directly from the portal, so we were able to paste our YAML file directly from there.
To validate everything, we looked at the deployment and opened the application running on AKS and the application worked the same way it was working before.
Hopefully, this gave you an idea on how the end to end process of modernizing your application works. We’re looking forward to seeing what you think of this video series and what you want to see next!
Vinicius!
Twitter: @vrapolinario
by Scott Muniz | Aug 30, 2020 | Azure, Microsoft, Technology, Uncategorized
This article is contributed. See the original author and article here.
Throughout this series, I’m going to discuss how Power Platform is particularly useful for ad-hoc basis jobs like provisioning resources on Azure.
- Provisioning VM for Streamers with Chocolatey
- Ad-hoc Resource Deployment through Power Apps
Everything has gone. I mean all off-line meetups and conferences disappeared. Instead, they have gone virtual – online meetups and conferences. For community events, they have two options – one that purchases a solution for online events, and the other that build a live streaming solution by themselves. If you are a community event organiser and running a live streaming session by yourself, it doesn’t really matter whether you install all necessary applications on your computer or not. However, if the event scales out, which includes inviting guests and/or sharing screens, it could be challenging unless your computer has relatively high spec enough.
For this case, there are a few alternatives. One option is to use a virtual machine (VM) on the Cloud. A VM instance can be provisioned whenever necessary, then destroyed whenever no longer required. However, this approach also has a caveat from the “live streaming” point of view. Every time you provision the VM instance, you should install all the necessary applications by hand. If this is not happening very often, it may be OK. But it’s still cumbersome to manually install those apps. Throughout this post, I’m going to discuss how to automatically install live streaming related software using Chocolatey during the provision of Azure Windows VM.
The sample code used in this post can be found at this GitHub repository.
Acknowledgement
Thanks Henk Boelman and Frank Boucher! Their awesome blog posts, Henk’s one and Frank’s one helped a lot to me set this up.
Installing Live Streaming Applications
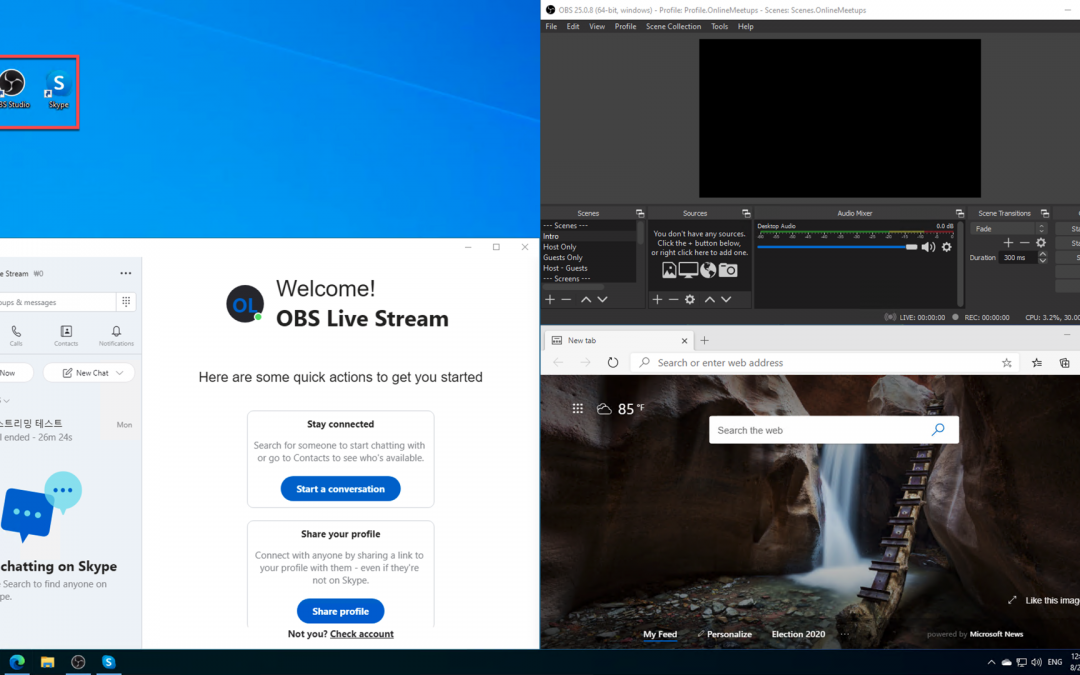
As we’re using a Windows VM, we need those applications for live streaming.
- Microsoft Edge (Chromium): As of this writing, Chromium-based Edge is not installed as default. Therefore, it’s good to update to this version.
- OBS Studio: Open source application for live streaming.
- OBS Studio NDI Plug-in: As OBS itself doesn’t include the NDI feature, this plug-in is required for live streaming.
- Skype for Content Creators: This version of Skype can enable the NDI feature. With this feature enabled, we can capture screens from all participants and shared screens, respectively.
These are the bare minimum for live streaming. Let’s compose a PowerShell script that installs them via Chocolatey. First of all, we need to install Chocolatey using the downloadable installation script (line #2). Then, install the software using Chocolatey (line #5-8). The command may look familiar if you’ve used a CLI-based application package management tool like apt or yum from Linux, or brew from Mac.
    #Install Chocolatey
    Set-ExecutionPolicy Bypass -Scope Process -Force; iex ((New-Object System.Net.WebClient).DownloadString('https://chocolatey.org/install.ps1'))

    #Install Software
    choco install microsoft-edge -y
    choco install obs-studio -y
    choco install obs-ndi -y
    choco install skype -y
So, if this installation script can be executable while provisioning the Windows VM instance on Azure, we can always use the fresh VM with newly installed applications.
Provisioning Azure Windows VM
Now, let’s provision a Windows VM on Azure. Instead of creating the instance on Azure Portal, we can use the ARM template for this. Although there are thousands of ways using the ARM template, let’s use the quick start templates as a starting point. Based on this template, we can customise the template for our live streaming purpose. We use the template, Deploy a simple Windows VM, and update it. Here is the template. I omitted details for brevity, except VM specs like VM size (line #43) and VM image details (line #48-51).
    {
        "$schema": "https://schema.management.azure.com/schemas/2019-04-01/deploymentTemplate.json#",
        "contentVersion": "1.0.0.0",
        "parameters": {
          ...
        },
        "variables": {
          ...
        },
        "resources": [
          {
            "comments": "=== STORAGE ACCOUNT ===",
            "type": "Microsoft.Storage/storageAccounts",
            ...
          },
          {
            "comments": "=== PUBLIC IP ADDRESS ===",
            "type": "Microsoft.Network/publicIPAddresses",
            ...
          },
          {
            "comments": "=== NETWORK SECURITY GROUP: DEFAULT ===",
            "type": "Microsoft.Network/networkSecurityGroups",
            ...
          },
          {
            "comments": "=== VIRTUAL NETWORK ===",
            "type": "Microsoft.Network/virtualNetworks",
            ...
          },
          {
            "comments": "=== NETWORK INTERFACE ===",
            "type": "Microsoft.Network/networkInterfaces",
            ...
          },
          {
            "comments": "=== VIRTUAL MACHINE ===",
            "type": "Microsoft.Compute/virtualMachines",
            "apiVersion": "[variables('virtualMachine').apiVersion]",
            ...
            "properties": {
              "hardwareProfile": {
                "vmSize": "Standard_D8s_v3"
              },
              ...
              "storageProfile": {
                "imageReference": {
                  "publisher": "MicrosoftWindowsDesktop",
                  "offer": "Windows-10",
                  "sku": "20h1-pro-g2",
                  "version": "latest"
                },
                ...
              },
              ...
            }
          },
          {
            "comments": "=== VIRTUAL MACHINE EXTENSION: CUSTOM SCRIPT ===",
            "type": "Microsoft.Compute/virtualMachines/extensions",
            ...
          }
        ],
        "outputs": {}
      }
If you want to see the full ARM template, click the following link to GitHub.
See ARM Template in full
Custom Script Extension
We’ve got the VM instance ready. However, we haven’t figured out how to run the PowerShell script during the provision. To run the custom script, add this extension to the ARM template. The custom script in the template looks below. The most important part of this template is the property value. Especially, pay attention to both fileUris (line #16) and commandToExecute (line #19).
    {
        "comments": "=== VIRTUAL MACHINE EXTENSION: CUSTOM SCRIPT ===",
        "type": "Microsoft.Compute/virtualMachines/extensions",
        "apiVersion": "[providers('Microsoft.Compute', 'virtualMachines/extensions').apiVersions[0]]",
        "name": "['mystreamingvm', '/config-app')]",
        "location": "[resourceGroup().location]",
        "dependsOn": [
          "[resourceId('Microsoft.Compute/virtualMachines', 'mystreamingvm')]"
        ],
        "properties": {
          "publisher": "Microsoft.Compute",
          "type": "CustomScriptExtension",
          "typeHandlerVersion": "1.10",
          "autoUpgradeMinorVersion": true,
          "settings": {
            "fileUris": "https://raw.githubusercontent.com/devkimchi/LiveStream-VM-Setup-Sample/main/install.ps1"
          },
          "protectedSettings": {
            "commandToExecute": "[concat('powershell -ExecutionPolicy Unrestricted -File ', './install.ps1')]"
          }
        }
      }
fileUris indicates the location of the custom script. The custom script MUST be publicly accessible like GitHub URL or Azure Blob Storage URL.commandToExecute is the command to execute the custom script. As we use the PowerShell script downloaded externally, add the -ExecutionPolicy Unrestricted parameter to loosen the permission temporarily. ./install.ps1 is the filename of the executing script from the URL.
ARM Template Execution
Once everything is done, run the ARM template for deployment. Here’s the PowerShell command:
    New-AzResourceGroupDeployment `
    -Name  `
    -ResourceGroupName  `
    -TemplateFile ./azuredeploy.json `
    -TemplateParameterFile ./azuredeploy.parameters.json `
    -Verbose
And, here’s the Azure CLI command:
    az group deployment create
    -n
    -g
    --template-file ./azuredeploy.json
    --parameters ./azuredeploy.parameters.json
    --verbose
If you’re lazy enough, click the following button to run the deployment template directly on Azure Portal.

It takes time to complete all the provisioning. Once it’s done, access to VM through either RDP or Bastion.

You can see all the applications have been installed!
So far, we’ve discussed how to automatically install applications for live streaming, using Chocolatey, while provisioning a Windows VM on Azure. There are many reasons to provision and destroy VMs on the Cloud. Using an ARM Template and custom script for the VM provisioning will make your life easier. I hope this post gives small tips to live streamers using VMs for their purpose.
This article was originally published on Dev Kimchi.
by Scott Muniz | Aug 30, 2020 | Azure, Microsoft, Technology, Uncategorized
This article is contributed. See the original author and article here.
This blogpost can support your DevOps journey to make your Continuous Integration and Continuous Delivery (CI CD) for companies and or customers. What is DevOps?
People, Process, and Technology to continually provide value to customers.
While adopting DevOps practices automates and optimizes processes through technology, it all starts with the culture inside the organization—and the people who play a part in it. The challenge of cultivating a DevOps culture requires deep changes in the way people work and collaborate. But when organizations commit to a DevOps culture, they can create the environment for high-performing teams to develop.
My name is James van den Berg and I’m a MVP in Cloud and Datacenter Management on my DevOps journey as an IT Infrastructure Guy managing datacenters on-prem and in the Microsoft Azure Cloud. Today It’s not only a Virtual Machine or a Website to deploy for your customers, it’s much more then that like :
- Time to market, deploy your solution fast without waiting on dependencies because you automated your process with a CI CD Pipeline.
- Security and Monitoring to keep you in Controle.
- Working together with different Teams who are each responsible for a part of the solution.
- The complete DevOps Pipeline must be Compliant
Here you can start with Azure DevOps on Microsoft Learn platform.
In the following step-by-step guide, you will see how easy it can be to Build your own first pipeline.
Before you start, you need a Microsoft Azure Subscription to start with.
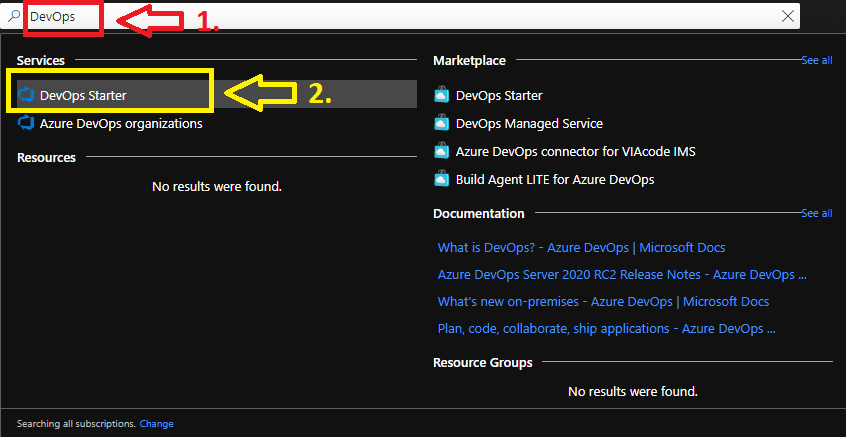
1. Login your Azure subscription and type DevOps in your search bar.

Click on DevOps Starter

From here you can start with a new application of your choice or bring your own code from Git Hub.
I will choose a new dot NET application, but when you have your Own Code on Git Hub for example it will integrate in your Azure Cloud Pipeline like this :

Your existing repository on Git Hub will integrate with your Azure DevOps Pipeline. But for this step-by-step guide we will make an ASP.NET Web application pipeline in Microsoft Azure Cloud.

Here you choose your Application Framework and you can select a SQL Database for your Solution.
More information about all the quick starts in Azure DevOps Starter.

The Next step is to select the right Azure services to run on your ASP.NET solution. I selected the Windows Web App fully managed compute platform.

Complete the last step and you can change your Service Plan at additional settings when you need more resources. From here the Azure DevOps Starter has enough information to Build your first Azure Pipeline solution in the Cloud. 

Pipeline in Progress.
When you Click here on the Build link you will be redirected to your Azure DevOps environment.
Here you find more information about Microsoft Azure DevOps

Azure DevOps Pipeline creation in Progress.
To monitor the creation of your Pipeline solution, you can see that in the live logs :

Live monitoring the deployment

Your Azure DevOps Starter deployment is running.

Your ASP.NET Web App running with a Pipeline.

Your Deployment in Azure DevOps.
From here is the baseline deployment of your solution done with Azure DevOps Starter and can you Configure the Pipeline environment with the other teams to get RBAC and Dashboards in place to work with.

Azure DevOps Dashboard.
Conclusion :
Microsoft Azure DevOps Starter supports you with the basic of your Pipeline Solution. It’s a good start for your DevOps journey and to configure your solution with other teams to get your compliant result for your customer or business.
You can follow me on Twitter : @JamesvandenBerg
More information :
Blog : Microsoft Azure DevOps Blog
Follow on Twitter : @AzureDevOps
Start here with Microsoft Azure DevOps

by Scott Muniz | Aug 29, 2020 | Uncategorized
This article is contributed. See the original author and article here.
In Azure Data Factory, historical debug runs are now included as part of the monitoring experience. Go to the ‘debug’ tab to see all past pipeline debug runs.
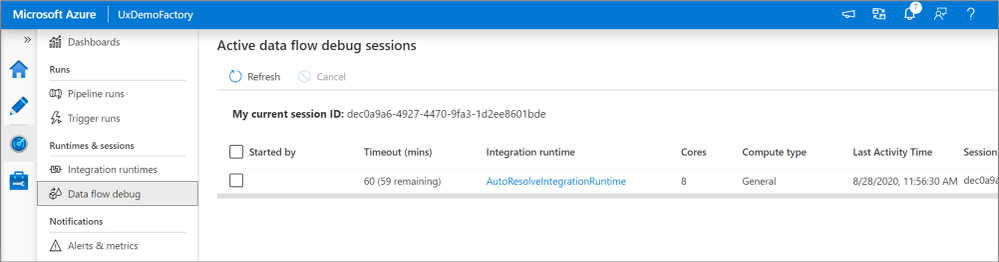
You can also see what data flow debug sessions are currently active.in the ‘Data flow debug’ pane.
Additionally, now when running a debug run of a pipeline with a data flow, you can choose to spin up a new isolated just-in-time cluster or use the existing debug cluster.

For more information on how and when to use these features, check out the ADF iterative debugging documentation!


Recent Comments