by Contributed | Oct 6, 2020 | Azure, Technology, Uncategorized
This article is contributed. See the original author and article here.
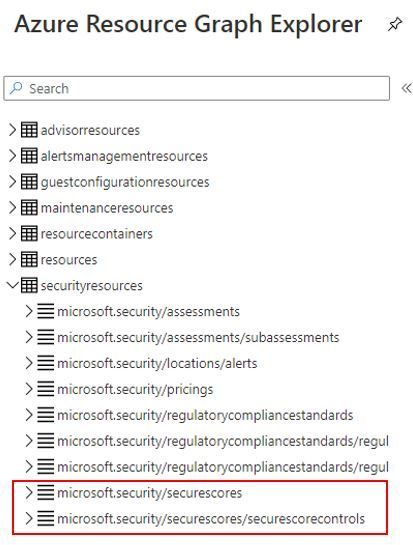
Although the capability to query the Secure Score using API was already available and we already published some automations to leverage this capability, now you can also query your Secure Score using Azure Resource Graph (ARG). In addition, you will be able to calculate the score for the security controls and accurately calculate the aggregated score across multiple subscriptions. The following tables were added to allow you to query not only the secure score, but also the security controls:

Here an example of how to query your current secure score (percentage):
SecurityResources
| where type == ‘microsoft.security/securescores’
| extend current = properties.score.current, max = todouble(properties.score.max)
| project subscriptionId, current, max, percentage = ((current / max)*100)
This query will return an output that looks like this one:

This corresponds to what you see in the UI for your subscription. In this case, ASC dashboard show the following Secure Score:

This other example below will list all security controls, the amount of unhealthy resources, their current score and their max score:
SecurityResources
| where type == ‘microsoft.security/securescores/securescorecontrols’
| extend SecureControl = properties.displayName, unhealthy = properties.unhealthyResourceCount, currentscore = properties.score.current, maxscore = properties.score.max
| project SecureControl , unhealthy, currentscore, maxscore
The output should look like the example below:

Calculating the Secure Score
For a single subscription the type of resource we are calling is the microsoft.security/securescores where we get the maximum score (∑ maximum scores of each security control) and the current score (∑ current scores of each security control). To obtain the secure score of a single subscription, the following formula is used:

To obtain the aggregated secure score for multiple subscriptions you should use the formula below:

As you can see in the formula, the aggregated score for multiple subscriptions is not the average, it uses the weight field that is provided in the query (ARG or API). The weight takes in account the size of the subscription (# of resources ) and hence allows to calculate a weighted score which is more accurate than a regular average between different subscriptions with different sizes. For more information refer to the secure score documentation page.
To see how this looks like, let’s use the query below as an example:
securityresources
| where type == “microsoft.security/securescores”
| extend subscriptionScore = todouble(properties.score.current)/todouble(properties.score.max)
| extend subScoreXsubWeight = todouble(subscriptionScore)*todouble(properties.weight)
| summarize upperValue = sum(subScoreXsubWeight), underValue = sum(todouble(properties.weight))
| extend overallScore = round(100*((upperValue)/(underValue)))
| project overallScore
The subscriptionScore is obtained dividing its current score by its maximum score. Then, the value subScoreXsubWeight holds the subscription secure score times the subscription weight. Finally, the overall score is the sum of subScoreXsubWeight divided by the sum of the subscriptions’ weights. The result is shown below:

One of the advantages of querying the secure score via ARG is that you can quickly use these queries to create custom dashboard with Azure Workbooks. If you are querying the secure score using API, you can send a GET Request as shown below:
GET https://management.azure.com/subscriptions/20ff7fc3-e762-44dd-bd96-b71116dcdc23/providers/Microsoft.Security/secureScores/ascScore?api-version=2020-01-01-preview
In the JSON result you will see the weight field, which is used to calculate the secure score is also available as shown the sample below:

For more information about the Secure Score API, read the following articles:
Make sure to utilize this feature and provide your feedback in the comments below, or if you want to formally suggest improvements, provide your feedback at https://aka.ms/ascuservoice
Thanks to all Reviewers
Miri Landau, Senior PM – Azure Security Center Engineering Team
Meital Taran- Gutman, Principal PM – Azure Security Center Engineering Team
Fernanda Vela Huerta, PM – CxE Azure Security Center Team
by Contributed | Oct 6, 2020 | Uncategorized
This article is contributed. See the original author and article here.
Ever since WPF had been released, we have been written code like below many times to implement INofityPropertyChanged interface:
class Person : INotifyPropertyChanged
{
  public event PropertyChangedEventHandler PropertyChanged;
  private string _name;
  public string Name
  {
    get { return _name; }
    set
    {
      if (_name == value)
      {
        return;
      }

      _name = value;
      if (PropertyChanged != null)
      {
        PropertyChanged(this, new PropertyChangedEventArgs("Name"));
      }
    }
  }
}
To labor saving, we have been created base classes such as BindableBase, NotificationObject, etc… like following:
public class BindableBase : INotifyPropertyChanged
{
  public event PropertyChangedEventHandler PropertyChanged;
  protected bool SetProperty<T>(ref T field, T value, [CallerMangerName]string propertyName = null)
  {
    if (EqualityComparer<T>.Default.Equals(field, value))
    {
      return false;
    }
    field = value;
    PropertyChanged?.Invoke(this, new PropertyChangedEventArgs(propertyName));
  }
}
Using this class, the Person class is become to simple:
public class Person : BindableBase
{
  private string _name;
  public string Name
  {
    get => _name;
    set => SetProperty(ref _name, value);
  }
}
That is less code enough. And if using with code snippets, then we can just type the code snippet name to generate the definition of properties. There are many useful C# features such as CallerMemberNameAttribute, expression-bodied members, ref, Null-conditional operators, etc.
Source generator
In a part of C# 9 compiler features, there is source generator feature. The detail is explaining in the following blog post.
Introducing C# Source Generators
I think that it is one of the best solutions to INotifyPropertyChanged interface implementation. In fact, INotifyPropertyChanged implementation is introduced as a use case of Source generator.
The sample source generator to that is here.
The sample source generator is simple and that has minimum features to focus on learning. So, I added a feature to support computed properties to get closer real use cases. The repo is here.
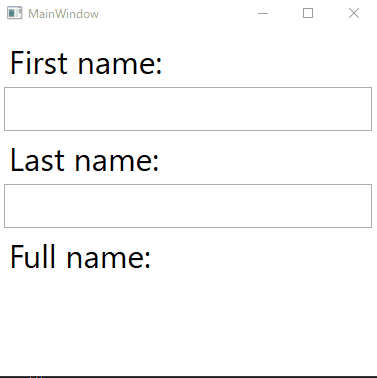
The source generator I created is able to generate codes from below definition:
using MvvmGenerator;

namespace MvvmGeneratorTestApp.VIewModels
{
    public partial class MainWindowViewModel
    {
        [AutoNotify]
        private string _firstName;
        [AutoNotify]
        private string _lastName;
        [AutoNotify]
        public string FullName => $"{FirstName} {LastName}"; // computed property!
    }
}
The generated code is as below(I formatted it for easy to read):
namespace MvvmGeneratorTestApp.VIewModels
{
    public partial class MainWindowViewModel : System.ComponentModel.INotifyPropertyChanged
    {
        public event System.ComponentModel.PropertyChangedEventHandler PropertyChanged;
        private static readonly System.ComponentModel.PropertyChangedEventArgs FirstNamePropertyChangedEventArgs =
            new System.ComponentModel.PropertyChangedEventArgs(nameof(FirstName));
        public string FirstName
        {
            get => this._firstName;
            set
            {
                if (System.Collections.Generic.EqualityComparer<string>.Default.Equals(this._firstName, value))
                {
                    return;
                }
                this._firstName = value;
                PropertyChanged?.Invoke(this, FirstNamePropertyChangedEventArgs);
                PropertyChanged?.Invoke(this, FullNamePropertyChangedEventArgs);
                FirstNameChanged();
            }
        }

        partial void FirstNameChanged();

        private static readonly System.ComponentModel.PropertyChangedEventArgs LastNamePropertyChangedEventArgs =
            new System.ComponentModel.PropertyChangedEventArgs(nameof(LastName));

        public string LastName
        {
            get => this._lastName;
            set
            {
                if (System.Collections.Generic.EqualityComparer<string>.Default.Equals(this._lastName, value))
                {
                    return;
                }
                this._lastName = value;
                PropertyChanged?.Invoke(this, LastNamePropertyChangedEventArgs);
                PropertyChanged?.Invoke(this, FullNamePropertyChangedEventArgs);
                LastNameChanged();
            }
        }

        partial void LastNameChanged();
        private static readonly System.ComponentModel.PropertyChangedEventArgs FullNamePropertyChangedEventArgs =
            new System.ComponentModel.PropertyChangedEventArgs(nameof(FullName));
    }
}
The generated code is works on WPF, UWP, Xamarin.Forms and other platforms that need INotifyPropertyChanged implementation. The repository has a small WPF app to test the generated code.
If you would like to try it, then please open MvvmGenerator.sln on Visual Studio 2019 preview. And please set MvvmGeneratorTestApp project as a startup project, then start debugging. You will see following window:

Conclusion
C# 9.0 and .NET 5 will be released in November 2020. There are a lot of useful features such as source generator I introduced in this article.
For windows developers too, all features will be available on WPF on .NET 5 and WinForms on .NET 5. After Windows UI Library 3.0 was released, I believe you also get the benefits on Win UI 3.0 on .NET 5 too.
I think that the source generator is the one of great features for all developers. If you make similar codes many times, then please remind this article.
Happy coding!
by Contributed | Oct 6, 2020 | Azure, Technology, Uncategorized
This article is contributed. See the original author and article here.
Initial Update: Tuesday, 06 October 2020 06:03 UTC
We are aware of issues within Application Insights and are actively investigating. Some customers may experience failures while accessing metrics from the Azure portal.
-
Work Around: None
-
Next Update: Before 10/06 08:30 UTC
We are working hard to resolve this issue and apologize for any inconvenience.
-Vyom
by Contributed | Oct 6, 2020 | Uncategorized
This article is contributed. See the original author and article here.
During MS Ignite 2020, I was surprised to learn of a growing debate that system administrators are starting to become increasing vocal on…
“Which scripting language is better? Python or PowerShell?”
Having only dabbled in both, I am not an authority on either to share my opinion. From a fact’s perspective, PowerShell provides a shell scripting environment whereas Python is an interpreted high-level programming language. Both can accomplish similar tasks but thier differences also help distinguish themselves to complete certain tasks.
So why not use both?
This was a question I began to research for this post and thought it would be an innovative idea to compare the similarities in syntax between Python and PowerShell. In conducting said research I came across the work by Adam Driscoll, an 8 year MVP in the Cloud and Datacenter space and added a few subtle changes.
Here is the reference between PowerShell and Python language syntax. Let us know in the comments below if something is missing or should be added.
Syntax Reference
Arrays
| |
PowerShell |
Python |
| Defining |
@('Hello', 'World')
|
['Hello', 'World']
|
| Access Element |
$arr = @('Hello', 'World')
$arr[0]
# Hello
|
arr = ['Hello', 'World']
arr[0]
# 'Hello'
|
| Length |
$arr = @('Hello', 'World')
$arr.Length
|
arr = ['Hello', 'World']
len(arr)
|
| Adding |
$arr = @('Hello', 'World')
$arr += "Friend"
|
arr = ['Hello', 'World']
arr.append('Friend')
|
| Removing |
 $arr = [System.Collections.ArrayList]@('Hello', 'World')
 $arr.RemoveAt($arr.Count - 1)
|
arr = ['Hello', 'World']
arr.pop(1)
|
| Removing by value |
 $arr = [System.Collections.ArrayList]@('Hello', 'World')
 $arr.Remove("Hello")
|
arr = ['Hello', 'World']
arr.remove('Hello')
|
Casting
| |
PowerShell |
Python |
| Integers |
$i = [int]"10"
|
i = int("10")
|
| Floats |
$i = [float]"10.5"
|
i = float("10.5")
|
| Strings |
$i = [string]10
|
i = str(10)
|
Classes
| |
PowerShell |
Python |
| Definition |
class MyClass {
    $x = 5
}
|
class MyClass:
  x = 5
|
| Create Object |
[MyClass]::new()
|
MyClass()
|
| Constructor |
class Person {
    Person($Name, $Age) {
        $this.Name = $Name
        $this.Age = $Age
    }

    $Name = ''
    $Age = 0
}
[Person]::new('Orin', 40)
|
class Person:
  def __init__(self, name, age):
    self.name = name
    self.age = age

p1 = Person("Orin", 40)
|
| Methods |
class Person {
    Person($Name, $Age) {
        $this.Name = $Name
        $this.Age = $Age
    }

    [string]myfunc() {
        return "Hello my name is $($this.Name)"
    }

    $Name = ''
    $Age = 0
}
[Person]::new('Thomas', 32)
|
class Person:
  def __init__(self, name, age):
    self.name = name
    self.age = age

  def myfunc(self):
    print("Hello my name is " + self.name)

p1 = Person("Thomas", 32)
p1.myfunc()
|
Conditions
| |
PowerShell |
Python |
| If Else |
$a = 33
$b = 200
if ($b -gt $a)
{
    Write-Host "b is greater than a"
}
elseif ($a -eq $b)
{
    Write-Host "a and b are equal"
}
else
{
  Write-Host "a is greater than b"
}
|
a = 33
b = 200
if b > a:
  print("b is greater than a")
elif a == b:
  print("a and b are equal")
else:
  print("a is greater than b")
|
Comments
| |
PowerShell |
Python |
| Single line |
# Hello, world!
|
# Hello, world!
|
| Multiline |
|
"""
Hello, world!
"""
|
Data Types
| |
PowerShell |
Python |
| Get Type |
$var = 1
$var | Get-Member
#or
$var.GetType()
|
var = 1
type(var)
|
Dictionaries
| |
PowerShell |
Python |
| Defining |
$thisdict = @{
  brand = "Dodge"
  model = "Challenger"
  year = 1970
}
|
thisdict = {
  "brand": "Dodge",
  "model": "Challenger",
  "year": 1970
}
print(thisdict)
|
| Accessing Elements |
$thisdict = @{
  brand = "Dodge"
  model = "Challenger"
  year = 1970
}
$thisdict.brand
$thisdict['brand']
|
thisdict = {
  "brand": "Dodge",
  "model": "Challenger",
  "year": 1970
}
thisdict['brand']
|
| Updating Elements |
$thisdict = @{
  brand = "Dodge"
  model = "Challenger"
  year = 1970
}
$thisdict.brand = 'Fiat'
|
thisdict = {
  "brand": "Dodge",
  "model": "Challenger",
  "year": 1970
}
thisdict['brand'] = 'Fiat'
|
| Enumerating Keys |
$thisdict = @{
  brand = "Dodge"
  model = "Challenger"
  year = 1970
}
$thisdict.Keys | ForEach-Object {
    $_
}
|
thisdict = {
  "brand": "Dodge",
  "model": "Challenger",
  "year": 1970
}
for x in thisdict:
    print(x)
|
| Enumerating Values |
$thisdict = @{
  brand = "Dodge"
  model = "Challenger"
  year = 1970
}
$thisdict.Values | ForEach-Object {
    $_
}
|
thisdict = {
  "brand": "Dodge",
  "model": "Challenger",
  "year": 1970
}
for x in thisdict.values():
    print(x)
|
| Check if key exists |
$thisdict = @{
  brand = "Dodge"
  model = "Challenger"
  year = 1970
}
if ($thisdict.ContainsKey("model"))
{
    Write-Host "Yes, 'model' is one of the keys in the thisdict dictionary"
}
|
thisdict = {
  "brand": "Dodge",
  "model": "Challenger",
  "year": 1970
}
if "model" in thisdict:
  print("Yes, 'model' is one of the keys in the thisdict dictionary")
|
| Adding items |
$thisdict = @{
  brand = "Dodge"
  model = "Challenger"
  year = 1970
}
$thisdict.color = 'Plum Crazy Purple'
|
thisdict = {
  "brand": "Dodge",
  "model": "Challenger",
  "year": 1970
}
thisdict["color"] = "Plum Crazy Purple"
|
Functions
| |
PowerShell |
Python |
| Definition |
function my-function()
{
  Write-Host "Hello from a function"
}
my-function
|
def my_function():
  print("Hello from a function")

my_function()
|
| Arguments |
function my-function($fname, $lname)
{
    Write-Host "$fname $lname"
}


my-function -fname "Anthony" -lname "Bartolo"
|
def my_function(fname, lname):
  print(fname + " " + lname)

my_function("Anthony", "Bartolo")
|
| Variable Arguments |
function my-function()
{
    Write-Host "$($args[2])"
}

my-function "Sarah" "Pierre" "Rick"
|
def my_function(*team):
  print("The team member is " + team[1])

my_function("Sarah", "Pierre", "Rick")
|
| Named Arguments |
function my-function($team3, $team2, $team1)
{
    Write-Host "The youngest team member is $team3"
}

my-function -team1 "Rick" -team2 "Pierre" -team3 "Sarah"
|
def my_function(team3, team2, team1):
  print("The youngest team is " + team3)

my_function(team1 = "Rick", team2 = "Pierre", team3 = "Sarah")
|
| Default Values |
function my-function
{
    param(
        $country = "Canada"
    )

    Write-Host "I am from $country"
}
|
def my_function(country = "Canada"):
  print("I am from " + country)
|
| Return Values |
function my-function($x)
{
    5 * $x
}
|
def my_function(x):
  return 5 * x
|
Lambdas
| |
PowerShell |
Python |
| Lambda |
$x = { param($a) $a + 10 }
& $x 5
|
x = lambda a : a + 10
print(x(5))
|
Loops
| |
PowerShell |
Python |
| For |
$fruits = @("strawberry", "banana", "mango")
foreach($x in $fruits)
{
    Write-Host $x
}
|
fruits = ["strawberry", "banana", "mango"]
for x in fruits:
  print(x)
|
| While |
$i = 1
while ($i -lt 6)
{
    Write-Host $i
    $i++
}
|
i = 1
while i < 6:
  print(i)
  i += 1
|
| Break |
$i = 1
while ($i -lt 6)
{
    Write-Host $i
    if ($i -eq 3)
    {
        break
    }
    $i++
}
|
i = 1
while i < 6:
   print(i)
   if i == 3:
     break
  i += 1
|
| Continue |
$i = 1
while ($i -lt 6)
{
    Write-Host $i
    if ($i -eq 3)
    {
        continue
    }
    $i++
}
|
i = 1
while i < 6:
   print(i)
   if i == 3:
     continue
  i += 1
|
Operators
| |
PowerShell |
Python |
| Addition |
$var = 1 + 1
|
var = 1 + 1
|
| Subtraction |
$var = 1 - 1
|
var = 1 - 1
|
| Multiplication |
$var = 1 * 1
|
var = 1 * 1
|
| Division |
$var = 1 / 1
|
var = 1 / 1
|
| Modulus |
$var = 1 % 1
|
var = 1 % 1
|
| Floor |
[Math]::Floor(10 / 3)
|
10 // 3
|
| Exponent |
[Math]::Pow(10, 3)
|
10 ** 3
|
Packages
| |
PowerShell |
Python |
| Install |
Install-Module PowerShellProtect
|
pip install camelcase
|
| Import |
Import-Module PowerShellProtect
|
import camelcase
|
| List |
Get-Module -ListAvailable
|
pip list
|
Strings
| |
PowerShell |
Python |
| String |
"Hello"
|
"Hello"
'Hello'
|
| Multiline |
"Hello
World
"
|
"""Hello
World"""
|
| Select Character |
$str = 'Hello'
$str[0]
# H
|
str = 'Hello'
str[0]
# 'H'
|
| Length |
$str = 'Hello'
$str.Length
|
str = 'Hello'
len(str)
|
| Remove whitespace at front and back |
$str = ' Hello '
$str.Trim()
# Hello
|
str = ' Hello '
str.strip()
# 'Hello'
|
| To Lowercase |
$str = 'HELLO'
$str.ToLower()
# hello
|
str = 'HELLO'
str.lower()
# 'hello'
|
| To Uppercase |
$str = 'hello'
$str.ToUpper()
# HELLO
|
str = 'hello'
str.upper()
# 'HELLO'
|
| Replace |
$str = 'Hello'
$str.Replace('H', 'Y')
# Yello
|
str = 'Hello'
str.replace('H', 'Y')
# 'Yello'
|
| Split |
'Hello, World' -split ','
# @('Hello', ' World')
|
str = 'Hello, World'
str.split(',')
# ['Hello', ' World']
|
| Join |
$array = @("Hello", "World")
$array -join ", "
[String]::Join(', ', $array)
|
list = ["Hello", "World"]
", ".join(list)
|
| Formatting |
$price = 40
$txt = "The price is {0} dollars"
$txt -f $price
|
price = 40
txt = "The price is {} dollars"
print(txt.format(price))
|
| Formatting by Index |
$price = 40
$txt = "The price is {0} dollars"
$txt -f $price
|
price = 40
txt = "The price is {0} dollars"
print(txt.format(price))
|
| Formatting Strings |
$price = 40
"The price is $price dollars"
|
price = 40
f"The price is {price} dollars"
|
Try Catch
| |
PowerShell |
Python |
| |
try {
    Write-Host $x
} catch {
    Write-Host "An exception ocur Plum Crazy Purple"
}
|
try:
  print(x)
except:
  print("An exception occur Plum Crazy Purple")
|
Variables
| |
PowerShell |
Python |
| |
$var = "Hello"
|
var = "Hello"
|
| Global |
$global:var = "Hello"
|
global var
var = "Hello"
|
by Contributed | Oct 5, 2020 | Uncategorized
This article is contributed. See the original author and article here.
Use MITREid Connect for OAuth2 Authorization in API Management
By (alphabetically): Akinlolu Akindele, Dan Balma, Maarten Van De Bospoort, Minhui Burket, Nick Drouin, Heba Elayoty, Andrei Ermilov, Tom Fleming, David Giard, Michael Green, Alfredo Chavez Hernandez, Hao Luo, Siva Mullapudi, Kamil Somaj, Nsikan Udoyen, William Zhang
Introduction
Using an API gateway in front of REST APIs is a common design pattern which allows us to offload the cross-cutting capabilities such as OAuth2 authorization to the gateway instead of letting security code get scattered in application code. Azure API Management (APIM) is such an API gateway service. For the common case that the OAuth2 server in APIM is Azure AD (AAD), it has been well documented. In this document we will cover the case that the OAuth2 server is MITREid Connect instead of AAD.
MITREid Connect is an open source Identity Provider, popular in Java community. MITREid Connect is compliant to OpenID Connect and OAuth 2.0 protocol. This document is based on MITREid Connect v 1.3.3.
Prerequisites
- An Azure subscription
- A MITREid Connect instance. This document focuses on how to enable OAuth2 over APIM and MITREid Connect, instead of on how to set up MITREid Connect.
- A REST API app for test. The REST API could be deployed to AKS, App Service, or other. Or use this sample REST API with Swagger http://conferenceapi.azurewebsites.net/?format=json.
- Familiar with Azure API Management
- Basic understanding of OAuth2. OAuth2 involves a few specs (OAuth2, OIDC, PKCE and JOSE). A list of good references on OAuth2 and related specs can be found here.
NOTE: This article does not cover the security between APIM and the REST API which is a separate topic. If a REST API is deployed to AKS, there are a few options which have been documented in Use Azure API Management with microservices deployed in Azure Kubernetes Service.
If APIM Premium is used, we can leverage VNET so that the security between APIM and AKS is simpler. Otherwise, we need to secure the REST calls from APIM to AKS thru technique such as mutual TLS (mTLS) (note that it is mutual TLS, not just TLS). This could be the topic of a future document.
Preparations in MITREid Connect
In order to prepare for OAuth2 setup in APIM, we need to perform the following steps in MITREid Connect:
- Register a server application registration;
- Define its scopes;
- Register a client application;
- Specify its permissions: either Delegated Permissions or Application Permissions;
- Create a client secret.
The concepts and the steps for the above OAuth2 steps between MITREid Connect and Azure AD are not fundamentally different. You may get detailed steps from Protect an API by using OAuth 2.0 with Azure Active Directory and API Management
The following parameters from MITREid Connect must be prepared and available for our setup in APIM.
| Parameter |
Typical Format |
| Client ID |
A string. Unlike Azure AD, a client ID in MITREid Connect does not have to be a GUID. But it needs to be unique within its tenant. |
| Client secret |
Hexadecimal representation of a cryptographically secure pseudorandom number |
| OpenID config endpoint |
https://[host]/.well-known/openid-configuration |
| Authorization endpoint |
https://[host]/authorize/ |
| Token endpoint |
https://[host]/token/ |
| Audience |
A string |
| Issuer |
https://[host]/ |
| Default Scopes |
Optional, and it could have multiple values |
Create an OAuth2 Server on MITREid Connect
- In Azure portal left menu column, click “OAuth 2.0”
- Click “Add” button on the right pane
- You need the following parameters to create the OAuth 2 server on MITREid Connect:
- Client ID
- Client secret
- Authorization endpoint
- Token endpoint
For Authorization grant types, you may choose to checkmark the following:
- Authorization code
- Client credentials
For Default scope, you can either leave it blank or enter any valid scope as defined in MITREid Connect client registration.
You can keep Resource owner username and Resource owner password as blank.
For additional details on creating OAuth2 server in APIM, please see this document.
Set up a REST API App in APIM
- Create an API Management service by following this document.
- Import a REST API by following this document.
- Make sure to disable subscription-key authorization which is enabled by default.
- Click on “APIs” menu in the left menu column
- Select the API you are working with in the mid-column
- In the right pane, select Settings tab at the top
- Uncheck Subscription required under Subscription section. This ensures that subscription-key authorization is not used since we intend to use OAuth2 authorization.
Customize API Inbound Policy
  <validate-jwt header-name="Authorization" failed-validation-httpcode="401" failed-validation-error-message="Unauthorized. Access token is missing or invalid.">
        <openid-config url="[openid-config endpoint]" />
        <required-claims>
              <claim name="aud">
                 <value>[audience]</value>
              </claim>
              <claim name="iss">
              <value>[issuer]<value>
              </claim>
              <claim name="scope">
                 <value>[scope 1]</value>
                 <value>[scope 2]</value>
              </claim>
        </required-claims>
  </validate-jwt>
The openid-config endpoint is the OpenID Config URL from MITREid Connect. It is critical to make sure you have the correct URL since this is the URL thru which APIM acquires JWKS (JSON Web Key Set) for JWT validation.
The values for audience and *issuer” are from MITREid Connect and can be found from its token sample.
For *scope” claim, you can have 0, 1 or multiple scope values. Notice that if you have mutlipel scope values, it means AND (all required) instead of OR (one of scope values is enough).
Troubleshooting Guide
In OAuth2 authorization, it is typical to have multiple parts involved in the authorization flow:
| Component |
Purpose |
| Client application |
The client application can be either an app for end users or a service/server process depending on the secured REST API. In case of a client app for end users, it can be either a private client which can hide client_secret or a public client which cannot. Depending on use case, different OAuth2 authorization flows can be used. If the client is a service, a Client Credentials Flow is used. For a public end user client, Authorization Code Flow with PKCE is used such as in the OAuth2 Test Tool. |
| Identity Provider |
Users get authenticated and are issued authorization code which can be used to acquire access_token. |
| Token issuer |
The MITREid Connect component which issues access_tokens and refresh_tokens |
| Token introspector |
The APIM component which inspects and validates JWT tokens based on policy settings, such as claims, issuer and audience |
| OpenID config endpoint |
An endpoint provided by MITREid Connect from which APIM acquires public keys for token introspection. This is based on OpenID Discovery spec. APIM is never configured to hold a static public key from MITREid Connect. |
| Registered client app |
A client app pointer in MITREid Connect which defines the scopes granted by either admin or users, as well as its client ID and client_secret |
| Registered server app |
A server app pointer in MITREid Connect which defines an abstraction of REST API and defines the scopes |
Unauthorized (401) Issue
The most common error in OAuth2 authorization is Unauthorized (401). This could be caused by any of the following:
- Incorrect openid-config endpoint in API inbound policy
- Incorrect *iss” value in API inbound policy
- Incorrect “aud” value in API inbound policy
- Incorrect “scope” values in API inbound policy. If you can capture a sample JWT token, you can parse it via a tool like http://aka.ms/jwt to see its claims values. These values are determined by registered server application in MITREid Connect and the API permission configurations for the registered client application.
- Incorrect Security settings in the API. Check the *Settings” tab of the API and make sure that *User authorization” is OAuth 2.0 and the right OAuth 2.0 server is selected in the OAuth 2.0 server dropdown.
Subscription-key Issue
By default, when an API is installed into APIM service, its subscription-key authorization is enabled. Make sure it is disabled since we use OAuth2 instead of subscription-key. You can find its settings under Settings tab in the API.
CORS Issue
If your test client is a web or SPA client and you use javascript to make API calls with OAuth2 authorization, you will likely face CORS issue since the web app or SPA is from different domain as APIM. By default, an API in APIM does not support CORS preflight and you need to enable it in inbound policy.
Inbound section:
  <cors allow-credentials="true">
        <allowed-origins>
            <origin>http://localhost:3000</origin>
        </allowed-origins>
        <allowed-methods preflight-result-max-age="300">
            <method>GET</method>
            <method>POST</method>
            <method>PATCH</method>
            <method>DELETE</method>
            <method>PUT</method>
        </allowed-methods>
  </cors>
Outbound section:
  <outbound>
     <base />
     <set-header name="Access-Control-Allow-Origin" exists-action="override">
           <value>@(context.Request.Headers.GetValueOrDefault("Origin",""))</value>
     </set-header>
     <set-header name="Access-Control-Allow-Credentials" exists-action="override">
           <value>true</value>
     </set-header>
  </outbound>
Custom header issue
Another potential issue is: for a production REST API, it has custom headers such as transaction or correlation ID for logging and troubleshooting. Such correlation ID may be scoped to the enterprise or the service itself.
However, there is a restriction to access response headers when you are using javascript Fetch API over CORS. Due to this restriction, by default you can access only following standard headers:
- Cache-Control
- Content-Language
- Content-Type
- Expires
- Last-Modified
- Pragma
More info on this restriction can be found here.
In order to allow such client to get access to custom headers (such as correlation ID), we need to add the following section in our inbound/cors section:
  <allowed-headers>
        <header>content-type</header>
        <header>accept</header>
        <header>authorization</header>
        <header>x-correlation-id</header>
        <header>x-my-request-id</header>
  </allowed-headers>
  <expose-headers>
        <header>x-correlation-id</header>
        <header>x-my-request-id</header>
  </expose-headers>
Terraform for Deployment
Needless to say, it is desirable to have the creation and configuration automated. We could use Terraform for this purpose. Detailed document on Terraform Azuure API Management Resources can be found here.
The Terraform (.tf file) should cover the following tasks:
- Create a resource group
- Create an API Management service
- Create a product
- Add a REST API into the product
- Disable subscriptin key authorization in the REST API
- Import a prepared inbound policy (XML) into the REST API
- Add OAuth2 Server based on MITREid Connect
- Configure REST API settings
In addition to the variables defined in variables.tf file, the Terraform also requires a XML policy file as input. In the policy file, the following parameters (XML node/attribute values) are required.
| XML node |
Node attribute |
Definition |
| openid-config |
url |
The OpenID Config endpoint URL for public keys used in token introspection |
| claim |
name (aud) |
Audience defined in the registered server app in MITREid Connect |
| claim |
name (iss) |
The issuer of JWT tokens |
| claim |
name (scope) |
The list of required scopes. All of the listed scopes listed must be present in a token before it can be validated. |
| allowed-origins |
|
List of allowed origins for CORS preflights |
The APIM inbound policy with these parameters is critical in ensuring the following to work:
- Token introspection
- CORS policy
- Custom header accessibility
by Contributed | Oct 5, 2020 | Uncategorized
This article is contributed. See the original author and article here.
We recently released the next preview of the Microsoft Drivers for PHP for SQL Server, version 5.9.0-preview1. This preview release has been built with PHP 7.2+ and tested on all supported platforms.
Notable items about this release include:
Added
Removed
- Dropped support for Ubuntu 19.10 and Debian 8.
Fixed
- Pull Request #1127 – removal of TSRMLS macros in preparation for PHP 8 by remicollet
- Pull Request #1136 – improved performance when handling decimal numbers as inputs or outputs and removed unncessary conversions for numeric values
- Pull Request #1143 – if an exception occurs when executing a query, will not change the output parameters
- Pull Request #1144 – use the correct C types when binding output parameters with integer values
- Pull Request #1146 – improved performance when fetching numbers using client buffers
- Pull Request #1165 – setting query timeout without using LOCK TIMEOUT, which saves an extra trip to the server
- Issue #1170 – when fetching large data types such as ntext will check more than only the display size – pull request #1172
Limitations
- No support for inout / output params when using sql_variant type
- No support for inout / output params when formatting decimal values
- In Linux and macOS, setlocale() only takes effect if it is invoked before the first connection. Attempting to set the locale after connecting will not work
- Always Encrypted requires MS ODBC Driver 17+
- Only Windows Certificate Store and Azure Key Vault are supported. Custom Keystores are not yet supported
- Issue #716 – With Always Encrypted enabled, named parameters in subqueries are not supported
- Issue #1050 – With Always Encrypted enabled, insertion requires the column list for any tables with identity columns
- Always Encrypted limitations
Known Issues
- This preview release requires ODBC Driver 17.4.2 or above. Otherwise, a warning about failing to set an attribute may be suppressed when using an older ODBC driver.
- Connection pooling on Linux or macOS is not recommended with unixODBC < 2.3.7
- When pooling is enabled in Linux or macOS:
- unixODBC <= 2.3.4 (Linux and macOS) might not return proper diagnostic information, such as error messages, warnings and informative messages.
- due to this unixODBC bug, fetch large data (such as xml, binary) as streams as a workaround. See the examples here.
Survey
Let us know how we are doing and how you use our drivers by taking our pulse survey.
Install
- On Linux and macOS run the commands below:
sudo pecl install sqlsrv-5.9.0preview1
sudo pecl install pdo_sqlsrv-5.9.0preview1
- To download Windows DLLs for PHP 7.2 or above from the PECL repository, please navigate to SQLSRV or PDO_SQLSRV.
- Direct downloads for released binaries can also be found at the Github release tag.
David Engel
by Contributed | Oct 5, 2020 | Uncategorized
This article is contributed. See the original author and article here.
How often do you end work thinking ‘this was a great, productive and effective day’? Hopefully you have many of those, but perhaps you also recognize the feeling where you end your day thinking, ‘I was busy, but I didn’t do the things I wanted to do’. We feel disappointed, perhaps anxious and yet as tomorrow comes, we remain busy.
This social norm of busyness doesn’t necessarily equal valuable work. And while technology should facilitate our work, often it can feel like a burden, as we grapple to keep on top of our inbox, messages, and calendar. When we are bounce from message to meeting and back again, zipping through those to-dos, managing mails, and switching between documents and devices, we are constantly chipping away at our attention. Keeping on top of all this noise can feel like an end in itself; but it´s exhausting, ineffective and unlikely to feel meaningful.
Technology, in itself, does not lead to productivity. Our digital tools are amazing, but they are not enough. Unless they are harnessed to the power of human attention, digital technology can lead as much to distraction as it can enablement. Or, as Tony Crabbe, business psychologist specialized in attention summarizes it, “Technology x Attention = Productivity”.
So, what makes the difference between a great day and a distracted, draining day? What does it mean to enable attention through technology, and how can we support our people, and ourselves, to move from busyness to digital productivity? These should be central questions for all of us to grapple with if we want to truly unlock the enabling power of technology.
What are we missing in our approach to productivity and the digital workplace? We’ve certainly got the tools, but have we got the right attention and the right habits? Great days, when we feel productive and make an impact on the problems that matter, have three consistent elements: Purpose, People and Progress (the 3Ps).
Purpose: Recent research showed that employees spend only 44% of their day working on their primary job activities and 40% of their working time is responding to internal emails that they admit add no value to their business1. Yet, when we have a sense of purpose, we can see the clear value of our work, we lean in. We engage. In fact, 25% of performance can be attributed to our sense of meaning in our work.
People: According to one study, there has been a 50% increase in collaboration over the last decade, with people spending 85% of their day in collaborative activities2. Consistent studies find one of the greatest drivers of impact, but also motivation, is the quality of collaboration.
Progress: Teresa Amabile’s research3 shows that one of the greatest motivators is a sense of progress on the projects and tasks that really matter to us on a daily basis. Yet, on our busy days, how many of us leave work exhausted but underwhelmed by our progress on what matters.
Our goal is to help you build holistic strategies for your digital workplaces. Strategies that encompass the scenarios that will add value to your organization, its employees, and encourage new ways of working that facilitate the 3Ps. So how can you plan a your workplace strategy and a technology adoption approach for the continuously evolving digital workplace in a way that harnesses employee attention and leverages the digital workplace as a change agent to catalyze the forming of new digital cultural norms, adapted to today’s work environment?
The Modern Collaboration Architecture (MOCA) came about to try to solve for this challenge. It offers best practices and guidance to help you develop your digital workplace strategy, understand scenarios that will add value, and provide best practices to support individuals in your organization to harness their attention.

Starting with the purpose we looked at what the specific needs of individuals in the workplace are. What are the common things employees are trying to achieve with technology and what kind of work is the technology designed to facilitate?
When it comes to the people aspect we thought through the different contexts of productivity and attention. We looked from individual work to more collaborative and community-based work. In the MOCA model, the organization plays a facilitation role to enable all individuals, teams, and communities.
Progress is incorporated when we think about the digital cultural norms that we can encourage to facilitate getting work done and the conditions to harness attention. How can we leverage technology and science to learn to facilitate Flow for example, a key factor in employee engagement4 and general well-being5 because it builds this feeling of progress?
Talking about progress, our most collaborative employees are often also the most disengaged3. As teams we rarely discuss our “rules of engagement” that will make the most of people’s time, talents, passions, and attention as we embark on a task. It is time to start.
The intent of the MOCA framework is not to predict ‘THE BEST way to organize your work’, but to act as a guide. As you look at the MOCA, think about the different needs, scenarios, and contexts your employees work in. Does it fit or do you need to adapt based on your organization’s goals? What other tools are end-users using that need to fit in?
Leverage the “MOCA on a page” as a starting point to spark discussions as you consider priority needs and scenarios that will add value to your organization and employees. How you will enable those scenarios based on the evolving technology landscape? And what digital culture norms you want to encourage as you continue the digital workplace journey? If you are that individual who is overloaded or needs to re-take control of your time, do it and think about how you can leverage technology to facilitate that.
You might find yourself asking why ‘how work gets done,’ and ‘how we facilitate employees to harness their attention are so important to business’? Tune in next week for the next blog in the series, “The business case for attention management” from guest blogger Tony Crabbe.
References:
1. Nick Atkin (2012) 40% of staff time is wasted on reading internal emails. The Guardian, Dec 17th
2. Rob Cross, Reb Rebele and Adam Grant (2016) Collaborative overload. Harvard Business Review Jan – Feb
3. Teresa Amabile (2011) The power of small wins. HBR Article
4. Microsoft and London Business School (2019), Work Reworked
5. M. Csikszentmihalyi, Creativity: Flow and the Psychology of Discovery and Invention. New York: Harper Perennials, 1997
BIOS
Emma Stephen
Emma a Customer Success Manager at Microsoft and is passionate about bringing the human element into the workplace. She believes technology both enables change and can catalyze wider change efforts if introduced in the right way. Emma is based in Zurich and currently studying for her Masters in Applied Positive Psychology and Coaching Psychology with a hope to leverage this in the organizational context.
Claudia van der Velden
Claudia a Customer Success Manager at Microsoft and enjoys exploring organizational cultures from an eco-system perspective. In a complex puzzle where all is interconnected, small changes can have a large impact. She believes in the importance of considering all elements for the eco-system to thrive, stay well balanced, and perhaps most importantly, letting go of control and trusting the natural course to find its way. Claudia is based in the Netherlands and studies for her Masters in Applied Psychology, Leadership Development.
Tony Crabbe
Tony Crabbe is a Business Psychologist who supports Microsoft on global projects as well as a number of other multinationals. As a psychologist he focuses on how people think, feel and behave at work. Whether working with leaders, teams or organizations, at its core his work is all about harnessing attention to create behavioral change.
His first book, the international best-seller ’Busy’ was published around the world and translated to thirteen languages. In 2016 it was listed as being in the top 3 leadership books, globally. His new book, ‘Busy@Home’ explores how to thrive through the uncertainties and challenges of Covid; and move positively into the hybrid world.
Tony is a regular media commentator around the world, as well as appearances on RTL, the BBC and the Oprah Winfrey Network.
by Contributed | Oct 5, 2020 | Uncategorized
This article is contributed. See the original author and article here.
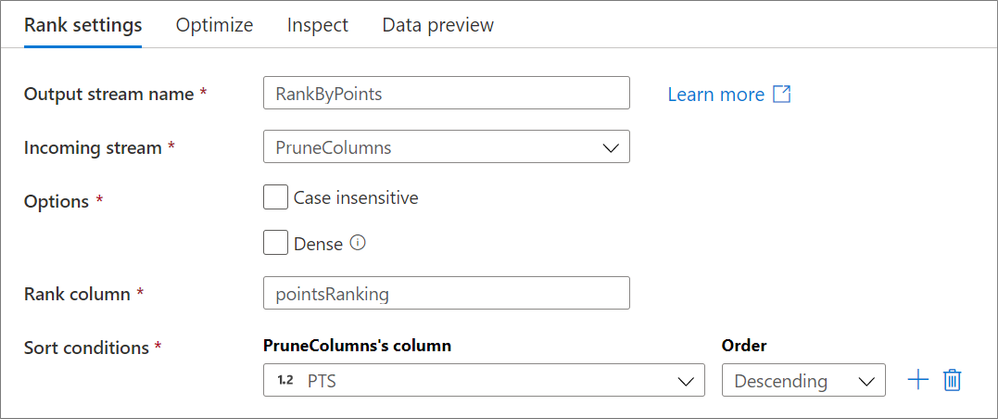
This week in Azure Data Factory, mapping data flow is getting two new features!
The rank transformation is a new schema modifier data flow transformation that allows you to generate an order ranking based upon different sort conditions. Choose whether or not you wish for the sorting to be case sensitive or if you want a dense rank! Learn more from our rank transformation documentation.

When running the above configuration on basketball data provided by basketball-reference.com on the 2019 NBA season, the following “pointsRanking” column is generated:

The find() function takes is a new function takes in an array and a filter condition and returns the first value that satisfies that condition.
For example, say you have an integer array [10,20,30] and want to find the first value that is greater than 10. In mapping data flows, you can enter find([10, 20, 30], #item > 10) and the output would be 20.
For more information, see the mapping data flow expression function reference.
by Contributed | Oct 5, 2020 | Uncategorized
This article is contributed. See the original author and article here.
The Access team has implemented a new data type: Date & Time Extended, which enhances syntax compatibility with SQL server, and increases the accuracy and level of detail in records that include dates and times. This investment aligns with our broader goal of building Access apps on top of data that can be stored in the cloud.
See attributes:
|
Attribute
|
Date & Time
|
Date & Time Extended
|
|
Minimum Value
|
100-01-01 00:00:00
|
0001-01-01 00:00:00
|
|
Maximum Value
|
9999-12-31 23:59:59.999
|
9999-12-31 23:59:59.9999999
|
|
Accuracy
|
0.001 seconds
|
1 nanosecond
|
|
Size
|
Double-precision floating point
|
Encoded string of 42 bytes
|
As indicated in the table above, this new data type has a larger date range and greater fractional precision than the existing Date & Time data type in Access. However, Access’s current Date & Time data type will continue to operate as-is; we will not remove it.
SQL Compatibility
Our new Date & Time Extended type is compatible with SQL’s DateTime2 type; therefore, when you import or link to a SQL Server table, you can map the Access Date & Time Extended field to SQL’s Datetime2 field without losing date range or time precision.
Keep in Mind
- This supports SQL Server version 2016 and after.
- Date & Time Extended requires the use of Microsoft ODBC Driver for SQL Server 11 or later. We recommend using Microsoft ODBC Driver 13.1 for SQL Server.
Backward Compatibility
The Date/Time Extended data type is supported in Microsoft Access 365 but is not compatible with non-subscription (perpetual) versions of Microsoft Access. As a result, if the data type is implemented within a local Access table and that Access database is shared with a non-subscription version of Access, you will not be able to open the database in your non-subscription version.
Expression Support
You can use a number of expressions on our data type, including DateAdd, DateDiff, and more (see full list of expressions here).
For more advanced developers, you can also leverage SQL Aggregate Functions and expressions. For example, you can use LoggedDateTime as a field with the Date/Time Extended data type:
|
Task
|
Example
|
Result
|
|
Find the minimum value
|
Min(LoggedDateTime)
|
The earliest date and time within the range
|
|
Extract the month
|
Month(LoggedDateTime)
|
The month name, such as January
|
|
Add one day
|
[LoggedDateTime]+1
|
Tuesday would become Wednesday
|
Using the Date/Time Extended data type as a string in VBA
As of today, you cannot perform calculations on the data type in VBA code, however you can use the new data type in VBA as text (string). The following VBA example uses Data Access Object methods to display, enter, and evaluate the Date/Time Extended data type based on the table below.
|
ID
|
DTEData
|
DTData
|
|
1
|
1/1/2 1:01:03.1234567 AM
|
1/1/2001
|
Table name: DTETable
ID data type: Autonumber
DTEData data type: Date/Time Extended
DTData data type: Date/Time
If you’d like to reference the type in VBA code, please be aware that expressions on the type are not supported, given that the data will be casted as a text. However, performing calculations of the new type in VBA code is an investment that the Access team is planning for at a later date.
Formatting
All formats for Date/Time are supported for Date/Time Extended.
|
Format
|
Description
|
Example
|
|
General Date
|
(Default) Displays date values as numbers and time values as hours, minutes, and seconds followed by AM or PM.
|
06/30/2018 10:10:42.1234567 AM
|
|
Long Date
|
Displays only date values, as specified by the Long Date format in your Windows regional settings.
|
Monday, August 27, 2018
|
|
Medium Date
|
Displays the date as dd/mmm/yy, but uses the date separator specified in your Windows regional settings.
|
27/Aug/18
27-Aug-18
|
|
Short Date
|
Displays date values, as specified by the Short Date format in your Windows regional settings.
|
8/27/2018
8-27-2018
|
|
Long Time
|
Displays hours, minutes, and seconds followed by AM or PM. Access uses the separator specified in the Time setting in your Windows regional settings.
|
10:10:42.1234567 AM
|
|
Medium Time
|
Displays hours and minutes followed by AM or PM. Access uses the separator specified in the Time setting in your Windows regional settings.
|
10:10.1234567 AM
|
|
Short Time
|
Displays only hours and minutes. Access uses the separator specified in the Time setting in your Windows regional settings.
|
10:10.1234567
|
For more information, see Using the Date/Time Extended data type.
On behalf of the Access team, we’d appreciate your feedback, and we hope you enjoy this new feature! :smiling_face_with_smiling_eyes:
by Contributed | Oct 5, 2020 | Uncategorized
This article is contributed. See the original author and article here.
Continuing our hybrid migration blog post series (see part 1 here and part 2 here) we arrived at troubleshooting failed migrations.
A ‘failed migration’ is when the status of the move request shows as ‘failed’, and we have one or more failures logged in the move report. The move is stopped and needs the administrator’s attention to investigate the reason of failure. Sometimes, resuming of the move can help, especially if there were some temporary issues on the Exchange Online side that were addressed.
Before getting into troubleshooting, I recommend you check the following ‘Minimum Requirements’; those are the things we know will break migrations (and we see them do so):
-
MRSProxy needs to be enabled and running on Exchange on-premises.
- Exchange Online requires Negotiate (NTLM) authentication for MRSProxy.
- Make sure your migration users are synchronized with AADconnect tool and corresponding mail users are provisioned correctly on the Exchange Online side for corresponding on-premises mailboxes (ExchangeGuid present, alias, recipient type correct, accepted domains for the email addresses and secondary smtp address user@tenant.mail.onmicrosoft.com).
- Maximum storage quota in Exchange Online for both primary and archive mailbox is 100GB each. Even if you have auto-expanding enabled in Exchange Online, as of this writing the maximum mailbox size for migration of main archive is still 100GB – reference here.
- Maximum number of items per regular mailbox folder is 1 million and 3 million for the dumpster, reference here
- On-premises migration admin needs to have the minimum required permissions and valid credentials.
- You cannot offboard to Exchange 2010 an Exchange Online Mailbox that has any hold other than Litigation Hold. This is because Exchange 2010 doesn’t know about in-place hold which was introduced in Exchange 2013 or about organization-wide holds in Office 365. More info on the types of holds can be found here.
- You cannot offboard an Exchange Online archive mailbox which has auto-expanding enabled in Office 365
- You cannot offboard a mailbox and a primary archive to Exchange 2007
- You cannot offboard a remote mailbox without ExchangeGuid set on it
- Any network load-balancing for Exchange 2010 MRSProxy servers requires IP persistence (affinity).
-
SSL offloading is not supported for MRSProxy.
- For classic hybrid – where we require inbound connectivity from Exchange Online to on-premises Exchange, allow all Exchange Online IP addresses to connect to on-premises EWS / Autodiscover.
- For classic hybrid, pre-authentication for EWS / Autodiscover virtual directories is not supported.
- For classic hybrid, a valid 3rd party certificate is required for EWS / IIS. Also see this.
-
TLS1.2 should be enabled in the on-premises infrastructure.
- If you have an Exchange organization with Exchange 2013/2010 in coexistence with legacy Exchange servers (Exchange 2010), then you need to point the MRSproxy namespace to the newer Exchange version in your environment. This is required because, for example, Exchange 2010 cannot proxy to Exchange 2016 in order to move an Exchange 2016 mailbox to or from Exchange Online through an Exchange 2010 MRSProxy endpoint.
We also recommend that you bypass the network devices such as firewalls and reverse proxies during migrations in order to reduce source network latency and avoid frequent communication transient errors that would result in mailbox locks and slow migrations.
Often when troubleshooting Office 365 migrations, the Exchange Admin Center GUI is helpful and quite verbose regarding the reason of failure, and it many times includes a link to the corresponding documentation page for more information on specific issue.
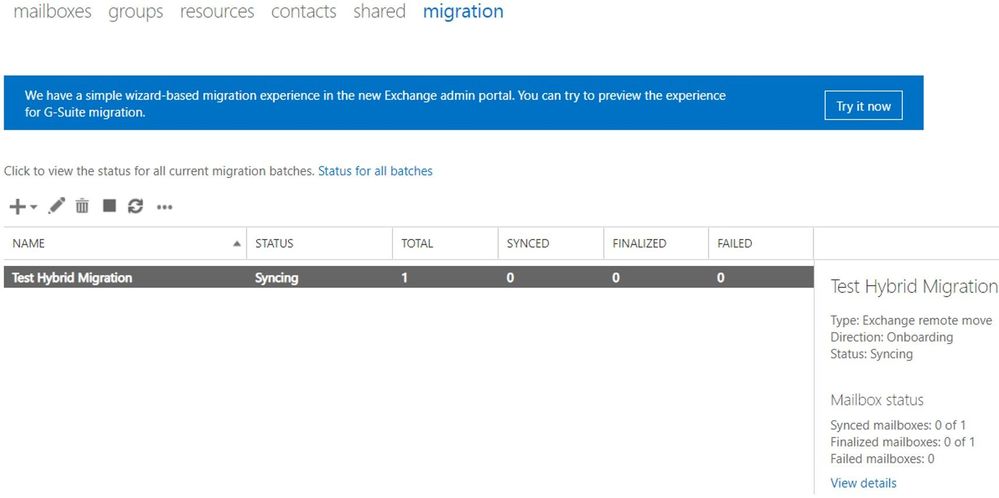
Let me briefly show you some useful info that we can see in the (Classic) Exchange Admin Center. As a note, at the time of writing this article, the New Exchange Admin Center doesn’t currently show all of this information.

The following can be seen in the above screenshot:
- We have one migration batch called “Test Hybrid Migration” of type Exchange Remote Move
- Direction of the move is Onboarding (from on-premises to the cloud)
- The current status Syncing (things are going well so far)
- There is only one migration user in the batch (looking at the Total column)
- The user is not Synced (hasn’t reached the Incremental Sync at 95%), not Finalized (hasn’t reached the 100% completion) and not Failed (didn’t encounter a fatal failure)
After clicking on View details, we also see:
- Who created the batch (crystal@mytenant.onmicrosoft.com),
- When it was created and started (New-MigrationBatch -AutoStart),
- When it should complete (after the initial sync will be done)
- There is no last synced time because the status is syncing and no initial sync has been done
- Also, the associated endpoint is the name of my migration endpoint (Get-MigrationEndpoint) through which I am running the batch.

After a little while, the user failed because of the ExchangeGuid missing on the mail user object in Exchange Online:

In such situation, the migration service failed to inject the move request because the user failed validation. This means that we don’t have a move request for this user and therefore will have no move report.
If you were to click on ‘Download the report for this user’, you would get an empty .txt file.
Let me show you how this failure looks like in PowerShell and what objects are created and available for us to check there.
With Get-MigrationBatch command, we can see the name of the batch, the status, the type and how many users are contained in the batch:

To see all properties, run Get-MigrationBatch |FL.
Some other attributes values that you saw in the Exchange Admin Center GUI, for this batch were:
CreationDateTime : 6/1/2020 8:23:35 AM
StartDateTime : 6/1/2020 8:23:34 AM
LastSyncedDateTime :
SubmittedByUser : crystal@<mytenant>.onmicrosoft.com
BatchDirection : Onboarding
SourceEndpoint : Hybrid Exchange Miry
If I had multiple batches and I was interested in seeing this particular one, I would run: Get-MigrationBatch “Test Hybrid Migration” or if I wanted to see all batches that are failed, I would run: Get-MigrationBatch -Status SyncedWithErrors
Going further with PowerShell, if I want to see the migration user contained in that batch, I would do it like this: Get-MigrationUser -BatchId “Test Hybrid Migration”. To see all the details on the migration user, I would again append |FL

This error is self-explanatory, ExchangeGuid is missing on the user and I can also see it with Get-MailUser command for this migration user:
 From the Get-MigrationUser output, I can also see the RequestGuid is empty, so this also tells me that there is no move request / move report for this migration user. I can run Get-MoveRequest <user> or Get-MigrationUser -BatchId “Test Hybrid Migration” | Get-MoveRequest to confirm this.

In cases where the error message on the migration user is not so obvious and you still don’t have a move request created for it, you can check Get-MigrationUserStatistics with DiagnosticInfo verbose switch: Get-MigrationUserStatistics <user identity> -DiagnosticInfo verbose |FL and see if any more details found.
I will now go through some more command examples if you want to play around and check simple or more complicated stuff in PowerShell. Also, some things can be only checked from PowerShell and if you have a move request created and this is failed or is progressing slow, you can see more on analyzing move reports with PowerShell in later part of this blog series.
To get an overview of migration statistics:
Get-MigrationStatistics

To get all migration users, their status and corresponding batches:
Get-MigrationUser

To get a specific migration user:
Get-MigrationUser <email address>

To check the error on a specific migration user:
Get-MigrationUser <email address> |FL errorsummary
Get-MigrationUser <email address> |FL

To get all failed migration users:
Get-MigrationUser -Status Failed

To get all failed migration users and their errors:
Get-MigrationUser -Status Failed | FT identity , errorsummary
Get-MigrationUser -Status Failed | FL identity , errorsummary

To get migration users from a particular batch:
Get-MigrationUser -Batch “Batch Name”

To get all migration batches:
Get-MigrationBatch

To get a particular batch:
Get-MigrationBatch “Batch Name”

Checking move requests (specific for hybrid remote moves)
To get all existing move requests:
Get-MoveRequest

To get move request statistics for a specific move request:
Get-MoveRequestStatistics “User”

Know that there are 2 main types of failures:
- Transient Exceptions, example DataExportTransientException
- Permanent Exceptions, example StoragePermanentException
Note: For a move request to be in a Failed state, we would need to have a permanent failure. Too many transient failures (usually more than 60) will eventually cause a permanent failure. Too many transient failures can also slow down your migration considerably.
To see the failures (transient or permanent), you would run commands similar to these or export the statistics to an XML file (discussed in the later part of this blog series)
To store the move report in a variable:
$stats = Get-MoveRequestStatistics “Affected User” -IncludeReport
To check all failures and their count:
$stats.report.Failures | group failuretype | Format-Table -AutoSize

To check full details of the last failure:
$stats.report.Failures[-1]

To check the last 2 failures:
$stats.Report.Failures | select -last 2
To check the first failure:
$stats.report.Failures[0]
To check the first 3 failures:
$stats.Report.Failures | select -first 3
If there are a lot of failures, you can create a list of the failures with the PowerShell Index number associated with each failure by running the following:
$i=0;$stats.report.Failures | % { $_ | Select-Object @{name=”index”;expression={$i}},timestamp,failurecode,failuretype,failureside;$i++} | ft

Using this output, you can then easily identify the index number you want to focus on by enclosing the failure index number in [brackets], example:
$stats.report.Failures[4]

To get failed move requests:
Get-MoveRequest -MoveStatus Failed

Most frequent failures
Here is a list of most frequently seen failures in hybrid migrations (and when I say ‘most frequent’ I mean ‘most frequent’ issues that we see in support, not that you will see those errors in every migration). Note that not all are permanent failures, meaning not all these will cause your migrations to fail.
- “User is already being moved” – reference here
- “You can’t use the domain because it’s not an accepted domain for your organization” – reference here
- “Target mailbox doesn’t have an smtp proxy matching ‘.mail.onmicrosoft.com’” – reference here
- “MigrationPermanentException: Cannot find a recipient that has mailbox GUID” – reference here. Note that another possible scenario for this error is when we cannot find a ComponentShared Mailbox by its GUID on the Exchange Online side. A ComponentShared mailbox is used to host data from other Office 365 workloads like Teams, OneDrive for Business and SharePoint. You would check (in Exchange Online PowerShell) these mailbox GUIDs with the command: Get-MailboxLocation -User <SMTP>. If the mailbox GUID in the error belongs to a component shared mailbox, please log a case with Microsoft Support.
- “You must specify the PrimaryOnly parameter” – reference here
- “The remote server returned an Error 404” or “HTTP request has exceeded the allotted timeout” – reference here
- “The remote server returned an error: (403) Forbidden” – reference here
- “Access is denied” – reference here
- “Couldn’t switch the mailbox into Sync Source mode” – reference here
- “CommunicationErrorTransientException – The remote endpoint no longer recognizes this sequence. This is most likely due to an abort on the remote endpoint. The value of wsrm:Identifier is not a known Sequence identifier. The reliable session was faulted.” – reference here
- “The server was unable to process the request due to an internal error. For more information about the error, either turn on IncludeExceptionDetailInFaults …” – references here and here
- “TooManyBadItemsPermanentException” – Failed to find a principal from the source forest or target forest – references here and here
- “The data consistency score (Investigate) for this request is too low” – reference here. Note that we will have more on Data Consistency Score later in the blog post series.
- “Exception has been thrown by the target of an invocation.” – reference here
- “Transient error CommunicationErrorTransientException has occurred. The system will retry” – reference here
- “The Mailbox ‘<username>@contoso.com’ isn’t enabled for unified messaging.” – reference here
- “Failed to convert the source mailbox ‘Primary (00000000-0000-0000-0000-000000000000)’ to mail-enabled user after the move.” or “Unable to update Active Directory information for the source mailbox at the end of the move.” – reference here
- “Target user <User> already has a primary mailbox”. Note: pay special attention to the scenario, it matters if you get this error in onboarding (move to Exchange Online) or offboarding (move from Exchange Online). For onboarding moves, please see this, and for offboarding see this. For onboarding, follow this. Note on scenario 1 step 7 in that article: it is not supported to remote restore a disconnected mailbox from Exchange 2010 on-premises source server version, it needs to be minimum Exchange 2013 version.
- “StalledDueTo_Target*” when you move mailboxes to 0365 Exchange Online – reference here. More on this when we will be discussing slow migrations in next part of this blog post series.
- “MapiExceptionTooComplex: Unable to query table rows. (hr=0x80040117, ec=-2147221225)” – reference here.
- “Mailbox Replication Proxy Service can’t process this request because it has reached the maximum number of active MRS connections allowed” – reference here.
A few more troubleshooting tips
MoveOptions Parameter
Often mailbox moves fail because of corrupt items or elements in a mailbox. These mailbox move failures can be avoided by excluding those (often corrupt) elements from being migrated.
The MoveOptions parameter (previously known as the SkipMoving parameter which is being deprecated) can be added to the onboard or offboard request from PowerShell with the values of:
‘SkipFolderRules, SkipFolderACLs, SkipFolderPromotedProperties, SkipFolderViews, SkipFolderRestrictions, SkipContentVerification, SkipPerObjectIndex’.
This will tell the migration to skip these elements when performing the move. We recommend you perform these skips under the guidance of Microsoft Support.
You can review a move report from a previously failed move attempt and get some clues on what exclusions you should consider making.
For example, this failure below means that we have a search folder on the source mailbox where the query (restriction) is too complex and cannot be created on the target.

Sometimes the failure identifies the actual problematic source folder so you can look more at the DataContext content. You can then either delete the query on the source mailbox or just skip the migration of the queries (search folders) so that you can complete the migration:
Set-MoveRequest user@contoso.com -MoveOptions @{add=”SkipFolderRestrictions”}
Mailbox Integrity checks
If you migrate a mailbox (primary mailbox or archive) to Exchange Online and the size is bigger than 10GB, this is considered a large mailbox and the MRS will perform an ISinteg task to ensure integrity of the mailbox that is being moved.
If you suspect that your move is stuck on ISinteg task, you can check the move report in EXO PowerShell and search for all strings containing isinteg keyword:
$stats = Get-MoveRequestStatistics <user> -IncludeReport
$stats.report.Entries | where { [string] $_ -like “*IsInteg*” } | % {[string] $_}
If that shows completed, this means there are no issues. Otherwise, you can try running the same command MRS is using on your Exchange on-premises environment, in EMS:
New-MailboxRepairRequest <migration user identity> -CorruptionType MessageId
For more info on the New-MailboxRepairRequest cmdlet, you can check here.
Depending on the Exchange Server Version you can check then the status of the repair request.
For Exchange 2013 and later, use this cmdlet:
Get-MailboxRepairRequest -Mailbox <user identity>
For Exchange 2010 version, you would need to look in Event Viewer for the following events:
- Event 10047 when the repair request is started
- Event 10062 when a corruption is detected and repaired
- Event 10048 when the repair completes successfully
You can also try to move a mailbox locally from one server to another, remove the local move request and then retry migration of the mailbox to Exchange Online.
Testing MRS service
One utility that can be used for troubleshooting the mailbox move operation is the Test-MRSHealth cmdlet. One thing to realize is that it cannot be tested from Office 365 side since the cmdlet is not available to a tenant administrators. However, at least from my experience, I have never encountered a situation where MRS service would be stopped on the Office 365 side (and was not automatically recovered within seconds). We can use this utility to test the mailbox replication service health on-premises. Also on-premises, you can check if the MRSProxy is enabled on the EWS virtual directories and if EWS application pool is started in IIS manager.
Event Viewer Diagnostic logging
When performing a mailbox move, you can turn up diagnostic logging on the mailbox replication service or other component like asp.net to get better, more granular events in the event log on-premises.
In most situations, you don’t actually get useful events in the on-premises event viewer when troubleshooting an Exchange Online remote move due to the fact that those events would be written in the datacenter. The default event logging can provide you with enough information on what the issue would be, take for example event 1309 from ASP.NET where the description is self-explanatory: MRSproxy service being disabled.
If you do find a relevant event log for the affected Exchange Online remote move in the event viewer and this is related to MRS, you can turn up diagnostic logging for the MRS service with the following cmdlet:
Get-EventLogLevel ‘MSExchange Mailbox Replication*’ | Set-EventLogLevel -Level Expert
Then reproduce the issue or wait for it to be reproduced again and then check in the Event Viewer logs for any relevant events.
Tracking incoming failed requests from EXO
Especially useful in communication or timeout failures, there are 3 main logs to track the MRS requests on the Exchange on-premises servers in order for you to understand if an MRS Exchange Online request reached your Exchange server, or not. These often help us narrow down the issue to a most likely network device (in front of Exchange Server) that could terminate the connection and not pass it to Exchange Servers. Or if the request reaches the Exchange servers, we can see where this is stuck and get a better understanding on what’s the problem on the Exchange server on-premises.
Exchange on-premises server logs to track an EXO Incoming MRS request:
- HTTPerr logs: %SystemRoot%System32LogFilesHTTPERR
- IIS logs for Default Web Site (DWS): %SystemDrive%inetpublogsLogFilesW3SVC1 – UTC Timezone
The name of the IIS logs contains the date of the log, for example u_ex190930.log is from Sept 30, 2019.
- HTTPProxy logs for EWS (available in Exchange 2013 or later): %ExchangeInstallPath%LoggingHttpProxyEws
The name of the HTTPProxy logs contains the date and hour starting to log, for example HttpProxy_2019093014-10.LOG (10th log from Sept 30, 2019, starting hour 14:00 UTC)
Few things to mention here:
- Always correlate the timestamp of a failure HH:MM:SS in move report with these logs (IIS and HTTPProxy are in UTC timezone)
- A failed request will never have 200 Status code (if you see it with 200 in logs, it means you are not looking at the failed one). Note that for a request that times out, you might still be able to see it here with 200 status code and possibly a higher time-taken
- If you see the failed request in HTTPerr logs, this won’t probably be present in IIS logs or HTTPProxy logs – it is stuck in front of IIS, check the particular reason in HTTPerr logs and check for IIS misconfiguration
- If you see the failed requests in IIS logs , then you can do IIS failed request tracing on that status code and check further the detailed error in HttpProxy logs
This concludes Part 3 of these blog series. We will be talking about troubleshooting slow migrations next!
I would like to thank the following persons for contributing to this blog and for their time and patience to read this: Angus Leeming, William Rall, Brad Hughes, Chris Boonham, Ben Winzenz, Cristian Dimofte, Nicu Simion, Nino Bilic, Timothy Heeney
Mirela Buruiana

Recent Comments