by Contributed | Oct 7, 2020 | Technology
This article is contributed. See the original author and article here.
October is Dyslexia Awareness Month, and also the 75th anniversary of National Disability Employment Awareness Month (NDEAM.) To mark the month of October, Microsoft has launched Dyslexia DecodEd, a 3-part webinar series with the goal to put the right information, tools and resources required to support students with dyslexia into action in every classroom. Hear from experts, advocates, and leaders from various organizations globally on their perspectives on supporting students and building teacher capacity. Register for Dyslexia Decoded today!
The Immersive Reader was originally inspired by focusing on students with dyslexia, and we used the latest science and research around reading while using inclusive design principles to empower students and workers of all abilities. Today, more than 23 million people every month are using the Immersive Reader, improving their reading and writing comprehension. To build on Dyslexia Awareness month and National Disability Employment Awareness Month, we are excited to announce a set up updates that bring this powerful literacy tool to even more places!
Immersive Reader is coming to more Microsoft apps
PowerPoint gets more inclusive
One of the top requests we’ve heard from students, parents and educators has been to add the Immersive Reader to PowerPoint. It has also been a top UserVoice request for the PowerPoint team. Today we are thrilled to announce that we are adding the Immersive Reader to PowerPoint in two areas.
You’ll be able to select any text on a PowerPoint slide and choose the Immersive Reader (see the demo below). The other area was inspired directly by Molly Paris. Molly and her mother visited the Microsoft campus last year and Molly told us how helpful it would be for her to be able to access the Immersive Reader in the Notes area of PowerPoint. We’re happy to announce to Molly and everyone else that we will be adding the Immersive Reader access on the Notes section of every slide as well. This will roll out later this year.

OneDrive adding the Immersive Reader for documents
OneDrive is a great place to store and access documents and other content. To enable better access to content, we’re adding the Immersive Reader directly into the OneDrive menus to launch it on Word documents and text files. This will roll out later this year.
.gif")
Forms Embedded into OneNote
OneNote has long had the ability to embed Forms on the canvas, and more recently we added the Immersive Reader for Forms. With our most recent update, students can now enable the Immersive Reader for Forms embedded into OneNote. This works for Math Quizzes in OneNote and complex equations. To access this, in the Form in OneNOte, choose the “…” menu, and then Enable Immersive Reader

New Partners Integrate Immersive Reader
- itslearning is Europe’s leading LMS provider and the learning platform is designed for teaching, because our mission is to improve education through technology. ItsLearning believes that while technology will never replace dedicated teachers, it can help great teachers transform lives.
Hope Cameron, a Social Studies teacher at Wausau East, Wisconsin has been using the Immersive Reader in her class and says “Immersive Reader has been very good for struggling readers to consume text. We’ve been working on the civil war, and I copied a long old newspaper article into an itsLearning Note, which the students then could use Immersive Reader to open. Having Immersive Reader in itslearning means fewer clicks and better availability.”
Frøydis Hamre, itsLearning Product Manager say “Immersive Reader is an addition to our platform that makes such a big difference to students who need help understanding text. It makes it so much easier for all students to understand and engage with the tasks and information given by their teachers.”
– Will Stewart, 5th grade teacher at Westwood Intermediate School in Spring Lake Park, MN

18 new Neural Text-to-Speech languages
We are always looking to broaden the languages and locales of Immersive Reader. Today we are excited to announce 18 new Neural TTS languages for the Immersive Reader. Neural Text-to-Speech is the “human sounding” read aloud voices that we’ve been rolling out for many languages.
Neural TTS has now been extended to support 18 new languages/locales. They are Bulgarian, Czech, German (Austria), German (Switzerland), Greek, English (Ireland), French (Switzerland), Hebrew, Croatian, Hungarian, Indonesian, Malay, Romanian, Slovak, Slovenian, Tamil, Telugu and Vietnamese. Chinese (Cantonese, Traditional) and HsiaoYu in Chinese (Taiwanese Mandarin). Read the blog for the new list, and explore the full list of Neural TTS languages.
In addition to these product updates, Microsoft was setup up educator training sessions throughout the month of October on how Microsoft Learning Tools can support student success in reading, writing and math. Register here.
Mike Tholfsen
Principal Product Manager
Microsoft Education
@mtholfsen
by Contributed | Oct 7, 2020 | Azure, Technology
This article is contributed. See the original author and article here.
Abstract
This is common mistake and observation. Most of the time customers ignore Load testing for their web based applications keeping too much trust on cloud scale infrastructure and services. It is good to trust on cloud scale model however not every application problem can be solved by just scaling underlying cloud infrastructure to support growing volume.
Cloud scalability should be entrusted with proper testing framework for your application and this is where “load testing” performs an important role. Load testing is really important to understand “how your application is performing under the expected load, unexpected load, sudden spiked load”.
While working with few of the big organizations in recent times I have observed “Load testing” has been made too much of a complex thing to achieve. In reality it is simple if you do it in part and test individual components of the system. Most critical part of the today’s software systems is API layer.
In this post we will see how an Open Source Tool “Vegeta” combined with power of Azure Container Instance can help you to test your individual APIs or web app.
Let’s attack!
What is Vegeta?
Vegeta is a versatile HTTP load testing tool built out of a need to drill HTTP services with a constant request rate. It can be used both as a command line utility and a library.
Source: https://github.com/tsenart/vegeta
It is written in Go language!
Vegeta seems to be quite popular and very active in OSS community. Github stars speak for itself! This tool have got stunning 15.5K github stars as of writing. That is impressive!
The usage manual is on Github and official docker image is also present here – Vegeta Docker Official Image
Why Azure Container Instance for load testing?
Most of the load testing tools I have seen uses VM based solution, or Kubernetes based solution in today’s world. Ideally load test may not be required to run 24x7x365. It is momentary to test the system and you will always want your infra to shutdown/ removed after testing is done. This is where Azure container instance fits perfectly. Below are few more benefits I see –
- When you use VM, some part of compute [cores] and memory [RAM] is still used with VM functioning [OS operations] and you don’t get full capacity of underlying VM for load testing. With container instance if you assign 1 core 2GB memory then complete capacity is used only for load testing.
- While you can automate VM shutdown/ start etc. if it is missed then cost is still incurred. Container instance is charged per second and as soon as it is terminated there is no charge. This makes very cost effective solution for incremental load testing.
Single URL testing with Vegeta and Azure Container Instance
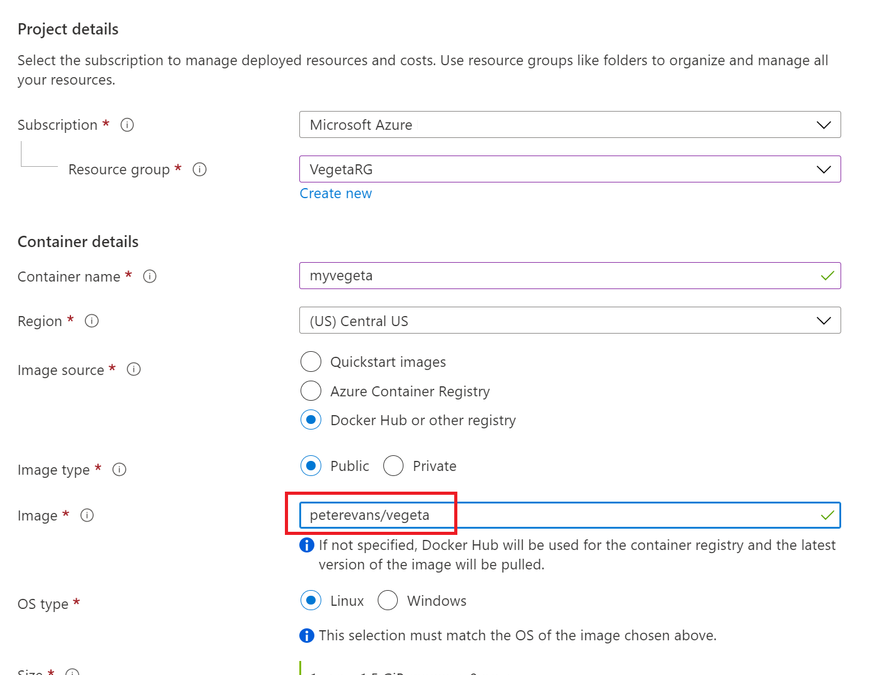
Go to Azure portal and provision the Azure container Instance. Make sure you specify the docker URL of Vegeta as sown below –
 Create Vegeta – specify vegeta docker image
Keep the default setting on networking tab and move to Advanced tab. On the advanced tab we have an option to specify first commands to execute in container. The main purpose of this option is to provide defaults to an executing container.
This is more of docker feature than container instance.
This is where we will provide below command to start the Vegeta Attack to URL of our choice.
"sh", "-c", "echo 'GET https://www.sanganakauthority.com/' | vegeta attack -duration=10s -rate=10 | tee results.bin | vegeta report"
In above command we are hitting my personal blog for continuous 10 seconds, with 10 requests per second. storing the result in results.bin file.
Go ahead and create the container instance. Refer to screenshot below for command view –
 Specify Vegeta command in advanced tab
The container is created and terminated after 10 seconds of execution. If we click on Log as directly see the output of results.bin file as shown below –
 Vegeta output on shell
Important aspect to record from this load test result is min latency as 43.351 ms and max latency recorded was 573.565.ms. The total success rate is 100%. Means all the requests that were sent for testing all of them were successful. Similarly status code is 200. This is where you can see how many request were successful and ho many of them were non 200. Also if any error is generated then error text is shown at the bottom. In our case there is no error received.
Need less to say, you are charged only for duration of 10 seconds along with CPU and memory consumed. Pretty cool!
Vegeta attack output in JSON on container instance
The above output we received in shell. Most of the time you may want to receive the output in JSON to consume into some other reporting systems. You can output the Vegeta attack in JSON as follows –
"sh", "-c", "echo 'GET https://www.sanganakauthority.com/' | vegeta attack -duration=10s -rate=10 | tee results.bin | vegeta report -type=json"
 Vegeta json output
Vegeta Attack, and authentication header on container instance
Vegeta attack can also be used to load test APIs which require an authentication token. Refer to below command that can be used with Azure container instance to load test APIS with authentication header –
"sh", "-c", "echo 'GET https://myapi.com' | vegeta attack -header "authorization: Bearer <your-token-here>" -duration=10s -rate=10 | tee results.bin | vegeta report"
Use case
You have an api hosted behind Azure API management. You want to perform load test for your Azure API Management link which required subscription key in the header. This is where we can use Authentication header based Vegeta attack as below –
"sh", "-c", "echo 'GET https://myapi.com' | vegeta attack -header " Ocp-Apim-Subscription-Key: <your-Azure API-Management-subscription-key-here>" -duration=10s -rate=10 | tee results.bin | vegeta report"
Similarly this can be used for load testing with Azure API Management configured with “Validate JWT” policy.
Conclusion
Vegeta attack with Azure Container instance is the most flexible way of load testing in my opinion. Above post just demonstrate the same. Hope you find this useful.

by Contributed | Oct 7, 2020 | Technology
This article is contributed. See the original author and article here.
 This Monday Microsoft’s Scott Murray and Jeremy Windmiller touched on some of the security highlights from Ignite focusing on a handful that are directly relevant to Healthcare and Life Sciences.
You can watch the video below as well as grab the slides used. Additionally, be sure to check out Jeremy Windmiller’s post “Microsoft Security Matters – October 2020 (Ignite Wrap-up).”
Resources:
Thanks for visiting – Michael Gannotti LinkedIn | Twitter
 Michael Gannotti
by Contributed | Oct 7, 2020 | Technology
This article is contributed. See the original author and article here.
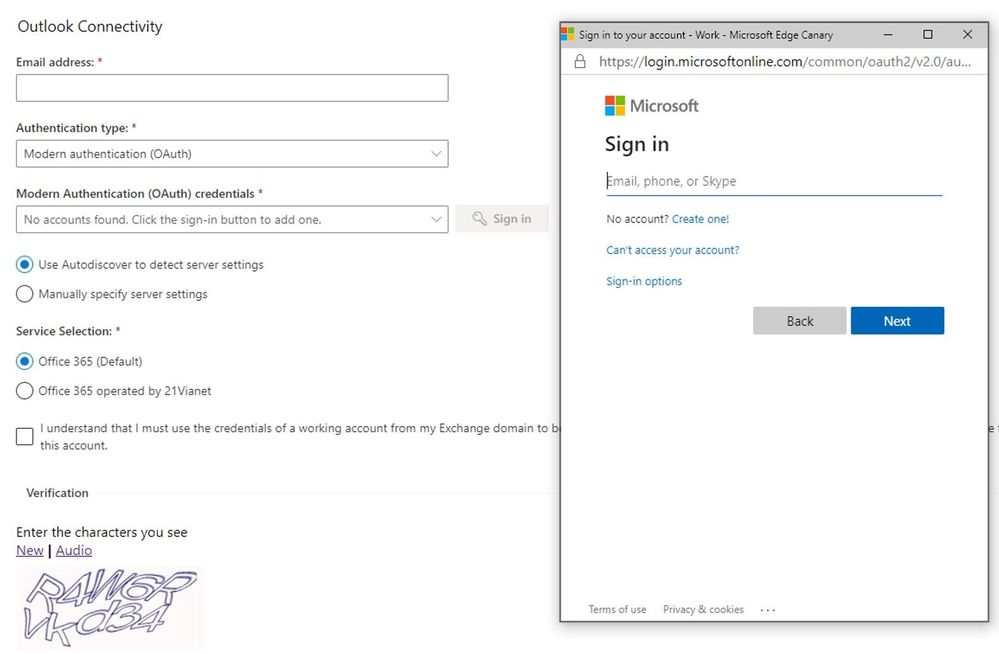
Since December last year, we’ve been making a lot of investment into the Microsoft Remote Connectivity Analyzer site. If you’ve used the website in the past couple of months, you probably saw the website has had a face lift with a modern UI for all pages as well as that we added the ability to switch languages/locales at any point during your connectivity testing. While these are exciting changes, we have been quietly working away on a huge functionality improvement. We’re thrilled to announce that our Office 365 tests now have modern authentication capabilities!
In the past, customers would have to run tests by temporarily exempting an account from modern authentication (if it was possible) or simply had to engage Microsoft support since there wasn’t a good workaround for connectivity testing.
For the O365 tests, Modern auth will be selected by default, but you can opt to use basic auth wherever needed:
 The two tests that still don’t support modern auth are POP and IMAP tests. In the coming months, we intend to light up modern auth capabilities for more tests so stay tuned for more Microsoft Remote Connectivity Analyzer updates.
Let us know in the comments what tests and features you’d like to see in the future releases!
Migration Team
by Contributed | Oct 7, 2020 | Technology
This article is contributed. See the original author and article here.
Hi Microsoft Teams Community,
Today I’m excited to introduce a new video series we’re calling Kitchen Table Admin. This video series is intended to help M365 IT Pros and Admins solve common configuration and troubleshooting tasks in Microsoft Teams.
While our production is low-fi – think garage band with a 4-track, not Abbey Road Studios – we hope the content is useful and valuable to you all. Why Kitchen Table Admin? Well, like most of you out there, we at Microsoft find ourselves working from home, or anywhere we can safely access a reliable Internet connection. In my own case, that means working from my kitchen a lot. I’m sure you can relate.
In this first ever video in what we hope to be a long series, I’m going to show you how to use Self Help Diagnostics that my team makes available to you in your Admin Portal to troubleshoot a basic setup of Microsoft Teams Guest Access. I cover the top 3 things we see in support from IT Admins when setting up this very popular feature.
Please check out our short video and let us know what you think in the comments. The demo portion starts at 0:57 if you want to skip the intro. What would you like to see covered in a future video?
by Contributed | Oct 7, 2020 | Technology
This article is contributed. See the original author and article here.
When it comes to mail routing, every organization has different needs
Across Office 365, we see various mail routing configurations, and we know that one size does not fit all. Many customers still route email through their on-premises environment before sending it to Office 365, and others leverage a third-party solution as their first hop. This can be for a variety of reasons, like compliance regulations, or to support legacy on-premises infrastructure. We understand the need to create hybrid mail routing configurations, and regardless of where these messages have been when they arrive at Office 365, our fundamental goal is to ensure that your organization and your users stay secure.
Introducing Enhanced Filtering for Connectors
Based on feedback from our customers, we’ve introduced capabilities to support additional configurations for mail flow. Enhanced Filtering for Connectors is designed to be used in routing scenarios where your MX record does not point to Office 365.
Both Exchange Online Protection and Microsoft Defender for Office 365 provide capabilities that protect your users from impersonation attacks while ensuring that legitimate senders don’t get caught in our spam or phishing filters. Enhanced Filtering preserves authentication signals that were previously lost, which improves the accuracy for our filtering stack, including our heuristic clustering, anti-spoofing, and anti-phishing machine learning models when used in complex or hybrid routing scenarios. These capabilities make the detection of business email compromise attacks more effective, and equip your security teams with more information to more effectively hunt and investigate threats.
Take advantage of additional capabilities today
Getting started with Enhanced Filtering for Connectors is easy and only takes a couple clicks in the Security and Compliance Center. Once enabled, you’ll be able to get the most out of the included Anti-Phish and Anti-Spam protection, while reducing false-positives caused by authentication failures, and taking advantage of signals that were previously lost while your is organization is running in a hybrid mail routing flow. We’ve documented more details to help you get started with enhanced filtering here. Once configured, you can measure effectiveness by checking out the Threat Protection Status report or the Spam Detections report in the Security & Compliance center in Office 365.
Why is email authentication important?
When email is forwarded to Office 365 via a connector from a third-party, Office 365 sees that the third-party filter is the source of the message. This breaks explicit authentication signals such as SPF, DKIM, and DMARC, which allow Office 365 verify the reputation of the sending domain. Without explicit authentication, Office 365 relies on implicit authentication to protect customers from spoofing. This isn’t a limitation of Office 365; it’s simply how SMTP works. You can learn more about explicit and implicit email authentication here.
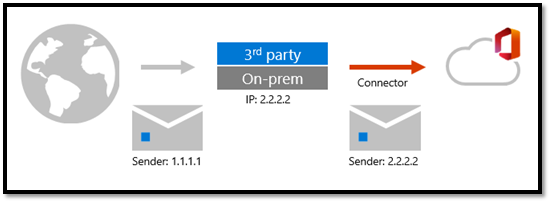
As shown here in Figure 1, the email message adopts the sending IP of the third-party filter, arriving at Office 365 with a different sending IP address than it arrived at the third-party with.
 Figure 1: Mailflow with third-party filtering
As shown here in Figure 2, with Enhanced Filtering enabled, Office 365 can “see” the original sending IP address, through a process sometimes referred to as “skip listing”.
 Figure 2: Mailflow with Enhanced Filtering
Enable Enhanced Filtering for Connectors today to get the most out of Office 365 security!
by Contributed | Oct 7, 2020 | Uncategorized
This article is contributed. See the original author and article here.

In this weekly discussion of latest news and topics around Microsoft 365, hosts – Vesa Juvonen (Microsoft) | @vesajuvonen, Waldek Mastykarz (Microsoft) | @waldekm, are joined by Christina Wheeler | @cwheeler76, a long time Office Apps and Services MVP and principal solutions architect for US-based Canviz.
The discussion ranged from avoiding work burn-out and server management (go cloud!) to architecting solutions that draw upon capabilities across Microsoft 365 to Drone FAA 107 certification and of course many laughs between topics.
This episode was recorded on Friday, October 2, 2020.
Did we miss your article? Please use #PnPWeekly hashtag in the Twitter for letting us know the content which you have created.
As always, if you need help on an issue, want to share a discovery, or just want to say: “Job well done”, please reach out to Vesa, to Waldek or to your PnP Community.
Sharing is caring!
by Contributed | Oct 7, 2020 | Azure, Technology, Uncategorized
This article is contributed. See the original author and article here.
Together with the Azure Stack Hub team, we are starting a journey to explore the ways our customers and partners use, deploy, manage, and build solutions on the Azure Stack Hub platform. Together with the Tiberiu Radu (Azure Stack Hub PM @rctibi), we created a new Azure Stack Hub Partner solution video series to show how our customers and partners use Azure Stack Hub in their Hybrid Cloud environment. In this series, as we will meet customers that are deploying Azure Stack Hub for their own internal departments, partners that run managed services on behalf of their customers, and a wide range of in-between as we look at how our various partners are using Azure Stack Hub to bring the power of the cloud on-premises.
Umbrellar is a cloud-based company focused on empowering its customers and resellers in making the most of the Azure and Azure Stack Hub clouds and create value to their end-customers in a multi-tenanted environment. Join the Umbrellar team as we explore how they create value to their customers using Azure and Azure Stack Hub
Links mentioned through the video:
I hope this video was helpful and you enjoyed watching it. If you have any questions, feel free to leave a comment below. If you want to learn more about the Microsoft Azure Stack portfolio, check out my blog post.
by Contributed | Oct 6, 2020 | Azure, Technology, Uncategorized
This article is contributed. See the original author and article here.
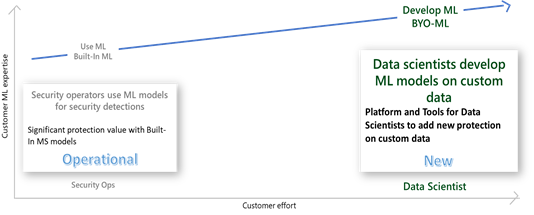
Azure Sentinel, among the most advanced SIEM solutions, is deeply infused with Machine Learning (ML), providing unparalleled richness of built-in, advanced ML analytics, covering the prevalent threats and data types connected to the SIEM. Now, the same richness of capabilities is made available to the data scientists in organizations, extending the reach to unique customer threats, providing Azure Sentinel customers the ability to build their own ML models.
Built-in analysis using machine learning, like ‘Fusion’ ML detections and entity enrichment, is already available in Azure Sentinel, identifying advanced threats on well-known data feeds, while maintaining a low level of alert fatigue. See this blog to learn more about Fusion.
Many organizations need to extend the advanced analysis capability to the myriad of threats applicable to their organization or industry vertical. Azure Sentinel makes it easier for data scientists in these organizations to unlock these insights with a BYO-ML framework.

Azure Sentinel provides a threat detection framework for custom ML, including platform, tools, and templates, to accelerate development of models for custom business analysis, leveraging Microsoft’s shared algorithms and best practices.
Azure Sentinel integrates its bring-your-own-ML feature with familiar development environments, tools, and programming languages, like Azure Databricks, Spark, Jupyter Notebooks and Python, to reduce the learning curve and development time to the minimum. The framework comes with cloud scale data pipelines, seamlessly integrating the ML development and runtime environment with Azure Sentinel service and user experience, significantly reducing the time to value from custom ML analysis.
Using the BYO-ML framework, customers can:
- Train an ML algorithm shared by MS or community with your own data, to customize the ML model to your environment
- Modify an ML algorithm and/ or features to customize the model, adapting it to your organization
- Create new model from scratch, or import existing models, leveraging Azure Sentinel’s BYO ML framework and tools
- Operationalize the model in Databricks/ Spark environment, leveraging the framework to seamlessly integrate your ML environment with Azure Sentinel user experience and operational flow (detections, investigation, hunting and response)
- Share the ML algorithm for the community
This article provides an overview of BYO ML framework and recommended usage of its components. For detailed documentation please refer to Azure Sentinel feature documentation.
Azure Sentinel features of the BYO-ML framework
The BYO-ML framework includes the following features:
- Anomaly detection model template: an example of an end to end template for a generic algorithm for ‘access to a network share’ anomaly. The example is provided with pre-trained data on Windows file share access log, that a customer is encouraged to retrain on their custom data.
- Template for Model Training: an example of notebook to train the algorithm, build and save the model
- Template for Model Scoring: an example of notebook to run the model on schedule, scoring new data
- Data pipelines between Sentinel and ML environments: used for exporting Azure Sentinel data to the Spark execution environment for model training and scoring and importing the scored results back into Azure Sentinel tables
- Utilities for integration with Sentinel: support for enabling the integration between the environments
- Enrichments: making entity enrichment information like peer metadata and blast radius available to the custom ML models for refinement
The BYO ML package shared in Github, includes utilities and a model example showcasing the best Microsoft ML practices and research for security.
BYO-ML environment for Azure Sentinel
To build custom ML models on your data, you have 2 options.
For smaller amounts of data, like alerts and anomalies, you can use Azure ML to run models hosted in the Azure Sentinel Notebooks (new menu option currently in Preview).

The Azure ML experience is launched from this Azure Sentinel experience, with the selected Notebook loaded in the ML environment, operating to the data in the Azure Sentinel tables.

You can use this option on a small sample of large data as well, to ease the initial steps of development.
For development and operationalization of models built on larger data, like analyzing feeds of raw data, you will need to make this data accessible to the ML model in Azure Databricks.
Apache Spark™ provides a unified environment for building big data pipelines. Azure Databricks builds on this environment, providing a zero-management cloud platform, holistically addressing the platform needed for data analysts to develop their custom ML based security analysis.
You can either bring your raw data directly to the Azure Databricks ML environment, via EventHub or Azure Blobs or you can use the capabilities provided with Azure Sentinel, to export the data from Azure Sentinel Log Analytics tables. Regardless of the export methods used for raw data, you can use the libraries provided by BYO-ML framework to import the scoring of the ML model back into Sentinel Log Analytics tables for further processing and creating incidents.

On Azure Sentinel roadmap, we plan to support Azure Synapse in addition to Azure Databricks as the BYO-ML development environment.
You can either set up a new Azure Databricks environment or use one already set up for other use. To set up a new Databricks environment, please reference to the quickstarts document (note that MMLSpark used by our algorithm requires Spark 2.4.5).
Once the environment is set, export your data from Azure Sentinel into the BYO-ML environment, using the Azure Command Line Interface (CLI). See Azure Sentinel BYO-ML feature documentation for details.
BYO-ML Example Walkthrough: Anomalous File Share Access Detection
The BYO ML package includes an example of an ML model, leveraging the framework to deliver a customized ML detection.
The example is an ML algorithm template for “anomalous resource access” detection. It is based on collaborative filtering algorithm, trained and tested on Windows file share access logs, containing security events of users and resources accessed by them (Event ID 5140).
The example includes a notebook used to train the model (AnomalousRATraining.ipynb) on your specific organization data.

An additional notebook, AnomalousRAScoring.ipynb, allows you to adjust the model features to the anomalous behavior and accepted level of noise in your organization. You can use it to evaluate the scoring results, adjusting model thresholds, filtering out known benign users and ranking the anomalous ones.

Optionally use visualization capabilities in the Notebook, to check the results of the iterations and adjust to an acceptable noise level.

Once you are satisfied with the scoring results, use the same Notebook to write the results back to the Log Analytics workspace associated with your Azure Sentinel instance.

With the scored data in the Azure Sentinel tables, you can use the standard analytics development experience to create your custom rule(s), as you would do for the rest of your custom KQL queries.
BYO-ML is currently in Public Preview. If you have any questions or feedbacks, please reach out to askepd@microsoft.com.
by Contributed | Oct 6, 2020 | Uncategorized
This article is contributed. See the original author and article here.
The Azure App Service is offered as two deployment types: the multi-tenant service and the App Service Environment. In the multi-tenant service there are thousands of customers on the same infrastructure. Your apps are always secured but they share the network, address space, front ends, and some other components. In an App Service Environment you get a single tenant version of App Service that runs in your Azure Virtual Network. In this article, you will learn how to build network-secured, multi-tier web applications in the multi-tenant App Service.
Multi-tier web applications
The obvious question to start with is, what is a multi-tier web application? A multi-tier web application is an application with a front end that makes calls to one or more API applications behind it. By itself this is not a complex concept, but when a user wants to secure the API applications so they are not internet accessible the architecture becomes more complex.
There are multiple ways to secure your API applications so that they can only be reached from your front end applications. They all involve securing your API application’s inbound traffic. There are multiple features that could be used for this purpose:
- Service endpoints secure the listening service. With Service Endpoints, the source address must be in an Azure Virtual Network subnet.
- Private endpoints prevent data exfiltration and secure the listening service. With private endpoints, you can reach the web app from anywhere that has network access to the private endpoint address.
- Access restrictions can lock down your inbound traffic to a set of address blocks.
Each of those features satisfies a specific situation and there are trade offs. Access restrictions are useful if you have public address access points like NAT devices or perhaps a virtual network device with a dedicated public address. If you use service endpoints, you do not add any new resources to your subscription and are able to use one subnet. If you use private endpoints you will add a new top level resource, add Azure DNS private zones to your VNet and will require two subnets. Let’s now dicsuss each of these options in greater detail.
Service endpoints
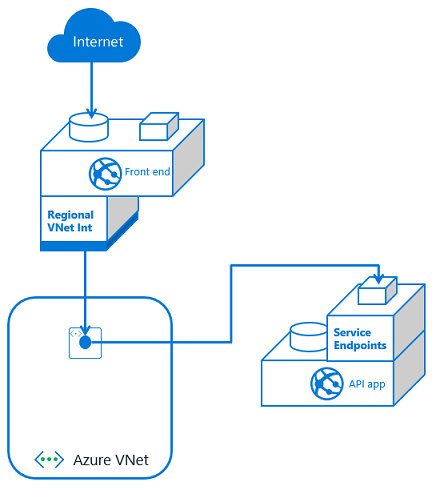
To configure a multi-tier application using service endpoints to secure your API application, you need to use VNet Integration with your front end app and service endpoints with your API app. Set service endpoints on the integration subnet used by your Front End application. This solution is fast to set up and easy as well.

If you have multiple front end apps, the configuration is the same if all of the front end apps are in the same App Service plan. With VNet Integration, the apps in the same App Service plan can use the same integration subnet. If you have additional front end applications in separate App Service plans, you will need to use multiple integration subnets. In this situation, service endpoints must be configured against each of the integration subnets. With VNet Integration, you cannot have more than one App Service plan configured with a subnet.

If you have multiple API apps and multiple front end apps from separate App Service plans, you need to configure VNet Integration from each front end app and then service endpoints on each API app against the integration subnets.

As you add front end applications, you need to configure service endpoints with each dependent API application. This means service endpoints are great at smaller scale. It can quickly get out of hand if you have many–or an ever increasing number of–front end applications with multiple API applications. Managing the configuration can be confusing as the number of front ends grows.
Private endpoints
With private endpoints, the configuration is both easier and harder. It is easier in that when you place a private endpoint in your VNet for an app, you are done managing the inbound traffic to your API app. Unlike with service endpoints, there is no additional configuration to your API app as you add new front end consumers. It is harder because setting up private endpoints creates a new, top-level resource and Azure DNS private zones.
If you have one front end app or more than that, the configuration is the same. You set up VNet Integration with the same VNet that your API app has a private endpoint in. You also have private endpoints configured on your API application.

If you have more than one front end app, the only difference is that this second front end app needs VNet Integration to be configured with it. If this additional front end application is in a different App Service plan, it will use a separate subnet. Each time you use VNet Integration from another App Service plan, you will need another subnet for integration.

If you have multiple API applications, you will need multiple private endpoints. Those private endpoints can be in the same subnet, or not. Private endpoints are more flexible in this regard than VNet Integration. Once your API application has exposed itself with a private endpoint, any front end app that integrates with that VNet should be able to reach it.

At a small scale, private endpoints incurs more overhead. You will have more to manage and maintain than with service endpoints. On the other hand, private endpoints are a solution for data exfiltration concerns. They also do better at scale as it is easy to add more front end applications.
Access restrictions
With access restrictions you can secure inbound traffic to a set of IP address blocks. This is useful when you want to lock your traffic to a set of egress devices. You can also use it with other edge protection services such as Azure Front Door. With respect to using it directly with multi-tier applications, you can secure your API applications to the egress addresses used by your front end applications. The problem with this approach is that the outbound addresses are shared with all of the other customers in the same scale unit. From a security review perspective it doesn’t look as secure as service endpoint or private endpoint based solutions. So while it is possible and worth noting, it is not recommended to use access restrictions to create multi-tier web applications.

Recent Comments