Upcoming canvas and landing page enhancements for the Visio web app
This article is contributed. See the original author and article here.
[text]
This article is contributed. See the original author and article here.
[text]
This article is contributed. See the original author and article here.
One way you can quickly search and query metrics data is using Azure Portal, where you have chart data. But maybe you want to get the raw data and query it yourself. Find below a Powershell sample to get this data
Find below a sample I build based on one I got from https://docs.microsoft.com/en-us/azure/azure-sql/database/scripts/monitor-and-scale-database-powershell
And you can get the other possible metric names to send it in as parameter in this other document: https://docs.microsoft.com/en-us/azure/azure-monitor/platform/metrics-supported#microsoftsqlserversdatabases
Find full sample at https://github.com/FonsecaSergio/ScriptCollection/blob/master/Powershell/AzureSQL%20-%20Read%20Azure%20SQL%20Metrics.ps1
But the main idea is using Get-AzMetric powershell command. You will get results as table, that you can save it in the format you want or save it to a database.
$MonitorParameters = @{
ResourceId = "/subscriptions/$($SubscriptionID)/resourceGroups/$($ResourceGroup)/providers/Microsoft.Sql/servers/$($ServerName)/databases/$($DBName)"
TimeGrain = $TimeGrain
MetricNames = $MetricName
StartTime = (Get-Date).AddDays($DaysToLook)
}
$Metrics = Get-AzMetric @MonitorParameters -DetailedOutput
TimeStamp           Average Metric
---------           ------- ------
07/10/2020 11:07:00       0 dtu_consumption_percent
07/10/2020 11:07:00      10 dtu_limit
07/10/2020 11:07:00       0 dtu_used
07/10/2020 11:12:00       0 dtu_consumption_percent
07/10/2020 11:12:00      10 dtu_limit
07/10/2020 11:12:00       0 dtu_used
07/10/2020 11:17:00    19,6 dtu_consumption_percent
07/10/2020 11:17:00      10 dtu_limit
07/10/2020 11:17:00    1,96 dtu_used
07/10/2020 11:22:00   34,85 dtu_consumption_percent
07/10/2020 11:22:00      10 dtu_limit
07/10/2020 11:22:00   3,485 dtu_used
07/10/2020 11:27:00    30,1 dtu_consumption_percent
07/10/2020 11:27:00      10 dtu_limit
07/10/2020 11:27:00    3,01 dtu_used
07/10/2020 11:32:00    27,7 dtu_consumption_percent
07/10/2020 11:32:00      10 dtu_limit
07/10/2020 11:32:00    2,77 dtu_used
07/10/2020 11:37:00       0 dtu_consumption_percent
07/10/2020 11:37:00      10 dtu_limit
07/10/2020 11:37:00       0 dtu_used
07/10/2020 11:42:00       0 dtu_consumption_percent
07/10/2020 11:42:00      10 dtu_limit
07/10/2020 11:42:00       0 dtu_used
This article is contributed. See the original author and article here.
Capacity planning plays a critical role in migrating an existing application or designing a new one. In the final part of this three-part series with Silvano Coriani, we’ll review various Azure SQL capacity planning scenarios, as well as review best practices and recommendations on what to use when.
For an overview of Azure SQL Capacity planning, watch part one.
To learn about the differences between DTU and vCore, watch part two.
Resources:
Choose between the vCore and DTU purchasing models
vCore model overview
Service tiers in the DTU-based purchase model
Migrate Azure SQL Database from the DTU-based model to the vCore-based model
Query Performance Insight for Azure SQL Database
Troubleshoot with Intelligent Insights
This article is contributed. See the original author and article here.
Over the past few months having meetings with our colleagues and even friends and families via Microsoft Teams is something we’ve all had to adjust to. I’ve been a home based worked for over 2 years now and have become adept at using Teams for meetings and figuring out the best way to do things. Which has meant that I’ve become the source of knowledge for a lot of friends and family who are new to using Teams. In this article, I want to share some of the questions I’ve been asked by them and of course the answers.
Looking back at meeting Chat
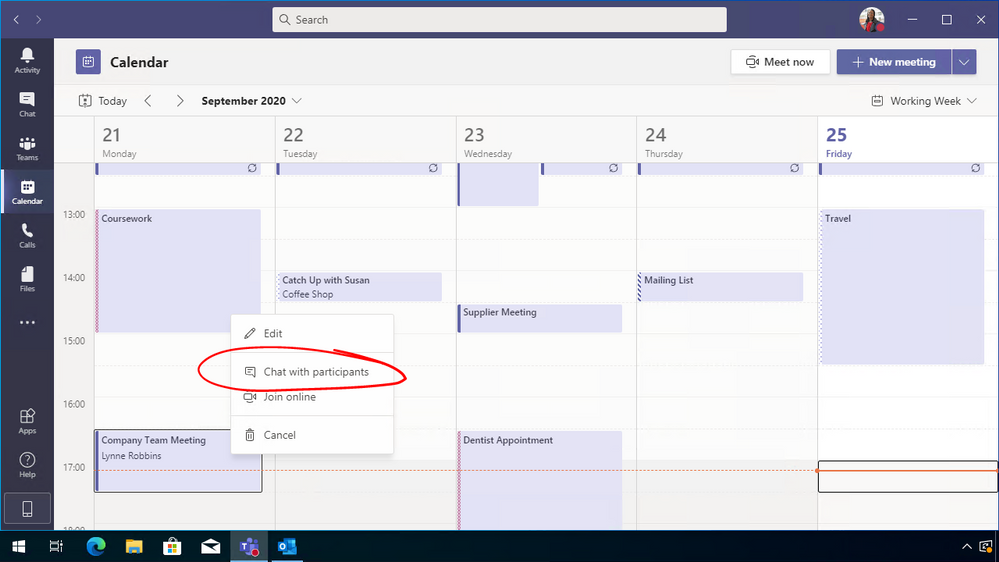
One question I was asked was can I go back and check the chat from a meeting? And yes you can, it’s totally possible. There are a couple of ways to do this.
If you find the meeting within your calendar within Teams you can then right click on it and select “Chat with participants”, this will allow you to see the meeting chat and hopefully you’ll find the reference you are looking for.

The other option is to open up the meeting event within Microsoft Teams and then click on chat. This will take you back to that chat and also allow you see details such as participants invited to the meeting etc.
Configure who can present
Microsoft Teams has an option that allows people to which is a great facility if you want to present a PowerPoint presentation or even just your screen. However, in some meeting scenarios you might want to restrict who has access to do that during the meeting. I know a lot of school teachers have this very scenario and are encountering some issues.
You can however configure your Teams meeting to restrict who has presentation rights during the meeting. There are three times you can configure this.
Setting up the meeting
When you set up a Teams meeting from within Outlook you can configure the meeting settings.
Within Outlook, click on the New Teams Meeting button. A new window will open allowing you to set the meeting team, invite the people, etc. Along the top banner you will see a button called “Meeting Options”. This is the button you need. (If you don’t see this button, within the body of the email, there will be a URL link to the meeting options instead.)

After the meeting has been set up
If you’ve set the meeting up and have to change who is presenting you can still do that, you can still tweak the settings to suit what is going to happen during your meeting.
Just find the meeting either in your Outlook calendar or within your Teams calendar and open it up. Within there you will see the Meeting Options URL link and you can tweak the settings there.

During the meeting
Now if during the meeting you decide that others need to be able to present or you’ve set up the meeting with everyone being able to present and you don’t want that, all is not lost, you can change this during the meeting.
Click on the participants list and when it comes up you will see a list of everyone that is in the meeting. Depending on how you’ve set your meeting up and who has accepted or not turned up to the meeting you will may have several sections, displaying presenters, attendees and invited attendees.
Find the person that you want to give presenter rights to and click on the ellipsis (three dots) beside their name, click on “Make Presenter”, you will get a dialog box popping up confirming this is the action you want to take and when you confirm that the attendee will have the rights to present to the meeting.
Call to Action
What questions have you been fielding or what questions do you still need an answer to? Leave a comment below!
This article is contributed. See the original author and article here.

This article is contributed. See the original author and article here.
Hi Cloud automation friends. This is Preston K. Parsard again, and in this post we’ll cover configuring PKI on an existing Active Directory domain-joined Windows Azure Virtual Machine in Microsoft Azure.
Now before being scared by the term PKI, like zombies shuffling towards you at twilight, it’s really not that bad this time. In fact, I’ve provided a link in the references section of this post to a short video demonstration as well. Feel free to skip to it now if you prefer, but the rest of this post does provide some background and sets the context for this type of configuration.
DISCLAIMER: These instructions are primarily meant for an informal dev/test or training lab environment intended to experiment or learn about technologies which may rely on a basic certificate authority service. For a more formal and extensive reference for Windows PKI, please see the Windows PKI Documentation Reference and Library link in the references section at the end of this article. Also my esteemed colleague Daniel Metzger wrote Building the Totally Network Isolated Root Certificate Authority, which is a great article for production environments and is also referenced at the end.
By configuring an enterprise certificate authority server in your test and development or lab environment, you can reproduce scenarios that require certificates for web server, code signing or document encryption. One example may include building a simulated on-premises Desired State Configuration (DSC) pull server and auto-enrolling the virtual machines in the domain for document encryption certificates.
Now I realize that it’s more likely that if you have workloads in Azure and you need to leverage desired state configuration, you already have the option to use the native Azure automation state configuration feature for this purpose. So you wouldn’t really need to build a traditional on-premises simulated DSC pull server after-all and consequently would not require a certificate server as well.
The idea behind our scenario however is simply to provide the added flexibility to experiment with setting up a small PKI infrastructure to evaluate, train or prepare for any certificate services related technologies. Most medium and large enterprise customers I’ve worked with have separate IT operations and PKI teams, and IT ops folks are not usually exposed to the mechanics and experience of the PKI integration, relying fully on the PKI teams instead for these services. This solution aims to now empower the IT ops staff to learn and gain better insights and appreciation for any PKI related technologies their projects may rely on. Who knows? It may even encourage greater dialogue and collaboration between both teams when ops can more explicitly elaborate their requirements to the PKI team and the PKI folks can see exactly how and why ops will be using these services if they need such information for approving certificate requests.
Adatum Consulting Overview
First, let’s visit our fictitious company, Adatum Consulting, which is a global provider of cloud architecture and automation consulting services for its manufacturing customers. Adatum has recently created a consolidated development environment where they can develop, test, reproduce and prototype solutions for their clients.
Opportunity
To accommodate this requirement, Jason, the infrastructure team lead, has asked Jessica to deploy certificate services on an existing Azure VM to act as the enterprise certificate authority for this environment. By implementing a simple single tier certificate services PKI infrastructure, the team can quickly issue certificates for these secure web applications or to reproduce configuration management solutions. In fact, to configure the certificate services server, Jessica will actually use the Azure automation state configuration capability, but the really cool part about this option is that Azure based DSC does not require first configuring a certificate authority itself, because certificate services for this feature is already built into Azure!

Target State Diagram
Here is the target state diagram, which is based on the existing Project 0026 solution in GitHub. If you want to use this solution to automatically provision the dev.adatum.com environment so you can follow along, please use these links below and return to this article when you’re ready to continue.
Requirements
So let’s review the sequence of steps that Jessica will take to configure certificate services on an VM in their existing dev.adatum.com domain, right after we outline the requirements and assumptions below.
Workflow
1. Download Script
In a PowerShell console, opened in the context of administrator, Jessica first creates a target folder named C:Project0067 on her machine to download the script from a public GitHub repository.
New-Item -Path C:Project0026 -ItemType Directory -Verbose
Start-Process -FilePath https://github.com/autocloudarc/0067-ConfigurePKI
Next, she downloads the zip file, extracts only the Configure-PKIonVMinAzure.ps1 script and copies it to the new directory named C:Project0067. She then unblocks it assuming that her PowerShell execution policy is set to RemoteSigned so it can be executed locally.
Set-Location -Path c:project0067 -Verbose
Unblock-File -Path .Configure-PKIonVMinAzure.ps1 -Verbose
2. Execute Script
Next, Jessica executes the C:Project0067Configure-PKIonVMinAzure.ps1 script from her existing Windows PowerShell 5.1 session. She uses the command below to specify the automation account name and resource group that contains the dev.adatum.com environment and the target VM that will be configured.
. .Configure-PKIonVMinAzure.ps1 -aaaName <AutomationAccountName> -rgpName <ResourceGroupName> -Verbose
A prompt will appear to upgrade from the legacy AzureRM to the newer Az PowerShell modules so that the most up-to-date PowerShell Azure cmdlets can be used for this configuration. Jessica will enter ‘y’, or ‘yes’, which is not case sensitive, to proceed with the upgrade if it is required.

3. Authenticate to Subscription
The script then presents a prompt for Jessica to enter her Azure subscription credentials. Since Jessica has multiple subscriptions, a secondary prompt also asks her to specify which subscription associated with her credentials she wants to use. She chooses the subscription in which the dev.adatum.com target PKI virtual machine resides.

4. Select Virtual Machine
Based on the resource group used in the parameter -rgpName for this script shown in step 2 above, which was rg10, the virtual machines in that resource group is then listed so that Jessica can select the appropriate target VM that she wants to configure. She chooses AZRPKI1001. The naming convention used here is AZR = three letter cloud service provider code ([A][Z]u[R]e), PKI = virtual machine function code ([P]ublic [K]ey [I]nfrastructure), and the remaining characters are 1001, where 10 represents the resource group identifier in rg[10] and 01 is the series number.
5. Provide Credentials
Jessica enters the username for this domain as adm.infra.user@dev.adatum.com, which is a member of the Enterprise Admins and Domain Admins in the root (and only) domain for this forest. This is a requirement to install and configure Active Directory Certificate Services.
6. Download Configuration
The script will now automatically download both the pkiConfig.ps1 as well as the configuration data file pkiConfigData.psd1 as artifacts from the public GitHub project.
The pkiConfigData.psd1 information are the set of DSC related parameter values that are associated with the pkiConfig.ps1 configuration script. When the configuration is imported and compiled, it will include these configuration data parameters and used to specify properties of the PKI server. Some examples of these properties include; the CACommonName, the cryptographic provider, hash algorithm and key length for the CA root certificate.
7. Import Modules
Before the configuration script can be imported and compiled, the DSC resource modules it requires must first be imported from the PowerShell gallery into the Azure automation account. The script also does this automatically as shown in the image below.
8. Import and Compile Configuration
The script will also import and compile the configuration with the configuration data associated. Both the import and compilation steps are initiated from a single command in PowerShell, which is show below in line 404.
The output in the PowerShell console shows that the PkiConfig compilation has started.
The automation account will also confirm that the configuration was compiled.
9. Register Node
Since the script has now completed the compilation of the configuration, it proceeds to register or on-board the target virtual machine that will be configured. In this example this process took less than 5 minutes, but there may be other factors that may make it take longer. As with most of the previous steps, no manual intervention is required here either. Recall from step 4 that this is the AZRPKI1001.dev.adatum.com virtual machine. This is the last step in the configuration process where the configuration is actually applied to the PKI server and then restarted to finalize that configuration.
10. Get Results
The script then provides a set of instructions to perform the final verification and prompts Jessica to open the transcript. This transcript provides all the details of the script output that was shown in the console and Jessica decides to open the transcript to see if there are any errors she may have missed. The transcript opens with notepad in a new window and the script completes.
From the Azure portal, Jessica confirms that the target node applied the PkiConfig.localhost node configuration and that the node itself is compliant.
11. Verify Configuration
For the final verification that PKI was properly setup on this target VM, Jessica will log into the VM with RDP over HTTPs using the Azure bastion service.
She then starts a PowerShell session and types certsrv.msc to open the certificate authority MMC console and validates that this certificate services feature was installed and configured correctly.
Summary
So to quickly setup a simple PKI server, we can just download and execute a script from a public GitHub repository. Once executed, this script will automatically retrieve, import artifacts and modules, compile a configuration and register a target domain joined virtual machine in Azure to configure it as a certificate authority server. I hope this information was useful and feel free to leave a comment. Thanks for reading and happy automating!
References
Other Links
This article is contributed. See the original author and article here.
The Azure Sphere 20.10 OS is scheduled for release to Retail Evaluation in mid-October. For this release, we are making important changes to the Retail Evaluation period:
Why is 20.10 Retail Evaluation different?
The Azure Sphere 20.10 OS and SDK incorporate some fundamental changes that may affect your applications. For 20.10, we upgraded The Yocto Project to the latest 3.1 LTS Dunfell release, which includes updated tools and libraries that may result in a change to the amount of memory used by applications.
To help you verify that your applications continue to work as intended, we will provide an evaluation version of the 20.10 SDK along with the Azure Sphere OS, so that you can rebuild your applications. You might see new or different GCC warnings when you compile with the new Azure Sphere SDK.
We are providing early notification of the evaluation release and extending the overall evaluation period by a week so that you have additional time to validate your existing applications and ensure that you can rebuild and run them without issues.
What should you do?
First, set up a device group for Retail Evaluation if you haven’t already done so. Devices in this group will receive the 20.10 Retail Evaluation OS when we release it.
When we release the 20.10 OS to Retail Evaluation:
When the Retail Evaluation OS is released, we will provide details about installation and use of the evaluation SDK, recommended testing scenarios, and how to notify us about problems. See 20.10 Retail Evaluation for more information.
This article is contributed. See the original author and article here.

This article is contributed. See the original author and article here.

In this webcast (10/28 1:30pm to 2:30pm EST) we’ll explore how cloud-based technology powered by Artificial Intelligence (AI) and Machine Learning assists physicians to develop predictive models for individual patients and then implement patient-specific interventions with experts from Microsoft Partner Innovaccer.
Questions that will be addressed during this webcast include:
You can add the webcast to your calendar by grabbing the .ics file below or access the event directly by clicking the direct link at event time.
About this sessions guest partner Innovaccer:
Innovaccer is a leading healthcare technology company pioneering the Data Activation Platform that’s helping the healthcare industry realize the promise of value-based care. – About Innovaccer
Thanks for visiting – Michael Gannotti LinkedIn | Twitter

This article is contributed. See the original author and article here.
This year’s PASS Summit has gone virtual and is taking place November 10-13. PASS Summit is the largest gathering of data professionals focused on the Microsoft platform, and this year, it will be more accessible than ever, giving attendees the opportunity to learn from data professionals around the world right from their very own home.
Not only will the Azure SQL/ SQL Server teams be delivering 25+ sessions, but there will also be opportunities to connect directly with the product groups through:
As a bonus – the first 1,500 registrants for PASS Summit will receive Bob Ward, Principal Architect on the Azure Data team, new eBook, Azure SQL Revealed: A Guide to the Cloud for SQL Server Professionals.
More details about the events are being updated directly on the PASS Summit website but in the meantime, you can start planning which Azure Data sessions you would like to attend with my quick reference list below:
We’re looking forward to seeing you online! Tweet us at @AzureSQL for sessions you are most excited about.


Recent Comments