by Contributed | Oct 14, 2020 | Azure, Technology
This article is contributed. See the original author and article here.
FedRAMP enables Agencies to rapidly adapt from old, insecure legacy IT to mission-enabling, secure and cost effective cloud-based IT. The good news is Azure is FedRAMP compliant and has been for years. For those that don’t know FedRAMP has multiple governing bodies:
- Joint Authorization Board (JAB) – Primary governance and decision making is body for FedRamp are the Chief Information Officers (CIOs) from Department of Homeland Security, General Services Administration, and Department of Defense
- Office of Management and Budget (OMB) – The governing body that issued the FedRAMP policy memo which defines the key requirements and capabilities of the program
- CIO Council – Disseminates FedRAMP information to Federal CIOs and other representatives through cross-agency communications and events
- FedRAMP Program Management Office (PMO) – Established within GSA and responsible for the development of the FedRAMP program including the management of day to day operations
- Department of Homeland Security (DHS) – Manages the FedRAMP continuous monitoring strategy including data feed criteria, reporting structure, threat notification coordination, and incident response
- National Institute for Standards and Technology (NIST) – Advises FedRAMP on FISMA compliance requirements and assists in developing the standards for the accreditation of independent 3PAOs
Now that we know who is telling us the standards, who do we apply that to Azure?
Azure Gov or Public?
When I was working in a Federal agency years ago one of the early misconceptions was that you could only get FedRAMP compliance in the Azure Gov but that isn’t the case at all, you can achieve FedRAMP compliance in both public and gov region, but you have to make sure to evaluate each service as some services are complain and some are not. To verify the service you want to use has been audited please review Azure services by FedRAMP.
FedRAMP Control Mapping
To be complaint during auditing you will have to show that the FedRAMP controls have been mapped to security settings in Azure, of course you knew at this point you would be using Azure Policy to help achieve this right? You can find the documentation of the controls for FedRAMP High and FedRAMP Medium already done for you.
Deploy FedRAMP to Azure
Microsoft has done some of the heavy lifting for you here and have provided you an Azure Blueprint to guide your Azure Policy deployments. These will provide you the governance guard rails to deploy compliant services in your Azure environment. You will find both FedRAMP High and FedRAMP Medium blueprints.
FedRamp Audit Report
The other requirement you will need to provide to get your approval will be the audit report for the Microsoft aspects of the controls that are required. You can find a copy here.
Not Done Yet…..
Just remember while these policies will give you a great head start on your authority to operate (ATO) there will still need to be very specific configurations depending on what systems you deploy especially if you are using IaaS as there are configurations inside the OS level you must account for. It is not a speedy process to get approved but the more info you can provide at the start the easier it will be to get through the process.
by Contributed | Oct 14, 2020 | Azure, Technology
This article is contributed. See the original author and article here.
In the Planning to perform Proof of Concept guide Part 1 , we discussed the necessary steps for a successful POC such as : Understanding network security requirements for the different resources, creating indices to measure successful security POC, the security standards to be reviewed, how to create timelines to work on security lapses and how to monitor the network for improvement.
In this second part, you will learn to deploy and verify the environment to validate some of the sample Proof of Concept mentioned earlier. If you know the elements required already, you can go straight to the components (WAF, Azure Firewall or DDOS) in the sections below.
Permissions
To provision and configure resources, it is necessary to have Network Contributor access or a more permissive/administrator role.
Azure Network Security Demo Environment.
An azure pre-configured test deployment kit for POC is available in this repository. By agreeing to the terms, you can use this environment for most of the POC in this guide e.g. DDOS protection, OWASP top ten core rule set, Virtual network security etc. This environment has been configured to have most of the tools you would need and they have been connected by network rules that you can verify.
(Note: Resources in this deployment will incur some charges. Make sure to remove resources once POC is completed)
Deployment
For portal deployment, Click on the Deploy button below to go to the deployment page.

- Create or use an existing resource group/region for the deployment.
- Provide username/password for access to the VMs.
- If you have a Workspace Name and Workspace Subscription for diagnostics log, insert it here. This is required for log access. If you do not have one, you can set it up here. This is highly recommended for all Azure resources.
- Click Create or Purchase to begin deployment.
To deploy the demo environment using PowerShell, follow these steps :
Connect to your Azure environment:
PS C:windowssystem32> Connect-AzAccount
Create a resource group in your region:
PS C:windowssystem32> New-AzResourceGroup -Name demoresourcegroup -location "westus"
Deploy the demo environment using the template in the GitHub repository
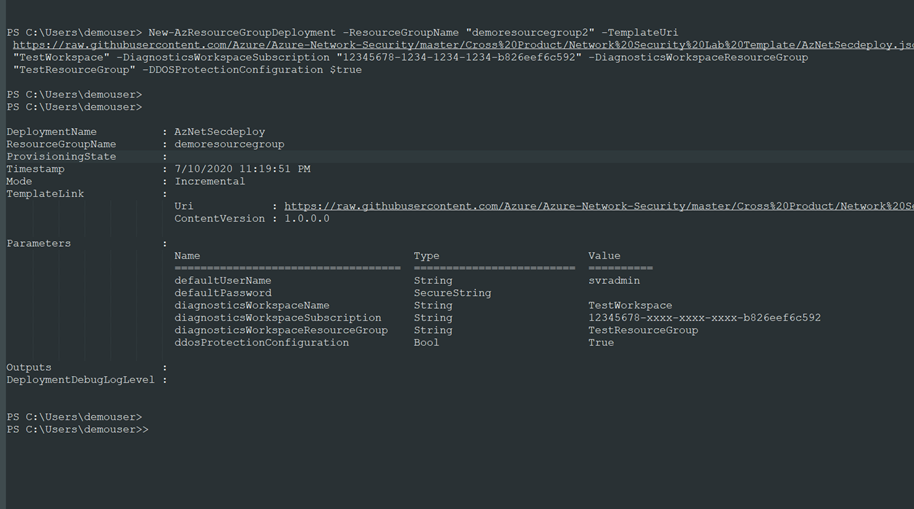
PS C:windowssystem32> New-AzResourceGroupDeployment -ResourceGroupName "demoresourcegroup" -TemplateUri https://raw.githubusercontent.com/Azure/Azure-Network-Security/master/Cross%20Product/Network%20Security%20Lab%20Template/AzNetSecdeploy.json -DiagnosticsWorkspaceName "TestWorkspace" -DiagnosticsWorkspaceSubscription "123456789-xxxx-xxxx-xxxx-b826eef6c592" -DiagnosticsWorkspaceResourceGroup "TestResourceGroup" -DDOSProtectionConfiguration $true
Note:
The following values in the last step should be updated for your account: Subscription ID, Log Analytics Workspace name and Resource Group for Log Analytics workspace.

In view of the deployment type you use,, the demo environment should include the following resources upon deployment:
- 3 Virtual Networks (1 Hub that hosts the firewall and 2 Spoke VNets)
- 1 Application Gateway provisioned with Web Application Firewall
- 1 Azure Front door with WAF enabled.
- 1 Azure Firewall (deployed in Hub VNet via Azure Firewall manager)
- 3 VMs (2 Windows and 1 Kali Linux)
- 2 Public IP addresses (1 for the Firewall and 1 for the App Gateway)
- DDoS protection enabled for the Hub virtual network.
- 2NSGs.
- Route table
- Web App (Demo web app to perform vulnerability tests)
The resources have been connected in a simple hub and spoke topology as seen in the diagram below.

The hub is a virtual network(VN-HUB) in Azure that acts as a central point of connectivity to your on-premises network. This is where you want to place the firewall. The spokes are virtual networks that peer with the hub and can be used to isolate workloads, thereby modeling a common deployment scenario for most network designs. This network diagram uses these two basic connections to keep it simple
- The hub virtual network will use virtual gateway access for the firewall to route traffic.
- The Spoke virtual networks will use the subnets to host the azure resources (VMs etc.)
for other additional considerations
- (If the planned spoke is in a local area network that requires a VPN connection through an external public interface, use this link: On-Premise-Network connection to Gateway)
- If you require multiple spoke-to-spoke connections, you may soon run out of virtual network peering allowable, User Defined Routings may be used to create routes in the router to forward traffic. See more on Multiple-Spokes-VNET-Connections
Azure Network Security Components
Web Application Firewall (WAF)
Web Application Firewall protects web apps from vulnerabilities and attacks without modification to back-end code, preventing the application from outage, data loss and attacks.
WAF policy
WAF is configured through HTTP and HTTP/s listeners by setting up a WAF security policy and applying it to Azure Front Door, Application Gateway or CDN.
WAF: Azure Application Gateway
WAF when combined with Application Gateway work as a web traffic load balancer and provide L3-L7 security for your back-end pool: VMs, VM scale sets, IP addresses and app service. For more information on the App gateway go to AppGateway features.

To view the WAF policy configured with the Application Gateway in the demo deployment:
- Go to the test Resource group that was created “demoresourcegroup” and click on SOC-NS-AGPolicy to view the WAF policy for the Application Gateway. The managed and custom rule sets can be used to effectively allow/deny traffic when in prevention mode.

Detection mode allows traffic to pass through while logging the attack events. Use this mode to observe and learn traffic behavior at the beginning for proper tuning, then switch to Prevention mode. This is the recommended configuration
The request body size (KB) can also be edited here, and you can configure what parts of requests to exclude under the Exclusions area
Managed rule set: This is the OWASP top vulnerability attacks list. It uses the OWASP 3.1 or most recent core rule set.
Custom rule: To block an IP from Canada or geolocation of choice: Click +Add custom rule.
- Custom rule name: type “blockCanada”.
- Status: Enabled, Rule type: Match, Priority: 1 or as desire
- IF Matchtype: dropdown- Geolocation
- Select Canada. You can select more than one.
- Then: Select Deny traffic (Or redirect to a custom page).
- Click Add
To view the Custom rules set up earlier in the WAF policy, click on Custom rules. 3 custom rules can be seen. Other features of Application Gateway when combined with WAF include protection from crawlers and scanners, bot mitigation, cross site scripting etc.
The OWASP Juice shop website, a site with vulnerabilities common to web apps, has been deployed in the App Gateway with WAF enabled for this scenario.
- Go to the demoresourcegroup and click on the Application Gateway configured with the demo deployment on the list: In our case: SOC-NS-AG-WAFv2.
- In the Overview section, on the right, the front-end private and public IP addresses associated with the Application Gateway are shown.
- Click on the Public IP to confirm the OWASP Juice web application is accessible.

WAF: Azure Front Door
Azure Front Door provides a secure global traffic delivery solution for your backend resources. It uses anycast protocol to improve global connectivity and availability using smart health probe, URL Path Based Routing, Multiple site hosting, Session Affinity, App Layer security, URL redirection.
The URL/IP for your web application and a Web Application Firewall policy are required to configure WAF for your environment behind Azure Front door.
To view the Front door and WAF configured with this deployment, go to the test resource group demoresourcegroup, and click the Front door in the list. In this case, Demowasp-jfyg5g7ve5w6a
On the Overview page, click on the Frontend host link on the right to view the web app. It should be a link with azurefd.net as part of the URL. E.g. https://Demowasp-7tzl765vvi3qe.azurefd.net
Back on the same Front door page, click on Front Door designer
a. The front-end domain configured can be seen. Click on the demo app.
– The session affinity and WAF features can be toggled as desired.
– The policy applied can also be changed if you have created other policies.
b. Under the Backend pools, the OWASP app can be viewed.
This is your app or container. Click the app to edit configurations such as health probes and load balancing options. Multiple backend hosts can also be added. In this case, we have added a back-end pool using the public IP address for our OWASP Juice shop application.
c. Lastly, Routing rules: This is connection between the frontend/domains and the backend pool from a and b above.
If an additional back-end pool is needed, you can add them here. Also, Path Based routes can also be set up in this window for content distribution and management. If you need to permit Front door access to your Keyvault, check certificate permission

Under Settings, select Web Application Firewall. The WAF policy for this front door SOCNSFDPolicy has been linked.
When Front door is combined with WAF in this way, rate limiting can be configured to manage access to your backend resources.
Visit the Azure documentation to see examples of custom rules with PowerShell and to configure the rules with Azure portal.
DDoS
To view the DDOS protection standard deployed, go to demoresourcegroup and click on SOCNSDDOSPLAN (or the name given to your DDOS plan in your resource group). You can enable and disable the plan here. DDOS can only be enabled for a Virtual Network. You can configure one DDoS protection plan for your organization and link virtual networks from multiple subscriptions to the same plan. More information on the DDOS plan here.
The test is performed using the public facing IP address to the resource’s endpoint. Apps may be placed in the Backend pool of App Gateway or set up in VMSS- all placed in the protected VNets, as shown in the network diagram above.

- Go to the demoresourcegroup and click the VN-HUB. The VN Hub is the virtual network protected by the DDOS protection standard.
- Under Settings, Click DDoS protection. If enabled, the two subnets in the Hub Virtual network: SOC-NS-AG-WAFv2 and SOC-NS-FW are protected by the DDOS protection plan.
Go to the Application Gateway. To view the Front-end Public IP, Go to the right-hand corner of the Overview page.
Next, we confirm how to set up the alerts for the DDOS protection metrics.
- Go to the top search bar on the page and type in Monitor, Select Monitor.
- Under Alerts, select Manage alert rules, select +New Alert rule. Under Scope, choose your subscription and its resource group, select a Public IP. In this case: SOCNSAGPIP (the Application gateway public facing IP address)
- For Condition, Click Select Condition to add a new signal. Select “Under DDoS attack or Not”. Aggregation: Max, Threshold 1.

- Action Group: Enter a name and provide an email address or phone number for notification.
- Under Settings, Go to Diagnostic settings, enable the public IP SOCNSAGPIP
Visit the web resources for additional information on DDOS adaptive tuning and DDoS Protection telemetry, monitoring, and alerting . We have now set up the test environment to observe DDOS protection metrics.
Azure Firewall
The “demoresourcegroup” has a firewall policy managed via the Firewall manager in the secure hub VNet for the POC scenario.
Azure Firewall Manager enables centralized management of your firewalls in your network. In this case, we have only one Firewall. More on Azure Firewall Manager
To access the firewall configuration in the test deployment,
- Go to demoresourcegroup, Click on Firewall (In this example: SOC-NS-FW).
- Under Settings, Go to the Firewall Manager. Click on the Azure Firewall Manager. Click “Azure Firewall Policies”.
- The firewall Policy properties can be seen. Click the policy (SOC-NS-Policy).
- Click on Rules under Settings to see the rules. There are 3 different rule types in the collection: Network, Application and DNAT rules. The VMs can be accessed through the NATted public IPs in the DNAT rules

Azure Firewall design is explicit deny-by-default. You can configure the rules for your traffic. As seen in the image above, the Azure firewall in the demo has been configured with this the following:
- The 2 spoke VNETs do not have direct connectivity between their subnets.
- Application rules are set up to grant and manage access using FQDN of search engines: Bing and Google for your test.
- Network rules to permit only SMB, RDP and SSH and deny all others have been configured.
DNAT rules to permit access from unique NATted IPs for VM access via the firewall have been configured
You may insert additional rules for your POC and test for connectivity.
Conclusion
Performing a Proof of concept may be done for several reasons: trying out a new network tool, introducing a new resource, capacity planning, performance, and response, trying out network architecture etc.
When you have performed the Proof of concept, review the outcome with the reference model expectation in terms of established indices, success indices, security standards and timelines to work on newfound evidence.
Also, confirm that you can monitor logs as discussed in the concluding session of part 1 of this series. Part 3 and beyond will focus on deep dive testing of these scenarios
by Contributed | Oct 14, 2020 | Technology
This article is contributed. See the original author and article here.
The 2021 Imagine Cup is where passion meets purpose, and you have the chance to bring your idea to life to help shape our future. Over the past 19 years, more than two million competitors have signed up for our global student technology competition to build something that matters to them, make a difference in their communities, and innovate for impact.
In today’s world, it’s more important than ever to create positive change using new tools. What better place to start than with tech? We’re looking for bold thinkers and big dreamers – we have the resources you need to turn your idea into a purpose-driven application, all you need is the drive to begin. Sign up today to start your journey.
What’s new in the 2021 competition?
- An all-digital competition experience to bring together students across the globe.
- A Microsoft Learn challenge to empower you to build new tech skills with Azure (plus you can win monthly prize giveaways!).
- Four competition categories in Earth, Education, Health, and Lifestyle to support you reimagining the social issues you’re most passionate about and expand your network of likeminded peers.
- The top 40 teams will advance to the World Finals and compete for cash prizes plus the ultimate chance to share their innovation on a global stage at the World Championship – where USD75,000 and a mentoring session with CEO Satya Nadella will be awarded.
Why should you compete?
Nurture your curiosity
The Imagine Cup is a chance to make something that matters to you and develop your skills as part of the journey. Whether you’re hoping to accelerate with artificial intelligence, create with cognitive services, invent with intelligent systems, or master machine learning, this competition is an experience for everyone.
2020 World Finalists, Team Syrinx, share why they believe all students should try competing in Imagine Cup.
Realize your passion
Innovate to reimagine technology solutions for some of the world’s biggest challenges. With past competitor projects encompassing mental healthcare, accessibility, environmental sustainability, and so much more, anything is possible when you blend passion and purpose with an inclusive mindset. What could you create next?
2020 World Champions, Team Hollo, share what it means to innovate for the future and how Imagine Cup can help you get started.
Shape our world
Transform your ideas into action with a purpose-driven application. You could win mentorship from Microsoft experts, priceless networking opportunities, the chance to showcase your work on a global stage, and other great prizes.
2020 World Finalists, Team Tremor Vision, share their advice on finding an idea worth pursuing.
Are you ready to get started? Join the journey and register now.
by Contributed | Oct 14, 2020 | Technology
This article is contributed. See the original author and article here.
During the Ignite 2020 conference, Ales Holecek announced a series of new services to help organizations manage their Office apps from the Microsoft 365 Apps Admin center. Since then, we have started to roll out the App Health service, were you can see the overall health of your Office apps.
Today, we are excited to be releasing the next set of tools and services that will provide you with insights, automation, and control to efficiently manage your monthly Office app updates. These features include:
- Office Apps & Add-in Inventory
- Security Currency report
- Servicing Profile
To access these services, you will need to ensure that each of your Office Apps are on a Version 2007 or later. You will also be required to run through a simple onboarding process which is outlined below. Once the onboarding has been completed, the next time a user launches one of the Office Apps, the newly enhanced click-to-run service will register that device with our inventory service. From there you will start seeing all of the new features light up.
Enabling preview features
The following steps will enable your tenant to access all of the preview features within the Apps Admin center.
- Got to https://config.office.com from your favorite web browser. From there click on the Sign in button and use your Office 365 user account with either the Office Apps admin or Global admin privileges.

- After you have successfully signed in, you will find three new links on the left nav . Servicing, Settings and Inventory. Click on the inventory tab to start the preview onboarding process (you can choose to click on Settings or Servicing, but we recommend you start with the Inventory tab). From here you will be presented with a preview screen. Click on Enable preview features.

- Read the preview agreement and click “Accept” to proceed

- Once accepted, our services will initiate a provisioning process and can take up to10 min to complete.
You have now enrolled your tenant into the preview. Next time your users launch an Office App with Version 2007 and higher, you will start to see rich information within your inventory.
For more information
For more information view our documentation at https://docs.microsoft.com/deployoffice/admincenter and check out the video and demos at https://aka.ms/IgniteAACDemo
We want to hear from you
We would love to hear from you about how these features are helping by posting your thoughts in this forum. For new feature requests please visit our UserVoice site at https://ODInsiders.uservoice.com
Until next time, keep on Deploying!
Amesh Mansukhani
Program Manager
Office engineering


.jpg")

![[Announcement] Community Mentors App Update: Version 3.1 Now Available!](https://www.drware.com/wp-content/uploads/2020/10/large-695)


Recent Comments