by Contributed | Oct 16, 2020 | Azure, Technology
This article is contributed. See the original author and article here.
Customers may have been unable to connect to their lab virtual machines (VMs) between Oct 13, 2020 and Oct 15, 2020.
Cause of the outage:
Azure Lab Services manages the customers’ VMs within internal Azure subscriptions that the service owns (more details on the service’s architecture fundamentals here). For internal subscriptions, Microsoft runs regular organizational security rules. Due to recent configuration changes, an internal security rule got applied to the customer VMs inside our subscriptions that blocked VM connections that came from external to Microsoft.
Resolution:
The internal security rules that were blocking customers’ access to the VMs have been removed, and we have ensured that the internal configurations will no longer be applied to our service’s subscriptions that host customer VMs.
This outage has been resolved and customers can now connect to their VMs. If you were affected by the issue, please try starting and connecting to the VMs again.
We apologize for the inconvenience. If you have any questions, please leave us a comment below.
– Azure Lab Services Team
by Contributed | Oct 16, 2020 | Azure, Technology
This article is contributed. See the original author and article here.
Virtual desktop infrastructure (VDI) is defined as the hosting of desktop environments on a central server. It is a form of desktop virtualization, as the specific desktop images run within virtual machines (VMs) and are delivered to end clients over a network. Those endpoints can be various devices including PC and tablets. There are many applications for this technology but today we will discuss some of the most common issues our customers face when using Microsoft Outlook (this extends to other Microsoft office apps) in a non-persistent Virtual Desktop Infrastructure (a.k.a. VDI) and are using Exchange Online. Some of the issues end users might see include:
- Outlook prompting for password repeatedly
- Outlook displaying “Need Password”
- Outlook/Office displaying a blank password screen
- Outlook/Office activation issues
To avoid these issues being caused by non-persistent VDI, we will discuss best practices. There are a lot of unsupported scenarios when it comes to using VDIs with Azure. To check supported scenarios please see the following link – VDI Supported Scenarios. There are some preparations that must be made for your users to have the best Microsoft 365 experience with Outlook. Currently, Microsoft only supports Hybrid Azure AD Join for VDIs. This means that you must follow the prerequisites and planning that is laid out here.
Not planning on hybrid Azure AD joining?
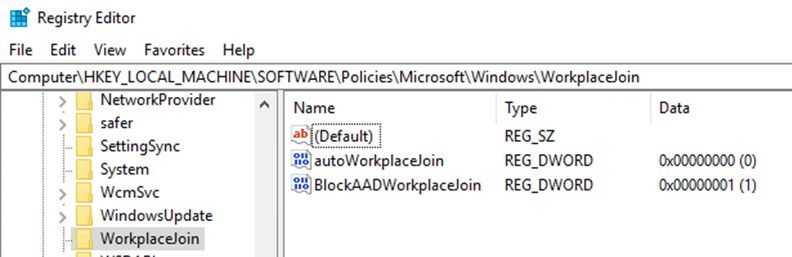
To prevent machines from performing workplace and Azure AD Join use the following registry keys: (Note: You may also have to delete the computer/device object from Azure AD devices if these computers have already been joined.)
Create a new DWORDs in this path HKEY_LOCAL_MACHINESoftwarePoliciesMicrosoftWindowsWorkplaceJoin
- DWORD: “BlockAADWorkplaceJoin”, Value=1
- DWORD: “autoWorkplaceJoin”, Value=0
 Requirements for all scenarios for non-persistent VDI
Ensure that you are NOT roaming your Identity hive located in ComputerHKEY_CURRENT_USERSoftwareMicrosoftOffice16.0CommonIdentity
- This entire hive must be excluded from roaming profiles. There are several ways you can exclude this from roaming. Example, Citrix profile management or GPO and sometimes both need to be configured depending on your configuration. The reason for this is due to the ADAL process writes device information into this key and if you only have one host this is acceptable but most environments have multiple VDI hosts and the machine information will not match when that user logs into a different machine with another machines Identity hive information. This will cause a prompt for the user even on application hosts only.
Ensure that you have shared computer activation configured for your VD environment. (See here for more information on shared computer activation)
- If shared computer activation is not configured for users, then users may be prompted to login to office to verify licensing.
- If you don’t have Single Sign-on configured, you can now roam the license location for profiles or have them on a shared folder on your network as well. The location for licensing token is %localappdata%MicrosoftOffice16.0Licensing. (Note: This does not guarantee that your user will not be prompted for credentials.)
Ensure that Office and Windows are to the most recent updates. Please see here for necessary Windows and Office builds.
If you are using a non-persistent VDI and may already be Azure AD Domain joined the following steps should remove the device from being Azure AD joined:
Verify that machines are not Azure AD and/or Workplace joined
Verify the following registry keys are present to prevent the machine from rejoining Azure AD or Workplace join:
1. Create a new DWORDs in this path HKEY_LOCAL_MACHINESoftwarePoliciesMicrosoftWindowsWorkplaceJoin
- DWORD: “BlockAADWorkplaceJoin”, Value=1
- DWORD: “autoWorkplaceJoin”, Value=0
2. If you are Azure AD joined, run the following command in an elevated command prompt, DSRegCMD /Leave and then reboot the host. You can check the status of AAD join by running DSRegCMD /status in command prompt.
- Azure AD join status showing that the machine is Azure AD joined.
 3. If you are Workplace joined (this is harder to remove) you have to perform the below steps. Run DSRegCMD /Status to check status of workplace join in command prompt.

4. Navigate to Settings > Accounts > Access work or school > Disconnect
 Hope this helps in your deployments! Let us know if you have any questions!
Taylor Morrison
by Contributed | Oct 16, 2020 | Technology
This article is contributed. See the original author and article here.
VMMap v3.30
This update to VMMap, a utility that reports the virtual memory layout of a process, identifies .NET Core 3.0 managed heaps.
RAMMap
This release to RAMMap, a utility that analyzes and displays physical memory usage, adds customizable map colors and a new command line option, -e, to empty the different types of system working sets.
Sysmon v12.01
Security and bug fix release, resolves a PipeEvent processing issue and adds extra checks to kernel writes.
ARM64 ports
New ARM64 releases for AccessChk v6.13, DiskView v2.41 and VMMap v3.30. Download all ARM64 tools in a single download with the Sysinternals Suite for ARM64.
by Contributed | Oct 16, 2020 | Technology
This article is contributed. See the original author and article here.
By John Lewis
Security administrators often focus on best practices for securing their company’s users, apps, services, and devices. It can be easy to forget that Security Administrators are also “users” and equally if not more important to secure within the organization. What is the best way to secure administrator accounts? This blog provides guidance on how to configure Azure AD Conditional Access to secure administrative access to Microsoft Cloud App Security (MCAS) and Defender for Identities (formerly Azure ATP).
Let’s quickly refresh our knowledge of the RBAC models for both MCAS and Defender for Identities.
In MCAS, admin access is provided by default for users within specific Azure AD roles such as Global and Security Administrators. It’s worth noting that these roles are overarching and provide access to services across M365 and Azure. Additionally, Cloud App Security provides specific admin roles for further granularity; these can be used to override roles set in Azure AD. More information on RBAC for MCAS can be found here.
Azure AD Global and Security admin roles provide access to the Defender for Identities portal. Once the service is provisioned, three Azure AD security groups (Azure ATP {instance name} Administrators, Azure ATP {instance name} Users, and Azure ATP {instance name} Viewers) are created to provide different levels of access. More information on RBAC for Defender for Identities can be found here.
Enforcing MFA
It is best practice to configure admins accounts with “just enough” access to perform their tasks. But first, admins need to have MFA enabled.
If you aren’t familiar with Azure AD’s security defaults, please pause here and take a quick read. This feature provides a preconfigured basic level of security for your tenant at no additional cost.
We can protect both MCAS and Defender for Identities with MFA using an Azure AD Conditional Access Policy. Note that while this blog is focused solely on MCAS and Defender for Identities, these concepts can be expanded to include other apps and conditions to meet the security needs of your environment.
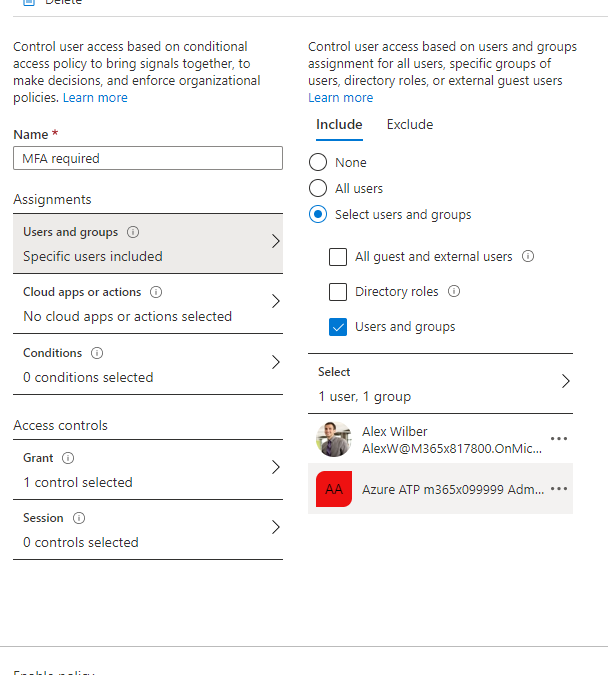
The setup is simple, create a new policy and scope your configuration. I’ve done so in the example below by including a specific user (Alex Wilber) and with the Defender for Identities administrative security group. This ensures my policy will only be applicable for those users.

Next, we want to select the apps this policy will apply to. Search for both Microsoft Cloud App Security and Azure Advanced Threat Protection in the cloud application catalog to add them.

Before we configure the Access controls to grant users access, I want to highlight, applying additional conditions (such as locations to include or exclude your trusted locations from the policy) could further strengthen the security of your accounts. A great use-case for this type of configuration is with the usage of a service account. When using a service account, such as an account provisioned explicitly for API access, it is important to clamp the access down as tight as possible. Typically, a service account would only be used inside your corporate network from a specific set of servers or from a set of trusted IP locations for a service provider. Limiting where your accounts can connect from, minimizes your environment’s risk exposure.
As a final step, you will need to configure the grant Access controls and require multi-factor authentication. If you aren’t using Azure MFA, you can leverage custom controls to support 3rd party MFA providers. More information for onboarding users to Azure MFA can be found here.

Denying Access to Default Azure AD Roles
As mentioned earlier in the blog post, many of the Azure AD roles have access to MCAS and Defender for Identities by default. By denying access to these roles, we ensure that only specific MCAS and Defender for Identities admins will be allowed access. Additionally, this level of authorization can meet the needs of legal and compliance boundaries as well as providing least privilege access for viewing application data and security events.
Like our MFA policy, begin by specifying the users and groups scope. By selecting the directory roles for Global Administrator, Security Administrator, Compliance Administrator, Compliance Data Administrator, Security Operator, Security Reader, and Global Reader we can prevent default access to our apps.

Next, define MCAS and Defender for Identities (Azure Advanced Threat Protection) to your Cloud apps scope.

Lastly, select the Block access control.

When a user belonging to one of the Azure AD roles attempts to login, access is denied.

That’s it, you’ve now secured your privileged accounts by enforcing MFA and denying access to the Azure AD built-in roles! Let us know in the comments what you are doing to protect your privileged accounts.
by Contributed | Oct 16, 2020 | Technology
This article is contributed. See the original author and article here.
We recently had a case where a customer reported that Autopilot was timing out on the Enrollment Status Page. While this known issue was documented and the fix is in Windows, we figured it would be helpful to share a few more details in case you run into this.
Scenario
If the real-time clock on a PC is off by a significant amount of time and you are using hybrid Azure AD join (AADJ), you may find that the enrollment status page times out. Behind the scenes, the device is performing a time sync against the on-prem time server after the offline domain join is applied to domain join the device, and when there’s a mismatch in time, it can’t always resolve.
You have two options for a fix for this issue:
- Upgrade the device to a Windows build that contains the fix for this issue –
- Windows 10, version 1903 or Windows 10, version 1909 – update to OS Builds 18362.815 and 18363.815 as discussed in this KB article.
- Windows 10, version 2004 – update to OS Builds 19041.508 as discussed in this KB article
- The second option, as mentioned in our documentation, is to manually force a time sync before the device is enrolled:
- Boot the device to the start of the out-of-box experience (OOBE).
- Establish a network connection (wired or wireless).
- Run the command w32tm /resync /force to sync the time.
Let us know if you have any additional questions on this by replying to this post or by tagging @IntuneSuppTeam out on Twitter.
by Contributed | Oct 16, 2020 | Technology
This article is contributed. See the original author and article here.
With Azure Lab Services, you can create labs using both marketplace images and custom images from a Shared Image Gallery. There are several ways to create a custom image, such as:
1. Export the image from your lab’s template VM.
- For Windows images, this option will automatically create a specialized image which means that the image will retain machine-specific information (such as the SID) and user data.
2. Upload an image to Shared Image Gallery from your physical lab environment.
- With this option, you have the flexibility of using either specialized or generalized images to create your Windows-based labs. A generalized image uses Sysprep to remove all of the user’s data. Sysprep also clears the SID so that a new lab template VM created from the image will have a unique SID.
- Another benefit is that you can create the image in your physical lab environment with tools that you are already accustomed to using – such as SCCM or Endpoint Configuration Manager.
- This is also a great option if you need access to large installationsetup files in your physical lab environment that are difficult to copy to a lab’s template VM.
We recently published the following article that shows the detailed steps for bringing an image from your physical lab environment to your lab account’s Shared Image Gallery:
IMPORTANT: Please keep in mind that when you move from a physical lab environment to Azure Labs, that you should restructure your images. Refer to the following blog post that has more details: Moving from a Physical Lab to Azure Lab Services
Thanks for reading!

by Contributed | Oct 16, 2020 | Technology
This article is contributed. See the original author and article here.

By Raman Pandey
Hello everyone, this time we bring you another JMeter post for those performance testers following this blog. JMeter is a very extensible and customizable tool, however sometimes it may need a few tweaks to make it look and behave the way you want on your specific OS and setup.
For example you can configure the log, enable and configure HiDPI (High Dots per inch) scaling, change the size of fonts, icons, toolbars, among many other things. This time around though, Raman will explain how to enable and configure Undo and Redo in JMeter and why it is not enabled by default:
Undo & Redo in JMeter
Here is the solution for reverting back mistakes/changes while creating these massive JMeter scripts:
Undo and Redo are a very basic features of any editor or IDE. It is really annoying that such a basic feature is not found in JMeter. Here is the catch. JMeter has this feature but not by default and therefore we have to enable it from our end. JMeter team believes in making JMeter as light as possible and they are avoiding the extra memory consumption that would take place, therefore Undo and Redo options are kept hidden or disabled by default.
Initially, the JMeter toolbar without the Undo and Redo buttons looks like this:

Instructions:
Follow the below steps to enable these options:
- Navigate to bin folder of JMeter directory
- Open jmeter.properties file using Notepad or Notepad++
- Side note here, you may prefer to make these changes in user.properties which would only apply to your user but the values on this file supersede values on the other properties file. Also if you mess up, you can always reset with the content of jmeter.properties.
- Search for undo.history.size
- Uncomment the line undo.history.size=0 by removing # (sharp sign)
- Set a natural number as a value of undo.history.size attribute e.g. 1, 5, 10, 50 etc. (This number represents the maximum number of steps that you can undo or redo.)
- Save the file and relaunch JMeter to reflect the changes.

Please note-
The number must be a natural number (1,2,3,….n) or simply say positive integer other than 0. The suggested value by JMeter is 25 which you can see in the description above this line in “jmeter.properties” file, it shows “Set it to a number > 0 (25 can be a good default)”. So, you can give 1 or 5 or 7 or 10 or 12 or 15 or 25, but not Zero. If you give Zero, there will not be any changes
Precaution:
This number represents the maximum number of steps that you can undo or redo. You can set this to a larger number e.g. 50 or 100 but the bigger it is, the more it consumes memory. When you try to undo/redo more than 5-10 steps at a time then you will notice a big slowdown in JMeter. Hence, JMeter team suggest to have a maximum value of 25 and that too for a computer with very high RAM memory.
For most of the normal users, 5 or 7 solve their purpose. Here, I have given the value as 5 which shown above.
Once you restart the JMeter you can see Undo and Redo options in the JMeter toolbar which are greyed-out; indicate no action done yet.

Now, perform some actions in JMeter so that both the buttons get colorfully visible and clickable, as illustrated below

Limitation:
Ctrl + Z or Command + Z (in Mac OS) does not work in JMeter. Only clicking the Undo/Redo button in the toolbar works.
You can also do Undo/Redo from “Edit” option of JMeter or “Context Menu” by right-clicking on any of the Element as illustrated below:

That is it. Thanks Raman for sharing!
Please leave any comments or questions below.

by Contributed | Oct 16, 2020 | Technology
This article is contributed. See the original author and article here.

Deep Dive into the Microsoft Teams Client
Guillaume Meyer is an entrepreneur living between Los Angeles and Paris. Guillaume is the founder of SalesTim, a SAAS app that automates Microsoft Teams Governance and integrates Salesforce with Microsoft Teams. An Office Apps & Service Microsoft MVP since 2013, Guillaume is focused on Microsoft Teams as a platform and likes to share his opinions, tips and tricks with this growing community. For more, see his Twitter @guillaumemeyer

STEP BY STEP APPLYING MICROSOFT DATA LOSS PREVENTION ON DATA COPIED TO USB
Ahmed Nabil has more than 17 years of experience in the field of Information Technology/Systems, Infrastructure, Project Management, Information Security, Application development/Automation, IT management and holds several professional IT certifications from Microsoft, CISCO, ISACA, ISC2, PMI, CWNP, PECB and EC- Council. Ahmed is an industry expert in Information Security and Digital Transformation, public speaker at several international conferences and author of several articles published in different international security magazines. Check him out on Twitter @ITCalls_ANabil

Build an Azure Application Gateway with Terraform
James Dumont le Douarec is a French Azure MVP specialized in building IT Infrastructures with a DevOps Architect mindset. James is fascinated by technologies that make IT Infrastructures easy to use, deploy and evolve. Previously, James has worked on projects including Cloud Infrastructure CI/CD, Data Lake Infrastructure on Azure, Cloud IaaS and PaaS migration, Hyper-convergence migration, VM Backup migration, and even Active Directory Domain Services migration. When he’s not behind a keyboard, James is wakeboarding whenever possible. For more on James, visit his Twitter @james_dld

Blazor Series: – Lazy Loading
Alexandre Felipe Malavasi Cardoso is a Microsoft MVP based in Ireland who counts more than 15 years of software development. Alexandre has participated in many projects as a technical leader and software developer, delivering solutions using Microsoft Technologies. He is also an accomplished postgraduate completing two master’s degrees in software engineering with Agile Methods Emphasis and in Software Development Process. For more see Alexandre’s Twitter @alemalavasi

Using Project ‘Bicep’ (Preview) to create ARM Templates that deploy WVD!
Freek Berson is an Infrastructure specialist at Wortell, a system integrator company based in the Netherlands. Here he focuses on End User Computing and related technologies, mostly on the Microsoft platform. He is also a managing consultant at rdsgurus.com. He maintains his personal blog at themicrosoftplatform.net where he writes articles related to Remote Desktop Services, Azure and other Microsoft technologies. An MVP since 2011, Freek is also an active moderator on TechNet Forum and contributor to Microsoft TechNet Wiki. He speaks at conferences including BriForum, E2EVC and ExpertsLive. Join his RDS Group on Linked-In here. Follow him on Twitter @fberson

by Contributed | Oct 16, 2020 | Technology
This article is contributed. See the original author and article here.
This week’s blog roundup brought to you by Excel MVPs Ajay Anand, Mourad Louha, and Ismael Romero.
 Ajay Anand
 Mourad Louha
.jpg") Ismael Romero
Ismael Romero
How to Connect Excel Tables, Ajay Anand
Ajay shows how to build relationships between tables using Data Model in Excel.
Zwei Bereiche per Formel zusammenführen (Merge two areas using formula), Mourad Louha
Mourad describes how you can dynamically append two ranges by using a single formula and dynamic arrays, building the formula step by step and using the LET function make it more readable and more performant.
Power Query: Combinaciones sin repetición (Power Query: Combinations without repetition), Ismael Romero
Ismael deep dives in creating a list of combinations without repetition using Power Query and M language.
Click the Like button and/or leave a comment below
by Contributed | Oct 16, 2020 | Azure, Technology
This article is contributed. See the original author and article here.
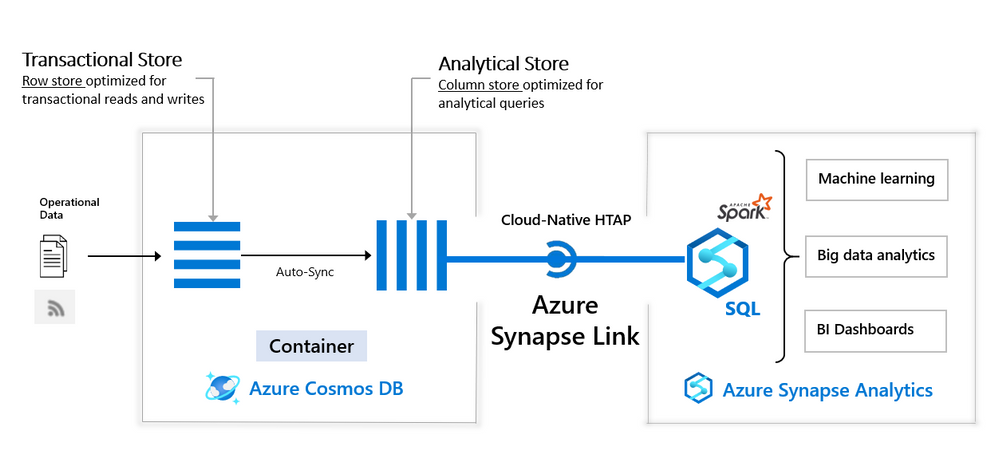
Azure Synapse workspace is advanced analytic solution that enables you to analyze various data sources in Azure cloud. Azure Synapse Link for CosmosDB connects Synapse workspace with Azure CosmosDB analytical store (preview) that contains a copy of CosmosDB data highly optimized for analytic workloads. With Synapse Link for CosmosDB, you can run complex analytic and create reports on top data stored in CosmosDB analytical store without impacting the main CosmosDB transactional containers.

Synapse Analytic s already enables you to use Apache Spark in Synapse workspace to analyze data and apply machine learning algorithms on Azure CosmosDB analytical data.
We are happy to announce that now Synapse workspace enables you to use Transact-SQL language to analyze data in CosmosDB analytical store. Synapse workspace has serverless T-SQL query engine where you can run T-SQL queries on top of your CosmosDB data.
Rich T-SQL surface in Synapse SQL endpoint enables a large ecosystem of tools and applications that can use T-SQL language to directly query CosmosDB analytical data. Synapse SQL represents a bridge between the analytical tools and globally distributed data stored in Azure CosmosDB containers.

With serverless Synapse SQL endpoint in Synapse workspace you can easily explore data in analytical store of CosmosDB container using T-SQL OPENROWSET function. You need to provide a connection string to your CosmosDB account and specify container name that should be analyzed. The following example shows how to explore sample data from your CosmosDB container:
SELECT TOP 10 *
FROM OPENROWSET (
    'CosmosDB',
    'account=<CosmosDB account>;database=<database>;region=<region>;key=<CosmosDB key>',
    Product
) AS products
Besides reading data, Synapse SQL enables you to create complex reports that join multiple containers, group by results, apply window aggregates, and perform any analytic and data transformation that you usually apply on classic SQL database data.
Synapse SQL with CosmosDB analytical store enables you to combine the power of a low latency, globally distributed NoSQL database with a powerful relational SQL analytics engine. This solution enables you to leverage cloud-native hybrid transactional and analytical processing (HTAP) capabilities to provide near real-time analytics solutions on Azure CosmosDB data. The resources in your Azure CosmosDB transactional store are not affected by analytic queries and analytic query don’t spend any Azure CosmosDB resource units (RU). No- extract-transform-load (ETL) analytics against globally distributed operational data at scale enables business analysts and data engineers with T-SQL skills to run near real-time business intelligence and analytics without impacting the performance on the transactional workloads on Azure CosmosDB.
In this video you can see Synapse SQL link to Cosmos DB in action:
Find more information about querying Azure CosmosDB analytical store using SQL language in the article How to query CosmosDB data using serverless Synapse SQL endpoint and Synapse Link.

Recent Comments