by Contributed | Oct 18, 2020 | Azure, Technology
This article is contributed. See the original author and article here.
This blog explains how a Server Provider can onboard Customer to Azure Lighthouse by sample templates in Azure Portal.
Pre-requirements:
Before we start, please read this document about what is Azure Lighthouse.
Azure Lighthouse can enable cross and Multi-tenant management, allow for higher automation, scalability, and enhanced governance across resources and tenants.
Concepts:
Service Provider: the one to manage delegated resources.
Customer: the delegated resources (subscription and/or resources group) can be accessed and managed through service provider’s Azure Active Directory tenant.
To onboard the Customer, at first we need to gather Server Provider’s Tenant ID and Principal ID.
Gather Server Provider’s Tenant ID and Principal ID
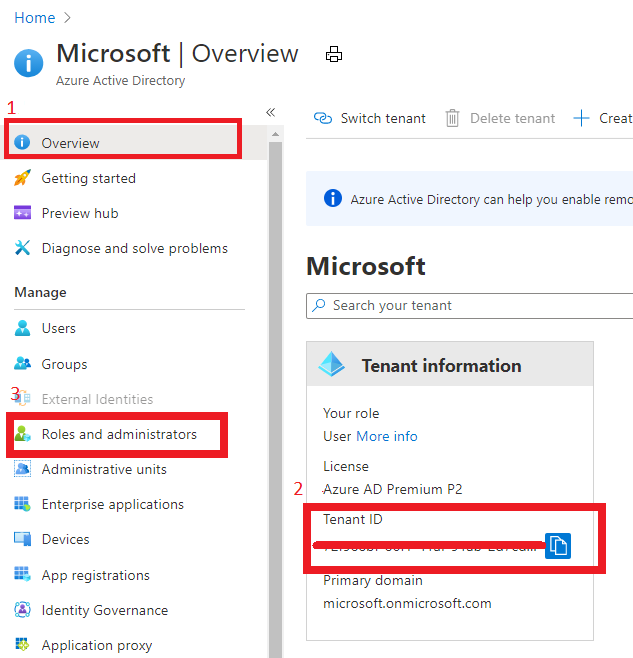
- Tenant ID:
In Azure portal, search for “Azure Active Directory”, you can find the Tenant ID in Overview.
It also can get Tenant ID through Azure Powershell or Azure CLI in local Poweshell (need to login first) or Cloud shell in Azure Portal.

For example, in Azure Poweshell use command “Select-AzSubscription <subscriptionId>”

- Principal ID:
This principal Id should be the User or Security AAD group who needs to manage customer’s resources.
In Azure portal you can search for “Azure AD roles “ or Click “Role and administrator” in the first image (marked 3). Then click find the role you want to onboard Azure Lighthouse.

Select “Profile”, you can find the Object ID there. It’s the principal ID need to keep.

Define roles and permission
As a service provider, you may want to perform multiple tasks for a single customer, requiring different access for different scopes. You can define as many authorizations as you need in order to assign the appropriate role-based access control (RBAC) built-in roles to users in your tenant.
You can get all the roles definition ID from role-based access control (RBAC) built-in roles.
https://docs.microsoft.com/en-us/azure/role-based-access-control/built-in-roles
If you know which role should assign, you also can use Azure Powershell or Azure CLI to get the role definition ID.
For example, use this command “(Get-AzRoleDefinition -Name ‘<roleName>’).id” in Azure Powershell. Here the example in below shows role definition ID for “Contributor”.

Note: Some roles are not supported for Azure Lighthouse(Like Owner role), pls check the details here https://docs.microsoft.com/en-us/azure/lighthouse/concepts/tenants-users-roles#role-support-for-azure-lighthouse
Onboard Customer delegation
After these preparation work, now let’s start to onboard the Customer delegation.
You can select one template you want to deploy for subscription or Resource group for Azure Lighthouse samples
Note: This deployment must be done by a non-guest account in the customer’s tenant who has the Owner built-in role for the subscription being onboarded (or which contains the resource groups that are being onboarded).
If the subscription was created through the Cloud Solution Provider (CSP) program, any user who has the Admin Agent role in your service provider tenant can perform the deployment.
Click one for the Azure button, it directly goes to the Azure portal custom deployment page.

Then select “Edit parameter”.

Put TenantID, PrincipalID and Role definitions found before. And click “Save”.

The deployment may take several minutes to complete.
After the deployment succeeds, it may take about 15 mins to allow us see it from portal.
In Customer Azure Portal, search for “Service Provider” and click “Service provider offers”.

In Service Provider portal, search for “My customers”, select “Customer”.

As I applied for “Contributor” role, you can find it in directory and subscription in Service Provider side.

What can we do in Azure Lighthouse delegation?
After on board Lighthouse successfully. you can use Server Provider account to manage Customer resources without switch tenant.
If Service Provider has Contributor role, it can update, delete and create resources in Customer’s subscription.
Below image shows Storage account can be created in Customer Resource group from Server provider.

To conclude, Azure Lighthouse provide benefits for managing Customers’ Azure resources securely, without having to switch context and control planes.
Reference: https://docs.microsoft.com/en-us/azure/lighthouse/how-to/onboard-customer
by Contributed | Oct 18, 2020 | Azure, Technology
This article is contributed. See the original author and article here.
This blog explains how a Server Provider can onboard Customer to Azure Lighthouse by sample templates in Azure Portal.
Pre-requirements:
Before we start, please read this document about what is Azure Lighthouse.
Azure Lighthouse can enable cross and Multi-tenant management, allow for higher automation, scalability, and enhanced governance across resources and tenants.
Concepts:
Service Provider: the one to manage delegated resources.
Customer: the delegated resources (subscription and/or resources group) can be accessed and managed through service provider’s Azure Active Directory tenant.
To onboard the Customer, at first we need to gather Server Provider’s Tenant ID and Principal ID.
Gather Server Provider’s Tenant ID and Principal ID
- Tenant ID:
In Azure portal, search for “Azure Active Directory”, you can find the Tenant ID in Overview.
It also can get Tenant ID through Azure Powershell or Azure CLI in local Poweshell (need to login first) or Cloud shell in Azure Portal.
For example, in Azure Poweshell use command “Select-AzSubscription <subscriptionId>”
- Principal ID:
This principal Id should be the User or Security AAD group who needs to manage customer’s resources.
In Azure portal you can search for “Azure AD roles “ or Click “Role and administrator” in the first image (marked 3). Then click find the role you want to onboard Azure Lighthouse.
Select “Profile”, you can find the Object ID there. It’s the principal ID need to keep.
Define roles and permission
As a service provider, you may want to perform multiple tasks for a single customer, requiring different access for different scopes. You can define as many authorizations as you need in order to assign the appropriate role-based access control (RBAC) built-in roles to users in your tenant.
You can get all the roles definition ID from role-based access control (RBAC) built-in roles.
https://docs.microsoft.com/en-us/azure/role-based-access-control/built-in-roles
If you know which role should assign, you also can use Azure Powershell or Azure CLI to get the role definition ID.
For example, use this command “(Get-AzRoleDefinition -Name ‘<roleName>’).id” in Azure Powershell. Here the example in below shows role definition ID for “Contributor”.
Note: Some roles are not supported for Azure Lighthouse(Like Owner role), pls check the details here https://docs.microsoft.com/en-us/azure/lighthouse/concepts/tenants-users-roles#role-support-for-azure-lighthouse
Onboard Customer delegation
After these preparation work, now let’s start to onboard the Customer delegation.
You can select one template you want to deploy for subscription or Resource group for Azure Lighthouse samples
Note: This deployment must be done by a non-guest account in the customer’s tenant who has the Owner built-in role for the subscription being onboarded (or which contains the resource groups that are being onboarded).
If the subscription was created through the Cloud Solution Provider (CSP) program, any user who has the Admin Agent role in your service provider tenant can perform the deployment.
Click one for the Azure button, it directly goes to the Azure portal custom deployment page.
Then select “Edit parameter”.
Put TenantID, PrincipalID and Role definitions found before. And click “Save”.
The deployment may take several minutes to complete.
After the deployment succeeds, it may take about 15 mins to allow us see it from portal.
In Customer Azure Portal, search for “Service Provider” and click “Service provider offers”.
In Service Provider portal, search for “My customers”, select “Customer”.
As I applied for “Contributor” role, you can find it in directory and subscription in Service Provider side.
What can we do in Azure Lighthouse delegation?
After on board Lighthouse successfully. you can use Server Provider account to manage Customer resources without switch tenant.
If Service Provider has Contributor role, it can update, delete and create resources in Customer’s subscription.
Below image shows Storage account can be created in Customer Resource group from Server provider.
To conclude, Azure Lighthouse provide benefits for managing Customers’ Azure resources securely, without having to switch context and control planes.
Reference: https://docs.microsoft.com/en-us/azure/lighthouse/how-to/onboard-customer
by Contributed | Oct 18, 2020 | Azure, Technology
This article is contributed. See the original author and article here.
In the Summer of 2018, we released SQL Server Integration Services (SSIS) in Azure Data Factory (ADF), which is a Platform as a Service (PaaS) for lifting & shifting on-premises SSIS workloads to the cloud. It offers SSIS Integration Runtime (IR) as a managed and dedicated compute resource to run SSIS packages in ADF. We realized early on that there’s a long road ahead for us to support full backward compatibility.
Our customers’ enthusiasm that greeted the release was curbed by their fear of losing accumulated investments in legacy SSIS packages and entrenched operational tools that they use to design, debug, deploy, configure, and manage those packages, as well as to trigger, schedule, or orchestrate their executions. Redesigning hundreds to thousands of those existing packages and retraining their teams to operate new tools are simply non-starters.
Recently, we’ve reached the end of that proverbial long road and can finally allay their fear of losing investments by providing many enablers that unblock and accelerate their legacy SSIS migrations into ADF. On top of that, we’ve also amplified their fear of missing out by offering cloud-first/cloud-only features that allow them to modernize their SSIS workflows in ADF.
This article highlights some of those enablers/features that avoid or at least minimize any changes to their existing packages and tools.
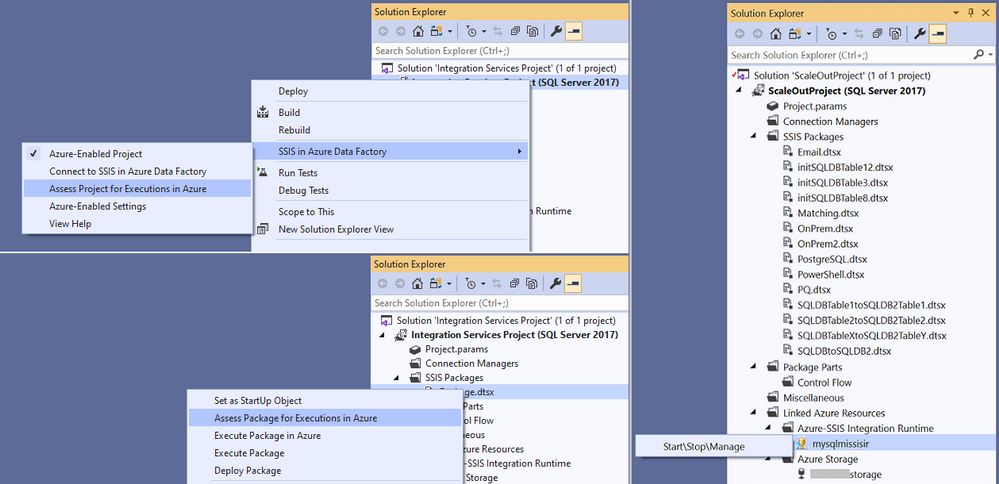
Design, Management, and Migration Tools
One of the main requirements from our customers is to preserve their skillsets in using the familiar tools, such as SQL Server Data Tools (SSDT) and SQL Server Management Studio (SSMS), to design, debug, deploy, configure, execute, and manage their SSIS packages.
To fulfil this requirement, we’ve Azure-enabled both SSDT and SSMS for you to operate on your packages in the cloud just like you’ve done on premises. On top of that, we’ve turned Azure-enabled SSDT into an all-in-one SSIS migration tool where you can perform the 3-step iterative process of package assessment for cloud compatibility, package execution testing in Azure, and package redeployment to Azure.
For more info, see the following docs:
https://docs.microsoft.com/azure/data-factory/how-to-invoke-ssis-package-ssdt
https://docs.microsoft.com/sql/integration-services/lift-shift/ssis-azure-deploy-run-monitor-tutorial?view=sql-server-ver15

Deployment Models
For a bit of history, SSIS on premises has supported two deployment models for a while:
- Package Deployment Model that has been around since the early days of SSIS. It allows you to deploy packages into file system or SQL Server database (MSDB), and then manage them using the legacy SSIS package store interface on SSMS.
- Project Deployment Model that was introduced with SQL Server 2012. It allows you to deploy projects/packages into SSIS catalog (SSISDB) hosted by SQL Server, and then manage them using the Integration Services Catalogs interface on SSMS.
In the beginning, SSIS in ADF supported only Project Deployment Model where SSISDB is hosted by Azure SQL Database (DB)/Managed Instance (MI). Over time, we’ve learned that converting SSIS packages from Package Deployment Model into Project Deployment Model can be quite challenging, especially when you have to redesign many of them to replace configuration files with project/package parameters. On top of that, our on-premises telemetry shows that SSIS instances with Package Deployment Model continue to outnumber those with Project Deployment Model by two to one.
Now, SSIS in ADF also supports Package Deployment Model where packages can be stored in file system, Azure Files, or MSDB hosted by Azure SQL MI, and managed using the new SSIS IR package store interface on SSMS. This also turns SSISDB from a potential migration blocker into an optional enhancement and makes the provisioning of SSIR IR much simpler, because bringing your own Azure SQL DB/MI to host SSISDB is not mandatory anymore.
With Project Deployment Model, you can use Integration Services Deployment Wizard on SSDT/SSMS to deploy projects/packages into SSISDB hosted by Azure SQL DB/MI. With Package Deployment Model, you can use dtutil command prompt utility to deploy packages into Azure Files or MSDB hosted by Azure SQL MI, while switching their protection level at the same time.
For more info, see the following docs:
https://docs.microsoft.com/azure/data-factory/tutorial-deploy-ssis-packages-azure#creating-ssisdb
https://docs.microsoft.com/azure/data-factory/tutorial-deploy-ssis-packages-azure#creating-azure-ssis-ir-package-stores
https://docs.microsoft.com/azure/data-factory/azure-ssis-integration-runtime-package-store
https://docs.microsoft.com/azure/data-factory/azure-ssis-integration-runtime-package-store#deploying-multiple-packages-with-dtutil

Orchestration Tools
On premises, most of our customers use SQL Server Agent to orchestrate SSIS package executions on SQL Server. Their packages can be stored in file system or MSDB/SSISDB hosted by SQL Server and referenced directly or indirectly via SSIS package stores.
If you migrate your SQL Server to Azure SQL MI, you can use Azure SQL MI Agent, which is a built-in tool similar to SQL Server Agent, to orchestrate SSIS package executions on SSIS IR in ADF. Your packages can be stored in file system, Azure Files, or MSDB/SSISDB hosted by Azure SQL MI and referenced directly or indirectly via SSIS IR package stores.
Since Azure SQL MI Agent supports SSIS jobs via SSISDB hosted by Azure SQL MI, if you want to use it as your orchestration tool, we’ll need to create and manage SSISDB on your behalf, even if you use Package Deployment Model that doesn’t store packages in SSISDB.
For more info, see the following doc:
https://docs.microsoft.com/azure/data-factory/how-to-invoke-ssis-package-managed-instance-agent
If you migrate your SQL Server to Azure SQL DB, there’s no built-in tool similar to SQL Server Agent to orchestrate SSIS package executions on SSIS IR in ADF. To address this gap, we’ve provided SSIS scheduling feature on SSMS for you to auto-create new ADF pipelines, activities, and triggers that orchestrate SSIS package executions on SSIS IR. We’ve also provided SSIS Job Migration Wizard on SSMS for you to convert your existing SSIS jobs created for SQL Server Agent into new ADF pipelines, activities, and triggers that orchestrate SSIS package executions on SSIS IR.
For more info, see the following docs:
https://docs.microsoft.com/sql/integration-services/lift-shift/ssis-azure-schedule-packages-ssms?view=sql-server-ver15
https://docs.microsoft.com/azure/data-factory/how-to-migrate-ssis-job-ssms

If you use a third-party tool, such as Tivoli, Control-M, ActiveBatch, etc., to orchestrate SSIS package executions on SQL Server, you probably want to continue using it to orchestrate SSIS package executions on SSIS IR in ADF after migrating your SQL Server to Azure SQL DB/MI. To facilitate this, we’ve provided Azure-enabled DTExec (AzureDTExec) command prompt utility that can be configured on SSMS and invoked by your third-party tool. It auto-creates new ADF pipelines and activities for SSIS package executions on SSIS IR that can be orchestrated by your third-party tool.
For more info, see the following doc:
https://docs.microsoft.com/azure/data-factory/how-to-invoke-ssis-package-azure-enabled-dtexec
On-Premises Data Access
After migrating your SQL Server to Azure SQL DB/MI and SSIS workloads to SSIS in ADF, you probably still have data stores on premises that you want to access from packages running on SSIS IR. We’ve provided two access methods: Virtual Network (VNet) injection of SSIS IR and Self-Hosted IR (SHIR) as a proxy for SSIS IR.
With VNet injection, the on-premises network where your data stores reside must be connected via ExpressRoute/VPN Gateway to the VNet where your SSIS IR is injected. In this way, those data stores will get their own private IP addresses that are accessible by your SSIS IR inside the same VNet. This requires you to modify the relevant connection strings to use these private IP addresses. Without redesigning your packages, you can make the above modifications at run-time by assigning the appropriate values to your SSIS parameters, connection manager properties, or property overrides.
With SHIR as a proxy, you can install SHIR in the on-premises network where your data stores reside. In this way, your packages can run on SHIR and still access those data stores just like they did when they ran on SQL Server. This requires you to enable the ConnectByProxy property of relevant connection managers. Without redesigning your packages, you can make the above modifications at run-time by assigning the appropriate values to your SSIS parameters, connection manager properties, or property overrides.
For more info, see the following blog:
https://techcommunity.microsoft.com/t5/sql-server-integration-services/vnet-or-no-vnet-secure-data-access-from-ssis-in-azure-data/ba-p/1062056

Authentication Methods
When running SSIS packages on SQL Server, you probably used Windows authentication to access on-premises data stores like most of our customers. Now that you run SSIS packages on SSIS IR in ADF, you can still access the same data stores using Windows authentication feature. Without redesigning/modifying your packages, you can enable this feature in several ways, for example via Execute SSIS Package activities in ADF pipelines, SSISDB stored procedure to set execution credentials, or Windows cmdkey command as express custom setups.
For more info, see the following doc and blog:
https://docs.microsoft.com/azure/data-factory/ssis-azure-connect-with-windows-auth
https://techcommunity.microsoft.com/t5/sql-server-integration-services/scripts-we-don-t-need-no-scripts-express-custom-setups-for-ssis/ba-p/1084779
If your on-premises data stores were databases on SQL Servers, you probably used Windows authentication via OLEDB connectors to access them like most of our customers. If you’ve migrated those databases to Azure SQL DB/MI, you can’t use Windows authentication to access them anymore, since Azure SQL DB/MI doesn’t support it, but you can use SQL authentication instead. This requires you to modify the relevant connection strings to switch from Windows authentication to SQL authentication. Without redesigning your packages, you can make the above modifications at run-time by assigning the appropriate values to your SSIS parameters, connection manager properties, or property overrides.
Now that you run SSIS packages on SSIS IR in ADF, you can also securely store your SQL authentication credentials in Azure Key Vault (AKV) when you use Execute SSIS Package activities in ADF pipelines.
For more info, see the following doc:
https://docs.microsoft.com/azure/data-factory/how-to-invoke-ssis-package-ssis-activity#connection-managers-tab
If you want to omit authentication credentials altogether from your packages, you can use Azure Active Directory (AAD) authentication with ADF managed identity to access Azure SQL DB/MI. This requires you to enable the ConnectUsingManagedIdentity property of relevant connection managers and modify the relevant connection strings to use the latest OLEDB driver for SQL Server (MSOLEDBSQL). Without redesigning your packages, you can make the above modifications at run-time by assigning the appropriate values to your SSIS parameters, connection manager properties, or property overrides.
For more info, see the following doc:
https://docs.microsoft.com/sql/integration-services/connection-manager/ole-db-connection-manager?view=sql-server-ver15#managed-identities-for-azure-resources-authentication

Monitoring and Alerting Capabilities
After provisioning your SSIS IR in ADF, you can check its operational status on ADF monitoring hub, where you’ll also find various informational/functional tiles depending on how you’ve configured its general, deployment, and advanced settings.
For more info, see the following doc:
https://docs.microsoft.com/azure/data-factory/monitor-integration-runtime#monitor-the-azure-ssis-integration-runtime-in-azure-portal
With Project Deployment Model, SSIS package execution logs are always stored in SSISDB internal tables and views, so you can interactively query/analyze and visually present them using designated tools like SSMS. With Package Deployment Model, SSIS package execution logs can be stored in file system or Azure Files as CSV files, but you still need to parse and process them using other designated tools first, before you can interactively query/analyze and visually present them.
Now, SSIS in ADF is also integrated with Azure Monitor, so you can interactively query/analyze and visually present all metrics and logs generated from SSIS IR operations and SSIS package executions on Azure portal, regardless of your deployment models. On top of that, you can also raise near-real time alerts on those metrics and logs.
For more info, see the following doc:
https://docs.microsoft.com/azure/data-factory/monitor-using-azure-monitor#monitor-ssis-operations-with-azure-monitor

I hope you’ll find the above enablers/features useful to unblock and accelerate your legacy SSIS migration into ADF. Please don’t hesitate to contact us if you have any feedbacks, questions, or issues, and we’ll follow up ASAP. Thank you as always for your support.

by Contributed | Oct 17, 2020 | Technology
This article is contributed. See the original author and article here.
Here is an opportunity to showcase your visualization skills to the rest of the community by answering one or more of our space-themed challenges!
The challenge will run from October 17th (World Spreadsheet Day) to November 2nd (the 20th anniversary of humans living and working aboard the International Space Station). Visit the Day of Data discussion space on Tech Community to participate – we look forward to seeing you there!
What is the challenge?
Bill Jelen, “MrExcel,” has analyzed a space data set – of all crewed missions, spacewalks, space vehicles, mission by crew, and space travelers – and crafted three questions to test your skills. In addition, there will also be an option of a “wildcard,” where you can surprise us with an idea for a visualization beyond the three questions! We will announce one top entry for each category after the challenge concludes.
Explore this data set at aka.ms/BaseData. For all these questions, please only use the provided data to create your visualization.
- Show the number of astronauts who have launched on each launch vehicle in the dataset. Your visualization should include at least the top three spacecraft that carried humans to space. Bonus: which spacecraft was most prevalent for crewed missions in each decade from 1960’s to 2020’s?
- Show the nationalities of astronauts who have visited the International Space Station. By country, show the total number of human-days on the ISS for each country. This only includes time spent at the ISS, not other space stations such as Skylab or Mir. Simplifying assumption: Assume the space travelers arrive at the ISS on the day after they launch.
- Show the distribution of human-days in space by decade. This includes all crewed spaceflights and stays at the Moon or any space station including Mir, Skylab, and the ISS. Optionally, add interesting Filters such as gender, launch site, astronaut nationality. Consider a way to show the 20 years of continuous space presence.
- Wildcard! Show us an interesting or surprising insight!
How do I enter?
Entries should be submitted by creating a new post in the Day of Data discussion space on Tech Community. To create a new post, create or sign into a profile on Tech Community and choose “Start a New Discussion.” In your post, please include the following:
- Question that you chose to answer
- Screenshot of your visualization
- Link to your Excel workbook
- [For the wildcard question only] A short description of the insight found and why it is interesting to you
If you would like to answer multiple questions, please do! Please create a new post for each question you would like to answer.
How is it judged?
We will choose the winning visualization for each answer through a combination of judging panel and popular vote. Five judges (a combination of Excel MVPs, Excel product team members, and NASA employees) will sit on a panel, with a sixth seat reserved for public vote received by your post.
Every vote counts! To vote on a visualization, simply “like” it. You may vote for as many visualizations as you wish to. Voting will be open from the start of the challenge (October 17th) to one week after the end of the challenge (November 9th).
What do I win?
First and foremost, you win bragging rights and get lots of community love! We are so proud to have you as a part of the Excel community, and look forward to seeing all the visualizations that you come up with. The winners will also get a shout out from Microsoft on social media and amplification of their visualizations.
And finally, we will have none other than Charles Simonyi announcing the winners. Mr. Simonyi is the father of Excel and Word, building the original “applications” group at Microsoft more than 35 years ago. He is also the fifth space tourist, having traveled to the International Space Station on two separate occasions in 2007 and 2009. Last but not least, he is the creator of Hungarian notation – he is “The Hungarian.” We are grateful to Mr. Simonyi for creating Excel, and so honored to have him recognize the winners and their visualizations.
Where can I find more information?
For official terms and conditions, as well as more details about judging, please review the Terms and Conditions.

by Contributed | Oct 16, 2020 | Azure, Technology
This article is contributed. See the original author and article here.
Azure Database for MySQL allows you retain your backup up to 35 days. Often, for audit purposes and compliance requirements, you may need to retain the backups longer than 35 days. In this scenario, you can perform logical backups of your database from Azure Database for MySQL to azure storage for long term retention at optimized. You can follow the steps below to automate full backup of your database on a weekly schedule using an Ubuntu server.
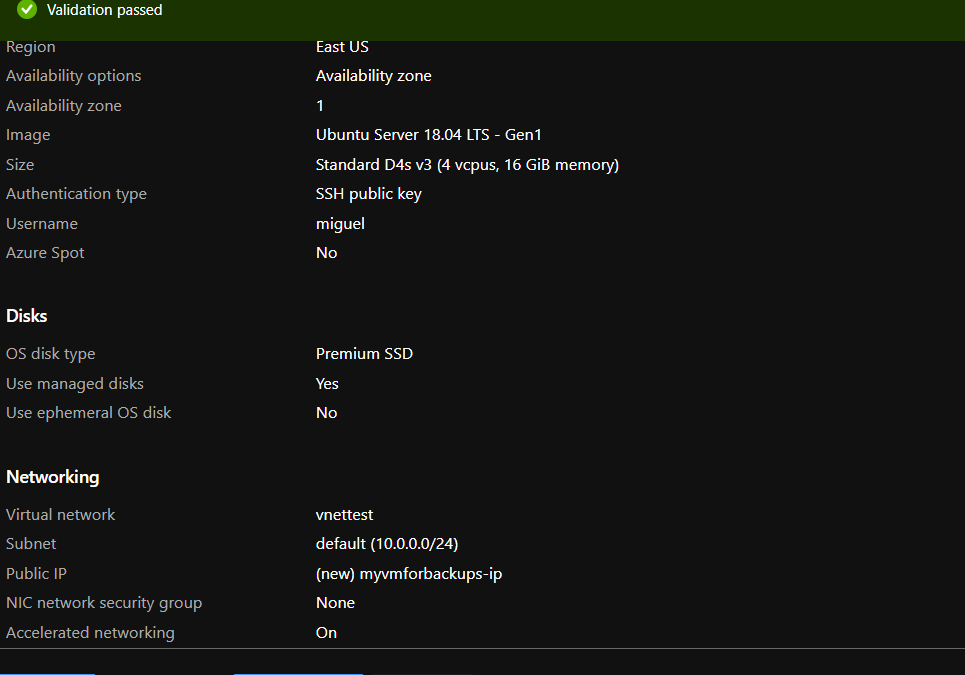
- Provision a VM in Virtual Network to perform secure backups – Create a D4s_v3 VM with ubuntu image and accelerated networking enabled as shown below. You should create the VM in the same region as your Azure Database for MySQL server and add it to a virtual network for secure communication to the MySQL server for backup operation.

- Add you Azure DB for MySQL server in VNet Service endpoint – While the VM is being created, you can use the time to add your Azure Database for MySQL server to VNet service endpoints as shown below:
- Navigate to connection security blade in Azure portal for you Azure Database for MySQL server.

- Click on “+ Adding existing virtual network” under VNet rules. After filling the details in the Create virtual network rule blade, you should have something like the screenshot below. Click on enable and click ok.

- After enabling the VNET rule it should look like the following screenshot.

- Create an Azure storage account – Create an Azure storage account with the name of your preference to host the backups of the server for longer term retention. In this case we will use a unique name to identify that the storage account is for our backups. On the Azure Portal navigate to “Storage Accounts” blade and click on “Add”.

Select the same resource group and create a new storage account. On performance we will use standard. Create it with a RA-GRS availability, and choose the same region where the vm is located.

- Add Storage account to the same Virtual Network – Once the storage account is created and under the newly created storage account navigate to “Firewalls and virtual networks” blade and choose “selected networks” instead of all networks. Click on add existing virtual network. Choose the virtual network, the subnet and click add. If you want to explore the files from the portal, you will need to add your public ip.


- Add Fileshare to store backups – Once the Firewall rule is configured, on the Storage Account navigate to “File Shares” under File Service. Click on Add fileshare. Give it a name (this will be a nfs disk which we will mount in our linux vm) Select Hot as the tier. Choose a name and configure the disk size depending on your estimated backup size up to 5 TB. Give it a name and enter how much Gib you want on the disk. Max to 5TB.

- Connect to Fileshare – Once the File Share is create, click on it to access it and click Connect. From the sidebar that will show up on the right handside select Linux and click on “Copy to Clipboard”. Please modify the sections in red below

sudo mkdir /home/yourusername/mysqlbackups
if [ ! -d "/etc/smbcredentials" ]; then
sudo mkdir /etc/smbcredentials
fi
if [ ! -f "/etc/smbcredentials/mysqlpaasbackup.cred" ]; then
sudo bash -c 'echo "username=mysqlpaasbackup" >> /etc/smbcredentials/mysqlpaasbackup.cred'     sudo bash -c 'echo "password=thiswillbedifferent" >> /etc/smbcredentials/mysqlpaasbackup.cred'
fi
sudo chmod 600 /etc/smbcredentials/mysqlpaasbackup.cred
sudo bash -c 'echo "//mysqlpaasbackup.file.core.windows.net/mysqlbackups /home/yourusername/mysqlbackups cifs nofail,vers=3.0,credentials=/etc/smbcredentials/mysqlpaasbackup.cred,dir_mode=0777,file_mode=0777,serverino" >> /etc/fstab'
sudo mount -t cifs //mysqlpaasbackup.file.core.windows.net/mysqlbackups /home/yourusername/mysqlbackups -o vers=3.0,credentials=/etc/smbcredentials/mysqlpaasbackup.cred,dir_mode=0777,file_mode=0777,serverino
#(Make sure you don’t leave the path under /mnt/ since this disk is erased everytime the vm is shutdown and since we create the directory it will no longer be available to mount it)
Verify connectivity to the file share from Azure VM – Connect to the Azure VM created in Step 1. Verify connectivity to the storage account using the following command. (change the storage account) This will not check if you have access to the file share but will make sure that if the storage account is configured correctly then the connection to the file share will succeed.
nc -zvw3 mysqlpaasbackup.file.core.windows.net
You should see the following screen.

Copy the updated script and run it in the terminal.

Install MySQL Client on Azure VM – Install the required packages to do the dump. In this case we will be using mysqldump which is installed as part of mysql client installation.
sudo apt install mysql-client
- Install and login to the azure CLI to shutdown vm after backup runs.
curl -sL https://aka.ms/InstallAzureCLIDeb | sudo bash
az login
- Setup bash script to take backups – Copy the script from here and change it accordingly to what you need. We will be dumping our dbs into one single file.
#!bin/bash
cd /home/miguel
export DBNAME="testconn newdb"
export MYPASSWORD="yourpassword"
date=$(date +%s)
year=$(date +%Y)
month=$(date +%m)
day=$(date +%d)
hour=$(date +%H)
path=$year/$month/$day/$hour
echo $date
cd /home/miguel/mysqlbackups/
mkdir -p $path
cd $pathmysqldump --databases $DBNAMES -hyourservername.mysql.database.azure.com -u username@servername -p$MYPASSWORD > back$date.bak
az vm deallocate -g MyResourceGroup -n MyVm
Setup a cron job to schedule backup – Run crontab -e and edit it with your favorite editor. This time we will use nano.
At the end of the file enter the time you want the vm to create the backup. We will setup to run on Sundays, at 2AM. The server is on UTC, you can either change it to your timezone or just make sure it is 2AM in the morning for you. In our case we have change the time in the server to our region. You can check the backup history with cat /home/miguel/backup.log
0 2 * * 6 sh /home/miguel/backup.sh >> /home/miguel/backup.log

Schedule VM Start to save cost – Schedule the VM to start before the selected backup time using Logic Apps, we will do it 30 mins before our backup runs. Click on Add and enter the required information and create it. Shutdown will be executed after backup finish in the script using azure cli to deallocate vm.


When it is created, it will be under Logic Apps Designer, choose Recurrence. 
Enter the interval you want this action to be run. We choose 1 every week, at 1 am, 30 min, Sunday, and select the timezone. Click on new step, and search for azure vm. Under azure vm search for start VM. Select your subscription, the resource group, and the vm. Hit on save and close it.

If you have any questions with Logic Apps, please follow the next link.
https://docs.microsoft.com/en-us/azure/logic-apps/
Hope this step by step guide allows you to automate backups of your Azure DB for MySQL server to azure storage for long term retention and archival.
by Contributed | Oct 16, 2020 | Azure, Technology
This article is contributed. See the original author and article here.
Azure Database for MySQL allows you retain your backup up to 35 days. Often, for audit purposes and compliance requirements, you may need to retain the backups longer than 35 days. In this scenario, you can perform logical backups of your database from Azure Database for MySQL to azure storage for long term retention at optimized. You can follow the steps below to automate full backup of your database on a weekly schedule using an Ubuntu server.

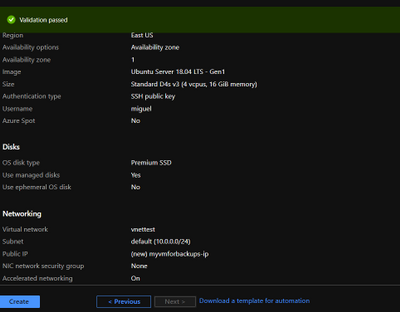
- Provision a VM in Virtual Network to perform secure backups – Create a D4s_v3 VM with ubuntu image and accelerated networking enabled as shown below. You should create the VM in the same region as your Azure Database for MySQL server and add it to a virtual network for secure communication to the MySQL server for backup operation.
- Add you Azure DB for MySQL server in VNet Service endpoint – While the VM is being created, you can use the time to add your Azure Database for MySQL server to VNet service endpoints as shown below:
- Navigate to connection security blade in Azure portal for you Azure Database for MySQL server.
- Click on “+ Adding existing virtual network” under VNet rules. After filling the details in the Create virtual network rule blade, you should have something like the screenshot below. Click on enable and click ok.

- After enabling the VNET rule it should look like the following screenshot.

- Create an Azure storage account – Create an Azure storage account with the name of your preference to host the backups of the server for longer term retention. In this case we will use a unique name to identify that the storage account is for our backups. On the Azure Portal navigate to “Storage Accounts” blade and click on “Add”.

- Select the same resource group and create a new storage account. On performance we will use standard. Create it with a RA-GRS availability, and choose the same region where the vm is located.

- Add Storage account to the same Virtual Network – Once the storage account is created and under the newly created storage account navigate to “Firewalls and virtual networks” blade and choose “selected networks” instead of all networks. Click on add existing virtual network. Choose the virtual network, the subnet and click add. If you want to explore the files from the portal, you will need to add your public ip.
- Add Fileshare to store backups – Once the Firewall rule is configured, on the Storage Account navigate to “File Shares” under File Service. Click on Add fileshare. Give it a name (this will be a nfs disk which we will mount in our linux vm) Select Hot as the tier. Choose a name and configure the disk size depending on your estimated backup size up to 5 TB. Give it a name and enter how much Gib you want on the disk. Max to 5TB.
- Connect to Fileshare – Once the File Share is create, click on it to access it and click Connect.
 From the sidebar that will show up on the right handside select Linux and click on “Copy to Clipboard”. Please modify the sections in red below
sudo mkdir /home/yourusername/mysqlbackups
if [ ! -d “/etc/smbcredentials” ]; then
sudo mkdir /etc/smbcredentials
fi
if [ ! -f “/etc/smbcredentials/mysqlpaasbackup.cred” ]; then
    sudo bash -c ‘echo “username=mysqlpaasbackup” >> /etc/smbcredentials/mysqlpaasbackup.cred’
    sudo bash -c ‘echo “password=thiswillbedifferent” >> /etc/smbcredentials/mysqlpaasbackup.cred’
fi
sudo chmod 600 /etc/smbcredentials/mysqlpaasbackup.cred
sudo bash -c ‘echo “//mysqlpaasbackup.file.core.windows.net/mysqlbackups /home/yourusername/mysqlbackups cifs nofail,vers=3.0,credentials=/etc/smbcredentials/mysqlpaasbackup.cred,dir_mode=0777,file_mode=0777,serverino” >> /etc/fstab’
sudo mount -t cifs //mysqlpaasbackup.file.core.windows.net/mysqlbackups /home/yourusername/mysqlbackups -o vers=3.0,credentials=/etc/smbcredentials/mysqlpaasbackup.cred,dir_mode=0777,file_mode=0777,serverino
#(Make sure you don’t leave the path under /mnt/ since this disk is erased everytime the vm is shutdown and since we create the directory it will no longer be available to mount it)
11. Verify connectivity to the file share from Azure VM – Connect to the Azure VM created in Step 1. Verify connectivity to the storage account using the following command. (change the storage account) This will not check if you have access to the file share but will make sure that if the storage account is configured correctly then the connection to the file share will succeed.
nc -zvw3 mysqlpaasbackup.file.core.windows.net
You should see the following screen.

Copy the updated script and run it in the terminal.

12. Install MySQL Client on Azure VM – Install the required packages to do the dump. In this case we will be using mysqldump which is installed as part of mysql client installation.
sudo apt install mysql-client
13.Install and login to the azure CLI to shutdown vm after backup runs.
curl –sL https://aka.ms/InstallAzureCLIDeb | sudo bash
az login
14.Setup bash script to take backups – Copy the script from here and change it accordingly to what you need. We will be dumping our dbs into one single file.
#!bin/bash
cd /home/miguel
export DBNAME=”testconn newdb“
export MYPASSWORD=”yourpassword“
date=$(date +%s)
year=$(date +%Y)
month=$(date +%m)
day=$(date +%d)
hour=$(date +%H)
path=$year/$month/$day/$hour
echo $date
cd /home/miguel/mysqlbackups/
mkdir -p $path
cd $pathmysqldump –databases $DBNAMES -hyourservername.mysql.database.azure.com -u username@servername –p$MYPASSWORD > back$date.bak
az vm deallocate -g MyResourceGroup -n MyVm
15. Setup a cron job to schedule backup – Run crontab -e and edit it with your favorite editor. This time we will use nano.
At the end of the file enter the time you want the vm to create the backup.
We will setup to run on Sundays, at 2AM. The server is on UTC, you can either change it to your timezone or just make sure it is 2AM in the morning for you. In our case we have change the time in the server to our region.
0 2 * * 6 sh /home/miguel/backup.sh >> /home/miguel/backup.log

You can check the backup history with cat /home/miguel/backup.log
16. Schedule VM Start to save cost – Schedule the VM to start before the selected backup time using Logic Apps, we will do it 30 mins before our backup runs. Click on Add and enter the required information and create it. Shutdown will be executed after backup finish in the script using azure cli to deallocate vm.


When it is created, it will be under Logic Apps Designer, choose Recurrence.

Enter the interval you want this action to be run. We choose 1 every week, at 1 am, 30 min, Sunday, and select the timezone. Click on new step, and search for azure vm. Under azure vm search for start VM. Select your subscription, the resource group, and the vm. Hit on save and close it.

If you have any questions with Logic Apps, please follow the next link.
https://docs.microsoft.com/en-us/azure/logic-apps/
Hope this step by step guide allows you to automate backups of your Azure DB for MySQL server to azure storage for long term retention and archival.
by Contributed | Oct 16, 2020 | Technology
This article is contributed. See the original author and article here.
You may have noticed that after synchronizing updates released on patch Tuesday (October 13, 2020), Windows 10 Feature Updates for versions 1903 and 2004 that were previously downloaded, now show a status of Downloaded = No under the All Windows 10 Updates node. The content for these Windows 10 Feature Updates were revised to address this security issue. As a result of this content revision, any previously downloaded feature updates will need to be downloaded again.
NOTE: The existing feature updates for Windows 10, versions 1809 and 1909 were not revised. New feature updates for these versions that supersede the previous versions were published that contain the security fix. Because the creation/release date for these new feature updates uses the same date/time as the previous versions, in some environments the superseded feature updates are expired immediately. |
If you used an automatic deployment rule or servicing plan to previously deploy the feature update, it will be downloaded again at the next scheduled evaluation. If you manually deployed the feature update, you will need to manually download it again.
If devices have previously downloaded the feature update content to their local cache but haven’t installed the feature update, the feature update content will be downloaded again to the local cache once the distribution points are updated.
by Contributed | Oct 16, 2020 | Technology
This article is contributed. See the original author and article here.
News this week includes:
Integration with Teams is now generally available – Create labs within Microsoft Teams
Apps can now narrate what they see in the world as well as people do
Azure Defender for IoT is now in public preview
FarisMalaeb is our Member of the Week, and a great contributor in the Windows PowerShell community.
View the Weekly Roundup for Oct 12-16 in Sway and attached PDF document.
by Contributed | Oct 16, 2020 | Technology
This article is contributed. See the original author and article here.
Introduction
This article is the second installment of a series on the scenario used in SAP BAPI Transactions Walkthrough, which should be read before this blog post.
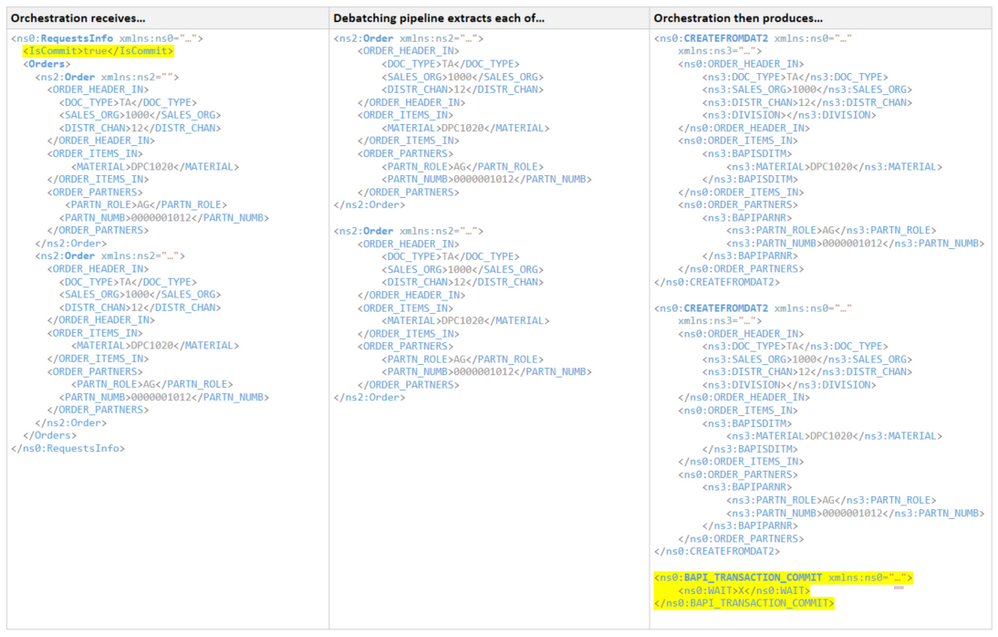
Here, instead of receiving a pre-determined number of BAPI transaction requests one at a time, the orchestration expects a single document containing a batch of requests, as well as the desired outcome (commit or rollback). Debatching of XML messages into single BAPI transaction requests is done inside the orchestration by calling the default XMLReceive pipeline. General documentation regarding this orchestration feature may be found at How to Use Expressions to Execute Pipelines.
The choice of in-orchestration pipeline processing over direct processing in the receive port is mostly arbitrary. It allows us to keep this presentation focused on a single place where the different stages are integrated. The orchestration is well-suited for a workflow of multiple actions and custom error handling. There are pros and cons mentioned in the literature regarding both options and it would take another post to cover them in detail.
It is worth mentioning that with in-orchestration pipelines:
– Transforms can happen before debatching, which in some cases could be a hard requirement;
– It is possible to enumerate over messages of different types;
– Failures result in exceptions being thrown rather than messages being suspended by the pipeline (see for instance Error Handling for failure behavior in the pipeline stage). The thrown exceptions can be handled in a catch block within the calling orchestration, which could allow for graceful error handling with BAPI_TRANSACTION_ROLLBACK.
Debatching with Receive Pipeline
Pipeline processing of messages containing batches of orders can summarized as :

Envelope Schema
The first step for using a debatching pipeline is to define an envelope schema to represent multiple orders. This is done according to the following process, initially documented in Calling a pipeline inside an orchestration.
- Add a new schema file to the project.
- Change the root node name to “Orders”.
- In the properties window for the <schema> treeview node: (a) change the Envelope property to Yes, and (b) import the Order schema.
- In the properties window for the “Orders” root node, set the Body XPath property to /*[local-name()=’Orders’ and namespace-uri()='<namespace of the schema here’
- Insert a child record under the root node.
- In the child record properties, set the data structure type field to Order. As a result, the Order definition will appear under Orders.

IsCommit is a promoted property which is used later on for deciding whether to commit or rollback the transaction batch. Orders corresponds to the envelope schema imported into RequestsInfo. The Orders element is extracted by a transform shape into a message called SalesOrders.
Note: the RequestsInfo schema could also be an envelope schema for Order, instead of the Orders schema.
Implementing the Pipeline
Before using the pipeline, the following dependencies must be added to the BizTalk project:
- Microsoft.XLANGs.Pipeline.dll
- Microsoft.BizTalk.Pipeline.dll
The pipeline must be inside a scope of type Atomic because it is of non-serializable type. As a result, the orchestration has to be of type “Long running”. Inside the atomic scope, the first expression starts the pipeline execution:
PipelineOutputMessageVar = Microsoft.XLANGs.Pipeline.XLANGPipelineManager.ExecuteReceivePipeline(typeof(Microsoft.BizTalk.DefaultPipelines.XMLReceive), SalesOrders);
where PipelineOutputMessageVar is a variable of type Microsoft.XLANGs.Pipeline.ReceivePipelineOutputMessages and is used to iterate in a loop shape with the expression:
PipelineOutputMessageVar.MoveNext()
Inside the loop shape, a message of type Order, CurrentOrder, is assigned as follows:
CurrentOrder = null;
PipelineOutputMessageVar.GetCurrent(CurrentOrder);
CurrentOrder is then mapped to a message (BAPIMessage) of type BUS2032.CREATEFROMDAT2.
The figure below shows the entire pipeline stage:

Caching BAPIMessages
Ideally, the BAPIMessages should be sent to the SAP server from within the pipeline, by using the send-receive port connected to SAP. However, an atomic scope may not contain both the send and the corresponding receive (see a detailed explanation here); in our case, the SAP adapter port needs to be bidirectional because the orchestration needs the document id contained in the response and which is used later on to query the transactions status. To work around this limitation, BAPIMessages are saved in a list object to be used outside the pipeline scope:
TempXmlData = BAPIMessage;
BAPIOrders.AddFromXMLString(TempXmlData);
where TempXmlData is a variable of type XmlDocument, and BAPIOrders is of custom type BAPIOrderList added in a helper library.
namespace SapBAPITxClientDebatching
{
    [Serializable]
    public class BAPIOrdersList : List<CREATEFROMDAT2>
    {
        public BAPIOrdersList() { }

        public void AddFromXMLString(XmlDocument document)
        {
            MemoryStream stream = new MemoryStream();
            document.Save(stream);
            stream.Flush();
            stream.Position = 0;

            XmlSerializer reader = new System.Xml.Serialization.XmlSerializer(typeof(CREATEFROMDAT2));
            StreamReader st = new StreamReader(stream);
            this.Add((CREATEFROMDAT2)reader.Deserialize(st));
            st.Close();
        }

        public CREATEFROMDAT2 Get(int index)
        {
            return this[index];
        }

        public int OrdersCount()
        {
            return this.Count;
        }
    }
}
The helper library also contains C# classes corresponding to the BAPI transactions schemas generated by running the xsd.exe utility on the BAPI schemas generated in Visual Studio.
Processing the debatched BAPI Transactions
Once all Order elements have been debatched, the orchestration exits the pipeline atomic scope and iterates over the list of BAPI transaction messages to serialize and send to the send-receive port (LOBPort) connected to the SAP server. This stage is identical to Stage 2 in SAP BAPI Transactions Tutorial except that here, BAPI transaction requests are provided by the orchestration variable BAPIOrders.

The Global Picture
Subsequent stages of the orchestration are presented in detail in SAP BAPI Transactions Tutorial. In Stage 3, the action to take (Commit/Rollback) is determined by the IsCommit promoted property mentioned earlier.


Concluding Remarks
The aim of this post was to extend the BAPI tutorial scenario by showing BAPI transactions working with known BizTalk patterns such as debatching. Another pattern to consider is Scatter-Gather, of which debatching is the first step. This will be the topic of another blog post.
All code used in this article is attached.
References
SAP BAPI Transactions Tutorial
Calling a pipeline inside an orchestration
Debatching in orchestration
Performance study of debatching within an orchestration
Different techniques of debatching in orchestration
How to Use Expressions to Execute Pipelines
Error Handling in Pipelines
For more general info on the SAP Adapter:
Operations on BAPIs in SAP
Run BAPI Transactions in SAP using BizTalk Server
Message Schemas for BAPI Operations
SAP Adapter documentation
Registry setting to enable BAPI transactions
Get Metadata for SAP Operations in Visual Studio
Browse, search, and retrieve metadata from SAP for BAPI operations

by Contributed | Oct 16, 2020 | Technology
This article is contributed. See the original author and article here.
 Price Transparency and Touchless Intake: Empowering Patients; Delivering Opportunity to Providers
When: November 11, 2020 12 noon CT
Biological and regulatory issues have converged in 2020, creating action items for providers, particularly those in the patient access function. The CMS price transparency rule goes into effect January 1 and the impact of COVID-19 is ongoing, driving providers to look at new patient intake processes to help prevent contagious disease spread. But rather than approaching these issues as compliance burdens, providers can use these events as an opportunity.
During this session, we’ll review the CMS price transparency rule and what it means to your organization…and how you can leverage it to your benefit. We’ll also look at how providers nationwide are implementing touchless processes and how technology can help enable touchless patient intake while helping your organization acquire new patients.
- Speaker: Natalie Lawrence, Director, Business Development, Connected Consumer Health Change Healthcare
Natalie Lawrence directs business development for Change Healthcare’s Connected Consumer Health suite, a ground-breaking new consumer and financial engagement platform for healthcare providers. Prior to her current role at Change Healthcare, Natalie worked in a variety of roles in the healthcare information technology industry, including Fortune 10 companies and innovative start-ups. Natalie received her BA in speech communication from the University of Georgia
- Host: Michael Gannotti, Principal Technology Specialist, Microsoft
To attend the session on November 11th from 1-2pm eastern/12 to 1 central, you can grab the .ics calendar invite below or click the direct link provided.
Thanks for visiting – Michael Gannotti LinkedIn | Twitter
 Michael Gannotti

Recent Comments