by Contributed | Oct 29, 2020 | Technology
This article is contributed. See the original author and article here.
Now, you can take your containerized app to Azure Kubernetes Service (AKS) in a few simple steps by using GitHub Actions.
A GitHub Actions workflow will be configured for your GitHub repository. The workflow builds and deploys a container image to an AKS cluster every time new commits are pushed to a given branch of the GitHub repository.
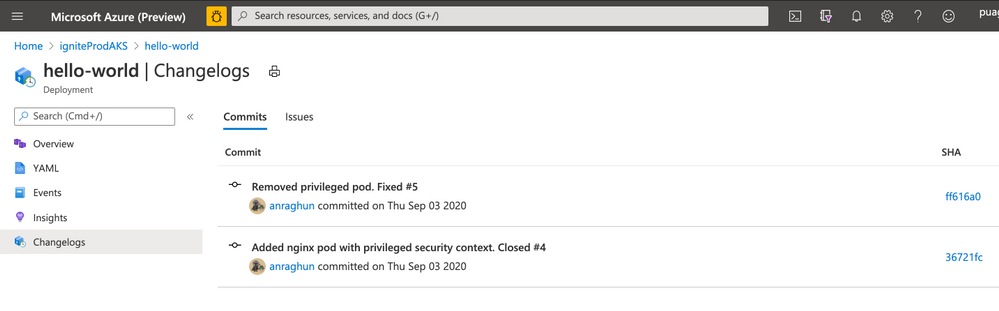
Once you have set up you will be able to trace the GitHub commits and issues that got deployed to the Deployment workload. For this we have added a “ChangeLog” view in context of Deployment Workload in Azure Kubernetes Service. This view has
- Details of the GitHub commits and issues that got deployed. You can use the links on this view to navigate to GitHub portal for more details of a specific issue or commit.
- The GitHub Workflow that was used to build and deploy these changes.

You can extend the default GitHub Actions Workflow and add richer capabilities: like provisioning additional Azure resources, deploying to another AKS cluster, running scripts or for running container scanning, integration tests.
We are adding support for configuring GitHub Actions for Azure Kubernetes Service in Deployment Center in Azure Portal as well as Azure Kubernetes Service extension in Visual Studio Code. Now you can create the appropriate GitHub Actions workflows in the context of your favourite tool – Azure Portal or Visual Studio Code.
Azure Kubernetes Service Deployment Center
- Deployment Center analyses the repository and detects your Dockerfile and Kubernetes manifest files. In case, the Kubernetes manifest files are not present, the experience will auto generate the manifest files.
- Based on the repository analysis the experience generates and commits a GitHub Actions workflow file to the GitHub repository
- A GitHub repository secret is added which contains the content of kubeconfig. A GitHub repository secret is added which contains the content of kubeconfig.This secret is used by workflow to connect to the AKS cluster and deploy the application.
- The generated GitHub Actions Workflow will build container image; push the image into Azure Container Registry and then deploy it to a new or an existing namespace.

The AKS Deployment Center shows you all the workflows that are targeting that particular AKS cluster. This gives you a quick summary view of what workflows that are updating your cluster, thereby giving you details of what process is being followed for the deployments.

Azure Kubernetes Service VS Code extension
We are adding a couple of additional commands in the Azure Kubernetes Service Visual Studio Code extension,
- First one being “Configure CI/CD Workflows” that enables you to setup GitHub Actions workflows from within Visual Studio Code. This is similar to the Deployment Center feature for AKS and provides the same guided workflow setup and traceability features.
- Another one is “Browse CI/CD Workflows” which helps you view all the workflows that are configured for a particular AKS cluster. From this listing you can navigate to Deployment Center experience in Azure Portal for traceability, issue and commit tracking.

If you have any changes you’d like to see or suggestions for these features, then we’d love your feedback as well as contributions to the GitHub Action repository taking pull requests. If you encounter a problem with any specific action, you can also open an issue on the action repository.
- View more GitHub integrations with Azure to automate your code-to-cloud workflow.
- Check out the comprehensive list of GitHub Actions.
by Contributed | Oct 28, 2020 | Technology
This article is contributed. See the original author and article here.
Azure Sphere 20.10 Update 1 is now available in the Retail Eval feed. This update fixes some issues reported to us by customers using 20.10 Retail Eval for compatibility testing. We’re grateful to you, our customers, for immediately reporting the problems. Because of your diligence, we were able to respond quickly and update the OS before 20.10 is available in the Retail production feed.
The release of 20.10 Update 1 will not reset the retail evaluation period. Evaluation will continue until the second week of November. Please continue to verify that your applications and devices operate properly with this release before it’s deployed broadly via the Retail feed. The Retail feed will continue to deliver OS version 20.09 until we publish the final 20.10 release.
What’s new in Update 1?
- Fixes a logging issue in Networking_GetInterfaceConnectionStatus
- Fixes a bug in cURL configuration
For more information on Azure Sphere OS feeds and setting up an evaluation device group, see Azure Sphere OS feeds and Set up devices for OS evaluation.
If you encounter problems
For self-help technical inquiries, please visit Microsoft Q&A or Stack Overflow. If you require technical support and have a support plan, please submit a support ticket in Microsoft Azure Support or work with your Microsoft Technical Account Manager. If you would like to purchase a support plan, please explore the Azure support plans.
by Contributed | Oct 28, 2020 | Technology
This article is contributed. See the original author and article here.
By: Charlotte Maguire | Program Manager – Microsoft Endpoint Manager – Intune & Shantaram Punukollu | Sr Program Manager – Identity
Microsoft Endpoint Manager – Intune support for automatically enrolling Android Enterprise dedicated devices into Azure AD Shared device mode is now in public preview! This new feature is rolling out with the October service release and will soon be available to all Microsoft Endpoint Manager customers.
Today, Microsoft Endpoint Manager customers have the option to enroll their Android devices as Android Enterprise (AE) dedicated devices. With this public preview, customers will now be able to optionally enroll their AE dedicated devices into Azure AD Shared device mode, which will allow end-users to gain single sign-on and single sign-out across all of the participating applications on the device. For an application to participate with Azure AD Shared mode, it must integrate with Azure AD’s MSAL library. More information about Azure AD Shared Mode and its capabilities can be found here.
Here are additional capabilities included with this public preview release:
Ensure device compliance with Conditional Access – Customers using Azure AD shared mode on dedicated devices will be able to secure their corporate data on user sign-in with Conditional Access that is based on device compliance.
Customized sign-in experience – Customers will be able to leverage new Managed Home Screen customizations that were built specifically for Azure AD Shared device mode. For example, admins can allow users to define a session PIN for the duration of their shift and configure an automatic sign-out timer.
To learn more about Azure AD Shared mode, dedicated devices, and/or Managed Home Screen, please see the following articles:
To learn more about how to use the features in public preview, read on!
What steps do I need to take prior to enrolling with this scenario?
In the Microsoft Endpoint Manager admin center, follow the steps listed here to get your dedicated device enrollment profile(s) and device groups appropriately set up.
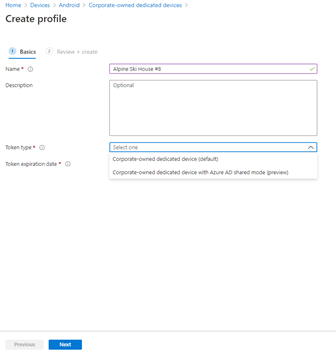
With Intune’s October release, you will notice an option to specify a “Token type” when you create an enrollment profile. You can choose “Android Enterprise dedicated device (default),” or “Android Enterprise dedicated device with Azure AD shared mode (preview).” To enroll your devices with Azure AD Shared device mode automatically set up during enrollment, choose the latter.
 Step 1 – Create AE enrollment profile
 Step 2 – Select token type and expiration
Check that any applications you want users to sign into with this solution have integrated with Azure AD’s MSAL library and global sign-in and sign-out calls. If needed, read about how to add Managed Google Play apps to your devices and how to assign apps to groups.
How do I enroll my dedicated devices into Azure AD shared mode?
To enroll with Intune’s dedicated device solution, make sure that you have factory reset devices that meet the requirements found here. Identify the enrollment method you would like to use, and follow the appropriate steps listed here.
Once you begin enrollment with an “Android Enterprise dedicated device with Azure AD shared mode (preview)” you will see screens similar to the ones shared below. Follow the steps on-screen to complete enrollment.
 Fig. 1 – Set up your work phone
  Fig. 2 – Register shared device
  Fig. 3 – Shared device registering
 Fig. 4 – Shared device successfully registered
  Fig. 5 – Shared device successfully registered
What are the new Managed Home Screen features and how do I use them?
In conjunction with Intune’s public preview, Microsoft’s Managed Home Screen is releasing support for Azure AD Shared device mode and offering customizations specific to this scenario. As always, Managed Home Screen can be optionally used on your dedicated devices to provide a locked-down, tailored experience for your end-users, giving them access to a curated set of apps, settings, and more. The main features Managed Home Screen is releasing alongside their support of Azure AD Shared device mode can be found below.
Sign-in screen & wallpaper for sign-in screen
This is an optional set of configurations to show a sign-in screen to end-users when Managed Home Screen is on the device and no user is signed in. Use of this feature ensures that the only action an end-user can take on a signed-out device is to sign in. Users can still access the Managed Home Screen settings pane, if configured by IT. Additionally, the debug menu is still accessible.
You can also configure a sign-in screen wallpaper that is separate from the wallpaper shown after sign-in.
 Sign-in screen wallpaper
Session PIN
An optional set of configurations that allows your end-user to set IT choice of numeric or alphanumeric PIN that lasts for the duration of their signed-in session. The prompt to set a PIN appears directly after initial sign in and the PIN is completely cleared upon sign out. This PIN can be used throughout the session to access specific permissions, rather than needing to use full user credentials.
 Set your session PIN
Automatic sign-out
An optional set of configurations that allows you to choose if end-users on the device should get signed-out after a specified period of inactivity. You can also choose whether or not to give user notice of the auto-sign-out with configured time frame in which they can choose to resume if they are still using the device.
 Automatic sign-out prompt
Customer facing folder
This is an optional specification for any folders you create on Managed Home Screen. If you specify a folder as customer facing, then when the folder is launched it cannot be exited until the logged in user enters their session PIN. This allows the logged in user to share their device with another end-user without fear of accidentally sharing sensitive information. The logged in user also has the option to switch user when exiting the folder, which will sign out all apps on the device and return the user to the sign-in screen.
 Fig 1. Home screen
  Fig 2. Enter session PIN
 Fig 3. Session PIN entered
  Fig 4. Switch User prompt
Custom privacy statement
On the Managed Home Screen sign-in screen, notice a link to Microsoft’s privacy statement. Choose whether or not to include your organization’s privacy statement, as well, by including a link and a title for the link. If you use this feature, both privacy statement links will appear on Managed Home Screen’s sign-in screen.
Things to note:
- To recieve single sign-in and single sign-out while in Azure AD shared device mode, each app must participate. Today, Microsoft applications that participate with Azure AD shared device mode include Teams and Managed Home Screen.
- App Protection Policies (APP) are not currently supported on Intune’s Android Enterprise dedicated devices, though they are also not formally blocked. If a user targeted with APP signs into an APP-protected application, they will be prompted to install the Company Portal application, and the user’s sign in will effectively block other users from signing into the same application. It is recommended that users signing into apps on dedicated devices not be targeted with APP. With Intune’s November release, APP will be formally blocked on dedicated devices. With the November change, even if users are targeted with APP, they will not receive APP when using apps on their dedicated devices. As a result, they will be able to sign into and out of apps on their dedicated devices without blocking other users from sign-in. Users targeted with APP on non-dedicated devices will not be impacted.
How can you reach us?
Let us know if you have any additional questions on this by replying back to this post or tagging @IntuneSuppTeam out on Twitter.
by Contributed | Oct 28, 2020 | Technology
This article is contributed. See the original author and article here.
Beginning November 5th, 2020, you will see a clear distinction between automatic and manual updates in Windows Update, completing the transformation of driver servicing that we began earlier this year.
Back in August, we introduced an improved update experience on Windows 10 PCs to help you discover available Windows 10 feature updates, monthly non-security quality updates, and driver updates. Now, to give users more control, Microsoft is redefining the way manual drivers are serviced for machines running Windows 10, version 2004 and later.
In the past, when a user connected a peripheral device (a web camera, for example) to their machine for the first time, and that device had a manual driver (formally known as an optional driver) available on Windows Update, the manual driver was automatically installed on the user’s machine. The user had no control over the decision.
Beginning November 5th, 2020:
- Automatic driver updates will automatically be installed on your machine either when you plug-in a peripheral device for the first time, or when a device manufacturer publishes a driver to Windows Update. In other words, there will be no change to the plug-and-play scenario when an automatic driver is available on Windows Update.
- Manual driver updates can be installed manually on your machine if you specifically request them by navigating to Settings > Update & Security > Windows Update > View optional updates.
For IT professionals managing drivers on behalf of their organizations, there will be no change. The changes described above applies only to machines that are open to receive driver updates directly from Windows Update.
For more information, see Understanding Windows Update automatic and optional rules for driver distribution.
by Contributed | Oct 28, 2020 | Technology
This article is contributed. See the original author and article here.
We’re excited to re-open applications for the Microsoft Content Services Partner Program, which highlights both SIs and ISVs around the globe who have demonstrated their expertise in delivering solutions that make the transformation of their customers’ content management approach practical and attainable.

This year we’re looking to program partners to help us drive adoption and usage of Microsoft 365, focusing on Project Cortex, including SharePoint Syntex, and help our customers realize the full value of the knowledge and insights solutions available in Microsoft 365.
If your organization delivers solutions that make the transformation of your customers’ content management approach practical and attainable, we encourage you to submit an application to join the Microsoft Content Services Partner Program. We’ll accept applications for new membership now through December 31, 2020.
To learn more about the program, view the recording of our office hours call, where we walked through the program, benefits, requirements, and application process. More details about the partner program are also available in the Microsoft 365 Content Services Partner Program overview deck.
Program partners can receive the following benefits:
- Access to compete and go-to-market collateral
- Access to technical and business training
- Quarterly updates
Charter and preferred partners can receive additional benefits, like:
- NDA briefings and events, like the Microsoft Content Services Summit and the Content Kitchen
- Distribution and amplification of approved partner/customer case studies
- Use of logos and letters recognizing charter and preferred partner status
- Alignment and referral to the Microsoft field
- Additional marketing opportunities
In return for these additional benefits, charter and preferred partners will commit to having team members complete the Knowledge & Insights training series (November 9 to 11); obtaining a Gold competency for Knowledge (when it becomes available); and submitting two pieces of customer evidence during the program year. Furthermore, preferred partners must have the capacity to lead or support multiple Project Cortex engagements.
For more information on the Microsoft Content Services Partner Program, visit aka.ms/ContentServicesProgram.
by Contributed | Oct 28, 2020 | Technology
This article is contributed. See the original author and article here.
Digital Transformation has been with us for some years, but with the global pandemic, it has quickly become an urgent reality for many organizations! With the various lockdowns around the globe, companies suddenly had to adjust their business processes and enable workers to work from home (WFH) while others are in the office. IT must ensure printing is still secure when supporting a hybrid workforce.
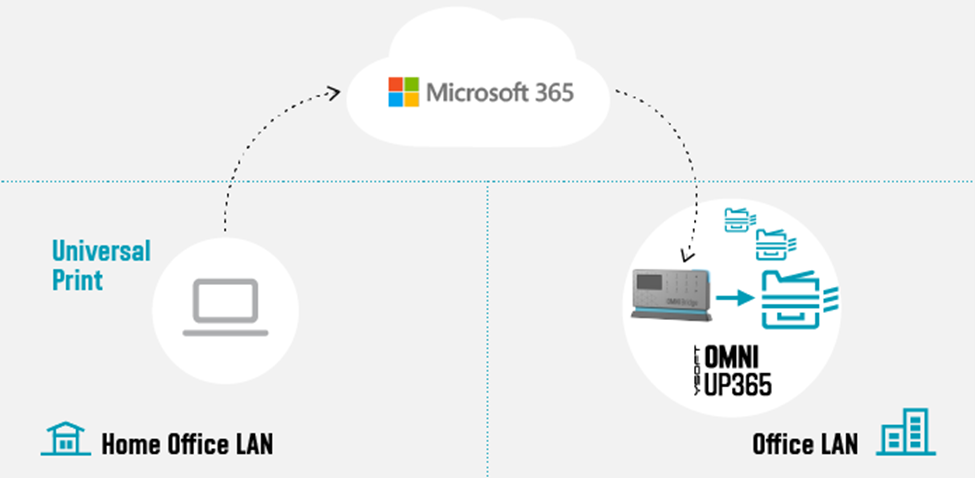
The Microsoft 365 Universal Print service and YSoft OMNI Series combined, offer a great solution for print admins. YSoft OMNI Series instantly connects any in-market home or office printer to Universal Print. Here’s how these two technologies work together to facilitate three hybrid workforce use cases (and more).
- Print to Office from Home
- Print to Home from Home
- Print to / from Anywhere
Print to office from home
 Figure 1: Print to office from home
Our first use-case is an SMB business with a Microsoft 365 Business premium subscription that wants to take advantage of Universal Print with their existing, in-market printers.
Some workers remain essential to corporate operations, such as shipping and receiving. So, there are times where workers at home need to print to a device at the office for others to pick up the print job (e.g. shipping documents, manifest, etc.).
One of the main advantages of the cloud is that it does not care where you are located. Whether you are at the office or at home, you can always reach the cloud given an internet connection. Home users can print using Universal Print just as if they were sitting in the office. The YSoft OMNI Series solution, consisting of YSoft OMNI Bridge™ and OMNI UP365™ App, retrieves and delivers the print job to the desired in-office printer transparently! No need for the home user to dial the company VPN to reach an on-premises printer!
But you are probably thinking, “Ok, but how often does this help me? Most of the time, I need to print something for myself!” Which leads us to the next use-case.
Print to home from home (with corporate processes and security)
 Figure 2: Print to home from home
In this use-case, it’s obvious that a home-office printer can be printed to without any additional solution beyond printer drivers and a wi-fi network or USB cable. But what about the security concerns in this scenario? Do companies have any way to track what gets printed on that home-use or personal printer?
Universal Print and OMNI Series come to the rescue here. The company can issue an OMNI Series solution along with the home-office printer. Via Universal Print, OMNI Series enables traceability and accountability for all print jobs printed on the printer. Other household members are restricted from printing to the device, since they lack access to the Universal Print’s print queue.
Print to / from anywhere
Additionally, we can reverse the previous use case. Someone sitting in the office can print to the home-office printer for the remote worker’s convenience. This is enabled by deploying OMNI Series solutions in both sites, which in turn, enables the final use-case wherein everyone can print anywhere!
 Figure 3: Print to/from anywhere
Technologies
The various technologies applied to create these solutions range from industry standards, such as Internet Printing Protocol (IPP), to public interfaces provided by Microsoft (e.g. MS Graph API for Pull Printing) to proprietary Y Soft innovations. Specifically, IPP relies on and inherits capabilities from the Hypertext Transfer Protocol (HTTP) which provides the foundation for all the streaming and security features that one would come to expect from printing to the cloud.
OMNI Series leverages such standards and APIs to provide industry compliant solutions and provides enhanced value-add beyond the scope of the underlying technology. For example, by leveraging IPP/IPPS standards, OMNI Series realizes immediate capabilities such as:
- Print job submission
- Standard query implementations of a printer’s capabilities and status
- Simultaneous querying of multiple print jobs’ states
- Standard implementation to cancel previously submitted jobs
Without an industry-wide standard such as IPP, OMNI Series would have to implement specific business logic for each printer brand (and possibly model) which leads to dramatic increases in complexity and development costs.
Additionally, Microsoft is bringing additional value through their implementation of value-add Print Management features such as their recently released preview of their Pull Printing API as part of the Microsoft Graph API. Most print management solutions now offer some form of “pull printing”. For
Y Soft’s flagship product, YSoft SAFEQâ, this feature is called Print Roamingâ. OMNI Series is looking toward Universal Print’s Pull Print API to implement a rich and robust printing capability wherein a user will be able to print to the cloud and “pull” his print job to whichever printing device is most convenient to them.
Security
Working from Home implies a risk, and cybercriminals have taken advantage. Any solution dealing with data as sensitive as a company’s private print stream must make security a top priority. For a WFH solution such as OMNI Series, one must be concerned with both “Data in Transit” and “Data at Rest”.
Data ‘in Transit’ security means that the communications links and channels are encrypted and secured using the latest technologies which are yet to be “cracked”. For OMNI Series and Universal Print, encryption is provided through Transport Layer Security (TLS) and uses AES-256 encryption on all communications between client, cloud, and printer. OMNI Series relies on these security measures as well.
For data ‘at Rest’ in a pull-printing scenario, this means that the print job data is spooled to the Microsoft 365 cloud, awaiting a final destination for the print job release. For OMNI Series, this means relying on the Universal Print infrastructure built within the secure Microsoft 365 infrastructure, where all Universal Print data is stored in the tenant’s Office storage area.
Both Microsoft and Y Soft are working together to ensure that businesses who are not able to purchase a new print fleet will be able to use Universal Print easily and cost effectively and that document printing is secure whether workers are at home or in the office. The hybrid workforce model is here to stay and technology is keeping pace. Stay tuned for more exciting news and watch our WFH webcast.
by Contributed | Oct 28, 2020 | Technology
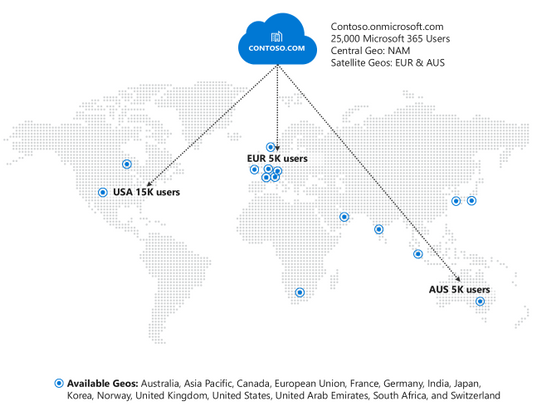
This article is contributed. See the original author and article here.
We are excited to announce the availability of Microsoft 365 Multi-Geo in Germany and Norway! With the addition of these two countries, you can now extend your Microsoft 365 tenant to store your users’ Exchange Online, OneDrive for Business, and SharePoint Online data in one or more of our 15 available geographies:
Australia
|
India
|
United Kingdom
|
Asia Pacific
|
Germany
|
United States
|
Canada
|
Japan
|
United Arab Emirates
|
European Union
|
Korea
|
South Africa
|
France
|
Norway
|
Switzerland
|
Microsoft 365 Multi-Geo enables customers to reduce their on-premises footprint and meet data residency obligations by allocating user data at rest to our available geo locations in the Microsoft 365 cloud, all within a single tenant. For more details, visit the Microsoft 365 Multi-Geo docs page.

For in-depth information on the overall Microsoft 365 data center strategy and Multi-Geo, take a look at our video from Ignite 2020 below.
Pricing and Licensing:
Multi-Geo is available as an add-on to the following Microsoft 365 subscription plans for EA customers with a minimum of 250 Microsoft 365 seats in their Microsoft 365 tenant, and a minimum of 5% of the Microsoft 365 seats within a tenant have corresponding Multi-Geo Capabilities for Microsoft 365. Please contact your Microsoft account team for details.
Microsoft 365 F1, E1, E3, or E5
|
Exchange Online Plan 1 or Plan 2
|
OneDrive for Business Plan 1 or Plan 2
|
SharePoint Online Plan 1 or Plan 2
|
Licensing
- USD $2/user/month for users in Satellite Geos
- Resource mailboxes (Rooms/Equipment) and Shared mailboxes need to be licensed
- Microsoft 365 Group Mailboxes moved to Satellite Geos will not need to be licensed for Multi-Geo
How to buy Multi-Geo?
Please talk to your Microsoft representative to buy Multi-Geo Capabilities for Microsoft 365.
Questions?
Please comment on this thread with your questions
by Contributed | Oct 28, 2020 | Technology
This article is contributed. See the original author and article here.
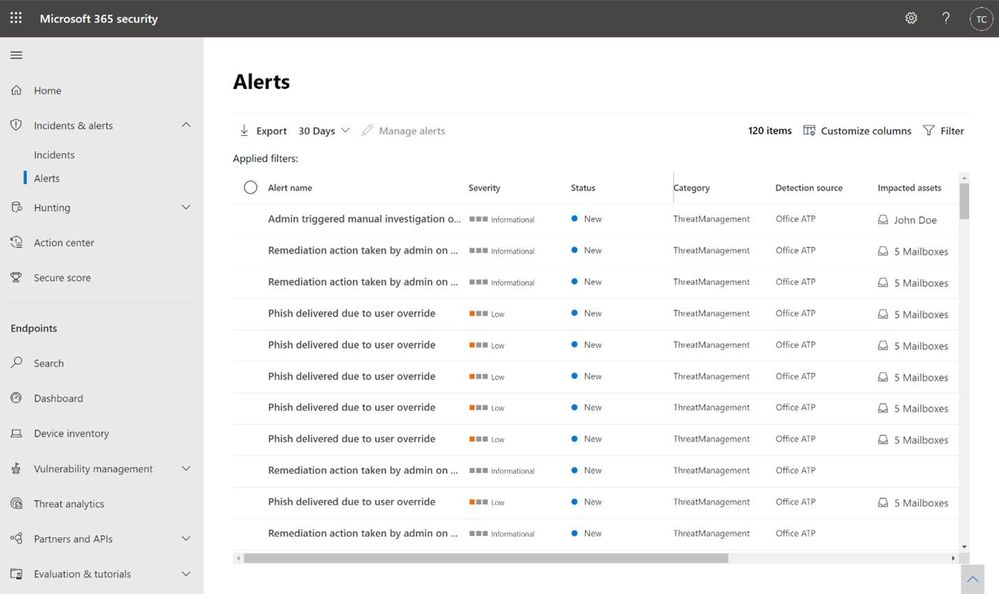
The extensive use of collaboration tools during the COVID-19 remote work era is putting many organizations at even higher risk for phishing attacks: via business emails or video conferencing solutions. This may be a good opportunity to refresh your workflows in investigating Microsoft Defender for Office 365 alerts, which can assist in catching cyberattacks in early stages.
What is an alert?
In Microsoft Defender for Office 365, we create billions of signals daily, for every phishing email we defuse. If the email was automatically blocked, deleted or neutralized in other methods – we do not create an alert for it, as no additional action is required from the security team. You can review the blocked phish or malware events in the Threat Explorer.
If we detect a suspicious activity, which was not blocked before delivery due to various reasons, and we think it requires your attention, we generate an alert for it. The common reasons that malicious activities are not blocked include a misconfiguration of the product, a delayed threat intelligence signal like Zero-hour Auto Purge (ZAP), user reported phishing emails, URLs weaponized at time-of-click and more. All of these cases trigger alerts when a suspicious activity is detected, and these alerts require an investigation by the security operations team.

Alert policies
Every alert is created because of an alert policy, which helps you to determine what suspicious activities you want to be notified of. For this purpose, we have created many out of the box alert policies, which generate alerts. You can enable or disable these policies, update recipients, update category, severity level and other parameters that will help your SOC with day-to-day operations while working with the alerts. For more information, see our docs article on alert policies.
Customers that are interested in investigating more granular alerts can create custom alert policies, that trigger custom alerts. A custom policy can be configured to trigger for a specific attachment type, a ZAP operation, or when a specific audited operation occurs in Office 365. For more information on managing alerts, see managing alerts on docs.
Manual alerts investigation by the Security Operations team
Since every alert is a call-for-investigation by the security operations team, these teams need to determine the next step required to mitigate the threat of malicious content, or dismiss the alert. Such an investigation usually follows one of these workflows:
Analyze the alerts queue
The alerts queue allows security teams to investigate each alert, by drilling down in Threat Explorer or in Advanced Hunting, or to follow the relevant playbooks for remediation. The Microsoft 365 Defender alerts queue will provide a prioritized view of all alerts from multiple Microsoft security products: Defender for Office 365, Defender for Endpoint, Defender for Identity and Microsoft Cloud App Security. For more information on alerts in Microsoft 365 Defender, see our Ignite session on leveraging automated incident correlation to make Defender for Office 365 even more efficient.
If you are using a custom reporting or SIEM solution, you can also look to ingest information about Alerts surfaced through the Office 365 Management API to construct your own experience, and correlate it with additional data within your solutions.
Analyze incidents
Incidents are a set of correlated alerts from various Microsoft security products. Microsoft Research creates correlation across alerts and events, taking care of the heavy lifting for the SOC team and helping them understand the overall impact of the attack on the organization across its digital estate and assets. Incidents help customers manage fewer items in their queue. On average, customers report an 80% reduction in Office 365 cases as a result of correlation during the first month alone.

The unified portal of Microsoft 365 Defender shows the entire incident overview, based on MITRE ATT&CK tactics: initial access, execution, lateral movement, and exfiltration. It also shows the timeline of the event, to provide a better understanding of the attack flow. This cross-product investigation fits into one unified view, like an email issue becoming an endpoint issue, or identity compromise resulting in cloud app resources utilization. Surfacing these incidents in a central place helps many organizations save time tackling the same attack that spreads via multiple tactics, triggering suspicious alerts by multiple products. You can learn more about Incidents in Microsoft 365 Defender in the Ignite session.
You can also look to ingest incidents within your custom solutions through the MTP Incident API (currently in Public preview).
The prioritization challenge
In both of the scenarios above, most organizations still have a very high volume of alerts to analyze. Many customers choose to prioritize the alerts that involve their most visible and most targeted users. With Priority Account Protection in Defender for Office 365, security teams can prioritize alerts for Priority Accounts, and ensure that these threats are addressed, even when alert volumes are high. Learn more about Priority Account Protection to ensure these priority accounts are always protected.
Additional prioritization methods may be based on threat Intelligence or focus on the latest or most common threats. And finally, we allow customers to add custom alerts, to identify specific threats that are relevant to the organization.
Automated investigation of alerts
Defender for Office 365 includes powerful automated investigation and response (AIR) capabilities that can save your security operations teams time and effort. Instead of reviewing, prioritizing, and responding to the continuous flood of incoming alerts, you can automate some of this to increase efficiency. An automated investigation can trigger a security playbook, depending on the incident type. Another option is for the security analyst to start an automated investigation using Threat Explorer.
Customers that investigate alerts using a third-party SIEM solution can use the Office 365 Management Activity APIs for the investigation. You can follow this detailed example of an organization that uses this integration for alerts investigation from a recent blog post on improving the effectiveness of your SOC with Defender for Office 365 and the O365 Management API. For additional information about the public APIs, see our documentation.
Malicious activity or false alarm?
For each alert, we provide additional information to help the security team to determine if this is indeed a malicious activity or not. We also provide governance actions to Resolve, Suppress and Notify users upon this alert, for further investigation. The decision regarding the appropriate governance action can be made after additional review of the alert details and context information in Threat Explorer or in Advanced Hunting.
Investigating suspicious alerts, more relevant than ever
In this time that many organizations are in historic rates of remote work, many customers experience an abundance of alerts that indicate suspicious activity. This can put pressure on the Security Operations teams to be more effective than ever in analyzing alerts created by Defender for Office 365. This is a good time to refresh the workflows around alerts investigation, to make sure the alerts are handled according to their real priority in the eyes of the organization. Moreover, it is a good opportunity to revise your use of the Automatic Investigation and Response (AIR) tools, to automate workflows that can reduce the manual investigation time by the Security Operations teams, and to reduce alerts which requires investigation by fully resolving some of these alerts automatically.
by Contributed | Oct 28, 2020 | Technology
This article is contributed. See the original author and article here.
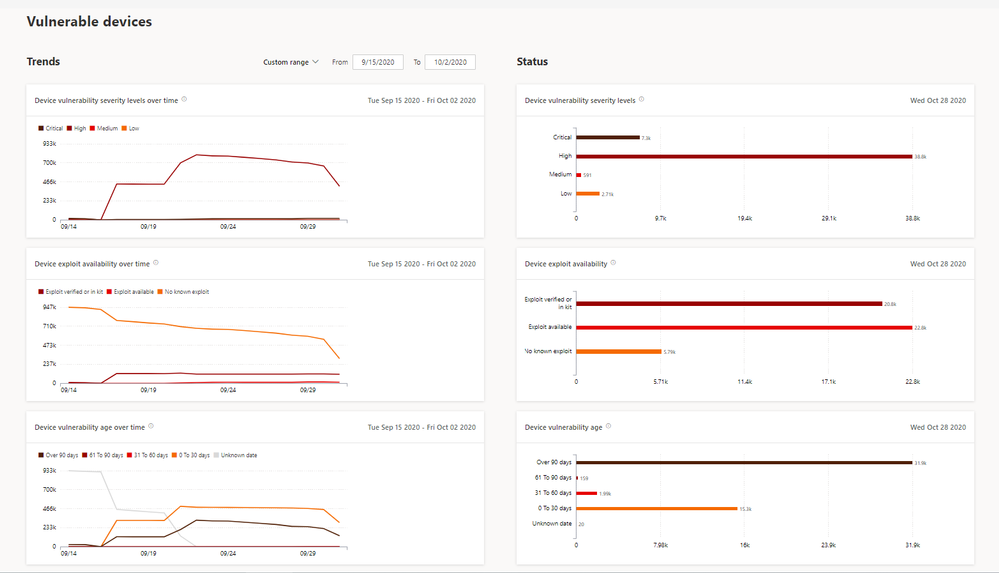
We are excited to announce a new built-in report for Microsoft Defender for Endpoint’s threat and vulnerability management capability, the vulnerable devices report!
Have you ever wondered which devices have the most critical vulnerabilities? Or which devices have the oldest or most exploitable vulnerabilities? Our new report is now in public preview to give you those answers, and much more!
The Vulnerable devices report provides extensive insights into your organization’s vulnerable devices with summaries of the current status and customizable trends over time.
Report insights include:
- Device vulnerability severity levels (e.g. all the devices with critical vulnerabilities)
- Device exploit availability (e.g. all the devices with vulnerabilities that have verified exploits)
- Device vulnerability age (e.g. devices with vulnerabilities that were published over 90 days ago)
- Vulnerable devices by operating system
- Vulnerable devices by Windows 10 version


Let’s take some examples:
- If there are a lot of devices with old vulnerabilities, you might want to learn about the MTTR (mean time to remediate) process in your organization.
- If you see multiple devices with Critical or High vulnerabilities, you might want to prioritize those devices first.
Is there an insight you want to explore further? Select the bar chart to drill down and view a list of relevant devices.


You can also use the graphs and granular filtering capabilities to easily learn about your security posture and the vulnerable devices in the organization.
Are you ready? If you’ve enabled public preview features, you can check out the new report today! If not, we encourage you to turn on preview features in Microsoft Defender Security Center to get access to the newest capabilities.
If you’re not yet taking advantage of Microsoft’s industry-leading security optics and detection capabilities for endpoints, sign up for a free trial of Microsoft Defender for Endpoint today.
We welcome your feedback. If you have any comments or questions, let us know!
by Contributed | Oct 28, 2020 | Technology
This article is contributed. See the original author and article here.
Microsoft is continually looking to evolve the driver servicing system to increase clarity in users’ acquisition scenarios and, over the past several months, has made several changes in support of that goal with improvements to areas such as publication and user acquisition.
On November 5th, Microsoft is planning to change the way ‘Manual drivers’ (formally known as ‘Optional drivers’) are being serviced. For Windows 10, version 2004 and subsequent updates, Manual drivers will be downloaded to a machine only when an end user specifically requests them through Settings -> Update & Security -> Windows Update -> View optional updates. This change can cause a DNF (Driver Not Found) error when a device is plugged-in for the first time and only a Manual driver is published on WU. After this change, a Manual driver will no longer be offered automatically.
More information is available at https://docs.microsoft.com/en-us/windows-hardware/drivers/dashboard/understanding-windows-update-automatic-and-optional-rules-for-driver-distribution

Recent Comments