by Contributed | Dec 2, 2020 | Technology
This article is contributed. See the original author and article here.
We are getting ready to update SQL Server Replication Management Pack. This release will bring support for older SQL Server versions (2012, 2014, 2016) into the version agnostic MP. That is, going forward just like SQL Server MP, we will have version-agnostic Replication MP that can monitor all SQL Server versions in support. This is the last MP in SQL Server MP family to move to full version-agnostic mode.
Please install and use this public preview and send us your feedback. We appreciate the time and effort you spend on these previews which make the final product so much better.
Microsoft System Center Management Pack (Community Technology Preview) for SQL Server Replication
What’s New
- Updated MP to support SQL Server 2012 through 2019
- Updated “Replication Agents failed on the Distributor” unit monitor to extend it for Log Reader and Queue Reader agents’ detection
- Added new property ‘DiskFreeSpace’ for “Publication Snapshot Available Space” unit monitor
- Removed “One or more of the Replication Agents are retrying on the Distributor” monitor as non-useful
- Updated display strings
Issues Fixed
- Fixed discovery issue on SQL Server 2019
- Fixed issue with the incorrect definition of ‘MachineName’ property of DB Engine in some discoveries and replication agent-state unit monitors
- Fixed issue with wrong property-bag key initialization on case-sensitive DB Engine in some unit monitors and performance rules
- Fixed issue with the critical state of “Replication Log Reader Agent State for the Distributor” and “Replication Queue Reader Agent State for Distributor” unit monitors
- Fixed wrong space calculation in “Publication Snapshot Available Space”
- Fixed duplication of securable detection for monitor “Subscriber Securables Configuration Status”
We are looking forward to your feedback.
by Contributed | Dec 2, 2020 | Azure, Microsoft, Technology
This article is contributed. See the original author and article here.
Today we are looking at how you can modernize Windows Server Apps on Microsoft Azure using Containers with Windows Admin Center and Azure Kubernetes Service (AKS). We will see how we can create a new custom Docker container image using Windows Admin Center, upload that to an Azure Container registry and deploy it to our Azure Kubernetes Service cluster.
In the video, we have a quick intro about Windows and Hyper-V containers in general. After that, we are using Windows Admin Center with the new Container Extension to manage our Windows Server container host and create a new Docker container image.
Windows Admin Center Container Extension and Windows Server Container Host
@Vinicius Apolinario and his team just released a new version of the container extension for Windows Admin Center in November 2020, which will help you to simply create a new Windows Server container host. You can find more about the latest new features here.
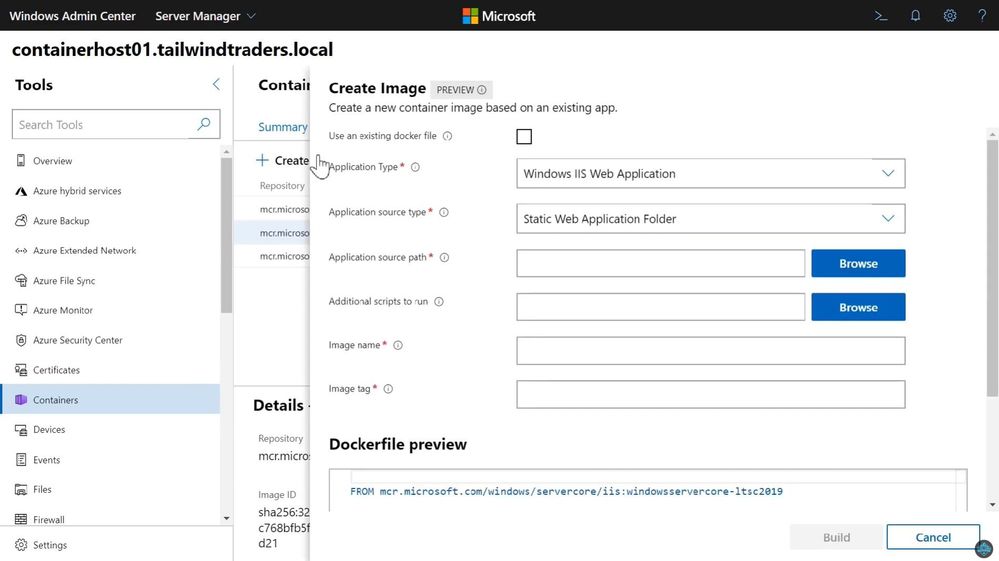
Create a new Docker Container Image using Windows Admin Center
You can use the Windows Admin Center Container extension to create a new Docker container image. This will help you to easily create the necessary basic Docker file for your container image.
Create a new Docker Container Image using Windows Admin Center
Push Windows Container Image to Azure Container Registry
After you have created your custom container image, you can now upload it to your container registry. This can be an Azure Container Registry (ACR) or another container registry you want to use.
 Push Container image to ACR
You can now find your container image on your container registry.
 Azure Container Registry ACR
Now you can deploy your Windows Server container image to your Azure Kubernetes Service (AKS) cluster or other container offerings on Azure, AKS on Azure Stack HCI, Azure Stack Hub, or any other container platform which has access to the ACR.
 Windows Server Containers on AKS
I hope this blog was helpful to show some of the tooling available to modernize Windows Server applications on Microsoft Azure using Containers with Windows Admin Center and AKS! If you have any questions, feel free to leave a comment.
by Contributed | Dec 2, 2020 | Azure, Microsoft, Technology
This article is contributed. See the original author and article here.
All Around Azure is the amazing show you may already know to learn everything about Azure services and how they can be utilized with different technologies, operating systems, and devices. Now, the show is expanding! All Around Azure: Developers Guide to IoT is the next event in our Worldwide Online Learning Days event series and will focus on topics ranging from IoT device connectivity, IoT data communication strategies, use of artificial intelligence at the edge, data processing considerations for IoT data, and IoT solutioning based on the Azure IoT reference architecture.
Join us on a guided journey into IoT Learning and certification options. We will be hosting 2.5 hours of live content and Q&A sessions in your local time zone – so you can get all your questions answered in real-time by our speakers. No matter where you are and what time zone you are streaming from, we will see you on January 19th.
Internet of Things Event Learning Path
This event follows along the Internet of Things Event Learning Path. A learning path is a carefully curated set of technical sessions that provide a view into a particular area of Azure; and often help you prepare for a certification. Each session in a learning path is business-scenario focused so you can see how this technology could be used in the real world. Each session is independent, however viewing them as a series builds a clearer picture of when and how to use which technology.
The Internet of Things Event Learning Path is designed for Solution Architects, Business Decision Makers, and Development teams that are interested in building IoT Solutions with Azure Services. The content is comprised of 5 video-based modules that approach topics ranging from IoT device connectivity, IoT data communication strategies, use of artificial intelligence at the edge, data processing considerations for IoT data, and IoT solutioning based on the Azure IoT reference architecture.
Each session includes a curated selection of associated modules from Microsoft Learn that can provide an interactive learning experience for the topics covered and may also contribute toward preparedness for the official AZ-220 IoT Developer Certification.
The video resources and presentation decks are open-source and can be found within the associated module’s folder in this repository.
Session 1: Connecting Your Physical Environment to a Digital World – A Roadmap to IoT Solutioning
With 80% of the world’s data collected in the last 2 years, it is estimated that there are currently 32 billion connected devices generating said data. Many organizations are looking to capitalize on this for the purposes of automation or estimation and require a starting point to do so.
This session will share an IoT real world adoption scenario and how the team went about incorporating IoT Azure services.
Session 2: Deciphering Data – Optimizing Data Communication to Maximize your ROI
Data collection by itself does not provide business values. IoT solutions must ingest, process, make decisions, and take actions to create value. This module focuses on data acquisition, data ingestion, and the data processing aspect of IoT solutions to maximize value from data.
As a device developer, you will learn about message types, approaches to serializing messages, the value of metadata and IoT Plug and Play to streamline data processing on the edge or in the cloud.
As a solution architect, you will learn about approaches to stream processing on the edge or in the cloud with Azure Stream Analytics, selecting the right storage based on the volume and value of data to balance performance and costs, as well as an introduction to IoT reporting with PowerBI.
Check out more on Learn!
Session 3: Adding Intelligence – Unlocking New Insights with AI & ML
For many scenarios, the cloud is used as a way to process data and apply business logic with nearly limitless scale. However, processing data in the cloud is not always the optimal way to run computational workloads: either because of connectivity issues, legal concerns, or because you need to respond in near-real time with processing at the Edge.
In this session we dive into how Azure IoT Edge can help in this scenario. We will train a machine learning model in the cloud using the Microsoft AI Platform and deploy this model to an IoT Edge device using Azure IoT Hub.
At the end, you will understand how to develop and deploy AI & Machine Learning workloads at the Edge. Check out more on Learn!
Session 4: Big Data 2.0 as your New Operational Data Source
A large part of value provided from IoT deployments comes from data. However, getting this data into the existing data landscape is often overlooked. In this session, we will start by introducing what are the existing Big Data Solutions that can be part of your data landscape.
We will then look at how you can easily ingest IoT Data within traditional BI systems like Data warehouses or in Big Data stores like data lakes. When our data is ingested, we see how your data analysts can gain new insights on your existing data by augmenting your PowerBI reports with IoT Data. Looking back at historical data with a new angle is a common scenario. Finally, we’ll see how to run real-time analytics on IoT Data to power real time dashboards or take actions with Azure Stream Analytics and Logic Apps. By the end of the presentation, you’ll have an understanding of all the related data components of the IoT reference architecture. Check out more on Learn!
Session 5: Get to Solutioning – Strategy & Best Practices when Mapping Designs from Edge to Cloud
by Contributed | Dec 2, 2020 | Technology
This article is contributed. See the original author and article here.
Project for the web comes with some great out-of-the-box tools for keeping your team on track. App features like orange and red highlights for late and overdue tasks provide you with visual cues for quickly finding tasks that need attention. There’s also Power BI reporting, which gives you visually rich report pages for your portfolio, resource and and project overviews.
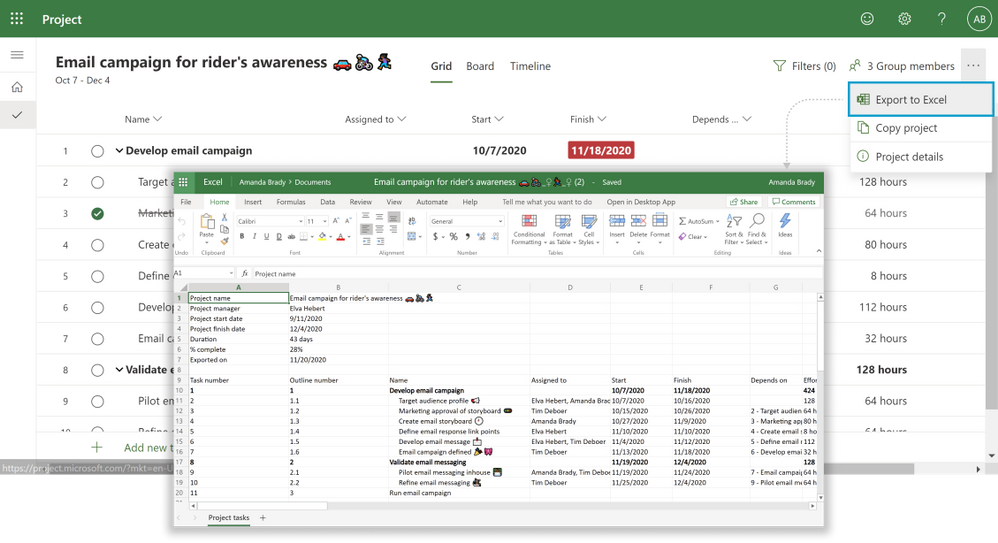
And now we have added Export to Excel as it was one of your top requests we have received over the months. You can now export your project to Microsoft Excel where you can customize the data in whatever way your team finds most useful.
To export a project, simply click on the overflow menu at the top right corner and then click the Export to Excel button.
This feature is also available in Project Teams app.

When to export a project to Excel
There are multiple scenarios for Export to Excel, here are some to help you get started:
- For reporting: You will now be able to use the data you export from Project to create charts, pivot tables and more in Excel. You can quickly sort the task by their finish dates or filter information to find out the completed tasks. You can then share this information with your team or drop into presentations. Some snapshots of the charts created on top of Excel are:

- For sharing: Use Export to Excel to share your project status with guest users, vendors, or your clients who do not have access to Project. Easily delete information you do not wish to share with others such as providing high-level executive summaries without unnecessary details.
- For Archiving: Archive your completed projects in Excel to quickly share your compliance and maintain an external record of your work.
- For Printing: Print your project in Excel in a format that makes it easier for senior management to consume.
These are just a few of our ideas of how Export to Excel can help you get more out of Project—but we want to hear how you are using it! Leave us a comment below on your experiences so far. Please let us know the ideas for future integration capabilities or enhancements to current ones, like adding the ability to import items from Excel back into Project, through our User Voice site.
by Contributed | Dec 2, 2020 | Technology
This article is contributed. See the original author and article here.
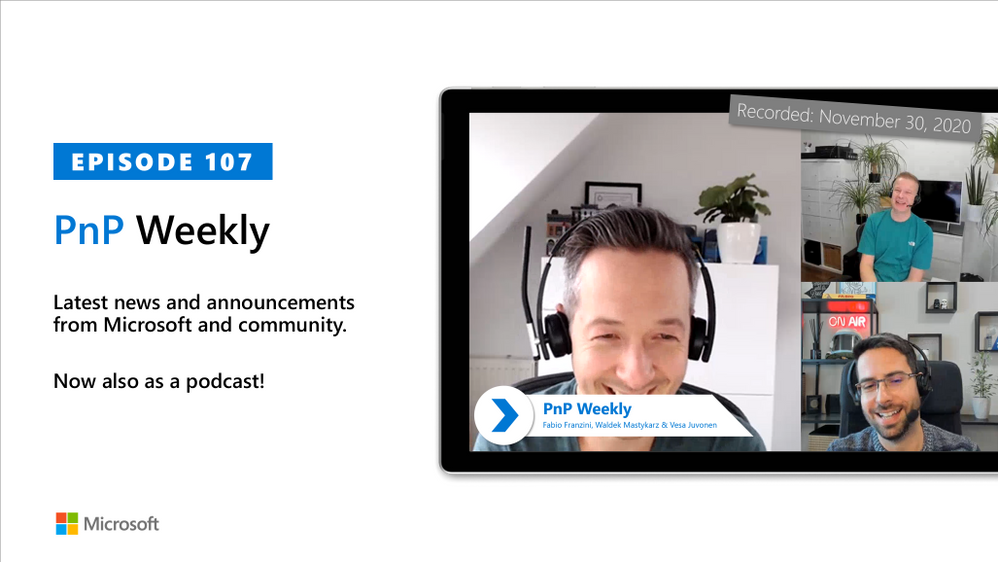
In this installment of the weekly discussion revolving around the latest news and topics on Microsoft 365, hosts – Vesa Juvonen (Microsoft) | @vesajuvonen, Waldek Mastykarz (Microsoft) | @waldekm, are joined by Independent Consultant, Office Developer and Business Apps (Power Platform) MVP Fabio Franzini | @franzinifabio.
Topics discussed in this session include:
- Becoming and prospering as an independent consultant – drive exposure by delivering training, watch parties, and speaking at conferences.
- When to go with Power Platform vs traditional coding – the key is architecting the complete solution and including change management.
- Thoughts on extending SPFx beyond SharePoint and Teams to create add-ins for all office clients.
- And finally, a few words from Fabio around styling with Tailwind CSS.
This episode was recorded on Monday, November 30, 2020.
Did we miss your article? Please use #PnPWeekly hashtag in the Twitter for letting us know the content which you have created.
As always, if you need help on an issue, want to share a discovery, or just want to say: “Job well done”, please reach out to Vesa, to Waldek or to your Microsoft 365 PnP Community.
Sharing is caring!
by Contributed | Dec 2, 2020 | Technology
This article is contributed. See the original author and article here.
Hi IT Pros,
There is a need to run the Windows 10 kiosk mode with its beautiful, illuminative screen in the reception area of your Corporate Office or in the conference room, also there are the needs to run Windows 10 kiosk mode with specialized tool in Hospital operation room, Manufacturer plant, …

Beautiful screen of Windows 10 Kiosk mode:
Setup Windows 10 kiosk device by Endpoint Manager
You will need to follow the steps in Microsoft document about “Deploy Microsoft Edge Legacy kiosk mode” (1-17-2020). In short, you would need to create the following:
- a device restriction profile with Edge browser settings
- a Windows 10 platform, kiosk configuration profile with the applications to be run by Windows Kiosk Device.
Examples of Kiosk Configuration Profile:

The easiest way to configure the application launched in Kiosk mode is using AUMID application as shown:

You may want to check one application as the default app and it will be automatically launched at sign-in time.

Besides the Troubleshooting guide from Microsoft document, Troubleshoot kiosk mode issues .
I have observed the other common setup problems, which prevent Windows 10 Kiosk mode to work properly.
WINDOWS 10 KIOSK SETUP COMMON PROBLEMS
- Incorrect Local Sign in Account Name.
- Whatever sign-in account we configured in Kiosk Profile, that account has to be accessible at targeted kiosk device.
- If we set up the Kiosk Profile with local sign in account, it has to be existed as local account in targeted windows 10 device,
In the following example, the “LocalKioskUser” account in profile matching to the Computer Management – User account named LocalKioskUser on target kiosk device:

- Local Kiosk Account is member of Administrators group
The sign-in local account must not be a member of the Administrator group.
If it is, windows will operate in normal mode.
- Edge Chromium is installed instead of Edge Legacy
Uninstall Edge Chromium because the engine which runs the Windows Kiosk Configuration Profile is originally designed for Edge legacy. It may change in the short future but up to this point of time, you have to use Edge legacy for Windows 10 Kiosk mode.
- There is mismatch between kiosk setting of Device Restriction Configuration Profile for Edge Browser and Kiosk Configuration Profile

Changing the “Use Microsoft Edge kiosk mode” to the appropriate kiosk option as shown in the following example image:

- Autopilot Profile is missing If you deploy image by Autopilot.
It is used for initial kiosk setup, no specific setting is required but the profile itself.
- Reboot is not applied on kiosk device after an kiosk profile setting change
If all the above configurations are setup correctly and kiosk mode is still not working as expected, the device may need to be synchronized with Endpoint Manager and rebooted to have kiosk profile updated with new change.
Result example, Windows 10 Kiosk with Bing Weather autolaunch.
- Sign-in as localkioskuser

- After about 2 seconds, the Bing Weather will be automatically launched as shown:

- After 3-10 seconds, Bing Weather detail screen is impressively shown.

- To get other apps, you could move mouse to top right corner to close the current app, and open another one.

To Repurpose kiosk devices:
Once the assigned access feature, (kiosk mode) with multi-app configuration is applied on the device, certain policies are enforced system-wide, and will impact other users on the device. You will need to reset to factory default or reimage devices to clear all the policies.
Running Windows 10 Kiosk by Edge Chromium
An initial set of kiosk mode features are now available to test with Microsoft Edge Canary Channel, version 87. You can download Microsoft Edge Canary from the Microsoft Edge Insider Channels page.
I hope the information is useful,
Until next time.
Reference
https://www.inthecloud247.com/setup-edge-chromium-based-kiosk-device-with-microsoft-intune/
by Contributed | Dec 2, 2020 | Technology
This article is contributed. See the original author and article here.
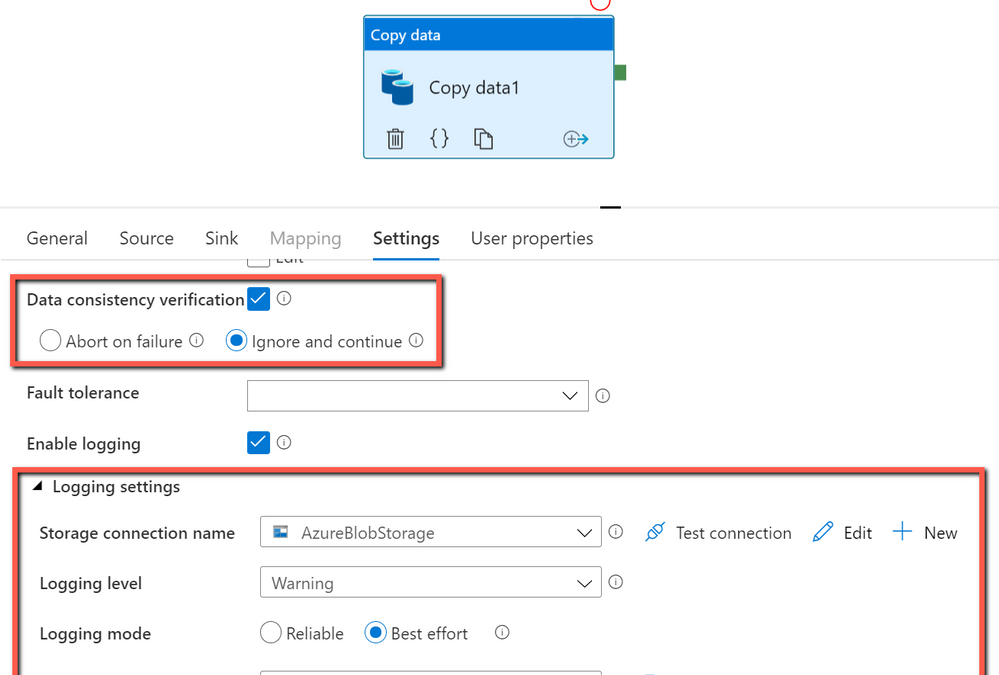
When you move data from source to destination store, Azure Data Factory copy activity provides an option for you to do additional data consistency verification to ensure the data is not only successfully copied from source to destination store, but also verified to be consistent between source and destination store. Once inconsistent files have been found during the data movement, you can either abort the copy activity or continue to copy the rest by enabling fault tolerance setting to skip inconsistent files. You can get the copied and skipped file names by enabling session log setting in copy activity.
How data consistency verification works:
With data consistency verification enabled, when copying binary files, ADF copy activity will verify file size, lastModifiedDate, and MD5 checksum for each binary file copied from source to destination store to ensure the data consistency between source and destination store. When copying tabular data, copy activity will verify the row count after job completes. Be aware the copy performance will be affected by enabling this option.
Get started:
In ADF copy activity, you can choose to enable “Data consistency verification” setting, and then decide if you want to abort the copy activity job or continue to copy the rest once inconsistent files found as below:

Get the verification result after copy job completes:

by Contributed | Dec 2, 2020 | Technology
This article is contributed. See the original author and article here.
For those of you using Microsoft Defender for Office 365 automated investigations, we have several new investigation improvements rolling out this month to improve your experience in the security center. These new features improve the clarity of Office 365 investigations, as well as improve Defender for Office 365 integration with SecOps tools in the security center.
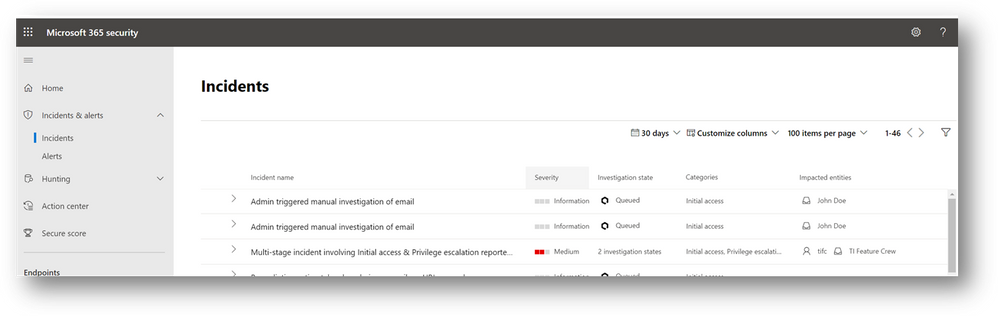
- Manually triggered investigations – Office 365 has supported investigations triggered manually by security administrators from Explorer since the Office 365 automated investigation features were released. This capability allows security teams to trigger ‘email investigations’ to see if anything in an email is bad, identify any unusual Office 365 behaviors for the recipient, and queue remediation actions for anything malicious or suspicious. With the addition of a new alert for admin-triggered email investigations from explorer, SecOps teams can now see alert notifications for these investigations in their alert queues – as well as view these investigations in the Microsoft 365 security center. The alert and investigations from these admin-triggered email investigations will be correlated in incidents, which further expands the signal provided by the admin action to show the full relevant scope of the suspected attack or malicious activity. In addition, this enables use of other Microsoft 365 Defender capabilities for these investigations, including the unified investigation page, the display of investigation actions in action center, and the alerts/entities within advanced hunting.
- Mailbox configuration entities – Defender for Office 365 identifies suspicious configurations like external forwarding rules and suspicious delegation rules – which are key methods that attackers can setup malicious persistence in their attack on businesses. Microsoft 365 Defender incident view has shown such findings under the mailbox tab. Since these configuration findings will have actions to disable them, we have added a new entity type called ‘Mailbox configuration’. These new entities help you will clearly see these suspicious mailbox configuration findings in the incident and investigation evidence tabs, so that you can more easily review these suspicious mailbox configurations associated with the pending actions.

- Outbound email clusters for user compromise investigations— Microsoft Defender for Office 365’s user compromise investigations analyze users in scenarios where the user has been blocked for sending out too many suspicious or malicious emails. To extend these investigations and provide better understanding of the potential impact of compromised mailboxes, we have added new email clusters to show recent email being sent from the mailbox. The three new email clusters show the ‘suspicious’ spam email, the ‘malicious’ malware/phish email, and the ‘clean’ email sent from the account in the last week. This information aids security operations teams in assessing:
- Whether the mailbox account was compromised
- What problems may have been created through malicious/suspicious use of the account
- Whether there was any potential data exfiltration through email
- Which outbound emails are legitimate (differentiate good email use from abuse/misuse)
These new email clusters will augment the existing email clusters in the user compromise investigation, which find emails similar to the malicious/suspicious messages that triggered the compromise-related mailbox alerts.

- Deprecation of block URL investigation action – We are removing the redundant ‘block URL’ action from our current investigations. In these current investigations, this action appears when the investigation finds a malicious URL. Since the Office 365 protection stack will be blocking the URL at the time of delivery and from Safe Links protected clicks, the investigation action is no longer needed. There will be future action uses from advanced hunting and explorer for false positive and false negative related admin remediation actions.
There is no impact to your current incident and automated investigation use. These new features add new fields you can use to find items easier. The main thing to note is that the new manually triggered email investigation alert will be seen in the security center, will generate alert email notifications, and will be available alongside other alerts in the Office 365 Management Activity API.
by Contributed | Dec 1, 2020 | Technology
This article is contributed. See the original author and article here.
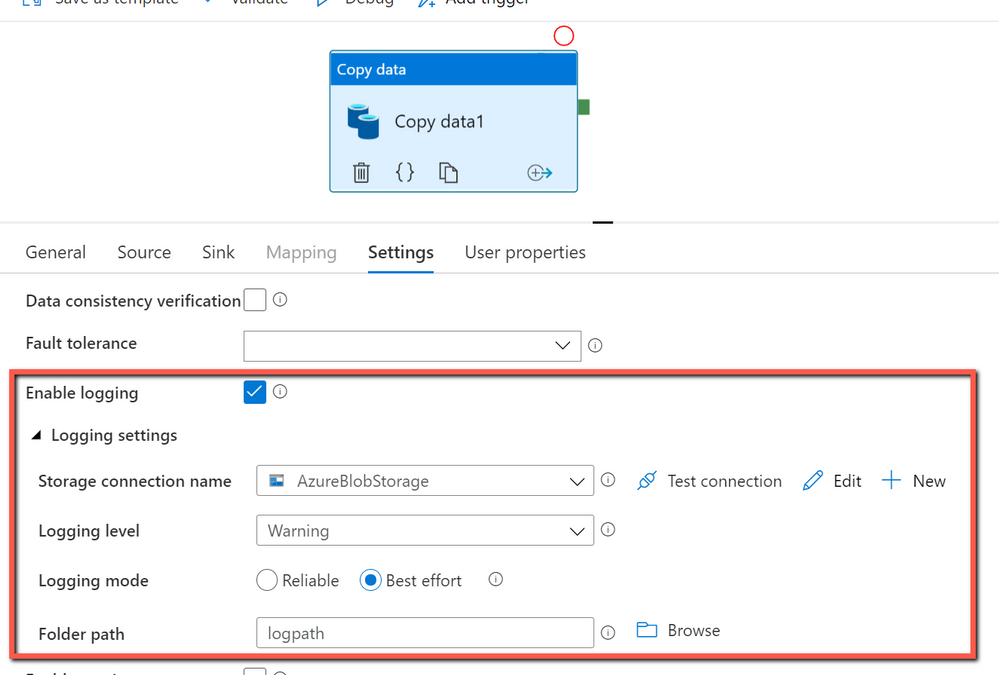
Benefit of using session log in copy activity:
With session log enabled in copy activity, you can log your copied file names, which can help you to further ensure the data is not only successfully copied from source to destination store, but also consistent between source and destination store by verifying the copied file names with their metadata in the log files. When you enable fault tolerance setting in copy activity to skip faulty data, the skipped files and skipped rows can also be logged. For more information, you can get details from here.
How to get started:
You can create a pipeline with a copy activity, and then configure the copy activity to enable session log as below:

The sample log file is as below:

From the log file above, you can see sample1.csv has been skipped because it failed to be verified to be consistent between source and destination store. You can get more details about why sample1.csv becomes inconsistent is because it was being changed by other applications when ADF copy activity is copying at the same time. You can also see sample2.csv has been successfully copied from source to destination store.

by Contributed | Dec 1, 2020 | Technology
This article is contributed. See the original author and article here.
Thanks for tuning back into our Azure Security Center (ASC) Controls Series, where we dive into different Secure Controls within ASC’s Secure Score. This post is dedicated to the Remediate Security Configurations Secure Control. As previously mentioned, organizations face different kinds of threats and the need to keep infrastructure, apps and devices secure is essential across the business. Misconfigurations at any level in infrastructure, operating systems (OS) and network appliances lead to a heightened risk of attack. This secure control enables Azure Security Center to list possible misconfigurations within your environment. Remediate Security Configurations can provide a maximum four-point score increase to your secure score.
By the time this blog was written, Remediate Security Configurations includes the following recommendations:
- Log Analytics agent should be installed on your virtual machines
- Log Analytics agent health issues should be resolved on your machines
- Vulnerabilities in security configuration on your machines should be remediated.
- Log Analytics agent should be installed on virtual machine scale sets
- Vulnerabilities in security configuration on your virtual machine scale sets should be remediated
- Azure Policy Add-on for Kubernetes should be installed and enabled on your clusters(preview)
- Overriding or disabling of containers AppArmor profile should be restricted (preview)
- Log Analytics agent should be installed on your Linux-based Azure Arc machines (Preview)
- Log Analytics agent should be installed on your Windows-based Azure Arc machines (Preview)
Explanation of recommendations
Every organization’s environment is made up of resources that need to be kept secure to maintain the security hygiene of the company. For a more in-depth look at how ASC can help you maintain those resources, keep reading!
Log Analytics Agent should be installed on your virtual machine
Security center monitors and collects data from virtual machines (VMs) using the Log Analytics Agent. The agent reads security-related configurations and event logs from the machines, then copies only the necessary data to your Log Analytics workspace. Data collection from the agent is essential in giving Security Center visibility into missing updates, misconfigured OS security settings, endpoint protection status and health, and threat protection. Data collection is only needed for compute resources. Configuring auto-provisioning on these machines is recommended. By turning auto provisioning on, Security Center will deploy the Log Analytics Agent on all Azure VMs and any VMs that are created in the future within the same subscription.
While it is recommended that the agent’s installation is to be done automatically, it can also be installed manually. When manually installing the agent on an Azure VM, make sure to download the latest version of the agent to ensure that it functions properly.
Log analytics agent health issues should be resolved on your machines.
Aside from just installing the agent, it also needs to be configured correctly to make sure that your machines are being properly monitored. In case you’re wondering how you would know if the agent is set up correctly, this recommendation is here to tell you! When viewing this recommendation, as shown below, Azure Security Center will include the Unhealthy Resources tab to show which VMs do not have the Agent properly installed. If any agents were manually installed, you must verify that the latest version of the agent is in use. After confirming that you’re using the latest version of the agent, check the “Reason” column to guide you in remediating your machine.

Vulnerabilities in security configuration on your machines should be remediated.
This recommendation covers the security configuration of your machines. Here we are focusing on the vulnerability of the machine’s operating system (OS).
Clicking on this recommendation will take you to the screen below. This page gives you information about the specific VMs in your environment and their OS configurations that do not align with ASC’s recommended settings. VMs in the environment below have failed 246 total OS configuration rules. The number of failed rules are provided by each type of machine, Linux or Windows. The rules are also broken down into severity and type.

In the Operating System tab, the column titled “State” shows the state of the OS’s vulnerability. The state here will be listed as “open” because the vulnerability has not yet been resolved. Security Center uses Common Configuration Enumeration (CCE) which assigns a unique identifier, as shown in the CCeId tab, to different security-related system configuration issues.
Log Analytics agent should be installed on virtual machine scale sets
We have encountered our good friend, the Log Analytics Agent, once again. If you’re looking to bypass the redundancy of updating numerous virtual machines in your environment one by one, virtual machine scale sets are the way to go! Virtual machine scale sets enable you to manage, update and configure multiple virtual machines as a unit. Scale sets can support up to 1,000 VM instances and up to 600 instances if you choose to create and upload your own custom virtual machine images. In order to give Security Center access into the security configurations of your scale sets and an accurate look into your environment’s security hygiene, the Log Analytics agent should also be installed on your virtual machine scale sets. Auto-provisioning of the agent for Azure virtual machine scale sets is currently not available.

Vulnerabilities in security configuration on your machines should be remediated.
Remediating security configurations on VMs doesn’t stop at the machine itself. Vulnerabilities in the security configuration of VM scale sets are also significant to prevent them from attacks. By clicking on the unhealthy scale set listed in the recommendation, ASC will then give you a list of rules and descriptions that your scale sets did not meet.


Azure Policy Add-on for Kubernetes should be installed and enabled on your clusters (Preview)
Azure Policy for Kubernetes clusters safeguards your clusters by managing and reporting their compliance state. The Add-on policy uses Gatekeeper v3 of Open Policy Agent (OPA) to communicate any policies that have been assigned to the clusters, apply those policies to your Kubernetes cluster and report the details back to Azure Policy.
This remediation comes with a Quick Fix button that allows you to deploy Azure Policy Add on for AKS with only a couple of clicks. The installation can also be completed manually. Azure policy provides the option to assign built-in policy definitions to you Kubernetes clusters where you see fit.

Overriding or disabling of containers AppArmor profile should be restricted (Preview)
Application Armor, or AppArmor, is a Linux security module which protects an OS and its applications from both external and internal security threats. A system administrator can restrict a program’s capabilities by associating it with an AppArmor security profile. The security profile protects against attacks by limiting access and privileges of different resources. In order to protect your containers running on your Kubernetes cluster, they need to be limited to allowed AppArmor profiles only.

Log Analytics agent should be installed on your Linux-based Azure Arc machines (Preview)
Linux-based machines onboarded through Azure Arc should also have the Log Analytics Agent. Although the machine uploaded through Azure Arc may be a VM hosted on-premises or in another Cloud Solution Provider (CSP), it still needs the Log Analytics Agent for Azure Security Center to monitor its security configuration and workloads. The Quick Fix button can install the agent through a single click, or you can manually install the agent by following the remediation steps.
Log Analytics agent should be installed on your Windows-based Azure Arc machines (Preview)
Like Linux-based machines, Windows-based machines onboarded through Azure Arc also need to have the Log Analytics Agent. A Quick Fix button is also available here to install the agent as well as the option to manually install it on Windows-based machines.
Conclusion
The Remediate security configurations control is not a one-time fix. As you continue to onboard machines into your environment, these recommendations should be re-visited to make sure you’re keeping up with the security hygiene of your machines. Improving the security hygiene of your VMs and infrastructure is another great step forward in improving your overall security posture and increasing your secure score.
Acknowledgements
Reviewer: Yuri Diogenes, Principal PM for ASC CxE Team
Contributor: @Kerinne Browne
Thank you so much for assisting me in writing this blog post!


Recent Comments