by Contributed | Dec 16, 2020 | Technology
This article is contributed. See the original author and article here.
This post was authored by Bruce Nelson, Senior Solutions Architect at Databricks and Clinton Ford, Staff Partner Marketing Manager at Databricks
Overview
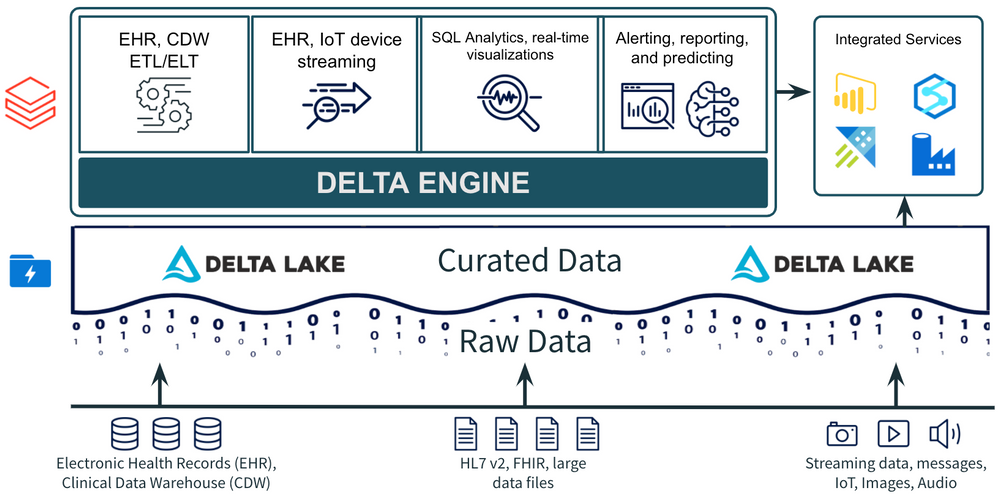
Healthcare organizations are improving the patient experience and delivering better health outcomes with analytic dashboards and machine learning models on top of existing electronic health records (EHR), digital medical images and streaming data from medical devices and wearables. Azure Databricks and Delta Lake make it easier to work with large clinical datasets to identify top patient conditions.
Using Delta Lake to build a comorbidity dashboard
Simulated EHR data are based on roughly 10,000 patients in Massachusetts and generated using the Synthea simulator. Our ETL notebook ingests and de-identifies our data, then prepares it for our visualization notebook. We create visualizations and a simple dashboard that show the top conditions (comorbidities) in our real world data and also analyze the correlation between any two conditions specified by the user.
Extract, transform and load (ETL)
To begin, we use pyspark to read EHR data from comma-separated values (CSV) files, de-identify patient personally identifiable information (PII) and write to Delta Lake for analysis. Using Delta Lake is a best practice for ingestion, ETL and stream processing as an open source format with support for ACID transactions, faster processing with Delta Engine and easy integration with other Azure services for additional use cases.

EHR data analysis and comorbidity dashboard
In this notebook we visualize top conditions in the database and create a simple dashboard to analyze the correlation between any two conditions specified by the user. You can share this notebook as a dashboard following these instructions.

Next steps
For additional background on this use case see this blog post. See live demos or get hands on at an Azure Databricks event. Go even deeper with this 3-part webinar training series to operationalize machine learning models for your own organization.
by Contributed | Dec 16, 2020 | Technology
This article is contributed. See the original author and article here.
Hello Dear Reader, when last we were together in CI CD in Azure Synapse Analytics Part 1 we started out our series by:
- Creating an Azure DevOps project
- Linking our Azure Synapse Analytics environment to that Project via Git
- Validating that our Azure DevOps Repo was populated with our Azure Synapse Analytics environment
This time we will:
- Create a new branch on our Repo
- Edit our Azure Synapse Analytics environment
- Specifically my SQL scripts have demos all over the place and Buck Woody said I have to clean up my
very messy room …. Azure Synapse Analytics environment
- Create a Pull Request in Azure Synapse Analytics to merge our new branch with the main
- Approve the Pull Request in Azure DevOps
- Validate our main branch is updated in our Azure Synapse Analytics Environment
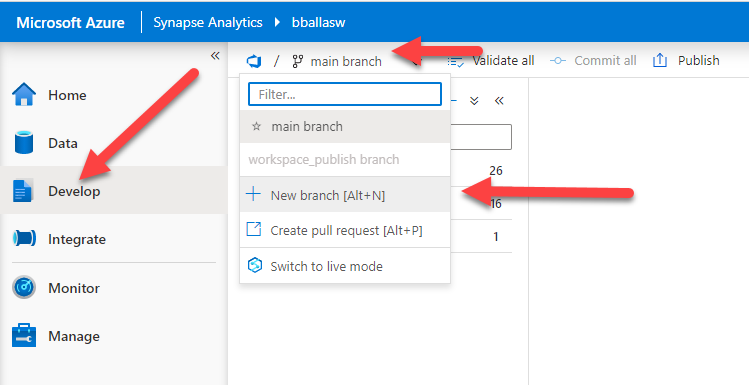
We will start by opening up our Azure Synapse Analytics environment by navigating to https://web.azuresynapse.net and signing in, and then navigating to the Develop blade. We will then click on the down arrow next to the main branch and select + New Branch.
Our DevOps project stores SQL scripts, Pipelines, Notebooks, Linked Services, and many other items from our Azure Synapse Analytics environment. It also stores meta-data. Today we will make pure meta-data changes by creating folders to organize our SQL Scripts. So we will create a working branch that describes our change and name it Folders.

Looking at the Develop blade we can see that the main working branch has been supplanted by the Folders branch. We will click on the three ellipsis … next to SQL scripts and create a new folder.

Now we create our folders. We will repeat this step for each folder that we will create. The first folder will be for our SQL Serverless demos. Now a quick song montage while I create the rest of the folders for us.

Before we start organizing we will take a before picture. Here is a good look at all of my SQL Scripts without any folders.

These demos are all over the place!!! We start by hovering over one of the SQL Scripts and then clicking the three ellipsis … by the script and selecting Move to.

We will select the College demos folder for the 01 Create College Tables script, and then click move here. One more quick song montage while I organize all of the scripts for us.

Now that all of the scripts are organized there are some very IMPORTAINT things to point out. Each script has a dot next to the name. This signifies that the changes to our Folders branch have not yet been committed. We need to click on Commit all in order to save these.
If we navigated off of this page prior to committing the change all of the folders we created and the organization we’ve done would be gone.
If we were writing a new SQL script, Notebook, or Pipeline each of those items have a Commit button in the user interface. That will commit just that item as you work. You can also use the Commit all button if you want to commit all changes you’ve made to the branch. The good news is we have options!
So now we commit and preserve these changes.

After committing notice all of the dots have gone away. This means our commit to branch Folders was successful.
Now we go to the Folders Branch click the drop down button and click Create pull request.

This will launch Azure DevOps and bring us to a Pull Request window. Now is a good moment for a quick sidebar.
A few items <begin sidebar>:
- I’m an army of one right now
- In your environment you should have a sprint you are working on, and a work item associated with the work you are doing. That would get entered into the pull request for me (see item 1)
- You should have Reviewers identified for your code, and you would select them here, for me (see item 1)
- When you create this other processes would be in place, for the sake of the tutorial I will show you everything because….. (see item 1)
- </end sidebar>
We create a title stating what we are doing “Folders Merge”, in the description we give a little more info. We do not have Reviewers or a Work Item, remember the sidebar, then we click Create.

We will approve and then Complete these changes. This will merge the Folders branch with the main branch and the Folders branch will cease to exist.

Navigating back to our Azure Synapse Analytics environment we can see we are in the main branch and all of our beautiful folders are in place.

Next in our series we will migrate all of these changes to a new squeaky clean QA environment by creating an Azure DevOps pipeline to create an artifact and then a release pipeline to deploy our artifact to a new Azure Synapse Analytics QA.
Thank you for stopping by!
by Contributed | Dec 16, 2020 | Technology
This article is contributed. See the original author and article here.
Learn how you can combine the best of Azure Sphere IoT security with the power of Azure RTOS to deliver new IoT solution categories. Covered in this article is a brief introduction to Azure RTOS, Azure Sphere, and the MediaTek MT3620 MCU architecture. You will also learn why you might want to run real-time applications on an Azure Sphere, how applications communicate across cores and how to get started.
Azure RTOS
Azure RTOS is a Real-Time Operating System available from Microsoft that runs on most microcontrollers. Azure RTOS includes a small powerful Real Time operating system called ThreadX, a GUI designer plus GUI library, and more. Azure RTOS ThreadX makes it easier to build reliable embedded solutions with a rich set of services including real-time, multithreading, inter-thread communication, synchronization, timers, and memory management.
Azure RTOS is free to use on an Azure Sphere MT3620 MCU and is covered by the “Distribution and Production Use” license.
Azure Sphere
The traditional approach to IoT microcontroller development is that you are responsible for integrating and maintaining all the bits of a solution. This includes the communications stack, security, authentication, certificates, identity, encryption libraries, update processes, your solution and more. Not only are you a solution domain expert, but you are now responsible for tracking new and emerging security threats, mitigating, and updating to protect IoT devices.
Azure Sphere is a unique highly secure IoT platform. You focus on your solution, Azure Sphere deals with security, identity, certificates, reporting, tracking emerging attack vectors, mitigating, updating the platform, and application distribution to protect your solutions, customers, and reputations.
Azure Sphere consists of the following components:
- Azure Sphere–certified chips from hardware partners include built-in Microsoft security technology to provide connectivity and a dependable hardware root of trust.
- Azure Sphere OS adds layers of protection and ongoing security updates to create a trustworthy platform for new IoT experiences.
- Azure Sphere Security Service brokers trust for device-to-cloud communication, detects threats, and renews device security.
Together these components implement The Seven Properties of Highly Secure Devices .

Azure Sphere MediaTek MT3620 MCU architecture
The first Azure Sphere certified MCU is the MediaTek MT3620 microcontroller unit (MCU). This MCU which has three developer-accessible cores, a Cortex-A7 that runs a hardened Linux kernel, and two Cortex-M4 cores.
- The Cortex-A7 core runs less timing-sensitive tasks such as setting up network connections, negotiating security, refreshing certificates, updating the device OS and applications. You can run a custom application on this core and send and receive messages to predefined network endpoints including cloud gateways such as Azure IoT Hub.
- On the Cortex M4 cores you can run bare-metal code, or applications running on a real-time operating system such as Azure RTOS or FreeRTOS.

What is an RTOS (Real-Time Operating System)
A system is said to be real-time if the total correctness of an operation depends not only upon its logical correctness, but also upon the time in which it is performed Link to Wikipedia Article.
A Real-Time Operating System is system software that provides services and manages processor resources for applications. These resources include processor cycles, memory, peripherals, and interrupts. The main purpose of a real-time Operating System is to allocate processing time among various duties the embedded software must perform.
Why run real-time Azure RTOS applications on Azure Sphere
The main reasons to run real-time applications on an Azure Sphere include:
- Your application requires precise or deterministic timing that cannot be guaranteed on the Cortex-A7 Linux kernel core where it would have to compete for resources with other services.
- You are migrating existing Cortex M4 code to an Azure Sphere.
- Running your application across multiple cores to take advantage of all the memory and processing resources on the Azure Sphere.
- Dedicating a core to running compute intensive applications like machine learning models
Intercore communications
For security reasons, applications running on the Cortex M4 cores cannot directly access network endpoints. Applications can communicate with applications running on other cores through a secure mailbox mechanism. As an added layer of security, applications can only communicate across cores with applications they have been partnered with at development time.
Solution architecture example
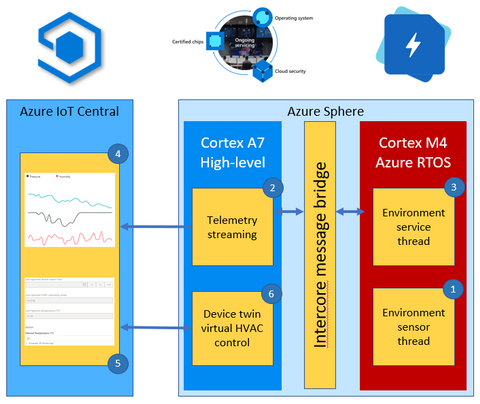
This environment monitoring solution shows how you can integrate a real-time Azure RTOS application with Azure Sphere and IoT Central.
The solution architecture is as follows:
- The Azure RTOS real-time environment sensor thread runs every 2 seconds. The thread stores in memory the latest environment temperature, humidity, and pressure data.
- The high-level Azure Sphere applications requests environment data from the real-time Azure RTOS application.
- The Azure RTOS real-time ‘environment service thread’ responds with the latest environment data.
- The high-level application serializes the environment data as JSON and sends the telemetry message to IoT Central.
- The IoT Central user can also set the desired temperature for the room by setting a property in IoT Central.
- The Azure Sphere then sets the HVAC operating mode to meet the desired temperature.

Developer Experience
You can develop Azure Sphere and Azure RTOS applications on Linux and Windows. On Windows, you can develop high-level and real-time applications with Visual Studio (free Community Edition or better), Visual Studio Code, or integrate with your existing toolchains. On Linux you can develop high-level and real-time applications with Visual Studio Code or integrate with your existing toolchains.
Next Steps
There are two Microsoft Learn modules which include hands-on labs you can download to start your Azure Sphere and Azure RTOS journey.
- Develop secure IoT solutions for Azure Sphere, Azure RTOS and Azure IoT Central
- Develop secure IoT Solutions for Azure Sphere, Azure RTOS and IoT Hub
Skip to unit 16 to learn more about real-time Azure RTOS running on an Azure Sphere.
by Contributed | Dec 16, 2020 | Technology
This article is contributed. See the original author and article here.
Configuring transactional replication with Azure SQL Managed Instance there are some limitations that we need to take into consideration. One of them is that both the publisher and distributor need to be placed either on Managed Instance or on the on-premises server. The other requirements can be found here.
In the docs there are already covered two types of topologies:
- Azure SQL Managed Instance Publisher, Distributor and Subscriber
- Azure SQL Managed Instance Publisher and Distributor, Azure SQL VM Subscriber
In this article we will focus more on the scenario in which instead of a Azure SQL VM Subscriber, we will have an on-premises Subscriber. Being similar to the second above topology type the steps will also be alike, after configuring the on-premises and Managed Instance servers we need to do the following:
After that comes the create subscription step where the difference will be in the @subscriber parameter. For an on-premises subscriber we will not need a private DNS zone so the syntax will be similar to this:
use [ReplTutorial]
exec sp_addsubscription
@publication = N'ReplTest',
@subscriber = N'OnPremServerName',
@destination_db = N'ReplSub',
@subscription_type = N'Push',
@sync_type = N'automatic',
@article = N'all',
@update_mode = N'read only',
@subscriber_type = 0

exec sp_addpushsubscription_agent
@publication = N'ReplTest',
@subscriber = N'OnPremServerName',
@subscriber_db = N'ReplSub',
@job_login = N'azureuser',
@job_password = '<Complex Password>',
@subscriber_security_mode = 0,
@subscriber_login = N'azureuser',
@subscriber_password = '<Complex Password>',
@dts_package_location = N'Distributor'
GO
Common issues
- Failed to connect to Azure Storage
2019-11-19 02:21:05.07 Obtained Azure Storage Connection String for replstorage 2019-11-19 02:21:05.07 Connecting to Azure Files Storage ‘replstorage.file.core.windows.netreplshare’ 2019-11-19 02:21:31.21 Failed to connect to Azure Storage ” with OS error: 53.
Recommendations:
– Ensure that the port 445 is open in the outbound security rules of the Network Security Group (NSG) that your Managed Instance is using
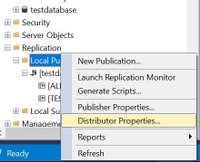
– Check Distributor properties as below:
Right-click on Local Publications and access Distributor properties:
After that access the Publishers page and press on the below highlighted area:

After that you should have a window similar to this:

In here please check that the Default Snapshot Folder is in the correct format and for the Storage Account Connection String you can also re-enter it here from here:

More details on this error are accessible here Failed to connect to Azure Storage.
- Could not connect to Subscriber
Error messages:
The process could not connect to Subscriber ‘REPLMITOVM.REPLDNS.COM’. (Source: MSSQL_REPL, Error number: MSSQL_REPL0)
Get help: http://help/MSSQL_REPL0
Named Pipes Provider: Could not open a connection to SQL Server [53]. (Source: MSSQLServer, Error number: 53)
Get help: http://help/53
A network-related or instance-specific error has occurred while establishing a connection to SQL Server. Server is not found or not accessible. Check if instance name is correct and if SQL Server is configured to allow remote connections. For more information see SQL Server Books Online. (Source: MSSQLServer, Error number: 53)
Get help: http://help/53
Query timeout expired, Failed Command: (Source: MSSQLServer, Error number: HYT00)
Get help: http://help/HYT00
Recommendations:
– Ensure that the port 1433 is open in the outbound security rules of the Managed Instance NSG
– As an alternative to T-SQL script mentioned here you can also add the subscription directly from the GUI of SSMS:
Right-click on the publication and click New Subscriptions

Click Next, select the publication name and click Next, Run all agents at the Distributor, Add SQL Server Subscriber:

Here we will need to connect to the on-premises server with SQL Authentication as mentioned in the first part of the requirements.
After the subscription was added click on the highlighted area below:

On the top part use login that you are using for the distributor (SQL login that you are accessing the Azure SQL Managed Instance) and on the bottom part of the window enter the SQL login used previously to access the on-premises server.
After that you can leave the Synchronization Schedule together with the Initialize Subscription steps as default and Finish the New Subscription Wizard.
As a short summary the recommendations for the Could not Connect to Subscriber error would be:
- Ensure that the port 1433 is open and that the other requirements are met
- Try as an alternative to add the subscription with SSMS
- Provide the IP address of the on-premises server in the sp_addsubscription stored procedure
- Check if the @@SERVERNAME is the same with SERVERPROPERTY(N’servername’)
SELECT SERVERPROPERTY(N'servername')
SELECT @@SERVERNAME
If the results are different this can be fixed by using this script:
DECLARE @actualname NVARCHAR(100)
DECLARE @currentname NVARCHAR(100)
SELECT @actualname = CONVERT(NVARCHAR(100), SERVERPROPERTY(N'servername'))
SELECT @currentname = @@SERVERNAME
EXEC sp_dropserver @currentname
EXEC sp_addserver @actualname, local
Reference article: SQL SERVER – FIX – Replication Error: SQL Server replication requires the actual server name to make a connection to the server
More details about the Could not connect to Subscriber error can also be found here.
by Contributed | Dec 16, 2020 | Technology
This article is contributed. See the original author and article here.
As part of this year’s Festive Tech Calendar event which is being run by Gregor Suttie and Richard Hooper, myself and a couple of my colleagues will be doing a fun Q&A or Ask Me Anything session.
On the 16th December at 3pm UK time, 4pm Switzerland time and 10am Ottawa time, myself, Pierre Roman and Thomas Maurer will be answering your questions on Azure, Hybrid Cloud, Windows Server or we are happy to take questions on our home office setups, what certification tips we have, or what our favourite Christmas movie is.
The stage is open for you to ask us a question and we’ll try and answer it. This session will be an hour long and we’d love to have you all join us LIVE.
You can tune into the event on our YouTube channel, be sure to hit that reminder button so you are reminded of the event, or download the calendar ICS file here and add it to your diary and block out that time. :calendar:
The recording will be available on demand after the live event so if you aren’t able to tune in but would love to ask a question please drop it in the comments below and we’ll try our best to get to it and you can watch the recording for the answer. ;)
A massive thank you to Gregor and Richard for organising this event and for all those that have contributed so far this month.
by Contributed | Dec 16, 2020 | Technology
This article is contributed. See the original author and article here.
PROBLEM:
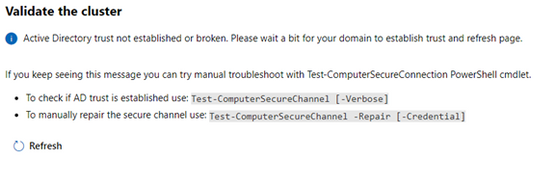
I began configuring a Windows Server 2019 Storage Space Direct (S2D) cluster using 3 virtual machines running on a physical Windows 2019 Hyper-V server. I started the installation using Windows Admin Center (v2009 Bld: 1.2.2009.21002) Cluster Creation wizard. I selected the Windows Server Deploy a failover cluster to run VMs or cluster roles and apps on Windows Servers option. I filled in all the screen information until I got to the end of the Networking: Virtual Switch page. When I clicked Next: Clustering it took me to the Validate Cluster page and presented the following error:
Active Directory trust not established or broken. Please wait a bit for your domain to establish trust and refresh page…
The error message leads you to believe there is an Active Directory trust relationship issue with at least one of the nodes. Therefore, I started testing the nodes trust relationships with Active Directory. I confirmed all the nodes were in the domain and had connectivity with each other and the domain. Running the Test-ComputerSecureChannel command confirmed all the connections and did not show any errors. I could not find any issues with the trust relationship between the nodes and Active Directory.
SOLUTION:
The time zone was off/misconfigured on one of the nodes. I corrected it, the error went away, and I was able to proceed to Validate the cluster.
Therefore, confirm that the trust relationship with the nodes in the cluster and Active directory is healthy.
If they are all set properly, ensure that the time zone is the same on all S2D nodes. If necessary, set the time zone to the same zone on all the cluster nodes. If it is different on even one of the nodes, you will get the error when entering the Validate Cluster page.
And that is it. The steps above were successful in resolving the issue I had with the S2D-Active Directory trust not established or broken… I hope this post saves you time if you ever encounter these errors.
by Contributed | Dec 15, 2020 | Technology
This article is contributed. See the original author and article here.
Scenario:
Within Logic App constructing a string variable – sendtosftp
Using this data creating a new file on the SFTP server.
If the constructed variable size exceeds 50 MB size limit, get an error similar to:
{
“status”: 400,
“message”: “The provided file size ‘58100000’ for the create or update operation exceeded the maximum allowed file size ‘52428800’ using non-chunked transfer mode. Please enable chunked transfer mode to create or update large files.rnclientRequestId: xxxxxxxx-xxxx-xxxx-xxxx-xxxxxxxxxxxx”,
“error”: {
“message”: “The provided file size ‘58100000’ for the create or update operation exceeded the maximum allowed file size ‘52428800’ using non-chunked transfer mode. Please enable chunked transfer mode to create or update large files.”
},
“source”: “sftpwithssh-eus.azconn-eus.p.azurewebsites.net”
}
This issue happens even though “Allow Chunking” property is set to “On”.
Resolution:
Before sending the data to SFTP, create a Componse action and set its value to the previous string variable.
Add the “body” to the Compose action.
e.g.
“Compose”: {
“inputs”: {
“body”: “@variables(‘sendtosftp’)”
},
“runAfter”: {
“Until”: [
“Succeeded”
]
},
“type”: “Compose”
},
“Create_file”: {
“inputs”: {
“body”: “@body(‘Compose’)”,
by Contributed | Dec 15, 2020 | Technology
This article is contributed. See the original author and article here.
Today we are excited to announce the public preview of two new highly desired features, Availability Zone spanning using a single VMSS, and stateless node types!
Availability Zone spanning using a single VMSS
We are simplifying the deployment of Service Fabric clusters which span availability zones by enabling you to create a zone spanning cluster using a single VMSS. Previously it was required that you deploy three independent scale sets with each one pinned to a single zone. It is now possible to create the same cluster topology using a single VMSS greatly simplifying the deployment and management of these clusters.
Use it today!
To try out availability zone spanning using a single VMSS, see the documentation and sample templates.
Stateless Node Types
Stateless node types are a new property which will only place stateless services on the specific node type. This enables several benefits for stateless workloads:
- Faster scale out operations.
- Support for scale sets with greater than 100 nodes. (Support for >100 nodes in a scale sets to simplify meeting demand)
- Support for VMSS Automatic OS upgrades on bronze durability to further simplify OS patching.
Use it today!
To try out stateless node types, see the documentation and sample templates.
Use it, and tell us about it
As with other previews, the public preview features should not be used for production workloads until they reach general availability.
We look forward to hearing your feedback on these new capabilities. Please provide feedback via GitHub here with any features or issues you encounter.
by Contributed | Dec 15, 2020 | Technology
This article is contributed. See the original author and article here.
As we approach the end of 2020, we wanted to take the opportunity to highlight some notable milestones for Microsoft Video Indexer. In recent months, we’ve added deep search for spoken words in multi-language videos and topics, lowered transcription costs, made enhancements to VI portal experience and more. The most notable advances we’ve made span the following areas:
- General availability (GA) of multi-language identification and transcription in Video Indexer
- Usability enhancements in Video Indexer portal experience addressing top customer feedback
- Extended functionality in the search API that enables search by topics
- Expanded region availability
GA of Multi-Language Identification and Transcription in Video Indexer
Video Indexer provides the unique capability of automating the identification of spoken languages within a video for transcription. This is especially useful when analyzing multi-language source content. This solution allows users to easily transcribe multi-language content without going through tedious manual preparation steps before starting the analysis. It saves time and money when it comes to processing large archives of videos. It also enables enhanced discoverability and improves accessibility.
By auto-detecting multiple languages before indexing your videos, Video Indexer simplifies the transcription and translation processes within your organization. In July, the multi-language identification capability was moved from preview to GA and is now ready for production use. There is no pricing impact from the “Preview to GA” transition. You can find a more detailed overview of this capability in this blog post. You can also refer to the Video Indexer documentation for full details.
New Portal Experience
The Video Indexer Portal is an out-of-the-box offering that allows customers to explore, learn, try, and even run limited Proof-of-Concepts (PoCs). It provides intuitive UI experience and is especially useful for low-scale scenarios such as video archives with 50 videos. We recently enhanced the portal offering with the addition of the following capabilities:
- The portal UI now supports mobile devices. By adapting to your mobile screen size (excluding customization UIs), the new portal gives you more seamless experience across the full range of desktop to mobile device form factors.

- The Video Indexer website experience is fully aligned with WCAG2.1, as part of Microsoft Accessibility standards. Several improvements related to keyboard navigation, programmatic access, and screen-reader were released to improve accessibility for our users.
- Improved Video Gallery. We now have a new search bar for deep insight search, with additional filtering capabilities and enhanced search results. The video gallery includes a new list of views with the ability to sort and manage video archives with multiple files (No API changes).

- There’s also a new side panel for easy selection and user configuration. It allows for simple and quick account creation and sharing and simplifies setting the configuration. The side panel is also used to provide convenient access to user preferences and help.
Search by Topics
We have enhanced the search API to enable searching on inferenced Topics to further enable you to optimize your search results. You can use the search API to search for videos with specific topics. Topics are added as part of the textScope (optional parameter).
Let’s say you have a video archive, and you would like to find videos in English-US only about web design, you would need to add the following request params: ‘&query=web+design’ (search for videos with all the words) and ‘&textScope=Topics’. You can use this C# sample or refer to the Video Indexer API documentation for more details and code samples.
using System;
using System.Net.Http.Headers;
using System.Text;
using System.Net.Http;
using System.Web;
namespace CSHttpClientSample
{
static class Program
{
static void Main()
{
MakeRequest();
Console.WriteLine(“Hit ENTER to exit…”);
Console.ReadLine();
}
static async void MakeRequest()
{
var client = new HttpClient();
var queryString = HttpUtility.ParseQueryString(string.Empty);
// Request headers
client.DefaultRequestHeaders.Add(“x-ms-client-request-id”, ””);
client.DefaultRequestHeaders.Add(“Ocp-Apim-Subscription-Key”, ”{subscription key}”);
// Request parameters
queryString[“sourceLanguage”] = ”en-US”;
queryString[“isBase”] = true;
queryString[“query”] = ”web+design”;
queryString[“textScope”] = ”Topics”;
var uri = ”https://api.videoindexer.ai/{location}/Accounts/{accountId}/Videos/Search?“ + queryString;
var response = await client.GetAsync(uri);
}
}
}
Video Indexer Region Availability in East US
Video Indexer paid accounts can now be created in the East US region. We will continue to expand our data center availability in the coming months. See the full list of regions that Video Indexer currently supports.
If you’re not already using Microsoft Video Indexer, please sign up for a free trial.
Got questions or feedback? We would love to hear from you!
by Contributed | Dec 15, 2020 | Technology
This article is contributed. See the original author and article here.
Update: Tuesday, 15 December 2020 22:17 UTC
Root cause has been isolated to new feature rollout which was causing duplicate notification when resource was unhealthy for some customer in the azure portal. Specifically, any metric alert names with non ascii characters see this impact. To address the issue, we’ve started mitigation to disable the feature. Some customers may continue to see notifications and we estimate 4 hours before all is addressed.
Root Cause: New feature rollout which was causing duplicate notification.
Incident Timeline: 14 day 23 hours – 12/01, 11:00 PM UTC through on going 12/15, 10:00 PM UTC
Next Update: Before 12/16 01:30 UTC
-Vincent

Recent Comments