by Contributed | Jan 19, 2021 | Technology
This article is contributed. See the original author and article here.
Welcome to the third and final blog post in our series on how to use tagging effectively in Microsoft Defender for Endpoint. We hope you’ve enjoyed this series and look forward to your feedback on this topic and what you’d like to see in the future.
Tagging using the API
Microsoft Defender for Endpoint APIs allow you to do many things through scripting to both query and change elements within your Microsoft Defender for Endpoint instance. As part of this blog on tagging we wanted cover how you can use scripting to apply tags to machines directly using an API.
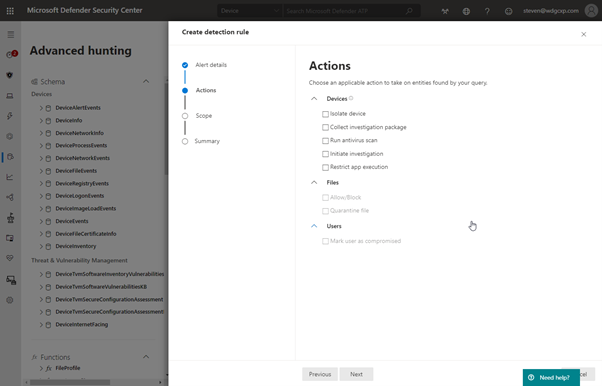
Within Advanced Hunting you can create a custom detection that runs the query on a regular basis to generate an alert. You can also enable response actions as a result of this detection to affect the machines contained in the results:
You will notice however that tagging the resultant machines is not one of the options available. Instead, it is possible to take the advanced hunting query and use it as an input to the script that applies the tag through the API.
Setting up API access
Before you can use PowerShell to query against the API you need to set up the API application in Azure.
In the Azure Active Directory section of https://portal.azure.com you need to click on new App Registration and create a new app:

Once you have completed this part you will be presented with the following screen:

Take a note of the Application ID and the Directory ID, you will need these for your script. Then click on “View API permissions”. It is here that you define how the API can be accessed.
- Select “Add a permission”
- Click “APIs my organization uses”
- Type “Windows” into the search box and then select the “WindowsDefenderATP” API

When accessing the API, it is possible to use either user permissions or application permissions. Using application permissions means that it doesn’t matter who is logged in to run the script and instead utilises the client secret to authenticate against the application.
For the purposes of what we are enabling we need specific permissions set. We are running an Advance Hunting query so we need the “AdvanceQuery.Read.All” permission and we are also applying a tag to the machine so we need the “Machine.ReadWrite.All”

If you are using this scripting method for other actions, i.e. isolating a machine, then you would need to apply the appropriate permissions.
The final stage of the application registration is to create the client secret that will be used for authenticating.
In the app properties, click onto “Certificates & secrets” and create a new secret:

Then take note of the client secret that is created as you will need this alongside your Application ID and Directory ID for your script:

Now that you have your application created you can use PowerShell scripting to query against it and then write a tag back on the devices in the results.
Using an Advanced Hunting query for your tagging criteria
Advanced Hunting in Microsoft Defender for Endpoint is a powerful query tool that allows you to create complex queries based upon the telemetry that is gathered from the managed endpoints. When writing these queries, it is possible to enable them as a custom detection, meaning they run at a regular interval and can apply actions against any device presented in the results. However, there are only certain actions that can be applied against these devices and tagging isn’t one of them:

Therefore, if you want to tag a device based upon a query then you need to utilise the API. Let’s say for example if you want to tag all devices in a certain subnet, the first step is to create the Advanced Hunting script:
DeviceNetworkInfo
| mvexpand parse_json(IPAddresses)
//| Subnet=IPAddresses.SubnetPrefix
| where IPAddresses contains “192.168.254” and IPAddresses.SubnetPrefix contains “24”
| summarize by DeviceId
| project DeviceId
Obviously, you can use pretty much any Advanced Hunting query in this test file, but it does need to return DeviceID in the results in order for it to be used in the next step.
Run the script first in the portal just to verify it is finding the correct data for you then copy the query into a text file to use as input to your API script.
The script below takes the query text file and then applies a tag of “DataCenter” against the DeviceIDs that are found by the query:
#Script to take a file containing an Advanced Hunting query and then apply a tag to the DeviceID shown in the results
#Replace ‘XXXXXXXXXXXXXXXXXXXX’ with the appropriate IDs relevant to your tenant/application (quotes required)
$tenantId = ‘ XXXXXXXXXXXXXXXXXXXX’
$appId = ‘XXXXXXXXXXXXXXXXXXXX’
$appSecret = ‘ XXXXXXXXXXXXXXXXXXXX’
$resourceAppIdUri = ‘https://api.securitycenter.windows.com‘
$oAuthUri = “https://login.windows.net/$TenantId/oauth2/token“
$body = [Ordered] @{
resource = “$resourceAppIdUri”
client_id = “$appId”
client_secret = “$appSecret”
grant_type = ‘client_credentials’
}
$response = Invoke-RestMethod -Method Post -Uri $oAuthUri -Body $body -ErrorAction Stop
$aadToken = $response.access_token
$query = [IO.File]::ReadAllText(“c:tempQuery3.txt”); # Replace with the path to your file
$url = “https://api.securitycenter.windows.com/api/advancedqueries/run“
$headers = @{
‘Content-Type’ = ‘application/json’
Accept = ‘application/json’
Authorization = “Bearer $aadToken”
}
$body2 = ConvertTo-Json -InputObject @{ ‘Query’ = $query }
$webResponse = Invoke-WebRequest -Method Post -Uri $url -Headers $headers -Body $body2 -ErrorAction Stop
$response2 = $webResponse | ConvertFrom-Json
$results = $response2.Results
$machine = $results.DeviceId
#Take the results from the query and parse through them to apply a tag to each DeviceID
Foreach ($machine in $machine)
{
#Comment sleep statement out if only planning to modify a small number of devices
Start-Sleep -Seconds 3
$url = “https://api.securitycenter.windows.com/api/machines/” +$machine+ “/tags”
$headers = @{
‘Content-Type’ = ‘application/json’
Accept = ‘application/json’
Authorization = “Bearer $aadToken”
}
$tag= @{
‘Value’ = ‘Datacenter’
‘Action’ = ‘Add’
}
#Output
$body3 = ConvertTo-Json -InputObject $tag
$webResponse = Invoke-WebRequest -Method Post -Uri $url -Headers $headers -Body $body3 -ErrorAction Stop
}
We have used the “add” action in this script, but you could just as easily delete tags through this method as well (assuming they haven’t been set via the registry). Simply replace ‘Add’ with ‘Remove’.
The other thing to watch out for is API limits. Due to resource constraints, we limit the amount of API calls that can be made to 100 per minute and 1500 per hour. To avoid this, a sleep value has been applied to the script to put a pause in after each API call. Obviously, this can be removed to speed things up if the number of machines you are modifying does not hit this limit.
I have talked to you in this part of the blog about how to use scripting against the API, but there is also a great article by Tomer Brand talking about how to achieve this using Microsoft Flow (or Power Automate as it is now), where the same concepts can also be applied to Logic Apps.
We hope you’ve gotten value from this blog series on how to use tags effectively in Microsoft Defender for Endpoint. Make sure to check out Part 1 and Part 2 in the series. We welcome your feedback and questions and look forward to hearing from you.
Steve Newby (@steve_newby) and Miriam Wiesner (@miriamxyra)
Program Managers @ Microsoft Defender for Endpoint Product Group
(Credit also to Thorsten Henking for some of the API scripting input)
by Contributed | Jan 19, 2021 | Technology
This article is contributed. See the original author and article here.
We realize that many customers have genuine business requirements to configure automatic email forwarding. On the other hand, email forwarding may lead to data leakage. For example, if we have a compromised account, the attacker might create a forwarding rule for a particular mailbox, and the user might be unaware that their mail is being forwarded. This is a very common tactic used when accounts are compromised.
It is therefore important for administrators to know all mailboxes that have forwarding enabled and where the mail is been forwarded to. We have various insights and alerts that help administrators monitor such activities, but prevention is always better than the cure. In this blog post, we thought to revisit (and update) various auto forward controls, how they work together and how they can help you achieve a requirement of allowing automatic forwarding for users who really need this feature.
Various ways to set up forwarding
Before discussing how to control automatic forwarding, let’s review a few different ways in which automatic forwarding can be setup:
- A forwarding rule can be setup within the Rules wizard in Outlook on the desktop. User can set this Automatic forwarding from Outlook > File > Manage Rules and Alerts. Using Outlook on the web, this can be done using Inbox rules.
- Using Outlook on the web (OWA) the user can also set the ForwardingSmtpAddress parameter on the mailbox. This option is available via Settings > Mail > Forwarding.
- Users can also set auto forward using Power Automate (used to be called Microsoft Flow).
- Administrators can configure forwarding from the properties of the mailbox from Exchange Admin Center. This option is available under “Manage Mail flow settings” in classic EAC, or user properties in the preview version of EAC. Configuring automatic forwarding from the properties of the mailbox will populate the ForwardingAddress parameter on the mailbox.
- Administrators can also configure forwarding from Microsoft 365 Admin Center. Configuring forwarding from Microsoft 365 Admin Center will set the ForwardingSmtpAddress parameter on the mailbox (but will show if ForwardingAddress is populated).
Controlling automatic forwarding
Administrators have several methods to prevent and regulate automatic forwarding of emails outside the organization:
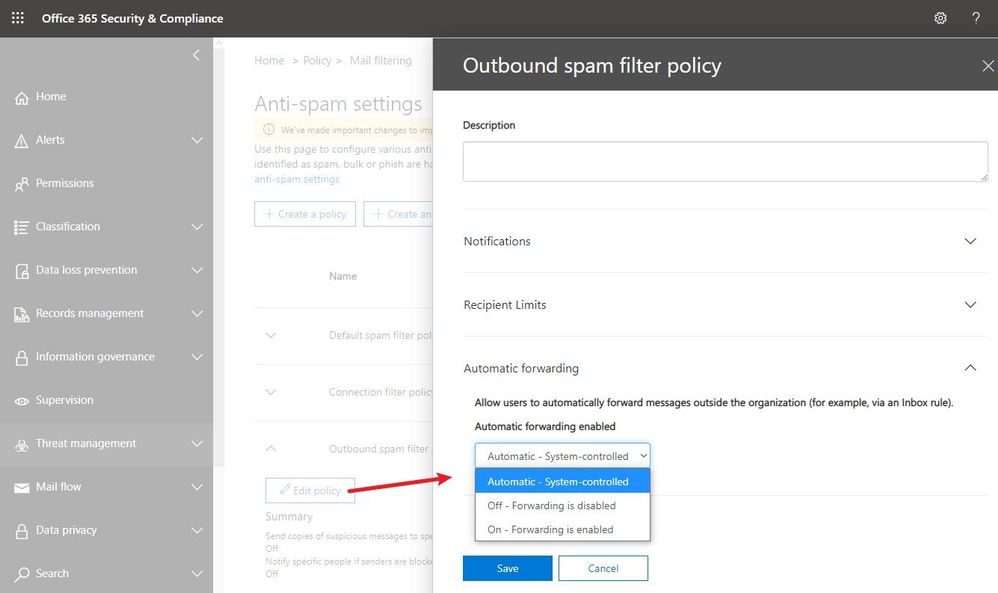
External email forward control using Outbound spam filter policy
Recently released, this feature is available in Security & Compliance portal under Outbound spam filter policy (to get the exact portal page, go here). As you see in the following screenshot, there are three possible options. The default configuration is “Automatic system-controlled.” Other options are Off and On. “Off” means auto forward is disabled and “On” means auto forward is enabled.
Note: If you see the option is set as “Automatic system-controlled”, most probably you have not configured the setting at all. For tenants where the setting is left at “Automatic system-controlled”, as we continue to move the service toward being more secure by default, this setting will be enforced and behave as “Off” (forwarding disabled). This enforcement process has started in phases and very soon, all tenants will get this setting enforced. Therefore, “Automatic system-controlled” will behave as “Off” and automatic forwarding will not work. Our recommendation is that all customers should configure the policy as appropriate for their organization and enable external auto forwarding only for the users who really need it (by leaving the default policy in disabled state, creating a different policy that allows forwarding and then assigning it to specific mailboxes only). If for your tenant, “Automatic system-controlled” still does not block email forwarding, you should make this change as soon as possible (as soon, it will).
Advantages of this method:
- It blocks all types of auto forwarding including ForwardingAddress and ForwardingSmtpAddress mailbox parameters.
- Blocks redirect rules configured using Outlook.
- A NDR is sent back to the mailbox that configured auto forwarding to external user if the policy is set to block automatic forwarding for that mailbox. The NDR will contain the following diagnostic information:
Remote Server returned ‘550 5.7.520 Access denied, Your organization does not allow external forwarding. Please contact your administrator for further assistance. AS(7550)’
- Easier to configure and administrators can selectively allow/block external auto forwarding for a few or all mailboxes.
Disadvantages of this method:
- Forwarding using Power Automate (Flow) is not covered as of now. To block external forwarding which is setup using Power Automate, follow the steps mentioned in our Email exfiltration controls for connectors article.
Block automatic forwarding using Remote Domains
This option is available under the Mail flow tab in the new Exchange Admin Center preview:


Advantages of this method:
- This setting can block auto forward rules configured using Outlook inbox rules as well as Outlook on the web options (ForwardingSmtpAddress parameter)
Disadvantages of this method:
- Does not block forwarding set from the properties of the mailbox by the administrator using EAC (ForwardingAddress parameter)
- This blocks auto forward to the specific remote domain. There is no granular control – cannot allow forwarding for certain users, and block for others.
- The user is not notified that their auto forwarded message is dropped, no rejection (NDR) is sent.
Block auto forward using a transport rule
You can create a transport rule from Exchange Admin Center > Mail Flow > Rules to block automatic forward:

Advantages of this method:
- Allows granular control on conditions and actions.
- Admins have the option to send rejection message (NDR).
Disadvantages of this method:
- Matches auto forward messages based on message class (IPM.note.forward). The Outlook web app forwarding (ForwardingSmtpAddress) or forwarding set by the admins on the properties of the mailbox (ForwardingAddress) have normal message class (IPM.Note), so transport rules won’t block them.
- Difficult to manage at times when too many transport rules are configured.
While this is not really a method of blocking forwarding, it is related in a way that it can help remove forwarding options from users if they are using Outlook on the web.
Advantages of this method:
- In OWA, users simply do not see the option to setup forwarding in their mail options
Disadvantages of this method:
- Does not remove the option in Outlook desktop.
- Any forwarding that was already configured will continue to work.
Overview
If you want to quickly compare various methods, you can refer to the following table:
Automatic forwarding option
|
Remote domain
|
Transport rule
|
Outbound spam filter policy
|
Block Outlook forwarding using inbox rules
|
Yes
|
Yes
|
Yes
|
Block OWA forwarding setting (ForwardingSmtpAddress)
|
Yes
|
No
|
Yes
|
Block forwarding set by the admin using EAC (ForwardingAddress)
|
No
|
No
|
Yes
|
Block forwarding using Power Automate / Flow
|
No
|
No
|
No
|
Does the sender get NDR when auto forward is blocked?
|
No
|
Yes
|
Yes
|
Customization and granular control
|
No
|
Yes
|
Yes
|
What happens if auto forward is controlled in multiple places mentioned above?
One question we encounter frequently is, how all these techniques work together? What if auto forward is blocked in one of the above methods but allowed in another? For example, auto forward is blocked by a remote domain setting or a transport rule but allowed in Outbound spam filter policy; what happens? The answer to that is that a restriction in one place will restrict auto forward for all.
For example:
- Automatic forwarding is On (allowed) in the Outbound spam filter policy.
- Automatic forwarding is disabled for the remote domain.
Will the automatically forwarded message be blocked by the remote domain? Yes, remote domain would block automatic forward as would an Exchange transport rule.
Depending on what you want to achieve, you can use combination of above features. There’s no one size fits all option. You can implement all four options if you really want, depending on your requirement. For example, the remote domain option controls the recipient domain and comes handy if you want to restrict auto forwarding for all except a few external domains. Outbound spam filter policies on the other hand can control the sender. If you want to allow external auto forwarding for only a few mailboxes (users with genuine business requirements to configure automatic forwarding) and block external auto forwarding for everyone else, Outbound spam filter policy is most preferred. Or you can use combination of these two options if you want to allow auto forwarding only for few mailboxes and to only a few external domains. Here is another example which is slightly more complex:
Let’s say you have the following requirements:
- By default, automatic forwarding should be blocked.
- Automatic forwarding to an external domain contoso.com should be allowed for all users.
- Allow users Jack and Jill to also be able to forward to northwindtraders.com, but no one else.
There are multiple methods to achieve this, the following is one such solution:
- Keep the new external forwarding control under Outbound spam filter policy setting to “On”.
- Disable automatic forward for default * domain in remote domain setting.
- Create a new remote domain for contoso.com and northwindtraders.com and allow automatic forward for these remote domains.
- Create a transport rule to block auto forward from all to northwindtraders.com but put an exception for users Jack and Jill.
- As transport rule will not block forwarding set using Outlook on the web (ForwardingSMTPAddress parameter) you can use RBAC rule to stop users from creating auto forward setting from OWA.
But wait, there is more!
To protect you further from attackers if a user mailbox is compromised (and for whom external automatic forward could be enabled without their knowledge), a new Email Forward Alert Policy has been released recently which is available under Alert Policies of our Security & Compliance portal. It is called “Suspicious Email Forwarding Activity.” This new alert will track all “forwarding scenarios” and detects when a user has automated the sending of messages external to the organization. Once we find any suspicious activity, we will alert the tenant administrator once per day as long as the user continues to forward to that external recipient. This policy has a Medium severity setting. Although it is rare, an alert generated by this policy may be an anomaly. Administrators should always check to confirm whether the user account is compromised. A screenshot of the policy:

A sample alert sent to the administrator:

That’s it for now! Hope you find this helpful. I also want to take a moment to thank Mike Brown, Nino Bilic for reviewing this.
Arindam Thokder
by Contributed | Jan 19, 2021 | Technology
This article is contributed. See the original author and article here.
“When you store your data in the Microsoft Cloud, achieving compliance becomes a shared responsibility between you and Microsoft.” [tweet]
― Martina Grom, co-founder of atwork and Microsoft MVP/RD.
What risks await without a compliance plan in place, or the tools to implement it, or the trust of partners, vendors, and employees? In one word: many. You can make risk less risky for your organization. By managing the who and what of data access, with awareness and adherence to policy, you forge a path with fewer risky business outcomes.
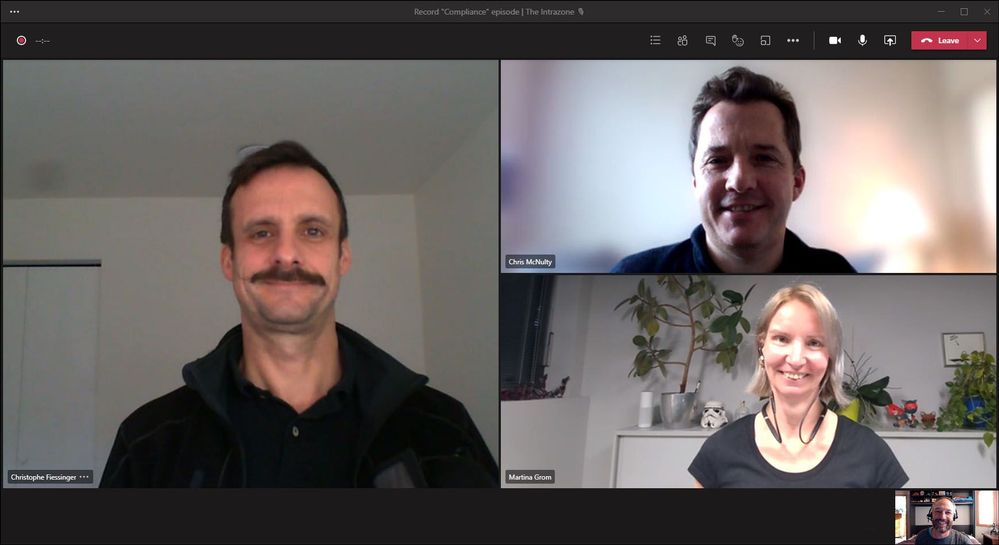
In this episode, Chris and I talk with Martina Grom (Co-founder, atwork and Microsoft MVP/RD) and Christophe Fiessinger (Principal program manager, Microsoft) about the role compliance plays in regards to information and communication governance. We dig into compliance strategy, technology like Microsoft 365 Compliance Manager, DLP, sharing, and more – with a nice dose of proven tips and tricks from two subject matter experts who know how to navigate the risky waters of security, governance, and keeping your information safe.
By tuning in, may you move your compliance score up many, many points.
Listen to podcast below at your own (minimized) risk:
https://html5-player.libsyn.com/embed/episode/id/17520329/height/90/theme/custom/thumbnail/yes/direction/backward/render-playlist/no/custom-color/247bc1/
Subscribe to The Intrazone podcast! And listen to episode 60 now + show links and more below.
Intrazone guests and co-hosts – clockwise, starting on the left: Christophe Fiessinger (principal program manager | Microsoft) [guest], Chris McNulty (director | Microsoft) [co-host], Martina Grom (co-founder atwork and Microsoft MVP/RD [guest], and little Mark Kashman (senior product manager | Microsoft) [co-host].
Links to important on-demand recordings and articles mentioned in this episode:
- Hosts and guests
- Articles and sites
- Events
Subscribe today!
Listen to the show! If you like what you hear, we’d love for you to Subscribe, Rate and Review it on iTunes or wherever you get your podcasts.
Be sure to visit our show page to hear all the episodes, access the show notes, and get bonus content. And stay connected to the SharePoint community blog where we’ll share more information per episode, guest insights, and take any questions from our listeners and SharePoint users (TheIntrazone@microsoft.com). We, too, welcome your ideas for future episodes topics and segments. Keep the discussion going in comments below; we’re hear to listen and grow.
Subscribe to The Intrazone podcast! And listen to episode 60 now.
Thanks for listening!
The SharePoint teams want you to unleash your magic, creativity, and productivity – and be compliant about it all. And we will do this, together, one compliance score point at a time.
The Intrazone links
+ Listen to other Microsoft podcasts at aka.ms/microsoft/podcasts.
![Left to right [The Intrazone co-hosts]: Chris McNulty, director (SharePoint, #ProjectCortex – Microsoft) and Mark Kashman, senior product manager (SharePoint – Microsoft).](https://www.drware.com/wp-content/uploads/2020/11/large-375 "Chris-Mark_in-studio.jpg") Left to right [The Intrazone co-hosts]: Chris McNulty, director (SharePoint, #ProjectCortex – Microsoft) and Mark Kashman, senior product manager (SharePoint – Microsoft).
Left to right [The Intrazone co-hosts]: Chris McNulty, director (SharePoint, #ProjectCortex – Microsoft) and Mark Kashman, senior product manager (SharePoint – Microsoft).
 The Intrazone, a show about the Microsoft 365 intelligent intranet (https://aka.ms/TheIntrazone)

by Contributed | Jan 19, 2021 | Technology
This article is contributed. See the original author and article here.
We continue to expand the Azure Marketplace ecosystem. For this volume, 95 new offers successfully met the onboarding criteria and went live. See details of the new offers below:
|
Applications
|
|
Aceso Virtual Health: Maintain close relationships with your patients remotely. These telehealth services, ranging from primary to mental health, cover areas with service delivery shortages or when you need to deliver care remotely.
|

|
AD Certificate Services on Windows Server 2016: This pre-configured image by Tidal Media provides Azure Active Directory certificate services on Windows Server 2016. Azure AD certificate services allow you to build public key infrastructure and provide public key cryptography.
|

|
AD Certificate Services on Windows Server 2019: This pre-configured image by Tidal Media provides Azure Active Directory certificate services on Windows Server 2019. Azure AD certificate services provide a database that manages information about network resources and application-specific data.
|

|
Altia-ABM: Insight: This end-to-end criminal investigation management software was designed by the Altia-ABM Group to solve crimes. It can be used in any jurisdiction and for any type of investigation.
|

|
Altia-ABM: Pegasus: This software has been developed by the Altia-ABM Group for law enforcement agencies to manage covert and undercover operations, intelligence, surveillance, informant management, and protected persons.
|

|
Altia-ABM: Smartcase: This is a modern incident and investigations software solution by the Altia-ABM Group to meet your investigation needs. It drives common working practices and has built-in analytical tools that are ready to use straight out of the box.
|

|
Android Archiver: Use this connector by TeleMessage to import text messages, voice calls, and call logs from Android cell phones and archive them in Microsoft 365.
|

|
ApertureDB: Visual Data Management Made Easy: This high-performance database by ApertureData manages visual data for data science applications. ApertureDB stores and manages images, videos, and associated metadata.
|

|
Architectural Style Recognition API: ArtemTecta recognizes the architectural style of a building from an input photo, whether it is Classical, Neoclassical, Gothic, Renaissance, Baroque, Rococo, Art Nouveau, Art Deco, Modern, or Postmodern.
|

|
Azure Deploy by Macquarie Cloud Services: Deploy SD-WAN with Macquarie Cloud Services to maximize Microsoft Azure. They offer a turnkey Virtual Edge deployment to establish secure, private tunnels between your sites and Azure.
|

|
Azure Discover by Macquarie Cloud Services: Assess your application and datacenter for cloud readiness with Macquarie Cloud Services. Identify early adoption scenarios, including Windows, Linux, and SQL Server. Analyze dependencies across VMware, Microsoft Hyper-V, and physical servers.
|

|
Azure Subscription Documentation: XTRATEGUS helps document your Microsoft Azure resources. Through subscription access, they generate a complete document containing the features of your Azure subscription. This offer is only available in Brazilian Portuguese.
|

|
BCM Node-Installer Azure Image: Bright Cluster Manager is an application built on top of Linux distributions. Bright Computing offers this node installer to provision and perform cluster extension cloud bursting of a Bright Cluster Manager to Microsoft Azure.
|

|
Chief Returns Officer: Accelerated e-commerce growth is driving higher product return rates. Blending big data analytics with powerful AI tools, Chief Returns Officer is a SaaS platform that reduces product returns.
|

|
Classify360: This data governance and rapid classification platform by Congruity360 enables intelligent data migration to Microsoft Azure via automated compliance workflows, repeatable classification processes, and defensible policies.
|

|
ACCELQ Codeless Test Automation for MS Dynamics and more: ACCELQ is a codeless AI-based test automation and agile test management platform, tightly integrated with Microsoft Dynamics 365 and other Microsoft platforms to accelerate and improve the quality of your releases.
|

|
Counter-Strike: Source Game Server on Ubuntu 18.04: This pre-configured image by Tidal Media provides a Counter-Strike: Source game server on Ubuntu 18.04. Counter-Strike: Source is a first-person shooter video game.
|

|
Cyberdefense: Companies are under continuous digital threats. Reduce your business risk with this cybersecurity solution by MNEMO to address threats, risks, and vulnerabilities. This app is available only in Spanish.
|

|
Datometry Hyper-Q for Azure Synapse Analytics: Run existing Teradata applications natively on Azure Synapse Analytics. Datometry Hyper-Q is a virtualization platform that lets enterprises move from Teradata to Azure Synapse with minimal effort.
|

|
Digital Humans: Dimension’s volumetric production studios are elevating and shaping the future of virtual entertainment. Dimension’s Digital Humans platform creates believable, emotional, and exciting human performance captures as volumetric holograms.
|

|
Docker Advanced Engine on Ubuntu 18.04 LTS: This pre-configured image by Tidal Media provides Docker Advanced Engine on Ubuntu 18.04 LTS. Docker is a software platform that allows you to build, test, and deploy applications quickly.
|

|
Docker Engine Advanced on Ubuntu 20.04 LTS: This pre-configured image by Tidal Media provides Docker Engine Advanced on Ubuntu 20.04 LTS. Docker is a software platform that allows you to build, test, and deploy applications quickly.
|

|
Enabling Studio – Website chat leveraging Teams: Enabling Technologies developed this website chat to power real-time communications via Microsoft Teams. Build communication workflows that align with your business processes without having to engage software developers.
|

|
Enterprise Number Archiver: Use this TeleMessage connector in the Microsoft 365 compliance center to import and archive messages, chats, voice call recordings, and logs. It provides employees with a business number associated with an app on their phone.
|

|
Expense Once: This cloud-based solution automates, streamlines, and controls the expense management process, ranging from receipt submission to staff reimbursement.
|

|
EYE-SYNC: Developed by SyncThink, this is a non-invasive eye-tracking system to identify functional impairments of the visual or vestibular systems with modified virtual reality or augmented reality goggles.
|

|
Flood Detection API: Detecting flooded areas in a photo using artificial intelligence, the Flooderizer API is especially useful for mall security cameras, parking lots, buildings, and agriculture.
|

|
FraudAi: Developed by Electrifai, this medical fraud, waste, and abuse prevention app utilizes artificial intelligence and machine learning. FraudAi will flag potential instances of medically unnecessary procedures and coding abnormalities.
|

|
Furniture Category Recognition API: Targeting furniture e-commerce companies, manufacturers, distributors, and retailers, the FurnishRec app recognizes the most common furniture categories, such as sofa beds or office chairs.
|

|
Genesys Cloud Contact Center for Dynamics 365: Appxconnect provides native integration between Genesys Cloud and Microsoft Dynamics 365. Business users get the best of the award-winning contact center solution from Genesys and Microsoft Dynamics 365 to fully manage customer engagement.
|

|
Hypersonix: This is an AI-powered intelligent enterprise platform for retail, restaurant, hospitality, and manufacturing enterprises. It incorporates a full array of descriptive, diagnostic, predictive, and prescriptive intelligence.
|

|
Icy Road Detection API: IcyRoadDet is intended for software development in the automotive, travel, and transportation industries. This app detects icy roads from a photo using artificial intelligence and cloud infrastructure.
|
.png")
|
Id-Gate (eng): LLC RecFaces offers this app for safe city systems, airports, banks, industrial enterprises, and retail business centers. Cameras and scanners capture the biometric data of the incoming person to verify access rights.
|

|
Intelligent Insights for Healthcare on DDP: Wipro’s healthcare apps provide insights into predictive maintenance for medical devices, detect adverse drug effects and fraudulent claims, forecast demand for medical equipment, and identify cross-sell/up-sell opportunities.
|

|
Intelligent Insights for Manufacturing on DDP: Powered by Wipro’s Azure-based Data Discovery Platform, Wipro’s intelligent manufacturing apps deliver end-to-end process view, real time monitoring, asset management, proactive failure diagnosis, and fraud identification.
|

|
Intelligent Insights for Retail on DDP: Providing store performance analytics, Wipro’s retail apps help identify store sections where customers spend the most time in and advise on better use of retail space, advertising channels, and proactive selling.
|

|
Kamvo EPM: Connecting strategy with execution, Kamvo by Resemble Systems is a flexible, scalable, end-to-end enterprise project management (EPM) solution for portfolio and project execution.
|

|
Komutel: Komutel’s Komand is a command center to facilitate and improve inbound and outbound call handling. Integrate Komand with Microsoft Teams or Microsoft Azure tenants in your environment to unify networks, data, and communications.
|

|
Markdown Price Optimization Solution: Churchill’s solution helps manage the lifecycle of each item in a category by identifying markdown candidates and price options, then recommending the optimum combination of price discounts and time periods.
|

|
MetalLB Helm Chart: This pre-configured container image from Bitnami provides MetalLB Helm Chart. MetalLB is a load balancer implementation for bare metal Kubernetes clusters, using standard routing protocols.
|

|
mindzie: This solution uses information already collected in Microsoft Dynamics 365 and identifies areas for improvement, such as procure-to-pay, accounts payable, order entries, or sales opportunities.
|

|
OfficeWatch XT Digital Workplace Analytics: XT is an omnichannel analytics and notification platform designed by Metropolis to help managers efficiently measure, monitor, track, and account for communications within their respective divisions.
|

|
OneVu Citizen Account: This citizen engagement platform by IEG4 enables the digital transformation of council services by providing a self-serve portal for citizens to communicate with back-office departments.
|

|
OTRS – Ticket Request System Server on CentOS 7.8: This pre-configured image by Tidal Media provides the OTRS ticket request server on CentOS 7.8. OTRS is a modern, flexible ticket and process management system for service management professionals.
|

|
OTRS – Ticket Request System Server on Debian 10: This pre-configured image by Tidal Media provides the OTRS ticket request server on Debian 10. OTRS is a modern, flexible ticket and process management system for service management professionals.
|

|
Painting Style Recognition API: PaintinGen recognizes the most popular painting styles, including Impressionism, Expressionism, Abstract, graffiti, or Surrealism. It was developed by SC DE VIS SOFTWARE for history of art professionals, students, and art patrons.
|

|
Pixel Mobile Clinical Uploader: This app by Medialogix provides an easy-to-use mobile interface for clinical photography. Use cases include disease and wound management, treatment planning, time-critical theater photography, and ambulance.
|

|
Pollution Index by Seabin Project: Developed by Seabin to provide measurable impact on pollution in the world’s oceans, the platform has the capacity to monitor the world’s waterways and inform governing bodies to fill pollution knowledge gaps.
|

|
PowerExcel – SaaS for Planning: This Microsoft Azure-hosted SaaS solution brings together the best of Microsoft Power BI, SQL Server, and Microsoft Excel. The platform seamlessly marries data between the relational and Excel worlds and provides Power BI visibility.
|

|
Regular Price Elasticity Module: Set the right price for each item. Churchill’s Regular Price Elasticity software uses artificial intelligence and machine learning technologies to measure the impact of regular price changes on consumer demand.
|

|
Remote Device Access: M&M Software’s solution allows you to access IoT devices’ servers from the cloud through the firewall. The firewall does not need configuration. This solution is available only in German.
|

|
Road Accidents Detection API: Accidentor detects road accidents in a photo using artificial intelligence and the power of the cloud. The recognized road accidents have a confidence score, a timestamp, an identifier, and a tag name.
|

|
ROGER365.io: Empower your business to become customer-led and customer-connected with the help of the Ask Roger! team. Link Microsoft Teams to web chat, WhatsApp, Microsoft Dynamics 365, and AI to optimally engage with your customer.
|

|
ScaleOut Digital Twin Streaming Service: Real-time digital twins model real-time behavior of individual data sources. ScaleOut’s twins are designed to run alongside your Microsoft Azure applications that process streaming data.
|

|
Sectigo Private CA: Many enterprise cloud applications are tightly integrated with Microsoft Azure Key Vault, which, however, cannot issue certain certificates. With Sectigo, you can manage large inventories of certificates.
|

|
Seidor BannaAnalytics: This analytics app built on Microsoft Power BI gives you control over your Microsoft cloud service costs, consumption, and security levels. The application is provided by Seidor for free to its customers.
|

|
Skybox Vulnerability Control: Skybox analyzes vulnerabilities in the complete context of your attack surface. By integrating with Microsoft Defender Advanced Threat Protection (ATP), formerly Azure ATP, Skybox gains access to an even broader range of data that enhances its vulnerability assessments.
|

|
SlideX Solutions: SlideX offers web and mobile applications for residential and commercial ticketless valet parking, automated fee payments, space monitoring, garage administration, visitor management, and on-demand car services.
|

|
SQL Server Health Check: ALESON ITC offers managed services to optimize database servers, especially those that were migrated from an on-premises environment to Microsoft Azure, including Azure Virtual Machines, Azure SQL Database, and Azure SQL Managed Instance. This service is available in English and Spanish.
|

|
Student Integrity: With the sudden move to remote learning, students may find it easier to cheat on assignments. The app by Analytikus helps detect plagiarism through cognitive analytics and machine learning.
|

|
Teams Connect for Education: Identity Experts’ solution automates Microsoft Teams lifecycle management, taking a feed directly from the student records system. It is provided as a fully supported service with UK-based support to universities and colleges.
|

|
TIMEA the chat bot: Reduce more than 40 percent of the time spent on repetitive tasks with this personal chatbot assistant from TotalSoft. This friendly interface responds to questions routinely addressed to HR departments. This app is available in English and Romanian.
|
.png")
|
ToolsGroup Service Optimizer 99+ (SO99+): This service-driven supply chain planning software automates and optimizes supply chain planning tasks to meet target service levels with demand analytics and self-learning AI technology.
|

|
Traffic Lights Detection API: The tLightsDet app detects lit traffic lights on input photos and localizes them by generating a probability score. It is recommended for apps developed for smart cities, drivers, pilots, navigators, automotive, and transportation.
|

|
UpKeep SaaS: Designed for small to midsize companies, UpKeep offers core maintenance functionality, such as preventive maintenance, asset, inventory, and work order management.
|

|
Verizon Network Archiver: Get a copy of employee text messages in Microsoft 365. Use the TeleMessage connector in the Microsoft 365 compliance center to import and archive SMS/MMS data from the Verizon network.
|

|
Vibe.fyi: Vibe is helping to transform the way multi-location organizations influence their workforce. Reach wired, non-wired, and remote workers via digital signage, screensavers, web browsers, and mobile devices.
|

|
Virusfree: This email security cloud service by Excello accurately and effectively protects your mailbox from the full range of cyberthreats. You will get reliable antispam, antivirus, attachment protection, and email encryption.
|

|
Wavefront Helm Chart: This pre-configured container image from Bitnami provides Wavefront as a Helm chart. Wavefront is a high-performance streaming analytics platform for monitoring and optimizing your environment and applications.
|

|
WhatsApp Archiver: Use the TeleMessage connector in the Microsoft 365 compliance center to import and archive WhatsApp calls, chats, attachments, files, and deleted messages.
|

|
Windows Virtual Desktop – Cloud Sandbox: This ready-to-use Windows Virtual Desktop (WVD) environment showcases the core capabilities and use cases for IT managers who want to learn, evaluate, and experience WVD before starting with production deployments.
|

|
WInsights – Insights to Win: This solution by WinWire Technologies uses Microsoft Azure data and AI services to transform data into actionable insights to help organizations monetize critical data assets, drive growth, and accelerate time to market.
|

|
Zeus Eye: Enable your leadership team to make effective decisions with this powerful analytics tool by Mozanta Technologies. Zeus Eye acts as a data source for your organization to analyze the performance of your disparate systems.
|
Consulting services
|

|
2-Day workshop – Azure modernization: 848 will deliver a two-day workshop to review your existing hosted and on-premises services, then create a high-level report with recommendations to migrate to IaaS, PaaS and SaaS solutions on Microsoft Azure.
|

|
Azure Foundations 2-Day Assessment: This assessment from FyrSoft helps customers understand their cloud maturity and provide steps to digitally transform. This is a consultative assessment to help the customer evaluate their options and capabilities.
|

|
Azure Readiness 5-Day Assessment: Superadmins’ 5-day Azure Readiness Assessment is dedicated to analyzing your on-premises workload and providing a recommendation report on how you can easily and quickly migrate to Microsoft Azure.
|

|
Azure Subscription Documentation: XTRATEGUS helps document your Microsoft Azure resources. Through subscription access, they generate a complete document containing the features of your Azure subscription. This offer is only available in Brazilian Portuguese.
|

|
Brillio Rapid App Modernization: 1-Day Workshop: Through sharing of case studies and interaction with your peers, you will walk away with a firm understanding of how to develop your strategy for transforming your existing legacy ecosystem.
|

|
Cloud Migration Assessment: 6-Week Assessment: The DataArt team of experts offers an assessment of an end-to-end migration to Microsoft Azure that will help deliver cost optimization. The assessment includes an estimate for the migration effort.
|

|
Cloud Migration: 6-Week Implementation: The DataArt team of experts offers an implementation of an end-to-end migration to Microsoft Azure that will help deliver cost optimization. The implementation includes a resources evaluation and cost estimate report.
|

|
DIA START2AI Use Case Discovery 2-Day workshop: This interactive workshop from Savaco uncovers business questions that can be supported by artificial intelligence. The output is a value-feasibility matrix and a hands-on Azure data and AI experience.
|

|
Hadoop to Azure DataServices: 10-Week Implementation: Motifworks accelerators can help you migrate your big data workload and deliver ROI. Create more productive development, optimize cost, increase time to market, innovate freely, and democratize data insights.
|

|
Identity & Access Management As A Service: This is a managed service offering from Phakamo Tech for organizations with a minimum of 500 users that require consistent governance, risk, and compliance management.
|

|
Infrastructure Migration 1-Day Workshop: FyrSoft invites you to an interactive exploration of how to migrate existing infrastructure to the cloud. The workshop covers everything from whiteboarding migration strategies to hands-on experiences with migration tools.
|

|
Insight Cloud Care for Azure: 12-Month Implementation: Insight offers managed cloud services to take advantage of the speed, scalability, and cost savings possible on Microsoft Azure. Its cloud management portal provides self-service access.
|

|
Microsoft Azure Security: 2-Week Assessment: This infrastructure review and testing activity from DataArt includes checking Azure environment security settings and controls, examining the environment to reveal any security gaps and issues, and more.
|

|
OpenFOAM on Azure: 10-Week Proof of Concept: Find out how OpenFOAM on Azure will harmonize with CAE workflows and what virtual product development in the cloud can do for your engineers. This proof of concept includes the professional services of GNS Systems.
|

|
OpenFOAM on Azure: 2-Hour Briefing: This briefing from GNS Systems will help you to understand the value of your virtual product development in the cloud and shows you the advantages of OpenFOAM on Azure.
|

|
OpenFOAM on Azure: 3-Day Workshop: Learn how OpenFOAM on Azure harmonizes with your CAE workflows and what virtual product development in the cloud can do for your engineers. The goal of this GNS Systems workshop is a statement of work (SOW) with recommended next steps.
|

|
Quickbooks on Azure: 5-Day Implementation: CloudIBN combines the robustness of Microsoft Azure and the simplicity of Quickbooks and offers migration services to shift Quickbooks to Azure seamlessly.
|

|
SELA Group Managed Services: Sela offers a complete service of your cloud in PaaS or Microsoft Azure infrastructures, network management, big data solutions, and utilization of your Azure solution.
|

|
SQL Server Migration: 10-Day Implementation: In 10 days, Seepath will execute on the SQL migration plan developed as part of its SQL Server Migration Assessment. At the end of the implementation your database workloads will be running on Microsoft Azure.
|

|
Virtual Desktop 365: 2-Week Implementation: Access Windows 10 desktop and apps from anywhere, on any device. Adopt a modern solution to secure remote work with Windows Virtual Desktop along with new capabilities that make deployment easier.
|

|
Windows Virtual Desktop – 2-Week Proof of Concept: Exelegent’s proof of concept for Windows Virtual Desktop includes one shared pool for five users, and a dedicated pool with two virtual machines. A Windows 10 multi-session also is included.
|
 in a Day Workshop.png")
|
Windows Virtual Desktop (WVD) in a Day Workshop: This Windows Virtual Desktop Workshop from FyrSoft provides you with the knowledge and skills to accelerate design and implementation. The workshop covers deployment options and more.
|

|
Windows Virtual Desktop 10-Day Proof of Concept: This proof of concept from itnetX helps accelerate the deployment of applications and workplaces. Leverage Azure to ease access to key business applications and data secure, and more.
|
|
by Contributed | Jan 19, 2021 | Technology
This article is contributed. See the original author and article here.
Remote and hybrid work has become the new norm for many employees across the globe as day-to-day collaboration continues to be accomplished virtually. With this shift to online communication, how can you ensure that you’re collaborating safely?
Queue Microsoft Teams! Whether you’re hosting virtual meetings, carrying out daily group and 1:1 chat, sharing documents, or coauthoring in a document in real-time – Teams enables safe and secure collaboration!
Tip 1: Control who can join your Microsoft Teams meetings directly and present
Meeting organizers can change participant settings for a specific meeting through the Meeting options web page. In Teams, go to your Calendar, select a meeting, and then select Meeting options. From here you can determine settings like who needs to be admitted to the meeting and who can bypass the lobby to join it directly. Additionally, you can decide which participants are able to join with the presenter role to present out content and who should join as standard attendees. Another helpful control for large meetings is the ability to prevent attendees from unmuting themselves – this is particularly useful when the meeting will be led by specific participants while the rest of the audience will be listening in. Note that your organization controls the default participant settings.
Tip 2: Minimize Teams meeting disruptions by muting individual or all meeting attendees
In order to prevent meeting disruptions, intentional or accidental, as a meeting organizer you have the ability to mute individual attendees or all meeting attendees. If an attendee happens to leave their microphone unmuted while being away, you can easily mute that participant from the participant pane. During large meetings led by designated speakers, such as a town hall or lecture, the ability to mute all attendees ensures your presenters won’t be accidentally interrupted.
Tip 3: Determine who can present content or share their screen in your Teams meeting
As the meeting organizer, you can determine who has the ability to present out content or share their screen within the meeting. Prior to the meeting start, we discussed above how this can be accomplished via Meeting options. Once your meeting has begun, you can select a participant via the participant pane to determine whether they have the presenter role or are a standard attendee. This can be especially useful when you have outside participants attending your meeting who may only need the presenter role temporarily.
Tip 4: End your Teams meeting for everyone in attendance at once
As the meeting organizer, sometimes the meeting needs to end at your discretion without allowing participants to remain. Ending a meeting for all attendees is often applicable in large-meeting settings such as a town hall, lecture, or webinar class to ensure attendees don’t remain in the meeting. Once a meeting has wrapped up, instead of clicking Leave, select the dropdown located next to it and click End Meeting. You can also access this by going into your meeting controls, click more options (…) , and select End Meeting. This will end and close the meeting for everyone in attendance.
Tip 5: Create a team with increased security
If any of the content stored or discussed within the team may be considered business sensitive, such as financial details or classified project information, it’s best practice to apply increased protections to that team to ensure the content security. This can be accomplished by creating a new team and applying an IT-created sensitivity label. When applying a sensitivity label to your team, it automatically applies the configured protections to the team.
When creating a new team, on the sensitivity and privacy pane select the dropdown under Sensitivity to select an IT-created sensitivity label to apply to the team. As a reminder, it’s always best to check with your organization or IT department on how sensitive business information should be stored.
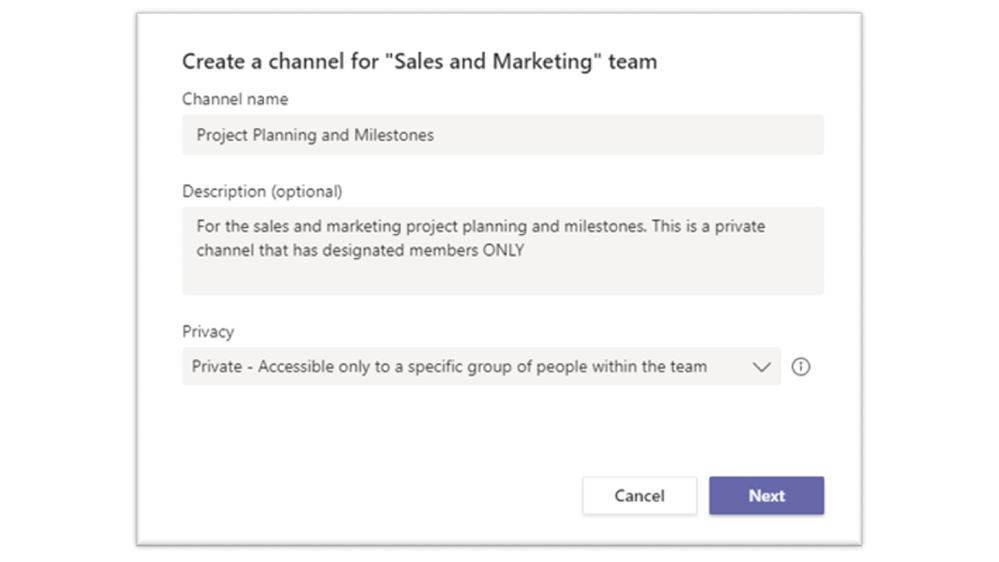
Tip 6: Create a private channel
Sometimes you need to share sensitive information within a team to specified team members only, such as project details or strategic planning, that doesn’t require holistic team protection. Rather than creating a new team, you can create a private channel within an existing team that is only accessible to designated members. This is a great way to provide a security layer to protect sensitive business information without creating a new team.
To create a private channel, go to the team and choose more options (…) and select Add channel. After providing a name and description, under Privacy select the dropdown arrow to specify the channel is Private – Accessible only to a specific group of people within the team. Once created, you can add additional private channel owners and up to 250 members. As a reminder, it’s always best to check with your organization or IT department on how sensitive business information should be stored.
Tip 7: Help protect sensitive data in Teams
Microsoft Teams supports data protection policies to help protect sensitive information from being accidentally or inadvertently shared. When collaborating in a Teams 1:1 or channel chat, you may have a message return as blocked if that message contains information that meets your organization’s sensitive information policy.

If your message is blocked, within that blocked message you may see a clickable link that says What can I do? If you click that link, a helpfully policy tip created by your organization will display educating you on why content within that message is considered business sensitive. Policy tips are designed to help the sender understand why certain content is considered business sensitive or is best practice not to share.
We hope that these safe online collaboration tips will help you remain productive while having the confidence you’re remaining secure.
by Contributed | Jan 19, 2021 | Technology
This article is contributed. See the original author and article here.
We’re pleased to announce the new Microsoft Certified: Power Platform Solution Architect Expert certification, giving you the opportunity to prove your expertise in architecting solutions using Microsoft Power Platform. To earn this certification, you must pass Exam PL-600: Microsoft Power Platform Solution Architect and earn at least one of the following certifications:
Exam PL-600 is replacing Exam MB-600 on June 30, 2021
Exam PL-600 replaces Exam MB-600: Microsoft Dynamics 365 + Power Platform Solution Architect, which expires on June 30, 2021. After that date, MB-600 will no longer be available for you to take—only PL-600 will be. If you’re currently preparing for MB-600, make sure you take and pass that exam before June 30, 2021. When you pass Exam PL-600 and earn one of the prerequisite certification options, you’ll have earned your Microsoft Power Platform Solution Architect Expert certification, and it will be valid for a full year.
Give your career a boost
Getting advanced training and certification in Microsoft Power Platform can help you improve your business and expand your opportunities to get hired and promoted. An increasing number of job listings on LinkedIn, PricewaterhouseCoopers (PwC), and other sites list proficiency in Microsoft Power Platform as part of the job description. And, according to the 2020/2021 Nigel Frank Microsoft Dynamics Salary Survey, 61 percent of respondents believe that certifications give you the edge in the job market, and 73 percent of permanent employees reported that their salary increased after certification.
Is this certification right for you?
Do you have experience performing proactive and preventive work to increase the value of your customers’ investment? Are you able to identify opportunities to solve business problems? Do you promote organizational health in your engagements? If this describes you and you want to brush up on these skills, why not take training that can help you earn certification as a Microsoft Power Platform Solution Architect Expert?
To pursue this advanced certification, you must have experience leading successful implementations and an ability to focus on solutions that address the broader business and technical needs of an organization. You should have functional and technical knowledge of Microsoft Power Platform, Dynamics 365 customer engagement apps, related cloud solutions from Microsoft, and third-party technologies. In addition to having experience across Microsoft Power Platform, you should be able to facilitate design decisions across development, configuration, integration, infrastructure, security, availability, storage, and change management.
Are you eager to sit for the exam? Your experience with the following tasks is the background you need to take the exam and get a certification that validates your skills:
- Initiate solution planning and identify Microsoft Power Platform components.
- Identify organization information and metrics.
- Evaluate an organization’s enterprise architecture.
- Capture requirements and perform gap analysis.
- Architect a solution.
- Lead the design process, and use Power Automate in your automation strategy.
- Design integrations.
- Identify opportunities to integrate and extend Microsoft Power Platform solutions by using Azure.
- Design the data and security models.
- Validate the solution design.
- Support and troubleshoot the solution as it goes live.
Preparing for certification
Start your Microsoft Certification journey today! The resources section on the certification page contains valuable help to get you ready for the certification exam. There, you’ll find links to the free online learning paths and paid instructor-led training offered by Microsoft Learning Partners that help you prepare for this exam, along with a link for scheduling the exam.
by Contributed | Jan 19, 2021 | Technology
This article is contributed. See the original author and article here.
As I stand here typing in my very poorly insulated, frigid, dilapidated shack of a garage (affectionately dubbed my “Papaya Boathouse”) in my puffy jacket, surrounded by 10 bicycles and a whitewater kayak among other things (a frequent talking point on the stream of video calls that make up my days), it’s almost laughable how normal it now seems, versus how foreign this scene was a year ago. So much has changed in ways we never could have imagined; our perspectives have been thrown out of whack – which has also presented opportunities.
The year 2020 was bonkers in many ways, but it was also a huge turning point in Microsoft becoming the worldwide frontrunner in ambitious environmental efforts, as well as being just the beginning, with a lot more that needs to be done, quickly. When I look back on 2020 (and it still feels like a really long March), a few main themes emerge for me around the environmental sustainability landscape.
1. Leveling the playing field
Many Microsoft employees joined the Worldwide Sustainability Community in a search for more information, resources, and a community that could be a connection point. The WWSC doubled its membership in 2020 to nearly 4,000 people, and the number of regional chapters in our community also doubled to 26 and counting.
However, members of the WWSC outside of the central “hubs” of activity (primarily Redmond, but strong chapter locations around the world) have expressed feelings of inequity at being unable to join in person for events and initiatives. With our new virtual world format, everyone, everywhere has a level playing field, and the opportunity to participate equally in the movement. This goes for people outside of the WWSC and outside of Microsoft, as well. With all the hilarity that often ensues with video conferencing in our remote world, there’s also a lot to gain from the equitable involvement opportunities now afforded to all.
2. Rebuilding right
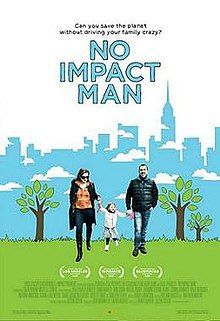
In one of my favorite books, “No Impact Man: The Adventures of a Guilty Liberal Who Attempts to Save the Planet, and the Discoveries He Makes About Himself and Our Way of Life in the Process,” a major theme is about taking away everything, to be able to bring back just what’s important to us. “Eliminating the colossal waste from our lives, responsible for so much of the damage we do to our planetary habitat, does not entail depriving ourselves but just changing some no-longer-functional habits. After all, who would suggest that a world without plastic bags is to be deprived? Who could possibly argue that using plastic bags makes us happier?” This can be applied to what’s happening now; starting by taking away, so we can rebuild with what matters – what’s actually important without all the stuff we thought we needed – and with the corresponding reduction in resource use and degradation.
No Impact man was later made into a documentary
3. Bring on the new administration
With president-elect Joe Biden calling climate change the “number one issue facing humanity,” things are looking a lot more hopeful for the United States rejoining the game for global cooperation and leadership on environmental issues. Mr. Biden’s Plan for Climate Change and Environmental Justice includes making US electricity production carbon-free by 2035 and having the country achieve net-zero emissions by the middle of the century. There are already efforts of cooperation across parties to point to, that have flown under the radar. In September, Democrats and Republicans cooperated on a bill to cut the use of hydrofluorocarbons (HFCs), a family of gases commonly used as refrigerants, which includes some of the most powerful greenhouse gases known to science. The same month, the Senate passed a bill called the Bipartisan Wildlife Conservation Act intended to improve species conservation and protect vital ecosystems.
4. The plant-based revolution
The science is clear that the meat and dairy industry is the single greatest factor in deforestation, water pollution, and a top contributor to climate change, putting us into the Earth’s sixth mass extinction. The conversion of land for beef production and animal feed is a leading cause of deforestation in many tropical regions, including in the Amazon. One of the US’s, and much of the world’s, most serious and persistent threats to clean drinking water is pollution from factory farm runoff. And there is endless evidence that the meat industry is one of the leading causes of climate change. If cattle were their own nation, they would be the world’s third-largest emitter of greenhouse gases.
Project Drawdown identifies plant-rich diets as their #4 top solution to reaching the point of drawing down carbon from our atmosphere. This is to speak nothing of the ethical travesties of inflicting these traumas on billions of sentient beings, including the workers, and the consistent evidence of the health concerns, with higher risks for heart disease, cancer, diabetes, and premature death (if you have not seen the movie Gamechangers, you have to watch it next!).
 Plant-based diets have both environmental and health benefits
While getting all our nutrition from plants is, for most people, not actually challenging, it’s certainly not what is convenient, cheap, accessible, and – most importantly – accepted as normal in many parts of the world, and especially in the United States. Until 2020! 2020 has seen a massive rise in plant-based products served in fast food chains, making it just as convenient to choose the planet-and moral-friendly option as the destructive one. See this massive list of chains serving the stuff! And in Singapore, cultured meat has been approved for consumers for the first time!! This is huge! So, while eating fluffy animal cadavers still abounds, this 2020 momentum has got me giddy, and I’m so excited to watch its progression.

by Contributed | Jan 19, 2021 | Technology
This article is contributed. See the original author and article here.
It is fair to say that 2020 has been disruptive, and nowhere is that more evident than in the acceleration of the climate crisis. 2020 was another year for the record books: the Artic is now 12 degrees F warmer on average than it was in 1990, an area the size of Connecticut was lost to historic wildfires in California alone, and global biodiversity is in freefall as the next mass extinction quickens. The list goes on and on but for all the bad news, there was some good too: 2020 saw Microsoft step forward with several bold new commitments, promising to leverage its vast resources to create solutions and drive sustainable change across the entire economy and we felt this acutely in the Worldwide Sustainability Community (WWSC) as new members and new questions flooded in.Wildfires raging in California
As I look back at 2020, I see it as the year sustainability was finally elevated to its rightful place as an essential part of Microsoft’s corporate strategy and slowly but surely, its very culture.
On January 9, 2020, I walked up to the microphone at the company’s first all-team meeting of the year and asked our CEO Satya Nadella, “How will you make sustainability a core cultural value at Microsoft? How will you make sustainability the next accessibility?” He essentially replied, “Stay tuned – we’re gonna have a lot more to say about this soon.”
Satya was foreshadowing January 15th, a mere 6 days later, when Microsoft unveiled its game-changing carbon negative announcement. I was sitting in the front row in Building 99 that day, wondering what was about to happen. I watched as Satya, Amy, Brad, and Lucas took the stage to tell the world, “Those of us who can afford to move faster and go further should do so,” and that Microsoft would lead the way by leveraging its resources to make sustainable change happen faster, in line with the best available science.
Watching President and Chief Legal Officer Brad Smith give a master class in carbon scope calculations was a sure sign things were different. As Vox, put it, “Climate change has moved out of the public relations department, into the C-suite, and down to the shop floor.” It was a turning point not only for Microsoft but for the overall debate on what role the private sector could play in addressing the climate crisis, where so many governments had failed to act.
At Microsoft, this moment represented something even more important: the awakening of our company’s ecological consciousness. This was a moment many of us in the WWSC had been working towards for years.
 WWSC Earth DayThe carbon announcement was just the beginning and was quickly followed by three more sustainability commitments throughout the year: ecosystems in April (just in time for the 50th anniversary of Earth Day, the birth of the modern environmental movement!), waste in August, and water in October. The sum of these announcements was that Microsoft would become a carbon negative, zero waste, water positive company that protected more land than it used for all of its operations by 2030. Sustainability would now be an indispensable part of Microsoft’s future; the company was proudly taking a leadership role and would create scalable tech solutions others could use too.
The sleeping giant had finally woken. The number of customer requests asking how Microsoft could help them be more sustainable went from a slow trickle to a raging torrent in the blink of an eye.
In many ways, this represents a new beginning: the hardest work lies ahead, and the window of time to do it is rapidly closing. At the current rate, our global civilization will spend its remaining carbon budget in 7 short years, by 2027, representing how many more greenhouse gases we can emit into the atmosphere before we pass a tipping point likely to be a civilization ender. To put this in perspective: while Microsoft promises to be carbon negative by 2030 (pulling more carbon out of the atmosphere than it emits annually), the target date is three years after we’ve exhausted the planetary budget.
 Global carbon emissions are still rising despite commitments made by most countries at the Paris Agreement in 2015
Microsoft’s total carbon emissions (16 million metric tons in 2019) represent .04% of the global annual total (40 billion metric tons). Even with the best of intentions, Microsoft is too small in the scheme of things to move the needle on our own. This is why such a big part of Microsoft’s strategy here is to empower customers, partners, and even competitors (we’re all Earthlings, after all) with new solutions themselves to create a wave of sustainable change across the entire economy.
Despite the grim reality that most things are moving in the wrong direction and we are running out of time, there are encouraging signs of progress. I can see interest sparking in other companies, companies that are looking to us for answers and for help. I see this progress happening every day from the conversations happening in our Worldwide Sustainability Community, watching as employees educate each other and point each other to answers to questions that weren’t even being asked six months ago.
2020 was, without a doubt, the year of sustainability at Microsoft. It’s fair to say that 2021 will be an important year for translating our corporate commitments into actionable change, something all employees have an important role to play in and precisely why we founded the WWSC.
We are now 10% of the way into our 2030 journey – the next 90% will need to be about education, innovation, and most importantly, action in rapid succession. It will need to happen at hyper-scale: any solutions we develop need to be highly scalable to address truly planetary sized challenges within the timeframe. I believe the fastest way to make this happen is culture change at Microsoft, the first wave of which has begun, initiated both from the bottom-up grassroots and now, the top-down leadership. Where we meet in the middle is where we get the most inertia.
In 2021, we will need to take action to translate Microsoft’s commitments into real change – and we need your help. The Worldwide Sustainability Community was founded on the belief that everyone has something meaningful to contribute and you don’t need sustainability in your job title to drive change in this space. This reinforces that it is incumbent on all of us to apply our growth mindset and be constant learners when it comes to sustainability. We must grow our knowledge in this area so that we can take full advantage of the opportunity that lies before us. Only then will we understand how to leverage the vast resources of a trillion-dollar technology company to help solve the world’s most pressing environmental challenges.
by Contributed | Jan 19, 2021 | Technology
This article is contributed. See the original author and article here.
In this installment of the weekly discussion revolving around the latest news and topics on Microsoft 365, hosts – Vesa Juvonen (Microsoft) | @vesajuvonen, Waldek Mastykarz (Microsoft) | @waldekm, are joined by Erwin van Hunen (Valo Intranet) | @erwinvanhunen – MVP, Father of PnP PowerShell, and Lead Architect at Valo Intranet in Sweden.
How do you end up owning a PnP open source project? Start by making and sharing something that makes your own life easier. In Erwin’s case, create a little PowerShell module in 2014. Now, 60 Million PowerShell Cmdlets are executed each day. Subsequent discussion focuses on who, why, where, how to use PnP PowerShell. PnP PowerShell can be used for Microsoft Teams and Planner in addition to SharePoint. Covered off on connectivity, authentication, supportability, roadmap, and on how PnP PowerShell and Microsoft Graph PowerShell are complementary. Future and present – a multi-Platform PnP PowerShell for Windows, Mac, Linux, Raspberry Pi, Azure Functions, Azure Automation. PnP.PowerShell v1.00 is releasing this week thanks to contributions from many PnP community members.
This episode was recorded on Monday, January 18, 2020.
Did we miss your article? Please use #PnPWeekly hashtag in the Twitter for letting us know the content which you have created.
As always, if you need help on an issue, want to share a discovery, or just want to say: “Job well done”, please reach out to Vesa, to Waldek or to your Microsoft 365 PnP Community.
Sharing is caring!
by Contributed | Jan 19, 2021 | Technology
This article is contributed. See the original author and article here.
Purpose:
The purpose of this post is to demonstrate how to automate the deployment of Azure Firewall to be used as an Network Virtual Appliance (NVA) in a Hub & Spoke architecture. Our previous post on this subject (Using Azure Firewall as a Network Virtual Appliance (NVA) (microsoft.com) walked through this process as it would be done in the Azure Portal. In this post we will show how to deploy this entire solution with one Powershell script.
Assumptions: Knowledge of creating Azure virtual machines and Azure virtual networks, as well as user-defined routes and peering is assumed. The firewall rules described in this writing will allow all outbound traffic from resources in Spoke1 and Spoke2. This configuration is for demonstration purposes only. Depending on the security posture needed for a production environment, this configuration would likely be more tightly controlled from the firewall. For our demonstration purposes, this configuration is being used for functionality and convenience.
Here are the items that are deployed with this automated solution:
Resource Group:
Virtual Networks:
Vnet
|
Address Space
|
Hub
|
10.200.0.0/16
|
Spoke1
|
10.201.0.0/16
|
Spoke2
|
10.020.0.0/16
|
Subnets:
Subnet
|
CIDR
|
Hub-Subnet
|
10.200.0.0/24
|
AzureFirewallSubnet
|
10.200.1.0/24
|
Spoke1-Subnet
|
10.201.0.0/24
|
Spoke2-Subnet
|
20.202.0.0/24
|
Virtual Network Peering:
- Hub peers with Spoke1 (bi-directional)
- Forwarding must be enabled
- Hub peers with Spoke2 (bi-directional)
- Forwarding must be enabled
Route Tables:
- RT-Spoke1
- Attached to default subnet in Spoke1-Vnet.
- Routes:
- 0.0.0.0/0: Next Hop: <<Azure Firewall Private IP>>
- RT-Spoke2
- Attached to default subnet in Spoke2-Vnet.
- Routes:
- 0.0.0.0/0: Next Hop: <<Azure Firewall Private IP>>
Azure Firewall:
- NAT Rule Collection:
- Rule 1, priority 1000 allow:
- Spoke1-RDP, allow traffic from any source to destination firewall public IP address on port 3389 which is translated to Spoke1 VM private IP address on port 3389
- Network Rule Collections:
- Rule 1, priority 2000, allow:
- Spoke1-Outbound, allow all traffic from source 10.201.0.0/24 to any destination, all ports
- Spoke2-Outbound, allow all traffic from source 10.202.0.0/24 to any destination, all ports
Virtual Machines:
- (3) Windows VM’s
- (1) VM in Hub VNet, hub-subnet
- (1) VM in Spoke1 VNet, spoke1-subnet
- (1) VM in Spoke2 Vnet, spoke2-subnet
Powershell Code Parameters/Notes:
The Powershell code used to deploy this solution can be easily modified to suit your needs. This sample code was written to deploy the solution as a lab environment meant for testing. Here are a few of the parameters that can be input or modified.
Param
|
Default
|
Options
|
Note
|
SubscriptionName
|
My-Subscription
|
|
|
RGBase
|
AzureFw
|
|
Base of Resource Group Name
|
AzureEnvironment
|
MAC
|
MAC, MAG, *Any*
|
Feeds a function to translate Azure Env
|
RG
|
$RGBase-RG
|
|
Adds “-RG” to RGBase for Resource Group Name
|
Location
|
EastUS
|
|
Azure Location
|
Script
|
c:tempDisable-WindowsFW.ps1
|
|
Temp location of script created to disable Windows Firewall on all VM’s after creation
|
VMUser
|
AzureAdmin
|
|
Admin user for VM’s if not using VMPWPrompt flag
|
VMPw
|
My@zurePW010203
|
|
Admin user password for VM’s if not using VMPWPrompt
|
VMPwPrompt
|
$false
|
$true,$false
|
Flag if you want to use VM admin name/password from variables or if you want to be prompted to enter for each VM
|
HubNvetName
|
Hub-Vnet
|
|
Name of Hub Vnet
|
Spoke1VnetName
|
Spoke1-Vnet
|
|
Name Spoke1 Vnet
|
Spoke2VnetName
|
Spoke2-Vnet
|
|
Name of Spoke2 Vnet
|
HubSubnetName
|
HubSubnet
|
|
Name of Hub Subnet
|
Spoke1SubnetName
|
Spoke1Subnet
|
|
Name of Spoke1 Subnet
|
Spoke2SubnetName
|
Spoke2Subnet
|
|
Name of Spoke2 Subnet
|
HubVnetAddSpace
|
10.200.0.0/16
|
|
Hub Vnet Address Space
|
Spoke1VnetAddSpace
|
10.201.0.0/16
|
|
Spoke1 Vnet Address Space
|
Spoke2VnetAddSpace
|
10.202.0.0/16
|
|
Spoke2 Vnet Address Space
|
HubSubnetCIDR
|
10.200.0.0/24
|
|
Hub Subnet CIDR
|
HubAzFwSubnetCIDR
|
10.200.1.0/24
|
|
Azure Firewall Subnet CIDR
|
Spoke1SubnetCIDR
|
10.201.0.0/24
|
|
Spoke1 Subnet CIDR
|
Spoke2SubnetCIDR
|
10.202.0.0/24
|
|
Spoke2 Subnet CIDR
|
HubVMName
|
Hub-VM-01
|
|
Hub VM Name
|
Spoke1VMName
|
Spoke1-VM-01
|
|
Spoke1 VM Name
|
Spoke2VMName
|
Spoke2-VM-01
|
|
Spoke2 VM Name
|
HubVMIP
|
10.200.0.10
|
|
Hub VM IP
|
Spoke1VMIP
|
10.201.0.10
|
|
Spoke1 VM IP
|
Spoke2VMIP
|
10.202.0.10
|
|
Spoke2 VM IP
|
VMSize
|
Standard_B2ms
|
|
VM Sku Family (VM Size)
|
ConvertStorage
|
$true
|
$true, $false
|
Flag to run convert storage function. Function that converts from Premium SSD disks to Standard SSD disks on all created VM’s
|
VMPIP
|
$false
|
$true, $false
|
Flag for assigning Public IP to each VM created
|
OutFile
|
c:tempCreate-AzureFW-As-NVA-FINAL_LOG.log
|
|
Path to output log file
|
VMStorageType
|
StandardSSD_LRS
|
|
Disk storage type used if $ConvertStorage is set to $true
|
Powershell Code:
param (
    [string]$SubscriptionName = "My-Subscription",
    [string]$RGBase = "AzureFW",
    [string]$AzureEnvironment = "MAC",
    [string]$RG = "$RGBase-RG",
    [string]$Location="EastUS",
    [string]$Script = "C:tempDisable-WindowsFW.ps1",
    [string]$VMUser = "AzureAdmin",
    [string]$VMPW = 'Azure@dmin010203',
    [switch]$VMPWPrompt = $false,
    [string]$HubVnetName = "Hub-vnet",
    [string]$Spoke1VnetName = "Spoke1-vnet",
    [string]$Spoke2VnetName = "Spoke2-vnet",
    [string]$HubSubnetName = "HubSubnet",
    [string]$Spoke1SubnetName = "Spoke1Subnet",
    [string]$Spoke2SubnetName = "Spoke2Subnet",
    [string]$HubVnetAddSpace = "10.200.0.0/16",
    [string]$Spoke1VnetAddSpace = "10.201.0.0/16",
    [string]$Spoke2VnetAddSpace = "10.202.0.0/16",
    [string]$HubSubnetCIDR = "10.200.0.0/24",
    [string]$HubAzFWSubnetCIDR = "10.200.1.0/24",
    [string]$Spoke1SubnetCIDR = "10.201.0.0/24",
    [string]$Spoke2SubnetCIDR = "10.202.0.0/24",
    [string]$HubVMName = "Hub-VM-01",
    [string]$Spoke1VMName = "Spoke1-VM-01",
    [string]$Spoke2VMName = "Spoke2-VM-01",
    [string]$HubVMIP = "10.200.0.10",
    [string]$Spoke1VMIP = "10.201.0.10",
    [string]$Spoke2VMIP = "10.202.0.10",
    [string]$VMSize = "Standard_B2ms",
    [switch]$ConvertStorage = $false,
    [switch]$VMPIP = $false,
    [string]$Outputfile = "c:tempCreate-Azure-Firewall-As-NVA_Final_LOG.log",
    [string]$VMStorageType = "StandardSSD_LRS"
)

#Logging/Output Function

Function Log($out) {
    $t = [System.DateTime]::Now.ToString("yyyy.MM.dd hh:mm:ss")
    set-variable -Name Now -Value $t -scope Script
    $Out = $Now +" ---- "+$out
    $Out | add-content $Outputfile
    Write-Host $Out -ForegroundColor "Green"
}

#Begin Processing
$Start = Get-Date
Log "Starting Process:  $Start"

#Convert necessary parts for MAG
Switch ($AzureEnvironment)
{
    "MAG" {$AzureEnvironment = "AzureUSGovernment"}
    "MAC" {$AzureEnvironment = "AzureCloud"}
    "AzureUSGovernment" {$AzureEnvironment = "AzureUSGovernment"}
    "AzureCloud" {$AzureEnvironment = "AzureCloud"}
    Default {$AzureEnvironment = "AzureCloud"}
}

#Connect to Azure
Connect-AzAccount -Environment $AzureEnvironment
Select-AzSubscription -SubscriptionName $SubscriptionName

#Validate Locations
$AzLocations = ((Get-AzLocation).Location)
If ($AzLocations -inotcontains $Location)
{
    Log "Creating error because Location: $Location is not found in Connected Environment: $AzureEnvironment Locations: $AzLocations"
    Log "Stopping Script"
    Log "ERROR: Selected Azure Environment and Selected Azure Region Do Not Match.  Change Region or Azure Environment.  (eg MAG vs MAC in the -AzureEnvironment Parameter)"
    Write-Error "Selected Azure Environment and Selected Azure Region Do Not Match.  Change Region or Azure Environment.  (eg MAG vs MAC in the -AzureEnvironment Parameter)" -ErrorAction Stop
}

#Create new RG
Log "Creating Resource Group"
New-AzResourceGroup -Name $RG -Location $Location

#Create Virtual Network and Subnets
Log "Creating VNets"
$s1 = New-AzVirtualNetworkSubnetConfig -Name $HubSubnetName -AddressPrefix $HubSubnetCIDR
$s2 = New-AzVirtualNetworkSubnetConfig -Name "AzureFirewallSubnet" -AddressPrefix $HubAzFWSubnetCIDR
$s3 = New-AzVirtualNetworkSubnetConfig -Name $Spoke1SubnetName -AddressPrefix "$Spoke1SubnetCIDR"
$s4 = New-AzVirtualNetworkSubnetConfig -Name $Spoke2SubnetName -AddressPrefix "$Spoke2SubnetCIDR"
$Hubvnet = New-AzVirtualNetwork -Name $HubVnetName -Location $Location -ResourceGroupName $RG -AddressPrefix "$HubVnetAddSpace" -Subnet $s1,$s2
$Spoke1vnet = New-AzVirtualNetwork -Name $Spoke1VnetName -Location $Location -ResourceGroupName $RG -AddressPrefix "$Spoke1VnetAddSpace" -Subnet $s3
$Spoke2vnet = New-AzVirtualNetwork -Name $Spoke2VnetName -Location $Location -ResourceGroupName $RG -AddressPrefix "$Spoke2VnetAddSpace" -Subnet $s4

#Setup Peering Between Hub and Each Spoke
Log "Setting Up Peering"
Add-AzVirtualNetworkPeering -Name Hub-Spoke1 -VirtualNetwork $Hubvnet -RemoteVirtualNetworkId $Spoke1vnet.Id -AllowForwardedTraffic
Add-AzVirtualNetworkPeering -Name Spoke1-Hub -VirtualNetwork $Spoke1vnet -RemoteVirtualNetworkId $Hubvnet.Id -AllowForwardedTraffic
Add-AzVirtualNetworkPeering -Name Hub-Spoke2 -VirtualNetwork $Hubvnet -RemoteVirtualNetworkId $Spoke2vnet.Id -AllowForwardedTraffic
Add-AzVirtualNetworkPeering -Name Spoke2-Hub -VirtualNetwork $Spoke2vnet -RemoteVirtualNetworkId $Hubvnet.Id -AllowForwardedTraffic

#create Public IP for Firewall
Log "Setting up PIP for FW"
$FWPipName = $RGBase + "-FW-PIP"
$FWPip = New-AzPublicIpAddress -Name $FWPipName -ResourceGroupName $RG -Location $Location -AllocationMethod Static -Sku Standard

#Create AZFW
Log "Creating Firewall"
$FWName = $RGBase + "-AzFW"
$Azfw = New-AzFirewall -Name $FWName -ResourceGroupName $RG -Location $Location -VirtualNetwork $Hubvnet -PublicIpAddress $FWPip

#Add a rule to allow internal traffic
Log "Creating Rules to Firewall"
$Azfw = Get-AzFirewall -ResourceGroupName $RG
$FWPrivIP = $Azfw.IpConfigurations[0].PrivateIPAddress
$FWAssignedPIP = $FWPip.IPAddress
$NetRule3 = New-AzFirewallNetworkRule -Name "Spoke1-All" -Protocol "Any" -SourceAddress $Spoke1SubnetCIDR -DestinationAddress "*" -DestinationPort "*"
$NetRule4 = New-AzFirewallNetworkRule -Name "Spoke2-All" -Protocol "Any" -SourceAddress $Spoke2SubnetCIDR -DestinationAddress "*" -DestinationPort "*"
$NatRule1 = New-AzFirewallNatRule -Name "RDP-In" -Protocol "TCP" -SourceAddress "*" -DestinationAddress $FWAssignedPIP -DestinationPort "3389" -TranslatedAddress $Spoke1VMIP -TranslatedPort "3389"
Log "Creating Rule Collections for FW"
$NetRuleCollection2 = New-AzFirewallNetworkRuleCollection -Name "Allow-Outbound" -Priority 2000 -Rule $NetRule3,$NetRule4 -ActionType "Allow"
$NatRuleCollection1 = New-AzFirewallNatRuleCollection -Name "Inbound-RDP-Nat" -Priority 1000 -Rule $NatRule1
Log "Assigning Rule Collections to FW and Saving"
$Azfw.NetworkRuleCollections.Add($NetRuleCollection2)
$Azfw.NatRuleCollections.Add($NatRuleCollection1)
Set-AzFirewall -AzureFirewall $Azfw

#Create Route Tables and Routes
Log "Creating Route Tables"

#Spoke1 to Spoke2
$Spoke1RouteName = $RGBase + "Spoke1-AllTraffic"
$Spoke1RouteTableName = $RGBase + "Spoke1-RT"
$Spoke1Route = New-AzRouteConfig -Name $Spoke1RouteName -AddressPrefix "0.0.0.0/0" -NextHopType VirtualAppliance -NextHopIpAddress $FWPrivIP
$Spoke1RouteTable = New-AzRouteTable -Name $Spoke1RouteTableName -ResourceGroupName $RG -location $Location -Route $Spoke1Route -DisableBgpRoutePropagation

#Spoke2 to Spoke1
$Spoke2RouteName = $RGBase + "Spoke2-AllTraffic"
$Spoke2RouteTableName = $RGBase + "Spoke2-RT"
$Spoke2Route = New-AzRouteConfig -Name $Spoke2RouteName -AddressPrefix "0.0.0.0/0" -NextHopType VirtualAppliance -NextHopIpAddress $FWPrivIP
$Spoke2RouteTable = New-AzRouteTable -Name $Spoke2RouteTableName -ResourceGroupName $RG -location $Location -Route $Spoke2Route -DisableBgpRoutePropagation

#Associate route tables to Subnets
Log "Associating Route Tables to Subnets"
Set-AzVirtualNetworkSubnetConfig -VirtualNetwork $Spoke1Vnet -Name $Spoke1SubnetName -AddressPrefix $Spoke1SubnetCIDR -RouteTable $Spoke1RouteTable | Set-AzVirtualNetwork
Set-AzVirtualNetworkSubnetConfig -VirtualNetwork $Spoke2Vnet -Name $Spoke2SubnetName -AddressPrefix $Spoke2SubnetCIDR -RouteTable $Spoke2RouteTable | Set-AzVirtualNetwork

#Create an IP configuration with a static private IP address
Log "Creating IP Configs with Private IP for VMs"
$HubIpConfigName = "Hub-IPConfig"
$HubSubnet = Get-AzVirtualNetworkSubnetConfig -VirtualNetwork $Hubvnet -Name $HubSubnetName
$Spoke1IpConfigName = "Spoke1-IPConfig"
$Spoke1Subnet = Get-AzVirtualNetworkSubnetConfig -VirtualNetwork $Spoke1vnet -Name $Spoke1SubnetName
$Spoke2IpConfigName = "Spoke2-IPConfig"
$Spoke2Subnet = Get-AzVirtualNetworkSubnetConfig -VirtualNetwork $Spoke2vnet -Name $Spoke2SubnetName

#Check if PIP is required, get PIP, and set Ip Configurations accordingly
If ($VMPIP){
    #PIP Required.  Create new and set Ip Configs
    Log "VMPIP Flag Found.  Creating PIP and Adding to Each VM"
    $HubPIP1 = New-AzPublicIpAddress -Name "$HubVMName-NIC-PIP" -ResourceGroupName $RG -Location $Location -AllocationMethod Static -Sku Standard
    $Spoke1PIP1 = New-AzPublicIpAddress -Name "$Spoke1VMName-NIC-PIP" -ResourceGroupName $RG -Location $Location -AllocationMethod Static -Sku Standard
    $Spoke2PIP1 = New-AzPublicIpAddress -Name "$SPoke2VMName-NIC-PIP" -ResourceGroupName $RG -Location $Location -AllocationMethod Static -Sku Standard
    $HubIpConfig = New-AzNetworkInterfaceIpConfig -Name $HubIpConfigName -Subnet $HubSubnet -PrivateIpAddress $HubVMIP -PublicIpAddress $HubPIP1 -Primary
    $Spoke1IpConfig = New-AzNetworkInterfaceIpConfig -Name $Spoke1IpConfigName -Subnet $Spoke1Subnet -PrivateIpAddress $Spoke1VMIP -PublicIpAddress $Spoke1PIP1 -Primary
    $Spoke2IpConfig = New-AzNetworkInterfaceIpConfig -Name $Spoke2IpConfigName -Subnet $Spoke2Subnet -PrivateIpAddress $SPoke2VMIP -PublicIpAddress $Spoke2PIP1 -Primary
}
Else
{
    #PIP NOT Required.  Set IP Config without PIP
    Log "VMPIP is NOT Found.  Creating IPConfig with NO PIP"
    $HubIpConfig = New-AzNetworkInterfaceIpConfig -Name $HubIpConfigName -Subnet $HubSubnet -PrivateIpAddress $HubVMIP -Primary
    $Spoke1IpConfig = New-AzNetworkInterfaceIpConfig -Name $Spoke1IpConfigName -Subnet $Spoke1Subnet -PrivateIpAddress $Spoke1VMIP -Primary
    $Spoke2IpConfig = New-AzNetworkInterfaceIpConfig -Name $Spoke2IpConfigName -Subnet $Spoke2Subnet -PrivateIpAddress $SPoke2VMIP -Primary
}

#Create & Configure NSG's for the NIC's
Log "Create NSG Rules"
$NSGRule = New-AzNetworkSecurityRuleConfig -Name "Allow-RDP" -Protocol Tcp -Direction Inbound -Priority 1000 -SourceAddressPrefix * -SourcePortRange * -DestinationAddressPrefix * -DestinationPortRange 3389 -Access Allow

# Create a network security group
Log "Create NSGs for VMs"
$HubNSG = New-AzNetworkSecurityGroup -ResourceGroupName $RG -Location $Location -Name "HubNetworkSecurityGroup" -SecurityRules $NSGRule
$Spoke1NSG = New-AzNetworkSecurityGroup -ResourceGroupName $RG -Location $Location -Name "Spoke1NetworkSecurityGroup" -SecurityRules $NSGRule
$Spoke2NSG = New-AzNetworkSecurityGroup -ResourceGroupName $RG -Location $Location -Name "Spoke2NetworkSecurityGroup" -SecurityRules $NSGRule

#Create the NICs
Log "Create NICs for VMs"
$HubNIC = New-AzNetworkInterface -Name "$HubVMName-NIC" -ResourceGroupName $RG -Location $Location -IpConfiguration $HubIpConfig -NetworkSecurityGroupId $HubNSG.Id
$Spoke1NIC = New-AzNetworkInterface -Name "$Spoke1VMName-NIC" -ResourceGroupName $RG -Location $Location -IpConfiguration $Spoke1IpConfig -NetworkSecurityGroupId $Spoke1NSG.Id
$Spoke2NIC = New-AzNetworkInterface -Name "$Spoke2VMName-NIC" -ResourceGroupName $RG -Location $Location -IpConfiguration $Spoke2IpConfig -NetworkSecurityGroupId $Spoke2NSG.Id

#Setup Credentials for VM's
If ($VMPWPrompt)
{
    Log "VMPWPrompt Found.  Prompting for VM Name/PW"
    $Cred = Get-Credential -UserName $VMUser -Message "Specify Credentials for VM OS"
} Else
{
    Log "NO VMPWPrompt Found.  Using Specified Creds for VMs"
    $SecurePassword = ConvertTo-SecureString $VMPW -AsPlainText -Force
    $Cred = New-Object System.Management.Automation.PSCredential ($VMUser, $securePassword)
}

#Define the virtual machines
Log "Building Config for VMs"
$HubVirtualMachine = New-AzVMConfig -VMName $HubVMName -VMSize $VMSize
$HubVirtualMachine = Set-AzVMOperatingSystem -VM $HubVirtualMachine -Windows -ComputerName $HubVMName -ProvisionVMAgent -EnableAutoUpdate -Credential $Cred
$HubVirtualMachine = Add-AzVMNetworkInterface -VM $HubVirtualMachine -Id $HUbNIC.Id
$HubVirtualMachine = Set-AzVMSourceImage -VM $HubVirtualMachine -PublisherName 'MicrosoftWindowsServer' -Offer 'WindowsServer' -Skus '2016-Datacenter' -Version latest
$Spoke1VirtualMachine = New-AzVMConfig -VMName $Spoke1VMName -VMSize $VMSize
$Spoke1VirtualMachine = Set-AzVMOperatingSystem -VM $Spoke1VirtualMachine -Windows -ComputerName $Spoke1VMName -ProvisionVMAgent -EnableAutoUpdate -Credential $Cred
$Spoke1VirtualMachine = Add-AzVMNetworkInterface -VM $Spoke1VirtualMachine -Id $Spoke1NIC.Id
$Spoke1VirtualMachine = Set-AzVMSourceImage -VM $Spoke1VirtualMachine -PublisherName 'MicrosoftWindowsServer' -Offer 'WindowsServer' -Skus '2016-Datacenter' -Version latest
$Spoke2VirtualMachine = New-AzVMConfig -VMName $Spoke2VMName -VMSize $VMSize
$Spoke2VirtualMachine = Set-AzVMOperatingSystem -VM $Spoke2VirtualMachine -Windows -ComputerName $Spoke2VMName -ProvisionVMAgent -EnableAutoUpdate -Credential $Cred
$Spoke2VirtualMachine = Add-AzVMNetworkInterface -VM $Spoke2VirtualMachine -Id $Spoke2NIC.Id
$Spoke2VirtualMachine = Set-AzVMSourceImage -VM $Spoke2VirtualMachine -PublisherName 'MicrosoftWindowsServer' -Offer 'WindowsServer' -Skus '2016-Datacenter' -Version latest

#Create the virtual machine
Log "Creating VMs"
New-AzVM -ResourceGroupName $RG -Location $Location -VM $HubVirtualMachine -Verbose
New-AzVM -ResourceGroupName $RG -Location $Location -VM $Spoke1VirtualMachine -Verbose
New-AzVM -ResourceGroupName $RG -Location $Location -VM $Spoke2VirtualMachine -Verbose
Start-Sleep -Seconds 15

#Create Script to Disable Windows Firewall
Log "Creating Script to Disable Windows FW in VM OS"
'Get-netfirewallprofile | Set-netfirewallprofile -enabled "false"' | out-file -FilePath $Script -Force

#Run Script Inside VM's to Disable Windows Firewall
Log "Execute Script to Disable Windows FW Inside VMs"

Invoke-AzVMRunCommand -ResourceGroupName $RG -Name $HubVMName -CommandId "RunPowerShellScript" -ScriptPath $Script

Invoke-AzVMRunCommand -ResourceGroupName $RG -Name $Spoke1VMName -CommandId "RunPowerShellScript" -ScriptPath $Script

Invoke-AzVMRunCommand -ResourceGroupName $RG -Name $Spoke2VMName -CommandId "RunPowerShellScript" -ScriptPath $Script

#Remove Script to Disable Windows Firewall
Log "Remove Generated Script"
Remove-Item -Path $Script -Force

#If ConvertSTorage is $True, convert storage of all VM's in RG.  Includes Shutdown and Startup.
If ($ConvertStorage)
{

    #Get the VM's in the RG, Stop the VM's, Get the Disks for the VM's, Set the Disk to SSD Standard, Start the VM's
    Log "ConvertStorage Flag Found.  Changing Storage to $StorageType"
    $VMs = Get-AzVM -ResourceGroupName $RG
    Foreach ($VM in $VMs)
    {
        #Wait for VM's to Finish Provisioning
        $Count = 0
        Do
        {
            $Count++
            Log "Sleeping for VM Provisioning...Trying to Convert Storage for $($VM.Name)"
            Log "Loop Iteration Count: $Count"
            Start-Sleep -Seconds 10
            $V = $null
            $V = Get-AzVM -ResourceGroupName $RG -Name $VM.Name
            Log "VM: $($V.Name) is in Provisioning State: $($V.ProvisioningState)"
        } Until ($V.ProvisioningState -eq "Succeeded")
        Log "Stopping VM $($VM.Name) for Storage Conversion"
        Stop-AzVM -ResourceGroupName $RG -Name $VM.name -Force
        Start-Sleep -Seconds 15
        $VMID = $null
        $VMID = $VM.Id
        $vmDisks = $null
        $vmDisks = Get-azDisk -ResourceGroupName $RG | Where-Object {$_.managedby -eq $VMID}

        Foreach ($Disk in $vmDisks)
        {
            Log "Converting Storage for Disk"
            $disk.Sku = [Microsoft.Azure.Management.Compute.Models.DiskSku]::new($VMStorageType)
           $disk | Update-AzDisk
        }
    }

#Start VMs
    Foreach ($VM in $VMs)
    {
        Log "Starting VM $($VM.Name) After Disk Conversion"
        Start-AzVM -ResourceGroupName $RG -Name $VM.name -NoWait
    }
}

$Stop = Get-Date
Log "Output Log File Stored to: $Outputfile"
Log "Total Duration: $(($Stop-$Start).Minutes) Minutes"

Recent Comments