by Contributed | Jan 18, 2021 | Technology
This article is contributed. See the original author and article here.
There are lots of different ways you can deploy and configure your Azure resources. When customers are first starting their cloud journey it’s common to provision resources manually, deploying and configuring them in the Azure portal. However, this quickly becomes difficult to manage and scale. Infrastructure as Code (IaC) techniques and tools are designed to help you make use of your skills with coding and DevOps practices when working with your cloud infrastructure. However, I frequently work with customers who aren’t completely convinced that IaC is going to help them, or be worth the investment. It can be helpful to have some insight into the benefits that many other customers have seen when using IaC approaches. This post outlines the main reason I think IaC is an essential part of a modern solution for Azure. We won’t get much into the technical details of how you use IaC – this is just a high-level overview of why you should use it.
What is Infrastructure as Code?
The Azure Well-Architected Framework has a great definition of IaC:
Infrastructure as code (IaC) is the management of infrastructure – such as networks, virtual machines, load balancers, and connection topology – in a descriptive model, using a versioning system that is similar to what is used for source code. When you are creating an application, the same source code will generate the same binary every time it is compiled. In a similar manner, an IaC model generates the same environment every time it is applied. IaC is a key DevOps practice, and it is often used in conjunction with continuous delivery.
Ultimately, IaC allows you and your team to develop and release changes faster, but with much higher confidence in your deployments.
Gain higher confidence
One of the biggest benefits of IaC is the level of confidence you can have in your deployments, and in your understanding of the infrastructure and its configuration.
Integrate with your process. If you have a process by which code changes gets peer reviewed, you can use the exact same process for your infrastructure. This can be very helpful when a team member might be proposing a change to a resource, but they don’t realise that the change might not work, could cause issues elsewhere in the solution, or may not meet the requirements. If these changes are made directly in the portal then you may not have the opportunity for your team to review the changes before they are made.
Consistency. Following an IaC process ensures that the whole team is following a standard, well-established process – regardless of who on the team has initiated it. I often work with customers who have a single designated person who is permitted to deploy to production; if this person is unavailable then deployments can be very difficult to complete, since that person will maintain all the knowledge in their head. By following a fully automated process you can move the knowledge of the deployment process into the automation tooling, and then you can broaden the number of people on your team who can initiate deployments while still maintaining the same quality level – and without giving broad administrative access to your environment. Not only does this help with your operational efficiency, it also has security benefits too.
Automated scanning. Many types of IaC assets can be scanned by automated tooling. One such type of tooling is linting, to check for errors in the code. Another type will scan the proposed changes to your Azure infrastructure to make sure they follow security and performance best practices – for example, ensuring that storage accounts are configured to block unsecured connections. This can be an important part of a Continuous Security approach.
Secret management. Every solution requires some secrets to be maintained and managed. These include connection strings, API keys, client secrets, and certificates. Following an IaC approach means that you need to also adopt some best-practice approaches to managing these secrets. For example, Azure has the Key Vault service to maintain these types of data. Key Vault can be easily integrated with many IaC tools and assets to ensure that the person conducting the deployment doesn’t need access to your production secrets, which means you’re adhering to the security principle of least privilege.
Access control. A fully automated IaC deployment pipeline means that all changes to your Azure resources should be done by an automated procedure. By doing this, you can be confident that all changes that are deployed to your Azure environment have followed the correct procedure, and it’s much harder for bad configuration to make its way through to production accidentally. Ideally, you would remove the ability for humans to modify your resources at all – although you may allow for this to be overridden in an emergency, by using a ‘break glass’ account or Privileged Identity Management.
Avoid configuration drift. When I work with customers to adopt IaC approaches, I recommend redeploying all of the assets on every release. IaC tooling is generally built to be idempotent (i.e. to be able to be run over and over again without any bad effects). Usually, the first deployment of an asset will actually deploy the asset, while subsequent redeployments will essentially act as ‘no-ops’ and have no effect. This practice helps in a few ways:
- It ensures that your IaC assets are regularly exercised. If they are only deployed occasionally, it’s much more likely they will become stale and you won’t notice until it’s too late. This is particularly important if you need to rely on your IaC assets as part of a disaster recovery plan.
- It ensures that your application code and infrastructure won’t get out of sync. For example, if you have an application update that needs an IaC asset to be deployed first (such as to deploy a new database), you want to make sure you won’t accidentally forget to do this in the right order. Deploying the two together in one pipeline means you are less likely to encounter these kinds of ‘race conditions’.
- It helps to avoid configuration drift. If someone does accidentally make a change to a resource without following your IaC pipeline, then you want to correct this as quickly as possible and get the resource back to the correct state. By following an IaC approach, the source of truth for your environment’s configuration is in code.
Manage multiple environments
IaC can help with managing your environments. Pretty much every customer has to maintain some non-production environments as well as production. Some customers also maintain multiple production environments, such as for multitenanted solutions or for geographically distributed applications.
Manage non-production environments. A common pain point for customers is when their non-production environments are not the same as their production. This slows down testing of changes and reduces the team’s confidence that they fully understand and what’s happening in production. This configuration drift will often happen when the environments are all created manually, and someone forgets to apply a change somewhere. If you follow an IaC approach then this problem goes away, because the same UaC definition is used to create and deploy all of your environments – both non-production and production. You can specify different configuration for each environment, of course, but the core definition will be the same.
Dynamically provision environments. Once you have your IaC assets, you can then use them to provision new environments very easily. This can be enormously helpful when you’re testing your solution. For example, you could quickly provision a duplicate of your production environment that can then be used for security penetration tests, for load testing, or to help a developer track down a bug.
Scale production environments. Some customers have the requirement to provision multiple production environments. For example, you might be following the deployment stamps pattern, or you might need to create a new instance of your solution in another geographical region. IaC assets can be used to quickly provision all of the components of your solution again, and keep them consistent with the existing environment.
Disaster recovery. In some situations, IaC assets can be used as part of a disaster recovery plan. If you don’t need to keep copies of all of your infrastructure ready for a potential disaster, and can cope with a bit of downtime while you wait for your IaC assets to provision resources in another Azure region, then this can be worth considering. You’ll need to be careful to plan out how you handle disaster recovery for your databases, storage accounts, and other resources that store state, though. You also need to make sure that you fully test your disaster recovery plans and that they meet your requirements for how much downtime you can experience in a disaster scenario (which is often called your Recovery Time Objective).
Better understand your cloud resources
IaC can also help you better understand the state of your resources.
Audit changes. Changes to your IaC assets will be version-controlled. This means you can review each change that has happened, as well as who made it, and when. This can be very helpful if you’re trying to understand why a resource is configured a specific way.
Metadata. Many types of IaC assets let you add metadata, like code comments, to help explain why something is done a particular way. If your organisation has a culture of documenting your code, you can apply the same principles to your infrastructure.
Keep everything together. It’s pretty common for a developer to work on a feature that will require both code changes and infrastructure changes. By keeping your infrastructure defined as code, you’ll be able to group these together and see the relationship. For example, if you see a change to an IaC asset on a feature branch or in a pull request, you’ll have a clearer understanding of what that change relates to.
Better understand Azure itself. The Azure portal is a great way to easily provision and configure resources, but it often simplifies the underlying resource model used. Using IaC will mean that you gain a much deeper understanding of what is happening in Azure and how to troubleshoot it if something isn’t working correctly. For example, if you provision a set of virtual machines manually in the Azure portal, you may not realise that there are actually lots of separate Azure resources provisioned – and that some of these can potentially be shared, which can help to simplify your ongoing operations. Another example is that when you provision a Key Vault instance through the portal, the person creating it will be given access to the vault automatically – which may not necessarily be what you want. Using IaC means you have explicit control.
Declarative and imperative IaC
Broadly speaking, there are two different models for IaC. Imperative IaC involves writing scripts, in a language like Bash, PowerShell, C# script files, or Python. These programmatically execute a series of steps to create or modify your resources. Declarative IaC instead involves writing a definition of how you want your environment to look; the tooling then figures out how to make this happen by inspecting your current state, comparing it to the target state you’ve requested, and applying the differences. There’s a good discussion of imperative and declarative IaC here.
There are great Azure tooling options for both models. For imperative IaC you can use the Azure CLI or PowerShell cmdlets. For declarative IaC you can use Azure Resource Manager (ARM) templates – or, in the near future, the new ARM template language called Bicep, which is my personal favourite option. Another popular choice is Terraform – there’s a good comparison of ARM templates and Terraform in the Azure Well-Architected Framework. There are plenty of other community and commercial tools around too, including Pulumi.
I prefer using declarative IaC approaches – it can sometimes be a little tricky to write imperative scripts that will work consistently and will do exactly what you expect every time. I also feel like you get the most benefit out of IaC when you use declarative tooling. My personal choice is to use ARM templates (or soon, Bicep) for my IaC. However, the choice is yours.
How to get started with IaC
Hopefully these reasons are enough to convince you that IaC is worth the initial upfront investment in time – you’ll need to be prepared to create your IaC assets, and to create a good process for your release and the necessary pipelines to support it.
First, explore and try out a few tools to see which will work best for your team. If you don’t have any experience with IaC already then I recommend you start using Bicep – there’s a great tutorial on how to get started. Try creating a simple dummy solution to see how the end-to-end process works.
Next, try creating some IaC assets for your actual solution. How do this will depend a little on your situation:
- If you’re working on a brand new solution then try to adopt the discipline of only deploying through IaC assets, and consider using the ARM template ‘complete’ deployment mode to help to maintain this discipline.
- If you’ve got existing Azure resources then I recommend following a hybrid approach and slowly migrating to IaC assets. Start by creating IaC assets for a few small pieces of your solution, get those working, and then add more and more until you have are deploying everything in code. At first, make sure you are doing incremental deployments so that you don’t accidentally destroy any existing production resources that you haven’t yet added to your IaC assets.
You’ll also need to build a pipeline to deploy the IaC assets. If you use ARM templates or Bicep, you can integrate these with Azure Pipelines. Make sure that any new resources are created and managed completely within your IaC assets and deployed using your pipelines.
You should also remember to use good coding practices in your IaC assets. Use elements like Bicep modules to help you organise your assets into separate, composable files. Make sure you follow the best practices for ARM templates.
Keep iterating and improving your IaC workflow, adding more and more of your solution to your IaC assets and deployment pipeline. Pretty soon you will start to see all of the benefits of IaC in your own team.
by Contributed | Jan 18, 2021 | Technology
This article is contributed. See the original author and article here.
As we know there are two kinds of operations for program threads — Asynchronous and Synchronous.
These are the definitions we can get from internet.
Asynchronous operation means the process operates independently of other processes.
Synchronous operation means the process runs only as a resource or some other process being completed or handed off.
However, whether it’s good to Receive Message Asynchronously on the Azure Service Bus?
Pre-requirement
Before we start, please read these documents. Service Bus asynchronous messaging and Azure Service Bus messaging receive mode
From the above pre–requisites, we learn the following:
Azure Service Bus support both Asynchronous messaging patterns and Synchronous messaging patterns. Applications typically use asynchronous messaging patterns to enable several communication scenarios.
This test is archived based on Service Bus PeekLock Receive mode. Here is more background information about the principle for PeekLock receive mode.
The principle for PeekLock Receive mode is that:
- Every time the Service Bus finds the next message to be consumed.
- Locks it to prevent other consumers from receiving it.
- Then, return the message to the application.
There is a common exception for the Service Bus Lock expiration. This exception is because the message transaction time longer than Lock duration. It may be due to many reasons like Receive Application has high latency. This blog will also reproduce this Lock expired exception for Receive Messages Asynchronously and Synchronously. Let’s do a test now!
Test Entities:
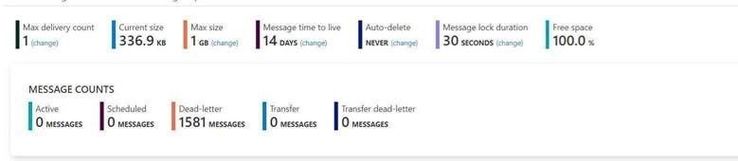
I use a same Queue to do this test. The Max delivery count is 1. If you are interested about the usage of “Max delivery count” please check from here Service Bus exceeding MaxDeliveryCount.
Message lock duration time is 30s.
My Program:
Here I use different function in .Net for receive messages. All the functions have “Async” like ReceiveBatchAsync means the functions are working Asynchronously.
To simulate the situation by sending a large number of messages, I use Batch function to receive 1000 messages at one time.
- Here is the program that receives messages in Asynchronous patterns.
using Microsoft.ServiceBus.Messaging;
using System;
using System.Collections.Generic;
using System.Linq;
using System.Text;
using System.Threading.Tasks;
namespace SendReceiveQueue
{
class Program
{
static string connectionString = “<your connection string>“;
static string queueName = “<queue name>“;
static void Main(string[] args)
{
MainAsync().GetAwaiter().GetResult();
}
public static async Task MainAsync()
{
QueueClient receiveClient = QueueClient.CreateFromConnectionString(connectionString, queueName);
//create a sender on the queue
var Timestamp2 = new DateTimeOffset(DateTime.UtcNow).ToUnixTimeMilliseconds();
Console.WriteLine(“Receiving message -, timestamp:{0}”, Timestamp2);
IEnumerable<BrokeredMessage> messageList = await receiveClient.ReceiveBatchAsync(1000);
foreach (BrokeredMessage message in messageList)
{
try
{
var Timestamp0 = new DateTimeOffset(DateTime.UtcNow).ToUnixTimeMilliseconds();
Console.WriteLine(“Message”+message.GetBody<string>() +“time”+Timestamp0);
await message.CompleteAsync();
}
catch (Exception ex)
{
var Timestamp3 = new DateTimeOffset(DateTime.UtcNow).ToUnixTimeMilliseconds();
Console.WriteLine(“abandon message – timestamp:{0},errorr message {1}”, Timestamp3,ex.Message);
await message.AbandonAsync();
}
}
await receiveClient.CloseAsync();
}
}
}
This is the result. The average time of receiving message is in 200ms to 300ms.

- And this is the Code for receiving messages with Synchronous messaging patterns.
using Microsoft.ServiceBus.Messaging;
using System;
using System.Collections.Generic;
using System.Linq;
using System.Text;
namespace SendReceiveQueue
{
class Program
{
static string connectionString = “<your connection string>“;
static string queueName = “<queue name>“;
static void Main(string[] args)
{
MainTest();
}
static void MainTest()
{
QueueClient receiveClient = QueueClient.CreateFromConnectionString(connectionString, queueName);
//create a sender on the queue
var Timestamp2 = new DateTimeOffset(DateTime.UtcNow).ToUnixTimeMilliseconds();
Console.WriteLine(“Receiving message -, timestamp:{0}”, Timestamp2);
IEnumerable<BrokeredMessage> messageList = receiveClient.ReceiveBatch(1000);
foreach (BrokeredMessage message in messageList)
{
try
{
var Timestamp0 = new DateTimeOffset(DateTime.UtcNow).ToUnixTimeMilliseconds();
Console.WriteLine(“Message” + message.GetBody<string>() + “time” + Timestamp0);
message.Complete();
}
catch (Exception ex)
{
var Timestamp3 = new DateTimeOffset(DateTime.UtcNow).ToUnixTimeMilliseconds();
Console.WriteLine(“abandon message – timestamp:{0},errorr message {1}”, Timestamp3, ex.Message);
message.Abandon();
}
}
receiveClient.Close();
Console.Read();
}
}
}
This is the result. At first time the messages can also finish in 200ms to 300ms. But after a while It shows error for “lock expired”.

Why didn’t we get any errors while using the Async pattern in this program? Why we got “Lock expired” exception while using Sync pattern?
This exception is highly possible in receiving messages in batch function. Because all these 1000 messages were received in one operation. Using Peeklock receive mode, Service Bus locked all the 1000 messages at the same time. And then complete messages in Asynchronous patten, Messages can be completed without blocking. The await keyword provides a non-blocking way to start a task, then continue execution when that task is completed. It saved the Message complete time.
But using Synchronous patten, all the Messages was completed one by one, the waiting time exceeds 30s. So, it shows “lock expired” error.
You can get detailed information on how the asynchronous C# backend works from this document. Asynchronous programming in C# | Microsoft Docs
Test Result Summary
- From the test result, it indicates that receiving messages with Asynchronous Messaging pattern would have higher ability than Synchronous Messaging pattern. We recommend using Asynchronous over than Synchronous.
- However, if we receive a larger number of messages in one Batch operation like 10000 messages. This program with Asynchronous Messaging pattern also would get “lock expired” error. As mentioned before this “Lock expired” exception may be due to many reasons. That also the reason Service Bus have Dead Lettering Queue to prevent Service Bus message being lost. If you are interested in this topic, you are welcome to provide your comments.
by Contributed | Jan 18, 2021 | Technology
This article is contributed. See the original author and article here.
Oracle 19c on Azure NetApp Files for SAP Workloads
PoC and Validation
Oracle Installation Guide
Introduction
This document will show how you can install Oracle 19c on Azure for SAP Applications using Azure NetApp Files (ANF) as storage platform for data and log areas. The support is mentioned in the two SAP notes:
2015553 – SAP on Microsoft Azure: Support prerequisites – SAP ONE Support Launchpad
2039619 – SAP Applications on Microsoft Azure using the Oracle Database: Supported Products and Versions – SAP ONE Support Launchpad
This document written for experienced technical people. Not all aspects are covered because we assume a profound technical knowledge on all the mentioned topics like Linux, Oracle DB and NFS.
The supported components are: Oracle Linux 8.2, Oracle 19c and NFS 4.1 on ANF
Thank you from the awesome support to:
Jan Klokkers Oracle
Christoph Kurucz Oracle
Geert van Teylingen Azure NetApp Files alliance
Jeffrey Steiner NetApp
Juergen Thomas Microsoft
Installation
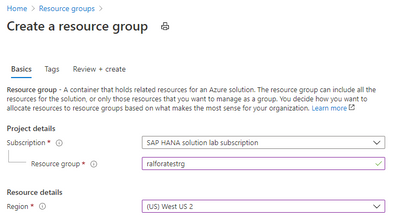
Create a resource Group.

Create the VM


Creating the Jump Box


Oracle Linux
Check the Kernel version
uname -a
Linux ralforavm01 5.4.17-2011.6.2.el8uek.x86_64 #2 SMP Thu Sep 3 13:38:27 PDT 2020 x86_64 x86_64 x86_64 GNU/Linux
Check the OS Release
cat /etc/os-release
NAME="Oracle Linux Server"
VERSION="8.2"
ID="ol"
ID_LIKE="fedora"
VARIANT="Server"
VARIANT_ID="server"
VERSION_ID="8.2"
PLATFORM_ID="platform:el8"
PRETTY_NAME="Oracle Linux Server 8.2"
ANSI_COLOR="0;31"
CPE_NAME="cpe:/o:oracle:linux:8:2:server"
HOME_URL="https://linux.oracle.com/"
BUG_REPORT_URL="https://bugzilla.oracle.com/"
List the number and type of CPU’S of the VM
lscpu
Architecture:        x86_64
CPU op-mode(s):      32-bit, 64-bit
Byte Order:          Little Endian
CPU(s):              32
On-line CPU(s) list: 0-31
Thread(s) per core:  2
Core(s) per socket:  16
Socket(s):           1
NUMA node(s):        1
Vendor ID:           GenuineIntel
CPU family:          6
Model:               63
Model name:          Intel(R) Xeon(R) CPU E7-8890 v3 @ 2.50GHz
Stepping:            4
CPU MHz:             2493.986
BogoMIPS:            4987.97
Virtualization:      VT-x
Hypervisor vendor:   Microsoft
Virtualization type: full
L1d cache:           32K
L1i cache:           32K
L2 cache:            256K
L3 cache:            46080K
NUMA node0 CPU(s):   0-31
Create a storage Account

Create a capacity Pool

Add a capacity Pool

Depending on the database size and expected performance decide which ANF SKU does fit best for the target database. In our case it is Ultra.

Finished

Volume design

Create the delegated subnet for ANF

Create a Capacity Pool

Select the protocol for the volumes

Add a Capacity Pool
After deploying the above mentioned design it looks like this:

Configure the /etc/hosts
vi /etc/hosts
127.0.0.1   localhost localhost.localdomain localhost4 localhost4.localdomain4
172.17.4.9  ralforavm01.localdomain ralforavm01
172.17.10.4 anf01
Configure the hostname as FQDN
vi /etc/hostname

ralforavm01.localdomain
Create the mountpoints for Oracle and SAP
mkdir -p /oracle/C11/sapdata1  /oracle/C11/sapdata2  /oracle/C11/sapdata3  /oracle/C11/sapdata4 /oracle/C11/origlogA /oracle/C11/origlogB /oracle/C11/mirrlogA /oracle/C11/mirrlogB /oracle/C11/saparch /oracle/C11/sapbackup /oracle/C11/sapreorg /oracle/C11/orainstall /oracle/C11/saptrace /oracle/C11/oraarch /oracle/C11/19.0.0 /oracle/stage /oracle/client

mkdir -p /usr/sap/C11 /sapmnt/C11 /usr/sap/trans
mount the root volume and create the mountpoints.
mount anf01:/ralforasapdatav3 /mnt

mkdir /mnt/sapdata1 /mnt/sapdata2 /mnt/sapdata3 /mnt/sapdata4 ; umount /mnt

mount anf01:/ralforaclemirrlog /mnt

mkdir /mnt/mirrlogA /mnt/mirrlogB; umount /mnt

mount anf01:/ralforacleoriglog /mnt

mkdir /mnt/origlogA /mnt/origlogB; umount /mnt

mount anf01:/ralforacleshared /mnt

mkdir /mnt/oraarch /mnt/saparch /mnt/sapbackup /mnt/sapreorg /mnt/saptrace /mnt/Software /mnt/usr_sap /mnt/sapmnt /mnt/19.0.0 /mnt/trans /mnt/ora_client /mnt/orainstall /mnt/ora_stage ;umount /mnt
Manage the idmapd for ANF
vi /etc/idmapd.conf
 # Example
 [General]
 Domain = defaultv4iddomain.com
modify the /etc/fstab
#
# Oracle
#
anf01:/ralforacledatav4/sapdata1  /oracle/C11/sapdata1 nfs rw,hard,timeo=600,vers=4.1,rsize=1048576,wsize=1048576,noatime,nointr,lock 0 0
anf01:/ralforacledatav4/sapdata2  /oracle/C11/sapdata2 nfs rw,hard,timeo=600,vers=4.1,rsize=1048576,wsize=1048576,noatime,nointr,lock 0 0
anf01:/ralforacledatav4/sapdata3  /oracle/C11/sapdata3 nfs rw,hard,timeo=600,vers=4.1,rsize=1048576,wsize=1048576,noatime,nointr,lock 0 0
anf01:/ralforacledatav4/sapdata4  /oracle/C11/sapdata4 nfs rw,hard,timeo=600,vers=4.1,rsize=1048576,wsize=1048576,noatime,nointr,lock 0 0
anf01:/ralforaclemirrlog/mirrlogA /oracle/C11/mirrlogA nfs rw,hard,timeo=600,vers=4.1,rsize=1048576,wsize=1048576,noatime,nointr,lock 0 0
anf01:/ralforaclemirrlog/mirrlogB /oracle/C11/mirrlogB nfs rw,hard,timeo=600,vers=4.1,rsize=1048576,wsize=1048576,noatime,nointr,lock 0 0
##
anf01:/ralforacleoriglog/origlogA /oracle/C11/origlogA nfs rw,hard,timeo=600,vers=4.1,rsize=1048576,wsize=1048576,noatime,nointr,lock 0 0
anf01:/ralforacleoriglog/origlogB /oracle/C11/origlogB nfs rw,hard,timeo=600,vers=4.1,rsize=1048576,wsize=1048576,noatime,nointr,lock 0 0
##
anf01:/ralforacleshared/19.0.0   /oracle/C11/19.0.0   nfs rw,hard,timeo=600,vers=4.1,rsize=1048576,wsize=1048576,noatime,nointr,lock 0 0
anf01:/ralforacleshared/oraarch  /oracle/C11/oraarch   nfs rw,hard,timeo=600,vers=4.1,rsize=1048576,wsize=1048576,noatime,nointr,lock 0 0
anf01:/ralforacleshared/saparch   /oracle/C11/saparch  nfs rw,hard,timeo=600,vers=4.1,rsize=1048576,wsize=1048576,noatime,nointr,lock 0 0
anf01:/ralforacleshared/sapbackup /oracle/C11/sapbackup nfs rw,hard,timeo=600,vers=4.1,rsize=1048576,wsize=1048576,noatime,nointr,lock 0 0
anf01:/ralforacleshared/sapreorg  /oracle/C11/sapreorg nfs rw,hard,timeo=600,vers=4.1,rsize=1048576,wsize=1048576,noatime,nointr,lock 0 0
anf01:/ralforacleshared/saptrace /oracle/C11/saptrace  nfs rw,hard,timeo=600,vers=4.1,rsize=1048576,wsize=1048576,noatime,nointr,lock 0 0
anf01:/ralforacleshared/Software /oracle/C11/Software  nfs rw,hard,timeo=600,vers=4.1,rsize=1048576,wsize=1048576,noatime,nointr,lock 0 0
anf01:/ralforacleshared/ora_client /oracle/client     nfs rw,hard,timeo=600,vers=4.1,rsize=1048576,wsize=1048576,noatime,nointr,lock 0 0
anf01:/ralforacleshared/ora_stage /oracle/stage       nfs rw,hard,timeo=600,vers=4.1,rsize=1048576,wsize=1048576,noatime,nointr,lock 0 0
anf01:/ralforacleshared/usr_sap   /usr/sap/C11        nfs rw,hard,timeo=600,vers=4.1,rsize=1048576,wsize=1048576,noatime,nointr,lock 0 0
anf01:/ralforacleshared/trans     /usr/sap/trans      nfs rw,hard,timeo=600,vers=4.1,rsize=1048576,wsize=1048576,noatime,nointr,lock 0 0
anf01:/ralforacleshared/sapmnt    /sapmnt             nfs rw,hard,timeo=600,vers=4.1,rsize=1048576,wsize=1048576,noatime,nointr,lock 0 0
anf01:/ralforacleshared/orainst /oracle/C11/orainstall nfs rw,hard,timeo=600,vers=4.1,rsize=1048576,wsize=1048576,noatime,nointr,lock 0 0
Stop the firewalld
systemctl disable firewalld
systemctl stop firewalld
Update the VM’s OS image (no registration required)
yum update

Last metadata expiration check: 1:24:42 ago on Tue 03 Nov 2020 10:04:53 AM UTC.
…
Install   5 Packages
Upgrade  25 Packages

Total download size: 159 M
Is this ok [y/N]:y
Install the required libraries.
dnf install -y oracle-database-preinstall-19c
dnf install -y binutils
dnf install -y compat-libstdc++-33
dnf install -y elfutils-libelf
dnf install -y elfutils-libelf-devel
dnf install -y fontconfig-devel
dnf install -y glibc
dnf install -y glibc-devel
dnf install -y ksh
dnf install -y libaio
dnf install -y libaio-devel
dnf install -y libXrender
dnf install -y libXrender-devel
dnf install -y libX11
dnf install -y libXau
dnf install -y libXi
dnf install -y libXtst
dnf install -y libgcc
dnf install -y librdmacm-devel
dnf install -y libstdc++
dnf install -y libstdc++-devel
dnf install -y libxcbdnf install -y unixODBC
# New for OL8
dnf install -y ipmiutil
dnf install -y libnsl2
dnf install -y libnsl2-devel
dnf install -y net-tools
dnf install -y nfs-utils
dnf install -y libnsl
dnf install -y make
dnf install -y python # ACFS
dnf install -y python-configshell # ACFS
dnf install -y python-rtslib # ACFS
dnf install -y python-six # ACFS
dnf install -y targetcli # ACFS
dnf install -y smartmontools
dnf install -y sysstat
modify the /etc/sysctl.conf
Change the nessesary kernel parameter in /etc/sysctl.conf
kernel.sem = 250 32000 100 128
kernel.shmmni = 4096
kernel.shmall = 1073741824
kernel.shmmax = 4398046511104
kernel.panic_on_oops = 1
net.ipv6.conf.all.disable_ipv6 = 1
net.core.rmem_max = 16777216
net.core.wmem_max = 16777216
net.core.optmem_max = 16777216
net.core.somaxconn = 4096
net.core.netdev_max_backlog = 300000
net.ipv4.ip_local_port_range = 9000 65500
net.ipv4.conf.all.rp_filter = 2
net.ipv4.conf.default.rp_filter = 2
net.ipv4.conf.default.rp_filter = 2
net.ipv4.tcp_rmem = 65536 16777216 16777216
net.ipv4.tcp_wmem = 65536 16777216 16777216
net.ipv4.tcp_max_syn_backlog = 16348
net.ipv4.tcp_slow_start_after_idle = 0
net.ipv4.tcp_dsack = 1
net.ipv4.tcp_sack = 1
net.ipv4.tcp_no_metrics_save = 1
net.ipv4.tcp_moderate_rcvbuf = 1
net.ipv4.tcp_window_scaling = 1
net.ipv4.tcp_syn_retries = 8
net.ipv4.tcp_tw_reuse = 1
net.ipv4.tcp_timestamps = 1
vm.swappiness = 10
vm.dirty_bytes = 629145600
vm.dirty_background_bytes = 314572800
vm.max_map_count = 2147483647
vm.memory_failure_early_kill = 1
fs.file-max = 820448174
fs.aio-max-nr = 18446744073709551615
Download the Oracle 19c DB and the Patch-Set 19.8.0.0 from the SAP Software download Center
Create the SAP and Oracle user
groupadd sapsys -g 79
groupadd dba -g 80
groupadd oper -g 85
groupadd oinstall -g 90
Create the required oracle user
useradd c11adm -u 1001 -d /usr/sap/C11 -g 79 -s /bin/csh -c "SAP Administrator C11"

useradd orac11 -u 1002 -d /oracle/C11 -g 80 -G oper,dba,oinstall -s /bin/bash -c "Oracle Administrator C11"

useradd oracle -u 1003 -d /oracle/C11 -g 90 -G oper,dba -s /bin/bash -c "Oracle Installation"

usermod -a -G oper orac11
disable selinux
[root@ralforavm01 ~]# sestatus
SELinux status:                 enabled
SELinuxfs mount:                /sys/fs/selinux
SELinux root directory:         /etc/selinux
Loaded policy name:             targeted
Current mode:                   permissive
Mode from config file:          permissive
Policy MLS status:              enabled
Policy deny_unknown status:     allowed
Memory protection checking:     actual (secure)
Max kernel policy version:      31
Disable selinux
vi /etc/selinux/config

# This file controls the state of SELinux on the system.
# SELINUX= can take one of these three values:
#     enforcing - SELinux security policy is enforced.
#     permissive - SELinux prints warnings instead of enforcing.
#     disabled - No SELinux policy is loaded.
SELINUX=disabled
# SELINUXTYPE= can take one of these three values:
#     targeted - Targeted processes are protected,
#     minimum - Modification of targeted policy. Only selected processes are protected.
#     mls - Multi Level Security protection.
SELINUXTYPE=targeted change the user Permission to the sap and oracle directories.
Reboot the server
Check if selinux is disabled
sestatus
SELinux status:        disabled
Change the nfs mountpoint permissions.
chown -R c11adm:sapsys /usr/sap/
chown -R orac11:dba /oracle
Unzip the compressed files into “your” Software directory and execute the install process under the directory SAP.
su – orac11
cd /Software/Oracle_19c_Inst/LINUX_X86_64/db_home/SAP
export DB_SID=C11
export ORACLE_STAGE=/oracle/stage
export ORACLE_BASE=/oracle/C11
Call the Oracle installer for 19c
./19cinstall.sh -silent -db C11 -oracle_stage /oracle/C11/Software/Oracle_19c_Inst/LINUX_X86_64/db_home/
As a root user, execute the following script(s):
- 1. /oracle/oraInventory/orainstRoot.sh
- 2. /oracle/C11/19.0.0/root.sh
[root@ralforavm01 SAP]#  /oracle/oraInventory/orainstRoot.sh
[root@ralforavm01 SAP]#  /oracle/C11/19.0.0/root.sh
Test connect to Oracle
su – orac11
sqlplus /nolog
SQL> CONNECT / SYS AS SYSDBA
SQL*Plus: Release 19.0.0.0.0 - Production on Wed Nov 4 11:51:28 2020
Version 19.3.0.0.0
Copyright (c) 1982, 2019, Oracle.  All rights reserved.
Connected to an idle instance.
SQL> exit
Patch Installation
Install the OPatch utility first.
https://updates.oracle.com/ARULink/PatchDetails/process_form?patch_num=6880880
or download it from SAP swdc à databases Oracle19c
chmod 777 OPATCH19P_2008-70004508.ZIP
su – orac11
/oracle/C11/19.0.0/OPatch/opatch version
OPatch Version: 12.2.0.1.17
OPatch succeeded.
cd /oracle/C11/19.0.0/
unzip /Software/OPATCH19P_2008-70004508.ZIP
/oracle/C11/19.0.0/OPatch/opatch version
========================================================
GENERIC OPATCH VERSION - FOR USE IN SAP ENVIRONMENT ONLY
========================================================
OPatch Version: 12.2.0.1.21
OPatch succeeded.
Validate the Oracle Inventory
/oracle/C11/19.0.0/OPatch/opatch lsinventory -detail -oh /oracle/C11/19.0.0
…..
...
OPatch succeeded.
Apply the OPatch 19.8.0.0 to the DB
Apply the patches
cd /Software/Oracle_Patch_19.8/31305339/31281355

/oracle/C11/19.0.0/OPatch/opatch apply
========================================================
GENERIC OPATCH VERSION - FOR USE IN SAP ENVIRONMENT ONLY
========================================================
Oracle Interim Patch Installer version 12.2.0.1.21
Copyright (c) 2020, Oracle Corporation.  All rights reserved.
Oracle Home       : /oracle/C11/19.0.0
Central Inventory : /oracle/oraInventory
   from           : /oracle/C11/19.0.0/oraInst.loc
OPatch version    : 12.2.0.1.21 FOR USE IN SAP ENVIRONMENT ONLY
OUI version       : 12.2.0.7.0
Log file location : /oracle/C11/19.0.0/cfgtoollogs/opatch/opatch2020-11-04_16-10-50PM_1.log
Verifying environment and performing prerequisite checks...

OPatch continues with these patches:   31281355
Do you want to proceed? [y|n] Y
...
..
cd ../31304218
/oracle/C11/19.0.0/OPatch/opatch apply
cd ../31305087
/oracle/C11/19.0.0/OPatch/opatch apply
cd ../31335188
/oracle/C11/19.0.0/OPatch/opatch apply
cd /oracle/C11/19/OPatch/
datapatch -verbose
Any databases that have invalid objects after the execution of datapatch should have utlrp.sql run to revalidate those objects.
For example:
cd $ORACLE_HOME/rdbms/admin
sqlplus /nolog
SQL> CONNECT / AS SYSDBA
SQL> @utlrp.sql
Apply the SAP Bundle Patch SAP19P_2008-70004508.ZIP (also downloaded from SWDC
dnf install bc.x86_64
cd /Software/SAP19P/SBP_19800200714_202008

ls -l /oracle/C11/19/MOpatch
ls: cannot access '/oracle/C11/19/MOpatch': No such file or directory
cp -r  MOPatch /oracle/C11/19/

$ORACLE_HOME/MOPatch/mopatch.sh -hv
MOPatch - Install Multiple Oracle Patches in One Run - 2.5.1.
Copyright (c) 2007, 2020, Oracle and/or its affiliates. All rights reserved.

cd /Software/SAP19P

ls -l
-rw-r--r--.  1 root   root     14532539 Nov  4 15:52 SAP19P_2008-70004508.ZIP
drwxr-xr-x. 24 oracle oinstall     4096 Aug 18 17:02 SBP_19800200714_202008
-rw-r--r--.  1 oracle oinstall    76390 Aug 21 15:21 SIGNATURE.SMF

export IHRDBMS=/oracle/C11/19.0.0
env |grep ORA
ORACLE_UNQNAME=C11
ORACLE_SID=C11
ORACLE_BASE=/oracle/C11
ORACLE_HOME=/oracle/C11/19.0.0
ORA_INVENTORY=/oracle/oraInventory
ORACLE_HOSTNAME=ralforavm01.localdomain
$IHRDBMS/MOPatch/mopatch.sh -v -s SAP19P_2008-70004508.ZIP
Create a Database
https://docs.oracle.com/cd/B28359_01/server.111/b28310/create003.htm#ADMIN11073
vi /oracle/C11/19.0.0/dbs/initC11.ora
db_name='C11'
memory_target=1G
processes = 150
db_block_size=8192
open_cursors=300
compatible ='11.2.0'
sqlplus /nolog
SQL*Plus: Release 19.0.0.0.0 - Production on Thu Nov 5 14:57:34 2020
Version 19.8.0.0.0
Copyright (c) 1982, 2020, Oracle.  All rights reserved.
SQL>  connect / as sysdba
Connected to an idle instance.
SQL>  CREATE SPFILE FROM PFILE;
File created.
SQL> startup nomount
ORACLE instance started.
Total System Global Area  713031464 bytes
Fixed Size                  8900392 bytes
Variable Size             557842432 bytes
Database Buffers          134217728 bytes
Redo Buffers               12070912 bytes
SQL>
Create C11 Database (only for a Test! The DB will get created during the SAP installation)
vi create_db.sql

CREATE DATABASE C11
USER SYS IDENTIFIED BY manager
USER SYSTEM IDENTIFIED BY manager
LOGFILE GROUP 1 ('/oracle/C11/origlogA/redo01.log') SIZE 100M,
GROUP 2 ('/oracle/C11/origlogB/redo02.log') SIZE 100M,
GROUP 3 ('/oracle/C11/origlogA/redo03.log') SIZE 100M,
GROUP 4 ('/oracle/C11/origlogB/redo04.log') SIZE 100M
MAXLOGFILES 5
MAXLOGMEMBERS 5
MAXLOGHISTORY 1
MAXDATAFILES 100
CHARACTER SET US7ASCII
NATIONAL CHARACTER SET AL16UTF16
EXTENT MANAGEMENT LOCAL
DATAFILE '/oracle/C11/sapdata1/system01.dbf' SIZE 500M REUSE
SYSAUX DATAFILE '/oracle/C11/sapdata2/sysaux01.dbf' SIZE 325M REUSE
DEFAULT TABLESPACE users
DATAFILE '/oracle/C11/sapdata3/users01.dbf'
SIZE 500M REUSE AUTOEXTEND ON MAXSIZE UNLIMITED
DEFAULT TEMPORARY TABLESPACE tempts1
TEMPFILE '/oracle/C11/sapdata1/temp01.dbf'
SIZE 20M REUSE
UNDO TABLESPACE undotbs
DATAFILE '/oracle/C11/sapdata4/undotbs01.dbf'
SIZE 200M REUSE AUTOEXTEND ON MAXSIZE UNLIMITED;
Create the DB
SQL> @create_db.sql
Database created.
Run the required post processing scripts
SQL> @$ORACLE_HOME/rdbms/admin/catalog.sql;
SQL> @$ORACLE_HOME/rdbms/admin/catproc.sql;
SQL> @$ORACLE_HOME/sqlplus/admin/pupbld.sql;
Test if the DB is open
SQL> select status from v$instance;
STATUS
------------
OPEN
1 row selected.
DROP DATABASE:
SQL> shutdown abort
SQL> startup force mount restrict;
ORACLE instance started.

Total System Global Area 243268208 bytes
Fixed Size 8895088 bytes
Variable Size 180355072 bytes
Database Buffers 50331648 bytes
Redo Buffers 3686400 bytes
Database mounted.
SQL> drop database;
Database dropped.
Enable dNFS
To use Oracle dNFS MultiPath with Azure NetApp Files you will need an oranfstab file, Oracle will look in the following order and locations for the configuration file.
- /etc/oranfstab – Server wide
- $ORACLE_HOME/dbs/oranfstab – Oracle Home specific
You need to specify ONLY those volumes in the oranfstab which are used by Oracle. If you specify not used volumes this construct will end up in an non working dNFS scenario. Theoretically oracle should look into the /etc/mtab to automatically enable dNFS volumes.
Below is a copy of my $ORACLE_HOME/dbs/oranfstab
cat /etc/hosts

127.0.0.1   localhost localhost.localdomain localhost4 localhost4.localdomain4
172.17.4.9  ralforavm01.localdomain ralforavm01
172.17.5.4  anf01
dNFS oranfstab for NFSv4.1
[root@ralforavm01 dbs]# cat oranfstab
server: anf01
path: 172.17.10.4
nfs_version: NFSv4.1
security_default: sys
export: /ralforacledatav4/sapdata1 mount: /oracle/C11/sapdata1
export: /ralforacledatav4/sapdata2 mount: /oracle/C11/sapdata2
export: /ralforacledatav4/sapdata3 mount: /oracle/C11/sapdata3
export: /ralforacledatav4/sapdata4 mount: /oracle/C11/sapdata4
export: /ralforacleoriglog/origlogA mount: /oracle/C11/origlogA
export: /ralforacleoriglog/origlogB mount: /oracle/C11/origlogB
export: /ralforacleshared mount: /oracle/C11/19.0.0
export: /ralforaoraarch mount: /oracle/C11/oraarch
export: /ralforasapbackup mount: /oracle/C11/sapbackup
Enabling dNFS
Change dir to $ORACLE_HOME/rdbms/lib and use the make command e.g
cd $ORACLE_HOME/rdbms/lib
make -f ins_rdbms.mk dnfs_on
rm -f /oracle/C11/19.0.0/rdbms/lib/odm/libnfsodm19.so;
    cp /oracle/C11/19.0.0/lib/libnfsodm19.so /oracle/C11/19.0.0/rdbms/lib/odm/libnfsodm19.so
restart oracle
Verify Oracle dNFS Usage
If dNFS is enabled correctly there should be no errors in the alert files. Here we see dNFS issues in the trace directory:
pwd
/oracle/C11/diag/rdbms/c11/C11/trace
The output here shows dNFS issues…. If everything is configured correctly there should be no output.
grep -i kgnfs *.trc

....
…
C11_lgwr_99210.trc: [53257270973] kgnfs_mntrsp: KGNFS_NFSPROC3_MNT FAIL 13
C11_lgwr_99210.trc:[53257271002] kgnfs_dump_hex_data: 0x7ffe492523bc len 120 lt 30
C11_lgwr_99210.trc: [53257271026] kgnfs_dump_hex_data: 0x7ffe492547e8 len 528 lt 132
C11_lgwr_99210.trc: [53257283545] kgnfs_mntrsp: KGNFS_NFSPROC3_MNT FAIL 13
C11_lgwr_99210.trc:[53257283571] kgnfs_dump_hex_data: 0x7ffe492523bc len 120 lt 30
C11_lgwr_99210.trc: [53257283595] kgnfs_dump_hex_data: 0x7ffe492547e8 len 528 lt 132
C11_lgwr_99210.trc: [53257296302] kgnfs_mntrsp: KGNFS_NFSPROC3_MNT FAIL 13
C11_lgwr_99210.trc:[53257296328] kgnfs_dump_hex_data: 0x7ffe492523bc len 120 lt 30
C11_lgwr_99210.trc: [53257296359] kgnfs_dump_hex_data: 0x7ffe492547e8 len 528 lt 132
C11_ora_99256.trc:[53257072683] kgnfs_mntrsp: KGNFS_NFSPROC3_MNT FAIL 13
C11_ora_99256.trc:[53257072983] kgnfs_dump_hex_data: 0x7ffd811d920c len 120 lt 30
C11_ora_99256.trc: [53257073007] kgnfs_dump_hex_data: 0x7ffd811db638 len 528 lt 132
C11_ora_99256.trc: [53257102434] kgnfs_mntrsp: KGNFS_NFSPROC3_MNT FAIL 13
C11_ora_99256.trc:[53257102459] kgnfs_dump_hex_data: 0x7ffd811d920c len 120 lt 30
C11_ora_99256.trc: [53257102485] kgnfs_dump_hex_data: 0x7ffd811db638 len 528 lt 132
C11_ora_99256.trc:[53257522107] kgnfs_mntrsp: KGNFS_NFSPROC3_MNT FAIL 13
C11_ora_99256.trc:[53257522142] kgnfs_dump_hex_data: 0x7ffd811e39ec len 120 lt 30
C11_ora_99256.trc: [53257522167] kgnfs_dump_hex_data: 0x7ffd811e5e18 len 528 lt 132
In this example dNFS is not enabled correctly.
On NFSv4.1
col SVRNAME format a10
col DIRNAME format a40
col NFSVERSION format a10
col SECURITY format a10
SQL> select SVRNAME,DIRNAME,NFSVERSION,SECURITY  from v$dnfs_servers;

SVRNAME    DIRNAME                                  NFSVERSION SECURITY
---------- ---------------------------------------- ---------- ----------
anf01      /ralforacleshared                        NFSv4.1    sys
anf01      /ralforacledatav4/sapdata1               NFSv4.1    sys
anf01      /ralforacledatav4/sapdata2               NFSv4.1    sys
anf01      /ralforacledatav4/sapdata4               NFSv4.1    sys
anf01      /ralforacledatav4/sapdata3               NFSv4.1    sys
anf01      /ralforacleoriglog/origlogB              NFSv4.1    sys
anf01      /ralforacleoriglog/origlogA              NFSv4.1    sys
anf01      /ralforaoraarch                          NFSv4.1    sys
8 rows selected.
After switching the redo-logfile also the oraarch should appear
SQL> alter system switch logfile;
System altered.
SQL> select SVRNAME,DIRNAME,NFSVERSION,SECURITY  from v$dnfs_servers;

SVRNAME    DIRNAME                                  NFSVERSION SECURITY
---------- ---------------------------------------- ---------- ----------
anf01      /ralforacleshared                        NFSv4.1    sys
anf01      /ralforacledatav4/sapdata1               NFSv4.1    sys
anf01      /ralforacledatav4/sapdata2               NFSv4.1    sys
anf01      /ralforacledatav4/sapdata4               NFSv4.1    sys
anf01      /ralforacledatav4/sapdata3               NFSv4.1    sys
anf01      /ralforacleoriglog/origlogB              NFSv4.1    sys
anf01      /ralforacleoriglog/origlogA              NFSv4.1    sys
anf01      /ralforaoraarch                          NFSv4.1    sys
anf01      /ralforaoraarch                          NFSv4.1    sys
9 rows selected.
Disable dNFS
For test reasons it can be necessary to disable the dNFS cleint.
Change dir to $ORACLE_HOME/rdbms/lib and use the make command e.g
cd $ORACLE_HOME/rdbms/lib
make -f ins_rdbms.mk dnfs_off
rm -f  /oracle/C11/19.0.0/rdbms/lib/odm/libnfsodm19.so
restart oracle
Performance Test
Before we start the performance testing we configure the system accordingly.
Reference: I/O Configuration and Design (oracle.com)
DB_FILE_MULTIBLOCK_READ_COUNT parameter is used to specifies the maximum number of blocks read in one I/O operation during a sequential scan.
SQL> show parameter DB_FILE_MULTIBLOCK_READ_COUNT
NAME                                 TYPE        VALUE
------------------------------------ ----------- ------------------------------
db_file_multiblock_read_count        integer     128
SQL> alter system set DB_FILE_MULTIBLOCK_READ_COUNT=256 scope=both;
Setting the dNFS_BATCH_SIZE parameter to 128 (restart of the DB is required to activate)
SQL> alter system set DNFS_BATCH_SIZE=128  scope=spfile;
SQL> shutdown
SQL> startup
SQL>  show parameter DNFS_BATCH_SIZE
NAME                                 TYPE        VALUE
------------------------------------ ----------- ------------------------------
dnfs_batch_size                      integer     128
For now we keep the default for:
SORT_AREA_SIZE
|
Determines I/O sizes and concurrency for sort operations.
|
HASH_AREA_SIZE
|
Determines the I/O size for hash operations.
|
SQL> show parameter SORT_AREA_SIZE
NAME                                 TYPE        VALUE
------------------------------------ ----------- ------------------------------
sort_area_size                       integer     65536

SQL> show parameter HASH_AREA_SIZE
NAME                                 TYPE        VALUE
------------------------------------ ----------- ------------------------------
hash_area_size                       integer     131072
Running I/O Calibration
The I/O calibration feature of Oracle Database is accessed using the DBMS_RESOURCE_MANAGER.CALIBRATE_IO procedure. This procedure issues an I/O intensive read-only workload, made up of one megabyte of random of I/Os, to the database files to determine the maximum IOPS (I/O requests per second) and MBPS (megabytes of I/O per second) that can be sustained by the storage subsystem.
Preparation:
SQL> show parameter TIMED_STATISTICS
NAME                                 TYPE        VALUE
----------------------------------- ----------- ------------------------------
timed_statistics                     boolean     TRUE
SQL> show parameter STATISTICS_LEVEL
NAME                                 TYPE        VALUE
------------------------------------ ----------- ------------------------------
client_statistics_level              string      TYPICAL
statistics_level                     string      TYPICAL
Data Volume = 4*2TB Ultra = 4*256MB/s
NFSv4.1 dNFS disabled:
SQL> SET SERVEROUTPUT ON
DECLARE
  lat  INTEGER;
  iops INTEGER;
  mbps INTEGER;
BEGIN
-- DBMS_RESOURCE_MANAGER.CALIBRATE_IO (<DISKS>, <MAX_LATENCY>, iops, mbps, lat);
   DBMS_RESOURCE_MANAGER.CALIBRATE_IO (2, 10, iops, mbps, lat);
  DBMS_OUTPUT.PUT_LINE ('max_iops = ' || iops);
  DBMS_OUTPUT.PUT_LINE ('latency  = ' || lat);
  DBMS_OUTPUT.PUT_LINE ('max_mbps = ' || mbps);
end;
/
max_iops = 38049
latency  = 1.208
max_mbps = 297
max_iops = 38049
latency  = 1
max_mbps = 297

PL/SQL procedure successfully completed.
Data Volume = 4*2TB Ultra = 4*256MB/s
NFSv4.1 dNFS enabled:
SQL>  SET SERVEROUTPUT ON
DECLARE
  lat  INTEGER;
  iops INTEGER;
  mbps INTEGER;
BEGIN
-- DBMS_RESOURCE_MANAGER.CALIBRATE_IO (<DISKS>, <MAX_LATENCY>, iops, mbps, lat);
   DBMS_RESOURCE_MANAGER.CALIBRATE_IO (2, 10, iops, mbps, lat);
  DBMS_OUTPUT.PUT_LINE ('max_iops = ' || iops);
  DBMS_OUTPUT.PUT_LINE ('latency  = ' || lat);
  DBMS_OUTPUT.PUT_LINE ('max_mbps = ' || mbps);
end;
/
max_iops = 38083
latency  = .497
max_mbps = 296
max_iops = 38083
latency  = 0
max_mbps = 296

PL/SQL procedure successfully completed.
Set the tablespaces to async_io
SQL> col name format a50
SELECT name, asynch_io FROM v$datafile f,v$iostat_file i
  WHERE f.file#        = i.file_no
  AND   filetype_name  = 'Data File'

NAME                                               ASYNCH_IO
-------------------------------------------------- ---------
/oracle/C11/sapdata1/system01.dbf                  ASYNC_OFF
/oracle/C11/sapdata2/sysaux01.dbf                  ASYNC_OFF
/oracle/C11/sapdata4/undotbs01.dbf                 ASYNC_OFF
/oracle/C11/sapdata3/users01.dbf                   ASYNC_OFF
SQL> SHOW PARAMETER FILESYSTEMIO_OPTIONS
NAME                                 TYPE        VALUE
------------------------------------ ----------- ------------------------------
filesystemio_options                 string      none
SQL> ALTER SYSTEM SET FILESYSTEMIO_OPTIONS=SETALL SCOPE=SPFILE;
SQL> shutdown
SQL> startup
SQL> SHOW PARAMETER FILESYSTEMIO_OPTIONS

NAME                                 TYPE        VALUE
------------------------------------ ----------- ------------------------------
filesystemio_options                 string      SETALL
SQL> col name format a50
SELECT name, asynch_io FROM v$datafile f,v$iostat_file i
  WHERE f.file#        = i.file_no
  AND   filetype_name  = 'Data File'

NAME                                               ASYNCH_IO
-------------------------------------------------- ---------
/oracle/C11/sapdata1/system01.dbf                  ASYNC_ON
/oracle/C11/sapdata2/sysaux01.dbf                  ASYNC_ON
/oracle/C11/sapdata4/undotbs01.dbf                 ASYNC_ON
/oracle/C11/sapdata3/users01.dbf                   ASYNC_ON
Preparing the Orion Performance check tool
1 ANF Data-Volume 6TB with Ultra = 768MB/s troughput
Creating the orion files for the test
[orac11@ralforavm01 ~]$ dd if=/dev/zero of=/oracle/C11/sapdata1/orion1 bs=1024k count=10000
10000+0 records in
10000+0 records out
10485760000 bytes (10 GB, 9.8 GiB) copied, 12.7701 s, 821 MB/s

[orac11@ralforavm01 ~]$ dd if=/dev/zero of=/oracle/C11/sapdata2/orion2 bs=1024k count=10000
10000+0 records in
10000+0 records out
10485760000 bytes (10 GB, 9.8 GiB) copied, 12.744 s, 823 MB/s

[orac11@ralforavm01 ~]$ dd if=/dev/zero of=/oracle/C11/sapdata3/orion3 bs=1024k count=10000
10000+0 records in
10000+0 records out
10485760000 bytes (10 GB, 9.8 GiB) copied, 12.7365 s, 823 MB/s

[orac11@ralforavm01 ~]$ dd if=/dev/zero of=/oracle/C11/sapdata4/orion4 bs=1024k count=10000
10000+0 records in
10000+0 records out
10485760000 bytes (10 GB, 9.8 GiB) copied, 12.7354 s, 823 MB/s
Preparing the orion “lun” declaration file
vi orion_nfs.lun

/oracle/C11/sapdata1/orion1
/oracle/C11/sapdata2/orion2
/oracle/C11/sapdata3/orion3
/oracle/C11/sapdata4/orion4
Run the test (NFSv4.1)
~/19.0.0/bin/orion -run oltp -testname orion_nfs -hugenotneeded
ORION: ORacle IO Numbers -- Version RDBMS_19.3.0.0.0DBRU_LINUX.X64_190417
orion_nfs_20201125_1351
Calibration will take approximately 25 minutes.
[orac11@ralforavm01 ~]$ ~/19.0.0/bin/orion -run normal -testname orion_nfs -hugenotneeded

ORION: ORacle IO Numbers -- Version RDBMS_19.3.0.0.0DBRU_LINUX.X64_190417
orion_nfs_20201125_1425
Calibration will take approximately 190 minutes.
Using a large value for -cache_size may take longer.
Setting ftype=0
Maximum Large MBPS=771.28 @ Small=5 and Large=8
Maximum Small IOPS=34449 @ Small=19 and Large=0
Small Read Latency: avg=550.983 us, min=322.815 us, max=11369.239 us, std dev=134.209 us @ Small=19 and Large=0
Minimum Small Latency=419.288 usecs @ Small=1 and Large=0
Small Read Latency: avg=419.288 us, min=311.915 us, max=43826.080 us, std dev=153.365 us @ Small=1 and Large=0
Small Read / Write Latency Histogram @ Small=1 and Large=0
        Latency:                         # of IOs (read)          # of IOs (write)
        0 - 256        us:               0 (  0.00%)              0 (  0.00%)
      256 - 512        us:          138100 ( 96.71%)              0 (  0.00%)
      512 - 1024       us:            4268 ( 99.70%)              0 (  0.00%)
     1024 - 2048       us:             366 ( 99.95%)              0 (  0.00%)
     2048 - 4096       us:              52 ( 99.99%)              0 (  0.00%)
     4096 - 8192       us:               9 (100.00%)              0 (  0.00%)
     8192 - 16384      us:               3 (100.00%)              0 (  0.00%)
    16384 - 32768      us:               0 (100.00%)              0 (  0.00%)
    32768 - 65536      us:               1 (100.00%)              0 (  0.00%)
    65536 - 268435456  us:               0 (100.00%)              0 (  0.00%)
Configuration of the Listener
Create the tnsnames.ora file
pwd
/oracle/C11/19/network/admin

vi tnsnames.ora
C11 =
 (DESCRIPTION =
   (ADDRESS_LIST =
     (ADDRESS = (PROTOCOL = TCP)(HOST = 172.17.4.9)(PORT = 1521))
   )
 (CONNECT_DATA =
   (SERVICE_NAME = C11)
 )
)
Start the listener
[orac11@ralforavm01 admin]$ lsnrctl start

LSNRCTL for Linux: Version 19.0.0.0.0 - Production on 01-DEC-2020 14:07:00
Copyright (c) 1991, 2020, Oracle.  All rights reserved.
Starting /oracle/C11/19.0.0/bin/tnslsnr: please wait...
TNSLSNR for Linux: Version 19.0.0.0.0 - Production
Log messages written to /oracle/C11/diag/tnslsnr/ralforavm01/listener/alert/log.xml
Listening on: (DESCRIPTION=(ADDRESS=(PROTOCOL=tcp)(HOST=ralforavm01.localdomain)(PORT=1521)))
Connecting to (ADDRESS=(PROTOCOL=tcp)(HOST=)(PORT=1521))
STATUS of the LISTENER
------------------------
Alias                     LISTENER
Version                   TNSLSNR for Linux: Version 19.0.0.0.0 - Production
Start Date                01-DEC-2020 14:07:01
Uptime                    0 days 0 hr. 0 min. 0 sec
Trace Level               off
Security                  ON: Local OS Authentication
SNMP                      OFF
Listener Log File         /oracle/C11/diag/tnslsnr/ralforavm01/listener/alert/log.xml
Listening Endpoints Summary...
  (DESCRIPTION=(ADDRESS=(PROTOCOL=tcp)(HOST=ralforavm01.localdomain)(PORT=1521)))
The listener supports no services
The command completed successfully
RMAN Configuration
Check the DB logmode:
SQL> select log_mode from v$database;

LOG_MODE
------------
NOARCHIVELOG
Configure database in ARCHIVELOG mode.
SQL> shutdown
Database closed.
Database dismounted.
ORACLE instance shut down.

SQL> startup mount;
ORACLE instance started.
Total System Global Area 1073737800 bytes
Fixed Size                  8904776 bytes
Variable Size             864026624 bytes
Database Buffers          188743680 bytes
Redo Buffers               12062720 bytes

Database mounted.

SQL> alter database archivelog;
Database altered.

SQL> alter database open;
Database altered.
Ensure ARCHIVELOG destination.
SQL> select open_mode from v$database;

OPEN_MODE
--------------------
READ WRITE
SQL> archive log list

Database log mode              Archive Mode
Automatic archival             Enabled
Archive destination            /oracle/C11/19.0.0/dbs/arch
Oldest online log sequence     30
Next log sequence to archive   33
Current log sequence           33
Change the oracle archive destination.
SQL> alter system set log_archive_dest_1='location=/oracle/C11/oraarch' scope=both;
SQL>  archive log list
Database log mode              Archive Mode
Automatic archival             Enabled
Archive destination            /oracle/C11/oraarch
Oldest online log sequence     30
Next log sequence to archive   33
Current log sequence           33
Ensure the flash/fast recovery area location.
SQL> show parameter db_recovery_file_dest

NAME                                 TYPE        VALUE
------------------------------------ ----------- ------------------------------
db_recovery_file_dest                string
db_recovery_file_dest_size           big integer 0
Connect to RMAN prompt with target database.
[orac11@ralforavm01 ~]$  rman target /

Recovery Manager: Release 19.0.0.0.0 - Production on Mon Nov 30 16:47:40 2020
Version 19.8.0.0.0
Copyright (c) 1982, 2019, Oracle and/or its affiliates.  All rights reserved.
connected to target database: C11 (DBID=365226479)
RMAN>
Configure RMAN with control file auto-backup feature that will be auto-backup control file in case of major changes done in database.
RMAN> configure controlfile autobackup on;
using target database control file instead of recovery catalog
new RMAN configuration parameters:
CONFIGURE CONTROLFILE AUTOBACKUP ON;
new RMAN configuration parameters are successfully stored
Enable the optimization
RMAN> configure backup optimization on;
new RMAN configuration parameters:
CONFIGURE BACKUP OPTIMIZATION ON;
new RMAN configuration parameters are successfully stored
Configure the retention policy
RMAN> CONFIGURE RETENTION POLICY TO RECOVERY WINDOW OF 7 DAYS;
new RMAN configuration parameters:
CONFIGURE RETENTION POLICY TO RECOVERY WINDOW OF 7 DAYS;
new RMAN configuration parameters are successfully stored
Connect to the recovery catalog database (RMAN Repository) & Create a tablespace to store RMAN catalog database objects.
SQL> show parameter db_recovery_file_dest
NAME                                 TYPE        VALUE
------------------------------------ ----------- ------------------------------
db_recovery_file_dest                string
db_recovery_file_dest_size           big integer 0
SQL> select global_name from global_name;
GLOBAL_NAME
--------------------------------------------------------------------------------
C11
Create a tablespace to be used for RMAN and the temp tablespace
SQL> create tablespace catalogtbs datafile '/oracle/C11/sapdata1/catalogtbs1.dbf' size 100M autoextend on maxsize unlimited;
SQL> create tablespace temporary tablespace temp_01 tempfile '/oracle/C11/sapdata1/temp_01.dbf' size 5M autoextend ON;
Create a RMAN user, assign RMAN tablespace to RMAN user as a default & grant recovery catalog owner,connect & resource privileges to RMAN user.
SQL> create user recoveryman identified by recoveryman;
SQL> alter user recoveryman default tablespace catalogtbs temporary tablespace temp_01 ;
SQL> grant recovery_catalog_owner to recoveryman;
SQL> grant connect,resource to recoveryman;
alter user recoveryman DEFAULT TABLESPACE catalogtbs quota unlimited on catalogtbs;
Connect to RMAN on target and recovery catalog database.
rman target / catalog recoveryman/recoveryman@C11
Recovery Manager: Release 19.0.0.0.0 - Production on Tue Dec 1 14:13:27 2020
Version 19.8.0.0.0
Copyright (c) 1982, 2019, Oracle and/or its affiliates.  All rights reserved.
connected to target database: C11 (DBID=365226479)
connected to recovery catalog database

RMAN>
create catalog by issuing the following command in RMAN prompt and register the DB
RMAN> create catalog;
recovery catalog created
RMAN> register database;

database registered in recovery catalog
starting full resync of recovery catalog
full resync complete
Check whether registration was successful.
RMAN> report schema;
Report of database schema for database with db_unique_name C11
List of Permanent Datafiles
===========================
File Size(MB) Tablespace           RB segs Datafile Name
---- -------- -------------------- ------- ------------------------
1    500      SYSTEM               YES     /oracle/C11/sapdata1/system01.dbf
2    325      SYSAUX               NO      /oracle/C11/sapdata2/sysaux01.dbf
3    305      UNDOTBS              YES     /oracle/C11/sapdata4/undotbs01.dbf
4    500      USERS                NO      /oracle/C11/sapdata3/users01.dbf
5    100      CATALOGTBS           NO      /oracle/C11/sapdata1/catalogtbs1.dbf

List of Temporary Files
=======================
File Size(MB) Tablespace           Maxsize(MB) Tempfile Name
---- -------- -------------------- ----------- --------------------
1    20       TEMPTS1              20          /oracle/C11/sapdata1/temp01.dbf
2    5        TEMP_01              32767       /oracle/C11/sapdata1/temp_01.dbf
Or
RMAN> LIST INCARNATION OF DATABASE;
List of Database Incarnations
DB Key  Inc Key DB Name  DB ID            STATUS  Reset SCN  Reset Time
------ ------- -------- ---------------- --- ---------- ----------
1       2       C11      365226479        CURRENT 1          23-NOV-20
Creating a system backup
[orac11@ralforavm01 ~]$ ls -l /oracle/C11/sapbackup/
total 0
Starting an RMAN session and configure the backup path.
rman target / catalog recoveryman/recoveryman@C11

Recovery Manager: Release 19.0.0.0.0 - Production on Tue Dec 1 14:42:22 2020
Version 19.8.0.0.0
Copyright (c) 1982, 2019, Oracle and/or its affiliates.  All rights reserved.
connected to target database: C11 (DBID=365226479)
connected to recovery catalog database
RMAN> CONFIGURE CHANNEL DEVICE TYPE DISK FORMAT '/oracle/C11/sapbackup/full_%u_%s_%p';
new RMAN configuration parameters:
CONFIGURE CHANNEL DEVICE TYPE DISK FORMAT   '/oracle/C11/sapbackup/full_%u_%s_%p';
new RMAN configuration parameters are successfully stored
starting full resync of recovery catalog
full resync complete
Next, you should specify how long you want to retain the backup for. When RMAN takes a backup, it automatically deletes all the old backups that are older than the retention period. In the following example, I’m setting the retention period as 7 days, which will keep the DB backup for a week.
RMAN> CONFIGURE RETENTION POLICY TO RECOVERY WINDOW OF 7 DAYS;
old RMAN configuration parameters:
CONFIGURE RETENTION POLICY TO RECOVERY WINDOW OF 7 DAYS;
new RMAN configuration parameters:
CONFIGURE RETENTION POLICY TO RECOVERY WINDOW OF 7 DAYS;
new RMAN configuration parameters are successfully stored
starting full resync of recovery catalog
full resync complete
Typically we’ll use “BACKUP AS BACKUPSET” to backup a database. So, to take a full backup of the database without the archive logs, do the following.
RMAN> BACKUP AS BACKUPSET DATABASE
To take a full backup of the database with the archive logs, do the following:
RMAN> BACKUP AS BACKUPSET DATABASE PLUS ARCHIVELOG;
You can also take a backup of only a specific table space. The following example takes backup of only PRD01 tablespace.
RMAN> BACKUP AS BACKUPSET TABLESPACE PRD01;
Example output:
RMAN> BACKUP AS BACKUPSET DATABASE PLUS ARCHIVELOG;

Starting backup at 01-DEC-20
current log archived
allocated channel: ORA_DISK_1
channel ORA_DISK_1: SID=44 device type=DISK
channel ORA_DISK_1: starting archived log backup set
channel ORA_DISK_1: specifying archived log(s) in backup set
input archived log thread=1 sequence=33 RECID=1 STAMP=1057971633
input archived log thread=1 sequence=34 RECID=2 STAMP=1058020317
input archived log thread=1 sequence=35 RECID=3 STAMP=1058021321
channel ORA_DISK_1: starting piece 1 at 01-DEC-20
channel ORA_DISK_1: finished piece 1 at 01-DEC-20
piece handle=/oracle/C11/sapbackup/full_02vh07ub_2_1 tag=TAG20201201T144843 comment=NONE
channel ORA_DISK_1: backup set complete, elapsed time: 00:00:03
Finished backup at 01-DEC-20
Starting backup at 01-DEC-20
using channel ORA_DISK_1
channel ORA_DISK_1: starting full datafile backup set
channel ORA_DISK_1: specifying datafile(s) in backup set
input datafile file number=00001 name=/oracle/C11/sapdata1/system01.dbf
input datafile file number=00004 name=/oracle/C11/sapdata3/users01.dbf
input datafile file number=00002 name=/oracle/C11/sapdata2/sysaux01.dbf
input datafile file number=00003 name=/oracle/C11/sapdata4/undotbs01.dbf
input datafile file number=00005 name=/oracle/C11/sapdata1/catalogtbs1.dbf
channel ORA_DISK_1: starting piece 1 at 01-DEC-20
channel ORA_DISK_1: finished piece 1 at 01-DEC-20
piece handle=/oracle/C11/sapbackup/full_03vh07ug_3_1 tag=TAG20201201T144846 comment=NONE
channel ORA_DISK_1: backup set complete, elapsed time: 00:00:07
Finished backup at 01-DEC-20

Starting backup at 01-DEC-20
current log archived
using channel ORA_DISK_1
channel ORA_DISK_1: starting archived log backup set
channel ORA_DISK_1: specifying archived log(s) in backup set
input archived log thread=1 sequence=36 RECID=4 STAMP=1058021335
channel ORA_DISK_1: starting piece 1 at 01-DEC-20
channel ORA_DISK_1: finished piece 1 at 01-DEC-20
piece handle=/oracle/C11/sapbackup/full_04vh07uo_4_1 tag=TAG20201201T144856 comment=NONE
channel ORA_DISK_1: backup set complete, elapsed time: 00:00:01
Finished backup at 01-DEC-20

Starting Control File and SPFILE Autobackup at 01-DEC-20
piece handle=/oracle/C11/19.0.0/dbs/c-365226479-20201201-00 comment=NONE
Finished Control File and SPFILE Autobackup at 01-DEC-20
RMAN>
Check the backup location:
[orac11@ralforavm01 admin]$ ls -l /oracle/C11/sapbackup/
total 782612
-rw-r----- 1 orac11 dba 169256448 Dec  1 14:48 full_02vh07ub_2_1
-rw-r----- 1 orac11 dba 628776960 Dec  1 14:48 full_03vh07ug_3_1
-rw-r----- 1 orac11 dba    204800 Dec  1 14:48 full_04vh07uo_4_1
References
Microsoft
Solution architectures using Azure NetApp Files – Oracle
Solution architectures using Azure NetApp Files – SAP on Azure
SAP deployment on Azure using an Oracle DB – Azure Architecture Center | Microsoft Docs
Oracle:
https://oracle-base.com/articles/19c/oracle-db-19c-installation-on-oracle-linux-8
https://docs.oracle.com/en/database/oracle/oracle-database/19/ladbi/supported-oracle-linux-8-distributions-for-x86-64.html#GUID-F4902762-325B-4C89-B85B-F52BA482190F
SAP
2015553 – SAP on Microsoft Azure: Support prerequisites – SAP ONE Support Launchpad
2039619 – SAP Applications on Microsoft Azure using the Oracle Database: Supported Products and Versions – SAP ONE Support Launchpad
NetApp
Oracle Databases on Microsoft Azure Using Azure NetApp Files | TR-4780 | NetApp
TR-3633: Oracle Databases on NetApp ONTAP | NetApp


Recent Comments