by Contributed | Jan 25, 2021 | Technology
This article is contributed. See the original author and article here.
AI capabilities can enhance many types of applications, enabling you to improve your customer experience and solve complex problems. With Azure Cognitive Services, you can easily access and customize industry-leading AI models, using the tools and languages of your choice.
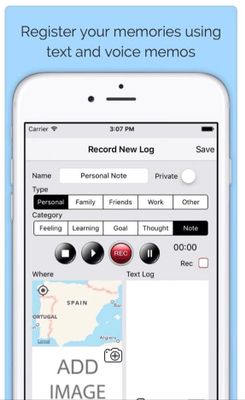
In this blog, we’ll walk through an exercise which you can complete in under an hour, to get started using Azure AI Services. Many of us are dreaming of traveling again, and building this intelligent travel journal app can help you capture memories from your next trip, whenever that may be. We’ll provide high level guidance and sample code to get you started, and we encourage you to play around with the code and get creative with your solution!
Features of the application:
- Capture voice memos, voice tag photos, and transcribe speech to text.
- Automatically tag your photos based on key phrase extraction and analysis of text in pictures.
- Translate tags and text into desired language.
- Organize your memos by key phrase and find similar travel experiences you enjoyed with AI-powered search.
Prerequisites:
Key Azure technologies:
NOTE: For more information refer to the “References.txt” file under respective folders within JournalHelper library project in the provided sample solution with this blog.
Solution Architecture

App Architecture Description:
- User records a voice memo; for example, to accompany an image they’ve captured. The recorded file is stored in a file repository (alternatively, you could use a database).
- The recorded voice memo (e.g. .m4a) is converted into desired format (e.g. .wav), using Azure’s Speech Service batch transcription capability.
- The folder containing voice memos is uploaded to a Blob container.
- Images are uploaded into a separate container for analysis of any text within the photos, using Azure Computer Vision.
- Use Translator to translate text to different languages, as needed. This may be useful to translate foreign street signs, menus, or other text in images.
- Extract tags from the generated text files using Text Analytics, and send tags back to the corresponding image file. Tags can be travel related (#milan, #sunset, #Glacier National Park), or based on geotagging metadata, photo metadata (camera make, exposure, ISO), and more.
- Create a search indexer with Azure Cognitive Search, and use the generated index to search your intelligent travel journal.
Implementation
Sample code
The entire solution code is available for download at this link. Download/clone and follow instructions in ReadMe.md solution item for further setup.
Implementation summary
The sample is implemented using various client libraries and samples available for Azure Cognitive Services. All these services are grouped together into a helper library project named “journalhelper”. In the library we introduce a helper class to help with scenarios that combine various Cognitive Services to achieve desired functionality.
We use “.Net Core console app” as the front end to test the scenarios. This sample also uses another open source library (FotoFly), which is ported to .Net Core here, to access and edit image metadata.
High level overview of steps, along with sample code snippets for illustration:
- Start by batch transcribing voice memos and extracting key tags from the text output. Group the input voice memos into a folder, upload them into an Azure Blob container or specify a list of their URls, and use batch transcription to get results back into the Azure Blob container, as well as a folder in your file system. The following code snippet illustrates how helper functions can be grouped together for a specific functionality. It combines local file system, Azure storage containers, and Cognitive Services speech batch transcription API.
Console.WriteLine("Uploading voice memos folder to blob container...");
Helper.UploadFolderToContainer(
HelperFunctions.GetSampleDataFullPath(customSettings.SampleDataFolders.VoiceMemosFolder),
customSettings.AzureBlobContainers.InputVoiceMemoFiles, deleteExistingContainer);
Console.WriteLine("Branch Transcribing voice memos using containers...");
//NOTE: Turn the pricing tier for Speech Service to standard for this below to work.

await Helper.BatchTranscribeVoiceMemosAsync(
customSettings.AzureBlobContainers.InputVoiceMemoFiles,
customSettings.AzureBlobContainers.BatchTranscribedJsonResults,
          customSettings.SpeechConfigSettings.Key,
          customSettings.SpeechConfigSettings.Region);

Console.WriteLine("Extract transcribed text files into another container and folder, delete the intermediate container with json files...");

await Helper.ExtractTranscribedTextfromJsonAsync(
customSettings.AzureBlobContainers.BatchTranscribedJsonResults,
customSettings.AzureBlobContainers.InputVoiceMemoFiles,
customSettings.AzureBlobContainers.ExtractedTranscribedTexts,
HelperFunctions.GetSampleDataFullPath(customSettings.SampleDataFolders.BatchTranscribedFolder), true);
- Next, create tags from the transcribed text. Sample helper function using the Text Analytics client library is listed below.
//text analytics
public static void CreateTagsForFolderItems(string key, string endpoint, string batchTranscribedFolder, string extractedTagsFolder)
{
    if (!Directory.Exists(batchTranscribedFolder))
    {
       Console.WriteLine("Input folder for transcribed files does not exist");
       return;
    }

    // ensure destination folder path exists
    Directory.CreateDirectory(extractedTagsFolder);
    TextAnalyticsClient textClient = TextAnalytics.GetClient(key, endpoint);

    var contentFiles = Directory.EnumerateFiles(batchTranscribedFolder);
    foreach(var contentFile in contentFiles
    {
var tags = TextAnalytics.GetTags(textClient,
contentFile).ConfigureAwait(false).GetAwaiter().GetResult();

// generate output file with tags
string outFileName = Path.GetFileNameWithoutExtension(contentFile);
                outFileName += @"_tags.txt";
string outFilePath = Path.Combine(extractedTagsFolder, outFileName);
File.WriteAllLinesAsync(outFilePath, tags).Wait() ;
    }
}
The actual client library or service calls are made as shown:
static public async Task<IEnumerable<string>> GetTags(TextAnalyticsClient
client, string inputTextFilePath)
{
   string inputContent = await File.ReadAllTextAsync(inputTextFilePath);
   var entities = EntityRecognition(client, inputContent);
   var phrases = KeyPhraseExtraction(client, inputContent);
   var tags = new List<string>();
   tags.AddRange(entities);
   tags.AddRange(phrases);
   return tags;
}
- Update tags to the photo/image file, using the open source FotoFly library. Alternatively, you can update the Blob metadata with these tags and include that in the search index, but the functionality will be limited to using Azure Blob storage.
string taggedPhotoFile = photoFile.Replace(inputPhotosFolder,
      OutPhotosFolder);
File.Copy(photoFile, taggedPhotoFile, true);

if (tags.Count > 0)
{
    ImageProperties.SetPhotoTags(taggedPhotoFile, tags);
}
- Other useful functions to complete the scenario are:
- Helper.ProcessImageAsync, and
- Helper.TranslateFileContent
The first one can be used to extract text from images using OCR or regular text processing using Computer Vision. The second can detect the source language, translate using Azure’s Translator service into the desired output language, and then create more tags for an image file.
- Finally, use Azure Cognitive Search to create an index from the extracted text files saved in the Blob container, enabling you to search for documents and create journal text files. For example, you can search for images by cities or countries visited, date, or even cuisines. You can also search for images by camera-related metadata or geolocation.
In this sample we have demonstrated simple built-in skillsets for entity and language detection. The solution can be further enhanced by adding additional data sources to process tagged images and their metadata, and adding additional information to the searches.
NOTE: The helper functions can be made more generic to take additional skillset input.
public static async Task CreateSearchIndexerAsync(
    string serviceAdminKey, string searchSvcUrl,
    string cognitiveServiceKey,
    string indexName, string jsonFieldsFilePath,
    string blobConnectionString, string blobContainerName
    )
{
    // Its a temporary arrangment.  This function is not complete
    IEnumerable<SearchField> fields = SearchHelper.LoadFieldsFromJSonFile(jsonFieldsFilePath);

    // create index
    var searchIndex = await
Search.Search.CreateSearchIndexAsync(serviceAdminKey,
searchSvcUrl, indexName, fields.ToList());

    // get indexer client
    var indexerClient =
Search.Search.GetSearchIndexerClient(serviceAdminKey, searchSvcUrl);

    // create azure blob data source
    var dataSource = await
Search.Search.CreateOrUpdateAzureBlobDataSourceAsync(indexerClient,
blobConnectionString, indexName, blobContainerName);

    // create indexer

    // create skill set with minimal skills
    List<SearchIndexerSkill> skills = new List<SearchIndexerSkill>();
            skills.Add(Skills.CreateEntityRecognitionSkill());
            skills.Add(Skills.CreateLanguageDetectionSkill());
     var skillSet = await
Search.Search.CreateOrUpdateSkillSetAsync(indexerClient,
             indexName + "-skillset", skills, cognitiveServiceKey);

     var indexer = await Search.Search.CreateIndexerAsync(indexerClient,
dataSource, skillSet, searchIndex);

     // wait for some time to have indexer run and load documents
     Thread.Sleep(TimeSpan.FromSeconds(20));

     await Search.Search.CheckIndexerOverallStatusAsync(indexerClient,
             indexer);
}
Finally, search documents and generate the corresponding journal files, utilizing the following functions:
- Helper.SearchDocuments
- Helper.CreateTravelJournal
Additional Ideas
In addition to the functionality described so far, there are many other ways you can leverage Azure AI to further enhance your intelligent travel journal and learn more advanced scenarios. We encourage you to explore some the following ideas to enrich your app:
- Add real time voice transcription and store transcriptions in an Azure managed database, to correlate voice transcription with images in context.
- Include travel tickets and receipts as images for OCR-based image analysis (Form Recognizer) and include them as journal artifacts.
- Use multiple data sources for a given search index. We have simplified and only included text files to index in this sample, but you can include the tagged photos from a different data source for the same search index.
- Add custom skills and data extraction for search indexer. Extract metadata from images and include as search content.
- Extract metadata from video and audio content using Video Indexer.
- Experiment with Language Understanding and generate more elaborate and relevant search content based on top scoring intents and entities. Sample keywords and questions related to current sample data are included in Objectives.docx solution item.
- Build a consumer front-end app that stitches all of this together and displays the journal in a UI.
by Contributed | Jan 25, 2021 | Technology
This article is contributed. See the original author and article here.
AI allows you to deliver breakthrough experiences in your apps. With Azure Cognitive Services, you can easily customize and deploy the same AI models that power Microsoft’s products, such as Xbox and Bing, using the tools and languages of your choice.
In this blog we will walk through an exercise that you can complete in under an hour and learn how to build an application that can be useful for you, all while exploring a set of Azure services. If you have ever wanted to get your financial transactions in order, look no further. With this exercise, we’ll explore how to quickly take a snap of a receipt from your phone and upload it for categorization, creating expense reports, and to gain insights to your spending. Remember, even though we’ll walk you through each step, you can always explore the sample code and get creative with your own unique solution!
Features of the application:
- Snap a picture of your receipt and upload it using your smartphone
- Extract relevant data from the images: Who issued the receipt? What was the total amount? What was purchased? All of this information can be effortlessly stored for exploration
- Query the data: bring your receipts to life by extracting relevant and insightful information
Prerequisites
- If you don’t have an Azure subscription, create a free account before you begin. If you have a subscription, log in to the Azure Portal.
- You will need to have python installed locally to run some of the samples.
Key Azure technologies:
Solution Architecture
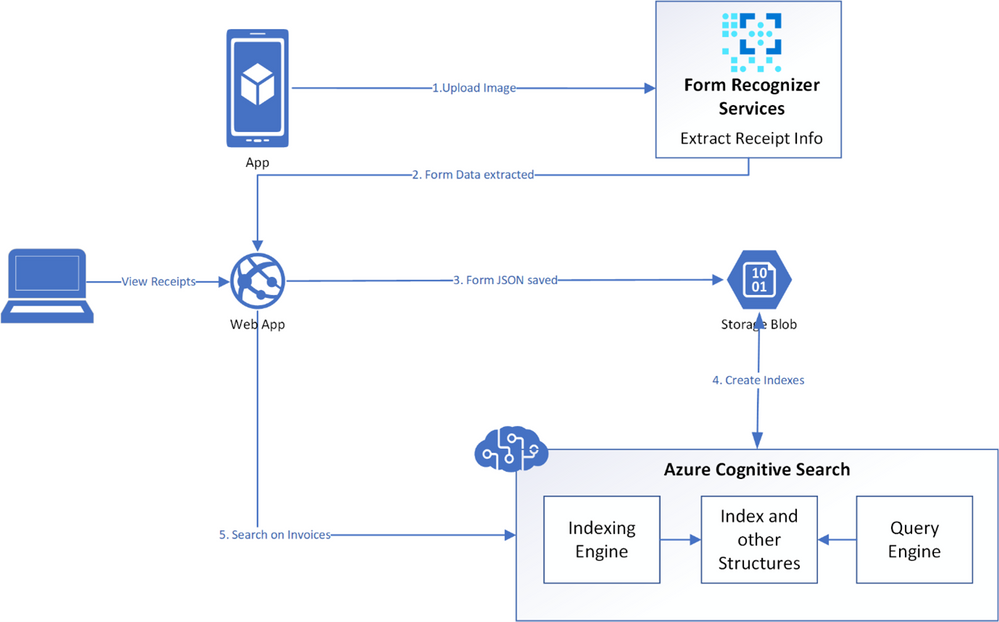
App Architecture Description:
- User uploads a receipt image from their mobile device
- The uploaded image is verified and then sent to the Azure Form Recognizer to extract information
- The image is analysed by the REST API within the Form Recognizer prebuilt receipt model
- A JSON is returned that has both the text information and bounding box coordinates of the extracted receipt data
- The resulting JSON is parsed and a simpler JSON is formed, saving only the relevant information needed
- This receipt JSON is then stored in Azure Blob Storage
- Azure Cognitive Search points directly to Azure Blob Storage and is used to index the data
- The application queries this search index to extract relevant information from the receipts
Another visual of the flow of data within the solution architecture is shown below.

Now that we’ve explored the technology and services we’ll be using, let’s dive into building our app!
Implementation
To get started, data from receipts must be extracted; this is done by setting up the Form Recognizer service in Azure and connecting to the service to use the relevant API for receipts. A JSON is returned that contains the information extracted from receipts and is stored in Azure Blob Storage to be used by Azure Cognitive Search. Cognitive Search is then utilized to index the receipt data, and to search for relevant information.
High level overview of steps, along with sample code snippets for illustration:
- Go to the Azure portal and create a new Form Recognizer resource. In the Create pane, provide the following information:
Name
|
A descriptive name for your resource.
|
Subscription
|
Select the Azure subscription which has been granted access.
|
Location
|
The location of your cognitive service instance. Different locations may introduce latency, but have no impact on the runtime availability of your resource.
|
Pricing Tier
|
The cost of your resource depends on the pricing tier you choose and your usage. For more information, see the API pricing details.
|
Resource Group
|
The Azure resource group that will contain your resource. You can create a new group or add it to a pre-existing group.
|
- After Form Recognizer deploys, go to All Resources and locate the newly deployed resource. Save the key and endpoint from the resource’s key and endpoint page somewhere so you can access it later.
- You can use the following Analyze Receipt API to start analyzing the receipt. Remember to replace <endpoint> & <subscription key> the values you saved earlier and replace <path to your receipt> with the local path to your scanned receipt image.
# Analyse script
import json
import time
from requests import get, post
# Endpoint URL
endpoint = r"<endpoint url>"
apim_key = "<subscription key>"
post_url = endpoint + "/formrecognizer/v2.0/prebuilt/receipt/analyze"
source = r"<path to your receipt>"
headers = {
# Request headers
'Content-Type': 'image/jpeg',
'Ocp-Apim-Subscription-Key': apim_key,
}
params = {
"includeTextDetails": True
}
with open(source, "rb") as f:
data_bytes = f.read()
try:
resp = post(url=post_url, data=data_bytes, headers=headers, params=params)
if resp.status_code != 202:
print("POST analyze failed:n%s" % resp.text)
quit()
print("POST analyze succeeded:n%s" % resp.headers)
get_url = resp.headers["operation-location"]
except Exception as e:
print("POST analyze failed:n%s" % str(e))
quit()
- If you run this code and everything is as it should be, you’ll receive a 202 (Success) response that includes an Operation-Location header, which the script will print to the console. This header contains an operation id that you can use to query the status of the asynchronous operation and get the results. In the following example value, the string after operations/ is the operation ID.
- Now you can call the Get Analyze Receipt Result API to get the Extracted Data.
# Get results.
n_tries = 10
n_try = 0
wait_sec = 6
while n_try < n_tries:
try:
resp = get(url = get_url, headers = {"Ocp-Apim-Subscription-Key": apim_key})
resp_json = json.loads(resp.text)
if resp.status_code != 200:
print("GET Receipt results failed:n%s" % resp_json)
quit()
status = resp_json["status"]
if status == "succeeded":
print("Receipt Analysis succeeded:n%s" % resp_json)
quit()
if status == "failed":
print("Analysis failed:n%s" % resp_json)
quit()
# Analysis still running. Wait and retry.
time.sleep(wait_sec)
n_try += 1
except Exception as e:
msg = "GET analyze results failed:n%s" % str(e)
print(msg)
quit()
This code uses the operation id and makes another API call.
- The JSON that is returned can be examined to get the required information – ‘readResults’ field will contain all lines of text that was decipherable, and the ‘documentResults’ field contains ‘key/value’ information for the most relevant parts of the receipt (e.g. the merchant, total, line items etc.)
The receipt image below,

resulted in the JSON from which we have extracted the following details:
 MerchantName: THE MAD HUNTER
 TransactionDate: 2020-08-23
 TransactionTime: 22:07:00
 Total: £107.10
- We will now create a JSON from all the data extracted from the analysed receipt. The structure of the JSON is shown below:
{
"id":"INV001",
"user":"Sujith Kumar",
"createdDateTime":"2020-10-23T17:16:32Z",
"MerchantName":"THE MAD HUNTER",
"TransactionDate":"2020-10-23",
"TransactionTime":"22:07:00",
"currency":"GBP",
"Category":"Entertainment",
"Total":"107.10",
"Items":[ ]
}
We can now save this JSON and build a search service to extract the information we want from it.
Before continuing onto step 8, you must have an Azure Storage Account with Blob storage.
- We will now save the JSON files in an Azure Blob Storage container and use it as a source for the Azure Cognitive Search Service Index that we will create.
- Sign-in to the Azure Portal and search for “Azure Cognitive Search” or navigate to the resource through Web > Azure Cognitive Search. Follow the steps to:
- Choose a subscription
- Set a resource group
- Name the service appropriately
- Choose a location
- Choose a pricing tier for this service
- Create your service
- Get a key and URL endpoint
We will use the free Azure service, which means you can create three indexes, three data sources and three indexers. The dashboard will show you how many of each you have left. For this exercise you will create one of each.
- In the portal, find the search service you created above and click Import data on the command bar to start the wizard. In the wizard, click on Connect to your data and specify the name, type, and connection information. Skip the ‘Enrich Content’ page and go to Customize Target Index.
- For this exercise, we will use the wizard to generate a basic index for our receipt data. Minimally, an index requires a name and a fields collection; one of the fields should be marked as the document key to uniquely identify each document.
Fields have data types and attributes. The check boxes across the top are index attributes controlling how the field is used.
- Retrievable means that it shows up in search results list. You can mark individual fields as off limits for search results by clearing this checkbox.
- Key is the unique document identifier. It’s always a string, and it is required.
- Filterable, Sortable, and Facetable determine whether fields are used in a filter, sort, or faceted navigation structure.
- Searchable means that a field is included in full text search. Only Strings are searchable.
Make sure you choose the following fields:
- id
- user
- createdDateTime
- MerchantName
- TransactionDate
- TransactionTime
- Currency
- Category
- Total
- Still in the Import data wizard, click Indexer > Name, and type a name for the indexer.
This object defines an executable process. For now, use the default option (Once) to run the indexer once, immediately.
- Click Submit to create and simultaneously run the indexer.
Soon you should see the newly created indexer in the list, with status indicating “in progress” or success, along with the number of documents indexed.
The main service page provides links to the resources created in your Azure Cognitive Search service. To view the index you just created, click Indexes from the list of links.

- Click on the index (azureblob-indexer in this case) from the list of links and view the index-schema.
Now you should have a search index that you can use to query the receipt data that’s been extracted from the uploaded receipts.
- Click the search explorer

- From the index drop down choose the relevant index. Choose the default API Version (2020-06-30) for this exercise.

- In the search bar paste a query string (for eg. category=’Entertainment’)
You will get results as verbose JSON documents as shown below:

Now that you have built a query indexer and aimed it at your data you can now use it to build queries programmatically and extract information to answer some of the following questions:
- How much did I spend last Thursday?
- How much have I spent on entertainment over the last quarter?
- Did I spend anything at ‘The Crown and Pepper’ last month?
Additional Ideas
In addition to the services and functionalities used throughout this exercise, there are numerous other ways you can use Azure AI to build in support for all kinds of receipts or invoices. For example, the logo extractor can be used to identify logos of popular restaurants or hotel chains, and the business card model can ingest business contact information just as easily as we saw with receipts.
We encourage you to explore some of the following ideas to enrich your application:
- Search invoices for specific line items
- Train the models to recognize different expense categories such as entertainment, supplies, etc.
- Add Language Understanding (LUIS) to ask your app questions in natural language and extract formatted reports
- Add Azure QnA Maker to your app and get insights such as how much you spent on entertainment last month, or other categories of insights you’d like to explore
by Contributed | Jan 25, 2021 | Technology
This article is contributed. See the original author and article here.
In case you hadn’t noticed, it’s a polyglot world. The number of scenarios where your application needs to communicate with services using a runtime you know nothing about is greater than ever. Fortunately, things like RESTful endpoints and JSON make life a lot easier. But what if your application needs to share settings with other applications? Or what if a backing service’s address changes between datacenters? How will your application know to switch?
The answer – as you may have guessed – doesn’t come right off the shelf. In this post we will look at some best practice solutions using an external configuration provider and a service registry. Both will complicate local development and testing, as well as add some debt to the person (or team) that maintains it in production. Both solutions have a ton of configurable possibilities, which, of course, makes things even more complicated.
Let’s focus on (arguably) the two most popular products to solve these challenges. As an external configuration provider, Spring Cloud Config is a top performer. The most popular way to configure the value store is with a Git based repository. Just check-in a YAML file of name-value pairs and tell Config Server how to connect with it. Config server will monitor the repo for future changes and interpret things like different profiles for different environments.
Using Eureka from the Spring Cloud Netflix project is a safe bet to implement service discovery. It’s a time tested solution that came from an organization that knows a little something about microservices. Starting a registry instance doesn’t have a whole lot of overhead. The work is more focused on each application that wants to register itself or discover register services. The app needs to implement a Eureka client for proper interaction, and it has lots of possibilities.
Config Server and Eureka Discovery themselves are worthy of their own discussion, which I’ll leave to folks smarter than me to cover. The fun really starts when you combine them both. Say, for example, you have an ASP.NET Core microservice that follows the config first pattern. That means in appsettings.json you add two simple values – the address of the config server and turn on FailFast. That’s it. The application won’t start if it can’t contact the server. Upon successfully connecting the application’s default logging levels, address to discovery server, management endpoint policies, connection strings, and everything else you can imagine will be loaded in.
The application also relies on the service discovery pattern to find the address of other services. For instance, instead of setting the HTTP client’s base URL to an IP address or FQDN, the application instead uses the name of the service like ‘https://another-service/api/something/2’ as the base. A request is first sent to the discovery service to find addresses where instances of the service can be reached. Then Steeltoe uses an ILoadBalancer to decide the best address to use. The decision could be based on a load balancing algorithm, the health of instances, or other strategies. Steeltoe then forwards the request to the actual service, and the response comes directly back to the calling application. To you (the Developer) all of this is wrapped up in a single HTTPClient call.
This combination of discovery and external config is quite powerful in situations where settings and service addresses stay fluid – i.e. the cloud. But I have yet to meet a developer that is willing to manage all this for the entire organization.
Meet the Pet Clinic application
In the Spring Java world, there is an application known as Pet Clinic that has been around since the dawn of…well… Spring. Its purpose is to highlight the many features of Spring and has become so popular that it has its own GitHub org. Of the many Pet Clinic derivations, the spring-petclinic-microservices version offers a relatively real-world cloud platform scenario. This version breaks the application into different microservices and uses Spring API Gateway to host the web UI as well as host a few public endpoints.
Note that API Gateway doesn’t have any backing database. Its endpoints dynamically create responses by calling other backing services and aggregating the results together. It insulates those backing services from ever having to be publicly available.
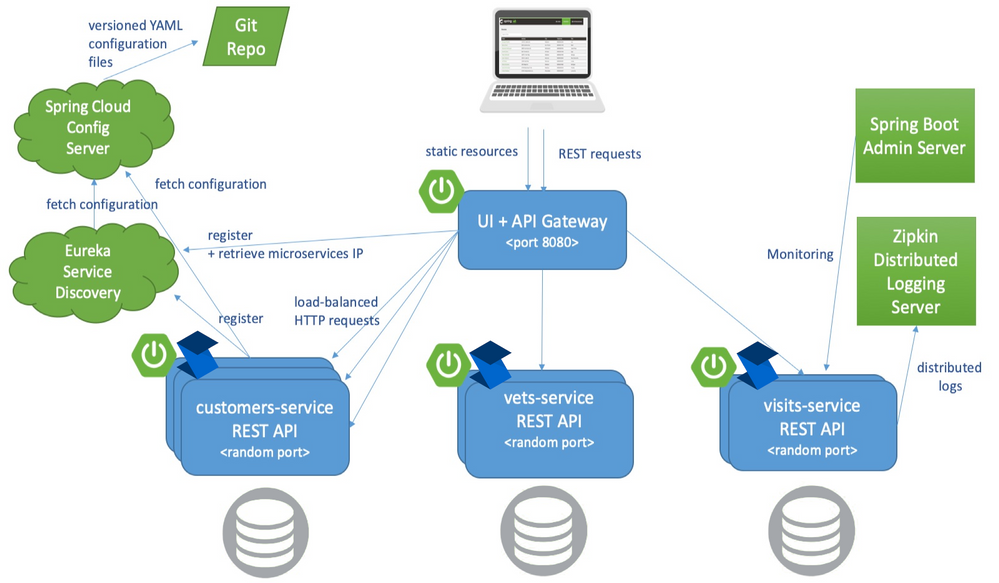
Referring to the below architecture drawing you’ll see the relationship Eureka and Config server play. Almost everything relies on retrieving config dynamically and either discovering service addresses or registering itself as discoverable.
Also of note is the Spring Boot Admin Server. This service packs a powerful debugging punch and can serve as a priceless resource to developers wanting to see exactly how each application’s container is configured and turn logging levels up and down instantly. Admin Server can provide so much insight into all the services because the ‘actuator’ feature is enabled in each. You can learn more about Spring Boot Actuators for Spring Java apps and Steeltoe Management Endpoints for .NET apps in their respective docs.
The last feature of the Pet Clinic Microservices architecture is for performance & debugging with distributed tracing. In this case, Zipkin is the chosen server. Each application is given direction to export traces to the Zipkin server in a compliant format. The power here is around simplicity. In Spring you use Sleuth and in Steeltoe you use the Zipkin exporter. Both are dead simple to implement and know exactly how to monitor requests and build spans into traces. In fact, both can also monitor an application’s logging and correlate logs with request traces! This is a very powerful feature for developing and debugging.
Deploy Pet Clinic on Azure Spring Cloud
As you review the previous architecture, the elephant in the room is how many working parts the Pet Clinic Microservice application has. Each service brings value and takes the application to a higher cloud-native status, but adds to the management burden.
Azure Spring Cloud aims to minimize the management burden. When you create an instance of Azure Spring Cloud you get a fully managed Eureka, Config, and Zipkin compatible tracing service. They have taken care of the hard stuff. Each application running in Azure Spring Cloud is given the address to these services in a secure manner. This means Spring and Steeltoe applications are going to feel right at home the second they start running.

The customers, vets, and visits services don’t need to be public, only the API Gateway. The Admin Server also doesn’t need a public address. Instead it can use the automatically generated “Test Endpoint” that is behind Azure auth.
The applications still export traces to a Zipkin compatible service. The service provides a very useful map to drill into details via Application Map in Azure Application Insights.
As you can see Azure Spring Cloud helps developers be more cloud-native by managing the infrastructure and providing native bindings to Spring and Steeltoe thus minimizing the maintenance burden.
Get Started
For .NET developers, the Steeltoe team has refactored each Spring microservice to ASP.NET Core 3.1 and added in all the Steeltoe fixin’s so everything just works. Review the source code here and get started. The main branch of the application is meant for local development. Note, to run the entire application, you’ll need maven to compile the Spring pieces and (within the Docker Compose) you’ll see the Dockerfile used for compiling the .NET services. On my Windows desktop I used a combination of Docker Desktop with WSL and VS Code with WSL to get everything running.
If you would rather run everything as Spring Boot (no .NET services), refer to the spring-petclinic-microservices repo. There you will find exact instructions to run the application locally.
Once you are ready to get started with Azure Spring Cloud, you have quite a few options. If you prefer to get a little more familiar with Azure Spring Cloud without diving in with Pet Clinic, you’ll find how to’s, tutorials, overview, and getting started guides for both Java and .NET in the documentation. There are step by step instructions to help get familiar with the overall service and deploy different flavors of microservices.
When you’re ready to see Azure Spring Cloud in full swing, head over to the azure-spring-cloud branch of the Steeltoe application. There you will find a “deploy-to-Azure Spring Cloud” script in both powershell and bash. Either will get everything going in Azure Spring Cloud and help you see the full potential of the Azure Spring Cloud managed service.
You can also find a Spring only version of Pet Clinic for Azure Spring Cloud in the Azure samples.
by Contributed | Jan 25, 2021 | Technology
This article is contributed. See the original author and article here.
In the past part 1 and part 2, I discussed how we can monitor the security and health of our subscription manually. Also, we used Microsoft tools to find security issues with the subscription and discussed how we could resolve them.
Today I would like to discuss another Azure service called Azure Sentinel, to monitor security incidents in our subscription and respond to them.
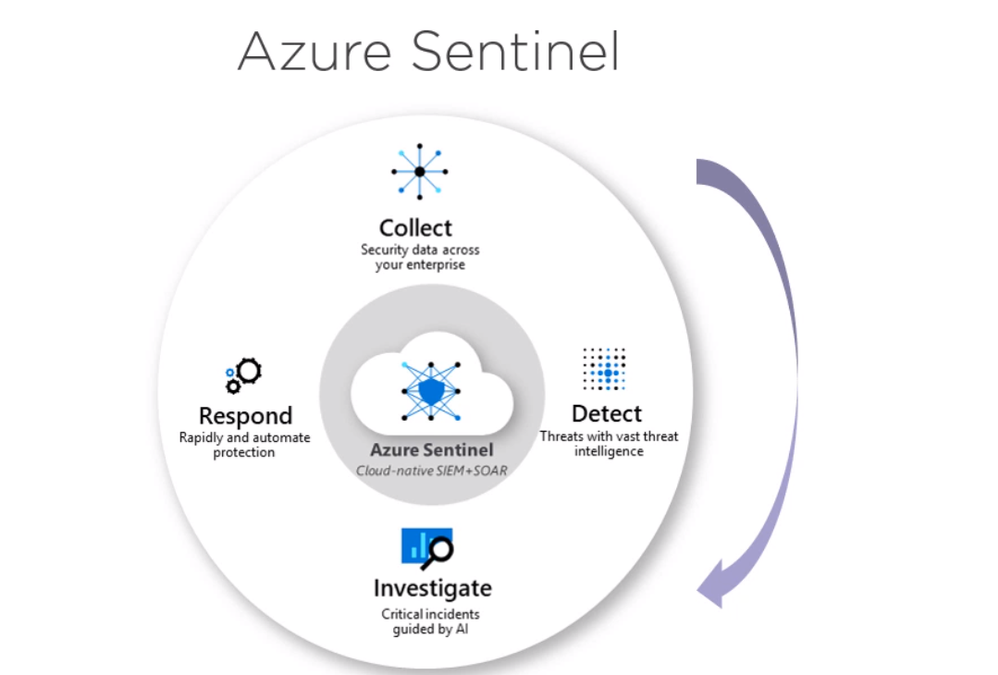
What is Azure Sentinel?
Microsoft Azure Sentinel is a scalable, cloud-native, security information event management (SIEM) and security orchestration automated response (SOAR) solution. Azure Sentinel delivers intelligent security analytics and threat intelligence across the enterprise, providing a single solution for alert detection, threat visibility, proactive hunting, and threat response.
Azure Sentinel is our birds-eye view across the enterprise alleviating the stress of increasingly sophisticated attacks, increasing volumes of alerts, and long resolution time frames.
- Collect data at cloud scale across all users, devices, applications, and infrastructure, both on-premises and in multiple clouds.
- Detect previously undetected threats, and minimize false positives using Microsoft’s analytics and unparalleled threat intelligence.
- Investigate threats with artificial intelligence, and hunt for suspicious activities at scale, tapping into years of cybersecurity work at Microsoft.
- Respond to incidents rapidly with built-in orchestration and automation of common tasks.

Using Azure Sentinel, We can collect security data. Then we can use the tools offer by Azure Sentinel to investigate these logs for the events we are interested in.
Also, we can use machine learning backed Azure sentinel tools to detect familiar security incidents. After we found these incidents, we can easily respond to them using responders. This means we can monitor Azure subscription security status or the subscription health and respond to Misconfigurations.
Consider the following example. We have resource group with the following azure services,

What kind of security checks we could enable and monitor
- Storage account: HTTPS is mandatory enabled.
- Key vault: soft-delete is enabled.
- Azure SQL database: Threat detection is enables.
This can be done easily by configuring these services to send their logs to in Azure Sentinel workspace to monitor and report. The following section is a walkthrough demo where we will do the following:
- Provision Sentinel workspace
- Configure resources to send diagnostic logs to Sentinel.
- Configure Sentinel to respond to incidents.
Provision Azure Sentinel Service
We can select all services, search for Sentinel, and click on Azure Sentinel.

Then we can click Create a new workspace


Now, we will give the workspace name and select a region that is suitable for Our resources. Once our workspace is ready then We can click add Azure Sentinel


our Azure sentinel workspace is created. So now we can go ahead and configure a few Azure resources to send logs to this workspace.
Configure resources to send diagnostic logs to Sentinel
We will start with apps services. From the portal page for the app services, we can scroll down under monitoring, click on diagnostic settings, click on add diagnostic settings.

From the Diagnostics setting, we can select a different type of logs to send to Sentinel workspace as following

We can do the same steps with other resources like Azure Key Vault

Now if we check the Azure Sentinel workspace page, we will see something like the following.

Configure Azure Sentinel to respond to Incidents
In this section, we will explain how to configure Azure Sentinel to respond to incidents and security violations. First, we need to connect Azure Sentinel to a data source by clicking on data connectors, it will show us a list of data sources.

We will configure Azure Sentinel to detect and respond to policy violations in our subscription. In this case, we will need to select Azure Activity as our data connector and click “Configure Azure Activity Logs”

Then we select the subscription and click Log Analytics Connection


Now, We are connected and Azure sentinel instance can now ingest Azure activity logs. We can check Activity Logs by running a simple query to make sure we are receiving logs

Next step, we will create a query to return policy violations.

Once we verify the query is working properly, we can start setting the alert. From Sentinel blade click on Analytics and click on “Create” to establish a new rule

Here we will fill the rule fields and Click Next

Under rule logic, we will enter the query that we created previously.

We will scroll down to specify how often we want the query to run.

After filling the schedule, we can click on Incident settings where we need to specify how we want Azure Sentinel to respond to the incident. If we do not have a playbook set up yet we can just click “Review” and create the alert


Next, we will add a new logic app to respond to the alert we just created in the above section.
From the Playbooks section click create a new playbook

We will be redirected to a new page to create a logic app

Once the logic app is created, we can review the “Overview page” and select “Blank Logic App”

The only difference between an ordinary logic, app, and responder is the first action. The first action here should be Azure sentinel. Also if it is not showing, we can simply search for it.

Now, we will choice respond to Azure Sentinel Alert

Next will select the connection to connect to the Azure Sentinel Workspace instance

Once we complete the connections by choosing an existing one or create a new one. We can use the Get entities functions, which enable us to get the relevant entities from inside the Entities list, such as accounts, IP addresses, and hosts. This will enable us to run actions on specific entities.
Now, We can define what happens when we trigger the playbook. We can add an action, logical condition, switch case conditions, or loops. For example, once an alert is triggered it will send an email and post a message in Team. Please review Logic App for more information

The last step now, we need to configure the alert to use the playbook we just created.
We start by clicking analytics and select the alert we click Edit

Click on Automated Response then click on the playbook we just created in the previous section

Then click Review and save. Now if any resource will violate the policy in place we will be notified from Azure Sentinel. Also, we can check Incidents Review to check all the violation and incident As we can see it is extremely easy to use Azure Sentinel to respond to security events threatening the health of our subscription

Summary
In this series, we talked about the importance of security. There are two aspects of security validations, credentials in the code, and Azure subscription security.
We discussed CredScan tool and how we can use it automatically The credits can Tool has two flavors. Clients and server-side, the clients is a visual studio extension, which we can install on the developers’ machine. So, each time the developer builds the solution, they’ll get a list of warnings of the credentials in the coat. The Server side can be integrated into the continuous integration pipeline. So each time a bill kicks off, CredScan is going to look for credentials in the code.
In the second blog, we talked about AzSK. This tool can be used to run security health checks for Azure subscriptions.
In the final blog, we talked about Azure Sentinel and talked about how we can provision it and how we can configure azure resources to send diagnosis logs to Azure Sentinel. We also talked about how to set an incident alert and how to configure a playbook to respond to the alert as an automated response for an incident.
Thank you for reading, I hope the information is useful to you.
by Contributed | Jan 25, 2021 | Technology
This article is contributed. See the original author and article here.
Final Update: Monday, 25 January 2021 21:33 UTC
We’ve confirmed that all systems are back to normal with no customer impact as of 1/25, 20:25 UTC. Our logs show the incident started on 1/21, 20:20 UTC and that during the 4 days and 5 minutes that it took to resolve the issue, customers in the US Gov Virginia Region could have experienced data loss for the below data types:
HeartBeat
Perf
Security CEF
Security Events
Synapse
- Root Cause: The failure was due to a backend configuration issue.
- Incident Timeline: 4 days and 5 minutes – 1/21, 20:20 UTC through 1/25, 20:25 UTC
We understand that customers rely on Azure Log Analytics as a critical service and apologize for any impact this incident caused.
-Eric Singleton
by Contributed | Jan 25, 2021 | Technology
This article is contributed. See the original author and article here.
Microsoft Learn for Educators takes the best of Microsoft Learn online learning paths and supporting instructor-led training materials into the classroom.
Higher education institutions, educators, and faculty members at colleges, universities, community colleges, polytechnics, and secondary schools can access Microsoft ready-to-teach curriculum and teaching materials aligned to industry-recognized Microsoft Certifications.
These certifications augment a student’s existing degree path and validate the skills needed to be successful across a variety of in-demand technical careers.
Demand for technical certifications is growing. For students who are looking to stand out in the job market, and the faculty and higher education institutions looking to support them, technical certifications can be a differentiator. For a student, adding a Microsoft Certification to their profile alongside artifacts from class projects demonstrates not only their learning from coursework, but also a commitment to keeping up with the evolving forefront of technology.
Microsoft Learn for Educators program benefits. Through this program we are offering educators & academic institutions many benefits, including:
- Microsoft curriculum and teaching materials
- Free Microsoft Certification practice exams
- Free Microsoft Certification exams
- Training program managers
- Curriculum integration support
- Microsoft Learn for Educators community
- Data and insights reporting
For more details see this blog post: Microsoft Learn for Educators delivers cutting-edge instruction to students – Microsoft Tech Community
by Contributed | Jan 25, 2021 | Technology
This article is contributed. See the original author and article here.
With the proliferation of cyberattacks continuing to grow every day, it’s essential to stay ahead of the challenges and mitigate risk. It is important for security teams to research trends, so that they can protect their environment from the persistent and ever-growing threats, phishing campaigns and other forms of cyberattacks.
DocuSign allows organizations to manage electronic agreements. As part of the DocuSign Agreement Cloud, DocuSign offers eSignature, a way to sign documents electronically on different devices. As your DocuSign use cases continue to grow, the DocuSign Monitor API can be a powerful tool to bolster the integrity of your systems, reinforce company policies and help assure your customers that their sensitive data is in good hands.
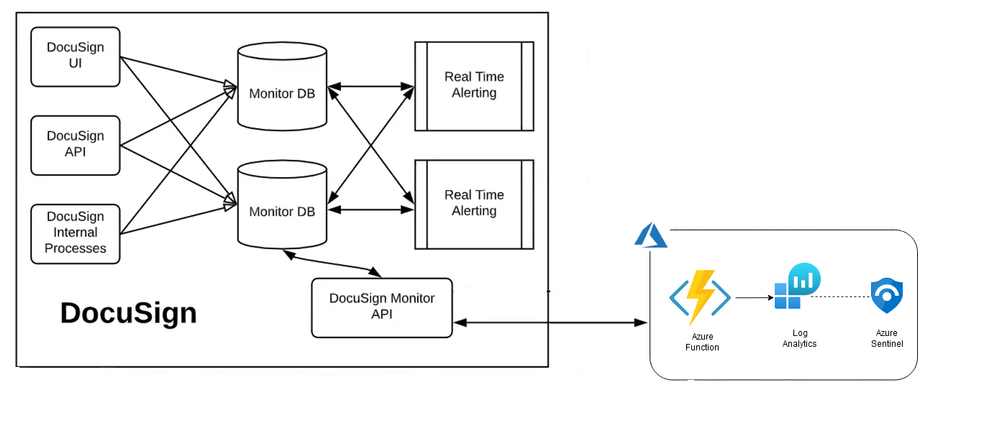
In this blog, we will cover the process to integrate Azure Sentinel with critical DocuSign security events to stay on top of signs of intrusion or suspicious activity. The steps below will demonstrate the process to collect for Azure Sentinel which uses an Azure Function to pull DocuSign security events using the DocuSign Monitor API and ingests them into an Azure Log Analytics workspace.
Collecting events from the DocuSign Monitor API
This section explains how to get the activity tracking information for your organization by calling the DocuSign Monitor API endpoint.
You can get the activity tracking information for your organization by calling the DocuSign Monitor API endpoint:
https://<<ORG>>.docusign.net/api/v2.0/datasets/monitor/stream?cursor=={{cursorValue}}&limit={{queryLimit}}
Ex:
https://lens.docusign.net/api/v2.0/datasets/monitor/stream?cursor==&limit=1000
Name
|
Description
|
cursor
|
A string query parameter that specifies the place in your monitoring data from which the request will begin gathering records. Your app can use cursor to keep its place while sifting through monitoring records in a way like how you might use a bookmark to keep your place while reading chapters of a book.
Whenever you successfully call the monitor API endpoint, the response will include an endCursor value which you can use to create the cursor for your next request, enabling you to chunk your downloads as you examine large numbers of event and alert records.
Calls that do not specify a cursor will begin retrieving records from the first event recorded.
Not required. Defaults to 0.
|
limit
|
An Int32 query parameter that specifies the maximum number of records (up to 2000) to be returned in the response.
Not required. Defaults to 1000.
|
When you call the above endpoint, you can supply two parameters, cursorValue and queryLimit, that determine the subset of the monitoring data that will be returned in response JSON.
After a successful call, a set of JSON event and alert records is returned, including an endCursor metadata property.
API response example:
{
    "endCursor": "aa_637383858077494473_637383857323373872_1",
    "data": [
        {
            "timestamp": "2020-10-15T19:08:52.3373872Z",
            "eventId": "8a977c98-xxxx-xxxx-xxxx-44b8149a905d",
            "site": "DEMO",
            "accountId": "692934c6-xxxx-xxxx-xxxx-5b0741b5dd7f",
            "organizationId": "",
            "userId": "524faa2d-xxxx-xxxx-xxxx-072d88c7effc",
            "integratorKey": "QTES-f79957b2-xxxx-xxxx-xxxx-80e57adfbb8e",
            "userAgent": "Faraday v0.15.3",
            "userAgentClientInfo": {
                "browser": {
                    "family": "Other",
                    "version": {}
                },
                "device": {
                    "family": "Other",
                    "brand": "",
                    "model": ""
                },
                "os": {
                    "family": "Other",
                    "version": {}
                }
            },
            "ipAddress": "162.xxx.xx.1",
            "ipAddressLocation": {
                "latitude": xx.74,
                "longitude": -xx.99,
                "country": "US",
                "state": "Colorado",
                "city": "Denver"
            },
            "object": "Account",
            "action": "Updated",
            "property": "SecurityPolicy",
            "field": "RecipientAuthenticationSettings",
            "result": "Optional",
            "data": {}
        }
    ]
}
Name
|
Description
|
endCursor
|
A string value that specifies the place in your monitoring data from which your next request can begin to continue getting records data from the place this request ended.
Use the value of endCursor to begin your next query from this spot in your records.
|
Deploying the DocuSign connector
This section explains how to use the ARM template to deploy the data connector to ingest DocuSign security events into Azure Log Analytics Workspace
To access the ARM template, navigate to https://github.com/Azure/Azure-Sentinel/tree/master/DataConnectors/DocuSign-SecurityEvents
- Click the Deploy to Azure Button
- Enter values for the following parameters
- “DocuSignOAuthAccessToken”: This is the DocuSign OAuth Token
- “Workspace Id”: Azure Log Analytics Workspace Id
- “Workspace Key”: Azure Log Analytics Workspace Key
- “CustomLogTableName”: Azure Log Analytics Custom Log Table Name
- “Function Schedule”: The `TimerTrigger` makes it incredibly easy to have your functions executed on a schedule. The default **Time Interval** is set to pull the last ten (10) minutes of data.
Note: DocuSignOAuthAccessToken and Workspace Key values will be placed as “Secrets” in the docusignkv<<uniqueid>> Azure KeyVault

For complete instructions, please refer to README.md
Security events that can be collected from DocuSign Monitor API
Once it has been deployed, the data connector will be able to collect the following events from your DocuSign organization:
Ex:
- Account administrator added.
- Account password rules updated.
- Account user deleted.

The complete list of all events that can be collected from DocuSign can be found here
Example analytics rules using DocuSign event data
Once DocuSign security events are ingested into your Azure Sentinel Workspace, you can create a custom analytics rule with a scheduled query to help you discover threats and anomalous behaviors that may be present in your organization.
Below are some examples of analytics rules you could run against your ingested DocuSign data:
Rule #1:
Description: User fails six or more login attempts in an hour
DocuSignSecurityEvents_CL
| where TimeGenerated > ago(1h)
| where object_s == 'User'
| where action_s == 'Login'
| where field_s == 'Status'
| where result_s == 'Failed'
| summarize Attempts = count() by userId_s, accountId_g
| where Attempts >= 6
Rule #2:
Description: Admin initiates a bulk account export
DocuSignSecurityEvents_CL
| where TimeGenerated > ago(1h)
| where object_s == 'Organization'
| where action_s == 'Initiated'
| where property_s == 'BulkAccountsExport'
Rule #3:
Description: When a bulk user settings export is initiated
DocuSignSecurityEvents_CL
| where TimeGenerated > ago(1h)
| where object_s == 'Organization'
| where action_s == 'Initiated'
| where property_s == 'BulkUsersExport'
Summary
This post outline the key components that are necessary to ingest DocuSign security events to Azure Log Analytics using DocuSign Monitor API. The DocuSign security events data connector helps to protect your organization’s electronic agreements with round-the-clock activity tracking and provides near real-time visibility across your DocuSign organization operations which helps security teams to detect potential threats, investigate incidents and respond decisively. Try it out, and let us know what you think!
We will be continuing to develop and add custom analytics rules and hunting queries for DocuSign security event data over time so make sure you keep an eye on Azure Sentinel GitHub repo. As always if you have your own ideas for queries or detections please feel free to contribute to the Azure Sentinel community.
With thanks to @Sarah_Young, @Cristhofer Munoz and @Chi_Nguyen for their input into this blog post.

by Contributed | Jan 25, 2021 | Technology
This article is contributed. See the original author and article here.
Join us Monday, 12 noon EST, for MidDay Café where Microsoft’s Gregory Lisiak will be covering the Microsoft COVID Vaccine Health Bot to assist organizations in implementing, and leveraging, the bot. Additionally, Microsoft’s Samantha Brown, Mark Litwin, Pete Anello, and Patrick Miller, will be joining me to bring you the latest in Microsoft News, Events, and more.
Mid-Day Café is a new, weekly, fast paced, live web series by the HLS Group. Join us each Monday at 12 noon eastern.
February 1st Lineup:
- Welcome and Introductions.
- Mid-Day Café News in 2!
- Upcoming HLS Events in 1!
- COVID Vaccine Health Bot featuring Gregory Lisiak.
- Open Q&A
- Wrap Up
How to join:
Thanks for visiting – Michael Gannotti LinkedIn | Twitter
 Michael Gannotti

by Contributed | Jan 25, 2021 | Technology
This article is contributed. See the original author and article here.
Today, we are pleased to share an update on the roll out status of the Windows 10 Team 2020 Update. Our last update that was shared in December can be found here.
With the start of a new year, we continue to hear from our customers that they are navigating hybrid work environments. While some companies around the world have begun their returns to the office, many are still working from home and other remote locations. From higher education to manufacturing, customers are relying on Surface Hub more than ever to stay connected and maintain business continuity. We feel a deep sense of responsibility to support our customers in this time, by providing a quality experience and ongoing transparency.
In this time of increased reliance on Surface Hub we have been laser focused on providing a high-quality rollout of the Windows 10 Team 2020 Update. We are continuously working with customers and partners and actively monitoring the deployment of the Windows 10 Team 2020 update globally.
As we look at the data, combined with the continuous efforts of our engineering teams to resolve known issues, we plan to continue the deployment of Windows 10 Team 2020 as detailed below:
Surface Hub 2S
- Windows Update will be available for the remaining throttled regions in late February 2021.
- Windows Update for Business is currently available globally and will remain available.
- Bare Metal Recovery (BMR) image is currently available for download and will remain available.
Surface Hub (first-generation)
- Windows Update will become available based on throttle regions for both 55” and 84” devices in late February 2021.
- Windows Update for Business will be available globally for both 55” and 84” devices beginning late February 2021.
- Surface Hub Recovery Tool (SHRT) with the Windows 10 Team 2020 image is currently available for download and will remain available.
Quality updates and fixes for known issues are expected to land for all devices during the same timeframe. Windows 10 Team, version 1703 (RS2) will remain supported through March 16, 2021. Please make sure to read the known issues list before updating your devices to Windows 10 Team 2020.

by Contributed | Jan 25, 2021 | Technology
This article is contributed. See the original author and article here.
With an uncompromised goal to provide our customers with the ideal, fast, and smooth user experience, we’re excited to announce the latest significant performance improvements in Excel for the web.
We have addressed and improved several scenarios, including opening workbooks, navigating within a workbook, and other interactions. Check out all the improvements we’ve made below:
Loading – We’ve significantly reduced the time it takes to load a workbook, making it faster for you to start working in Excel for the web.
Scrolling – Scrolling is a fundamental part of working in Excel. Now, even in incredibly complex sheets, scrolling is smooth and fast.
 Scrolling in Excel for the Web
Selection – Even more fundamental than scrolling, is the need to interact with content in your workbook. We have optimized the speed of cell selection, so you’ll experience less lag and a more fluid experience when working in the grid.
 Selection in Excel for the Web
Navigating – We optimized several navigation actions: find/search, Go-To, page-up and page-down are all now faster.
Modifying – We developed faster cell editing and formatting experiences.
Our team is always working on performance improvements and we’re dedicated to improve the user experience for Excel for the web. Your input is vital to help us ensure that we continue to address the areas of improvement that customers like you have communicated through Send us a Smile or Frown. Want to be more involved in the process? Stay connected with us and other Excel enthusiasts in the Excel Tech Community, read and comment on our Excel blog posts, and send us your ideas and suggestions for the next version of Excel through UserVoice. Don’t forget to follow Excel on Facebook and Twitter!
Want to learn more on Excel for the web? Stay informed on recent changes by regularly visiting What’s New in Excel for the web.
Thanks for reading, and for your interest in Excel!
Danielle Rifinski Fainman
Dror Yashar
-Microsoft Excel Team

Recent Comments