by Contributed | Jan 26, 2021 | Technology
This article is contributed. See the original author and article here.
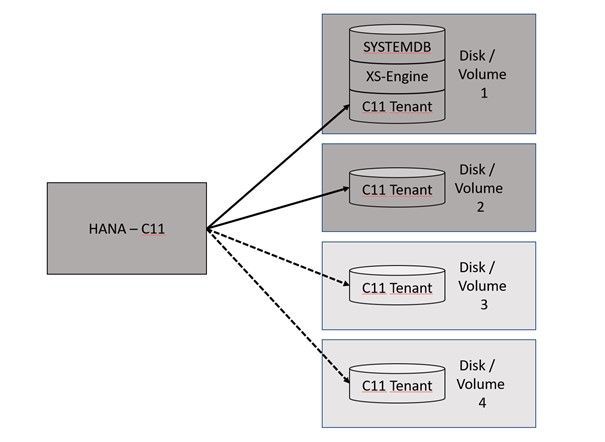
HANA Data Path Striping (partitioning)
Since SAP HANA 2.0 SPS03 (Rev 35) and above versions, data volumes on the Indexserver can be partitioned so that read and write operations can run in parallel with increased data throughput. Also, the HANA startup time will benefit from this feature because the data throughput will increase massively, depending in the number and performance of the additional disks or volumes.
HANA data partitioning is only available for data volumes not for log volumes.
This, of course, can be configured on our HLI’s and on VM’s with Premium Managed Disks or Azure NetApp Files (ANF).
There is no additional certification required.
Interesting Links:
SAP HANA – Partitioning Data Volumes | SAP Blogs
2400005 – FAQ: SAP HANA Persistence – SAP ONE Support Launchpad
2700123 – Indexserver Crash at PageAccess::PageFlushCallback::pageChunkWritten With “Unexpected offset” – SAP ONE Support Launchpad
Partitioning Data Volumes – SAP Help Portal
It can be one option to create a HANA partitioning with 2 or 4 volumes…
This documentation is covering the configuration of 2 data volumes.
HANA Disk Partitioning
Create a second data path directory.
mkdir -p /hana/data2/ML4/mnt00001
Create the /etc/fstab entry.
vi /etc/fstab

10.20.255.31:/hana_data2_a91_t250_vol            /hana/data2/ML4/mnt00001 nfs      rw,hard,nosuid,timeo=600,vers=4.1,rsize=1048576,wsize=1048576,intr,noatime,lock 0 0
Set the user permissions.
chown -R ml4adm:sapsys /hana/data2
Enable HANA to work with multi data partitioning.
su – ml4adm
cdcoc
vi global.ini
[customizable_functionalities]
persistence_datavolume_partition_multipath = true
restart HANA
sapcontrol -nr 02 -function StopSystem
sapcontrol -nr 02 -function StartSystem
See the actual size of the datavolume 1:
ls -l /hana/data/ML4/mnt00001/hdb00003.00003/
ml4adm sapsys 127708168192 Jan 18 08:01 datavolume_0000.dat
Execute the following SQL statement against the tenant database:
hdbsql -u system -p <PASSWD> -n localhost:30215
ALTER SYSTEM ALTER DATAVOLUME ADD PARTITION PATH '/hana/data2/ML4';
HANA will do the striping over time.
ls -l /hana/data2/ML4/mnt00001/hdb00003.00003/
ml4adm sapsys 0 Jan 18 08:04 datavolume_0001.dat
After some time the situation will change….
ls -l /hana/data2/ML4/mnt00001/hdb00003.00003/
ml4adm sapsys 23219666944 Jan 18  2021 datavolume_0001.dat


ls -l /hana/data/ML4/mnt00001/hdb00003.00003/
ml4adm sapsys 127708168192 Jan 18 08:43 datavolume_0000.dat
Benefits of Data Partitioning
With HANA data partitioning the HANA Savepoint will benefit massively from the striping over many disks/volumes. This Graph shown the savepoint behavior with a single data volume:
HCMT with multiple volumes
To measure the additional data files with HCMT use the appropriate json config file.
This config file is called multivolume.json…
Here is a place where we can add the additional datafiles…
  "Variables": [
      {
         "Comment": "The <Value> should be adapted to the HANA log multi volume paths",
         "Name": "LogVolumes",
         "Value": "/hana/log/ML4/mnt00001",
         "Request": "true"
      },
      {
         "Comment": "The <Value> should be adapted to the HANA data multi volume paths",
         "Name": "DataVolumes",
         "Value": "/hana/data/ML4/mnt00001,/hana/data2/ML4/mnt00001",
         "Request": "true",
         "Profile": "LNX"
      },
This is just a result on my system. Performance surly is dependent on many different parameter and configuration options.
As a result, we can compare the data write results.
Block size Data Write values with one data-file Data write values with two data-files
Initialwrite Overwrite Initialwrite Overwrite

Backup
For snapshot-based backups, please play close attention that you snapshot all data volumes belonging to the same database.
by Contributed | Jan 26, 2021 | Technology
This article is contributed. See the original author and article here.
So are you new to Git, GitHub, REST, Poweshell and Bash?
The following Modules are perfect introductions for you to get started on your developer journey.
Introduction to Git
Learn Series Length/Time to complete: 1 hr 15 min
Find out what source control is, and get an introduction to Git – the world’s most popular version control system.
Learning objectives
In this module, you will:
- Learn what version control is
- Understand distributed version control systems, like Git
- Create a new Git project and configure it
- Make and track changes to code using Git
- Use Git to recover from simple mistakes
Collaborate with Git
Learn Series Length/Time to complete: 55 mins
Use Git to track changes to source code and collaborate with other developers
Learning objectives
In this module, you will:
- Clone a repository
- Learn about and make a pull request
- Stash changes
- Push your changes and update your repo by pulling
Level up your Git knowledge by learning about how to keep code separate using branches and how to merge them later
Learning objectives
In this module, you will:
- Understand what Git branches are
- Create new branches and switch between branches
- Merge branches together
- Learn basic techniques for resolving merge conflicts
Do you want to communicate more effectively with other GitHub users? Are you looking for a free way to promote your GitHub project?
Learn how to use Markdown to effectively communicate with others in your GitHub issues, pull requests, comments, and documentation. Then learn how to build project sites and blog posts to promote your projects with GitHub Pages.
In this learning path, you’ll learn how:
- Markdown enables you to organize your thoughts through code, images, lists, and tables.
- GitHub-Flavored Markdown (GFM) enables syntax highlighting for popular programming languages and enables you to link to issues, pull requests, and commits.
- GitHub Pages helps you create project pages and blog posts that include custom themes.
Utilize the tight integration of Visual Studio Code with the Git source-control management system.
Learning objectives
In this module, you will:
- Use the Command Palette in Visual Studio Code to perform many Git tasks, such as cloning repositories and creating branches.
- Take visual cues from Visual Studio Code to understand the status of your work.
- Harness the Source Control view in Visual Studio Code to stage and unstage changes and create commits.
- Uncover numerous time-saving shortcuts that are tucked into the Visual Studio Code user interface.
Take full control of your GitHub projects. Through work planning and tracking, effective branching strategies, and extending GitHub through its API, manage releases all the way from idea to working software in the hands of your users.
In this learning path, you’ll learn how to:
- Use GitHub project boards to plan and track work.
- Package, version, and deliver software releases to consumers.
- Choose a branching strategy that enables team members to work in parallel.
- Resolve conflicts in code changes from multiple contributors.
- Use the GitHub API and GitHub Apps to build tools that improve your processes.
- Explore the history of your GitHub repository through issues, pull requests, and search.
Introduction to Bash
Learn Series Length/Time to complete: 57 mins
Use Bash to manage IT infrastructure.
Learning objectives
In this module, you will:
- Learn what shells are and what Bash is.
- Learn about the syntax of Bash commands.
- Learn about important Bash commands, such as ls, cat, and ps.
- Learn how to use I/O operators to redirect input and output.
- Learn how to update a server’s operating system.
- Learn how to find and terminate rogue processes.
- Learn how to use Bash to filter Azure CLI output.
Learn about the basics of PowerShell. This cross-platform command-line shell and scripting language is built for task automation and configuration management. You’ll learn basics like what PowerShell is, what it’s used for, and how to use it.
Learning objectives
After completing this module, you’ll be able to:
- Understand what PowerShell is and what you can use it for.
- Explore cmdlets.
- Construct a sequence of cmdlets in a pipeline.
- Apply sound filtering and formatting principles to your commands.
Learn about how to build a basic API, how to query APIs, and authentication strategies in Python and JavaScript while discovering unique art by using museum APIs.
Learning objectives
In this module, you will:
- Learn about RESTful APIs.
- Build your own simple API.
- Learn various strategies to connect to external APIs.
- Learn how to query two different museum APIs.
Learn how to enable the Windows Subsystem for Linux (WSL), install your favorite Linux distribution, set up an integrated dev environment with Visual Studio Code, and more.
The time it takes to complete this course could vary because you will need to install multiple tools.
Learning objectives
In this module, you will:
- Enable the Windows Subsystem for Linux on your Windows device.
- Install a Linux distribution.
- Use Linux commands and work across Windows and Linux file systems.
- Create a website with Node.js, running on WSL.
- Set up your dev environment with Visual Studio Code.
- Debug a Node.js Express app.
- Manage multiple Linux distributions.

by Contributed | Jan 26, 2021 | Technology
This article is contributed. See the original author and article here.
Learn to develop real-world Internet of Things solutions built with Microsoft Azure services from experts from around the world!
On January 19, the IoT Advocacy team partnered with 9 amazing IoT focused MVPs from around the world plus our very own Olivier Bloch and CVP of Azure IoT Sam George to deliver a live event across Asia Pacific, Europe Middle East, and the Americas in three unique time zones. This event served as a flagship demonstration of the Internet of Things – Event Learning Path, an open-source collection of IoT focused sessions designed for IoT Solution Architects, Business Decision Makers, and Development teams.
Each session begins with a 15 minute Introductory presentation and is supported by a 45 minute video recording which deep dives into the topics introduced. We encourage partners, field teams, and general IoT enthusiasts to reuse any portions of the content as they see fit for example: user group presentations, third party conferences, or internal training systems!
That is exactly what we did for the All Around Azure – A Developer’s Guide to IoT Event, with the help of a worldwide team of experts from the Azure IoT Community, we adapted the 15 minute introductory sessions for delivery to a global audience. The sessions drew 1,800+ live viewers over three local-specific timeslots.
There really is no better time than now to leverage our IoT skilling content as you can now officialize as an official Azure Certified IoT Developer with the availability of the AZ-220 IoT Developer Exam. And even better, we are currently running a “30 Days to Learn It – IoT Challenge” which challenges you to complete a collection of IoT focused modules on Microsoft Learn, and rewards you with a 50% off voucher to sit for the AZ-220 IoT Developer Exam!
You can catch up on all the excitement and learning from the All Around Azure IoT Event on Channel 9 or right here on the #IoTTechCommunity!
Keynote with Sam George and Olivier Bloch with SketchNote by @nityan
Live Sessions and Associated Deep Dives
With 80% of the world’s data collected in the last 2 years, it is estimated that there are currently 32 billion connected devices generating said data. Many organizations are looking to capitalize on this for the purposes of automation or estimation and require a starting point to do so. This session will share an IoT real world adoption scenario and how the team went about incorporating IoT Azure services.
Data collection by itself does not provide business values. IoT solutions must ingest, process, make decisions, and take actions to create value. This module focuses on data acquisition, data ingestion, and the data processing aspect of IoT solutions to maximize value from data.
As a device developer, you will learn about message types, approaches to serializing messages, the value of metadata and IoT Plug and Play to streamline data processing on the edge or in the cloud.
As a solution architect, you will learn about approaches to stream processing on the edge or in the cloud with Azure Stream Analytics, selecting the right storage based on the volume and value of data to balance performance and costs, as well as an introduction to IoT reporting with PowerBI.
For many scenarios, the cloud is used as a way to process data and apply business logic with nearly limitless scale. However, processing data in the cloud is not always the optimal way to run computational workloads: either because of connectivity issues, legal concerns, or because you need to respond in near-real time with processing at the Edge.
In this session we dive into how Azure IoT Edge can help in this scenario. We will train a machine learning model in the cloud using the Microsoft AI Platform and deploy this model to an IoT Edge device using Azure IoT Hub.
At the end, you will understand how to develop and deploy AI & Machine Learning workloads at the Edge.
A large part of value provided from IoT deployments comes from data. However, getting this data into the existing data landscape is often overlooked. In this session, we will start by introducing what are the existing Big Data Solutions that can be part of your data landscape. We will then look at how you can easily ingest IoT Data within traditional BI systems like Data warehouses or in Big Data stores like data lakes. When our data is ingested, we see how your data analysts can gain new insights on your existing data by augmenting your PowerBI reports with IoT Data. Looking back at historical data with a new angle is a common scenario. Finally, we’ll see how to run real-time analytics on IoT Data to power real time dashboards or take actions with Azure Stream Analytics and Logic Apps. By the end of the presentation, you’ll have an understanding of all the related data components of the IoT reference architecture.
In this session we will explore strategies for secure IoT device connectivity in real-world edge environments, specifically how use of the Azure IoT Edge Gateway can accommodate offline, intermittent, legacy environments by means of Gateway configuration patterns. We will then look at implementations of Artificial Intelligence at the Edge in a variety of business verticals, by adapting a common IoT reference architecture to accommodate specific business needs. Finally, we will conclude with techniques for implementing artificial intelligence at the edge to support an Intelligent Video Analytics solution, by walking through a project which integrates Azure IoT Edge with an NVIDIA DeepStream SDK module and a custom object detection model built using CustomVision.AI to create an end-to-end solution that allows for visualization of object detection telemetry in Azure services like Time Series Insights and PowerBI.
by Contributed | Jan 26, 2021 | Technology
This article is contributed. See the original author and article here.
In this installment of the weekly discussion revolving around the latest news and topics on Microsoft 365, hosts – Vesa Juvonen (Microsoft) | @vesajuvonen, Waldek Mastykarz (Microsoft) | @waldekm, are joined by MVP, “Stickerpreneur”, conference speaker, and engineering lead Elio Struyf (Valo Intranet) | @eliostruyf.
Their discussion focuses on building products on the Microsoft 365 platform, from a partner perspective. Angles explored – platform control, product ownership, communications, a marriage, importance of roadmap, areas for improvement, communications, and value. Considerations behind product development and distribution strategy including on-Prem, SAAS offering or delivery to customer to host in their own cloud with assistance from partners. Valo is effectively an ISV that delivers solutions like an SI.
This episode was recorded on Monday, January 25, 2020.
Did we miss your article? Please use #PnPWeekly hashtag in the Twitter for letting us know the content which you have created.
As always, if you need help on an issue, want to share a discovery, or just want to say: “Job well done”, please reach out to Vesa, to Waldek or to your Microsoft 365 PnP Community.
Sharing is caring!

by Contributed | Jan 26, 2021 | Technology
This article is contributed. See the original author and article here.
Authors: Lu Han, Emil Almazov, Dr Dean Mohamedally, University College London (Lead Academic Supervisor) and Lee Stott, Microsoft (Mentor)
Both Lu Han and Emil Almazov, are the current UCL student team working on the first version of the MotionInput supporting DirectX project in partnership with UCL and Microsoft UCL Industry Exchange Network (UCL IXN).
Examples of MotionInput
Running on the spot
Cycling on an exercise bike
Introduction
This is a work in progress preview, the intent is this solution will become a Open Source community based project.
During COVID-19 it has been increasingly important for the general population’s wellbeing to keep active at home, especially in regions with lockdowns such as in the UK. Over the years, we have all been adjusting to new ways of working and managing time, with tools like MS Teams. It is especially the case for presenters, like teachers and clinicians who have to give audiences instructions, that they do so with regular breaks.
UCL’s MotionInput supporting DirectX is a modular framework to bring together catalogues of gesture inputs for Windows based interactions. This preview shows several Visual Studio based modules that use a regular webcam (e.g. on a laptop) and open-source computer vision libraries to deliver low-latency input on existing DirectX accelerated games and applications on Windows 10.
The current preview focuses on two MotionInput catalogues – gestures from at-home exercises, and desk-based gestures with in-air pen navigation. For desk-based gestures, in addition to being made operable with as many possible Windows based games, preliminary work has been made towards control in windows apps such as PowerPoint, Teams and Edge browser, focusing on the work from home era that uses are currently in.
The key ideas behind the prototype projects are to “use the tech and tools you have already” and “keep active”, providing touchless interactive interfaces to existing Windows software with a webcam. Of course, Sony’s EyeToy and Microsoft Kinect for Xbox have done this before and there are other dedicated applications that have gesture technologies embedded. However, many of these are no longer available or supported on the market and previously only worked with dedicated software titles that they are intended for. The general population’s fitness, the potential for physiotherapy and rehabilitation, and use of motion gestures for teaching purposes is something we intend to explore with these works. Also, we hope the open-source community will revisit older software titles and make selections of them become more “actionable” with further catalogue entries of gestures to control games and other software. Waving your arms outreached in front of your laptop to fly in Microsoft Flight Simulator is now possible!
The key investigation is in the creation of catalogues of motion-based gestures styles for interfacing with Windows 10, and potentially catalogues for different games and interaction genres for use industries, like teaching, healthcare and manufacturing.
The teams and projects development roadmap includes trialing at Great Ormond Street’s DRIVE unit and several clinical teams who have expressed interest for rehabilitation and healthcare systems interaction.
Key technical advantages
- Computer vision on RGB cameras on Windows 10 based laptops and tablets is now efficient enough to replace previous depth-camera only gestures for the specific user tasks we are examining.
- A library of categories for gestures will enable many uses for existing software to be controllable through gesture catalogue profiles.
- Bringing it as close as possible to the Windows 10 interfaces layer via DirectX and making it as efficient as possible on multi-threaded processes reduces the latency so that gestures are responsive replacements to their corresponding assigned interaction events.
Architecture

All modules are connected by a common windows based GUI configuration panel that exposes the parameters available to each gesture catalogue module. This allows a user to set the gesture types and customise the responses.
The Exercise module in this preview examines repetitious at-home based exercises, such as running on the spot, squatting, cycling on an exercise bike, rowing on a rowing machine etc. It uses the OpenCV library to decide whether the user is moving by calculating the pixel difference between two frames.
The PyTorch exercise recognition model is responsible for checking the status of the user every 8 frames. Only when the module decides the user is moving and the exercise he/she is performing is recognized to be the specified exercise chosen in the GUI, DirectX events (e.g. A keypress of “W” which is moving forward in many PC games) will be triggered via the PyDIrectInput’s functions.
The Desk Gestures module tracks the x and y coordinates of the pen each frame, using the parameters from the GUI. These coordinates are then mapped to the user’s screen resolution and fed into several PyDirectInput’s functions that trigger DirectX events, depending on whether we want to move the mouse, or press keys on the keyboard and click with the mouse.

Fig 1 – HSV colour range values for the blue of the pen
From then the current challenge and limitation is having other objects with the same colour range in the camera frame. When this happens, the program detects the wrong objects and therefore, produces inaccurate tracking results. The only viable solution is to make sure that no objects with similar colour range are present in the camera view. This is usually easy to achieve and if not, a simple green screen (or another screen of a singular colour) can be used to replace the background.
In the exercises module, we use OpenCV to do motion detection. This involves subtracting the current frame from the last frame and taking the absolute value to get the pixel intensity difference. Regions of high pixel intensity difference indicate motion is taking place. We then do a contour detection to find the outlines of the region with motion detected. Fig 2 shows how it looks in the module.
Technical challenges
OpenCV
In the desk gestures module, to track the pen, we had to provide an HSV (Hue, Saturation, Value) colour range to OpenCV so that it only detected the blue part of the pen. We needed to find a way to calculate this range as accurately as possible.
The solution involves running a program where the hue, saturation, and value channels of the image could be adjusted so that only the blue of the pen was visible(see Fig 1). Those values were then stored in a .npy file and loaded into the main program.

Fig 2 – Contour of the motion detected
Multithreading
Videos captured by the webcam can be seen as a collection of images. In the program, OpenCV keeps reading the input from the webcam frame by frame, then each frame is processed to get the data which is used to categorize the user into a status (exercising or not exercising in the exercise module, moving the pen to different directions in the desk gesture module). The status change will then trigger different DirectX events.
Initially, we tried to check the status of the user after every time the data is ready, however, this is not possible because most webcams are able to provide a frame rate of 30 frames per second, which means the data processing part is performed 30 times every second. If we check the status of the user and trigger DirectX events at this rate, it will cause the program to run slow.
The solution to this problem is multithreading, which allows multiple tasks to be executed at the same time. In our program, the main thread handles the work of reading input from webcam and data processing, and the status check is executed every 0.1 seconds in another thread. This reduces the execution time of the program and ensures real-time motion tracking.
Human Activity Recognition
In the exercise module, DirectX events are only triggered if the module decides the user is doing a particular exercise, therefore our program needs to be able to classify the input video frames into an exercise category. This then belongs to a broader field of study called Human Activity Recognition, or HAR for short.
Recognizing human activities from video frames is a challenging task because the input videos are very different in aspects like viewpoint, lighting and background. Machine learning is the most widely used solution to this task because it is an effective technique in extracting and learning knowledge from given activity datasets. Also, transfer learning makes it easy to increase the number of recognized activity types based on the pre-trained model. Because the input video can be viewed as a sequence of images, in our program, we used deep learning, convolutional neural networks and PyTorch to train a Human Activity Recognition model that can output the action category given an input image. Fig 3 shows the change of loss and accuracy during the training process, in the end, the accuracy of the prediction reached over 90% on the validation dataset.
Fig 3 – Loss and accuracy diagram of the training
Besides training the model, we used additional methods to increase the accuracy of exercise classification. For example, rather than changing the user status right after the model gives a prediction of the current frame, the status is decided based on 8 frames, this ensures the overall recognition accuracy won’t be influenced by one or two incorrect model predictions [Fig 4].

Fig 4 – Exercise recognition process
Another method we use to improve the accuracy is to ensure the shot size is similar in each input image. Images are a matrix of pixels, the closer the subject is to the webcam, the greater the number of pixels representing the user, that’s why recognition is sensitive to how much of the subject is displayed within the frame.
To resolve this problem, in the exercise module, we ask the user to select the region of interest in advance, the images are then cropped to fit the selection [Fig 5]. The selection will be stored as a config file and can be reused in the future.

Fig 5 – Region of interest selection
DirectX
The open-source libraries used for computer vision are all in Python so the library ‘PyDirectInput’ was found to be most suitable for passing the data stream. PyDirectInput is highly efficient at translating to DirectX.
Our Future Plan
For the future, we plan to add a way for the user to record gestures to a profile and store it in a catalogue. From there on the configuration panel they will be able to assign mouse clicks, any keyboard button presses and sequences of button presses, for the user to map to their specific gesture. This will be saved as gesture catalogue files and can be reused in different devices.
We are also benchmarking and testing the latency between gestures performed and DirectX events triggered to further evaluate efficiency markers, hardware limits and exposing timing figures for the users configuration panel.
We will be posting more videos on our progress of this work on our YouTube channels (so stay tuned!), and we look forward to submitting our final year dissertation project work at which point we will have our open-source release candidate published for users to try out.
We would like to build a community interest group around this. If would like to know more and join our MotionInput supporting DirectX community effort, please get in touch – d.mohamedally@ucl.ac.uk
Bonus clip for fun – Goat Simulator

by Contributed | Jan 26, 2021 | Technology
This article is contributed. See the original author and article here.
Targets are locked. We’re flooding the torpedo tubes so we’re ready to dive into battle for this Feb 2nd event. I believe it’s time to share some freshly declassified details about things we have planned, so let’s kick this off with the event flow and info about our Keynote Speaker for the event.
On Feb 2nd, 7:30 AM PST ITOps Talks: All Things Hybrid will be LIVE on Microsoft Learn TV to kickstart the festivities. I’ll be there chatting with folks from my team about the logistics of the event, why we’re doing this, how you can get involved in hallway conversations and how to participate throughout the coming days. After we’ve gotten the logistical stuff out of the way – we’ll be introducing our featured keynote speaker.
Who is that you ask? (drum roll please)
It’s none other than Chief Technology Officer for Microsoft Azure – Mark Russinovich! After debating with the team about possible candidates – Mark was an obvious choice to ask. As a Technical Fellow and CTO of Azure paired with his deep technical expertise in the Microsoft ecosystem – Mark brings a unique perspective to the table. He’s put together this exclusive session about Microsoft Hybrid Solutions and has agreed to join us for a brief interview and live Q&A following the keynote. I’ve had a quick peek at what he has instore for us and I’m happy to report: it’s really cool.
After the Keynote and Live Q&A on February 2nd, we will be releasing the full breadth of content I introduced to you in my previous blogpost. All sessions will be live for your on-demand viewing at a time and cadence that meets your schedule. You can binge watch them all in a row or pick and choose selective ones to watch when you have time in your busy life / work schedule – It’s YOUR choice. We will be publishing one blog post for each session on the teams ITOpsTalk.com blog with the embedded video so they will be easy to find as well as having all supporting reference documentation, links to additional resources as well as optional Microsoft Learn modules to learn even more about their related technologies.
What about the connectedness you would feel during a real event? Where are the hallway conversations? We’re trying something out using our community Discord server. After the keynote and the release of the session content, you will want to login to Discord (have you agreed to the Code of Conduct / Server Rules?) where you will see a category of channels that looks something like this:

The first channel is just a placeholder with descriptions of each talk and a link to that “chat” channel. It’s really just for logistics and announcements. The second channel “itops-talks-main-channel” is where our broad chat area is with no real topic focus, other than supporting the event and connecting with you. The rest of the channels (this graphic is just a sample) identify the session code and title of each session. THIS is where you can post questions, share your observations, answer other folks questions and otherwise engage with the speakers / local experts at ANY point of the day or night. The responses may not be in real-time if the speaker is asleep or if the team is not available at the time you ask – but don’t worry – we’ll be there to connect once we’re up and functioning.
Oh Yeah! Remember – there is no need for registration to attend this event. You may want to block the time in your calendar though…. just in case. Here’s a quick and handy landing page where you can quickly/conveniently download an iCal reminder for the Europe/Eastern NorthAmerica livestream OR Asia Pacific/Western NorthAmerica livestream.
Anything else you’d like to know? Hit me up here in the comments or can ask us in the Discord server. Heck – you can even ping us with a tweet using the #AzOps hashtag on Twitter.

by Contributed | Jan 26, 2021 | Technology
This article is contributed. See the original author and article here.
Hello everybody, Simone here to tell you about a situation that happened many times to my customers: understanding how the syslog ingestion works.
To make subject clear make sure you have clear in mind the below references:
Most of the time nobody knows what needs to be collected and how hence, with this article, I just want to make some clarification on what is behind the scenes.
Starting from RFC, it is mentioned that we have a list of “Facility” like in the screenshot below:
And for each of them we could have a specific “Severity” (see the corresponding picture below):

Back to the situation, the natural question that comes up is: how can we clearly understand who is using who if we have no information about facilities and severities about related products we are using?
To find the information we need, we must capture some TCP/UDP packets from the syslog server and rebuild the packets in wireshark and then analyze the results.
Let’s start with first step: packets capture. Below you have the macro steps to be followed:
- From the syslog server (in this case a Linux server) we will use the tcpdump command,
if not available follow this link on how to setup
https://opensource.com/article/18/10/introduction-tcpdump
- the command could be for example
tcpdump -i any -c50 -nn src xxx.xxx.xxx.xxx (replace with source IPADDRESS under analysis)
- the results after the rebuilt with wireshark, should be something similar the following image:

The header of every row contains exactly the information that we are looking for; how to deal with this piece of info? Easy; use the formula contained in the following part directly taken from RFC:
“The Priority value is calculated by first multiplying the Facility number by 8 and then adding the numerical value of the Severity. For example, a kernel message (Facility=0) with a Severity of Emergency (Severity=0) would have a Priority value of 0. Also, a “local use 4” message (Facility=20) with a Severity of Notice (Severity=5) would have a Priority value of 165. In the PRI of a syslog message, these values would be placed between the angle brackets as <0> and <165> respectively.
The only time a value of “0” follows the “<” is for the Priority value of “0”. Otherwise, leading “0”s MUST NOT be used.”
In the example above, we have the value of <46>. According to the above-mentioned RFC, the formula used to translate that number into something human readable is the following:
8 x facility + severity
We now must look for the formula result in the following matrix:
|
Emergency
|
Alert
|
Critical
|
Error
|
Warning
|
Notice
|
Informational
|
Debug
|
|
|
|
|
|
|
|
|
|
Kernel
|
0
|
1
|
2
|
3
|
4
|
5
|
6
|
7
|
user-level
|
8
|
9
|
10
|
11
|
12
|
13
|
14
|
15
|
mail
|
16
|
17
|
18
|
19
|
20
|
21
|
22
|
23
|
system
|
24
|
25
|
26
|
27
|
28
|
29
|
30
|
31
|
security/auth
|
32
|
33
|
34
|
35
|
36
|
37
|
38
|
39
|
message
|
40
|
41
|
42
|
43
|
44
|
45
|
46
|
47
|
printer
|
48
|
49
|
50
|
51
|
52
|
53
|
54
|
55
|
network news
|
56
|
57
|
58
|
59
|
60
|
61
|
62
|
63
|
UUCP
|
64
|
65
|
66
|
67
|
68
|
69
|
70
|
71
|
clock
|
72
|
73
|
74
|
75
|
76
|
77
|
78
|
79
|
security/auth
|
80
|
81
|
82
|
83
|
84
|
85
|
86
|
87
|
FTP deamon
|
88
|
89
|
90
|
91
|
92
|
93
|
94
|
95
|
NTP
|
96
|
97
|
98
|
99
|
100
|
101
|
102
|
103
|
Log Audit
|
104
|
105
|
106
|
107
|
108
|
109
|
110
|
111
|
Log Alert
|
112
|
113
|
114
|
115
|
116
|
117
|
118
|
119
|
Clock
|
120
|
121
|
122
|
123
|
124
|
125
|
126
|
127
|
local0
|
128
|
129
|
130
|
131
|
132
|
133
|
134
|
135
|
local1
|
136
|
137
|
138
|
139
|
140
|
141
|
142
|
143
|
local2
|
144
|
145
|
146
|
147
|
148
|
149
|
150
|
151
|
local3
|
152
|
153
|
154
|
155
|
156
|
157
|
158
|
159
|
local4
|
160
|
161
|
162
|
163
|
164
|
165
|
166
|
167
|
local5
|
168
|
169
|
170
|
171
|
172
|
173
|
174
|
175
|
local6
|
176
|
177
|
178
|
179
|
180
|
181
|
182
|
183
|
local7
|
184
|
185
|
186
|
187
|
188
|
189
|
190
|
191
|
So now, let’s make one step back to customer’ question and “guess” what the “Facility” and the “Severity” are in the provided example.
Since header was 46, the result was:
- Facility = message
- Severity = Informational
Once we understood what to deal with, it’s time to configure Log Analytics / Sentinel enabling the Syslog data sources in Azure Monitor.
All we have to do is to:
- add the facilities (by entering its name and leveraging the intellisense) to the workspace.

- select what severity(ies) to import.

- and click Save.

Using some real-life example, if we want to collect the logs for FTP, the corresponding facility to be entered is “ftp” and the following logs will be imported:
Syslog file
|
Log Path
|
ftp.info; ftp.notice
|
/log/ftplog/ftplog.info
|
ftp.warning
|
/log/ftplog/ftplog.warning
|
ftp.debug
|
/log/ftplog/ftplog.debug
|
ftp.err; ftp.crit; ftp.emerg
|
/log/ftplog/ftplog.err
|
Differently, talking about Users, the facility is “user” and the imported logs will be:
Syslog file
|
Log Path
|
user.info;user.notice
|
/log/user/user.info
|
user.warning
|
/log/user/user.warning
|
user.debug
|
/log/user/user.debug
|
user.err;user.crit;user.emerg
|
/log/user/user.err
|
Another one: for Apache, the facility is “local0” and the logs will be:
Syslog file
|
Log Path
|
local0.info;local0.notice
|
/log/httpd/httpd.
|
local0.warning
|
/log/httpd/httpd.warning
|
local0.debug
|
/log/httpd/httpd.debug
|
local0.err; local0.crit;local0.emerg
|
/log/httpd/httpd.err
|
We have everything in place, but are we really sure that info is produced?
What if you would like to effectively test that data is flowing in the corresponding facility?
We can leverage the following sample commands for CEF & Syslog using the logger built-in utility:
logger -p auth.notice “Some message for the auth.log file”
logger -p local0.info “Some message for the local0.log file”
logger “CEF:0|Microsoft|MOCK|1.9.0.0|SuspiciousActivity|Demo suspicious activity|5|start=2020-12-12T18:52:58.0000000Z app=mock suser=simo msg=Demo suspicious activity externalId=2024 cs1Label=tag cs1=my test”
Note pay attention to time when you query for this result!!! ;)
That’s it from my side, thank you for reading my article till the end.
Special thanks go to Bruno Gabrielli for review
Simone
by Contributed | Jan 25, 2021 | Technology
This article is contributed. See the original author and article here.
The Azure Service Fabric 7.2 fifth refresh release includes stability fixes for standalone, and Azure environments and has started rolling out to the various Azure regions. The updates for .NET SDK, Java SDK and Service Fabric Runtime will be available through Web Platform Installer, NuGet packages and Maven repositories in 7-10 days within all regions.
- Service Fabric Runtime
- Windows – 7.2.452.9590
- Ubuntu 16 – 7.2.454.1
- Ubuntu 18 – 7.2.454.1804
- Service Fabric for Windows Server Service Fabric Standalone Installer Package – 7.2.452.9590
- .NET SDK
- Windows .NET SDK – 4.2.452
- Microsoft.ServiceFabric – 7.2.452
- Reliable Services and Reliable Actors – 4.2.452
- ASP.NET Core Service Fabric integration – 4.2.452
- Java SDK – 1.0.6
Key Announcements
- Key Vault references for Service Fabric applications are now GA on Windows and Linux.
- .NET 5 apps for Windows on Service Fabric are now supported as a preview. Look out for the GA announcement of .NET 5 apps for Windows on Service Fabric.
- .NET 5 apps for Linux on Service Fabric will be added in the Service Fabric 8.0 release.
For more details, please read the release notes.
by Contributed | Jan 25, 2021 | Technology
This article is contributed. See the original author and article here.
The Azure Service Fabric 7.1 tenth refresh release includes stability fixes for standalone, and Azure environments and has started rolling out to the various Azure regions. The updates for .NET SDK, Java SDK and Service Fabric Runtime will be available through Web Platform Installer, NuGet packages and Maven repositories in 7-10 days within all regions. This release is only available on Windows.
- Service Fabric Runtime
- Windows – 7.1.510.9590
- Service Fabric for Windows Server Service Fabric Standalone Installer Package – 7.1.510.9590
- .NET SDK
- Windows .NET SDK – 4.1.510
- Microsoft.ServiceFabric – 7.1.510
- Reliable Services and Reliable Actors – 4.1.510
- ASP.NET Core Service Fabric integration – 4.1.510
- Java SDK – 1.0.6
Key Announcements
- .NET 5 apps for Windows on Service Fabric are now supported as a preview. Look out for the GA announcement of .NET 5 apps for Windows on Service Fabric.
- .NET 5 apps for Linux on Service Fabric will be added in the Service Fabric 8.0 release.
For more details, please read the release notes.
by Contributed | Jan 25, 2021 | Technology
This article is contributed. See the original author and article here.
Chatbots have become increasingly popular in providing useful and engaging experiences for customers and employees. Azure services allow you to quickly create bots, add intelligence to them using AI, and customize them for complex scenarios.
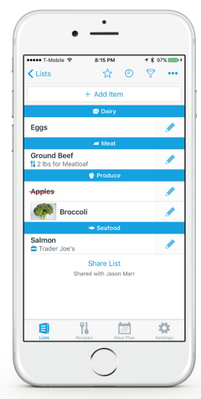
In this blog, we’ll walk through an exercise which you can complete in under two hours, to get started using Azure AI Services. This intelligent grocery bot app can help you manage your shopping list using voice commands. We’ll provide high level guidance and sample code to get you started, and we encourage you to play around with the code and get creative with your solution!
Features of the application:
- Add or delete grocery items by dictating them to Alexa.
- Easily access the grocery list through an app.
- Check off items using voice commands; for example, “Alexa, remove Apples from my grocery list.”
- Ask Alexa to read the items you have in your grocery list.
- Automatically organize items by category to help save time at the store.
- Use any laptop or Web Apps to access the app and sync changes across laptop and phone.
Prerequisites:
Key components:
Solution Architecture

App Architecture Description:
- The user accesses the chatbot by invoking it as an Alexa skill.
- User is authenticated with Azure Active Directory.
- User interacts with the chatbot powered by Azure Bot Service; for example, user requests bot to add grocery items to a list.
- Azure Cognitive Services process the natural language request to understand what the user wants to do. (Note: If you wanted to give your bot its own voice, you can choose from over 200 voices and 54 languages/locales. Try the demo to hear the different natural sounding voices.)
- The bot adds or removes content in the database.
Another visual of the flow of data within the solution architecture is shown below.

Implementation
High level overview of steps involved in creating the app along with some sample code snippets for illustration:
We’ll start by creating an Azure Bot Service instance, and adding speech capabilities to the bot using the Microsoft Bot Framework and the Alexa skill. Bot Framework, along with Azure Bot Service, provides the tools required to build, test, deploy, and manage the end-to-end bot development workflow. In this example, we are integrating Azure Bot Service with Alexa, which can process speech inputs for our voice-based chatbot. However, for chatbots deployed across multiple channels, and for more advanced scenarios, we recommend using Azure’s Speech service to enable voice-based scenarios. Try the demo to listen to the over 200 high quality voices available across 54 languages and locales.
- The first step in the process is to login into Azure portal and follow the steps here to create an Azure Bot Service resource and a web app bot. To add voice capability to the bot, click on channels to add Alexa (see the below snapshot) and note the Alexa Service Endpoint URI.
 Azure Bot Service Channels
- Next, we need to log into the Alexa Developer Console and create an Amazon Alexa skill. After creating the skill, we are presented with the interaction model. Replace the JSON Editor with the below example phrases.
{

  "interactionModel": {

    "languageModel": {

      "invocationName": "Get grocery list",

      "intents": [

        {

          "name": "AMAZON.FallbackIntent",

          "samples": []

        },

        {

          "name": "AMAZON.CancelIntent",

          "samples": []

        },

        {

          "name": "AMAZON.HelpIntent",

          "samples": []

        },

        {

          "name": "AMAZON.StopIntent",

          "samples": []

        },

        {

          "name": "AMAZON.NavigateHomeIntent",

          "samples": []

        },

        {

          "name": "Get items in the grocery",

          "slots": [

            {

              "name": "name",

              "type": "AMAZON.US_FIRST_NAME"

            }

          ],

          "samples": [

            "Get grocery items in the list",

            "Do I have bread in my list",

           ]

        }

      ],

      "types": []

    }

  }

}
- Next, we’ll integrate the Alexa Skill with our Azure bot. We’ll need two pieces of information to do this: the Alexa Skill ID and the Alexa Service Endpoint URI. First, get the Skill ID either from the URl in the Alexa portal, or by going to the Alexa Developer Console and clicking “view Skill ID”. The skill ID should be a value like ‘amzn1.ask.skil.A GUID’. Then, get the Alexa Service Endpoint URI from the Azure portal, by going to the channels page of our Azure Web App Bot in the Azure portal, and clicking on Alexa to copy the Alexa Service Endpoint URI. Then integrate as shown:
- Amazon Developer Console: After building the Alexa Skill, click on Endpoint and paste the Alexa Service Endpoint URI that we copied from the Azure portal and save the Endpoints.

- Azure Portal: Go to the channels page of the Azure Bot, click on Alexa, and paste the Alexa Skill ID that we copied from the Alexa Developer Console.

- Now, we’ll download and the bot locally for testing using the Bot Framework Emulator. Click on “Build” in the Azure Web Bot app to download the source code locally with Bot Framework Emulator. Modify app.py as below:
# Copyright (c) Microsoft Corporation. All rights reserved.
# Licensed under the MIT License.
from http import HTTPStatus
from aiohttp import web
from aiohttp.web import Request, Response, json_response
from botbuilder.core import (
BotFrameworkAdapterSettings,
ConversationState,
MemoryStorage,
UserState,
)
from botbuilder.core.integration import aiohttp_error_middleware
from botbuilder.schema import Activity
from config import DefaultConfig
from dialogs import MainDialog, groceryDialog
from bots import DialogAndWelcomeBot
from adapter_with_error_handler import AdapterWithErrorHandler
CONFIG = DefaultConfig()
# Create adapter.
# See https://aka.ms/about-bot-adapter to learn more about how bots work.
SETTINGS = BotFrameworkAdapterSettings(CONFIG.APP_ID, CONFIG.APP_PASSWORD)
# Create MemoryStorage, UserState and ConversationState
MEMORY = MemoryStorage()
USER_STATE = UserState(MEMORY)
CONVERSATION_STATE = ConversationState(MEMORY)
# Create adapter.
# See https://aka.ms/about-bot-adapter to learn more about how bots work.
ADAPTER = AdapterWithErrorHandler(SETTINGS, CONVERSATION_STATE)
# Create dialogs and Bot
RECOGNIZER = IntelligentGrocery(CONFIG)
grocery_DIALOG = groceryDialog()
DIALOG = MainDialog(RECOGNIZER, grocery_DIALOG)
BOT = DialogAndWelcomeBot(CONVERSATION_STATE, USER_STATE, DIALOG)
# Listen for incoming requests on /api/messages.
async def messages(req: Request) -> Response:
# Main bot message handler.
if "application/json" in req.headers["Content-Type"]:
body = await req.json()
else:
return Response(status=HTTPStatus.UNSUPPORTED_MEDIA_TYPE)
activity = Activity().deserialize(body)
auth_header = req.headers["Authorization"] if "Authorization" in req.headers else ""
response = await ADAPTER.process_activity(activity, auth_header, BOT.on_turn)
if response:
return json_response(data=response.body, status=response.status)
return Response(status=HTTPStatus.OK)
APP = web.Application(middlewares=[aiohttp_error_middleware])
APP.router.add_post("/api/messages", messages)
if __name__ == "__main__":
try:
web.run_app(APP, host="localhost", port=CONFIG.PORT)
except Exception as error:
raise error
- Next, we’ll run and test the bot with Bot Framework Emulator. From the terminal, navigate to the code folder and run pip install -r requirements.txt to install the required packages to run the bot. Once the packages are installed, run python app.py to start the bot. The bot is ready to test as shown below:
 }
}
Open the bot and add the below port number into the following URL.
 Bot Framework Emulator view
- Now we’re ready to add natural language understanding so the bot can understand user intent. Here, we’ll use Azure’s Language Understanding Cognitive Service (LUIS), to map user input to an “intent” and extract “entities” from the sentence. In the below illustration, the sentence “add milk and eggs to the list” is sent as a text string to the LUIS endpoint. LUIS returns the JSON seen on the right.
 Language Understanding utterances diagram
- Use the below template to create a LUIS JSON model file where we specify intents and entities manually. After the “IntelligentGrocery” app is created in the LUIS portal under “Import New App”, upload the JSON file with the below intents and entities.
{
      "text": "access the groceries list",
      "intent": "Show",
      "entities": [
        {
          "entity": "ListType",
          "startPos": 11,
          "endPos": 19,
          "children": []
        }
      ]
    },
    {
      "text": "add bread to the grocery list",
      "intent": "Add",
      "entities": [
        {
          "entity": "ListType",
          "startPos": 23,
          "endPos": 29,
          "children": []
The above sample intents are for adding items and accessing the items in the grocery list. Now, it’s your turn to add additional intents to perform the below tasks, using the LUIS portal. Learn more about how to create the intents here.
Intents
Name
|
Description
|
CheckOff
|
Mark the grocery items as purchased.
|
Confirm
|
Confirm the previous action.
|
Delete
|
Delete items from the grocery list.
|
Once the intents and entities are added, we will need to train and publish the model so the LUIS app can recognize utterances pertaining to these grocery list actions.
 Language Understanding (LUIS) Portal
- After the model has been published in the LUIS portal, click ‘Access your endpoint Urls’ and copy the primary key, example query and endpoint URL for the prediction resource.
 Language Understanding endpoint
 Language Understanding (LUIS) Prediction view
Navigate to the Settings page in the LUIS portal to retrieve the App ID.
 Application settings
- Finally, test your Language Understanding model. The endpoint URL will be in the below format, with your own custom subdomain, and app ID and endpoint key replacing APP-ID, and KEY_ID. Go to the end of the URL and enter an intent; for example, “get me all the items from the grocery list”. The JSON result will identify the top scoring intent and prediction with a confidence score. This is a good test to see if LUIS can learn what should be predicted with the intent.
Additional Ideas
We’ve now seen how to build a voice bot leveraging Azure services to automate a common task. We hope it gives you a good starting point towards building bots for other scenarios as well. Try out some of the ideas below to continue building upon your bot and exploring additional Azure AI services.
- Add Google Home assistant as an additional channel to receive voice commands.
- Add a PictureBot extension to your bot and add pictures of your grocery items. You will need to create intents that trigger actions that the bot can take, and create entities that require these actions. For example, an intent for the PictureBot may be “SearchPics”. This could trigger Azure Cognitive Search to look for photos, using a “facet” entity to know what to search for. See what other functionality you can come up with!
- Use Azure QnA maker to enable your bot to answer FAQs from a knowledge base. Add a bit of personality using the chit-chat feature.
- Integrate Azure Personalizer with your voice chatbot to enables the bot to recommend a list of products to the user, providing a personalized experience.
- Include Azure Speech service to give your bot a custom, high quality voice, with 200+ Text to Speech options across 54 different locales/languages, as well as customizable Speech to Text capabilities to process voice inputs.
- Try building this bot using Bot Framework Composer, a visual authoring canvas.


Recent Comments