by Contributed | Jan 31, 2021 | Technology
This article is contributed. See the original author and article here.
News this week includes:
Yammer Reactions are now inclusive
New transactable offers from CIS, DataVisor, and SPIN Analytics in Azure Marketplace
Microsoft Lists adoption for Government
ibrahimambodji is our member of the week and a fgreat contributor in the Azure Community.
View the Weekly Roundup for Jan 25-29th in Sway and attached PDF document.
https://sway.office.com/s/UOItp0p6MPEnBW2L/embed

by Contributed | Jan 31, 2021 | Technology
This article is contributed. See the original author and article here.
We made it to 2021, and we are back with the monthly summary for the Healthcare and Life Sciences Blog! Check out the highlights for January below:
Webcasts Recorded:
- Nursing Hackathon Delivered Innovative Solutions Designed to Reimagine Care Delivery: The HLS Blog carried a special webcast covering the nursing hackathon presented by Allscripts, MATTER, Microsoft and ARC that delivered innovative solutions designed to reimagine care delivery. Check it out here.
- Mid-Day Cafe Webcast:
- Tentative Schedule: Check out the Mid-Day Cafe Schedule for the new Monday webcast taking place at 12 noon EST/9 am Pacific. We look forward to you joining us live, as well as watching and sharing the posted recordings and resources. Drop us a line in our mailbag!
- Microsoft Teams Voice: We kicked off the first HLS Mid-Day Cafe and featured Microsoft’s Raj Gopalakrishnan, Senior Director and Principal Program Manager, Enterprise Engineering, Microsoft Teams. Check out Microsoft News, Events, and the new updates on Microsoft Teams Voice.
- Health and Life Sciences In the Age of Digitization with Adobe Sign and MSFT Teams: We partnered with Adobe to demonstrate how Adobe Sign can help support Virtual Consults by bringing patients and clinicians together to sign important documents like HIPAA consent forms. Click here for the recording and resources..
Upcoming Webcasts:
- Mid-Day Cafe – COVID Vaccine Health Bot: Join us tomorrow, February 1st at 12 noon EST for Mid-Day Café where Microsoft’s Gregory Lisiak and Nikita Pitliya will be covering the Microsoft COVID Vaccine Health Bot to assist organizations in implementing, and leveraging, the bot. Click here for more information.
- Microsoft Teams 101 – Hospital Case Study: Want to learn practical tips on how to use Microsoft Teams effectively at your hospital? Join Mary Buonanno, Healthcare Chief Technology Officer at The Ergonomic Group, and Margaret Campbell, Director at HealthNET Consulting, as they share their real-world experience with Microsoft Teams during COVID-19 in a multi-facility acute care hospital environment. Join us on Wednesday, February 10th from 2-3 PM EST. Click here to register!
Best Practice Resource:
- Microsoft 365 Resources for Architecture – Data Resiliency – Deletion and Retention – Data Restore: Wondering how your data in M365 is safeguarded when it comes to resiliency, retention and recovery? Microsoft’s Principal Technical Specialist Michael Gannotti supplies the documentation relevant to all three of those areas on this resource page.
January’s HLS Blog Contributors:

Shelly Avery, Senior Technical Specialist, Microsoft Teams

Michael Gannotti, Principal Technical Specialist, Microsoft Teams
Thanks for reading and let us know how else our Microsoft team can help!
.jpg")
Sam Brown, Technical Specialist, Microsoft Teams
by Contributed | Jan 31, 2021 | Technology
This article is contributed. See the original author and article here.
In many use cases Machine Learning models are built and applied over data that is stored and managed by Azure Data Explorer (ADX). Most ML models are built and deployed in two steps:
- Offline training
- Real time scoring
ML Training is a long and iterative process. Commonly, a model is developed by researchers/data scientists. They fetch the training data, clean it, engineer features, try different models and tune parameters, repeating this cycle until the ML model meets the required accuracy and robustness. To improve accuracy, they can:
- Use a big data set, if available, that might contain hundreds of millions of records and plenty of features (dimensions and metrics)
- Train very complex models, e.g., a DNN with dozens of layers and millions of free parameters
- Perform a more exhaustive search for tuning the model’s hyper parameters
Once the model is ready, it can be deployed to production for scoring.
ML Scoring is the process of applying the model on new data to get predictions/regressions. Scoring usually needs to be done with minimal latency (near real time) for batches of streamed data.
Azure Data Explorer (ADX) supports running inline Python scripts that are embedded in the KQL query. The Python code runs on the existing compute nodes of ADX, in distributed manner near the data. It can handle Data Frames containing many millions of records, partitioned and processed on multiple nodes. This optimized architecture results in great performance and minimal latency.
Specifically, for ML workloads, ADX can be used for both training and scoring:
- Scoring on ADX is the ultimate solution for data that is stored on ADX, as
- Processing is done near the data, which guarantees the fastest performance
- Embedding the scoring Python code in KQL query is simple, robust and cheap, relative to the usage of an external scoring service that requires management, networking, security, etc.
Scoring can be done using the predict_fl() library function
- Training on ADX can be done in case the full training data set is stored in ADX, the training process takes up to few minutes and doesn’t require GPUs or other special hardware
Still in many scenarios training is done on Big Data systems, such as Spark/Databricks. Specifically, ML training on these systems is preferred in case that:
- The training data is not stored in ADX, but in the data lake or other external storage/db
- The training process is long (takes more than 5-10 minutes), usually done in batch/async mode
- Training can be accelerated by using GPUs
- ADX production workflows must not be compromised by lengthy, CPU intensive, training jobs
So we end up in a workflow that uses Spark/Databricks for training, and ADX for scoring. But the problem is that training on these Spark platforms is mostly done using the Spark ML framework, that is optimized for Spark architecture, but not supported by plain vanilla Python environment like ADX Python. So how can we still score in ADX?
We present a solution which is built from these steps:
- Fetch the training data from ADX to Azure Databricks using ADX Spark Connector
- Train an ML model in Azure Databricks
- Convert the model to ONNX
- Serialize and export the model to ADX using the same Spark connector
- Score in ADX using onnxruntime
Prerequisite
- Enable Python plugin on your ADX cluster (see the Onboarding section of the python() plugin doc)
- Create a workspace in Azure Databricks
- Install the Spark connector in that workspace as explained here
- Install onnxmltools in that workspace
In the following example we build a logistic regression model to predict room occupancy based on Occupancy Detection data, a public dataset from UCI Repository. This model is a binary classifier to predict occupied/empty room based on Temperature, Humidity, Light and CO2 sensors measurements. The example contains code snips from Databricks notebook showing for the full process of retrieving the data from ADX, building the model, convert it to ONNX and push it to ADX. Finally the KQL scoring query to be run using Kusto Explorer.
1. Load the data from ADX to Databricks
from pyspark.sql import SparkSession
pyKusto = SparkSession.builder.appName("kustoPySpark").getOrCreate()

cluster = 'https://demo11.westus.kusto.windows.net'
db = 'ML'
query = 'OccupancyDetection'

AppId = '***** Your App Id *****'
AppSecret = '***** Your App Secret *****'
AuthorityId = '***** Your Authority Id *****'

# Read the data from the kusto table with default reading mode

s_df  = pyKusto.read.
    format("com.microsoft.kusto.spark.datasource").
    option("kustoCluster", cluster).
    option("kustoDatabase", db).
    option("kustoQuery", query).
    option("kustoAadAppId", AppId).
    option("kustoAadAppSecret", AppSecret).
    option("kustoAadAuthorityID", AuthorityId).
    load()

s_df.take(4)
Out[37]: [Row(Timestamp=datetime.datetime(2015, 2, 4, 17, 51), Temperature=23.18, Humidity=27.272, Light=426.0, CO2=721.25, HumidityRatio=0.004792988, Occupancy=True, Test=False),

 Row(Timestamp=datetime.datetime(2015, 2, 4, 17, 51), Temperature=23.15, Humidity=27.2675, Light=429.5, CO2=714.0, HumidityRatio=0.004783441, Occupancy=True, Test=False),

 Row(Timestamp=datetime.datetime(2015, 2, 4, 17, 53), Temperature=23.15, Humidity=27.245, Light=426.0, CO2=713.5, HumidityRatio=0.004779464, Occupancy=True, Test=False),

 Row(Timestamp=datetime.datetime(2015, 2, 4, 17, 54), Temperature=23.15, Humidity=27.2, Light=426.0, CO2=708.25, HumidityRatio=0.004771509, Occupancy=True, Test=False)]
2. Train the ML model in Azure Databricks
s_df.groupBy('Test', 'Occupancy').count().show()
+-----+---------+-----+
| Test|Occupancy|count|
+-----+---------+-----+
| true|    false| 9396|
| true|     true| 3021|
|false|    false| 6414|
|false|     true| 1729|
+-----+---------+-----+
# Prepare the input for the model

# Spark Logistic Regression estimator requires integer label so create it from the boolean Occupancy column
s_df = s_df.withColumn('Label', s_df['Occupancy'].cast('int'))

# Split to train & test sets
s_train = s_df.filter(s_df.Test == False)
s_test = s_df.filter(s_df.Test == True)

# Create the Logistic Regression model
from pyspark.ml.feature import VectorAssembler
from pyspark.ml.classification import LogisticRegression

# The Logistic Regression estimator expects the features in a single column so create it using VectorAssembler
features = ('Temperature', 'Humidity', 'Light', 'CO2', 'HumidityRatio')
assembler = VectorAssembler(inputCols=features,outputCol='Features')
s_train_features = assembler.transform(s_train)
s_train_features.take(4)
lr = LogisticRegression(labelCol='Label', featuresCol='Features',maxIter=10)
s_clf = lr.fit(s_train_features)

# Predict the training set
s_predict_train = s_clf.transform(s_train_features)

# Predict the testing set
s_test_features = assembler.transform(s_test)
s_predict_test = s_clf.transform(s_test_features)
s_predict_test.select(['Timestamp', 'Features', 'Label', 'prediction']).show(10)
+-------------------+--------------------+-----+----------+
|          Timestamp|            Features|Label|prediction|
+-------------------+--------------------+-----+----------+
|2015-02-02 14:19:00|[23.7,26.272,585....|    1|       1.0|
|2015-02-02 14:19:00|[23.718,26.29,578...|    1|       1.0|
|2015-02-02 14:21:00|[23.73,26.23,572....|    1|       1.0|
|2015-02-02 14:22:00|[23.7225,26.125,4...|    1|       1.0|
|2015-02-02 14:23:00|[23.754,26.2,488....|    1|       1.0|
|2015-02-02 14:23:00|[23.76,26.26,568....|    1|       1.0|
|2015-02-02 14:25:00|[23.73,26.29,536....|    1|       1.0|
|2015-02-02 14:25:00|[23.754,26.29,509...|    1|       1.0|
|2015-02-02 14:26:00|[23.754,26.35,476...|    1|       1.0|
|2015-02-02 14:28:00|[23.736,26.39,510...|    1|       1.0|
+-------------------+--------------------+-----+----------+
only showing top 10 rows
# Calculate accuracy on the testing set

import pyspark.sql.functions as F
check = s_predict_test.withColumn('correct', F.when(F.col('Label') == F.col('prediction'), 1).otherwise(0))
check.groupby('correct').count().show()
accuracy = check.filter(check['correct'] == 1).count()/check.count()*100
print(f'Accuracy: {accuracy}')
+-------+-----+
|correct|count|
+-------+-----+
|      1|12271|
|      0|  146|
+-------+-----+

Accuracy: 98.8241926391238
3. Convert the model to ONNX
from onnxmltools import convert_sparkml
from onnxmltools.convert.sparkml.utils import FloatTensorType

initial_types = [('Features', FloatTensorType([None, 5]))]
onnx_model = convert_sparkml(s_clf, 'Occupancy detection Pyspark Logistic Regression model', initial_types, spark_session = pyKusto)
onnx_model
{'classlabels_ints': [0, 1],
 'coefficients': [0.2995554662269534,
                  0.08678036676466962,
                  -0.01768699375517248,
                  -0.005589950773872156,
                  19.092004694715197,
                  -0.2995554662269534,
                  -0.08678036676466962,
                  0.01768699375517248,
                  0.005589950773872156,
                  -19.092004694715197],
 'intercepts': [1.396631045353889, -1.396631045353889],
 'multi_class': 1,
 'name': 'LinearClassifier',
 'post_transform': 'LOGISTIC'}

(full print trimmed here)
4. Export the model to ADX
import datetime
import pandas as pd

smodel = onnx_model.SerializeToString().hex()
models_tbl = 'Databricks_Models'
model_name = 'Occupancy_Detection_LR'

# Create a DataFrame containing a single row with model name, training time and
# the serialized model, to be appended to the models table
now = datetime.datetime.now()
dfm = pd.DataFrame({'name':[model_name], 'timestamp':[now], 'model':[smodel]})
sdfm = spark.createDataFrame(dfm)
sdfm.show()
+--------------------+--------------------+--------------------+
|                name|           timestamp|               model|
+--------------------+--------------------+--------------------+
|Occupancy_Detecti...|2021-01-26 19:02:...|0807120b4f6e6e784...|
+--------------------+--------------------+--------------------+
# Write the model to Kusto
sdfm.write.format("com.microsoft.kusto.spark.datasource").
option("kustoCluster", cluster).
option("kustoDatabase", db).
option("kustoAadAppId", AppId).
option("kustoAadAppSecret", AppSecret).
option("kustoAadAuthorityID", AuthorityId).
option("kustoTable", models_tbl).
mode("Append").
save()
5. Score in ADX
Is done by calling predict_onnx_fl() You can either install this function in your database, or call it in ad-hoc manner:
let predict_onnx_fl=(samples:(*), models_tbl:(name:string, timestamp:datetime, model:string), model_name:string, features_cols:dynamic, pred_col:string)
{
    let model_str = toscalar(models_tbl | where name == model_name | top 1 by timestamp desc | project model);
    let kwargs = pack('smodel', model_str, 'features_cols', features_cols, 'pred_col', pred_col);
    let code =
    'n'
    'import binasciin'
    'n'
    'smodel = kargs["smodel"]n'
    'features_cols = kargs["features_cols"]n'
    'pred_col = kargs["pred_col"]n'
    'bmodel = binascii.unhexlify(smodel)n'
    'n'
    'features_cols = kargs["features_cols"]n'
    'pred_col = kargs["pred_col"]n'
    'n'
    'import onnxruntime as rtn'
    'sess = rt.InferenceSession(bmodel)n'
    'input_name = sess.get_inputs()[0].namen'
    'label_name = sess.get_outputs()[0].namen'
    'df1 = df[features_cols]n'
    'predictions = sess.run([label_name], {input_name: df1.values.astype(np.float32)})[0]n'
    'n'
    'result = dfn'
    'result[pred_col] = pd.DataFrame(predictions, columns=[pred_col])'
    'n'
    ;
    samples | evaluate python(typeof(*), code, kwargs)
};
//
OccupancyDetection
| where Test == 1
| extend pred_Occupancy=int(null)
| invoke predict_onnx_fl(Databricks_Models, 'Occupancy_Detection_LR', pack_array('Temperature', 'Humidity', 'Light', 'CO2', 'HumidityRatio'), 'pred_Occupancy')
| summarize correct = countif(Occupancy == pred_Occupancy), incorrect = countif(Occupancy != pred_Occupancy), total = count()
| extend accuracy = 100.0*correct/total
correct	incorrect	total	accuracy
12271	146	        12417	98.8241926391238
Summary
In this blog we presented how to train your ML model in Azure Databricks, and use it for scoring in ADX. This can be done by converting the trained model from Spark ML to ONNX, a common ML model exchange format, enabling it to be consumed for scoring by ADX python() plugin.
This workflow is common for ADX customers that are building Machine Learning algorithms by batch training using Spark/Databricks models on big data stored in the data lake. This new option to use this model for scoring directly on ADX is very appealing as it’s fast, simple and free.
by Contributed | Jan 30, 2021 | Technology
This article is contributed. See the original author and article here.
We had the wish to add native ReverseDsc support into SharePointDsc for over a year now, but technical issues prevented us from doing so. But I am glad to say that we have been able to resolve all issues and integrate the ReverseDsc orchestration script natively into SharePointDsc!! A huge thanks to Colin Hughes-Jones and Nik Charlebois for their help in solving these issues and achieving this milestone!
IMPORTANT: This does mean SharePointDsc now has a requirement for the ReverseDsc module to be installed as well. When installing from the PowerShell Gallery, this will be automatically installed.
But of course SharePointDsc v4.5 also contains a lot of bugfixes and even a new resource: SPDocIcon. With that resource you are able to manage the docicon.xml file in which icons are configured for various file types.
You can find the SharePointDsc v4.5 in the PowerShell Gallery!
NOTE: We can always use additional help in making SharePointDsc even better. So if you are interested in contributing to SharePointDsc, check-out the open issues in the issue list, check-out this post in our Wiki or leave a comment on this blog post.
Improvement/Fixes in v4.5:
Added
- SharePointDsc
- Added native support for ReverseDsc
- SPDocIcon
- SPUserProfileSyncConnection
- Added ability to update UseSSL and UseDisabledFilter parameters
- SPWordAutomationServiceApp
- Added ability to specify that the new service app should be added to the default proxy group
Changed
- SharePointDsc
- Updated pipeline build scripts
- SPProjectServerConnector
- Updated logic to check to required DLL file
- SPFarmAdministrators
- Update the event log messages so they are better formatted
- SPQuotaTemplate
- Updated resource to prevent errors when specified limits are conflicting configured values. E.g. new warning is high than the current max limit.
- SPTrustedIdentityTokenIssuer
- Do not set property ProviderSignOutUri in SharePoint 2013 as it does not exist
- SPUserProfileServiceApp
- Changed MySiteHostLocation to not be mandatory
- Added validation to Set function for testing if SiteNamingConflictResolution parameter is defined then also MySiteHostLocation parameters has to be because it is a mandatory parameter in the parameter set of New-SPProfileServiceApplication when SiteNamingConflictResolution is used.
- Added “MySiteHostLocation” to Test-SPDscParameterState function in Test-TargetResource
Fixed
- SPBlobCacheSettings
- Fixed issue where the Get method threw an error when the zone didn’t exist.
- SPTrustedIdentityTokenIssuer
- Do not set property ProviderSignOutUri in SharePoint 2013 as it does not exist
- SPWebAppPolicy
- Fixed a blocking issue introduced in version 4.4.0 when extracting cache accounts
Removed
- SharePointDsc
- Removed two old files from the previous CD/CI system
A huge thanks to the following guy for contributing to this project:
Colin Hughes-Jones, Nik Charlebois, Jens Otto Hatlevold, Yvan Duhamel and Petri Puustinen
Also a huge thanks to everybody who submitted issues and all that support this project. It wasn’t possible without all of your help!
For more information about how to install SharePointDsc, check our Readme.md.
Let us know in the comments what you think of this release! If you find any issues, please submit them in the issue list on GitHub.
Happy SharePointing!!
by Contributed | Jan 30, 2021 | Technology
This article is contributed. See the original author and article here.
Azure Data Lake Storage Gen2 (ADLS Gen2) is a set of capabilities dedicated to big data analytics, built on Azure Blob storage, so it supports Azure blob Storage API while also has its own File System API.
Blob Storage API: https://docs.microsoft.com/en-us/rest/api/storageservices/operations-on-blobs
File System API: https://docs.microsoft.com/en-us/rest/api/storageservices/data-lake-storage-gen2
These interfaces allow you to create and manage file systems, as well as to create and manage directories and files in file system. Azure Data Lake Storage Gen2 APIs support Azure Active Directory (Azure AD), Shared Key, and shared access signature (SAS) authorization.
In this blog, we will introduce how to use Azure AD service principal to upload file to ADLS gen2 through file system API using Powershell script.
Part 1: Register an application with the Microsoft identity platform and apply the valid role assignment for access. https://docs.microsoft.com/en-us/azure/active-directory/develop/quickstart-register-app
1. Register a new application in Azure AD.
2. Select account type based on your business requirements.

3. Assign Storage Blob Data Owner role to the service principal, which grants the service principal full access to blob data rights. You may assign other blob data role according to your business requirements. For the details of built-in roles’ permissions please refer to the document https://docs.microsoft.com/en-us/azure/role-based-access-control/built-in-roles#storage-blob-data-owner.

Part 2: Generate an access token of the service principal for the Rest API calls. https://docs.microsoft.com/en-us/rest/api/azure/#client-credentials-grant-non-interactive-clients
1. In the Azure Portal application Overview, we can obtain the Application ID (client id) and Directory ID(tenant id).

2. In the Certificate & Secret, create a secret with an expiration time.


3. To generate an access token for the storage, we need to name the resource endpoint for storage resource provider as storage.azure.com.
In the document https://docs.microsoft.com/en-us/azure/active-directory/develop/v2-oauth2-client-creds-grant-flow#get-a-token, we can see how a token endpoint work in a common scenario.
Powershell function Example:
function Get-StorageAADAccessToken()
{
    param($TENANT_ID, $client_id, $client_secret)

    $URI="https://login.microsoftonline.com/$TENANT_ID/oauth2/v2.0/token" #We are using the oauth version 2
    $CONTENT_TYPE="application/x-www-form-urlencoded"

    $HEADERS = @{
        "Content-Type"=$CONTENT_TYPE
    }


    $grant_type="client_credentials"
    $resource="https://storage.azure.com/.default"

    $BODY="grant_type=$grant_type&client_id=$client_id&client_secret=$client_secret&scope=$resource"
    $ACCESS_TOKEN = (Invoke-RestMethod -method POST -Uri $URI -Headers $HEADERS -Body $BODY).access_token

    return $ACCESS_TOKEN
}
Part 3: Upload the file using File System interface.
To upload a file using file system interface will use the three APIs, Create File, Append Data and Flush Data. All APIs will use the *.dfs.core.windows.net endpoint instead of *.blob.core.windows.net endpoint.
Here is a logic flow to upload a large file.
- The first position is 0
- The next position is the last position plus the last content length.
- We can send multiple append data requests at the same time, but the position information needs to be calculated.

The Powershell methods example:
1. Create File is a Create API in the file system. By default, the destination is overwritten if the file already exists and has a broken lease.
function Create-AzureADLS2File()
{
    param($STORAGE_ACCOUNT_NAME, $ROOT, $PREFIX) ## storage account is the name of the ADLS gen2 account, root is the file system container, prefix is the path and file name of the storage account

    $URI="https://$STORAGE_ACCOUNT_NAME.dfs.core.windows.net/"+$ROOT+"/"+$PREFIX+"?resource=file"

    $DATE = [System.DateTime]::UtcNow.ToString("R")

    $ACCESS_TOKEN=Get-StorageAADAccessToken -TENANT_ID $TENANT_ID -client_id $CLIENT_ID -client_secret $CLIENT_SECRET

    $HEADERS = @{
        "x-ms-date"=$DATE
        "x-ms-version"="2019-12-12"
        "authorization"="Bearer $ACCESS_TOKEN"
    }
    Invoke-RestMethod -method PUT -Uri $URI -Headers $HEADERS
}
After create a file by the Powershell custom method below, you will get a zero size file.
Create-AzureADLS2File -STORAGE_ACCOUNT_NAME frankpanadls2 -ROOT test -PREFIX file1

2. Append Data is a part of Update API in the file system. “append” is to upload data by appending to a file.
function Upload-AzureADLS2File()
{
    param($STORAGE_ACCOUNT_NAME, $ROOT, $PREFIX, $POS, $BODY)

    $URI="https://$STORAGE_ACCOUNT_NAME.dfs.core.windows.net/"+$ROOT+"/"+$PREFIX+"?action=append&position=$POS"
    $DATE = [System.DateTime]::UtcNow.ToString("R")

$ACCESS_TOKEN= Get-StorageAADAccessToken -TENANT_ID $TENANT_ID -client_id $CLIENT_ID -client_secret $CLIENT_SECRET

    $HEADERS = @{
        "x-ms-date"=$DATE
        "x-ms-version"="2019-12-12"
        "authorization"="Bearer $ACCESS_TOKEN"
        "content-length"=0
    }

   Invoke-RestMethod -method PATCH -Uri $URI -Headers $HEADERS -Body $BODY
}
If we have content below, we can get a list of position and content length.
data row 1
data row 22
data row 333

Upload-AzureADLS2File -STORAGE_ACCOUNT_NAME frankpanadls2 -ROOT test -PREFIX file1 -POS 0 -BODY "data row 1`n"
Upload-AzureADLS2File -STORAGE_ACCOUNT_NAME frankpanadls2 -ROOT test -PREFIX file1 -POS 11 -BODY "data row 22`n"
Upload-AzureADLS2File -STORAGE_ACCOUNT_NAME frankpanadls2 -ROOT test -PREFIX file1 -POS 23 -BODY "data row 333`n"
There will be no data in the file until you flush all content in the file.

3. Flush Data is a part of Update API in the file system. “flush” is to flush previously uploaded data to a file. This request is similar to PutBlockList in the blob storage api, but will need to specify position.
function Flush-AzureADLS2File()
{
    param($STORAGE_ACCOUNT_NAME, $ROOT, $PREFIX, $POS)

    $URI="https://$STORAGE_ACCOUNT_NAME.dfs.core.windows.net/"+$ROOT+"/"+$PREFIX+"?action=flush&position=$POS"
    $DATE = [System.DateTime]::UtcNow.ToString("R")

    $ACCESS_TOKEN= Get-StorageAADAccessToken -TENANT_ID $TENANT_ID -client_id $CLIENT_ID -client_secret $CLIENT_SECRET

    $HEADERS = @{
        "x-ms-date"=$DATE
        "x-ms-version"="2019-12-12"
        "authorization"="Bearer $ACCESS_TOKEN"
        "content-length"=$POS
    }

    Invoke-RestMethod -method PATCH -Uri $URI -Headers $HEADERS
}
Flush-AzureADLS2File -AzureADLS2File -STORAGE_ACCOUNT_NAME frankpanadls2 -ROOT test -PREFIX file1 -POS 36
We will see the flushed file like below with all content.

by Contributed | Jan 30, 2021 | Technology
This article is contributed. See the original author and article here.
As a result of a government order, the Republic of South Sudan will move to Central Africa Time (UTC+02:00) at 00:00 AM local time on February 1, 2021.
Microsoft plans to release an update to support this time zone change; however, there is insufficient time to properly build, test, and release such an update before the change goes into effect. In the meantime, we recommend that individuals and organizations with devices in the Republic of South Sudan follow the interim guidance below.
Interim guidance
Microsoft recommends that users temporarily set the time zone on their devices to “(UTC+2:00) Harare, Pretoria” on February 1, 2021 at 00:00. Selecting this time zone will ensure that devices reflect the correct local time. (Note: events that have occurred in the past, before the update, will not show correctly.)
This can be done in one of the two ways:
- Select the Windows logo key, type “time zone”, and select Change the time zone. From the time zone dropdown, select “(UTC+2:00) Harare, Pretoria”.
- Navigate to Control Panel > Date and Time > Change time zone. From the time zone dropdown, select “(UTC+2:00) Harare, Pretoria”. Select OK to apply the change.
We recommend switching time zone settings to “(UTC+2:00) Juba” after the update from Microsoft has been released and installed.
For Microsoft’s official policy on DST and time zone changes, please see Daylight saving time help and support. For information on how to update Windows to use the latest global time zone rules, see How to configure daylight saving time for Microsoft Windows operating systems.
by Contributed | Jan 29, 2021 | Technology
This article is contributed. See the original author and article here.
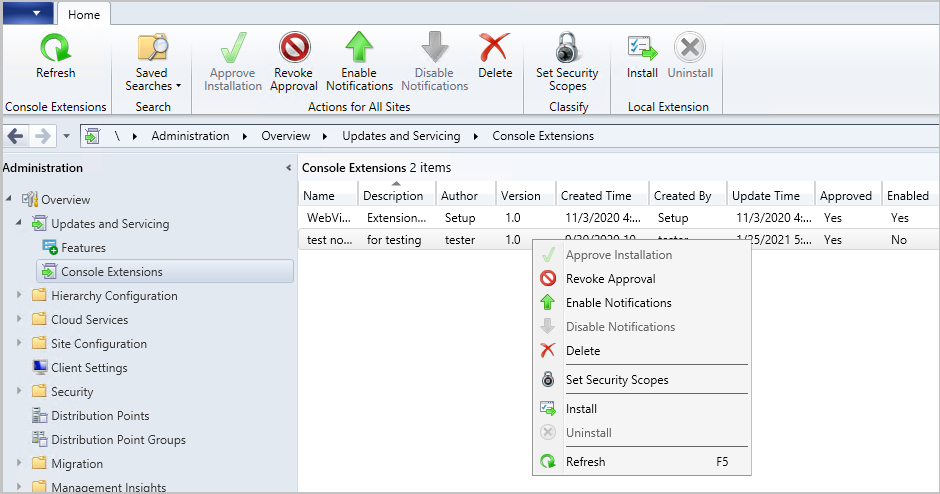
Update 2101 for the Technical Preview Branch of Microsoft Endpoint Configuration Manager has been released. You can now download console extensions from the Community hub and have it applied to all consoles connected to a hierarchy. This improvement allows you to start managing the approval and installation of console extensions used in your environment.
A new node has been added to the Configuration Manager console. The Console Extensions node is located under Administration > Overview > Updates and Servicing. Console extensions downloaded from the community hub will be located here. Actions for console extensions are grouped in the ribbon and the right-click menu.
Console extensions node
Actions include:
- Approve Installation: Approves the console extension for installation across all sites. An extension must be approved before notifications are enabled.
- Revoke Approval:
- Revokes the ability to install the extension from the Console Extensions node.
- Notifies then uninstalls existing instances of the extension across the hierarchy at the next launch of a locally installed console.
- Allows for reapproval of the extension at a later date.
- Enable Notifications: Upon next launch of the console, notifies users within the security scope that the extension can be installed.
- Disable Notifications: Disables the console notification messages for the extension. Users within the security scope can still install approved extensions from the Console Extensions node.
- Delete:
- Revokes the ability to install the extension from the Console Extensions node.
- Notifies then uninstalls existing instances of the extension across the hierarchy at the next launch of a locally installed console.
- Removes the extension from the Console Extensions node so it can’t be reapproved later.
- Set Security Scopes: Set the security scopes to secure the object and limit access.
- Install: Installs the selected extension for the current local console
- Uninstall: Uninstalls the selected extension from the current local console
Learn more about managing console extensions.
This preview release also includes:
Deploy a feature update with a task sequence – Based on your UserVoice feedback, you can now upgrade a client’s Windows OS by using a feature update deployed with a task sequence. This integration combines the simplicity of Windows servicing with the flexibility of task sequences. Servicing uses a single ESD file that you synchronize through the software update point. This process simplifies the need to manually get, import, and maintain the Windows image content used with a standard task sequence to upgrade Windows. The size of the ESD file is generally smaller than the WIM image file.
Tenant Attach: Required application deployments display in Microsoft Endpoint Manager admin center – Applications targeted to a device or a user with a required deadline will now show in the Applications view for a tenant attached device in Microsoft Endpoint Manager admin center. This improvement allows you to review when application installations are expected to occur on a device.
Client setting for displaying Software Center custom tabs – Technical preview version 2012 included an improved user experience and security with Software Center custom tabs. It required that you manually deploy the Microsoft Edge WebView2 browser control. Starting in this release, you can now configure a client setting to use the WebView2 control.
Simplified CMPivot permissions requirements – We’ve simplified the CMPivot permissions requirements. The following changes have been made:
- CMPivot no longer requires SMS Scripts read permission
- The administration service still requires this permission when falling back to use the SMS Provider when a 503 (Service Unavailable) error is received, as seen in the CMPivot.log
- The default scope permission isn’t required.
Allow exclusion of organizational units (OU) from Active Directory User Discovery – You can now exclude OUs from Active Directory User Discovery.
Changes to Support Center – Support Center is now split into the following tools:
- Support Center Client Data Collector: Collects data from a device to view in the Support Center Viewer. This separate tool encompasses the existing Support Center action to Collect selected data.
- Support Center Client Tools: The other Support Center troubleshooting functionality, except for Collect selected data.
Prerequisite rule for deprecated Azure Monitor connector – We continue to see broad adoption of native Azure Monitor log query groups as customers shift more of their workloads to the cloud. Because of this reason, starting in November 2020, the Configuration Manager feature to synchronize collections to Azure Monitor is deprecated. When you update to this release, a new prerequisite check warns about the presence of the Log Analytics connector for Azure Monitor. This connector is deprecated and will be removed from the product in a future release. At that time, this check will be an error that blocks upgrade.
Manage aged distribution point messages – In some environments, a small number of error status messages for a distribution point can cause the entire server status to show an error state. This behavior could be due to a known issue when failing to distribute content. To help you better manage the state of distribution points, this release includes the following improvements:
- Delete a specific distribution point status message.
- Delete aged status messages for a specific distribution point.
- Configure a site maintenance task to Delete Aged Distribution Point Messages.
Encryption algorithm to capture and restore user state – The task sequence steps to Capture User State and Restore User State always encrypt the USMT state store. Previously, Configuration Manager configured USMT to use the 3DES algorithm. Starting in this release, both steps now use the highest supported encryption algorithm, AES 256.
PowerShell release notes preview – These release notes summarize changes to the Configuration Manager PowerShell cmdlets in technical preview version 2101.
Update 2101 for Technical Preview Branch is available in the Microsoft Endpoint Configuration Manager Technical Preview console. For new installations, the 2010 baseline version of Microsoft Endpoint Configuration Manager Technical Preview Branch is available on the Microsoft Evaluation Center. Technical Preview Branch releases give you an opportunity to try out new Configuration Manager features in a test environment before they are made generally available.
We would love to hear your thoughts about the latest Technical Preview! Send us Feedback about product issues directly from the console and use our UserVoice page for ideas about new features.
Thanks,
The Configuration Manager team
Configuration Manager Resources:
Documentation for Configuration Manager Technical Previews
Try the Configuration Manager Technical Preview Branch
Documentation for Configuration Manager
Microsoft Endpoint Manager announcement
Microsoft Endpoint Manager vision statement
Configuration Manager Forums
Configuration Manager Support
by Contributed | Jan 29, 2021 | Technology
This article is contributed. See the original author and article here.
Howdy folks,
We continue to hear from you that hybrid identity is as important as ever, even as more apps move to the cloud. In Azure AD, our key hybrid identity tool is Azure AD Connect. This comes in two flavors based on your use case needs: Azure AD Connect sync which lives on-premises, and Azure AD Connect cloud sync which is powered by the cloud. We are constantly improving these capabilities based on your feedback, to make it easier to deploy and configure while also improving security, scale and throughput.
Today we’re announcing Azure AD Connect cloud sync is generally available! This was formerly known as Azure AD Connect cloud provisioning during its preview. We have also made significant updates to our classic Azure AD Connect sync tool with improved scale and performance.
Azure AD Connect cloud sync general availability
Azure AD Connect cloud sync is the future of our hybrid identity sync capabilities. It moves all the heavy-lifting of the transform logic to the cloud. It also reduces the on-premises footprint with light-weight agents that can be distributed for enterprise-grade availability. Customers can deploy this either standalone, or even alongside Azure AD connect sync. When deployed together, it allows you to connect disconnected AD forests that arise from merger and acquisition or remote office location scenarios. To see the differences in the sync capabilities within Azure AD Connect, check our comparison chart.
Since our public preview, we’ve introduced some additional capabilities:
- Enhanced security with support for gMSA: Using the group Managed Service Account (gMSA), you no longer need to provide domain admin credentials to run the sync agent. You can either use your own custom gMSA account or the one defined by us.
- Ability to sync large directories with up to 150,000 directory objects per configuration and large groups with up to 50,000 members.
- Prevent accidental deletes by configuring a threshold for deletes beyond which you get notified to take action.
- Health features that allow you to monitor your sync service and resolve common data issues such as duplicate attribute values.
- Advanced troubleshooting tools that helps your organization easily find out if something goes wrong with your sync configuration.
To get up and running with Azure AD Connect cloud sync today, check out our documentation.
Azure AD Connect sync updates
Many of you have been using classic Azure AD Connect sync for years as the primary means to bridge your hybrid identity. We’ve heard that as your business and teams grow, you need higher throughput on syncs as well as be able to sync larger groups. With the general availability of our v2 end point and latest build of Azure AD Connect sync, you can now sync groups of up to 250,000 members and customers who previewed the new end point saw 3 to 10x improvement in performance on average on their sync times. One customer told us that this update “has resulted in dramatic performance improvements on our delta synchronizations. Before, during the work week, the average was constantly around 5 hours. This week it is 25 minutes.”
To try the v2 end point and make sure you’re using the latest build of Azure AD Connect sync, check out our documentation.
As always, we’d love to hear from you. Please let us know what you think in the comments below or on the Azure AD feedback forum.
Best regards,
Alex Simons (twitter: @alex_a_simons)
Corporate Vice President Program Management
Microsoft Identity Division
by Contributed | Jan 29, 2021 | Technology
This article is contributed. See the original author and article here.
Version 9.2 of the Microsoft JDBC Driver for SQL Server has been released. Version 9.2.0 brings many added features, changes, and fixed issues over the previous production release.
Added
- Added a connection property for maxResultBuffer 1431
- Added support for Azure Active Directory Service Principal authentication 1456
- Added support for Azure Active Directory Interactive (MFA) authentication 1464
- Added support for already connected sockets when using a custom socket factory #1420
- Added JAVA 15 support #1434
- Added LocalDateTime and OffsetDateTime support in CallableStatement #1393
- Added new endpoints to the list of trusted Azure Key Vault endpoints #1445
Changed
- Enabled useBulkCopyForBatchInsert against any server, not just Azure Synapse Analytics #1465
- Changed the visibility of SQLServerBulkBatchInsertRecord to package-private #1408 (Potential breaking change)
- Upgraded to the latest Azure Key Vault libraries #1413
- Updated the API version when using MSI authentication #1418
- Updated the driver to remove clientKeyPassword from memory #1428
- Updated SQLServerPreparedStatement.getMetaData() to retain exception details #1430
- Made ADALGetAccessTokenForWindowsIntegrated thread-safe #1441
Fixed
- Fixed an issue with high memory allocation during bulk copy #1475
- Fixed an issue with column ordinal mapping not being sorted when using bulk copy #1406
- Fixed an issue with bulk copy when inserting non-unicode multibyte strings #1421
- Fixed an issue with SQLServerBulkCSVFileRecord ignoring empty trailing columns when using the setEscapeColumnDelimitersCSV() API #1438
Getting the latest release
The latest bits are available to download from Microsoft, from the GitHub repository, and via Maven Central.
Add the JDBC 9.2 RTW driver to your Maven project by adding the following code to your POM file to include it as a dependency in your project (choose .jre8, .jre11, or .jre15 for your required Java version).
<dependency>
  <groupId>com.microsoft.sqlserver</groupId>
  <artifactId>mssql-jdbc</artifactId>
  <version>9.2.0.jre11</version>
</dependency>
Help us improve the JDBC Driver by taking our survey, filing issues on GitHub or contributing to the project.
Please also check out our
tutorials to get started with developing apps in your programming language of choice and SQL Server.
David Engel
by Contributed | Jan 29, 2021 | Technology
This article is contributed. See the original author and article here.
We have released Microsoft Drivers for PHP for SQL Server, version 5.9.0. This production release of the SQLSRV and PDO_SQLSRV drivers has been built with PHP 7.3, 7.4, and 8.0 and tested on all supported platforms.
Notable items about this release since the previous production release include:
Added
Removed
- Dropped support for PHP 7.2
- Dropped support for macOS High Sierra, Ubuntu 19.10 and Debian 8
Fixed
- Pull Request #1127 – removed TSRMLS macros in preparation for PHP 8 by remicollet
- Pull Request #1136 – improved performance when handling decimal numbers as inputs or outputs and removed unnecessary conversions for numeric values
- Pull Request #1143 – if an exception occurs when executing a query, it will not change the output parameters
- Pull Request #1144 – use the correct C types when binding output parameters with integer values
- Pull Request #1146 – improved performance when fetching numbers using client buffers
- Pull Request #1165 – set query timeout without using LOCK TIMEOUT, which saves an extra trip to the server
- Issue #1170 – when fetching large data types such as ntext, check more than only the display size – pull request #1172
- Pull Request #1205 – minimized compilation warnings on Linux and macOS
- Pull Request #1209 – fixed a bug when fetching varbinary max fields as char or wide chars
- Issue #1210 – switched from preview to beta terminology to enable Pickle support
- Issue #1213 – the MACOSX_DEPLOYMENT_TARGET in config files caused linker errors in macOS Big Sur – Pull Request #1215
- Pull Request #1226 – replaced the problematic strlen function
- Pull Request #1227 – addressed static code analyis issues
Limitations
- No support for inout / output params when using sql_variant type
- No support for inout / output params when formatting decimal values
- In Linux and macOS, setlocale() only takes effect if it is invoked before the first connection. Attempting to set the locale after connecting will not work
- Always Encrypted requires MS ODBC Driver 17+
- Only Windows Certificate Store and Azure Key Vault are supported. Custom Keystores are not yet supported
- Issue #716 – With Always Encrypted enabled, named parameters in subqueries are not supported
- Issue #1050 – With Always Encrypted enabled, insertion requires the column list for any tables with identity columns
- Always Encrypted limitations
Known Issues
- This release requires ODBC Driver 17.4.2 or above. Otherwise, a warning about failing to set an attribute may be suppressed when using an older ODBC driver.
- Connection pooling on Linux or macOS is not recommended with unixODBC < 2.3.7
- When pooling is enabled in Linux or macOS
- unixODBC <= 2.3.4 (Linux and macOS) might not return proper diagnostic information, such as error messages, warnings and informative messages
- due to this unixODBC bug, fetch large data (such as xml, binary) as streams as a workaround. See the examples here.
Survey
Let us know how we are doing and how you use our drivers by taking our pulse survey.
Install
- On Linux and macOS run the commands below:
sudo pecl install sqlsrv
sudo pecl install pdo_sqlsrv
- Windows DLLs for PHP 7.3 or above can be downloaded as a package from Microsoft, or from the PECL repository for SQLSRV or PDO_SQLSRV.
- Direct downloads for released binaries can also be found at the Github release tag.
David Engel

Recent Comments