This article is contributed. See the original author and article here.
Jeff, Orin & Sonia discuss how cloud makes on-prem environments better, including cloud tiering & management tools, and what the future looks like for IT Pros.
Speaker:
Jeff Woolsey, Principal Program Manager
This session includes:
00:00 Introduction
00:36 The IT response to COVID-19 04:43 Where to next? 06:38 The criticality of the Domain Controller 07:52 Security improvements in later versions of Windows Server 08:44 What should IT Pros learn next? 13:50 Security versus compatibility 17:40 Azure policies deployed on-premises via Azure Arc 20:00 Systems management today versus in the past 21:10 Inventory and management in distributed environments 24:05 Managing hybrid environments with Azure Arc 26:45 How the cloud compliments on-prem 30:34 Better together – Windows Server 2019 and Azure File Sync 40:47 Centrally manage from Azure 43:50 Azure Monitor 44:25 Systems Center integration 44:54 Azure Policy 45:44 The next set of tools for your IT Pro toolbox and your career 46:38 SMB customers, Partners and managed service providers and Azure Lighthouse 51:58 On-prem “upwards” management and Windows Admin Center 56:05 Azure IoT Edge plug-in for Windows Admin Center 57:19 Orin kills mmc.exe 59:37 Windows Admin Center OR PowerShell? Why not both! 1:00:16 SPOILER ALERT – New versions of Windows Server will be released in the future 1:01:00 Azure Stack HCI
This article is contributed. See the original author and article here.
We’ve heard organizations of all sizes express the desire for a streamlined way to deploy a set of standardized security and configuration settings to endpoints that only need a few apps and have focused needs. Developed to support these organizations, Windows 10 in cloud configuration is a recommended set of settings for Windows 10 devices that makes devices easy to deploy, highly secure, and cloud-first. It enables organizations to provide frontline workers, remote workers, and other individuals with a select set of applications, cloud-based data storage, and a familiar Windows experience.
Cloud config is set up within Microsoft Intune, a part of Microsoft Endpoint Manager[1]. It works on new and existing Windows 10 devices running Windows 10 Pro, Pro for Education, Pro for Workstations, Windows 10 Enterprise, and Windows 10 Education, and does not require any new licensing, software, or hardware[2]. It can be used to pre-configure new devices, so they are ready to go when users open them for the first time, or to repurpose existing hardware to extend its lifetime. In addition, Windows 10 devices in cloud configuration have applications and capabilities specifically chosen by IT, helping to improve worker productivity while simultaneously improving the security posture and device compliance. Users are registered in Azure Active Directory (Azure AD) and devices are enrolled into Microsoft Intune for cloud management.
What is Windows 10 in cloud config?
Today, Windows 10 in cloud config is a recommended set of configuration settings for areas such as Windows Update for Business, Microsoft BitLocker, application deployment, and compliance. Microsoft will continue to innovate through cloud config—adding, removing, and modifying settings as needed—and is creating a guided scenario in Microsoft Intune for even easier configuration. More info on that soon!
What does cloud configuration include?
Windows 10 in cloud config includes Windows 10 Pro, Enterprise, or Education, Microsoft Teams, OneDrive for Business Known Folder Move (KFM), Microsoft Intune, and Azure AD. A number of Microsoft 365 subscriptions include all of these elements, or each can be licensed separately.
Do I need to reset devices into cloud config?
You are not required to wipe existing Windows 10 devices and start fresh to take advantage of Windows 10 in cloud config, but this process is recommended for those who would like to remove all extraneous apps, user accounts, and files from the device for maximum performance. Enrolling the device in Windows Autopilot and performing a Windows Autopilot reset is the preferred method, but it is not required.
Should I configure all of my devices in cloud config?
Windows 10 in cloud config is designed for users with simplified needs, such as productivity and browsing. You can start by identifying which users or teams in your organization would benefit from these specific policy and configuration settings. Ideal candidates are people who:
Have no dependency on on-premises infrastructure to be productive and successful in their role.
Use Windows 10 devices that do not require complex settings, configurations, or custom agents.
Use a focused set of apps like email, Teams, Microsoft Edge, and maybe a couple of internal line-of-business apps.
How does cloud config make things simpler?
Windows 10 in cloud configuration simplify both the end user experience and IT’s experience with endpoint management. Here are some of its key benefits:
Provides a uniform, simplified configuration optimized for the cloud that can be applied to Windows 10 Pro and Enterprise devices. Users enroll with cloud accounts (Azure AD) and devices are kept secure and compliant with Microsoft-recommended security settings. User data is redirected to compliant storage in OneDrive for Business[3].
Devices are configured with the default Windows 10 security baseline and are automatically updated through Windows Update for Business.
Microsoft Teams, Microsoft Edge, and additional Microsoft 365 Apps (optional) can be installed on the device and come securely configured, automatically updated, and ready to go.
Every Windows 10 in cloud config device has a uniform configuration, simplifying device replacements and troubleshooting.
Windows 10 in cloud config can be deployed using Microsoft Endpoint Manager.
Line-of-business apps may be installed on the device.
IT can provision apps both directly and through desktop/app virtualization.
Where can I learn more about Windows 10 in cloud config?
This article is contributed. See the original author and article here.
The new Microsoft Lists grid view is now available worldwide, including SharePoint lists and libraries that share the same technology platform in Microsoft 365.
With simple, inline experiences, you can quickly update your information or add new items easily. Features like drag to fill, undo/redo, new field editors (text, date, people, yes/no, choice), and copy/paste make grid view the best place to get your information, quickly and organized.
We’ll cover all new features and capabilities below – including screenshots and links to learn more, starting here with an in-depth demo video I produced to showcase all the goodness our Lists engineers have been working on and refining:
Let’s dive into the details…
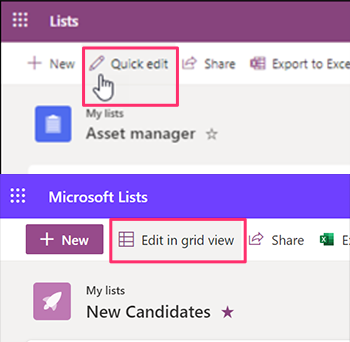
The ‘Quick edit’ button is now ‘Edit in grid view’
Previously, when users bulk edited list items in a list or a document library, they select the Quick edit button in the top action bar. We are renaming Quick Edit to Edit in grid view.
The Quick Edit button for all lists and libraries in Microsoft 365 will be renamed “Edit in grid view” [bottom]; previously “Quick edit” [top].
The newly named view provides an inline editing experience with lots of improvements, making it easy to quickly update list items in bulk within grid view. We’ll cover all of this beyond the button rename below.
And, if you love grid view, make it your default view. That’s right, you can save a view in grid for any SharePoint list or document library. Note: when a user saves a view in Quick Edit, the list or document library will always render in quick edit for easy inline editing.
Edit with confidence, for those accidental ‘oops’ moments
As you work across rows and columns within Microsoft Lists, mistakes will happen, and it needs to be easy to recover information. Like how you can remove sentences and phrases in a Word document, you will be able to do this in Lists by using the undo button. The same is true in reverse if there was something in a field previously that you want to bring back – just click the redo button.
Click Undo or Redo to revert changes or remove mistakes within Microsoft Lists.
The team has been working hard to improve the inline editing experience and release the new grid view. Our priority is providing the most effective inline editing experience by delivering new field editors and features designed to make editing data better than ever.
New inline field editors
Person
Items with a Person column can now be rendered using the new “pill” design format with a profile person’s photo also displayed. Select one or more people to add to a Person column quickly, and the entry will display an updated look. To turn this on, you can select “show profile picture” from the column setting.
Items within a Choice column will support single, multi-choice, and manual fill as you add items. You’ll see updated formatting right away and can update and remove choice fields and formatting selections previously applied.
The legacy calendar control is replaced with Office Fabric calendar for Gregorian calendars in SharePoint lists and libraries when filling or adjusting the date field. The new calendar experience is faster and delivers a coherent experience across throughout.
When you turn on rich text editing in your multi-line text fields, you can now edit directly inline in grid.
Roadmap ID: (coming soon)
Improvements to the overall editing experience throughout the grid
As you can see, what was ‘Quick edit’ is now Edit in grid view, and one of the biggest innovations is simply improving the speed and accuracy for how you input and update information. The grid itself is a feature, and we’ve spent a lot of time reviewing feedback and improving both technology and performance – to keep up with the speed at which you work AND not slow you down.
The new Quick Edit experience showing some of the innovation: updated grid lines, fixed row height, new selection, sticky first column, Add new button, visual cues and more.
Fixed row height | When in grid, you will see a new layout option “Fixed Height” within the view drop-down menu. This layout option will adjust the height of all rows to the same height to optimize vertical spacing.
Sticky first column | Easily navigate you list with a sticky column. As you scroll horizontally across a list or documentary library in grid, the far-left column remains in place. You can see this in the main graphic of this section – the “Session name” column remains in place as you scroll to the right.
New Visuals | You’ll see new grid lines, an improved on-hover experience when using your mouse around the grid, themed color bars on the side of list items – including error messaging, a “Create New Item” button at the bottom of quick edit for creating new items inline, and updated column header drop-down menus.
Selection | You will see an updated way for selecting single or multiple items. This, too, supports existing copy/paste and drag-to-fill, applicable to multiple rows when using shift + selection. And when navigating and interacting via keyboard keystrokes – like what we talked to John Sanders about – a consistent keyboard navigation approach.
Expanding the default grid view from 30 items to 100 | You will now see 100 items per page on SharePoint document library or list when using Quick Edit; aka, less need page through items – noting that many lists are greater than 30 items and less than 100 – a nice data-driven outcome based on real customer use.
Keyboarding consistency | When you edit in grid view, you will have a faster editing experience that adheres to greater levels of accessibility. Navigate across rows and columns using the tab key. Plus, pressing Enter enables you to edit that field. Clicking Enter on a new row saves the new item. And pressing the Esc key closes editor.
Configure your schema, aka – make lists your own especially when in grid view
You no longer need to leave inline editing to configure schema on your list – to do things like filter, sort, create new columns, hide columns, and save views… yep, do all that now directly from grid edit mode.
Create all column types directly from Quick Edit | You’ll be able to create all the same columns types when you need to start tracking additional information without have to leave Quick Edit.
Edit all columns directly from grid | The capabilities when in Lists “grid” view will now allow people to pin a column to the filter’s pane, format the column, show/hide columns, and hide their column(s). You used to have to exit out of grid edit to accomplish these common tasks. Exit edit mode less – that’s the new motto.
We have brought the form into grid view so you can easily view your content vertically or create new items. This is useful if certain columns are hidden from the view or you have lots of columns requiring horizontal scrolling.
View and edit items in forms inside of grid | Get full visibility on the whole of information per list or file item by viewing its form (instead of scrolling to the right on the row).
View and edit items in forms inside of Quick edit.
“New” button on the command bar | Alongside adding a new row below the last, you can now click the New button to add a new item or file – the same “New” experience when not in Quick Edit.
So, go ahead, Edit in grid view. We know you’re going to like the depth of capability when in edit mode, including the performance and bulk capability improvements.
To learn more about lists, check out the additional resources:
This article is contributed. See the original author and article here.
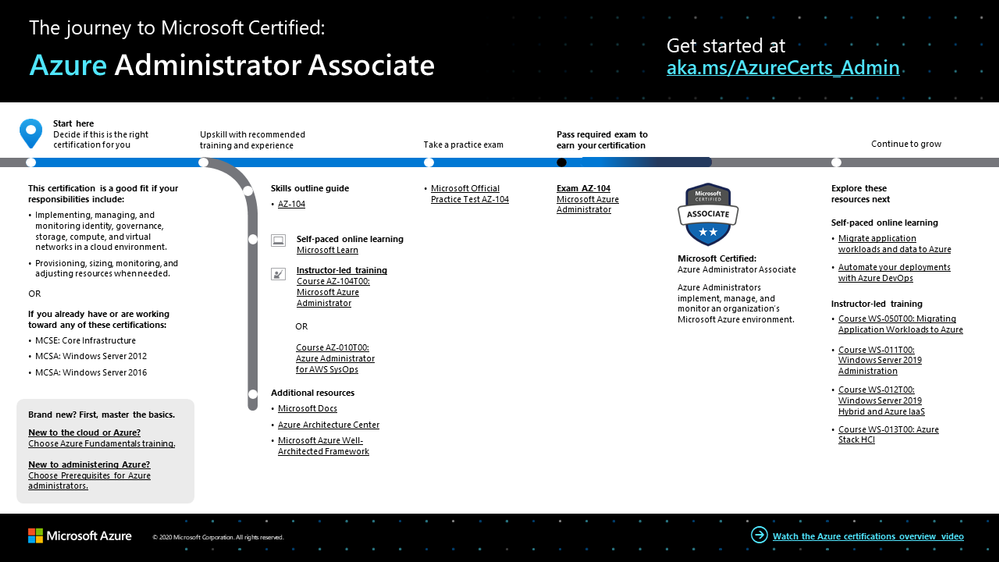
Cloud infrastructure enables companies around the world to reduce costs, enhance security, simplify management, and much more. And Azure administrators have what it takes to unlock the benefits of cloud computing for their organizations, making the most of the resiliency, scalability, and unified data governance of Azure. Plus, these professionals understand how to put the cloud to work to enable newly remote business processes and to help companies become more agile in the face of today’s rapid digital transformation. It’s no wonder that certified Azure administrators are in such great demand.
If your responsibilities include implementing, managing, and monitoring identity, governance, storage, compute, and virtual networks in a cloud environment, this could be the certification for you. Other key skills include the ability to provision, size, monitor, and adjust resources when needed, especially as part of a team dedicated to implementing your organization’s cloud infrastructure.
What kind of knowledge and experience should you have?
As a candidate for this certification, you should have at least six months of hands-on experience administering Azure, along with a strong understanding of core Azure services, Azure workloads, security, and governance. In addition, you should have experience using PowerShell, Azure CLI, Azure portal, and Azure Resource Manager templates.
After you pass the exam and earn your certification, check out the many other learning and certification opportunities. Want to add to your skill set? Consider learning to migrate application workloads and data to Azure or to manage hybrid cloud solutions. For related training, check out Microsoft Learn.
Note: Remember that Microsoft Certifications assess how well you apply what you know to solve real business challenges. Our training resources are useful for reinforcing your knowledge, but you’ll always need experience in the role and with the platform.
Celebrate your Azure talents with the world
When you earn a certification or learn a new skill, it’s an accomplishment worth celebrating with your network. It often takes less than a minute to update your LinkedIn profile and share your achievements, highlight your skills, and help boost your career potential. Here’s how:
If you’ve earned a certification already, follow the instructions in the congratulations email you received. Or find your badge on your Certification Dashboard, and follow the instructions there to share it. (You’ll be transferred to the Acclaim website.)
To add specific skills, visit your LinkedIn profile and update the Skills and endorsements section. Tip: We recommend that you choose skills listed in the skills outline guide for your certification.
Keep your certification up to date
If you’ve already earned your Azure Administrator Associate certification, but it’s expiring in the near future, we’ve got good news. You’ll soon be able to renew your current certifications by passing a free renewal assessment on Microsoft Learn—anytime within six months before your certification expires. For more details, please read our blog post, Stay current with in-demand skills through free certification renewals.
It’s time to level up!
Your Microsoft Certification can help validate that you have the skills to stay ahead with today’s technology. It can also help empower you with a boost in confidence and job satisfaction—and maybe even a salary increase. Want to know more? In our blog post, Need another reason to earn a Microsoft Certification?, we offer 10 good reasons to earn your certification.
As an Azure administrator, you understand what the cloud can do for your organization. And you know how to enable purpose-built infrastructures for consistent management, security, and governance—on-premises, in a hybrid scenario, or fully in the cloud. With all the innovation and capabilities that Azure has to offer, now is the time to earn your Azure Administrator Associate certification. Prove your ability to make a difference to your team and your organization—today and in the future—with your in-demand Azure administrator skills and experience.
This article is contributed. See the original author and article here.
At Microsoft Teams, we frequently hear the question, “I am running the same version as my coworker, but they have a feature I don’t. Why don’t I have that feature now? And how can I get it now?” Before we answer that question, we want to shed some light on our overall release processes so that the answer makes sense.
As a productivity tool connecting hundreds of millions of people around the world and enabling remote work, remote learning, and connections with family and friends, we take a very orchestrated approach to how we roll out and enable new features. We have multiple packages that get rolled out: web, desktop (Windows, Mac, Linux), mobile (iOS, Android), packages for conference room devices, and our backend services. Each of these packages are backed by feature flag configurations that let us ship a new Teams version and enable features separately.
When we roll out features, it consists of two activities:
Shipping the version (Teams application version with code for new features included)
Enabling the feature through the feature flag
Both activities happen progressively, but at different times. We first ship the build with the feature flags turned off. We progressively roll out the build to users, wait for the build to be picked up and used by users, and reach certain penetration rates. We’ll run scorecards for key performance and usage metrics between the prior build and the new build to ensure we are not introducing any form of regression with our latest version.
Once we have scorecards and confidence in the version, we can then begin to progressively enable our feature flags – making the new features available for users. For our larger, external customer facing rings, this is a multiple step process that usually happens over a few days.
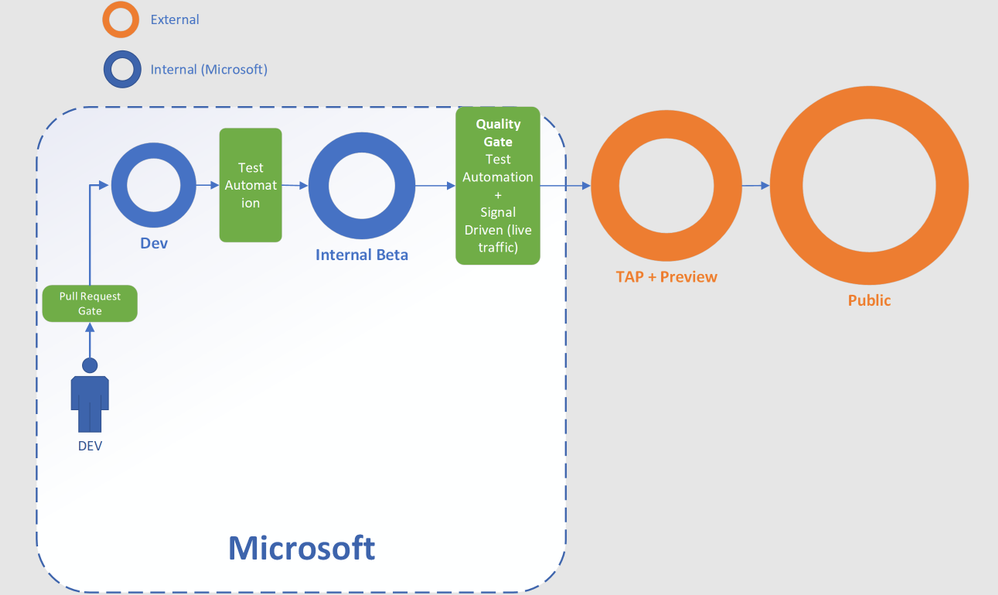
Below is a high-level view of our audience segmentation. Each ring represents an audience with specific gating criteria to allow us to exit the build and the feature flag, and to progress them to the next ring.
When we begin rolling out feature flags within a ring is where you will usually see differences in features within the same version. We roll features and versions out on in increasing % tranches at user level (considering the worldwide user pool and not at an organization/tenant level)as it gives us the best cross section of use cases, hardware configurations, software configurations, network topology, bandwidth availability, etc., to validate our changes and the user experience they provide – but this does mean that co-workers on the same build can see differences in their features. Rolling out feature flags by organization introduces the potential to bias our results with similar hardware, bandwidth, and usage patterns, so we focus on getting a cross section of users and usage patterns with our rollouts.
In December 2020 we announced the availability of Teams Public Preview. Public Preview is a great mechanism to expose a subset of your user base to features a little ahead of everyone else. This allows you to get familiar with new features before they are available to all users.
This article is contributed. See the original author and article here.
CISA is aware of a vulnerability in SonicWall Secure Mobile Access (SMA) 100 series products. SMA 100 series products provide an organization’s employees with remote access to internal resources. SonicWall security and engineering teams have confirmed a zero-day vulnerability that was reported by a third-party threat research team on Sunday, January 31, 2021. This vulnerability impacts only SMA 100 Series devices with firmware version 10.x, and SonicWall is working on a patch that is expected to be released by end of day Tuesday, February 2, 2021.
Earlier reports about other zero-day vulnerabilities remain unconfirmed and are still under investigation.
CISA encourages users and administrators to review the SonicWall security advisory and apply the necessary mitigations and patches when they become available. CISA also encourages users and administrators to monitor the SonicWall advisory for updates as new information becomes available.
As a risk-reduction measure, CISA recommends organizations implement multi-factor authentication on all virtual private network connections.
This article was originally posted by the FTC. See the original article here.
Using your own vehicle to deliver packages for Amazon and earn extra money. Sounds good, right? But has Amazon been keeping the tips its drivers are making when delivering for its Amazon Flex program? According to the complaint the FTC issued today, the answer is yes.
In its app and numerous marketing materials, Amazon advertises that drivers can earn $18 to $25 per hour — plus 100% of customer tips. According to the FTC, during a two-and-a-half year period, Amazon Flex used about $61.7 million in tips to subsidize drivers’ base pay. Customers thought they were tipping drivers — not Amazon — and drivers were left shortchanged.
The FTC also says that Amazon, despite receiving hundreds of complaints from drivers who saw their pay decrease, continued diverting drivers’ tips until the FTC notified the company of its investigation.
The settlement announced today would require Amazon to pay back the full $61.7 million to drivers, provide only accurate information about tips and pay to both customers and drivers, and get drivers’ consent before changing how it handles tips in the future.
Here are some things to consider before you become a gig worker.
Do your research.Search for information about the company online, like how it pays its workers and any other conditions of the job.
Talk to other gig workers.Reach out to your friends or family members who are gig workers and speak with them about their experiences, how they are paid, and how the company handles tips.
Compare earnings.Will you be paid hourly? By gig? Will you get every dollar a customer tips you? And will the company reduce your pay based on the tips you receive? Once you’re on the job, ask the company for a breakdown of your earnings so you can be sure you’re getting what they promised.
Compare costs and coverage.If you’re considering becoming a driver using your own vehicle, estimate your gas and maintenance costs, andcheck your car insurance. Does your auto policy cover you while you’re driving for work?
Report your concerns.If a company doesn’t deliver on its promises, report it to the FTC atReportFraud.ftc.gov.
Brought to you by Dr. Ware, Microsoft Office 365 Silver Partner, Charleston SC.
This article is contributed. See the original author and article here.
The Azure Sentinel CMMC Workbook provides a mechanism for viewing log queries aligned to CMMC controls across the Azure cloud including Microsoft security offerings, Office 365, Teams, Intune, Windows Virtual Desktop and many more. This workbook enables Security Architects, Engineers, SecOps Analysts, Managers, and IT Pros to gain situational awareness for the security posture of cloud workloads. There are also recommendations for selecting, designing, deploying, and configuring Microsoft offerings for alignment with respective CMMC requirements and practices. The workbook features 250+ control cards aligned to the 17 CMMC control families across all 5 maturity levels with selectable GUI buttons for navigation.
The workbook helps you to gain better visibility into your cloud architecture from security perspective while reinforcing CMMC principles for building cybersecurity critical thinking skills. The workbook consolidates multiple log sources from your Azure environment:
Azure Active Directory
Azure Active Directory Identity Protection
Azure Activity
Azure DDoS Protection
Azure Firewall
Azure Information Protection
Azure Security Center
Common Event Format
DNS
Intune
Microsoft 365 Defender
Microsoft Cloud App Security
Microsoft Defender for Endpoint
Microsoft Defender for Identity
Office 365
Security Events
Syslog
Threat Intelligence Platforms
Windows Firewall
Teams
User Entity Behavior Analytics
Windows Virtual Desktop
What is Cybersecurity Maturity Model Certification (CMMC)?
The US Defense Industrial Base (DIB) is charged with implementing Defense Federal Acquisition Regulation Supplement (DFARS) 252.204-7012. DFARS requires organizations supporting the Department of Defense (DoD) to implement NIST SP 800-171 and FedRAMP Moderate Impact level controls. DoD has mandated CMMC with periodic assessments because historic self-attestation audits haven’t met the desired impact. CMMC builds upon DFARS 7012 by verifying an organization’s readiness to protect Federal Contract Information (FCI) and Controlled Unclassified Information (CUI) such as International Traffic in Arms Regulation (ITAR) and Export Administration Regulations (EAR) export-controlled data.
CMMC extends beyond the parent organization into sub-contractors, partners, and suppliers. The framework is intended to enforce critical thinking approaches for comprehensive security. The CMMC framework specifies 5 levels of maturity measurement from Maturity Level 1 (Basic Cyber Hygiene) to Maturity Level 5 (Proactive & Advanced Cyber Practice). The Certification levels will be determined through audits from independent, third-party assessment organizations (C3PAO). Even if your organization doesn’t require CMMC compliance, the framework provides a useful maturity model assessment framework for building/improving cybersecurity resiliency.
Deploying the Workbook
It is recommended that you have the log sources listed above to get the full benefit of the CMMC Workbook, but the workbook will deploy regardless of your available log sources. Follow the steps below to enable the workbook:
Requirements: Azure Sentinel Workspace and Security Reader rights.
1) From the Azure portal, navigate to Azure Sentinel
2) Select Workbooks > Templates
3) Search CMMC and select Save to add to My Workbooks
Navigating the Workbook
The Legend Panel provides a helpful reference for navigating the workbook with respective colors, features, and reference indicators.
The Guide Toggle is available in the top left of the workbook. This toggle allows you to view panels such as architectural recommendations and guides which will be helpful when you first access the workbook but can be hidden once you’ve grasped respective concepts.
The Control Family Ribbon provides a mechanism for navigating to the desired control family. Selecting a control family will display Control Cards in the respective Control Family. The Maturity Level Ribbon drills down further to the desired control maturity level. You can view an index of controls in the workbook if you have the Guide Toggle enabled.
For example, if you’re interested in viewing Incident Response controls, you can view the Control Family Index to view which controls are covered in the workbook.
To drill down into a control of interest such as RM.4.149 (Update Threat Profiles/Adversary Tactics, Techniques, Procedures), select Risk & Recovery Management and Maturity Level 4 which populates all control cards available for that family in Maturity Level 4.
The Azure Sentinel CMMC Workbook displays each control in a Control Card. The Control Card provides respective control details to help you better understand the requirement, view your data, adjust SIEM queries, export artifacts, onboard Microsoft controls, navigate to respective configuration blades, access reference materials, and view correlated compliance frameworks.
Use Cases
There are several use cases for the Azure Sentinel CMMC Workbook depending on user roles and requirements. The graphic below shows how a cloud security architect can leverage the workbook to review requirements, reference documentation, make configurations, and export artifacts. There are also several additional use cases where this workbook will be helpful:
Security Architect: Build/design a cloud security architecture to compliance requirements.
It’s important to note that this workbook provides visibility and situational awareness for control requirements delivered with Microsoft technologies in predominantly cloud-based environments. Customer experience will vary by user and some panels may require additional configurations and query modification for operation. It’s unlikely that all 250+ panels will populate data, but this is expected as panels without data highlight respective areas for evaluation in maturing cybersecurity capabilities. Control Cards without data will display the custom error message below. Most issues are resolved by confirming licensing/availability/health of the log source, confirming the log source is connected to the Sentinel workspace, and adjusting time thresholds for larger data sets. Ultimately this workbook is customer-controlled content, so panels are configurable per customer requirements. You can edit/adjust Control Card queries as follows:
While using the Microsoft security controls for the CMMC Workbook is recommended, it’s not a set requirement as customers often rely on a multitude of security providers and solutions. Below is a use-case example for adjusting a Control Card to include third party tooling. The default KQL query provides a framework for target data and it is readily adjusted with the desired customer controls/solutions.
Microsoft Blog Posts on CMMC
Below are additional resources for learning more about CMMC in the cloud with Microsoft. Let us know if there are additional government compliance frameworks we can help with. Bookmark the Security blog to keep up with our expert coverage on security matters and follow us at @MSFTSecurity or visit our website for the latest news and updates on cybersecurity.
The Azure Sentinel CMMC Workbook demonstrates best practice guidance, but Microsoft does not guarantee nor imply compliance. All accreditation requirements and decisions are governed by the CMMC Accreditation Body. This workbook provides visibility and situational awareness for control requirements delivered with Microsoft technologies in predominantly cloud-based environments. Customer experience will vary by user and some panels may require additional configurations and query modification for operation. Recommendations do not imply coverage of respective controls as they are often one of several courses of action for approaching requirements which is unique to each customer. Recommendations should be considered a starting point for planning full or partial coverage of respective control requirements.
This article is contributed. See the original author and article here.
In Dynamics 365 Finance, you can use the credit management capability to define a credit limit at the customer level. However, the same customer might also be part of a customer credit group that has its own credit limit. So how does Dynamics 365 Finance determine which limit to use for sales orders when there’s a limit set in both places?
Here are five scenarios that describe how customer credit groups and individual customer credit limits affect each other.
Scenario 1: Individual limit is lower than the group limit
Individual customer credit limit = 10,000
Customer credit group limit = 15,000
How the credit limit is determined: The customer’s effective credit limit is 10,000 because it’s less than the group limit. Blocking rules first check the group limit, and the customer passes these rules. Blocking rules then check the individual customer credit limit and blocks any orders greater than 10,000.
Scenario 2: Individual limit is higher than the group limit
Individual customer credit limit = 20,000
Customer credit group limit = 15,000
How the credit limit is determined: The customer’s effective credit limit is 15,000 because blocking rules always check the customer group credit limit first.
Scenario 3: Individual limit is 0.00 and mandatory credit limit is enabled
Individual customer credit limit = 0.00 and mandatory credit limit option is set to Yes
Customer credit group credit limit = 15,000
How the credit limit is determined: Even though the customer is part of a group, their effective credit limit is 0.00. This supports a scenario where the customer is part of a group, but all orders must go through credit management for additional review.
Scenario 4: Individual limit is 0.00 and unlimited credit is enabled
Individual customer credit limit = 0.00 and unlimited credit limit option is set to Yes
Customer credit group credit limit = 15,000
How the credit limit is determined: This supports a scenario where the customer is part of a group but their effective credit limit is unlimited.
Scenario 5: Individual limit is 0.00, and neither unlimited credit nor mandatory credit limit is enabled
Individual customer credit limit = 0.00 and unlimited credit option is set to No, and mandatory credit limit is set to No
Customer credit group credit limit = 15,000
How the credit limit is determined: The customer’s effective credit limit is 15,000 (the same as the group limit).
All these scenarios still have to meet the applicable blocking rule criteria for the customer, table, or group before the order can be sent to credit management.


Recent Comments