This article is contributed. See the original author and article here.
Power Automate is a super cool tool, which gives us a lot of options. But sometimes, the built-in connectors, are not enough. In one of previous posts, I showed youhow to send HTTP requests to Microsoft Graph API. This time, I will show you how to connect to APIs outside of Microsoft 365 in Power Automate and even use an IOT button to trigger your flow.
Use case
To make things more approachable, here is a little use case for you:
I want to click an IOT button and this shall trigger a flow which tweets about the music I currently listen to on Spotify.
The result will look like this:
What we need
To achieve this, we will need a couple of things:
an IOT button – I use a Flic Smart button for that- that triggers my flow
a flow that connects to our Spotify and to twitter
So lets have a look at
IOT button
I use aFlic IOT buttonto trigger my flow. This button works with Bluetooth, which means that we will need a Bluetooth enabled device to work with this button- either a smartphone or an IOT Hub.
Set up your IOT button
download the app from your app store
install the app
register a new account
connect your folic button by pressing it for ~10 seconds
If you like to, rename this button – please keep in mind, that one button can be used to trigger several flows, as we have three different event types: Click, Double-Click and Hold.
Spotify
In this flow we want to trigger by one or any event of the flic button and then tweet the song we are currently listening to on Spotify. Turns out, that there is no connector for Spotify, so why not building our own custom connector?
To be able to build custom actions, you will need an API for this service. Lucky us, that Spotify provides us with that API so that we can use this to build our custom connector.
Of course we need to have at least a free Spotify account so that we can listen to music that then shall be tweeted about.
Before we can build the connector, we will need to register forSpotify’s Developer program– Once this is done, we can retrieve Spotify content such as album data, playlists and more though Spotify Web API. To get user-related data (like the song our user is playing right now) we need to authorize our application so that we are allowed to retrieve this information.
Register our application on Spotify
Log into your brand new Spotify for Developers account
If you like to, you can upload a connector icon, this step is optional
enterapi.spotify.comasHost
You can find the values you need to fill in here in theSpotify for developers documentation, but to make things easier for you, I will provide them for you.
To test our new connector, we need to select from an existing connection or create a new connection.
ClickNew connection
A new pop up window will appear and promt us toAgree– you as a user authorize your Spotify app to retrieve data related to your user account – such as the song currently playing.
ClickAgree
ClickClose
Use the custom connector in our flow
Now it’s time to build our flow
Trigger flic
As already said, we want the flic button to be our trigger
You can choose, if you want this flow to be triggered by any event type or if you want to save the two other event types for other flows.
Now we want to get the current song from our shiny new Custom connector:
Get current song
Click onInsert a new Step
Click onCustom
Select the new custom connector for Spotify
Our intention now is to tweet something like “I am currently listenintg to {songname} by {artistname}, check it out {spotify URL}.” But from our custom connector, we don’t get the name of song and artist per se, we will need to first parse the JSON output. If you never heard of that before, don’t worry, go read this article abouthow to parse JSON in Power Automate, I will just wait here for you and drink a coffee.
Back again? Cool!
Let your flow run
Go to your run history
Copy the output of theGet current songaction
Insert aParse JSONaction
ClickGenerate from sample
Paste into the new field
Clickdone
Magic– Now we can see all the output from our custom action as Dynamic content. Next thing up is to send the tweet. We can use the twitter connector for it, but Buffer works fine as well.
Add thepost a tweetaction
provide your tweet text with Dynamic content as you wish from your Parse JSON action. Don’t be afraid when the flow addsApply to eachloops! Unfortunately, both artist-name and -song-name are namedname, so you will need to figure out which is which.
save your flow
Run your flow
Open your flic app and select the new button, set the action that is triggered by theclickevent toMicrosoft Flow(watch out, this is the old name of Power Automate, which is not reflected in the Flic app). When you now click the button, this will trigger our flow, that listens to theClickevent of that button, get the current song and tweet about it!
Conclusion and what’s next
In this post I explained, how you can create a custom connector and call an API outside of Microsoft 365. You learned how to define actions and how to authorize your application so that you can retrieve the requested data. Which use cases do you have in mind? What would you like to build a custom connector for? Please share!
This article is contributed. See the original author and article here.
Carbon Negative
On January 28, 2021 Microsoft released its first Environmental Sustainability Report “A Year of Action” documenting progress the company made since announcing its 2020 commitments to become a carbon negative, water positive, zero waste company that protects more land than it uses by 2030. See a summary of the report in my previous blog post “Part one: A review of the Microsoft 2020 Environmental Sustainability Report A Year of Action.” This post will explore the carbon negative commitment. The third and final post will close out with a deeper look at water positive, zero waste and ecosystems, including the mysterious Planetary Computer.
Under construction: Climeworks’ new large-scale direct air capture and storage plant, “Orca.” (Credit: Climeworks)
Background
A company is carbon negative when it removes more carbon from the atmosphere than it emits each year. For the purposes of this post, carbon is shorthand for all greenhouse gases. If you want to understand why adding too much carbon to the atmosphere is bad, check out this great primer.
Microsoft will achieve carbon negativity through a combination of reduction and removal, making deep reductions of its emissions first and foremost, then using removal only for the residual footprint. This is rare: there aren’t many carbon negative companies, which means achieving this commitment will require operating in uncharted territory. Indeed, the report and accompanying white paper, Microsoft carbon removal “Lessons from an early corporate purchase”, make this point repeatedly as they describe the frustrating gap between ambition and reality. Today, we lack the technology, markets and commonly accepted accounting standards and methodologies required for carbon removal on a scale big enough to make a difference. Microsoft is going first and hoping to blaze a trail through the wilderness that others can follow.
Arguably this is where Microsoft focused most of its year one efforts, and for good reason. I recently had the chance to ask Microsoft’s Chief Environmental Officer Lucas Joppa “What keeps you up at night?” and the carbon problem was at the top of his list. From melting ice caps, to rising sea levels, more frequent extreme weather events, drought, heat waves, mass extinctions and a looming global migration crisis, the carbon problem is really one of mass systemic destabilization – the kind that could topple civilization as we know it. If climate science is telling us one thing most emphatically, it is that we need to drastically reduce the amount of carbon in the atmosphere immediately. This is why reduction of emissions simply will not be enough, for Microsoft or anyone else. As the chart below demonstrates, carbon removal will be critical to stabilizing the Earth’s climate.
Avoiding worst case climate scenarios will require removing emissions from the atmosphere.
Scoping it out
To learn more about Scope 1, 2, and 3 emissions, watch this 5 min video narrated by Lucas Joppa
Each of the 2020 carbon negative accomplishments represents an impressive amount of hard work and groundbreaking firsts. The complexity, challenge and scale of what went into the accomplishments cannot be overstated. What we see here is a company willing to go first and bring others along. Consider just a few of these points:
Microsoft charges its own internal business groups a real fee on their emissions as an incentive to drive them down and a way to raise capital for funds that reward sustainable innovation internally. I am not aware of many companies, especially the size of Microsoft, who actually charge a real carbon fee – most use what are called “shadow prices.”
Many companies haven’t yet begun to even measure their Scope 1 or 2 emissions, let alone reduce or remove them. Even fewer have done this for Scope 3
Further, the company extended this real fee from its Scope 1 and 2 emissions out to Scope 3, which are the indirect emissions associated with its supply and value chain. This means it collects revenue on emissions it did not directly produce! Microsoft’s updated Supplier Code of Conduct essentially says “if you want to continue doing business with Microsoft, you will need to measure and disclose your own emissions because ultimately, they are part of our footprint and we’re taking responsibility for that.” In essence, the company is using a carrot and stick approach with its own internal business groups and its suppliers to ensure everyone is coming along on this carbon negative journey.
Why is the inclusion of Scope 3 emissions so significant? Look no further than this chart:
Like most organizations, Scope 3 accounts for the vast majority of Microsoft’s carbon emissions.
A whopping ~95% of Microsoft’s emissions are Scope 3 – which means that the company can only control 5% of its own carbon footprint directly. The vast majority of emissions comes from the upstream parties Microsoft relies on to build its products and eventually, the downstream parties that consume them.Simply put, driving down the emissions of Microsoft’s entire supply and value chain is the only viable path to carbon negativity by 2030 and that is no easy task.It’s a fascinating example of just how far the private sector can go in incentivizing behavior change in others. Actions like these are not a substitute for government action (like a long overdue price on carbon) but they are an ambitious and positive step in the right direction.
Drawdown
While these efforts are laudable they are simply not enough. Carbon emissions are measured in billions of metric tons – millions barely move the needle. Microsoft was only able to procure 1.3M metric tons of carbon removal in its first year (the largest annual purchase of carbon removal ever made by a single company). But this represents a tiny fraction – just 0.5% – of the 50B metric tons humanity pumps into the atmosphere every year. In order to sequester carbon at scale, Microsoft must help catalyze a market for carbon reduction that barely exists while relying on technology that is largely unproven.
A deeper look at Microsoft’s FY21 Carbon Removal Portfolio
“For the world to achieve a net-zero carbon economy, Microsoft’s removal demands must make up a tiny fraction global demand and supply – not the entirety of it.” – Lucas Joppa
And that is largely the story of year one on Microsoft’s carbon negative journey. In my own words, what we need to accomplish carbon negativity doesn’t yet exist, but we won’t let that stop us from trying. We will deploy all our resources (money, technology, influence) to accelerate change and help others build what is needed. And we will be transparent about our successes and failures so others can follow suit, because frankly, the stakes could not be any higher.
“Stabilizing the global climate system will require a heroic societal effort. The world must drastically reduce carbon dioxide and other greenhouse gas (GHG) emissions. But reductions won’t be enough. As a global society we must also remove large amounts of carbon from the atmosphere, to avert the worst social, economic and environmental impacts of a rapidly changing climate. And we must do so while recovering from a pandemic.” – Carbon Program Manager Elizabeth Wilmott and Lucas Joppa
Want to go deeper and learn more about carbon removal?
This article is contributed. See the original author and article here.
Host: Bhavanesh Rengarajan – Principal Program Manager, Microsoft
Guest: Rudra Mitra – VP of Compliance Solutions, Microsoft
The following conversation is adapted from transcripts of Episode 1 of the Voices of Data Protection podcast. There may be slight edits in order to make this conversation easier for readers to follow along.
This podcast features the leaders, program managers from Microsoft and experts from the industry to share details about the latest solutions and processes to help you manage your data, keep it safe and stay compliant. If you prefer to listen to the audio of this podcast instead, please visit: aka.ms/voicesofdataprotection
BHAVANESH: Welcome to Voices of Data Protection! I’m your host Bhavanesh Rengarajan, and I’m a Principal Program Manager at Microsoft.In this first episode, I talk with Rudy (Rudra) Mitra, Vice President of Compliance Solutions at Microsoft 365. Rudy has been with Microsoft for more than 20 years, helping organizations keep data safe and minimize risks.
Rudy and I will discuss how the pandemic and remote work have accelerated the need for compliance, how organizations are navigating this new landscape, and how Microsoft is developing a strong solutions roadmap to help organizations and people succeed in these unprecedented times!
Thank you, Rudy, for taking time to speak with us today, please give us a quick introduction of your role at M365 Compliance and your charter.
RUDRA: Hey Bhavy, how’s it going? I’m Rudy Mitra, the Vice President of Compliance Solutions at Microsoft 365. And looking forward to having this chat.
BHAVANESH: Would you quickly cover your areas of operation and talk about your team as well?
RUDRA: At Microsoft 365 with our compliance solutions, we think about areas such as data governance, data protection, insider risk management, which we can probably go into a little bit more, discovering content and auditing the access to content. And then of course, compliance management to round it out, all geared towards keeping enterprise data safe, secure, and helping organizations work on risk, reducing risks.
BHAVANESH: So, let me ask you this question, how has compliance as a scene evolved since the pandemic and switching to working from home. And how are you thinking or reassessing the roadmap in these unprecedented tough times?
RUDRA: Of course, as you know, we all find ourselves in these unprecedented times. And organizations are looking to react as the workforce goes remote. And so, you know, a couple of things are coming forward as we sort of listen to customers, as we talked to them with remote work, it’s all about sort of where the organization’s data is now located, where it’s flowing as we work from home. There’s lots of questions in organization’s mind about how to keep their data secure, but also ensure employees can stay as productive as possible, not put-up walls to their productivity. So that’s sort of one key theme that we continue to hear and react to. Also, things like making sure the risk from communications, which are now happening more in the digital medium, you know, like us talking to each other versus the cooler talk or in other places, there’s a lot more of that going on, meaning that there could potentially be risks with that data, what’s talked about, what’s in email, what’s in chats. So covering those bases for compliance, making sure, you know, if there’s anything that needs to be discovered or flagged or protected, that’s another key theme through all of this. So, remote work, we’ve all been transitioning to it, but at the same time, maintaining that sense of compliance, meaning maintaining that sense of security of data protection of that data, key themes for organizations that are pretty much globally is what we hear.
BHAVANESH: Would it be fair to say that the need for compliance has grown over the last few months compared to where we were about a year ago?
RUDRA: Oh, for sure. This whole situation has accelerated the move to some digital medium. I think Satya says this really well from Microsoft, which is, he’s sort of puts it as the transition to digital and acceleration to the cloud move for organizations has really accelerated because that is the way to stay productive. That is the way to operate in this, in this situation. And with that, the need for compliance, as you just pointed out, has tremendously accelerated. And we see this not only in the customer conversations, but we also see this in the adoption and usage of our solutions.
BHAVANESH: Since I heard you say that you’re looking into information protection, governance, and insider risk management as some of the key pillars, what are some of the core concerns or struggles that you hear from our customers and what they feel they do not have a solution around today?
RUDRA: The intellect property of an organization, intuitively, is the thing they are trying to protect most. That’s the place where compliance really is important to make sure that their intellectual property is safe. They know where it is as workers for the enterprise access and data from home, what devices it on. It could be a managed, it could be unmanaged. So, the information protection need for these core assets is the key requirement we hear. When you think about areas like data loss prevention, very geared towards making sure that what is important for the company, stays within the enterprise is control, they know where it’s going, particularly in this distributed environment. And then of course, you know, where, where company secrets are involved, where company intellectual property is involved, being able to classify that content, being able to say what’s the important information from what the non-important information is so important now, to be able to make sure you can protect that 5% of data, 2% of data, 10% of data from everything else. That’s more data in the organization. And just to put this in perspective, by some, some measures it’s estimated that we are now doubling the digital data for an organization large or small every couple of years with continued acceleration on it, which means the volume of data that you’re trying to figure out your intellectual property out of protected, whether that’s patient records, whether that’s taskforce forms, whether that’s blueprints, for manufacturing, financial records, very important things to talk about the scale aspects of it and being able to protect what’s important from maybe all the other digital data that’s floating around.
BHAVANESH: That’s really exciting, Rudy. So how does your roadmap address all these concerns for your customers?
RUDRA: A great question. What we feel at Microsoft is that this explosion of data combined with the trend of remote work just brings to forefront the need for automated solutions, solutions, leverage the best of machine learning. And yeah, yeah, I do assist with the production of data would be identification when there are insider risks. And what we really leaned in on is solutions that are ML and AI powered so that these can scale. It’s very different when you’re trying to do this at small scale versus really the scale at which businesses operate today, large, or small. We talked a little bit about the, the volume of data and in that context, automation is super important, so, that’s sort of number one. Number two for our solutions is being part of the productivity experience or users and users. You know, it’s very easy to sort of say, I’m going to protect data that no one ever accesses, right. I can lock it up in a vault and protect it, but what’s the fun in that then there’s no productivity, but it’s 100% secure. And so, this balance of experiences that are geared towards productivity and security and protection and compliance is important. And so when you think about the work that we’ve done in the Office applications, in SharePoint, in Teams where the person working on it is in the flow of their work, they never leave their flow, but their knowledge, if they’re dealing with sensitive information, they know that they have to deal with it carefully combined with things like IT manageability, where they don’t have to deploy additional add ins it’s part of the product experiences and apps.
This is sort of number two on our sort of areas of focus, which is balancing productivity and protection. And then number three is sort of our partners and the work that we do with our ecosystem to make sure that this is not just production for Microsoft data, but for all data. Because an enterprise is messy, it has data in different places. And so really our production solutions are important as well.
BHAVANESH: And Rudy, I think I’m going to throw you a curveball. It will be good to get your perspective as well as a customer. Let’s say that if they are using a very manually operated system today, like you have manual labeling on sensitivity and retention, what kind of sedation would you give them so that they can basically increase their productivity by moving towards your automated solution, like auto labeling, using sensitive information, machine learning, AI? What would be your top three steps that you would suggest to them to move from here to there?
RUDRA: The idea of starting small with data loss prevention, you know, maybe starting with your data classification in, in more where they can see where the sensitive data is located. That’s sort of how we are approach this question with customers united very daunting, maybe to think about going from having no information production solution to a fully deployed solution overnight. And as you correctly pointed out in your question, yeah. Now, how do you, how do you take this a step at a time with Microsoft 365? The fact that this is data loss prevention built into teams this is built into Word, Excel, PowerPoint, Outlook SharePoint gives you as an organization, the control to start small, you know, see how you can roll out data loss prevention first, or see your insights on sensitive data first in these different repositories where data may be located and from there, and build on different policies.
And with manual data, labeling classification back to your question, you’re sort of still seeing an incomplete picture, but what you can do is automate that with the automation behind the scenes, run that in sort of test mode, run that in simulation mode, see what shows up and then go from there. So that’s, that’s sort of one part of it. If I may, the delivery, I’d kind of extend the question a little bit to also say that, you know, the work that we’ve been doing, an insider risk management, where, you know, we try to think about risks from people within the, within the organization. And just to put that in context, over 90% of organizations we survey and talk to say that they are worried about insider risks, and more than 50% of those risks are inadvertent, meaning that this isn’t a malicious scenario, it’s just an accidental leakage of data. It’s an accident, explore exposure of data.
So when you use the automation, when you use the controls that we build into Microsoft 365, and then extend across your entire digital estate, you sort of see more of the picture light up, whether that’s where the data is located with our know your data products or where sensitive data is that you need to protect or data loss prevention solutions you need to put on the end point or that, or the app. So, the automation can really be a staged rollout that augments what you may be doing already with manual controls.
BHAVANESH: Rudy, I think your last few statements really hits it out of the park. The vein, which I would like to summarize this as all of your companies, initiatives are totally focused towards trying to stop the accident, oversharing and breach of data. That’s how it kind of sums up in my head.
RUDRA: Yeah, that’s right, Bhavy. When we’re all remote, you know, it’s a, it’s a very interesting time. We’re all working in and in these unprecedented times, not to overuse that, but it really is a scenario. We’re all navigating together, but we’ve never seen. It’s work under duress. It’s working in this remote environment and we’ve got so many things going on, you know, just to kind of bringing at home, for me, you know, I’m, I’m juggling the kids at home you know, and trying to be productive in the work I’m doing. I’m multitasking all the time. And making a mistake with the handling of the company’s data, the enterprise data, you know, it’s not going to be something for me, that’s potentially malicious. It’s going to be an accident. And so, yes, being automated to sort of be there to help someone and catch those kinds of scenarios and protect those scenarios, that’s the very likely set of scenarios where we hear the customer need and want to be there to help them with it.
BHAVANESH: What have been some of your biggest learnings throughout your career working in this particular space?
RUDRA: Oh, wow. That is a little bit of a curveball. I would say as an engineer and as a product person, if I had to pick one out, I would say that being customer driven as we’ve worked on these areas in sort of our solution space of compliance, or sort of broadly, as we thought about how Microsoft delivers on security and compliance and identity solutions, it’s really listening to customers. It’s being very customer centric in terms of what we try to achieve for them. Making sure her activity for customers is as important as a compliance security is sort of our guiding light has been probably the biggest takeaway for us.
And, it’s frankly been at the center of every solution that we’re trying to build, because, you know, we could try to do these things in isolation and whatnot, but, you know, just as you talked a couple of times about the situation we find ourselves in right now, listening to the customer, going back to them, asking them how they’re trying to navigate this and then adapting our solutions to it, probably has been very core to what we do. And frankly, very rewarding and trying to help customers.
You can also add other functions from 3rd party Python packages or ones you write yourself as pivot functions.
Terminology
Before we get into things let’s clear up a few terms.
Entities – These are Python classes that represent real-world objects commonly encountered in CyberSec investigations and hunting. E.g., Host, URL, IP Address, Account, etc.
Pivoting – This comes from the common practice in CyberSec investigations of navigating from one suspect entity to another. E.g., you might start with an alert identifying a potentially malicious IP Address, from there you ‘pivot’ to see which hosts or accounts were communicating with that address. From there you might pivot again to look at processes running on the host or Office activity for the account.
Background reading
This article is available in Notebook form so that you can try out the examples. [TODO]
There is also full documentation of the Pivot functionality on our ReadtheDocs page.
Life before pivot functions
Before Pivot functions your ability to use the various bits of functionality in MSTICPy was always bounded by your knowledge of where a certain function was (or your enthusiasm for reading the docs).
For example, suppose you had an IP address that you wanted to do some simple enrichment on.
ip_addr=“20.72.193.242”
First, you’d need to locate and import the functions. There might also be (as in the GeoIPLiteLookup class) some initialization step you’d need to do before using the functionality.
Next you might have to check the help for each function to work it parameters.
>>> help(get_ip_type)
Help on function get_ip_type in module msticpy.sectools.ip_utils:
get_ip_type(ip: str = None, ip_str: str = None) -> str
    Validate value is an IP address and deteremine IPType category.        …
At which point you’d discover that the output from each function was somewhat raw and it would take a bit more work if you wanted to combine it in any way (say in a single table).
In the rest of the article we’ll show you how Pivot functions make it easier to discover data and enrichment functions. We’ll also show how pivot functions bring standardization and handle different types of input (including lists and DataFrames) and finally, how the standardized output lets you chain multiple pivot functions together into re-usable pipelines of functionality.
Getting started with pivot functions
Let’s get started with how to use Pivot functions.
Typically, we use MSTICPy‘s init_notebook function at the start of any notebook. This handles checking versions and importing some commonly-used packages and modules (both MSTICPy and 3rd party packages like pandas).
Then there are a couple of preliminary steps needed before you can use pivot functions. The main one is loading the Pivot class.
Pivot functions are added to the entities dynamically by the Pivot class. The Pivot class will try to discover relevant functions from queries, Threat Intel providers and various utility functions.
In some cases, notably data queries, the data query functions are themselves created dynamically, so these need to be loaded before you create the Pivot class. (You can always create a new instance of this class, which forces re-discovery, so don’t worry if mess up the order of things).
Note in most cases we don’t need to connect/authenticate to a data provider prior to loading Pivot.
Let’s load our data query provider for AzureSentinel.
Pivot searches through the current objects defined in the Python/notebook namespace to find provider objects that it will use to create the pivot functions. This is most relevant for QueryProviders – when you create a Pivot class instance it will find and use the relevant queries from the az_provider object that we created in the previous step. In most other cases (like GeoIP and ThreatIntel providers, it will create new ones if it can’t find existing ones).
Easy discovery of functionality
Find the entity name you need
The simplest way to do this is simply enumerate (using Python dir() function) the contents of the MSTICPy entities sub-package. This should have already been imported by the init_notebook function that we ran earlier.
The items at the beginning of the list with proper capitalization are the entities.
We’re going to make this a little more elegant in a forthcoming update with this helper function.
>>> entities.find_entity(“ip”)
Match found ‘IpAddress’msticpy.datamodel.entities.ip_address.IpAddress
Listing pivot functions available for an entity
Note you can always address an entity using its qualified path, e.g. “entities.IpAddress” but if you are going to use one or two entities a lot, it will save a bit of typing if you import them explicitly.
Once you have the entity loaded, you can use the get_pivot_list() function to see which pivot functions are available for it. The example below has been abbreviated for space reasons.
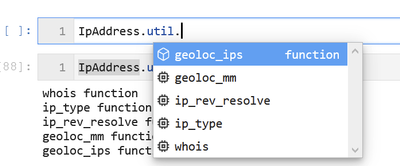
Some of the function names are a little unwieldy but, in many cases, this is necessary to avoid name collisions. You will notice from the list that the functions are grouped into containers: “AzureSentinel”, “ti” and “util” in the above example.
Although this makes the function name even longer, we thought that this helped to keep related functionality together – so you don’t get a TI lookup function, when you thought you were running a query.
Fortunately, Jupyter notebooks/IPython support tab completion so you should not normally have to remember these names.
The containers (“AzureSentinel”, “util”, etc.) are also callable functions – they just return the list of functions they contain.
>>> IpAddress.util()
whois functionip_type functionip_rev_resolve functiongeoloc_mm functiongeoloc_ips function
Now we’re ready to run any of the functions for this entity (we take the same initial examples from the “Life before pivot functions” plus a few more).
>>> IpAddress.util.ip_type(ip_addr)
ip
result
0
20.72.193.242
Public
>>> IpAddress.util.whois(ip_addr)
asn
asn_cidr
asn_country_code
asn_date
asn_description
asn_registry
nets
0
8075
20.64.0.0/10
US
2017-10-18
MICROSOFT-CORP-MSN-AS-BLOCK, US
arin
[{‘cidr’: ‘20.128.0.0/16, 20.48, …
>>> IpAddress.util.ip_rev_resolve(ip_addr)
qname
rdtype
response
ip_address
0
20.72.193.242
PTR
The DNS query name does not exist: 20.72.193.242.
20.72.193.242
>>> IpAddress.util.geoloc_mm(ip_addr)
CountryCode
CountryName
State
City
Longitude
Latitude
Asn
edges
Type
AdditionalData
IpAddress
0
US
United States
Washington
None
-122.3412
47.6032
None
{}
geolocation
{}
20.72.193.242
>>> IpAddress.ti.lookup_ip(ip_addr)
Ioc
IocType
SafeIoc
QuerySubtype
Provider
Result
Severity
Details
0
20.72.193.242
ipv4
20.72.193.242
None
Tor
True
information
Not found.
0
20.72.193.242
ipv4
20.72.193.242
None
VirusTotal
True
unknown
{‘verbose_msg’: ‘Missing IP address’, ‘response_code’: 0}
Notice that we didn’t need to worry about either the parameter name or format (more on this in the next section). Also, whatever the function, the output is always returned as a pandas DataFrame.
For Data query functions you do need to worry about the parameter name
Data query functions are slightly more complex than most other functions and specifically often support many parameters. Rather than try to guess which parameter you meant, we require you to be explicit about it.
Before we can use a data query, we need to authenticate to the provider.
If you are not sure of the parameters required by the query you can use the built-in help
>>> Host.AzureSentinel.SecurityAlert_list_related_alerts? Signature: Host.AzureSentinel.SecurityAlert_list_related_alerts(*args,**kwargs)-> Union[pandas.core.frame.DataFrame, Any] Docstring: Retrieves list of alerts with a common host, account or process Parameters ———- account_name: str (optional) The account name to find add_query_items: str (optional) Additional query clauses end: datetime (optional) Query end time host_name: str (optional) The hostname to find path_separator: str (optional) Path separator (default value is: ) process_name: str (optional) …
Shown below is a preview of a notebook tool that lets you browser around entities and their pivot functions, search for a function by keyword and view the help for that function. This is going to be released shortly.
>>> Pivot.browse()
Standardized way of calling Pivot functions
Due to various factors (historical, underlying data, developer laziness and forgetfulness, etc.) the functionality in MSTICPy can be inconsistent in the way it uses input parameters.
Also, many functions will only accept inputs as a single value, or a list or a DataFrame or some unpredictable combination of these.
Pivot functions allow you to largely forget about this – you can use the same function whether you have:
a single value
a list of values (or any Python iterable, such as a tuple or even a generator function)
a DataFrame with the input value in one of the columns.
Let’s take an example.
Suppose we have a set of IP addresses pasted from somewhere that we want to use as input.
We need to convert this into a Python data object of some sort.
To do this we can use another Pivot utility %%txt2df. This is a Jupyter/IPython magic function – to use it, just paste you data in a cell that you want to import into an empty. Use
%%txt2df –help
in an empty cell to see the full syntax.
In the example below, we specify a comma separator, that the data has a headers row and to save the converted data as a DataFrame named “ip_df”.
Warning if you specify the “–name” parameter, this will overwrite any existing variable of this name.
%%txt2df –sep , –headers –name ip_df
idx, ip, type
0, 172.217.15.99, Public
1, 40.85.232.64, Public
2, 20.38.98.100, Public
3, 23.96.64.84, Public
4, 65.55.44.108, Public
5, 131.107.147.209, Public
6, 10.0.3.4, Private
7, 10.0.3.5, Private
8, 13.82.152.48, Public
idx
ip
type
0
0
172.217.15.99
Public
1
1
40.85.232.64
Public
2
2
20.38.98.100
Public
3
3
23.96.64.84
Public
4
4
65.55.44.108
Public
5
5
131.107.147.209
Public
6
6
10.0.3.4
Private
7
7
10.0.3.5
Private
8
8
13.82.152.48
Public
For demonstration purposes, we’ll also create a standard Python list from the “ip” column of the DataFrame.
If you recall the earlier example of get_ip_type, passing it a list or DataFrame doesn’t result in anything useful.
>>> get_ip_type(ip_list)
[‘172.217.15.99’, ‘40.85.232.64’, ‘20.38.98.100’, ‘23.96.64.84’, ‘65.55.44.108’, ‘131.107.147.209’, ‘10.0.3.4’, ‘10.0.3.5’, ‘13.82.152.48’]
does not appear to be an IPv4 or IPv6 address
‘Unspecified’
Pivot versions are (somewhat) agnostic to input data format
However, the “pivotized” version can accept and correctly process a list.
>>> IpAddress.util.ip_type(ip_list)
ip
result
0
172.217.15.99
Public
1
40.85.232.64
Public
2
20.38.98.100
Public
3
23.96.64.84
Public
4
65.55.44.108
Public
5
131.107.147.209
Public
6
10.0.3.4
Private
7
10.0.3.5
Private
8
13.82.152.48
Public
In the case of a DataFrame, we have to tell the function the name of the column that contains the input data.
>>> IpAddress.util.whois(ip_df)  # won’t work!
—————————————————————————
KeyError                                  Traceback (most recent call last)
<ipython-input-32-debf57d805c7> in <module>
…
    173         input_df, input_column, param_dict = _create_input_df(
–> 174             input_value, pivot_reg, parent_kwargs=kwargs
    175         )
…
KeyError: (“‘ip_column’ is not in the input dataframe”,
‘Please specify the column when calling the function.
You can use one of the parameter names for this:’, [‘column’, ‘input_column’, ‘input_col’, ‘src_column’, ‘src_col’])
Note: for most functions you can ignore the parameter name and just specify it as a positional parameter. You can also use the original parameter name of the underlying function or the placeholder name “value”.
You can also pass an entity instance of an entity as a input parameter. The pivot code knows which attribute or attributes of an entity will provider the input value.
Iterable/DataFrame inputs and single-value functions
Many of the underlying functions only accept single values as inputs. Examples of these are the data query functions – typically they expect a single host name, IP address, etc.
Pivot knows about the type of parameters that the function accepts. It will adjust the input to match the expectations of the underlying function. If a list or DataFrame is passed as input to a single-value function Pivot will split the input and call the function once for each value. It then combines the output into a single DataFrame before returning the results.
You can read a bit more about how this is done in the Appendix – “how do pivot wrappers work?”
Data queries – where does the time range come from?
The Pivot class has a built-in time range, which is used by default for all queries. Don’t worry – you can change it easily.
Note: “Pivot.current” gives you access to the last created instance of the Pivot class – if you’ve created multiple instances of Pivot (which you rarely need to do), you can always get to the last one you created using this class attribute.
You can edit the time range interactively
Pivot.current.edit_query_time()
Or by setting the timespan property directly.
>>> from msticpy.common.timespan import TimeSpan
>>> # TimeSpan accepts datetimes or datestrings
>>> timespan = TimeSpan(start=”02/01/2021″, end=”02/15/2021″)
>>> Pivot.current.timespan = timespan
TimeStamp(start=2021-02-01 00:00:00, end=2021-02-15 00:00:00, period=-14 days +00:00:00)
In an upcoming release there is also a convenience function for setting the time directly with Python datetimes or date strings.
The Pivot layer will pass any unused keyword parameters to the underlying function. This does not usually apply to positional parameters – if you want parameters to get to the function, you have to name them explicitly. In this example the add_query_items parameter is passed to the underlying query function
>>> entities.Host.AzureSentinel.SecurityEvent_list_host_logons(
        host_name=”victimPc”,
        add_query_items=”| summarize count() by LogonType”
    )
LogonType
count_
0
5
27492
1
4
12597
2
3
6936
3
2
173
4
10
58
5
9
8
6
0
19
7
11
1
Pivot Pipelines
Because all pivot functions accept DataFrames as input and produce DataFrames as output, it means that it is possible to chain pivot functions into a pipeline.
Joining input to output
You can join the input to the output. This usually only makes sense when the input is a DataFrame. It lets you keep the previously accumulated results and tag on the additional columns produced by the pivot function you are calling.
The join parameter supports “inner”, “left”, “right” and “outer” joins (be careful with the latter though!) See pivot joins documentation for more details.
Although joining is useful in pipelines you can use it on any function whether in a pipeline or not. In this example you can see that the idx, ip and type columns have been carried over from the source DataFrame and joined with the output.
Here is an example of using it to call four pivot functions, each using the output of the previous function as input and using the join parameter to accumulate the results from each stage.
The whole thing is surrounded by a pair of parentheses – this is just to let us split the whole expression over multiple lines without Python complaining.
Next we have ips_df – this is just the starting DataFrame, our input data.
Next we call the mp_pivot.run() accessor method on this dataframe. We pass it the pivot function that we want to run (IpAddress.util.ip_type) and the input column name (IP). This column name is the column in ips_df where our input IP addresses are. We’ve also specified an join type of “inner”. In this case the join type doesn’t really matter since we know we get exactly one output row for every input row.
We’re using the pandas query function to filter out unwanted entries from the previous stage. In this case we only want “Public” IP addresses. This illustrates that you can intersperse standard pandas functions in the same pipeline. We could have also added a column selector expression ([[“col1”, “col2″…]]), for example, if we wanted to filter the columns passed to the next stage
We are calling a further pivot function – whois. Remember the “column” parameter always refers to the input column, i.e. the column from previous stage that we want to use in this stage.
We are calling geoloc_mm to get geo location details joining with a “left” join – this preserves the input data rows and adds null columns in any cases where the pivot function returned no result.
Is the same as 6 except the called function is a data query to see if we have any alerts that contain these IP addresses. Remember, in the case of data queries we have to name the specific query parameter that we want the input to go to. In this case, each row value in the ip column from the previous stage will be sent to the query.
Finally we close the parentheses to form a valid Python expression. The whole expression returns a DataFrame so we can add further pandas operations here (like .head(5) shown here).
Microsoft threat intelligence analytic has detected Blocked communication to a known WatchList d…
Threat Intelligence Alerts
Microsoft
91d806d3-6b6f-4e5c-a78f-e674d602be51
625ff9af-dddc-0cf8-9d4b-e79067fa2e71
ThreatIntelligence
83
1
8ecf8077-cf51-4820-aadd-14040956f35d
2020-12-23 14:08:12+00:00
Microsoft Threat Intelligence Analytics
Microsoft Threat Intelligence Analytics
Medium
Microsoft threat intelligence analytic has detected Blocked communication to a known WatchList d…
Threat Intelligence Alerts
Microsoft
173063c4-10dd-4dd2-9e4f-ec5ed596ec54
c977f904-ab30-d57e-986f-9d6ebf72771b
ThreatIntelligence
83
2
8ecf8077-cf51-4820-aadd-14040956f35d
2020-12-23 14:08:12+00:00
Microsoft Threat Intelligence Analytics
Microsoft Threat Intelligence Analytics
Medium
Microsoft threat intelligence analytic has detected Blocked communication to a known WatchList d…
Threat Intelligence Alerts
Microsoft
58b2cda2-11c6-42b8-b6f1-72751cad8f38
9ee547e4-cba1-47d1-e1f9-87247b693a52
ThreatIntelligence
83
Other pipeline functions
In addition to run, the mp_pivot accessor also has the following functions:
display – this simply displays the data at the point called in the pipeline. You can add an optional title, filtering and the number or rows to display
tee – this forks a copy of the DataFrame at the point it is called in the pipeline. It will assign the forked copy to the name given in the var_name parameter. If there is an existing variable of the same name it will not overwrite it unless you add the clobber=True parameter.
In both cases the pipelined data is passed through unchanged.
Use of these is shown below in this partial pipeline.
    …
    .mp_pivot.run(IpAddress.util.geoloc_mm, column=”ip”, join=”left”)
    .mp_pivot.display(title=”Geo Lookup”, cols=[“IP”, “City”])  # << display an intermediate result
    .mp_pivot.tee(var_name=”geoip_df”, clobber=True)  # << save a copy called ‘geoip_df’
    .mp_pivot.run(IpAddress.AzureSentinel.SecurityAlert_list_alerts_for_ip, source_ip_list=”ip”, join=”left”)
In the next release we’ve also implemented:
tee_exec – this executes a function on a forked copy of the DataFrame The function must be a pandas function or custom accessor. A good example of the use of this might be creating a plot or summary table to display partway through the pipeline.
Extending Pivot – adding your own (or someone else’s) functions
You can add pivot functions of your own. You need to supply:
the function
some metadata that describes where the function can be found and how the function works
The current version of Pivot doesn’t let you add functions defined inline (i.e. written in the notebook itself) but this will be possible in the forthcoming release.
Let’s create a function in a Python module my_module.py. We can do this using the %%write_file magic function and running the cell.
%%writefile my_module.py
“””Upper-case and hash”””
from hashlib import md5

def my_func(input: str):
    md5_hash = “-“.join(hex(b)[2:] for b in md5(input.encode(“utf-8”)).digest())
    return {
        “Title”: input.upper(),
        “Hash”: md5_hash
    }
We also need to create a YAML definition file for our pivot function. Again we can use %%write_file to create a local file in the current directory. We need to tell Pivot
the name of the function and source module,
the name of the container that the function will appear in,
the input type expected by the function (“value”, “list” or “dataframe”)
which entities to add the pivot to, along with a corresponding attribute of the entity. (The attribute is used in cases where you are passing an instance of an entity itself as an input parameter – if in doubt just use any valid attribute of the entity).
The name of the input attribute of the underlying function.
Now we can register the function we created as a pivot function.
>>> from msticpy.datamodel.pivot_register_reader import register_pivots
>>> register_pivots(“my_func.yml”)
An then run it.
>>> Host.cyber.upper_hash_name(“host_name”)
Title
Hash
input
0
HOST_NAME
5d-41-40-2a-bc-4b-2a-76-b9-71-9d-91-10-17-c5-92
host_name
In the next release, this will be available as a simple function that can be used to add a function defined in the notebook as shown here.
from hashlib import md5

def my_func2(input: str):
    md5_hash = “-“.join(hex(b)[2:] for b in md5(input.encode(“utf-8”)).digest())
    return {
        “Title”: input.upper(),
        “Hash”: md5_hash
    }


Pivot.add_pivot_function(
    func=my_func2,
    container=”cyber”,  # which container it will appear in on the entity
    input_type=”value”,
    entity_map={“Host”: “HostName”},
    func_input_value_arg=”input”,
    func_new_name=”il_upper_hash_name”,
)

Host.cyber.il_upper_hash_name(“host_name”)
Title
Hash
input
0
HOST_NAME
5d-41-40-2a-bc-4b-2a-76-b9-71-9d-91-10-17-c5-92
host_name
Conclusion
We’ve taken a short tour through the MSTICPy Pivot functions, looking at how they make the functionality in MSTICPy easier to discover and use.
I’m particularly excited about the pipeline functionality. In the next release we’re going to make it possible to define reusable pipelines in configuration files and execute them with a single function call. This should help streamline some common patterns in notebooks for Cyber hunting and investigation.
In Python you can create functions that return other functions. This is called wrapping the function.
It allows the outer function to do additional things to the input parameters and the return value of the inner function.
Take this simple function that just applies proper capitalization to an input string.
def print_me(arg):
    print(arg.capitalize())

print_me(“hello”)
Hello
If we try to pass a list to this function we get an expected exception since the function only knows how to process a string
print_me([“hello”, “world”])
—————————————————————————
AttributeError                            Traceback (most recent call last)
<ipython-input-36-94b3e61eb86f> in <module>
…
AttributeError: ‘list’ object has no attribute ‘capitalize’
We could create a wrapper function that checked the input and iterated over the individual items if arg is a list. The works but we don’t want to have to do this for every function that we want to have flexible input!
def print_me_list(arg): if isinstance(arg, list): for item in arg: print_me(item) else: print_me(arg)
In the example below, the outer function dont_care_func defines an inner function – list_or_str – and then returns this function. The inner function list_or_str is what implements the same “is-this-a-string-or-list” logic that we saw in the previous example. Crucially though, it isn’t hard-coded to call print_me but calls whatever function is passed (the func parameter) to it from the outer function dont_care_func.
# Our magic wrapper
def dont_care_func(func):

    def list_or_str(arg):
        if isinstance(arg, list):
            for item in arg:
                func(item)
        else:
            func(arg)
    return list_or_str
How do we use this?
We simply pass the function that we want to wrap to dont_care_func. Recall, that this function just returns an instance of the inner function. In this case the value func will have been replaced by the actual function print_me.
print_stuff = dont_care_func(print_me)
Now we have a wrapped version of print_me that can handle different types of input. Magic!
This article is contributed. See the original author and article here.
Time flies by so fast – An expression we all have used in many aspects of our lives. Time flies when you’re having fun. Do we have to go now? They sure do grow up quickly. As a father of one, with one on the way, I truly didn’t fully understand what this meant until I became a parent. Watching your children grow, making friends and seeing them develop into so much more…
…it simply goes by way too fast.
Then there is technology. From Windows 95 to Windows 10. From the first iPhone to iPhone 12. Technology is continuously being pushed beyond it’s limits to deliver more than it what was originally developed for.
Our MS Teams “Adoption App” (Boost your technology adoption efforts with this single MS Teams app) that was shared earlier this year, has received a lot of praise since it was just launched this past January. With praise, comes requests, comments and suggestions…and we wanted to let you all know….we heard you! So let’s get right down to it…
1. Name Change– We began to think theAdoption App (V1)was one that managed information within a single hub that was easily accessible. Which helped us to make the easy decision of renaming toAdoption Hub (V2).
2. Logo Change– Following the hub theme, we believe the new logo is a better representation of what the app actually does.
3. Bot – We sped up our idea to include a bot. It was one of the top top top conversations we had with our peers and our customers. Bots have so much to bring to the table when it comes to providing information out to end users.
4. GCC Friendly– The Adoption App (V1) is now Government Community Cloud (GCC) friendly. Working with fellow CSMs, we were able to add additional documentation to support the processes of a GCC tenant.
Now it is time to for Aaron Porzondek and I to thank a select group of very special individuals. They have inspired us, supported us, coached us and have joined us.
Christian Howe– Honestly. Aaron and I wouldn’t be here at all if it weren’t for Christian taking the time to show us the “origin app” if you will. Which inspired us to learn more about this framework and build out what the Adoption Hub is today.
Na-Young KwonandJace Moreno– With your unwavering support and continued guidance, it has motivated us to discover and find challenges to push us further along our Teams as a Platform journey.
Matt HickeyandErik Olsson– Bots. Bots. And more bots. Thank you both for educating and ramping us up on Power Virtual Agents (PVA) bots. Having a bot within the Adoption Hub will certainly help end users with the understanding of technologies within an organization, such as MS Teams.
Glenn BlinckmannandJeff Hicks– What started out as a show-and-tell of the Adoption App (V1), who knew it would lead to a great partnership between two OUs (MS talk). With Glenn’s and Jeff’s knowledge of how things need to be achieved within GCC, we were able to add GCC friendly instructions into Adoption App (V1) deployment guides.
HLS MW CSMs– Your encouragement, your ideas, your contributions, have greatly influenced our thought processes and decisions to take the direction we did of “platformizing the MW CSM playbook”, to help our customers and our fellow CSMs.
And to show our gratitude to you all and to the many others who have supported us…
This article is contributed. See the original author and article here.
For most people, remote work—whether part-time or full-time—is the new way of working. That’s why over 115 million daily users rely on Microsoft Teams to connect and collaborate, and also why Teams was recognized as a Leader in the Gartner Magic Quadrant for Unified Communications as a Service. We designed Teams, your digital hub for teamwork, and OneDrive, your personal cloud storage that lets you access your files from anywhere, to work seamlessly and securely together. You can use Microsoft 365 Apps including Word, PowerPoint, Excel, or OneNote notebooks to create your work, store those files using OneDrive, and share them securely with colleagues in Teams, where you can co-author documents, meet with your teammates, and chat or meet with people inside or outside organization, all in one place.
Imagine a day in the life using Teams + OneDrive
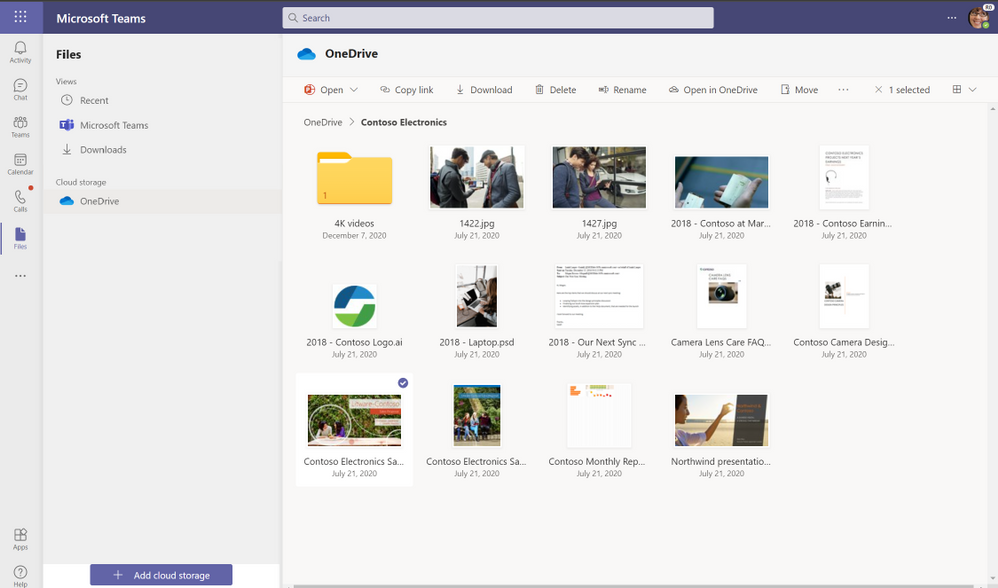
Let’s walk through a day of using OneDrive and Teams together for work. You’re preparing a PowerPoint presentation for a conference call with an important client, Contoso, later in the week. In the morning, you open Teams and select the Files list, which shows you Recent files you’ve been working on, your Microsoft Teams files, and Downloads, as well as any cloud storage services connected with Teams. OneDrive is the default files app for Microsoft 365. When you click on OneDrive, you can see all your individual files for work. You can quickly add, upload, and sync files right in Teams, or open in them directly OneDrive.
In the OneDrive view, you navigate to a folder called “Contoso Electronics” and open the Contoso Electronics Sales presentation draft you’ve been working on and recently shared with your manager for review via chat in Teams. When you share your OneDrive files in chat, each file has unique permissions granted based on the person or people in the chat—that way, you don’t have to worry about unintended recipients accessing your content.
After you’ve reviewed your manager’s edits and updated the presentation, you decide it’s ready for the whole team to review. Your department has a team called “ Contoso” where you share and manage all deliverables for the client. Whenever a team is created, a corresponding Microsoft 365 Group and SharePoint shared library are also automatically created. All the files created in or uploaded to your Contoso folder are stored and backed up in the SharePoint library. You copy the presentation from your OneDrive to the documents folder within Contoso team and then select the Posts tab to leave a message to let everyone on your team know the file is ready for review. Leveraging OneDrive you can sync all the files in the Contoso shared library directly to your device so you can work on them while offline.
Due to the deep integration between OneDrive, Teams, and Office, your team can select from a variety of tools to annotate, highlight, and comment on content. They can use @mentions to flag comments and tasks for you or other reviewers, and they can also track version history and restore previous file versions as needed. And because all edits are synced and stored in the cloud, they can start editing a document on one device and finish it on another. When the afternoon team meeting to review the presentation begins, everyone can easily access the file to review each other’s comments and use co-authoring to finish editing the presentation together in real time.
Later in the day, you’ve scheduled focus time to work on a project outlining the go-to market plan for a new product series. A co-worker has already started the outline and uploaded the document to the Go-To Market channel in Teams. You decide to work on the document at a park near your house, so you take your tablet. Since you had already added a shortcut to the Go To Market shared library using the Add to OneDrive feature, which brings all your shared content from OneDrive, Teams, and SharePoint into one place , you can swiftly fetch the outline and start working on the same right within your OneDrive app. You also realize that several GTM deliverables are missing approved vendor contracts. Using the file request feature in OneDrive you create an upload-only link and share the same in your “Partner Program“ team which consists of all your suppliers as guests members. This enables each vendor to upload their proposed scope of work directly to your OneDrive in a location that you chose—without having visibility to the other files in the folder.
Share files and collaborate securely, with peace of mind
While popular online storage apps integrate with Teams so you can access and share files, OneDrive provides a more secure sharing experience to help control data leakage and access to sensitive company information. Having your content in OneDrive enables you to share files as a link, internally and externally, so that every recipient has access to the most updated version. Depending on how your IT organization has configured sharing permissions in OneDrive and SharePoint, you can set permissions for who can access that link—anyone, people only inside the organization, specific people or people in the Teams group chat—and whether they can view or edit the file. You can also set expiration dates (for example, for outside vendors you don’t want accessing files or folders past a certain date) or set passwords to protect sensitive company or employee information. Blocking downloads on files also prevents recipients from saving files to their computers.
Sharing integration in Microsoft Teams
Work confidently, knowing that IT can protect your data
Exposure of sensitive company or client information can have serious legal and compliance implications. Today’s remote working environment can heighten these worries for IT, because people need to share information outside the bounds of a protected company environment. Teams and OneDrive not only provide coherent collaborative experiences for you but also bring consistency for the admins as they maintain the productivity apps. Instead of managing multiple third-party tools in silo the seamless integration between Teams and OneDrive empower admins to set governance and compliance policies at an organization level that can be extended to both OneDrive and Teams.
To keep you protected, IT can configure secure sharing policies in OneDrive which automatically gets adopted by Teams, ensuring you have the tools you need to collaborate securely and consistently.
IT can also use Microsoft Information Protection to create policies for automatic classification of sensitive data, so if you create a document that contains sensitive client data, that document will automatically be classified by the system and encrypted for additional protection. This takes the burden of worrying about security off you, letting you focus on getting work done. Using information barriers, IT can also restrict communication and collaboration in Teams or OneDrive between two departments or segments to avoid a conflict of interest from occurring or between certain people to safeguard internal information.
IT can also keep an eye on how you and your team interact with shared content, adding an extra layer of security and control. Through detailed audit logs and reports available in the Microsoft 365 Security and Compliance Center, IT can trace OneDrive activity at the folder, file, and user levels, so they can see at a glance if any unauthorized users have tried to access sensitive company or client information. Every user action, including changes and modifications made to files and folders, is recorded for a full audit trail. In addition, even remotely, IT has the device visibility and control that’s especially important for thwarting breaches and ransomware attacks.
To learn more about why Teams and OneDrive are better together and how you can streamline your workday, check out our latest episode on Sync Up- a OneDrive podcast where we talk with Cory Kincaid, a Customer Success Manager for Modern Work, who advises customers on how to use technologies like Teams and OneDrive to improve their business.
This article is contributed. See the original author and article here.
Next steps
Thank you for being part of the Windows Server and SQL Server community and watching our session at Ignite! Here are some ways you can accelerate your digital transformation:
Equip yourself with partner resources such as demos, readiness materials, offers, and more to be the best partner you can be for your Windows Server customers.
This article is contributed. See the original author and article here.
Microsoft Ignite, our free digital event, starts next week and runs from March 2-4, 2021. We thought you might be interested to learn ways you can plan to experience the power of Microsoft Azure and connect with your worldwide data, infrastructure, applications, and hybrid communities like never before. Attendees will learn about new innovations, speak with Microsoft experts from around the globe, and continue your technical learning journey.
Register to gain full access to all Microsoft Ignite has to offer–it’s easy and at no-cost to you.
Create the perfect event schedule Explore the session catalog to find expert speakers, interactive sessions, and more. After registering, get started on your journey at myignite.microsoft.com/sessions.
Below are seven featured sessions on Microsoft Azure you can’t miss:
Explore the latest event news, trending topics, and share your point of view in real time with your community.Join us on Twitter and LinkedIn by using #MSIgnite.
Only at #MSIgnite will you meet the engineers and partners who build and maintain our tools and get the answers to your toughest technical questions. Register for an Ask the Expert session at #MSIgnite.
The Learning Zone is the center for training, development, and certification with Microsoft. Whatever your style of learning happens to be, you can find content and interactive opportunities to boost and diversify your cloud skills.
This article is contributed. See the original author and article here.
Other> Azure Resource Mover
Multi-level dependency analysis
Encrypted VM support
Health monitoring & auto-resolve for VMs
Other>Azure Cloud Services (extended support)
Cloud Services (extended support) is now available in public preview in Azure portal
Intune
Updates to Microsoft Intune
Let’s look at each of these updates in greater detail.
Other> Azure Resource Mover
Multi-level dependency analysis
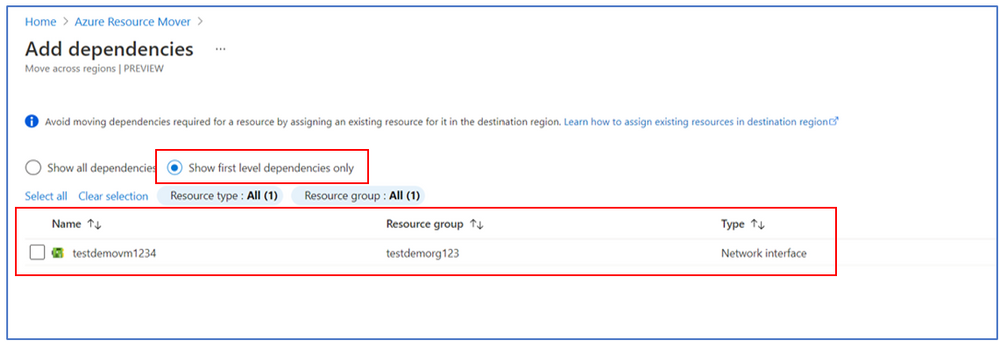
Responding to feedback, we have added an enhancement to the dependency analysis feature where users can now choose to do multi-level dependency analysis and be able to identify all dependencies in one go. This reduces the number of validation steps and makes identifying dependencies during large scale move seamless.
Users still have the option to choose between the multi-level & single level dependencies based on whether you want to assign resources in the destination at any point, and do not want the service to create all the resources till the last node.
Encrypted VM support Customers, from various verticals, such as Banking, Financial services or Healthcare have sensitive data which they have encrypted using keys or certificates in key vaults. Resource Mover now supports moving VMs encrypted with Azure Disk Encryption and VMs with Service Side Encryption (SSE) enabled using Customer Managed Keys (CMK).
Resolve dependencies will now show Disk Encryption Set (DES) & Key vault as dependencies based on encryption type.
Users need to copy the keys to the destination key vault for VMs encrypted with ADE with a script provided, and create a new DES VMs with SSE enabled using CMK. Afterwards, you can assign destination resources – for Key vault & DES.
Health monitoring & auto-resolve for VMs Health monitoring for Virtual Machines will monitor the VM replication health once ‘Prepare’ is triggered. This involves copying of delta changes for the time between VM is ready to move and customer initiating the VM move. A health error, which shows up in ‘Issues’ for a VM if the last copy of the delta changes was created more than 60 mins.
After making edits to a destination configuration, user can now choose to Save changes or Save and validate dependencies. Save changes is selected if you want to edit other resources also, and want to validate everything together. Save and validate is selected if you want to understand the impact this has on other resources before you proceed. This avoids user having to click on validate dependencies later.
Other>Cloud Services (extended support)
Cloud Services (extended support) is now available in public preview in Azure portal
Cloud Services (extended support) is now available in public preview. It is a new Azure Resource Manager (ARM) based deployment model for Azure Cloud Services. Cloud Services (extended support) has the primary benefit of providing regional resiliency along with feature parity with Azure Cloud Services deployed using Azure Service Manager (ASM). It also offers some ARM capabilities such as role-based access and control (RBAC), tags, policy, and supports deployment templates.
The Microsoft Intune team has been hard at work on updates as well. You can find the full list of updates to Intune on the What’s new in Microsoft Intune page, including changes that affect your experience using Intune.
Azure portal “how to” video series
Have you checked out our Azure portal “how to” video seriesyet? The videos highlight specific aspects of the portal so you can be more efficient and productive while deploying your cloud workloads from the portal. Check out our most recently published videos:
The Azure portal has a large team of engineers that wants to hear from you, so please keep providing us your feedback in the comments section below or on Twitter @AzurePortal.
Sign in to the Azure portal now and see for yourself everything that’s new. Download the Azure mobile app to stay connected to your Azure resources anytime, anywhere. See you next month!
This article is contributed. See the original author and article here.
Join Microsoft Ignite digital experience on March 2-4 2021 to learn, connect, and explore new tech that’s ready to implement. The Microsoft IoT teams are eager to connect with you and your world-wide community to share the latest and greatest of their work in all IoT domains, from Edge Intelligence to IoT device integration and management at scale. Register for this free event today!
Whether you are new to IoT and looking to learn new skills to further your career, or you are an IoT expert and want to apply your exiting skills in the world of Microsoft, expect technical presentations, ask-the-experts sessions, and roundtables just for you.
Our goal: simplifying IoT
As the Internet of Things is evolving, growing, and expanding, driving the digital transformation and now integrating into end-to-end solutions at all levels, from devices and sensors all the way up to business applications, Microsoft aims at simplifying IoT.
Azure IoT services make it easy to integrate IoT devices into Cloud applications, as easy as plug and play! They also allow bringing the power of the intelligent cloud all the way to the edge in a scalable and secure way. During the event we will drill down on the latest and new IoT technologies that will further the goal of simplifying IoT for all.
Register today to reserve your seat in the IoT sessions
If you want or need a one-on-one consultation, you can sign up on the site now to reserve your very own time with our SMEs to discuss your project, issues, requirements related to Azure Sphere, Azure Defender for IoT, Azure IoT Hub, Device Provisioning Service, Azure IoT Central, Azure IoT Edge, Azure Digital Twins, Azure Time Series Insights, IoT Plug and Play, EFLOW + Windows IoT and more.
Once you have registered for the event, sign up for a 1:1 consultation here. [TODO: add link]
Get ready for the event and start your learning experience early
As we are all eagerly waiting for the event to kick off, we recommend you start ramping up (or take a little refresh) on Azure IoT by checking some of our learning resources:
As we come closer to the event we will update this post with more details on the sessions, so don’t forget to bookmark the page and follow @MSIoTDevs on twitter to stay in touch.
We look forward to connecting and learning with you!


Recent Comments