
by Scott Muniz | Mar 25, 2021 | Security
This article was originally posted by the FTC. See the original article here.
While everything about the past year has felt strange and new — I just can’t say unprecedented another time — we could see one thing coming: scammers seized any opportunity to take advantage of the confusion and heightened emotion surrounding COVID-19. So, the FTC sprang into action, suing companies that made deceptive claims and did not correct them, making sure that deceptive claims for hundreds of products were quickly removed, sending hundreds of warning letters, and creating a dedicated site to share information as quickly as possible. We kept moving on other issues, too, got back $483 million to consumers who lost money to frauds, and expanded our outreach. Here’s the highlight reel from 2020.
- Reporting for duty. The agency launched a new streamlined and user-friendly website, ReportFraud.ftc.gov, where you can easily report scams, frauds, and bad business practices. The FTC has long encouraged people to report these issues to the agency when they encounter them — whether or not they lost money to the fraud.
- Helping every community. The FTC kicked off a new initiative, the Community Advocate Center, aimed at partnering with community legal aid organizations to expand our outreach to lower-income communities to encourage them to report fraud and provide them with advice to help recover.
- Reaching out. Last year, the Commission published 470 consumer blog posts (243 in English, 227 in Spanish) sent to more than 367,000 subscribers: more than 312,000 in English and 55,000 in Spanish. The FTC’s blog posts from 2020 (in English) logged more than 7.9 million views.
- Just watch. FTC videos online logged 2 million views. The most viewed video was Your Source for a Truly Free Credit Report? Annual Credit Report.com; it got 140,600 views on the FTC’s websites and 74,300 views on YouTube. In 2020, the FTC’s YouTube channel gained 7,700 new followers (for a total of 22,400).
- You’ve got mail. In 2020, the Commission had a total of 2.2 million people who got the agency’s email updates.
- Social life. The FTC’s social networks had a healthy growth spurt last year: for Facebook, more than 10,000 new followers (for a total of 89,000); for Twitter, nearly 9,000 new followers (for a total of 78,000); and for LinkedIn, 3,900 new followers (for a total of 15,200).
Brought to you by Dr. Ware, Microsoft Office 365 Silver Partner, Charleston SC.
by Contributed | Mar 24, 2021 | Technology
This article is contributed. See the original author and article here.
The ability to Unhide multiple worksheets at once has been a popular request on UserVoice, and we’re excited to let you know that this feature is now available for Microsoft 365 Subscribers. To get it, you can update to version 16.0.13525 or greater on Windows, and it’s also available in Excel for the Web. On Mac, the feature is rolling out to full availability on versions 16.45 or greater.

To unhide more than one sheet, follow these easy steps in any workbook that contains hidden worksheets.
Step
|
|
Description
|
1
|
Excel, Excel on Mac, Excel on the Web
|
Right-click the Sheet tab at the bottom, and select Unhide.
|
2
|
Excel
|
In the Unhide dialog box,
– Press the Ctrl key and click the sheets you want to show, or
– Press the Shift + Up/Down Arrow keys to select multiple (or all) worksheets, and then press OK.
|
|
Excel on Mac
|
In the Unhide dialog box
– Press the Cmd key + Left click on the sheets you want to show, or
– Press Shift+Left click, or Shift+Down arrow to select multiple (or all) worksheets
|
|
Excel on the Web
|
In the Unhide dialog box
– Press Shift + Up/Down arrows to select multiple (or all) worksheets
– Press the Shift + Up/Down Arrow keys to select multiple (or all) worksheets, and then press OK.
– Press Ctrl+Space to select/deselect sheets.
|
If you have additional suggestions, please use the feedback button on the Help tab of the ribbon to let us know.
by Contributed | Mar 24, 2021 | Technology
This article is contributed. See the original author and article here.
Over the last year, there has been a massive rise in the number of Yammer Live Events. Understandable. With so many people working remotely, Yammer Live Events are an awesome medium for organizations to connect with employees. Because of this, one of the recurring things we’re hearing from customers is the ability to understand the impact of these events.
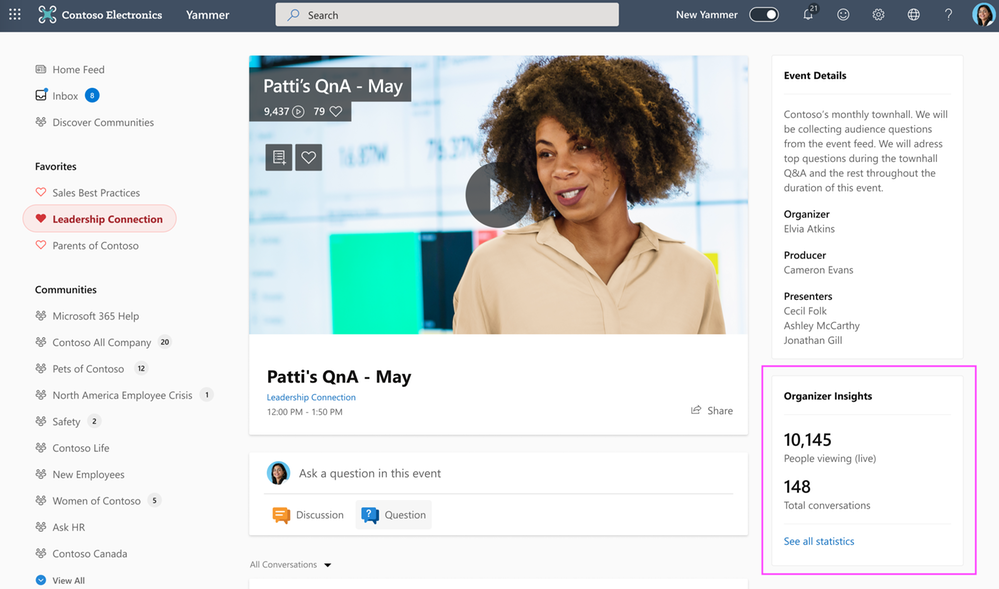
Today, we’re thrilled to announce Yammer Live Events Insights. This gives organizations the insights they need to measure reach and engagement and build more powerful events.
Organizer Insights in real-time
Event Organizers can peek at the Organizer Insights dashboard before, during, and after the event and glean vital stats such as the number of attendees, total views, and conversations in the event, with the ability to expand and see more insights.
Organizer Insights
Amplify Attendance
The reach section provides insights about the number of people that attended the event, which segments had the greatest viewership, average time watched, and more – all geared up to help you optimize your current and future events.
 Reach Insights
Recognize Trends
See the volume of questions, conversations, and reactions that were generated in the event so that you can recognize and amplify the discussions that people are most interested in engaging with.
 Engagement Insights
See the official documentation here.

by Contributed | Mar 24, 2021 | Technology
This article is contributed. See the original author and article here.
Introduction
Recent attacks highlight the fact that in addition to implementing appropriate security protection controls to defend against malicious adversaries, continuous monitoring, and response for is a top priority for every organization. To implement security monitoring and response from a networking perspective, you need visibility into traffic traversing through your network devices and detection logic to identify malicious patterns in the network traffic. This is a critical piece for every infrastructure/network security process.
Readers of this post will hopefully be familiar with both Azure Firewall which provides protection against network-based threats, and Azure Sentinel which provides SEIM and SOAR (security orchestration, automation, and response) capabilities. In this blog, we will discuss the new detections for Azure Firewall in Azure Sentinel. These new detections allow security teams to get Sentinel alerts if machines on the internal network attempt to query/connect to domain names or IP addresses on the internet that are associated with known IOCs, as defined in the detection rule query. True positive detections should be considered as Indicator of Compromise (IOC). Security incident response teams can then perform response and appropriate remediation actions based on these detection signals.
Scenario
In case of an attack, after breaching through the boundary defenses, a malicious adversary may utilize malware and/or malicious code for persistence, command-and-control, and data exfiltration. When malware or malicious code is running on machines on the internal network, in most cases, it will attempt to make outbound connections for command-and-control updates, and to exfiltrate data to adversary servers through the internet. When this happens, traffic will inevitably flow out through the network egress points where it will be processed and logged by the devices or ideally a firewall controlling internet egress. The data logged by devices/firewalls processing internet egress traffic can be analyzed to detect traffic patterns suggesting/representing command-and-control or exfiltration activities (also called IOCs or Indicator of Compromise). This is the basis of network-based detections discussed in this blog.
When customers use Azure Firewall for controlling their internet egress, Azure Firewall will log all outbound traffic and DNS query traffic if configured as a DNS Proxy, to the defined Log Analytics workspace. If a customer is also using Azure Sentinel, they can ingest log data produced by Azure Firewall and run built-in or custom Analytic Rules templates on this data to identify malicious traffic patterns representing IOCs, that these rules are defined to detect. These rules can be configured to run on a schedule and create an incident in Azure Sentinel when there is a match. These incidents can then be triaged by the SOC for response and remediation.
What’s New
Up until now, there were only a couple of detections for Azure Firewall available in Azure Sentinel. We are excited to announce availability of nine new detections for well-known IOCs in Azure Sentinel based on traffic patterns flowing through the Azure Firewall.
Here is a list of new detections which have been added recently and are available to you at the time of this blog.
How Network Based Detection Work
To understand how these detections work, we will examine the “Solorigate Network Beacon” detection which indicates a compromise associated with the SolarWinds exploit. The query snippet below identifies communication to domains involved in this incident.
- We start by declaring all the domains that we want to find in the client request from the internal network.
let domains = dynamic(["incomeupdate.com","zupertech.com","databasegalore.com","panhardware.com","avsvmcloud.com","digitalcollege.org","freescanonline.com","deftsecurity.com","thedoccloud.com","virtualdataserver.com","lcomputers.com","webcodez.com","globalnetworkissues.com","kubecloud.com","seobundlekit.com","solartrackingsystem.net","virtualwebdata.com"]);
- Then we perform a union to look for traffic destined for these domains in data from multiple sources which include Common Security Log (CEF), DNS Events, VM Connection, Device Network Events, Azure Firewall DNS Proxy, and Azure Firewall Application Rule logs.
(union isfuzzy=true

(CommonSecurityLog

        | parse ..

),

(DnsEvents

        | parse ..

),

(VMConnection

        |parse ..

),

(DeviceNetworkEvents

        | parse ..

),

(AzureDiagnostics

    | where ResourceType == "AZUREFIREWALLS"

    | where Category == "AzureFirewallDnsProxy"

    | parse msg_s with "DNS Request: " ClientIP ":" ClientPort " - " QueryID " " Request_Type " " Request_Class " " Request_Name ". " Request_Protocol " " Request_Size " " EDNSO_DO " " EDNS0_Buffersize " " Responce_Code " " Responce_Flags " " Responce_Size " " Response_Duration

    | where Request_Name has_any (domains)

    | extend DNSName = Request_Name

    | extend IPCustomEntity = ClientIP

    ),

  (AzureDiagnostics

    | where ResourceType == "AZUREFIREWALLS"

    | where Category == "AzureFirewallApplicationRule"

    | parse msg_s with Protocol 'request from ' SourceHost ':' SourcePort 'to ' DestinationHost ':' DestinationPort '. Action:' Action

    | where isnotempty(DestinationHost)

    | where DestinationHost has_any (domains)

    | extend DNSName = DestinationHost

    | extend IPCustomEntity = SourceHost

    )

    )
- When this rule query is executed (based on schedule), it will analyze logs from all the data sources defined in the query which also includes the Azure Firewall DNS Proxy and Application Rule logs. The result will identity hosts in the internal network which attempted to query/connect to one of the malicious domains which were declared in Step 1.
Instructions to Configure Azure Firewall Detections in Sentinel
These detections are available as Analytic Rules in Azure Sentinel and can be quickly deployed with steps demonstrated below.
- Open the Azure Sentinel blade in the Azure Portal
- Select the Sentinel workspace where you have the Azure Firewall logs
- Select Analytics blade and then click on Rule templates
- Under Data Sources, filter by Azure Firewall
- Select the Rule template you want to enable and click Create rule and configure rule settings
 Steps to Configure Azure Firewall Detection Rules in Azure Sentinel
Summary
Azure Firewall logs can help identify patterns of malicious activity and Indicators of Compromise (IOCs) in the internal network. Built-in Analytic Rules in Azure Sentinel provide a powerful and reliable method for analyzing these logs to detect traffic representing IOCs in your network. With added support for Azure Firewall to these detections, you can now easily detect malicious traffic patterns traversing through Azure Firewall in your network which allows you to rapidly respond and remediate the threats. We encourage all customers to utilize these new detections to help improve your overall security posture.
As new attack scenarios surface and associated detections are created in future, we will evaluate them and add support for Azure Firewall or other Network Security products, where applicable.
You can also contribute new connectors, detections, workbooks, analytics and more for Azure Firewall in Azure Sentinel. Get started now by joining the Azure Network Security plus Azure Sentinel Threat Hunters communities on GitHub and following the guidance.
Additional Resources
by Contributed | Mar 24, 2021 | Technology
This article is contributed. See the original author and article here.
The Microsoft 365 security center at security.microsoft.com combines security capabilities that protect, detect, investigate, and respond to email, collaboration, identity, and endpoint threats. We recently shared details about how we’re bringing together these existing product experiences and functionalities in our recent blog post.
As part of our investment in delivering world class SecOps experiences, we improved all of our threat and vulnerability management pages including: Dashboard, Recommendations, Remediation, Software inventory, Weaknesses, and Event timeline.
Going forward, all new threat and vulnerability management features will only be available in the new portal.
Here’s what you’ll see under the “Vulnerability management” section in the Microsoft 365 security center:
- New look and feel (including new insights on the top of each page)
- Recommendation side panel improvements
- New side panel design
- Lists of related device names and CVEs are in separate tabs with searchable items
- Threat Analytics reports
- New remediation request experience
- All items are visible when you scroll (no more pagination)
- New filters
- Better search options
- Better performance
- Accessibility improvements
Let’s go through some of the changes in Microsoft 365 security in more detail.
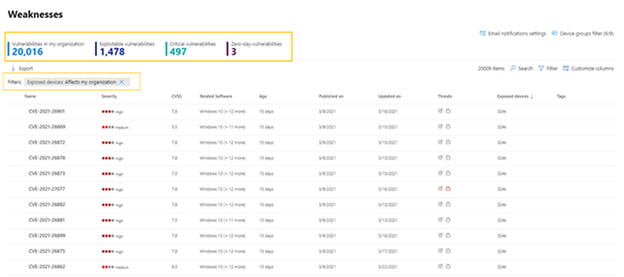
The new vulnerability management Weaknesses page includes:
- New insights on the top of the page: Including the number of exploitable vulnerabilities, critical vulnerabilities, and zero-day vulnerabilities.
- New filter experience: See what filters are turned on above the list.
- All items are now visible when you scroll: No more pagination.
Each recommendation in the Security recommendations page has a new side panel design with much more information:
- Wider side panel has better visibility with more in-depth information. All items are visible and with no need to scroll.
- Associated CVEs pivot, which is organized by severity.
- List of “related threats” with Threat Analytics links to related articles.
- All the lists are now shown in tabs, and each tab has its own search option.

Under the Related threats header within a security recommendation, you can find the related Threat Analytics articles and access them directly by clicking on the name:

In every tab within the security recommendation you can search for a specific item, such as a CVE or a device name, to check if the CVE or a device are applicable to this recommendation. The other option is to select the column header to sort the list:

Search for a device name in the Devices tab of the recommendation. There is also a “last seen” column for each device:

Selecting an activity in the Remediation activities tab of the recommendation will open a side panel with the remediation description, progress, and more. Previously, it directed you to another page:


To request remediation for a security recommendation, the Remediation request experience has been updated. Instead of a long form you need to scroll to fill out, there is a new wizard with step-by-step guidance:

On the Remediation page in vulnerability management, you now have insights into how many activities past due:

The main Dashboard page has had some design changes, including the list of the top security recommendations:

Finally, all the TVM experiences are compliant to the accessibility standard called WCAG 2.1.
Are you ready? If you’ve enabled public preview features, you can check out the new threat and vulnerability management experiences in the unified portal today! If not, we encourage you to turn on preview features for Microsoft Defender for Endpoint to get access to the newest capabilities. These features can be turned on in the Microsoft Defender Security Center or the Microsoft 365 security center. In addition, we recommend you learn about how to redirect accounts from Microsoft Defender for Endpoint to the Microsoft 365 security center.
Microsoft Defender for Endpoint is an industry leading, cloud powered endpoint security solution offering vulnerability management, endpoint protection, endpoint detection and response, and mobile threat defense. With our solution, threats are no match. If you’re not yet taking advantage of Microsoft’s unrivaled threat optics and proven capabilities, sign up for a free Microsoft Defender for Endpoint trial today.
We’re excited to hear your feedback as you explore the unified portal and we will continue to update the documentation throughout the preview. Our mission is to empower you with the most unified extended detection and response (XDR) solution in the industry so that you can focus on what’s important: preventing and remediating threats.
To read more about the unified portal experience, check out:
by Contributed | Mar 24, 2021 | Technology
This article is contributed. See the original author and article here.
Contributors:
Rob Garrett – Sr. Customer Engineer, Microsoft Federal
John Unterseher – Sr. Customer Engineer, Microsoft Federal
Martin Ballard – Sr. Customer Engineer, Microsoft Federal
This article replaces the previous article, which used the – now legacy – version of PnP PowerShell.
What is Look Book?
SharePoint Look Book templates build upon the open-source Patterns and Practices site provisioning engine.
|
Look Book templates are a set of Microsoft-provided site designs that programmatically add custom user interface elements to SharePoint Online sites. Microsoft has published a public web site with a set of showcase templates to should satisfy most customer needs:
https://lookbook.microsoft.com
Each category of templates targets the functionality of various industry verticals. For example, the Organization category contains templates for customizing SharePoint sites for Crisis Communication, Organization News, Leadership Information, to name a few.
SharePoint Look Book templates build upon the open-source Patterns and Practices site provisioning engine:
https://docs.microsoft.com/en-us/powershell/sharepoint/sharepoint-pnp/sharepoint-pnp-cmdlets?view=sh…
The templates themselves are a set of web assets (CSS, images, etc.) with accompanying template XML file that instructs the provisioning engine how to apply the customizations to an existing SharePoint Online site collection. SharePoint Look Book templates follow Microsoft recommended SharePoint User Interface Design principles:
https://spdesign.azurewebsites.net/
Users of Look Book templates should understand that the templates are “after-market” customizations applied to existing site collections. The base SharePoint Online offering in Office 365 does not provide these templates, nor their associated branding/customization. The templates are not available for end users to select from a central gallery as with earlier versions of SharePoint Server on-premises.
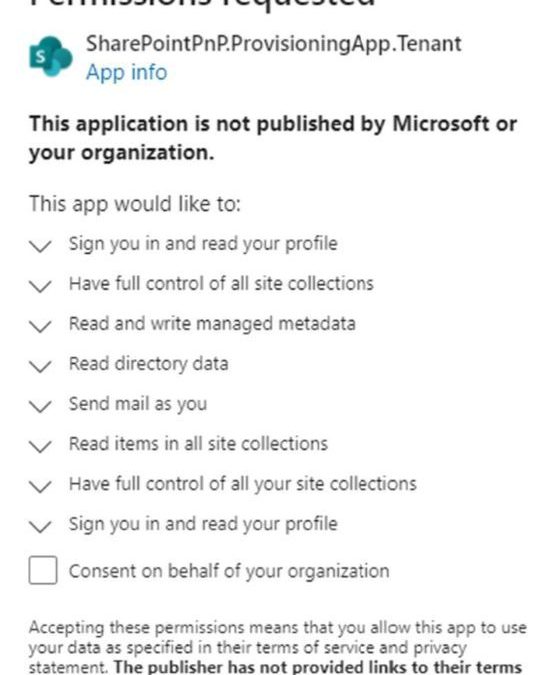
The Look Book web site facilitates the creation of a new Communication site collection and then the application of the template customizations to that site collection. The Look Book provisioning web site achieves this process via a tenant application, which requires tenant administration consent. Administrators deploying the first Look Book templates will see a consent dialog like the following:

The Look Book provisioning service works with the regular Government Community Cloud (GCC) but not in the High variant without modification. |
Challenge – Using Look Book in GCC High
Microsoft strives to implement functionality parity between all sovereign clouds. However, since each Office 365 cloud type serves a different customer audience and requirements, functionality will differ between these cloud types. Of the US clouds – Commercial, Government Community Cloud, Government Community Cloud High, and DOD Cloud, the last two offer the least functionality to observe US Federal mandates and compliance.
As Microsoft develops new functionality for Office 365 and Azure clouds, we typically release new functionality to commercial customers first, and then to the other GCC, GCC High, and DOD tenants later as we comply with FedRAMP and other US Government mandates. Open-source offerings add another layer of complexity since open-source code contains community contribution and is seldom developed with government clouds in mind.
The Look Book provisioning service (https://lookbook.microsoft.com) relies on open-source Patterns and Practices code and community developed APIs that may operate differently in GCC, GCC High, and DOD clouds. As an open-source resource, the SharePoint Look Book templates are not directly supported by Microsoft.
At the time of this writing, the Look Book provisioning service works with the regular Government Community Cloud (GCC) but not in the High variant without modification. GCC High places restrictions on cross domain access as well as script execution. GCC High and GCC reside on two different top-level domains: sharepoint.com vs. Sharepoint.us.
Solution – Apply Templates via PowerShell
We can create Communication sites in GCC High and then run PowerShell to affect the customizations after. |
Recall that the Look Book provisioning service leverages Patterns and Practices APIs to both create new site collections and lay template customization atop. Specifying a GCC High tenant, the service fails during the request to provision a new site collection. Fortunately, we do not require this service to create vanilla Communication or Team site collections in GCC High tenants. Instead, we can create sites in GCC High and then run PowerShell to affect the customizations after.

The application of Look Book templates, although existing within the Look Book provisioning service, is also available via PowerShell. Assuming a tenant administrator has pre-created an out-of-the-box Communication or Team Site, they may leverage the SharePoint PnP PowerShell Module to apply a template.
PnP PowerShell installation is a prerequisite for deploying Look Book templates via PowerShell. The previous edition of this article used the – now legacy – SharePointPnpPowerShell module. At the time of writing, the new steps require the latest bits for PowerShellGet, Nuget Package Provider and PnP.PowerShell module. You only need follow these side-line steps once for a specified Windows machine.
- Open a PowerShell console as an administrator (right-click, Run As Administrator).
Note: The latest version of PnP.PowerShell is cross-platform and works with PowerShell Core (v7.x).
- Check the installed version of PowerShellGet with the following cmdlet:
Get-PackageProvider -Name PowerShellGet -ListAvailable
- If you see version 2.2.5.0 or greater, proceed to step #5.
Note: if you have PowerShell 5.1 and 7.x installed, you may have different versions of PowerShellGet for each version of PowerShell.
- Install the required version of PowerShellGet with:
Install-PackageProvider -Name Nuget -Scope AllUsers -Force
Install-PackageProvider -Name PowerShellGet -MinimumVersion 2.2.5.0 -Scope AllUsers -Force
- If you ran step #4, close and reopen your PowerShell console (again, as an administrator).
- Install PnP.PowerShell with the following:
Install-Module -Name PnP.PowerShell -AllowPrerelease -SkipPublisherCheck -Scope AllUsers -Force
- Close and reopen your PowerShell console (run as administrator not required this time).
- Confirm that PnP.PowerShell is installed with the following:
Get-Module -Name PnP.PowerShell -ListAvailable
|
The following details the steps to provision a Look Book template via PowerShell:
- Download the desired templates from the following location:
https://github.com/SharePoint/sp-dev-provisioning-templates/tree/master/tenant
- Open a new PowerShell console (v5.1 or Core 7.x).
- Ensure the PnP.PowerShell module is loaded with the following:
Import-Module -Name PnP.PowerShell
- Run the following script ONCE per tenant to create an Azure App Registration for PnP:
Note: Replace tenant with your tenant name and the AzureEnvironment with the associated sovereign cloud.
Register-PnPAzureADApp -ApplicationName "PnP PowerShell" `
-Tenant [TENANT].onmicrosoft.com -Interactive `
-AzureEnvironment [USGovernment|USGovernmentHigh|USGovernmentDoD|Germany|China] `
-SharePointDelegatePermissions AllSites.FullControl `
-SharePointApplicationPermissions Sites.FullControl.All `
-GraphApplicationPermissions Group.ReadWrite.All `
-GraphDelegatePermissions Group.ReadWrite.All
Login with user credentials assigned Global Administrator role.
- Make a note of the GUID returned from step 4. This is the App/Client ID of the new PnP Azure App Registration.
- If you see the following consent dialog, review the requested permissions and click Accept. If you’d prefer different permissions, change the requested Graph and SharePoint permissions in step #4.

- Connect to the Communication site collection:
Note: Replace tenant with your tenant name and the AzureEnvironment with the associated sovereign cloud. Replace the ClientId with the GUID returned in step #4. The URL is to the site collection you want to apply a template.
Connect-PnPOnline -Url https://[TENANT].sharepoint.[com|us|mil|de|cn]/sites/[SITE COLLECTION] `
-Interactive -AzureEnvironment [USGovernment|USGovernmentHigh|USGovernmentDoD|Germany|China] `
-ClientId [ClientID] -Tenant
"[TENANT].onmicrosoft.com"
Login with user credentials assigned Global Administrator role (some templates make tenant-level changes).
- Apply one of the templates to your site collection with the following:
Invoke-PnPSiteTemplate -Path <path to file><template>.pnp
- The previous command will use the PNP file (contains XML) to instruct the PnP template API to configure the previously created site collection.

Your site collection should now be fully provisioned with the elements of the template you have chosen. It will be necessary to repeat these steps for any additional Look Book sites you wish to provision for your organization. Let us know what you think in the comments below.
Note: The SharePoint Look Book provisioning service and SharePoint PnP PowerShell modules are open-source resources not supported by Microsoft. Additionally, always know the risks associated with making change in your tenant in the Global Admin role when running scripts changing configurations. |
by Contributed | Mar 24, 2021 | Technology
This article is contributed. See the original author and article here.
3/24 Update: This issue is now resolved! The next time you run “Install-Module -Name WindowsAutoPilotIntune” it should download the latest version 5.0 of the Autopilot Module.
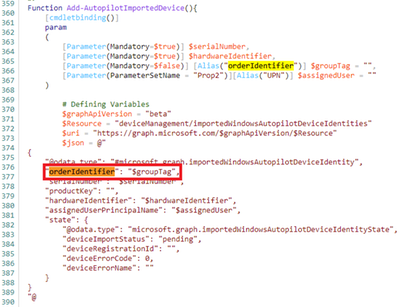
We were recently alerted to a scenario where customers using version 4.8 of the WindowsAutopilotIntune PowerShell script are no longer able to assign group tags to Intune managed Windows devices.
During investigation, we discovered that due to a recent change in promoting the Intune GraphAPI from beta to v1.0, the “orderIdentifier” property used with the “$groupTag” value has been renamed to “groupTag”.
Example screenshot of the “$groupTag” property in the WindowsAutoPilotIntune script.
To align with this recent change, the WindowsAutopilotIntune PowerShell script has been updated to use “groupTag” in place of the “orderIdentifier” property instead. We recently updated the script to align with these changes and the new version (v5.0) of the script can be found here: PowerShell Gallery | WindowsAutoPilotIntune 5.0.
We’d also like to share that you can manually set the group tag for Windows Autopilot devices by using the following steps:
- Login to the Microsoft Endpoint Manager admin center.
- Select Devices > Windows > Windows enrollment > Devices (under Windows Autopilot Deployment Program).
- Select the device you wish to assign a group tag to, enter in an attribute that can be used to identify a group of devices > Click Save.
See: Edit Autopilot device attributes for more info.
Note: You can also add Windows Autopilot devices by importing the CSV file to set a group tag. See: Manually register devices with Windows Autopilot | Add devices to learn more.
Additional considerations
A part of the recent improvements and changes to the windowsAutopilotDeviceIdentity resource types, we also wanted to let you know that in an upcoming Intune service release, the “azureActiveDirectoryDeviceId” property will soon be renamed to “AzureAdDeviceId”.
While the “AzureAdDeviceId” property is currently available, if you have any scenarios or scripts using the “azureActiveDirectoryDeviceId” property, you will soon have to update to use “AzureAdDeviceId” instead.
More info and feedback
For further resources on this subject, please see the links below.
Let us know if you have any additional questions by replying to this post or reaching out to @IntuneSuppTeam on Twitter.
Blog Post Updates:
3/24: This issue has been resolved with version (v5.0) of the script!
by Contributed | Mar 24, 2021 | Technology
This article is contributed. See the original author and article here.
We were recently alerted to a scenario where customers using version 4.8 of the WindowsAutopilotIntune PowerShell script are no longer able to assign group tags to Intune managed Windows devices.
During investigation, we discovered that due to a recent change in promoting the Intune GraphAPI from beta to v1.0, the “orderIdentifier” property used with the “$groupTag” value has been renamed to “groupTag”.
Example screenshot of the “$groupTag” property in the WindowsAutoPilotIntune script.
To align with this recent change, we’ll be updating the WindowsAutopilotIntune PowerShell script to use “groupTag” in place of the “orderIdentifier” property instead. We’ll keep this post updated once the new script is available.
In the meantime, you can manually set the group tag for Windows Autopilot devices by using the following steps:
- Login to the Microsoft Endpoint Manager admin center.
- Select Devices > Windows > Windows enrollment > Devices (under Windows Autopilot Deployment Program).
- Select the device you wish to assign a group tag to, enter in an attribute that can be used to identify a group of devices > Click Save.
See: Edit Autopilot device attributes to learn more.
Note: You can also add Windows Autopilot devices by importing the CSV file to set a group tag. See: Manually register devices with Windows Autopilot | Add devices to learn more.
Additional considerations
A part of the recent improvements and changes to the windowsAutopilotDeviceIdentity resource types, we also wanted to let you know that in an upcoming Intune service release, the “azureActiveDirectoryDeviceId” property will soon be renamed to “AzureAdDeviceId”.
While the “AzureAdDeviceId” property is currently available, if you have any scenarios or scripts using the “azureActiveDirectoryDeviceId” property, you will soon have to update to use “AzureAdDeviceId” instead.
More info and feedback
For further resources on this subject, please see the links below.
Again, we’ll keep this post updated as we receive additional information, but let us know if you have any additional questions by replying to this post or reaching out to @IntuneSuppTeam on Twitter.
by Contributed | Mar 24, 2021 | Technology
This article is contributed. See the original author and article here.
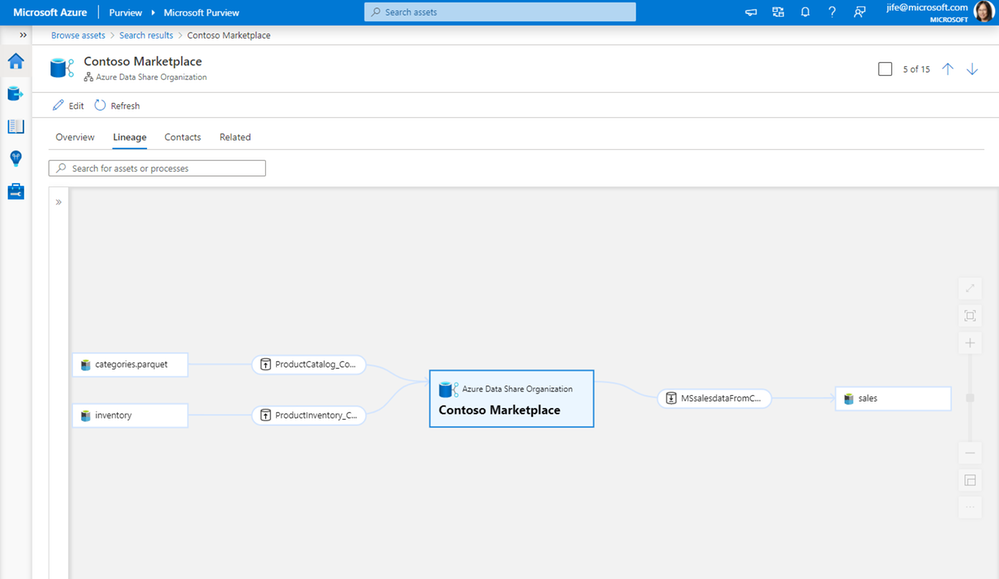
As companies embark on the journey to be data-driven, they need access to data both within and outside of their organization. It is critical to be able to share data easily and securely with external business partners and internally between different departments. Azure Data Share enables easy and secure sharing of files, folders, and databases with just a few clicks. Through the integration with Azure Purview, you can now have a 360-degree view of data sharing including what data is shared with or received from other organizations, which helps you perform impact and root cause analysis on your datasets.
Scenario 1: 360-degree view of data sharing
Whether you are sharing data with business partners or within your organization, you can see bi-directional sharing relationships in the Purview asset lineage graph. You can discover all the datasets that are shared to or received from a specific organization.
Scenario 2: Impact analysis on data shared with another organization
When you make a change to a dataset, such as changing the file format or the schema of a database table, it is important to know who is using that data and will be impacted by the change. Lineage lets you easily understand the impact of the downstream internal or external users who you have shared the data with.

Scenario 3: Root cause analysis for data received from other organizations
When troubleshooting a data issue, it is important to find out source of the data. Using lineage, you can identify where the data is originally coming from, and if it is from within or outside your organization.

Get started
It just takes a few simple steps to get data sharing lineage in Purview.
- Connect your Azure Data Share account to a Purview account
- Trigger scheduled or on-demand snapshots in Azure Data Share
- Browse and select an asset in Purview
- View the asset lineage in Purview
This quick demo shows the steps:
Resources
Connect to Azure Data Share – Azure Purview | Microsoft Docs
Azure Data Share | Microsoft Docs
by Contributed | Mar 24, 2021 | Technology
This article is contributed. See the original author and article here.
Back in September of 2020, we announced the new Outlook for Mac preview experience, available as a toggle for all our users. Now more than a third of Outlook for Mac users are using this new experience and that number is growing every day.
From the very beginning our strategy has been to build an exceptional Outlook experience based on direct feedback from you, our users. We’ve paid very close attention to what you have to say, and since September, we have added more than 50 top-asked-for features to the new Outlook for Mac, including support for additional account types, security enhancements, and more ways to stay on top of your calendar. The valuable feedback we’ve received has also helped us adjust our priorities.
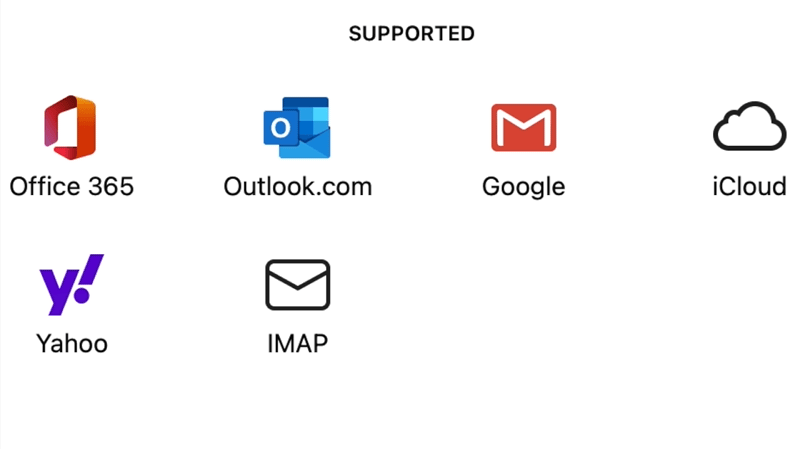
Support for iCloud, Yahoo, & IMAP Accounts
Let’s start with your accounts. The new Outlook for Mac now supports iCloud and Yahoo accounts, with full mail, calendar, and contact synching. IMAP support is also now available for your other email accounts. Additionally, when you first switch to the new Outlook, you’ll be asked about bringing your accounts into the new Outlook. Once you provide any missing account details, your account will appear in the new Outlook and start synching.
Shared Calendars, Shared Mailboxes, & Delegation
Since first releasing the new Outlook for Mac preview, support for shared calendars, mailboxes and mailbox delegation has been one of the top asked for features, critical to daily workflows of many users. We are very excited to announce that these are now available.
You can add a shared calendar, a shared mailbox, or a mailbox that has been delegated to you directly from within the new Outlook for Mac. Not just that but you can also manage your delegates via Outlook.
Preferences > Account settings.

Get caught up with updates around Security & Enterprise Features
S/MIME? You bet! With S/MIME support, you can add additional security by signing and encrypting messages end-to-end ensuring only you and your email recipients are able to view messages sent back and forth and rest assured that your emails haven’t been tampered with.

We’ve also added support for Microsoft Information Protection, to help you classify and protect your organization’s data. MIP policy labels can be configured in various ways to suit the needs of your organization.

Focus, Share, and stay on top of your calendar
The new Outlook for Mac continues to improve, to help you focus on what matters. Without leaving your inbox, you can now respond (RSVP) to events right from your message list and share an email to Teams.

If you are running Mac OS Big Sur, you can add the calendar widget to help stay on top of your day. You can even add events right from within the widget or click on an event to open it in Outlook.

Manage your contacts, in more ways than one!
You probably find yourself looking for emails from people with whom you interact a lot. Now you can add your most important contacts to your “Favorites”, so you can prioritize their messages and never miss an email from them. Simply click on a favorite person in the Sidebar in your mail view to see your recent email interactions with them.

We also have an updated contact card that has new panels for emails and files, providing quick access to relevant items for the contact.

Enhancements to Search, add-ins, and more
Do you find yourself often doing the same search over and over? Now you can save those searches and access them in one click! Saved searches are virtual folders that dynamically display a set of search results.

Add-ins have also been improved as frequently used add-ins are automatically pinned in your toolbar, and some add-ins can also be activated automatically and contextually, like from the text in an email or an appointment. To help with security and organizational compliance, emails and calendar invites can be blocked synchronously by an add-in at send time.

Our adaptive cards have been redesigned, which scale across several Microsoft services, including Outlook, Teams, SharePoint, Azure, and more, to bring about a seamless and consistent developer and user experience.
If you have not yet, you can preview and experience the new Outlook for Mac by turning on the “New Outlook” switch. If you would like to access features not yet supported, you can keep the “New Outlook” switch in the Off position and use the current version of Outlook for Mac.
To learn more about the requirements and detailed instructions on to enable the new Outlook for Mac preview, visit our support page.
Thank you for all your feedback, please keep it coming in our UserVoice channel as it helps us build a better product and prioritize our work.
If you want to learn more about how Microsoft 365 is improving the experience for Mac users, we recently shared a blog with 4 ways in which we are doing so.
Please note: The new Outlook for Mac is available as a preview experience. Certain features and account types are currently not supported in the preview. More information about the preview experience and known issues are available on our support page and as always, new feature availability is shared on the Microsoft 365 roadmap.


Recent Comments