
by Contributed | Mar 31, 2021 | Technology
This article is contributed. See the original author and article here.
What is LTI?
Learning Tools Interoperability, or LTI, is a standard published by the IMS Global Learning Consortium that makes it possible to integrate platforms such as Learning Management Systems (LMS) like Blackboard or Canvas with third party tools and vendors.
This standard makes it possible for third party tools to integrate quickly and easily, without having to create different integration solutions for each LMS. LTI enables third party tools to integrate seamlessly into the LMS, without the student even realizing that they’re using another tool.

What does the LTI Application do?
The Microsoft Learn LTI is an application that integrates MS Learn Modules and Learning Paths directly inside any LTI 1.1 or 1.3 compliant Learning Management System. The LTI will be released as an open sourced LTI code sample showcasing how the MS Learn Catalog is used as a LTI application. The GitHub repo will contain all relevant deployment instructions.
Prerequisites
-LMS system that supports LTI 1.1 or 1.3
-Azure subscription
-IT administrator to create Azure resource
-Enabled Azure Active Directory
Installation process based on 3 personas

Step 1. IT Administrator
To be completed by the institutions Azure Subscription owner and Azure Active Directory account administrator. Typically central IT at academic institutions.
Repo https://github.com/microsoft/Learn-LTI.git

Step 2. Learning Management System Administrator
To be completed by the Learning Management systems teams administrator.

Step 3. Educator Guide
To be completed by educators wishing to use the tool within their classes, courses or units.

Learn Organizational Reporting
Organizational Reporting
This is a service available to organizations to view Microsoft Learn training progress and achievements of the individuals within their tenant. This service is available to both enterprise customers and educational organizations.
Azure Data Share
The system uses a service called Azure Data Share to extract, transform, and load (ETL) user progress data into data sets, which can then be processed further or displayed in visualization tools such as Power BI. Data sets can be stored to either Azure Data Lake, Azure Blob storage, Azure SQL database, or Azure Synapse SQL Pool.
Reports and Dashboards
Organizations can create and manage their data share using Azure Data Share’s and PowerBI reporting.
https://docs.microsoft.com/en-us/learn/support/org-reporting

Microsoft Learn LTI Application
To Learn more see http://github.com/microsoft/learn-lti This project welcomes contributions and suggestions. Most contributions require you to agree to a Contributor License Agreement (CLA) declaring that you have the right to, and actually do, grant us the rights to use your contribution. For details, visit https://cla.opensource.microsoft.com.

by Contributed | Mar 31, 2021 | Technology
This article is contributed. See the original author and article here.
University College London project Resourcium
Guest blog by the IXN Resourcim team:
Hemil Shah – https://www.linkedin.com/in/hemil-shah-58747b161/
Louis De Wardt – https://www.linkedin.com/in/louis-d-a3a351124/
Pritika Shah – https://github.com/pritsspritss
Project Introduction
To start off with, our project is aimed at students which centralises resources for them on a single portal. It also includes data collection on student sentiments and areas that they need additional help on so that the teaching and learning teams as well as course reps can see what help can be provided to students. The aim of the application is to provide as much help as possible to the students via the surfacing of resources and a Question & Answer bot.
What was the problem?
The University College London academic team, emphasized how universities had no real way of viewing/measuring student engagement due to the current situation of COVID. The University places a strong emphasis on using a SharePoint site as the means of data storage as well as a dashboard on the SharePoint site to view this data for analysis. The University wanted the student IXN project team, to find ways in which students can be supported in their education and beyond via the provisioning of resources. According to our Universities admin team, this was an issue that many universities faced, hence we had to make the system design as generic as possible and become a open sourced scaffolded project for any institution across the globe to reimplement and build upon.
How we team approached the challenge?
Firstly, it was necessary for the team to research the existing technologies they would use to develop this application. After researching into the frameworks to use, they then had to investigate SharePoint sites which was an entirely different concept to standard web development. The key questions then came forward as to how we automate this data to SharePoint and how do we present this data to the user. It was also necessary to find resources that universities would typically provide a student with for FREE, that would be surfaced by the application. Finally, they also needed to research how to setup deployment scripts that would create the Azure resources and other dependencies that our system would have. With regards to the research about the above and more, all this information can be found at: https://resourcium.github.io/research/
What technical solution did we build?
The solution consists of a React web application that is accessible to students via a student login. They have utilised live login which enables students to login to our application through their university m365 user account/details. This did not only make it easier for them as developers as it saved us time making the database for the login system, but students do not need to remember an extra set of passwords. A link on a blog post we wrote on how to make a live login can be found here: Implementing SSO with Microsoft Accounts (for Single Page Apps) – Microsoft Tech Community
The project time frame was approx. 8 weeks.
System architecture diagram that simplifies our entire system:

key technologies our system uses (this can also be seen on the architecture diagram):
- React.js
- HTML/CSS/JS
- Azure services (functions, QnA bot and user settings)
- Microsoft Graphs
- Microsoft Forms
- Microsoft SharePoint
- Microsoft PowerApps
- Microsoft Flows
- PowerBI
Site map of our entire system:

Application Demo
Microsoft technologies that we used:
- The two-factor authentication (2FA) system: when users are registering their attendance for classes it is important that lecturers know that each student is registering themselves rather than someone else. To mitigate this concern, our client, wanted us to implement a two-factor authentication system. On the registration page if students are registering for the first time it will detect that they are yet to setup two-factor authentication. It will present a button that the user can press to generate a new secret. This method utilises Microsoft Azure functions to generate the secret and update the user’s information in Microsoft Cosmos DB. Once the secret has been generated the app will present the user with a QR code they can use to add our app to their favourite 2FA app. The user is asked to enter the current TOTP token to verify that they have setup the app correctly. If the verification token matches the Azure function will update the DB to mark the user as “verified”. From then on we are able to securely authenticate user’s registration of attendance to a lecture.
- The Wellbeing section: This section consists of forms for students to fill out to describe their sentiments and things they would require help in. The additional help form is aimed at storing information about the student so resources can be provisioned to them via the teaching and learning team. The stress form is an anonymous form for students to describe their feelings and course blockers. Microsoft Flows automates this forms data to a centralised SharePoint site where the data is presented as a dashboard. To ensure data can be analysed to the best extent, the stress form data is sent to PowerBi using another Microsoft Flow, and reports generated within PowerBi is embedded within our SharePoint site.
- The Student Help Page (LinkedIn Learning & MS Learn): This section aims to surface resources to students that they may not have known they have access to. We have made use of the Microsoft Learn API and LinkedIn Learning API to present results to students according to their input. Since the Microsoft Learn API cannot directly be filtered for resources, we must save a cached copy of the catalogue of results and manually filter that for the resources. This has given it an edge however, enabling almost instantaneous searching for results. The LinkedIn Learning API requires a client secret and key, which is only available for organisations and must be requested through them. In our case, we asked the UCL teaching and learning team for this access. If universities would like to deploy our application for their own system, they would need a subscription to LinkedIn Learning and would need to provide the client secret and token during deployment, this is normally a given as it falls under Microsoft.
- The Student Help Page (QnA Bot): This subsection is aimed to allow students to ask questions that may not be solved by the other two APIS above. The QnA bot utilises a QnA maker resource from Azure and a knowledgebase. If you are interested in setting up a simple QnA Bot please visit this site: https://docs.microsoft.com/en-us/learn/modules/build-faq-chatbot-qna-maker-azure-bot-service/.
What we have done here is enabled the teaching and learning team to easily setup questions within this QnA Bot via a SharePoint list. All they would need to do is submit a question and answer to a SharePoint list and via a Microsoft Flow we would automate these QnA pairs to the knowledgebase of the bot. We also have setup another flow that allows these QnA pairs to be easily deleted too, they just need to delete the record from the SharePoint list.
- The Settings Page (user customisations): For the user’s customisation to persist across multiple devices, instead of storing data locally, we use Azure Cosmos DB. Once the user authenticates their Microsoft account to our Settings endpoint, we retrieve their user ID and look up their settings in the database. The app then takes these settings to change how certain pages are rendered. Similarly, when the user goes to the Settings page it communicates the desired configuration to our Azure functions which update the database.
- The deployment of our application: With regards to the SharePoint deployment, we have written a site script that would automatically deploy the lists to a SharePoint site, but not the front-end view, this would be a limitation of the site-script itself. To make deployment for the SharePoint side as easy as possible, we have written an extensive guide consisting of videos on how the flows can be setup to work for any environment. Due to the composability and extensive API provided by Azure we can use Terraform to describe our entire Azure cloud environment including everything from the App Registration to the function’s app deployment.
What have we learnt?
We have come a long way as a team as initially two out of three of our members had no web development experience. This means we had to learn HTML/CSS/JS/React technologies from scratch which was quite time consuming. We also had to tread new depths as we learnt new Microsoft tools and technologies like MS Flows and SharePoint, again which was an entirely new concept. Additionally, we learnt how deployment of azure resources works through scripting like Terraform or ARM Templates.
How can this project be taken forward?
Our project provides the basis of a new paradigm of university centric app platforms. It solves the problem of engagement on two fronts that lecturers and other teaching staff have encountered as they adapt to online and remote learning. The first is that it provides students with direct access to information that universities already had but struggled to publicise. Secondly it provides a whole new means of understanding engagement with lectures. While what we achieved will inevitably prove useful with teaching, the current version of our app is only the first step along this path.
- Due to the time constraints, we were unable to make truly native mobile apps while also proving a version accessible from the web. Currently we have a responsive website that works well on both desktop and mobile devices, but it is currently not perfect on either. Future work would make truly independent versions optimised for mobile and desktop individually.
- There needs to be a way for admins to help students if they lose access to their second factor devices. Currently it is a manual process to reset them.
- We could more deeply integrate with a student’s calendar to make it more clear which events they are registering for and even provide lecturers with live dashboards of their student engagement.
- In future another team could implement sentiment analysis on the forms that our app directs students to which would help teaching staff understand what students need help with.
Resources/GitHub Repo
If you are interested in all the flows setup in our application as well as the deployment, please check out the following link which contains video guides on these flows and the deployment of the flows themselves as well as the SharePoint: site: https://github.com/hemilshah17/team29webappflows
The code for how we implemented the above system and technologies is available in our GitHub repository:
https://github.com/hemilshah17/team29webapp
by Contributed | Mar 31, 2021 | Technology
This article is contributed. See the original author and article here.
Google Import is a convenient tool for creating and managing your campaigns, ad budgets, bids and much more. By importing campaigns from Google Ads you don’t have to start from scratch to quickly expand your advertising reach. Bring over the specific features that you want, and make updates to entities such as bids, budgets, campaign names, and tracking templates – providing flexibility and control. Our customers have been able to enjoy these benefits via Microsoft Advertising online and the Microsoft Advertising Editor.
Today we are excited to announce the global release of Google Import API. Releasing the infrastructure as a service opens a world of automation and customization solutions. Develop an in-house app, or a custom import management set-up. Google Import API can also help lighten your workload as you don’t immediately have to be up to date on providing API support for all the new features. For example, you can import responsive search ads (RSA) from Google Ads even if your application hasn’t otherwise been updated to support RSA independently.
Google Import API allows you to create and delete import jobs, and get the current scheduling settings and previous import results. You can also retrieve details about the mapping between Google Ads and Microsoft Advertising campaigns to know how the import will function ahead of time for you to make an informed decision. For a more detailed picture on how to use the API, check out our API documentation and help pages to understand what gets imported.
As always please feel free to contact support or post a question in the Bing Ads API developer forum.
by Contributed | Mar 31, 2021 | Technology
This article is contributed. See the original author and article here.
Use Case:
To update the existing public ip address to Standard tier in existing service fabric cluster.
Approach:
The below approach helps in modifying the public ip address from basic tier to Standard tier.
To create public IP address and load balancer with standard SKU and attach to existing VMSS and cluster.
Step 1: Run the below command to remove NAT pools.
az vmss update –resource-group “SfResourceGroupName” –name “virtualmachinescalesetname” –remove virtualMachineProfile.networkProfile.networkInterfaceConfigurations[0].ipConfigurations[0].loadBalancerInboundNatPools
|
After the command is executed, it takes time to update each instance of VMSS. Please cross check if the virtual machine scale set instances are in running status before proceeding with next step.
Step 2: Run the below command to delete the NAT pools.
az network lb inbound-nat-pool delete –resource-group “SfResourceGroupName” –lb-name “LB ” –name “LoadBalancerBEAddressNatPool”
|
Step 3: Delete Backend pool
az vmss update –resource-group “SfResourceGroupName” –name “virtualmachinescalesetname” –remove virtualMachineProfile.networkProfile.networkInterfaceConfigurations[0].ipConfigurations[0].loadBalancerBackendAddressPools
|
Step 4: Copy the load balancer’s resource file from resources explorer. Delete the load balancer. This can be triggered from portal.
Step 5: Change the Sku of public Ip from ‘Basic’ to ‘Standard’ using the below command.
## Variables for the command ##
$rg = ‘SfResourceGroupName’
$name = ‘LBIP-addressname’
$newsku = ‘Standard’
$pubIP = Get-AzPublicIpAddress -name $name -ResourceGroupName $rg
## This section is only needed if the Basic IP is not already set to Static ##
$pubIP.PublicIpAllocationMethod = ‘Static’
Set-AzPublicIpAddress -PublicIpAddress $pubIP
## This section is for conversion to Standard ##
$pubIP.Sku.Name = $newsku
Set-AzPublicIpAddress -PublicIpAddress $pubIP
|
Step 6: Create load balancer of Standard Sku. You can modify the load balancer resource file with the below information.
"sku": {
        "name": "[variables('lbSkuName')]"
      },
Please find the template and parameter file attached for reference.
Step 7: Create inbound Nat rules
az vmss update -g ” SfResourceGroupName” -n “virtualmachinescalesetname” –add virtualMachineProfile.networkProfile.networkInterfaceConfigurations[0].ipConfigurations[0].loadBalancerInboundNatPools “{‘id’:’/subscriptions/{subId}/resourceGroups/{RG}/providers/Microsoft.Network/loadBalancers/{LB} /inboundNatPools/LoadBalancerBEAddressNatPool’}”
|
Step 8: Once the NAT rules are created, backend pool can be added from the portal. VMSS and ip address has to be updated.
To add backendpool: Select Backend pools and Click on ‘Add’

by Contributed | Mar 31, 2021 | Technology
This article is contributed. See the original author and article here.
First and foremost, THANK YOU for being amazing. We know that this school year has had its ups and downs, and we are so grateful to you for all your hard work and dedication to not only helping students learn but supporting their wellbeing. If there is something you’d like to see more of, please let us know! We’re always listening.
Last month, we announced a number of innovations to help in and out of the classroom including PowerPoint Live in Microsoft Teams, Live Reactions in meetings, Invite-only meeting options in private meetings, downloading attendance reports, and more.
This month, whether you’re teaching remotely, hybrid, or back in person, we’re excited to share the lasts updates to the Teams experience to help you:
- Encourage class participation during synchronous learning
- Support asynchronous learning
- Help keep students safe with better meeting controls
- Create better large meeting and webinar experiences
- Improve collaboration and communication among school staff
- Train yourself on Teams with new resources created for school scenarios
Let’s dive in! (Click here to jump right into a quick list without extra description)
1) Encourage class participation during synchronous learning
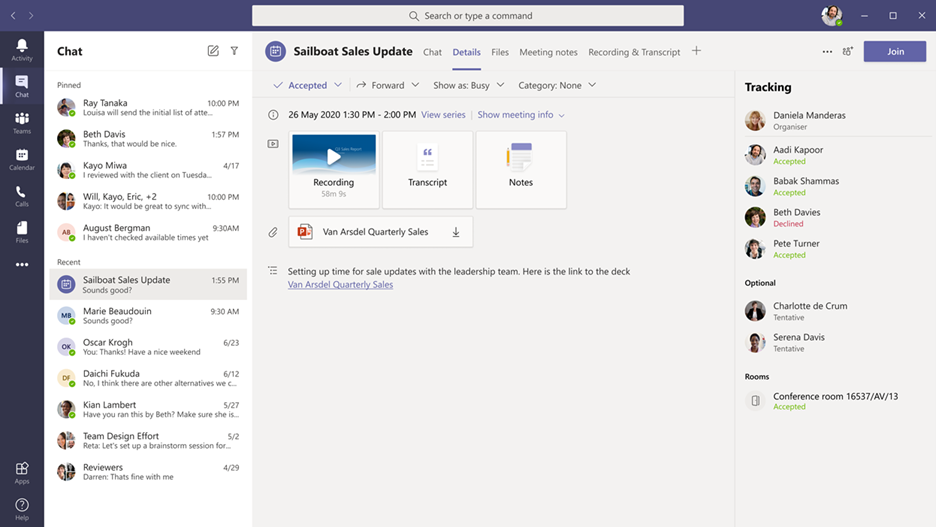
Meeting recap
Access all the relevant files for the class or meeting like recordings, transcripts, notes, and files in one easy view. Students will either be able to see the recordings, transcript, and files in the meeting chat or channel, or for private meetings by going to their calendar, expanding the meeting, and clicking on the “Details” tab at the top. Those who missed the meeting, joined late, or want to revisit what was discussed, can play the recording and visit class transcripts.
Get an easily shared meeting link from the Calendar
Users can now copy a meeting link from the Calendar tab and share it out with others without starting the meeting. If you are in an email, chat, or channel conversation and agreed to meet at a certain time, this is an easy way to copy a meeting link and paste it into the conversation.

Enable tenant administrators to configure masking PSTN participant phone numbers
With schools or institutions that have Audio Conferencing enabled for their Teams meetings, tenant administrators now have the ability to define how their Audio Conferencing participants’ phone numbers appear in the roster view for meetings scheduled within their organization. The options include masked to external users, masked for everyone, or off (visible to everyone). This provides flexibility in securing PSTN participants’ phone numbers. This feature is only available through PowerShell cmdlet at this time.

Outgoing participant video in meetings in Safari
If you use Safari, now you can turn on an outgoing video so the class can see your smiling face. Just click the camera icon to turn on the video in the meeting. This requires Safari 14 or higher on MacOS BigSur.
Touch Bar meetings controls for Mac
MacBooks with Touch Bars now have Teams Meeting controls that quickly allow users to access controls without clicking into the window. Users can open the ‘view participants’ panel, open meeting chat, use raise hand, enable video, mute/unmute, open shared tray, and leave the meeting from one place.

New and dynamic meeting experiences on Android
The newly improved Teams meetings experience on Android devices now allow educators and students to see up to 20 participants on phone devices and up to 30 participants on tablets. Simply scroll to the right on your device to see all the participants in the meeting. You can also view shared content and a spotlighted participant simultaneously. This enhancement enables participants to follow along with the presentation while continuing to view the speakers’ and other participants’ video. This is currently already available in iOS.

2) Support asynchronous learning
Android On-Demand Chat Translation
Inline message translation helps ensure that every student has a voice and facilitate conversations across language barriers or with language learners. With a simple click, people who speak different languages can fluidly communicate with one another by translating posts in channels and chat.
250 GB file size support in Microsoft Teams
Upload file size limits for Microsoft Teams have increased from 100 GB to 250 GB. This also applies to all other Microsoft 365, services including SharePoint and OneDrive. That means educators and students can easily share large files, like 3D models or large videos for projects. Learn more
Add Microsoft Teams to your SharePoint team site
Now it’s even easier to bring SharePoint content into Microsoft Teams, and at the same time add Teams to your teams site. As you connect SharePoint to Teams, you choose what lists, libraries, and pages you want to bring into Teams as tabs in the new, default General channel. Learn more

New file sharing experience
Create a shareable link for any file stored in Teams and directly set the appropriate permissions, making it a better process to share files with the right people. Additionally, you can also set permissions for files stored in SharePoint or OneDrive while composing a private chat or starting a channel conversation. Learn more
3) Help keep students safe with better meeting controls
New bypass lobby option
For class, it’s helpful to choose who can bypass the lobby and be allowed to directly join class. There are a number of different options you can choose from, and this month you’ll be able to choose two additional options: “People in my organization” (which excludes guests) and “People in my organization, trusted organizations, and guests.” This provides another level of security and flexibility to Teams users. This is available for both private and channel meetings and provides another level of security and flexibility for schools and universities using Teams for class. Learn more about Teams meeting safety and security options.

4) Create better large meeting and webinar experiences
Live Event presenter for iPad
Love using an iPad for large meetings? Now it’s easy to present live in Teams from your iPad. Just open the Teams for iPad app and select ‘Join as presenter’ to start broadcasting content to your class or audience. Learn more

Improved experience for large meeting participant lists
It can be tough to manage meetings with large numbers of participants. But now it’s now possible to review the full participant list in the lobby before admitting everyone into the meeting or webinar. During the presentation, attendees are listed in alphabetical order and those who raised their hands are elevated to the top of the participant list, making it easy to see interact with students asking questions or looking to participate.
5) Improve collaboration and communication among school staff
Viva Connections on Teams desktop
Viva Connections is your gateway to a modern employee experience. It is personalized and appears in the apps and devices your employees already use every day, such as Microsoft Teams. Viva Connections gives people a curated, company-branded experience that brings together relevant news, conversations, and other resources. Learn how you can add Viva Connections to your Teams desktop.

Create a task from a message in Microsoft Teams
Some messages result in follow-up actions. With this feature, you’ll be able to quickly create tasks right from any Microsoft Teams chat or channel conversation without having to switch apps or windows. Select More options on a Teams message to choose ‘Create task from message’ and pick which individual task list or shared plan to save the task to. Powered by the new Tasks in Teams experience, you can then track and manage the task in the Tasks app in Teams.
6) Train yourself on Teams with new resources created for school scenarios
For educators
- Join us for Microsoft Store’s next, “For You, By You: A How-To Series for Educators to Supercharge Classroom Engagement.” Taking place on May 13 at 3 PM PST, the event is the 2nd part of a series to celebrate the incredible work that educators around the world have been doing. May’s event will feature how to create engaging virtual lesson plans in Microsoft Teams, and review tools to assist with accessibility and inclusion in the classroom. There will also be some surprise celebrity appearances! Sign up for the event here.
- Find what you need to get started on Teams all in one place at aka.ms/TeamsPP
- Check out this resource about how to have secure online meetings
- Watch the recordings from the Microsoft Teams for EDU digital readiness event which dive into common scenarios and use cases to support you this school year at https://aka.ms/TeamsEduEvent.
For IT and school leaders
- See all the latest Microsoft Teams product news from Ignite here, including education specific on demand webinars: http://aka.ms/TeamsSessions
- Learn which policies to enable to keep students safe when using Teams for remote and hybrid learning with this Policy quick guide.
For parents and guardians
- Learn about Teams and common classroom scenarios with clickable interactive demos (in English).
- Quickly get up to speed on Teams Meetings and Accessibility with 1-page guides.
https://aka.ms/TeamsEduGetStartedParents
https://aka.ms/TeamsEduMeetingsParents
https://aka.ms/TeamsEduAccessibilityParents
- Find resources to keep kids engaged and learning new skills with family-led learning experiences (for children 3-12).
And for those that love lists, here’s a quick review of all the features we shared that are now generally available:
- Encourage class participation during synchronous learning
Meet recap
Get an easily shared meeting link from the Calendar
Enable tenant administrators to configure masking PSTN participant phone numbers
Outgoing participant meetings in Safari
Touch Bar meeting controls for Mac
New and dynamic meeting experiences on Android
- Support asynchronous learning
Android On-Demand chat translation
250 GB file size support in Microsoft Teams
Add Microsoft Teams to your SharePoint team site
New file sharing experience
- Help keep students safe with better meeting controls
New bypass lobby option
- Create better large meeting and webinar experiences
Live Event presenter for iPad
Improved experience for large meeting participant lists
- Improve collaboration and communication among school staff
Viva Connections on Teams desktop
Create a task from a message in Microsoft Teams
We’re always looking to improve the education experience in Teams, and we can only do that with your support and awesome ideas. If there’ something you’d like to see in Teams for Education, please let us know!
by Contributed | Mar 31, 2021 | Technology
This article is contributed. See the original author and article here.
It’s been a busy, productive couple of months. We announced a lot of exciting product updates and offerings at Ignite earlier this month, and many of these are now generally available.
For meetings you can now use PowerPoint Live, Live Reactions, Invite-only meeting options. Similarly for webinars and larger meetings, you can now host 20,000-person view-only broadcasts and download attendee reports after the webinar. When you are using a cellular connection and want to limit the used bandwidth, you can now use the low data calling mode. And if you happen to be mobile with spotty reception, you can still access your file offline. There are several updates to the Approvals app that lets you respond inline, as well as markdown and seamlessly attach files inside and outside of Microsoft 365 to your approvals. And to better manage your Android Teams Rooms devices you can now use remote device provisioning.
You can read about all Teams announcements during Ignite in the What’s New in Microsoft Teams | Microsoft Ignite 2021.
However, these aren’t the only new features and capabilities to launch in February and March. In fact, there’s a lot. So, grab a cup of something and let’s see what’s new in:
Meetings and webinars
Calling
Devices
Chat and Collaboration
Power Platform and custom development
Management
Security, compliance, and privacy
Government
Meetings and webinars
Live transcription with speaker attribution
Live transcription allows you to follow and review conversations (in English-US) alongside the meeting video or audio in real time. This promotes inclusivity for participants who have hearing disabilities or different levels of language proficiency. Attendees who joined late, or missed the meeting, can easily catch up by reading what was discussed and searching the transcript by speaker. Tenant admins have to turn on the Allow transcription policy to enable this feature. Learn more
Meeting recap
Meeting recap helps teams stay on track and keep their work moving forward after the meeting is over. It includes meeting recording, transcript, chat, attached files and more. The recap is shared with participants in the meeting Chat tab and viewable in the Details tab. Those who missed the meeting, joined late, or want to revisit what was discussed, can play the recording, or review the transcripts respectively.

Meet Now in Outlook client for Windows
You can now start an instant Teams meeting from the Calendar tab in Outlook for Windows by clicking Meet Now. To enable this feature, tenant admins just have to set the Allow Private Meet Now policy option to True in the admin console.

Get a Meet Now meeting link from the Calendar
Users can now copy a Meet Now meeting link from the Calendar and share it out with others without starting the meeting. If you are in an email, chat, or channel conversation and agreed to meet at a certain time, this is an easy way to copy a meeting link and paste it into the conversation.

Masking PSTN participant phone numbers
For customers who have Audio Conferencing enabled for their Teams meetings, their tenant administrators now have the ability to define how their participants’ phone numbers appear in the roster view for meetings scheduled within their organization. The options include masked to external users, masked for everyone, or off (visible to everyone). This provides flexibility in securing PSTN participants’ phone numbers. This feature is currently available through PowerShell cmdlet. Learn more

New bypass lobby option
The Teams meeting policy has a setting that allows certain groups of users to bypass the meeting lobby and join the meeting directly. This month’s update includes two additional options: “People in my organization” (which excludes guests) and “People in my organization, trusted organizations, and guests.” This provides another level of security and flexibility to Teams users.

Outgoing participant video in meetings in Safari browser
Outgoing video in web meetings is now available to Safari users. Simply click the camera icon to start a sharing your video in the meeting. This requires Safari 14 or higher on MacOS BigSur.
Touch Bar meetings controls on Mac
MacBooks with Touch Bars now have Teams Meeting controls that quickly allow users to access controls without clicking into the window. Users can open the ‘view participants’ panel, open meeting chat, use raise hand, enable video, mute/unmute, open shared tray, and leave the meeting from one place.

Dynamic meeting experiences on Android
New meeting experiences on Android devices enables participants to view content, speakers, and attendees all on one screen. Attendees are now able to see up to 20 participants on mobile devices and up to 30 participants on tablets. In addition, attendees are able to view shared content and a spotlighted participant simultaneously, and no longer have to choose between content being presented or pinned speakers. Already available on iOS.

Live Event presenter for iPad
Sales teams, executives, and other iPad users now have the ability to present live in Teams from an iPad. Just open the Teams for iPad app and select ‘Join as presenter’ to start broadcasting content to the audience. Learn more.

CVI support for Teams Live Events
Join Teams Live Events via Cloud Video Interop (CVI) with support for Microsoft partner meeting room devices. Contact your CVI provider to set started! Learn more.
Participant lists for large meetings updates
It’s now possible to review the full participant list in the lobby before admitting everyone into the meeting or webinar. During the presentation, attendees are listed in alphabetical order and those who raised their hands are elevated to the top of the participant list.

Teams Live Event GoLocal Data Center Support
We are now enabling local data centers for Teams Live Events in the following countries: France, Germany, South Africa, South Korea, Switzerland, and United Arab Emirates. Any user with the eligible SKU and the appropriate IT admin policy is able to schedule a live event.
Calling
Voice-enabled channels
Voice-enabled channels allow connecting a call queue to a channel in Microsoft Teams. Users can collaborate and share information within the channel while taking calls in the queue. This feature is ideal for scenarios such an IT help desk or HR hotline. IT admins can quickly connect call queues to specific channels, and team owners can manage the settings. Learn more

Survivable Branch Appliance
To support the most critical conversations in the event of an outage, a Survivable Branch Appliance (SBA) allows users to place and receive PSTN calls even in the event of a network outage. During an outage, the Teams client switches to the SBA automatically and ongoing calls continue without interruptions and no user action is required. Once the Teams client identifies that network connectivity has been restored, normal call functionality is resumed, and any call data records are uploaded to the cloud. Organizations can now take advantage of Survivable Branch Appliance capabilities by following the step-by-step configuration guidance provided by their SBC vendor. Learn more

Devices
We’ve have newly certified devices for Microsoft Teams this month from EPOS and Poly.
EPOS ADAPT 100 Series
Headsets from EPOS help meet the need for increased collaboration and seamless user workflows as they transition from tasks to meetings. The series encompasses many variants that are optimized for unified communications. Using the Teams button, you can easily join your Teams meetings and calls and their easy-to-use plug-and-play functionality makes getting started simple.

Poly Trio C60
The Poly Trio C60 is now certified for Microsoft Teams Rooms on Windows as USB audio peripheral. Previously certified as a Teams IP conference phone, the Poly Trio C60 can now be configured for use with a Teams Room system, such as Poly G85-T. The Trio C60 supports Poly signature audio innovation such as distraction-free NoiseBlock AI and rich 22kHz sound.

Poly Savi 7300 Office
The Savi 7300 Office Series is the ultra-secure DECT™ wireless headset perfect for anywhere sensitive conversations happen. The series is designed to meet the highest-level DECT™ security Step C, with military-grade 256-bit AES encryption for maximum security. Combined with Poly Acoustic Fence technology and Microsoft Teams Open Office spec, conversations always stay clear, private and protected. A dedicated Teams button provides a seamless Teams experience.

Poly Studio P15
The Poly Studio P15 is a personal USB video bar that gives you everything you need to look and sound your best on video calls in one sleek device. High performance 4K image sensors and automatic camera framingallow you to be seen without staying glued to your chair. A powerful speaker and microphone array deliver rich, clear audio, while NoiseBlockAI and Acoustic Fence technology keep out distracting sounds.

Chat and Collaboration
Android On-Demand Chat Translation
Inline message translation helps ensure that every worker in the team has a voice and facilitate global collaboration. With a simple click, people who speak different languages can fluidly communicate with one another by translating posts in channels and chat.
Additional settings for multiple Accounts and Organizations
You can now in the Teams desktop client add a personal account, along with one work/school account, change your profile picture, and switch between accounts and orgs through Settings.
250 GB file size support in Microsoft teams
We have now increased the upload file size limit for Microsoft Teams from 100 GB to 250 GB. This also applies to all other Microsoft 365, services including SharePoint and OneDrive. You are now able to easily share large files like a 3D model of a new building, a client commercial shot in 8K video, a large dataset for a vaccine trial or research projects or large videos for educational projects. Learn more
Viva Connections on Teams desktop
Viva Connections is your gateway to a modern employee experience. It is personalized and appears in the apps and devices your employees already use every day, such as Microsoft Teams. Viva Connections gives people a curated, company-branded experience that brings together relevant news, conversations, and other resources.
Learn how you can add Viva Connections to your Teams desktop.

Balance productivity and wellbeing with Microsoft Viva Insights
Viva Insights gives individuals, managers, and leaders personalized insights and actionable recommendations that help everyone in an organization thrive. This new app – discoverable directly in the Teams app bar by selecting the ellipsis (…) – makes it seamless for users with Exchange Online mailboxes to strengthen relationships with key people, follow up on to-dos, and protect focus time to work uninterrupted. For Workplace Analytics customers, manager and leader insights provide visibility into the impact of work patterns on people and the business and can help identify where a change in team and organizational norms could improve wellbeing and business outcomes. Personal insights are visible only to the individual, and for manager and leader insights, customers can rely on safeguards like de-identification, aggregation, and differential privacy by default. Learn more

PowerShell Support for team templates
Admins can now manage team templates at scale with templates cmdlets in PowerShell. With this new set of templates cmdlets, admins are able to get a list of all available templates within their tenant, get details of a particular template, and create, edit, and delete a team template.
Manage team templates with template policies
Admins can now choose which team templates are shown to the end user. In the Teams Admin Center, admins can create teams template policies and designate which team templates to hide or show. Once the policy was created, assign users to it so that each user sees only the team templates tailored to their role.
New file sharing experience
We have streamlined file sharing in Microsoft Teams. You can now create a shareable link for any file stored in Teams and directly set the appropriate permissions. Additionally, you can also set permissions for files stored in SharePoint or OneDrive while composing a private chat or starting a channel conversation. Learn more

Add Microsoft Teams to your SharePoint team site
We are making it even easier to bring SharePoint content into Teams, in the same motion of adding Microsoft Teams to your team site, aka #teamify. As you connect SharePoint to Teams, you choose what lists, libraries, and pages you want to bring into Teams as tabs in the new, default General channel. Learn more

Include up to 10,000 users in an org-wide team
You can now create an org-wide team to promote collaboration and communications across the entire organization. Administrators who manage tenants that have less than or equal to 10,000 members can now create an org-wide team, which automatically syncs all the tenant’s members with the team. Learn more
25,000 person teams
Team membership limit is increasing to 25,000 per individual team. With millions of employees working remotely or in hybrid environments, it’s more important than ever for employees to feel connected. Teams makes it easier to collaborate with others, chat, meet virtually, and integrate your business solutions, all in a single platform. The increased member limit enables you to easily communicate and collaborate with larger size teams.
Out of Office
Let others know that you are not available by scheduling an Out of Office message in Teams. This helps set expectations with your colleagues, letting them know that you won’t be able to respond during this time and allows you to take the time off. During this time, your presence status is changed to “Out of Office” and your status message is displayed when someone reaches out to you via chat. Additionally, your Outlook calendar and automatic replies are updated accordingly.

History Menu
The History Menu for Teams desktop clients displays your recently visited locations when hovering over the backward and forward navigation options. Using the menu you can quickly jump back to previous locations, making it much easier to quickly get back to nested locations like tabs or documents. The menu is also accessible via keyboard shortcut. Learn more

Queue sent messages when offline
When attempting to send messages while offline, Teams queues messages and send these once a network connection is re-established. This help ensure that your messages get to your recipients. If the message is in an unsent state for more than 24 hours, the message fails, and the user is prompted to resend or delete the message.
More labels in Microsoft Planner
Labels are a quick, visual way to categorize similar tasks in Planner and we’ve increased the number of labels to help you get even more organized. You can now add up to 25 labels in all different colors to your tasks in Planner in Microsoft Teams and Planner across web and mobile. Learn more
Power Platform and custom development
New mobile device capabilities APIs – QR/Barcode Scanner and Location APIs
We are excited to share new device capabilities – location and QR/Barcode scanner – that you can now utilize to light up new and compelling scenarios. These high-value experiences come out-of-box in the Teams Client JavaScript SDK and can be leveraged with minimal effort, reducing the barrier to app development. Learn more
SharePoint Framework (SPFx) version 1.12 for even more flexible and comprehensive extensibility options for both Microsoft Teams and SharePoint
With the release of SPFx version 1.12, we are making it even easier to build Microsoft Teams extensibility with automatic hosting of your UX layer and we enable you to combine the SharePoint Framework pieces together with the other Microsoft Teams extensibility options. Learn more
Management
Restricting Windows and Mac managed device sign-in to specific tenants
You are now able to restrict Teams sign-in for Windows and Mac managed devices to ensure that employees cannot sign-in to another organization’s tenant using the other tenant’s credentials from the device they are authorized to use for work. This policy can also be used to configure access to personal accounts. Learn more
Manage Teams displays in Team Admin Center
We are adding one more device category, the Teams Display, to the device portfolio that can be now managed within Teams Admin Center. This allows IT admins to simplify, customize, and automate Teams panel devices as well.
Simple Periodic review for guest users
We have added scheduled access reviews for guests across all Teams and Groups by default. The system automatically schedules periodic guest access reviews across Teams, delivering better identity security hygiene.
Assign policy package to a group
We have added the ability to assign policy packages to groups. Admins can now can easily assign a policy package to a group such as an entire retail workforce. This helps making your work more efficient in a simple friendly step. Learn more
Unifying the experiences of creating teams
We have aligned the experience of creating a team via the Teams Admin Center to the experience of creating a team in the Teams client, both on the desktop and web, to provide a unified experience when a team is added, regardless of interface.
Updated Teams table of content on docs.microsoft.com
To make it easy for our IT pro audience to find the right content at the right time we have launched an updated landing page for Teams on docs.microsoft.com. We have made it easier to find our MSLearn content and have reorganized the lifecycle content. Finally, we have dedicated content for our government and industry customers. Learn more

Security, compliance, and privacy
Microsoft Information Protection: changes in display of sensitivity labels for Teams
For Teams with hierarchical sensitivity labels applied, the channel headers only displays the parent label instead of showing the child label. For example, with a parent sensitivity label such as Confidential and a child sensitivity label of Finance, Teams only shows “Confidential” in the channel header.
Bounty Awards for Teams Desktop Client Security Research
We are excited to expand our partnership with the research community and introduce bounty awards for Teams desktop client security research under the new Microsoft Applications Bounty Program. The Teams desktop client is the first in-scope application under the new Apps Bounty Program and you can learn more about the Bounty Awards for Teams Desktop Client here.
Government
These features currently available to Microsoft’s commercial customers in multi-tenant cloud environments are now rolling out to our customers in US Government Community Cloud (GCC), US Government Community Cloud High (GCC-High), and/or United States Department of Defense (DoD).
PowerPoint File Sharing
PowerPoint File Sharing allows you to share a PowerPoint file within a Teams Meeting without having to use Desktop or Window sharing. Available in DOD.
Multi-Window Meetings and Calling experiences
Multi-window experiences are coming to Teams meetings and calling. Users will have the ability to pop out meetings and calling into separate windows to help them optimize their workflow. These experiences can be turned on directly within Teams for PC and Mac clients. Available in GCC-High and DOD as opt-in.
Add a shared calendar to a Teams channel
Create and share a calendar with members of a specific channel. When a channel meeting is created, Teams automatically creates a new post in the channel’s activity feed. Users, who have notifications turned off, will see the event only when they open the channel’s calendar. Once a channel event is posted, you can add it to your personal calendar. This feature provides all members within the channel, except guest users, visibility to upcoming events. Available in GCC and GCC-High. Learn more

Virtual Breakout Rooms
Breakout rooms allows meeting organizers to divide the meeting into smaller groups to facilitate discussions and brainstorming sessions. A breakout room can be created in a Teams meeting or a Teams channel meeting, allowing greater flexibility on how you want to meet. Organizers can easily jump in between breakout rooms, deliver announcements to all breakout rooms at once, and bring everyone back to the main meeting at any time. Any files from the breakout rooms can be shared in the main meeting and is available afterwards in the meeting chat. Available in GCC and GCC-High. Learn more
https://www.microsoft.com/en-us/videoplayer/embed/%20RE4JVgf?autoplay=false
Outgoing participant video in meetings in Safari browser
Outgoing video in web meetings is now available to Safari users. Simply click the camera icon to start a sharing your video in the meeting. This requires Safari 14 or higher on MacOS BigSur. Available in GCC.
Touch Bar Meetings Controls for Mac
MacBooks with Touch Bars now have Teams Meeting controls that quickly allow users to access controls without clicking into the window. Users can open the view participants panel, open meeting chat, use raise hands, enable video, mute/unmute, open shared tray, and leave the meeting from one place. Available in GCC, GCC-High, and DOD.
Live Reactions in Microsoft Teams meetings
All attendees can now use emojis to react during a meeting. These reactions help promote inclusivity in meetings and keep things upbeat and interactive. Available in GCC. Learn more
Get a Meet Now meeting link from the Calendar
Users can now copy a meeting link from the Calendar tab and share it out with others without starting the meeting. If you are in an email, chat, or channel conversation and agreed to meet at a certain time, this is an easy way to copy a meeting link and paste it into the conversation. Available in GCC.
Masking PSTN participant phone numbers
For customers who have Audio Conferencing enabled for their Teams meetings, their tenant administrators now have the ability to define how their participants’ phone numbers appear in the roster view for meetings scheduled within their organization. The options include masked to external users, masked for everyone, or off (visible to everyone). This provides flexibility in securing PSTN participants’ phone numbers. This feature is currently available through PowerShell cmdlet. Available for GCC. Learn more
Enable tenant administrators to configure masking of PSTN participant phone numbers
If a customer has Audio Conferencing enabled for their Teams meetings, their tenant administrators now have the ability to define how their Audio Conferencing participants’ phone numbers appear in the roster view for meetings scheduled within their organization. The options include masked to external users, masked for everyone, or off (visible to everyone). This provides flexibility in securing PSTN participants’ phone numbers. This feature is only available through PowerShell cmdlet at this time. Available in GCC. Learn more
Live Event Presenter for iPad
Live Event Presenters can now join and share content from their iPad. Select ‘Join as presenter’ to start broadcasting content to your audience. Available in GCC. Learn more
Set Presence Status duration for Government clouds
Manage your availability with the new status duration option in the presence menu allows users to set a certain status for a specific period of time. For example, they will be able to set their status settings to “Do not disturb” for 30 minutes, one hour, two hours, or the entire day or whole week. Learn more
Offline Presence Status for Government clouds
You can now change your presence to appear offline, signaling to colleagues that you are not available, while having a full access to Teams. The Offline presence status comes in handy for people who want to access Microsoft Teams outside of working hours and users who simply want to focus on their work. Learn more
Location picker support for security groups and distribution lists
Data loss prevention (DLP) for Microsoft Teams will now support security groups and distribution lists as part of the Teams location picker, enabling more granular control of DLP policy scope (i.e. to include/exclude particular departments, business units, geo-specific security groups, etc.). Available in GCC.
Data loss prevention for Microsoft Teams
Data loss prevention (DLP) capabilities in Microsoft 365 government clouds will be extended to include Microsoft Teams chat and channel messages, including private channel messages. If your organization has DLP, you can now define policies that prevent people from sharing sensitive information in a Microsoft Teams channel or chat session. Avaliable in GCC-High.
Channel notification settings updates
Manage your notification settings to get only the notifications you want, and better manage your time. Through the teams and channels list or from the channel header, the users can quickly manage their notification settings by the means of a new fly-out design. Users can turn on all activity on or off with a single click or diving deep into custom to set their preferred permutations. Available in GCC.
Polls in Teams Meetings
Forms polls for Teams meetings provides an easily discoverable and seamless experience that will help you conduct more engaging and productive meetings. With Forms polls, meeting presenters can prepare, launch, and evaluate polls before, during, and after meetings, respectively, all from one place under a tab in the Teams meeting. Avaliable in GCC.
Share from Microsoft Teams to Outlook
Sometimes not all your audience is in Teams. Leverage the information discussed over Teams messages and continue the conversation, without losing context, in email. Send a copy of a Teams chat message or an entire channel conversation into Outlook. The message will include rich text support. Avaliable in GCC.

Meeting recordings saved to OneDrive and SharePoint
Ability to save Microsoft Teams meeting recordings to OneDrive and SharePoint for improved sharing capabilities, basic governance, automatic retention labels, go local, bring your own keys and, more that comes from recording video files and storing them in SharePoint and OneDrive. Avaliable in GCC, GCC-High and DoD.
Walkie Talkie
Walkie Talkie, a push-to-talk experience that enables clear and secure voice communication over the cloud, enables teams to communicate instantly and always stay on the same page. This native built-in app in Teams turns employee or company-owned Android smartphones and tablets into a walkie-talkie, reducing the number of devices employees must carry and lowering costs for IT. Available in GCC.
Simplified Global Notification Settings
Government users can now configure and customize their notification settings through a newly designed notification settings section. Available in GCC.
Follow or Mute Conversations
This feature will empower users to have finer controls at a conversation thread level within a channel. Available in GCC.
Low data mode
Whether you want to preserve data or are just in a location with a poor or limited network connection, sometimes it’s helpful to limit the amount of data you’re using during a video call. A new low data mode is now available, allowing users to cap the amount of data that will be used during Teams video calls as well as establish different settings based on network availability so that the setting can be turned on always, or only while on cellular networks. Available in GCC, GCC-High, and DOD.
Reporting and analytics in the Teams Admin Center for GCCH
The reporting and analytic section in the Teams Admin Center was added in the left navigation bar, to enable them generating Teams usage reports. Available in GCC-High.

by Contributed | Mar 31, 2021 | Technology
This article is contributed. See the original author and article here.
Build AI-powered apps with pre-trained models or create your own machine learning models
Azure AI puts artificial intelligence and machine learning at the fingertips of every developer. Looking to build ML models? Choose your preferred method to do so, whether you prefer a code-first experience, automated ML, or visual tools that simplify ML for any experience level. Looking to add pre-built models to your apps? Give your app the abilities of computer vision, natural language processing (NLP), speech, and decision-making with simple API calls.
What Solutions should you develop?
Put your skills to the test and apply Azure AI to a new or existing project! We welcome projects of all types, including AI-powered apps or devices, conversational bots, ML models, or something else entirely!
Check out the resources tab for tips on getting started or review and join our Slack office hours to get your questions answered.
Additionally, if you’re looking for more inspiration, you can view past submissions and winners here. We’re excited to see what you build!
New to AI/Machine Learning?
We’ve got your back. Our machine learning quickstarts and sample code will help you start building. Need datasets? Azure Open Datasets offers curated, ML-ready open data including featured datasets like weather, city safety, satellite imagery, socioeconomic data and more.
You can also visit this ML resources page for more guidance on getting started.
Additionally, you can visit our AI developer resource page for guidance on getting started with Cognitive Services- whether you’re looking to solve for optical character recognition (OCR), detect objects in images, transcribe audio, understand or process natural language, make personalized recommendations, or even add read-aloud text-to-speech capabilities to build inclusive applications.
What to Build:
Use one or more of the following Azure AI services to build a new project or update an existing project: Azure Machine Learning, Azure Cognitive Services, and Azure Search. Projects may integrate with other Azure services, open source technologies (including but not limited to frameworks, libraries, and APIs) and physical hardware of your choice.
Register Now
Resources
Microsoft Learn AI Fundamentals is a great place to onboard students/universities to Azure AI.
We have a dedicated page with resources like Essentials videos, and a curated self-paced learning journey published at:
- https://aka.ms/ai-dev – AI Fundamentals for developers
- https://aka.ms/data-scientists – Data Scientists
by Contributed | Mar 31, 2021 | Technology
This article is contributed. See the original author and article here.
As part of the Azure Sphere team, we have a small team known as Devices & Demos, which includes software, electronics, and design expertise I met Mike Hall and James Scott from the team whom are both based out of Microsoft, Cambridge, UK, to understand a bit more about what the team are working on.
Devices and Demos Team
This team maintains assets such as the design of the MT3620 Reference Development Board and other hardware reference designs. In addition, by designing, implementing, manufacturing, and deploying small runs of real devices, we enable the Azure Sphere team to experience and validate our OEM customers’ perspective. So one of the biggest challenges we have seen in education is how to keep student engaged and what can institutions and students develop to inspire school children at STEM out Reach events.
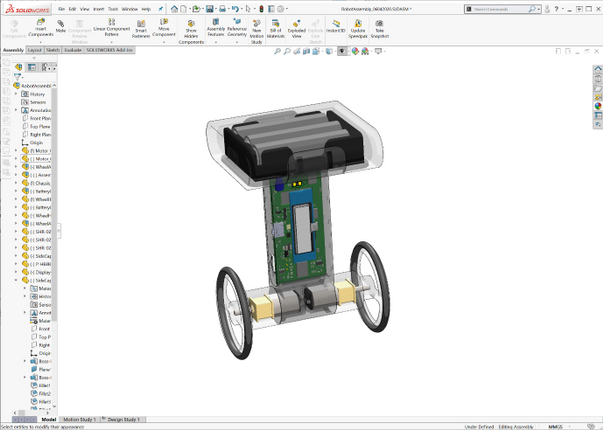
Welcome to the Azure Sphere Balance bot!
The Balance Bot is:
- Enclosed and self-contained
- Battery powered
- Connected to a cloud IoT dashboard – built with Azure IoT Central
- Using a small, custom PCB (printed circuit board)
- With real-time requirements
- Engaging and fun!
The Balance Bot is a balancing two-wheeled robot. Balancing robots (and inverted pendulums) are canonical examples of hard real-time control – if the control loop is stopped from executing, or misses timing constraints, they fall over – hard.
Of course, if we’re going to build a exciting showcase, it wouldn’t be complete without lasers. So we added some range-finding lasers that enable the robot to avoid obstacles.
Robot design and behavior
The device includes a small LCD screen to show the robot’s status. There are 4 icons, the top one being battery level, then WiFi connectivity status, then IoT Central connectivity status, and finally an indicator of the firmware version (version A or version B) that it is running that is used when demonstrating how the robot handles over-the-air software updates without falling over.
Inside, the robot looks like this:
As you can see, the 3 AA batteries are in the top compartment. The PCB forms the “spine” and includes an inertial measurement unit (IMU) for balancing, and the laser range-finders. The motors are housed at the bottom in line with the wheels. The whole thing is encased – we used 3D printing to quickly build some custom cases. To simplify the electronic design, we used the Avnet Azure Sphere MT3620 module.
The software architecture is illustrated in the diagram below. We made use of Azure RTOS on one of the MT3620’s M4F cores to perform the hard real-time loop of controlling the motors, using data from the IMU to stay upright, and data from the laser range-finders to detect and back away from obstacles. The “high level” A7 core app communicates with Azure IoT Central and with the real-time core to provide secured internet connectivity.

Connecting to the cloud
It wouldn’t be an IoT demo without showing how to view and control the data from the Internet. In Azure IoT Central, we implemented a dashboard showing the status of the robot:

This shows:
- The battery level of the robot over time
- The current heading of the robot in both degrees and as a compass direction
- The total number of obstacles that the robot has avoided using the laser rangefinder to detect and back away from an object
The team have also implemented a control feature in IoT Central:

This illustrates how IoT Central can set a “desired property” in the robot’s device twin, for the desired heading – the robot then turns on the spot to face in that direction.
Deferring updates while balancing
Being securely connected to the Internet requires a device to be regularly updated to stay on top of newly discovered security issues – this is one of the Seven Properties of Highly Secured Devices. However, to take a software update requires a device to be unresponsive while it installs – which is not a good idea if you’re balancing on two wheels. To address this, Azure Sphere supports deferral of device updates. For this robot, we use that feature and defer updates until the robot is safely lying down.
SourceCode
We have also made all the source files and docs for this robot available in the Azure Sphere Gallery github repository. This includes the software, electronics design, physical case design, plus assembly and end-user instructions. The Azure Sphere Gallery github repository includes unmaintained content that is not part of our official, maintained Azure Sphere platform. others might find useful as an example of a complete device implemented, manufactured and deployed on top of Azure Sphere.
Conclusion
If you haven’t already, why not grab an Azure Sphere dev board and see how quick it is to build a secured IoT device, or have a look at the github repository to see how we did it ourselves and we would love to hear what you build, This project welcomes contributions and suggestions. Most contributions require you to agree to a Contributor License Agreement (CLA) declaring that you have the right to, and actually do, grant us the rights to use your contribution. For details, visit https://cla.microsoft.com.
by Contributed | Mar 31, 2021 | Technology
This article is contributed. See the original author and article here.
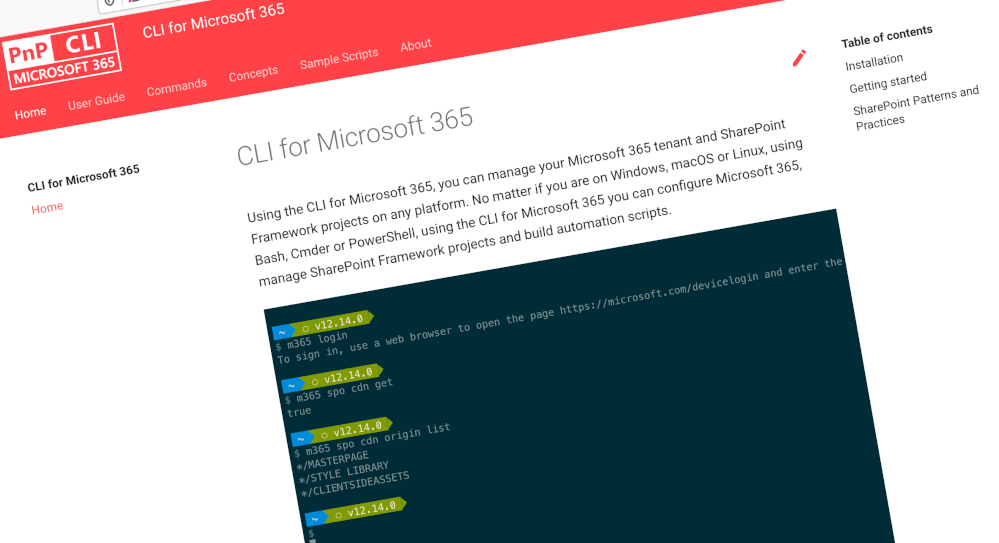
We’ve just published a new version of the CLI for Microsoft 365 with new commands for working with and managing Microsoft 365 tenants and SharePoint Framework projects on any platform.
Manage Microsoft 365 and SharePoint Framework projects on any platform
CLI for Microsoft 365 is a cross-platform CLI that allows you to manage various configuration settings of Microsoft 365 and SharePoint Framework projects no matter which operating system or shell you use.
While building solutions for Microsoft 365 expands beyond the Windows operating system, managing many of the platform settings is possible only through PowerShell on Windows. As more and more users work on non-Windows machines, it’s inconvenient for them to have to use a Windows virtual machine to configure their tenants. With the CLI for Microsoft 365, you can configure your tenant no matter which operating system you use. Additionally, using CLI for Microsoft 365, you can manage your SharePoint Framework projects.
New version of CLI for Microsoft 365 – v3.8
Following our monthly release cadence, we’ve released a new version of the CLI for Microsoft 365 with some new capabilities. Here are a few of the most noteworthy additions.
Changes
We’ve continued improving CLI building upon the changes we’ve introduced in the previous version.
Added support for configuring default command output
In the previous release, we added a new command `m365 cli config set` which gave you the ability to configure the CLI to your personal preferences, so with this release we have added the ability to configure the default output for all commands.
To set the default output for all commands to JSON, execute:
m365 cli config set --key output --value json
To set the default output for all commands to test, execute:
m365 cli config set --key output --value text
If there are other options that you would like to be able to configure, please let us know.
Improved error messages
In the 3.2.0 release of CLI for Microsoft 365, we replaced the request library with axios which we use to handle our requests to Microsoft 365 APIs.
Unfortunately, this change also changed the way that we handled error messages and instead of replying with the error message from the API we instead returned a generic error message which was meaningless.
So in this release, we have reverted back to our previous behaviour and so now error messages will be returned direct from the API call.
New Commands
Return Policies from Azure AD
Azure Active Directory (Azure AD) uses policies to control Azure AD feature behaviors in your organization. Policies are custom rules that you can enforce on applications, service principals, groups, or on the entire organization they are assigned to.
Administrators currently need to call multiple endpoints in the Microsoft Graph to return a list of policies based on policy type, as there are eight types of policies that can be listed this is not a trivial task, so we have We’ve introduced a single command that can return all policies created or policies of a specific type.
To return all policies from Azure AD, execute:
To return only Authorization policies, execute:
m365 aad policy list --policyType authorization
For information on the policy types that can be returned, checkout our documentation for this command.
New script samples
CLI for Microsoft 365 is a great tool both for quick adjustments to the configuration of your Microsoft 365 tenant as well as automating more complex tasks. Because CLI for Microsoft 365 is cross-platform you can use it on any OS and in any shell. To help you get started using the CLI for Microsoft 365 for automation scenarios, we started gathering some sample scripts.
If you have any scripts that you use frequently, please share them with us so that we can learn more about the common automation scenarios.
Monitor and notify Microsoft 365 health status
Grant API permissions to SharePoint Azure Active Directory (AAD) Application
List all Microsoft Teams team’s Owners and Members
Contributors
This release wouldn’t be possible without the help of (in alphabetical order)
Thank you all for the time you chose to spend on the CLI for Microsoft 365 and your help to advance it!
Work in progress
Here are some things that we’re currently working on.
More commands, what else
Microsoft 365 is evolving and new capabilities are being released every day. With CLI for Microsoft 365, we aim to help you manage your tenant on any platform in a consistent way, no matter which part of Microsoft 365 you interact with. While we keep adding new commands to CLI for Microsoft 365 each release, we still barely scratched the surface with what’s possible in Microsoft 365. In the upcoming versions of the CLI for Microsoft, you can expect us to add more commands across the different workloads in Microsoft 365.
Improved managing SharePoint pages
Microsoft keeps investing in modern SharePoint pages continuously introducing new capabilities to let us publish rich content. We’re looking into extending our support for managing modern SharePoint pages to let you use them to their full potential.
Improved creating Azure AD apps
Recently, we’ve introduced a command to easily create Azure AD app registrations. Because they’re backbone of every app you’d build on Microsoft 365, we think you should be able to create them as easily as possible. So with CLI for Microsoft 365, you can create a fully configured Azure AD app for the most common scenarios with just one line of code.
In the future versions of CLI for Microsoft 365 you can expect us extend the capabilities with additional scenarios and features supported by Azure AD.
Script examples
In every release of the CLI for Microsoft 365, we introduce new commands for managing Microsoft 365. With over 350 commands across the different Microsoft 365 services, the CLI for Microsoft 365 has become a powerful tool, not just for managing your tenant but also for automating your daily work.
We’d love to show you how you can use the CLI for Microsoft 365 to build automation scripts in PowerShell Core and Bash. If you have any scripts using SPO or PnP PowerShell that you use frequently, please share them with us so that we can learn more about the common automation scenarios.
‘ensure’ commands
We’ve just shipped our first ensure command – an easy way to help you that a site with specific settings exists. If it doesn’t, CLI creates it for you, if it does, CLI ensures it has the right properties. All in one line of code. We’d love to hear from you how you like it and if it’s something you’d like us to implement for other commands as well.
Try it today
Get the latest release of the CLI for Microsoft 365 from npm by executing:
npm i -g @pnp/cli-microsoft365
Alternatively, you can get the latest release from Docker by executing:
docker run --rm -it m365pnp/cli-microsoft365:latest
If you need more help getting started or want more details about the commands, the architecture or the project, go to aka.ms/cli-m365.
If you see any room for improvement, please, don’t hesitate to reach out to us either on GitHub or twitter.
by Contributed | Mar 31, 2021 | Technology
This article is contributed. See the original author and article here.
I’ve heard a bit of interest expressed recently in the ability to create a customizable Endpoint Configuration Manager (SCCM/ConfigMgr) console that could either be pruned down or featured up in a way to customize it to fit the specific needs of different departments and roles within the business. Help desk personnel may need to view installed apps on a device, while Software Update managers may need to view the status of software updates, while Application Deployment managers may only need to deploy apps. There’s a not-so-well known console customization tool that comes with every ConfigMgr admin console called Console Builder (see Matt Hinson’s blog post here for more on that.) However, what Console Builder cannot do, is it can’t make buttons hidden or visible based on the application user’s persona. It also doesn’t enable any external capabilities above and beyond what the out-of-the-box console offers, such as going out to Azure AD and grabbing a Bitlocker unlock key or displaying information about the endpoints in such a way that makes more sense to the needs of the business. This interest led me to an idea of creating a custom, Power Apps based Endpoint Manager / Intune administrative console and associated connectors to communicate with the Microsoft Endpoint Configuration Manager AdminService, Teams, and Intune.
Initially, I went down a path of creating individual Power Automate Flows for every AdminService request that I wanted to invoke. While this worked great, I soon realized how many different Power Automate Flows I’d eventually end up having when it was all said and done and decided instead to opt for creating a custom Power Apps connector. This would not only allow me to make the API calls within a single custom connector that could be wired in to any future Power App I create, but the same connector I create for my Power Apps could also be utilized for any Power Automate flows as well.
To facilitate the communications with ConfigMgr from the cloud, the ConfigMgr AdminService would need to handle the administrative action, by way of a Cloud Management Gateway (CMG) running within the site. The AdminService is a web service that provides connectivity to your on-premises SMS Provider role. It’s a Rest API service based on the OData v4 protocol that allows you to securely communicate with your on-premises SCCM/ConfigMgr/MECM hierarchy. While not 100% of the administrative actions are currently available via the AdminService just yet, you can accomplish a wide array of administrative actions against your hierarchy. For a very thorough blog posting along with some sample scripts that interact with the AdminService, do check out Adam Gross’ blog at https://www.asquaredozen.com and click on the ConfigMgr AdminService link at the very top. For the official documentation on setting up the AdminService, visit How to set up the admin service – Configuration Manager | Microsoft Docs.
First, you’ll need to enable access to the AdminService via CMG so that the Power App can access the AdminService. Then, you’ll need to create an Azure AD app registration in to allow communications with the AdminService via your CMG. This will allow you to launch your Power App from any web browser, or you can opt to create a mobile or responsive version of your Power App so it will automatically resize from a browser to an iPhone or Android as well.
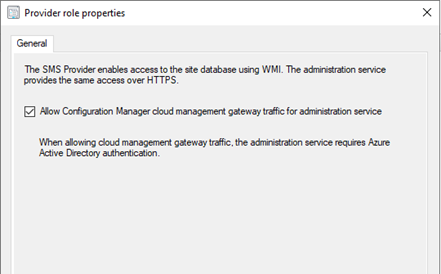
One of the pre-requisites to accessing the AdminService by way of the CMG, is to enable CMG traffic for the accessing the AdminService.
Configure the SMS Provider to allow access to the AdminService via CMG by going to Administration -> Servers and Site System Roles, selecting the server hosting the SMS Provider role, and clicking Properties.
Next, you’ll need to create an Azure AD app registration to facilitate the authentication and access to the AdminService API to external endpoints requesting it.
Creating the Azure AD Application Registration to allow access to the AdminService via CMG
An Azure AD app registration allows users to authenticate with their Azure AD credentials (or on-premises credentials of Azure AD Connect is syncing on-prem to Azure AD) to access the application. The Azure AD application will ultimately be used to provide a bearer token for authorization when connecting to the AdminService through CMG.
- 1. Log in to the Azure Portal -> Azure Active Directory -> App Registrations.
- 2. Click New registration.
- 3. Enter a name for the application and click Register
- Click API Permissions –> Add a permission.
- Click APIs my organization uses.
- Select your existing CMG server application.
- Check user_impersonation and click Add permissions.
- Click Grant admin consent for <orgname>

- Click Yes
- Click Overview
- Click Add a Redirect URI next to Redirect URIs
- Click Add a platform
- Click Mobile and Desktop applications
- Check the box to enable https://login.microsoftonline.com/common/oauth2/nativeclient
- Click Configure
- Click Expose an API
- Click Set next to Application ID URI and type in any FQDN that’s not already used in the tenant: ex: https://CMGAdminService and click Save.
- Click Certificates & secrets
- Under Client secrets, click New client secret.
- Enter a description, select an expiration date, and click Add

- Save the Client secret value to a safe place.
- Click Overview and save the Application (client) ID and Directory (tenant) ID to a safe place.
Creating the ConfigMgr AdminService Power Apps Custom Connector
After you create the app registration in Azure AD, you can begin to create the Custom Connector in Power Apps. To do so, you’ll need to define some basic settings such as the authentication type, as well as the Application URI. The Identity Provider should be Azure Active Directory, the Client id and Client secret should come from your Azure AD app you registered previously. Login URL, Tenant ID, and Scope can be left default. The resource URI should be something like <your CMG fqdn>/CCM_Proxy_ServerAuth/72057594037927941/AdminService/
Verify your external facing AdminService URL by running the following SQL query against your site database:
select ExternalEndpointName, ExternalUrl from vProxy_Routings where ExternalEndpointName = ‘AdminService’
The Identity Provider should be Azure Active Directory.
The Client id, and Client secret fields should come from your new Azure AD app registration properties. Tenant ID can be left as common or be populated with your Azure AD tenant ID.
Resource URL will come from the Expose an API screen on your new Azure AD app registration in the Application ID URI box. If it’s blank, you need to pick any URL to use. The only important requirement for this URL is it must be unique within your tenant. In my Azure AD application example, I used https://CMGAdminService so this is where I will enter this FQDN. This URL is not related in any way to the Homepage URL used when defining your CMG Web App.
The Redirect URL should be https://global.consent.azure-apim.net/redirect. The Redirect URL should also appear in your new Azure AD app registration in the Authentication section as either a Web, or Mobile and desktop application platform type.

After the security settings are defined, the next step is to define each action you want to perform. The actions make up the overall definition of the custom connector, and each action can be called directly from the Power App once the custom connector is wired to the Power App.

An example of a Definition within an Action is to get a list of devices. I named my first Action Get Devices and gave it an OperationID of GetDevices. When you call this action from the Power App, you will use the format CustomConnectorName.OperationID(<Parameters to pass>).
For example:
AdminService.GetDevices(({‘$filter’:”ClientType eq 1″,’$select’:”MachineId,Name,CNIsOnline,IsClient,SiteCode,ClientActiveStatus,LastDDR,LastHardwareScan,LastSoftwareScan,LastMPServerName,LastActiveTime,ADSiteName,LastClientCheckTime,Domain,ClientVersion,DeviceOS,DeviceOSBuild,PrimaryUser,CurrentLogonUser,ClientState,AADDeviceID,SMSID”}).value)
For the parameters, you can pass any of the same parameters that you would pass in the Rest API call including the parameter ‘$select’ to define which properties to select, filter to define any specific filters (ClientType eq 1 filters out things like unknown computers). It’s important to note that any time you change the parameters, the JSON schema that is in your response will likely also change. Therefore, you will probably have to make multiple updates to the action each time you change it in some way. This way, the action will be prepared for the overall structure of the request’s response that it should expect to receive from the request to the API.
The next step in creating an action, is to click Import from sample.

This will let you select a verb (ie. GET, PUT, POST), define the specific URL to call, any query parameters for the request ($filter, $select), any headers, and the body of the request.

From this sample URL, each of these will get automatically populated based on your sample. For example, let’s say you use a sample URL like: HTTPS://RIMCO.RUSSRIMMERMAN.COM/CCM_Proxy_ServerAuth/72057594037927941/AdminService/v1.0/Device?$filter=(startswith(Name,’DC1‘) eq true) and (ClientType eq 1)&$select=MachineId,Name,SMSID
The query will automatically populate with $filter and $select since they were used in the request URL. If you also entered any headers and a body, those would also automatically populate and when you call the action from within the Power App, you will be able to customize them each time you make the API call depending on what you want to take place.
A good way to test all your API calls before using them within your custom connector definition is to use an API testing tool like Postman. Not only can you test them here, but you can also export from Postman Collections into Power Apps to create the custom connector definitions that you’ve tested.
To make Rest API calls from Postman, the first step is to request a token from your Azure AD using the following information in the body of the POST. These body properties will come from the Azure AD app that was registered. When you make this POST request, you will receive back a Bearer token, which expires after 1 hour of inactivity and is used to make all subsequent API calls and a Refresh token to refresh the results and expires after 14 days of inactivity. The Bearer tokens are used in the Authorization tab of Postman and you can utilize Postman’s variables feature to automatically set the token upon its request to a variable so that you don’t have to copy/paste it each time into your subsequent requests.

Here’s an example of requesting the installed software for a specific Resource ID:

Once you get the request URL and results just the way you want to use it in the custom connector including any $filters, $selects, or other query parameters, copy the JSON formatted body of the results so you can paste it into the custom connector’s Response section for the action. Do this by clicking on the Add default response and pasting in the JSON results from Postman. You can also use the Test option within the connector to test the API call and get the JSON formatted results as well.

Utilizing the custom ConfigMgr connector in a Power App
Once you’ve created some or all the actions you want your connector to support, you are ready to connect it to a Power App and begin making your API calls with it.
Here is a list of devices along with their Client install status, Activity, and SiteCode, and the Azure AD Join Type (if applicable). Additionally, I added a Pending Restart icon if the endpoint has one pending.

Clicking the Installed Software button makes the following request to the AdminService:
https://RIMCO.RUSSRIMMERMAN.COM/CCM_Proxy_ServerAuth/72057594037927941/AdminService/wmi/SMS_G_System_INSTALLED_SOFTWARE
In the Power App, I have the OnSelect property of the Installed Software button call the custom connector with the following function:
ClearCollect(installedsoftware,AdminService.InstalledSoftware({‘$filter’:”ResourceID eq ” & selectedid,’$top’:25,’$skip’:0,’$select’:”ProductName,ProductVersion,Publisher,InstallDate”}).value)
This clears out anything that might already happen to be in the Power Apps collection I named installedsoftware from a previous request and populates it with the results of the request with the specified $filter parameters using the ResourceID of the selected machine, gets only the $top 25 results, and $select’s ProductName, ProductVersion, Publisher, and InstallDate and returns the array as “value” so I use .value to make sure this array is what is used to populate my installedsoftware collection. I also added sort options on the Product Name column and use the SortByColumns Power App function to sort by using either Ascending or Descending at the end of the SortByColumns function.

If I click the Device Collections button, my collections are listed along with their Collection ID and Limiting Collection. These are also sortable, and if I select any collection, it shows the last full evaluation run time and refresh times for the ConfigMgr collection (not to be confused with a Power Apps collection!)

Upon clicking App Deployments, it becomes obvious that I haven’t yet made a nice-looking display for the application deployment status info, but in the meantime have just dropped a basic gallery to show the results.

Clicking on any of the applications drills into the specifics of the app (another screen I haven’t put any beautification effort into yet.)

When clicking on the Client Actions button, it drills into the selected client. If you’re currently viewing a workstation OS, the Get Bitlocker Key button will also be visible. Clicking that button utilizes another Power Apps custom connector I created which makes a Graph API call to get the Bitlocker Key stored in Azure AD for the selected device. Just like the AdminService connector, using all the various documented Graph API calls for Intune can be useful for viewing and updating any Intune specific configurations.
If you’re using the Bitlocker Administration Service in ConfigMgr, you could also potentially have it go get and display your Bitlocker keys from there as well.

Clicking on the Current User brings up a dialog showing details of the currently logged on user including their current presence. This is all accomplished by leveraging Graph to query info using the user-id from both Azure AD as well as Teams. If you click the Chat button, it will bring up a chat window so you can communicate with the end-user via Teams without launching, using, or even having the Teams application installed on the device the Power App based console is running on. This is also done using Graph along with a Power Apps Gallery to display the chat messages between the user of the Power App and the end-user of the individual device. See Create chat – Microsoft Graph beta | Microsoft Docs for more information on this Graph request.
The chat session is first initiated using a POST to https://graph.microsoft.com/beta/chats. The body of the request must be the same structure as the following JSON, using the object ID GUIDs of each of the users in the chat session which is retrieved from their Azure AD user object.

The response will provide an id value which is the unique ID for the chat session.
Next, a chat message can be sent between the users in either direction using the Send chatMessage request. See Send chatMessage in a channel or a chat – Microsoft Graph beta | Microsoft Docs for more information on this Graph request.
The chat message is sent using the https://graph.microsoft.com/beta/chats/{id}/messages. The POST URL of the request must include the chat id provided in the Create chat request response.


Additionally, I’ve added some additional ideas I came up with to this custom console, like the ability to use the native ConfigMgr Run Script action on a given client or collection which lists all my available scripts in the Scripts node of the native console in a dropdown menu. You can use this to run any script like one to install all required updates immediately, collect all logs from the client (see https://github.com/russrimm/CollectAllLogs) and zip them up to a UNC share, etc. Leveraging the Run Scripts feature allows you to do things like gather all the updates currently pending installation in Software Center and display them prior to running the script to immediately initiate their installation on the selected client, and subsequently reboot the client.
Immediate software update insight + immediate software update action = immediate increased security!


The Install Application button allows selecting an available deployed application to be immediately installed on an endpoint. This is a feature introduced in ConfigMgr 1906 which installs applications in real time. See install applications for device for more details on this.
The Client Operation button allows you to run all the same client operations you can initiate from the native ConfigMgr console (restart, download policy, run hardware inventory, etc.)
The Device Category dropdown menu makes another call to Graph to enumerate and assign a Device Category to the device. You could also leverage Graph to allow creating/deleting categories as well.

Clicking Collection Memberships shows all the collections the device is currently a member of:

Since ConfigMgr now collects information related to boot performance as well as events including application crashes, driver installs, etc, all of this could be displayed to the administrator using the Power App.
Graph API calls can also be made from Power Apps in order to perform read and write operations in Intune. For example, I can enumerate all the applications in my tenant using a dropdown menu to pick iOS vs Android vs Built-In vs Win32.

As you can see, making your own Power App based console to accomplish the tasks you want to accomplish can be extremely powerful. I hope to continue improving my custom connector enough to eventually submit them as official Power Apps connectors so others can benefit from them. If you have any other ideas or suggestions, please do not hesitate to reach out to me. Also, if you’d like a demo of this or want to see any of it in more detail, feel free to hit up your Customer Success Account Manager (CSAM) and we can set up a time to discuss your specific needs and ideas further.
Thanks for reading!

Recent Comments