This article is contributed. See the original author and article here.
I’ve heard a bit of interest expressed recently in the ability to create a customizable Endpoint Configuration Manager (SCCM/ConfigMgr) console that could either be pruned down or featured up in a way to customize it to fit the specific needs of different departments and roles within the business. Help desk personnel may need to view installed apps on a device, while Software Update managers may need to view the status of software updates, while Application Deployment managers may only need to deploy apps. There’s a not-so-well known console customization tool that comes with every ConfigMgr admin console called Console Builder (see Matt Hinson’s blog post here for more on that.) However, what Console Builder cannot do, is it can’t make buttons hidden or visible based on the application user’s persona. It also doesn’t enable any external capabilities above and beyond what the out-of-the-box console offers, such as going out to Azure AD and grabbing a Bitlocker unlock key or displaying information about the endpoints in such a way that makes more sense to the needs of the business. This interest led me to an idea of creating a custom, Power Apps based Endpoint Manager / Intune administrative console and associated connectors to communicate with the Microsoft Endpoint Configuration Manager AdminService, Teams, and Intune.
Initially, I went down a path of creating individual Power Automate Flows for every AdminService request that I wanted to invoke. While this worked great, I soon realized how many different Power Automate Flows I’d eventually end up having when it was all said and done and decided instead to opt for creating a custom Power Apps connector. This would not only allow me to make the API calls within a single custom connector that could be wired in to any future Power App I create, but the same connector I create for my Power Apps could also be utilized for any Power Automate flows as well.
To facilitate the communications with ConfigMgr from the cloud, the ConfigMgr AdminService would need to handle the administrative action, by way of a Cloud Management Gateway (CMG) running within the site. The AdminService is a web service that provides connectivity to your on-premises SMS Provider role. It’s a Rest API service based on the OData v4 protocol that allows you to securely communicate with your on-premises SCCM/ConfigMgr/MECM hierarchy. While not 100% of the administrative actions are currently available via the AdminService just yet, you can accomplish a wide array of administrative actions against your hierarchy. For a very thorough blog posting along with some sample scripts that interact with the AdminService, do check out Adam Gross’ blog at https://www.asquaredozen.com and click on the ConfigMgr AdminService link at the very top. For the official documentation on setting up the AdminService, visit How to set up the admin service – Configuration Manager | Microsoft Docs.
First, you’ll need to enable access to the AdminService via CMG so that the Power App can access the AdminService. Then, you’ll need to create an Azure AD app registration in to allow communications with the AdminService via your CMG. This will allow you to launch your Power App from any web browser, or you can opt to create a mobile or responsive version of your Power App so it will automatically resize from a browser to an iPhone or Android as well.
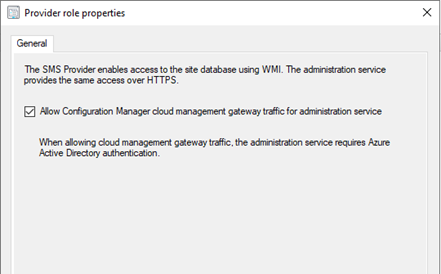
One of the pre-requisites to accessing the AdminService by way of the CMG, is to enable CMG traffic for the accessing the AdminService.
Configure the SMS Provider to allow access to the AdminService via CMG by going to Administration -> Servers and Site System Roles, selecting the server hosting the SMS Provider role, and clicking Properties.
Next, you’ll need to create an Azure AD app registration to facilitate the authentication and access to the AdminService API to external endpoints requesting it.
Creating the Azure AD Application Registration to allow access to the AdminService via CMG
An Azure AD app registration allows users to authenticate with their Azure AD credentials (or on-premises credentials of Azure AD Connect is syncing on-prem to Azure AD) to access the application. The Azure AD application will ultimately be used to provide a bearer token for authorization when connecting to the AdminService through CMG.
- 1. Log in to the Azure Portal -> Azure Active Directory -> App Registrations.
- 2. Click New registration.
- 3. Enter a name for the application and click Register
- Click API Permissions –> Add a permission.
- Click APIs my organization uses.
- Select your existing CMG server application.
- Check user_impersonation and click Add permissions.
- Click Grant admin consent for <orgname>
- Click Yes
- Click Overview
- Click Add a Redirect URI next to Redirect URIs
- Click Add a platform
- Click Mobile and Desktop applications
- Check the box to enable https://login.microsoftonline.com/common/oauth2/nativeclient
- Click Configure
- Click Expose an API
- Click Set next to Application ID URI and type in any FQDN that’s not already used in the tenant: ex: https://CMGAdminService and click Save.
- Click Certificates & secrets
- Under Client secrets, click New client secret.
- Enter a description, select an expiration date, and click Add
- Save the Client secret value to a safe place.
- Click Overview and save the Application (client) ID and Directory (tenant) ID to a safe place.


Creating the ConfigMgr AdminService Power Apps Custom Connector
After you create the app registration in Azure AD, you can begin to create the Custom Connector in Power Apps. To do so, you’ll need to define some basic settings such as the authentication type, as well as the Application URI. The Identity Provider should be Azure Active Directory, the Client id and Client secret should come from your Azure AD app you registered previously. Login URL, Tenant ID, and Scope can be left default. The resource URI should be something like <your CMG fqdn>/CCM_Proxy_ServerAuth/72057594037927941/AdminService/
Verify your external facing AdminService URL by running the following SQL query against your site database:
select ExternalEndpointName, ExternalUrl from vProxy_Routings where ExternalEndpointName = ‘AdminService’
The Identity Provider should be Azure Active Directory.
The Client id, and Client secret fields should come from your new Azure AD app registration properties. Tenant ID can be left as common or be populated with your Azure AD tenant ID.
Resource URL will come from the Expose an API screen on your new Azure AD app registration in the Application ID URI box. If it’s blank, you need to pick any URL to use. The only important requirement for this URL is it must be unique within your tenant. In my Azure AD application example, I used https://CMGAdminService so this is where I will enter this FQDN. This URL is not related in any way to the Homepage URL used when defining your CMG Web App.
The Redirect URL should be https://global.consent.azure-apim.net/redirect. The Redirect URL should also appear in your new Azure AD app registration in the Authentication section as either a Web, or Mobile and desktop application platform type.

After the security settings are defined, the next step is to define each action you want to perform. The actions make up the overall definition of the custom connector, and each action can be called directly from the Power App once the custom connector is wired to the Power App.

An example of a Definition within an Action is to get a list of devices. I named my first Action Get Devices and gave it an OperationID of GetDevices. When you call this action from the Power App, you will use the format CustomConnectorName.OperationID(<Parameters to pass>).
For example:
AdminService.GetDevices(({‘$filter’:”ClientType eq 1″,’$select’:”MachineId,Name,CNIsOnline,IsClient,SiteCode,ClientActiveStatus,LastDDR,LastHardwareScan,LastSoftwareScan,LastMPServerName,LastActiveTime,ADSiteName,LastClientCheckTime,Domain,ClientVersion,DeviceOS,DeviceOSBuild,PrimaryUser,CurrentLogonUser,ClientState,AADDeviceID,SMSID”}).value)
For the parameters, you can pass any of the same parameters that you would pass in the Rest API call including the parameter ‘$select’ to define which properties to select, filter to define any specific filters (ClientType eq 1 filters out things like unknown computers). It’s important to note that any time you change the parameters, the JSON schema that is in your response will likely also change. Therefore, you will probably have to make multiple updates to the action each time you change it in some way. This way, the action will be prepared for the overall structure of the request’s response that it should expect to receive from the request to the API.
The next step in creating an action, is to click Import from sample.

This will let you select a verb (ie. GET, PUT, POST), define the specific URL to call, any query parameters for the request ($filter, $select), any headers, and the body of the request.

From this sample URL, each of these will get automatically populated based on your sample. For example, let’s say you use a sample URL like: HTTPS://RIMCO.RUSSRIMMERMAN.COM/CCM_Proxy_ServerAuth/72057594037927941/AdminService/v1.0/Device?$filter=(startswith(Name,’DC1‘) eq true) and (ClientType eq 1)&$select=MachineId,Name,SMSID
The query will automatically populate with $filter and $select since they were used in the request URL. If you also entered any headers and a body, those would also automatically populate and when you call the action from within the Power App, you will be able to customize them each time you make the API call depending on what you want to take place.
A good way to test all your API calls before using them within your custom connector definition is to use an API testing tool like Postman. Not only can you test them here, but you can also export from Postman Collections into Power Apps to create the custom connector definitions that you’ve tested.
To make Rest API calls from Postman, the first step is to request a token from your Azure AD using the following information in the body of the POST. These body properties will come from the Azure AD app that was registered. When you make this POST request, you will receive back a Bearer token, which expires after 1 hour of inactivity and is used to make all subsequent API calls and a Refresh token to refresh the results and expires after 14 days of inactivity. The Bearer tokens are used in the Authorization tab of Postman and you can utilize Postman’s variables feature to automatically set the token upon its request to a variable so that you don’t have to copy/paste it each time into your subsequent requests.

Here’s an example of requesting the installed software for a specific Resource ID:

Once you get the request URL and results just the way you want to use it in the custom connector including any $filters, $selects, or other query parameters, copy the JSON formatted body of the results so you can paste it into the custom connector’s Response section for the action. Do this by clicking on the Add default response and pasting in the JSON results from Postman. You can also use the Test option within the connector to test the API call and get the JSON formatted results as well.

Utilizing the custom ConfigMgr connector in a Power App
Once you’ve created some or all the actions you want your connector to support, you are ready to connect it to a Power App and begin making your API calls with it.
Here is a list of devices along with their Client install status, Activity, and SiteCode, and the Azure AD Join Type (if applicable). Additionally, I added a Pending Restart icon if the endpoint has one pending.

Clicking the Installed Software button makes the following request to the AdminService:
In the Power App, I have the OnSelect property of the Installed Software button call the custom connector with the following function:
ClearCollect(installedsoftware,AdminService.InstalledSoftware({‘$filter’:”ResourceID eq ” & selectedid,’$top’:25,’$skip’:0,’$select’:”ProductName,ProductVersion,Publisher,InstallDate”}).value)
This clears out anything that might already happen to be in the Power Apps collection I named installedsoftware from a previous request and populates it with the results of the request with the specified $filter parameters using the ResourceID of the selected machine, gets only the $top 25 results, and $select’s ProductName, ProductVersion, Publisher, and InstallDate and returns the array as “value” so I use .value to make sure this array is what is used to populate my installedsoftware collection. I also added sort options on the Product Name column and use the SortByColumns Power App function to sort by using either Ascending or Descending at the end of the SortByColumns function.

If I click the Device Collections button, my collections are listed along with their Collection ID and Limiting Collection. These are also sortable, and if I select any collection, it shows the last full evaluation run time and refresh times for the ConfigMgr collection (not to be confused with a Power Apps collection!)

Upon clicking App Deployments, it becomes obvious that I haven’t yet made a nice-looking display for the application deployment status info, but in the meantime have just dropped a basic gallery to show the results.

Clicking on any of the applications drills into the specifics of the app (another screen I haven’t put any beautification effort into yet.)

When clicking on the Client Actions button, it drills into the selected client. If you’re currently viewing a workstation OS, the Get Bitlocker Key button will also be visible. Clicking that button utilizes another Power Apps custom connector I created which makes a Graph API call to get the Bitlocker Key stored in Azure AD for the selected device. Just like the AdminService connector, using all the various documented Graph API calls for Intune can be useful for viewing and updating any Intune specific configurations.
If you’re using the Bitlocker Administration Service in ConfigMgr, you could also potentially have it go get and display your Bitlocker keys from there as well.

Clicking on the Current User brings up a dialog showing details of the currently logged on user including their current presence. This is all accomplished by leveraging Graph to query info using the user-id from both Azure AD as well as Teams. If you click the Chat button, it will bring up a chat window so you can communicate with the end-user via Teams without launching, using, or even having the Teams application installed on the device the Power App based console is running on. This is also done using Graph along with a Power Apps Gallery to display the chat messages between the user of the Power App and the end-user of the individual device. See Create chat – Microsoft Graph beta | Microsoft Docs for more information on this Graph request.
The chat session is first initiated using a POST to https://graph.microsoft.com/beta/chats. The body of the request must be the same structure as the following JSON, using the object ID GUIDs of each of the users in the chat session which is retrieved from their Azure AD user object.

The response will provide an id value which is the unique ID for the chat session.
Next, a chat message can be sent between the users in either direction using the Send chatMessage request. See Send chatMessage in a channel or a chat – Microsoft Graph beta | Microsoft Docs for more information on this Graph request.
The chat message is sent using the https://graph.microsoft.com/beta/chats/{id}/messages. The POST URL of the request must include the chat id provided in the Create chat request response.


Additionally, I’ve added some additional ideas I came up with to this custom console, like the ability to use the native ConfigMgr Run Script action on a given client or collection which lists all my available scripts in the Scripts node of the native console in a dropdown menu. You can use this to run any script like one to install all required updates immediately, collect all logs from the client (see https://github.com/russrimm/CollectAllLogs) and zip them up to a UNC share, etc. Leveraging the Run Scripts feature allows you to do things like gather all the updates currently pending installation in Software Center and display them prior to running the script to immediately initiate their installation on the selected client, and subsequently reboot the client.
Immediate software update insight + immediate software update action = immediate increased security!


The Install Application button allows selecting an available deployed application to be immediately installed on an endpoint. This is a feature introduced in ConfigMgr 1906 which installs applications in real time. See install applications for device for more details on this.
The Client Operation button allows you to run all the same client operations you can initiate from the native ConfigMgr console (restart, download policy, run hardware inventory, etc.)
The Device Category dropdown menu makes another call to Graph to enumerate and assign a Device Category to the device. You could also leverage Graph to allow creating/deleting categories as well.

Clicking Collection Memberships shows all the collections the device is currently a member of:

Since ConfigMgr now collects information related to boot performance as well as events including application crashes, driver installs, etc, all of this could be displayed to the administrator using the Power App.
Graph API calls can also be made from Power Apps in order to perform read and write operations in Intune. For example, I can enumerate all the applications in my tenant using a dropdown menu to pick iOS vs Android vs Built-In vs Win32.

As you can see, making your own Power App based console to accomplish the tasks you want to accomplish can be extremely powerful. I hope to continue improving my custom connector enough to eventually submit them as official Power Apps connectors so others can benefit from them. If you have any other ideas or suggestions, please do not hesitate to reach out to me. Also, if you’d like a demo of this or want to see any of it in more detail, feel free to hit up your Customer Success Account Manager (CSAM) and we can set up a time to discuss your specific needs and ideas further.
Thanks for reading!
Brought to you by Dr. Ware, Microsoft Office 365 Silver Partner, Charleston SC.

Recent Comments