by Contributed | Apr 14, 2021 | Technology
This article is contributed. See the original author and article here.
Initial Update: Wednesday, 14 April 2021 07:55 UTC
We are aware of issues within Log Analytics and are actively investigating. Some customers may experience data access issues and delayed or missed Log Search Alerts in North Europe region.
- Work Around: None
- Next Update: Before 04/14 10:00 UTC
We are working hard to resolve this issue and apologize for any inconvenience.
-Deepika

by Contributed | Apr 14, 2021 | Technology
This article is contributed. See the original author and article here.
The SharePoint community monthly call is our general monthly review of the latest SharePoint news (news, tools, extensions, features, capabilities, content and training), engineering priorities and community recognition for Developers, IT Pros and Makers. This monthly community call happens on the second Tuesday of each month. You can download recurrent invite from https://aka.ms/sp-call.
Call Summary:
Visit the new Microsoft 365 PnP Community hub at Microsoft Tech Communities! Preview the new Microsoft 365 Extensibility look book gallery, attend one of a growing list of Sharing is Caring events. The Microsoft 365 Update – Community (PnP) | April 2021 is now available. SPFx v1.12.1 with Node v14 and Gulp4 support was released for public beta today and GA slated for end of April. In this call, quickly addressed developer and non-developer entries in UserVoice.
A huge thank you to the record number of contributors and organizations actively participating in this PnP Community. You continue to amaze. The host of this call was Vesa Juvonen (Microsoft) @vesajuvonen. Q&A took place in the chat throughout the call.
Getting started with Microsoft Viva Connections Desktop – an employee centric app in Teams with one stop access to internet resources, global search, contextual actions, and company branded experience. A SharePoint home site powered by Microsoft Teams, backed by Microsoft security, privacy and compliance. No additional licensing. Familiar extensible platform that will include mobile this summer. Create Viva Connections app package in PowerShell, upload package to Teams Admin Center.
Actions:
You can check the latest updates in the monthly summary and at aka.ms/spdev-blog.
This call was delivered on Tuesday, April 13, 2021. The call agenda is reflected below with direct links to specific sections. You can jump directly to a specific topic by clicking on the topic’s timestamp which will redirect your browser to that topic in the recording published on the Microsoft 365 Community YouTube Channel.
Call Agenda:
- SharePoint community update with latest news and roadmap – 2:47
- UserVoice status for non-dev focused SharePoint entries – 8:36
- UserVoice status for dev focused SharePoint Framework entries – 9:45
- Community contributors and companies which have been involved in the past month – 12:50
- Topic: Getting started with Microsoft Viva Connections Desktop – Tejas Mehta (Microsoft) | @tpmehta and Prateek Dudeja (Microsoft) | @PrateekDudeja4 – 16:16
The full recording of this session is available from Microsoft 365 & SharePoint Community YouTube channel – http://aka.ms/m365pnp-videos.
- Presentation slides used in this community call are found at OneDrive.
Resources:
Additional resources on covered topics and discussions.
Additional Resources:
Upcoming calls | Recurrent invites:
“Too many links, can’t remember” – not a problem… just one URL is enough for all Microsoft 365 community topics – http://aka.ms/m365pnp.
“Sharing is caring”
SharePoint Team, Microsoft – 14th of April 2021
by Contributed | Apr 14, 2021 | Technology
This article is contributed. See the original author and article here.
The Cloud Service Extended Support is a new service type which is similar to classic Cloud Service. The biggest difference between them is that the new Cloud Service Extended Support is ARM (Azure Resource Manager) based resource and can be used with ARM features such as tags, policy, RBAC, ARM template.
About the migration from the classic Cloud Service to Cloud Service Extended Support, Azure officially provided a way called in-place migration. The detailed information can be found at: https://docs.microsoft.com/en-us/azure/cloud-services-extended-support/in-place-migration-portal.
In this blog, we will present how we can manually create a new Cloud Service Extended Support and deploy the same project into this new service. The classic Cloud Service project will have following features and after migration, all these features will be kept:
- Remote Desktop
- SSL certificate for HTTPS endpoints
- Using the same IP address before and after migration
The main advantage of manual migration
Before how to do this manual migration, let us highlight the main advantage of the manual migration:
- The name of the new Cloud Service Extended Support can be decided by yourself. You can use a user-friendly name such as CSEStest.
- Both of manual and in-place migration need the modification of the project code. During manual migration process, this modification is already included. With in-place migration process, it may be more difficult for you to modify the code.
- This manual migration process is using ARM template to deploy new resources. You can do some changes by your own idea such as enabling RDP Extension which is not enabled in classic Cloud Service. But the in-place migration does not allow you to do so. It will keep the same configuration.
Before you begin
There will be some additional points to do before we start the migration. Please have a check of following points carefully since it may cause unexpected issue if they are not matched:
- Follow the “Before you begin” part of the document to check if you are an administrator/coadministrator of the subscription.
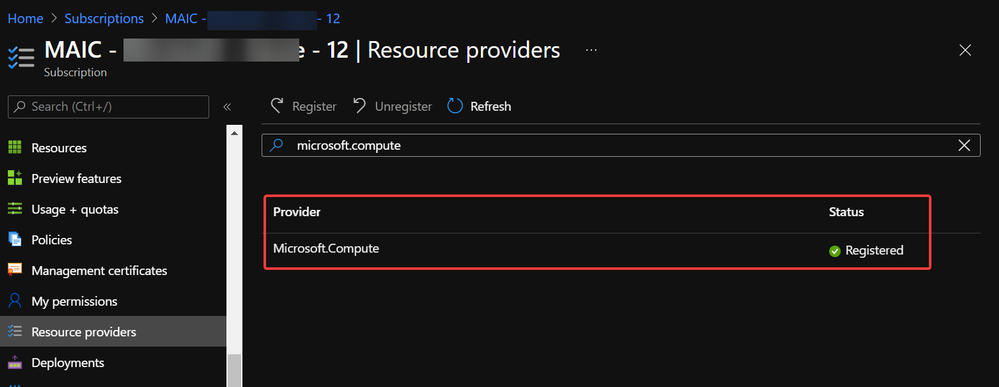
- In subscription page of Azure Portal, check the resource providers Microsoft.Compute, Microsoft.Network and Microsoft.Storage are already registered.
Example of resource provider registration
- We should have a running classic Cloud Service and its whole project code. If it is using certificate for any purpose (for HTTPS endpoint in this blog), that certificate in .pfx format and its password are also needed for the deployment.
With above 3 conditions, there should not be any other permission issue for this manual migration process. And for this process, a container in storage account is also required. If you do not have one yet, please follow this document to create one storage account and follow next 2 screenshots to create a new container.
https://docs.microsoft.com/en-us/azure/storage/common/storage-account-create?tabs=azure-portal#create-a-storage-account-1
 Create container 1
 Create container 2
Then, let us move on the main process.
Reserve the IP address of the classic Cloud Service and upgrade it to be used for Cloud Service Extended Support
In this example, my classic Cloud Service is testcstocses in resource group cstocses, in East US region.
- Use PowerShell command to keep the current IP address as a classic Reserved IP, with name ReservedIPCSES. The location must be the same as your classic Cloud Service location.
New-AzureReservedIP -ReservedIPName ReservedIPCSES -ServiceName testcstocses -Location "East US"
 Keep the IP to classic reserved IP
- Follow document to upgrade the generated classic Reserved IP to basic SKU Public IP (There is bug in script in official document)
https://docs.microsoft.com/en-us/azure/virtual-network/virtual-network-public-ip-address-upgrade?tabs=option-upgrade-powershell%2Coption-migrate-powershell#upgrade-migrate-a-classic-reserved-ip-to-a-static-public-ip
a. Verify if the classic Reserved IP is still associated with the classic Cloud Service. If yes, check if we can remove the association. (By design, the newly generated classic reserved IP should be still associated with classic Cloud Service)
## Variables for the command ##
$name = 'ReservedIPCSES'

## This section is only needed if the Reserved IP is not already disassociated from any Cloud Services ##
$service = 'testcstocses'
Remove-AzureReservedIPAssociation -ReservedIPName $name -ServiceName $service

$validate = Move-AzureReservedIP -ReservedIPName $name -Validate
$validate.ValidationMessages
 PowerShell commands to verify association between classic Cloud Service and generated reserved IP
b. If the result in above screenshot is Succeeded, then run the following command to remove the link.
Move-AzureReservedIP -ReservedIPName $name -Prepare
Move-AzureReservedIP -ReservedIPName $name -Commit
 Upgrade classic Reserved IP to basic tier
The new generated Basic SKU Public IP will be in a new resource group called {publicipname}-Migrated.
 Migrated basic tier reserved IP
- Set a DNS name on this Public IP. (Optional but recommended since the new Cloud Service Extended Support will not offer a DNS name as classic Cloud Service)
 Configure DNS name on public IP
- Move the Public IP into the original resource group.
 Move public IP to specific resource group 1
 Move public IP to specific resource group 2
- (Optional) If your original classic Cloud Service is using any certificate, create a Key Vault in the same region (East US in this example) and upload the .pfx format certificate.
 Create Key Vault 1
 Create Key Vault 2
Do not forget to check this checkbox “Azure Virtual Machines for deployment” in Access policy page.
 Create Key Vault 3
After creation of Key Vault, import the certificate.
 Upload certificate into Key Vault 1
 Upload certificate into Key Vault 2
 Upload certificate into Key Vault result
- Follow the official document to modify the classic Cloud Service code to make them match Cloud Service Extended Support requirement.
https://docs.microsoft.com/en-us/azure/cloud-services-extended-support/deploy-prerequisite
https://docs.microsoft.com/en-us/azure/cloud-services-extended-support/deploy-template
The yellow part is about the usage of the certificate. It is not necessary for all Cloud Service project.
The green part is the important information which we will use in following steps. Please take a note of it.
.csdef file
<?xml version=”1.0″ encoding=”utf-8″?>
<ServiceDefinition name=”AzureCloudService2″ xmlns=”http://schemas.microsoft.com/ServiceHosting/2008/10/ServiceDefinition” schemaVersion=”2015-04.2.6“>
<WebRole name=”WebRole1” vmsize=”Standard_D1_V2“>
<Sites>
<Site name=”Web”>
<Bindings>
<Binding name=”Endpoint1″ endpointName=”Endpoint1″ />
<Binding name=”HttpsIn” endpointName=”HttpsIn” />
</Bindings>
</Site>
</Sites>
<Endpoints>
<InputEndpoint name=”Endpoint1″ protocol=”http” port=”80″ />
<InputEndpoint name=”HttpsIn” protocol=”https” port=”443″ certificate=”Certificate1″ />
</Endpoints>
<Certificates>
<Certificate name=”Certificate1″ storeLocation=”LocalMachine” storeName=”My” permissionLevel=”limitedOrElevated”/>
</Certificates>
</WebRole>
</ServiceDefinition>
.cscfg file
<?xml version=”1.0″ encoding=”utf-8″?>
<ServiceConfiguration serviceName=”AzureCloudService2″ xmlns=”http://schemas.microsoft.com/ServiceHosting/2008/10/ServiceConfiguration” osFamily=”6″ osVersion=”*” schemaVersion=”2015-04.2.6“>
<Role name=”WebRole1“>
<Instances count=”1” />
<Certificates>
<Certificate name=”Certificate1″ thumbprint=”909011xxxxxxxxxx712303838613″ thumbprintAlgorithm=”sha1″ />
</Certificates>
</Role>
<NetworkConfiguration>
<VirtualNetworkSite name=”cstocsesvnet” />
<AddressAssignments>
<InstanceAddress roleName=”WebRole1″>
<Subnets>
<Subnet name=”WebRole1_subnet” />
</Subnets>
</InstanceAddress>
<ReservedIPs>
<ReservedIP name=”ReservedIPCSES” />
</ReservedIPs>
</AddressAssignments>
</NetworkConfiguration>
</ServiceConfiguration>
The thumbprint of the certificate can be found in Key Vault, Certificates page.
 Thumbprint of the certificate in Key Vault
- Package the project as we do for classic Cloud Service project. Then copy out the .cspkg and .cscfg files.
 Package in Visual Studio
 Package result for a classic Cloud Service project (certificate isn’t from package process)
- Upload the .cscfg file and .cspkg file into a container of storage account.
 Upload .cspkg and .cscfg to Storage container
- After uploading, generate the SAS URL of these 2 files one by one. We can click on the file, switch to Generate SAS, click on Generate SAS token and URL and find the needed SAS URL at the end of the page.
 Generate SAS token of .cscfg and .cspkg
The generated SAS token should be like:
https://storageforcses.blob.core.windows.net/test/AzureCloudService2.cspkg?sp=r&st=2021-04-02T10:47:04Z&se=2021-04-02T18:47:04Z&spr=https&sv=2020-02-10&sr=b&sig=osktC5FtJpI1uX28D2UMtJaZVi8FmhW6kpIHH%2FuFTUU%3D
https://storageforcses.blob.core.windows.net/test/ServiceConfiguration.Cloud.cscfg?sp=r&st=2021-04-02T10:48:12Z&se=2021-04-02T18:48:12Z&spr=https&sv=2020-02-10&sr=b&sig=8BmMScBU%2Bm6hRkKtUoiRNs%2F2NHYiHay8qxJq5TM%2BkGU%3D
- (Optional) If you use Key Vault to save the certificate, please visit the Certificate page and click 2 times on the uploaded certificate. You’ll find a URL at the end of the page with format:
https://{keyvaultname}.vault.azure.net/secrets/{certificatename}/{id}
 Find secret URL of certificate 1
 Find secret URL of certificate 2
Make a note of this URL for using it in next step. The following is my example: https://cstocses.vault.azure.net/secrets/csescert/e2f6ab1744374de38ae831ba8896edb9
Also, please make a note of the subscription ID, name of resource group where Key Vault is deployed and the Key Vault service name. These will also be used in next step.
- Please modify the following ARM template and parameters. And then save them into JSON format files. In my test, I saved into template.json and parameter.json.
Tips: The yellow parts are the optional parts. If you do not use any certificate, you can remove it from both template and parameter files. The green parts are the information noted from .csdef and .cscfg files. Please make sure they are the same and correct.
ARM template: (Except the above tips about certificate, no need to modify the ARM template file)
{
“$schema”: “https://schema.management.azure.com/schemas/2015-01-01/deploymentTemplate.json#“,
“contentVersion”: “1.0.0.0”,
“parameters”: {
“cloudServiceName”: {
“type”: “string”,
“metadata”: {
“description”: “Name of the cloud service”
}
},
“location”: {
“type”: “string”,
“metadata”: {
“description”: “Location of the cloud service”
}
},
“deploymentLabel”: {
“type”: “string”,
“metadata”: {
“description”: “Label of the deployment”
}
},
“packageSasUri”: {
“type”: “securestring”,
“metadata”: {
“description”: “SAS Uri of the CSPKG file to deploy”
}
},
“configurationSasUri”: {
“type”: “securestring”,
“metadata”: {
“description”: “SAS Uri of the service configuration (.cscfg)”
}
},
“roles”: {
“type”: “array”,
“metadata”: {
“description”: “Roles created in the cloud service application”
}
},
“vnetName”: {
“type”: “string”,
“defaultValue”: “csesVNet”,
“metadata”: {
“description”: “Name of vitual network”
}
},
“subnetSetting”: {
“type”: “array”,
“metadata”: {
“description”: “Setting of subnets”
}
},
“publicIPName”: {
“type”: “string”,
“defaultValue”: “contosocsIP”,
“metadata”: {
“description”: “Name of public IP address”
}
},
“upgradeMode”: {
“type”: “string”,
“defaultValue”: “Auto”,
“metadata”: {
“UpgradeMode”: “UpgradeMode of the CloudService”
}
},
“secrets”: {
“type”: “array”,
“metadata”: {
“description”: “The key vault id and certificates referenced in the .cscfg file”
}
},
“rdpPublicConfig”: {
“type”: “string”,
“metadata”: {
“description”: “Public config of remote desktop extension”
}
},
“rdpPrivateConfig”: {
“type”: “securestring”,
“metadata”: {
“description”: “Private config of remote desktop extension”
}
}
},
“variables”: {
“cloudServiceName”: “[parameters(‘cloudServiceName’)]”,
“subscriptionID”: “[subscription().subscriptionId]”,
“lbName”: “[concat(variables(‘cloudServiceName’), ‘LB’)]”,
“lbFEName”: “[concat(variables(‘cloudServiceName’), ‘LBFE’)]”,
“resourcePrefix”: “[concat(‘/subscriptions/’, variables(‘subscriptionID’), ‘/resourceGroups/’, resourceGroup().name, ‘/providers/’)]”
},
“resources”: [
{
“apiVersion”: “2019-08-01”,
“type”: “Microsoft.Network/virtualNetworks”,
“name”: “[parameters(‘vnetName’)]”,
“location”: “[parameters(‘location’)]”,
“properties”: {
“addressSpace”: {
“addressPrefixes”: [
“10.0.0.0/16”
]
},
“subnets”: “[parameters(‘subnetSetting’)]”
}
},
{
“apiVersion”: “2020-10-01-preview”,
“type”: “Microsoft.Compute/cloudServices”,
“name”: “[variables(‘cloudServiceName’)]”,
“location”: “[parameters(‘location’)]”,
“tags”: {
“DeploymentLabel”: “[parameters(‘deploymentLabel’)]”,
“DeployFromVisualStudio”: “true”
},
“dependsOn”: [
“[concat(‘Microsoft.Network/virtualNetworks/’, parameters(‘vnetName’))]”
],
“properties”: {
“packageUrl”: “[parameters(‘packageSasUri’)]”,
“configurationUrl”: “[parameters(‘configurationSasUri’)]”,
“upgradeMode”: “[parameters(‘upgradeMode’)]”,
“roleProfile”: {
“roles”: “[parameters(‘roles’)]”
},
“networkProfile”: {
“loadBalancerConfigurations”: [
{
“id”: “[concat(variables(‘resourcePrefix’), ‘Microsoft.Network/loadBalancers/’, variables(‘lbName’))]”,
“name”: “[variables(‘lbName’)]”,
“properties”: {
“frontendIPConfigurations”: [
{
“name”: “[variables(‘lbFEName’)]”,
“properties”: {
“publicIPAddress”: {
“id”: “[concat(variables(‘resourcePrefix’), ‘Microsoft.Network/publicIPAddresses/’, parameters(‘publicIPName’))]”
}
}
}
]
}
}
]
},
“osProfile”: {
“secrets”: “[parameters(‘secrets’)]”
},
“extensionProfile”: {
“extensions”: [
{
“name”: “RDPExtension”,
“properties”: {
“autoUpgradeMinorVersion”: true,
“publisher”: “Microsoft.Windows.Azure.Extensions”,
“type”: “RDP”,
“typeHandlerVersion”: “1.2.1”,
“settings”: “[parameters(‘rdpPublicConfig’)]”,
“protectedSettings”: “[parameters(‘rdpPrivateConfig’)]”
}
}
]
}
}
}
]
}
Parameters:
Tips:
For example:
“roles”: {
“value”: [
{
“name”: “WebRole1”,
“sku”: {
“name”: “Standard_D1_v2”,
“tier”: “Standard”,
“capacity”: “1”
}
},
{
“name”: “WorkerRole1”,
“sku”: {
“name”: “Standard_D1_v2”,
“tier”: “Standard”,
“capacity”: “2”
}
}
]
},
…
“subnetSetting”: {
“value”: [
{
“name”: “WebRole1_subnet”,
“properties”: {
“addressPrefix”: “10.0.0.0/24”
}
},
{
“name”: “WorkerRole1_subnet”,
“properties”: {
“addressPrefix”: “10.0.1.0/24”
}
}
]
},
- In the secrets part, sourceVault is the resource URI of your Key Vault. It’s constructed by /subscriptions/{subscription-id}/resourceGroups/{resourcegroup-name}/providers/Microsoft.KeyVault/vaults/{keyvault-name} And the certificateUrl is the one we noted in step 10.
- In rdpPublicConfig and rdpPrivateConfig, we only need to change the username and password we want to use to enable RDP. For example, here I use “admin” as username and “Password” as password.
{
“$schema”: “https://schema.management.azure.com/schemas/2015-01-01/deploymentParameters.json#“,
“contentVersion”: “1.0.0.0”,
“parameters”: {
“cloudServiceName”: {
“value”: “cstocses”
},
“location”: {
“value”: “eastus”
},
“deploymentLabel”: {
“value”: “deployment label of cstocses by ARM template”
},
“packageSasUri”: {
“value”: “https://storageforcses.blob.core.windows.net/test/AzureCloudService2.cspkg?sp=r&st=2021-04-02T10:47:04Z&se=2021-04-02T18:47:04Z&spr=https&sv=2020-02-10&sr=b&sig=osktC5FtJpI1uX28D2UMtJaZVi8FmhW6kpIHH%2FuFTUU%3D“
},
“configurationSasUri”: {
“value”: “https://storageforcses.blob.core.windows.net/test/ServiceConfiguration.Cloud.cscfg?sp=r&st=2021-04-02T10:48:12Z&se=2021-04-02T18:48:12Z&spr=https&sv=2020-02-10&sr=b&sig=8BmMScBU%2Bm6hRkKtUoiRNs%2F2NHYiHay8qxJq5TM%2BkGU%3D“
},
“roles”: {
“value”: [
{
“name”: “WebRole1“,
“sku”: {
“name”: “Standard_D1_v2“,
“tier”: “Standard”,
“capacity”: “1“
}
}
]
},
“vnetName”: {
“value”: “cstocsesVNet“
},
“subnetSetting”: {
“value”: [
{
“name”: “WebRole1_subnet“,
“properties”: {
“addressPrefix”: “10.0.0.0/24”
}
}
]
},
“publicIPName”: {
“value”: “ReservedIPCSES“
},
“upgradeMode”: {
“value”: “Auto”
},
“secrets”: {
“value”: [
{
“sourceVault”: {
“id”: “/subscriptions/4f27bec7-26bd-40f7-af24-5962a53d921e/resourceGroups/cstocses/providers/Microsoft.KeyVault/vaults/cstocses”
},
“vaultCertificates”: [
{
“certificateUrl”: “https://cstocses.vault.azure.net/secrets/csescert/e2f6ab1744374de38ae831ba8896edb9“
}
]
}
]
},
“rdpPublicConfig”: {
“value”: “<PublicConfig>rn <UserName>admin</UserName>rn <Expiration>4/2/2022 12:00:00 AM</Expiration>rn</PublicConfig>”
},
“rdpPrivateConfig”: {
“value”: “<PrivateConfig>rn <Password>Password</Password>rn</PrivateConfig>”
}
}
}
- Use PowerShell command to deploy the ARM template. (Not necessary by PowerShell. You can also use Azure Portal or Azure CLI to deploy the template)
https://docs.microsoft.com/en-us/powershell/module/az.resources/new-azresourcegroupdeployment?view=azps-5.7.0
Please remember to replace the resource group name and the path of the template and parameter JSON file in the command before running it.
New-AzResourceGroupDeployment -ResourceGroupName "cstocses" -TemplateFile "C:UsersjerryzDesktopCSES testdemotemplate.json" -TemplateParameterFile "C:UsersjerryzDesktopCSES testdemoparameter.json"
 ARM template deployment result
Result: (The classic Cloud Service is deleted)
 All created resources in this process
by Scott Muniz | Apr 13, 2021 | Security, Technology
This article is contributed. See the original author and article here.
Google has updated the stable channel for Chrome to 89.0.4389.128 for Windows, Mac, and Linux. This version addresses vulnerabilities that an attacker could exploit to take control of an affected system.
CISA encourages users and administrators to review the Chrome release and apply the necessary changes.
by Contributed | Apr 13, 2021 | Technology
This article is contributed. See the original author and article here.
Haim Sabo Senior Software Engineer at Video Indexer, AEDPLS
*This article was originally published on July 18, 2019, on Microsoft Azure blogs.
Video Indexer (VI), the AI service for Azure Media Services enables the customization of language models by allowing customers to upload examples of sentences or words belonging to the vocabulary of their specific use case. Since speech recognition can sometimes be tricky, VI enables you to train and adapt the models for your specific domain. Harnessing this capability allows organizations to improve the accuracy of the Video Indexer generated transcriptions in their accounts.
Over the past few months, we have worked on a series of enhancements to make this customization process even more effective and easy to accomplish. Enhancements include automatically capturing any transcript edits done manually or via API as well as allowing customers to add closed caption files to further train their custom language models.
The idea behind these additions is to create a feedback loop where organizations begin with a base out-of-the-box language model and improve its accuracy gradually through manual edits and other resources over a period of time, resulting with a model that is fine-tuned to their needs with minimal effort.
Accounts’ custom language models and all the enhancements this blog shares are private and are not shared between accounts.
In the following sections, I will drill down on the different ways that this can be done.
Improving your custom language model using transcript updates
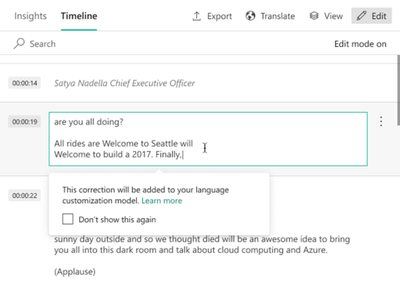
Once a video is indexed in VI, customers can use the Video Indexer portal to introduce manual edits and fixes to the automatic transcription of the video. This can be done by clicking on the Edit button at the top right corner of the Timeline pane of a video to move to edit mode, and then simply update the text, as seen in the image below.
The changes are reflected in the transcript, captured in a text file From transcript edits, and automatically inserted into the language model used to index the video. If you were not already using a custom language model, the updates will be added to a new Account Adaptations language model created in the account.
You can manage the language models in your account and see the From transcript edits files by going to the Language tab in the content model customization page of the VI website.
Once one of the From transcript edits files is opened, you can review the old and new sentences created by the manual updates, and the differences between them as shown below.

All that is left is to do is click on Train to update the language model with the latest changes. From that point on, these changes will be reflected in all future videos indexed using that model. Of course, you do not have to use the portal to train the model, the same can be done via the Video Indexer train language model API. Using the API can open new possibilities such as allowing you to automate a recurring training process to leverage ongoing updates.

There is also an update video transcript API that allows customers to update the entire transcript of a video in their account by uploading a VTT file that includes the updates. As a part of the new enhancements, when a customer uses this API, Video Indexer also adds the transcript that the customers uploaded to the relevant custom model automatically in order to leverage the content as training material. For example, calling update video transcript for a video titled “Godfather” will result with a new transcript file named “Godfather” in the custom language model that was used to index that video.
Improving your custom language model using closed caption files
Another quick and effective way to train your custom language model is to leverage existing closed captions files as training material. This can be done manually, by uploading a new closed caption file to an existing model in the portal, as shown in the image below, or by using the create language model and update language model APIs to upload a VTT, SRT or TTML files (similarly to what was done until now with TXT files.)

Once uploaded, VI cleans up all the metadata in the file and strips it down to the text itself. You can see the before and after results in the following table.
Type |
Before |
After |
VTT |
NOTE Confidence: 0.891635
00:00:02.620 –> 00:00:05.080
but you don’t like meetings before 10 AM.
|
but you don’t like meetings before 10 AM. |
SRT |
2
00:00:02,620 –> 00:00:05,080
but you don’t like meetings before 10 AM.
|
but you don’t like meetings before 10 AM. |
TTML |
<!– Confidence: 0.891635 –>
<p begin=”00:00:02.620″ end=”00:00:05.080″>but you don’t like meetings before 10 AM.</p>
|
but you don’t like meetings before 10 AM. |
From that point on, all that is left to do is review the additions to the model and click Train or use the train language model API to update the model.
Next Steps
The new additions to the custom language models training flow make it easy for you and your organization to get more accurate transcription results easily and effortlessly. Now, it is up to you to add data to your custom language models, using any of the ways we have just discussed, to get more accurate results for your specific content next time you index your videos.
Have questions or feedback? We would love to hear from you! Use our UserVoice page to help us prioritize features or use Video Indexer’s Stackoverflow page for any questions you have around Video Indexer.
by Contributed | Apr 13, 2021 | Technology
This article is contributed. See the original author and article here.
Getting started with Video Indexer v2 API
Itai Norman Program Manager, AEDPLS, Video Indexer.
Video Indexer is an Azure service, that enables you to easily extracts business insights from your media files by using around 30 AI models. Using this service, you can enrich your videos with meta-data, transcription, and translation to more the 50 different languages, search in videos for faces, people, topics, spoken words, and much more.
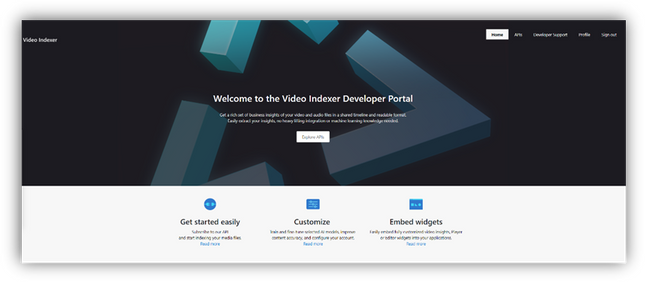
Video Indexer can be leveraged in three ways: via a REST API, via a full flagged portal experience, and via embeddable customizable widgets, that enable customers to leverage the portal experience in their own applications. In this blog we will focus on how to get to know and get started with the Video Indexer REST API easily, using our brand-new developer portal! Via this portal, you can explore and try out all different APIs, find code samples and easily navigate between all Video Indexer’s communities and documentation resources.
In this blog, I will walk you through few basic steps:
First thing first – get a Video Indexer account
Before starting to use Video Indexer’s REST API, you should have a Video Indexer account, you can start with a free trial account; Just sign-in with one of the following: AAD account, Personal Microsoft account, or a Google account and you are good to go!
Alternatively, you can get connected to your own Azure Subscription. If someone to their Video Indexer account, you could use that account as well.

Register to Video Indexer’s API
Now we are ready to start using the Video Indexer developer portal. You will be welcomed with the Video Indexer developer portal landing page, just press the ‘Sign-in’ button on the top-right corner of the ‘Get Started’ button, to authenticate. When the authentication process is finished you will be connected to the developer-portal as a signed-in user, and you will see the following tabs in your top-right menu: ‘Home’, ’APIs’, ’Developer Support’, ‘Profile’, ’Sign out’.
Getting familiar with the developer portal
Before moving to an example of using Video Indexer’s API, let’s briefly explore what’s available for you in the portal.
The first tab is the APIs tab. It has a list of all APIs calls in VI’s environment, by choosing an API call you will get a sample of how the request would look like, a documentation table, and an option to try the API call through the portal.
On the ‘try it’ blade you will be able to enter the relevant parameters and get a glance at what would the API call and response look like.

In the Home tab, you can find links to our documentation around main functionalities such as model customization and how to embed widgets. A three easy steps guide, on how to use Video Indexer’s API and a short code sample.
The Developer support page includes everything you need to learn about and get support for: GitHub repository, Stackoverflow page, ‘CodePen’ link with widgets code samples, and Video Indexer’s tech community relevant blog posts. Also available in the developer support, Video Indexer’s FAQ page, a ‘User Voice’, where you can suggest Video indexer capabilities and features that may be helpful for your business needs, and a general documentation link.

Using the API
This is really what we are here for, right? So, let’s see how to start using the VI API…
Getting the account id and access token.
In this section, I’ll walk you through the basic flow that lets you get media insights from Video Indexer, with only three calls: Getting an ‘AccountId’ and ‘Access Token’, uploading a file and retrieving the insight JSON file, and I’ll use the developer portal to do so.
First, open the developer portal, under the ‘APIs’ tab go to the ‘Get Accounts Authorization’.

Enter the query parameters:
- Location – ‘trial’ (or for non-trial account enter the region for your account)
- Generate Access Token: true.
At the bottom of the ‘Try it’ blade hit ‘Send’.

You should receive a 200 ok response with the appropriate data.

Open a Notepad or similar app to keep the different values of the response, you will need it in a minute… form the response save the: ‘Id’ which is the ‘Account Id’, and the ‘Access Token’.
Upload video

Now we have everything we need to upload the first video. Go to ‘Upload video’
enter the query parameters:
- Location: ‘trial’ (For non-trial account enter the region e.g. “eastus”).
- AccountId: GUID you received it in your ‘Get Accounts Authorization’.
- Name: give the video a name.
- VideoUrl: The full path of the video you want to upload, note, that video Indexer support a wide range of video and audio file formats, but it has to be a URL for a file (and not a HTTP link for example)
- Access Token: the ‘Access Token’ we got at the previous step.
, and hit ‘Send’.
Form the ‘upload video’ response fetch the ‘id’ – which is the Video Indexer id for the file you just uploaded. We will need it in the next step.
Getting Insights
Once the indexing completed (which might take a few minutes), we can use the third call, to see what Video Indexer was able to extract. Go to ‘Get Video Index’

enter the query parameters:
- Location – ‘trial’ (For non-trial account enter the region e.g. “eastus”).
- AccountId: GUID you received it in your ‘Get Accounts Authorization’.
- VideoId: we received from the last API call.
- Access Token: the ‘Access Token’ we got at the previous step.
, and hit ‘Send’.
And Walla… all the insights will be returned in a Json format file.

Congratulations! you just got your first set of insights in a readable JSON format.
So, what’s next?
Use these relevant articles to learn more on how to use Video Indexer:
Use these links to read more technical articles around Video Indexer:
by Contributed | Apr 13, 2021 | Technology
This article is contributed. See the original author and article here.
* The blog was first published at December 2019 by Anika Zaman in Azure blogs
We are pleased to introduce the ability to export high-resolution keyframes from Azure Media Service’s Video Indexer. Whereas keyframes were previously exported in reduced resolution compared to the source video, high resolution keyframes extraction gives you original quality images and allows you to make use of the image-based artificial intelligence models provided by the Microsoft Computer Vision and Custom Vision services to gain even more insights from your video. This unlocks a wealth of pre-trained and custom model capabilities. You can use the keyframes extracted from Video Indexer, for example, to identify logos for monetization and brand safety needs, to add scene description for accessibility needs or to accurately identify very specific objects relevant for your organization, like identifying a type of car or a place.
Let’s look at some of the use cases we can enable with this new introduction.
Using keyframes to get image description automatically
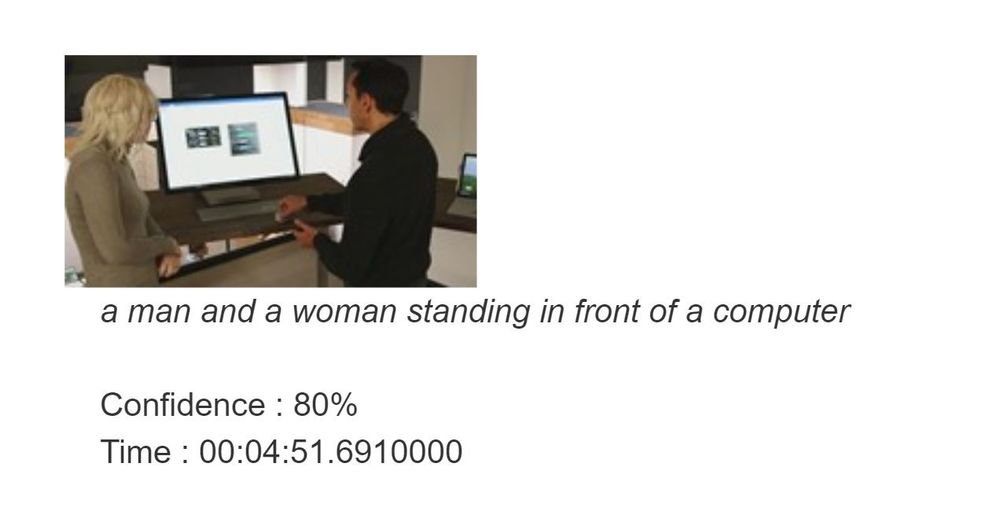
You can automate the process of “captioning” different visual shots of your video through the image description model within Computer Vision, in order to make the content more accessible to people with visual impairments. This model provides multiple description suggestions along with confidence values for an image. You can take the descriptions of each high-resolution keyframe and stitch them together to create an audio description track for your video.
Pic 1: An example of using the image description model to create a description of a high resolution key frame.
Using Keyframes to get logo detection
While Video Indexer detects brands in speech and visual text, it does not support brands detection from logos yet. Instead, you can run your keyframes through Computer Vision’s logo-based brands detection model to detect instances of logos in your content.
This can also help you with brand safety as you now know and can control the brands showing up in your content. For example, you might not want to showcase the logo of a company directly competing with yours. Also, you can now monetize on the brands showing up in your content through sponsorship agreements or contextual ads.
Furthermore, you can cross-reference the results of this model for you keyframe with the timestamp of your keyframe to determine when exactly a logo is shown in your video and for how long. For example, if you have a sponsorship agreement with a content creator to show your logo for a certain period of time in their video, this can help determine if the terms of the agreement have been upheld.
Computer Vision’s logo detection model can detect and recognize thousands of different brands out of the box. However, if you are working with logos that are specific to your use case or otherwise might not be a part of the out of the box logos database, you can also use Custom Vision to build a custom object detector and essentially train your own database of logos by uploading and correctly labeling instances of the logos relevant to you.

Pic 2: An example of log detection using Computer Vision’s logo-based brands detection
Using keyframes with other Computer Vision and Custom Vision offerings
The Computer Vision APIs provide different insights in addition to image description and logo detection, such as object detection, image categorization, and more. The possibilities are endless when you use high-resolution keyframes in conjunction with these offerings.
For example, the object detection model in Computer Vision gives bounding boxes for common out of the box objects that are already detected as part of Video Indexer today. You can use these bounding boxes to blur out certain objects that don’t meet your standards.

Pic 3: An example of object detection model in Computer Vision applied on a high resolution key frame
High-resolution keyframes in conjunction with Custom Vision can be leveraged to achieve many different custom use cases. For example, you can train a model to determine what type of car (or even what breed of cat) is showing in a shot. Maybe you want to identify the location or the set where a scene was filmed for editing purposes. If you have objects of interest that may be unique to your use case, use Custom Vision to build a custom classifier to tag visuals or a custom object detector to tag and provide bounding boxes for visual objects.
Try it for yourself
These are just a few of the new opportunities enabled by the availability of high-resolution keyframes in Video Indexer. Now, it is up to you to get additional insights from your video by taking the keyframes from Video Indexer and running additional image processing using any of the Vision models we have just discussed. You can start doing this by first uploading your video to Video Indexer and taking the high-resolution keyframes after the indexing job is complete and second creating an account and getting started with the Computer Vision API and Custom Vision.
Have questions or feedback? We would love to hear from you. Use our UserVoice page to help us prioritize features, leave a comment below or email VISupport@Microsoft.com for any questions.
by Contributed | Apr 13, 2021 | Technology
This article is contributed. See the original author and article here.
Welcome back to the Security Controls in Azure Security Center blog series! This time we are here to talk about the security control: Implement security best practices.
Keeping your resources safe is a joint effort between your cloud provider, Azure, and you, the customer. You have to make sure your workloads are secure as you move to the cloud, and at the same time, when you move to IaaS (infrastructure as a service) there is more customer responsibility than there was in PaaS (platform as a service), and SaaS (software as a service). Azure Security Center provides you the tools needed to harden your network, secure your services and make sure you’re on top of your security posture.
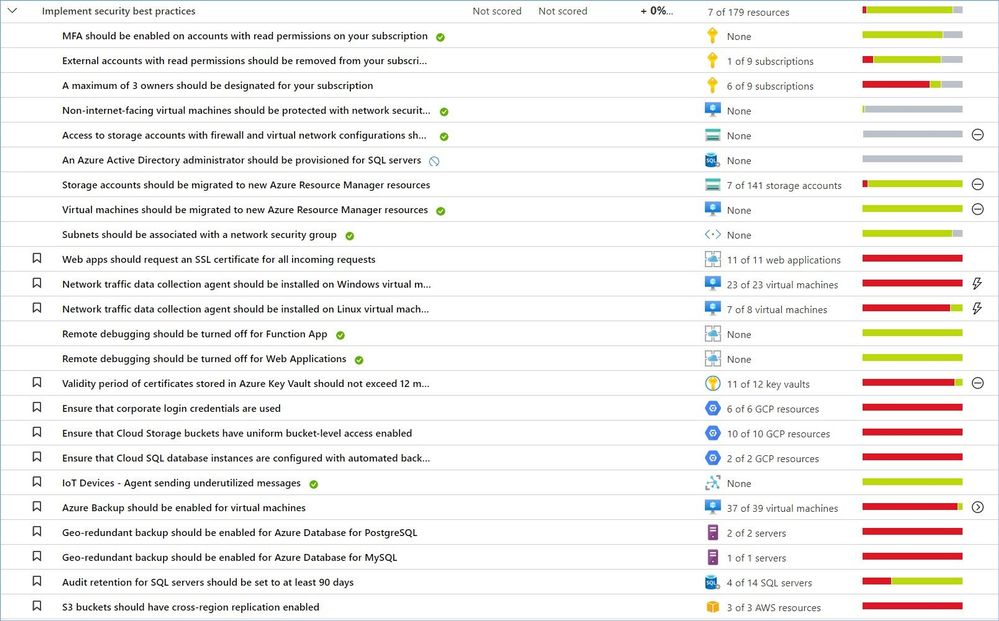
“Implement security best practices” is the largest control that includes more than 50 recommendations covering resources in Azure, AWS, GCP and on-premises. This list constantly gets updated as our teams add new resources and discover new attack technics, vulnerabilities, and risky misconfigurations.
As of this writing (April 2021) this control does not affect your Secure Score, but this does not mean that you want to ignore or shelve these recommendations.
Just a reminder, recommendations flagged as “Preview” are not included in the calculation of your Secure Score. However, they should still be remediated wherever possible, so that when the preview period ends, they will contribute towards your score.
Azure Security Center provides a comprehensive description, manual remediation steps, additional helpful information, and a list of affected resources for all recommendations.
Some of the recommendations might have a “Quick Fix!” option that allows you to quickly remediate the issue. In such cases we also provide “View remediation logic” option so that you can review what happens behind the scenes when you click the “Remediate” button, for instance:

In addition, you may use the remediation scripts for your own automations/templates to avoid similar issues in the future. You can also find some remediation scripts in our GitHub Repository.
Let’s now review the most common recommendations from this security control that can be grouped into the following categories:
Category #1: App Services recommendations.
Keep your software up to date.
Keeping software up to date is one of the top security practices you need to implement to make sure your systems are not vulnerable to known threats. Out of date or not regularly updated operating systems and applications put you at risk because they have a lot of vulnerabilities. Many of these vulnerabilities can be easily detected and exploited by threat actors.
Periodically, newer versions are released for software either due to security flaws or to include additional functionality. Using the latest version of PHP/Java/Python/.NET/Node/Ruby for web/function/api apps is recommended to benefit from security fixes, if any, and/or new functionalities of the latest version.
The following recommendations are part of this sub-category:
- Java should be updated to the latest version for your web app
- Java should be updated to the latest version for your API app
- Java should be updated to the latest version for your function app
- Python should be updated to the latest version for your web app
- Python should be updated to the latest version for your API app
- Python should be updated to the latest version for your function app
- PHP should be updated to the latest version for your web app
- Python should be updated to the latest version for your API app
- Python should be updated to the latest version for your function app
The manual remediation steps for these recommendations are:
- Navigate to Azure App Service
- Go to Configuration/General settings
- Select the latest stack version in the drop-down menu.

Implement Azure App Service best practices.
The following recommendations are part of this sub-category:
- Remote debugging should be turned off for API App
- Remote debugging should be turned off for Function App
- Remote debugging should be turned off for Web Applications
- Web apps should request an SSL certificate for all incoming requests
The manual remediation steps for these recommendations are:
- Navigate to Azure App Service
- Go to Configuration/General settings
- Make recommended changes.
Learn more about best practices for securing Azure App Services here.
Category #2: Identity and access recommendations.
Secure your Azure Key Vaults.
You use Azure Key Vault to protect encryption keys and secrets like certificates, connection strings, and passwords in the cloud. When storing sensitive and business critical data, you need to take steps to maximize the security of your vaults and the data stored in them.
The following recommendations are part of this sub-category:
- Key Vault keys should have an expiration date.
- Key Vault secrets should have an expiration date.
- Key vaults should have purge protection enabled.
- Key vaults should have soft delete enabled.
- Validity period of certificates stored in Azure Key Vault should not exceed 12 months.
Learn more about Azure Key Vault security here.
Protect your Azure Subscriptions.
To reduce the potential for breaches by compromised owner accounts, it is recommended to limit the number of owner accounts to as few as necessary and require two-step verification for all users.
The following recommendations are part of this sub-category:
- A maximum of 3 owners should be designated for your subscription.
- External accounts with read permissions should be removed from your subscription.
- MFA should be enabled on accounts with read permissions on your subscription
Configure notification settings.
To ensure the relevant people in your organization are notified when there is a potential security breach in one of your subscriptions, enable email notifications for high severity alerts in Security Center.
The following recommendations are part of this sub-category:
- Email notification to subscription owner for high severity alerts should be enabled.
- Email notification for high severity alerts should be enabled.
- Subscriptions should have a contact email address for security issues.
The manual remediation steps for these recommendations are:
- From Security Center’s menu, select Pricing & settings.
- Select the relevant subscription.
- Select ‘Email notifications’.
- Enter the email recipients to receive notifications from Security Center.
- In the ‘Notification type’ area, ensure mails are sent regarding security alerts from severity ‘high’.
- Select ‘Save’.

Learn more about Azure Identity Management and Access Control security best practices here.
Category #3: Compute recommendations.
In most infrastructure as a service (IaaS) scenarios, Azure virtual machines (VMs) are the main workload for organizations that use cloud computing. This fact is evident in hybrid scenarios where organizations want to slowly migrate workloads to the cloud. In such scenarios, follow the general security considerations for IaaS, and apply security best practices to all your VMs.
The following recommendations are part of this category:
- Azure Backup should be enabled for virtual machines.
- Auto provisioning of the Log Analytics agent should be enabled on your subscription.
Azure Security Center provides description, manual remediation steps and additional information for every recommendation in this category, e.g.:

Auto provisioning reduces management overhead by installing all required agents and extensions on existing – and new – machines to ensure faster security coverage for all supported resources. We recommend enabling auto provisioning, but it’s disabled by default.
Learn more about securing IaaS workloads in Azure here.
Category #4: Data recommendations.
To help protect data in the cloud, you need to account for the possible states in which your data can occur, and what controls are available for that state. Best practices for Azure data security and encryption relate to the following data states:
- At rest: This includes all information storage objects, containers, and types that exist statically on physical media, whether magnetic or optical disk.
- In transit: When data is being transferred between components, locations, or programs, it’s in transit. Examples are transfer over the network, across a service bus (from on-premises to cloud and vice-versa, including hybrid connections such as ExpressRoute), or during an input/output process.
The following recommendations are part of this category:
- All advanced threat protection types should be enabled in SQL managed instance advanced data security settings.
- All advanced threat protection types should be enabled in SQL server advanced data security settings.
- An Azure Active Directory administrator should be provisioned for SQL servers.
- Audit retention for SQL servers should be set to at least 90 days.
- Azure Cosmos DB accounts should have firewall rules.
- Cognitive Services accounts should enable data encryption.
- Cognitive Services accounts should restrict network access.
- Cognitive Services accounts should use customer owned storage or enable data encryption.
- Geo-redundant backup should be enabled for Azure Database for MariaDB.
- Geo-redundant backup should be enabled for Azure Database for MySQL.
- Geo-redundant backup should be enabled for Azure Database for PostgreSQL.
- Public network access on Azure SQL Database should be disabled.
- Private endpoint connections on Azure SQL Database should be enabled.
Azure Security Center provides description, manual remediation steps and additional information for every recommendation in this category, e.g.:

Learn more about:
- Azure data security here.
- Securing Azure SQL Database and SQL Managed Instances here.
- Cognitive Services security here.
Category #5: IoT recommendations.
Securing an Internet of Things (IoT) infrastructure requires a rigorous security-in-depth strategy. This strategy requires you to secure data in the cloud, protect data integrity while in transit over the public internet, and securely provision devices. Each layer builds greater security assurance in the overall infrastructure.
The following recommendations are part of this category:
- IoT Devices – Auditd process stopped sending events.
- IoT Devices – Operating system baseline validation failure.
- IoT Devices – TLS cipher suite upgrade needed.
- IoT Devices – Open Ports on Device.
- IoT Devices – Permissive firewall policy in one of the chains was found.
- IoT Devices – Permissive firewall rule in the input chain was found.
- IoT Devices – Permissive firewall rule in the output chain was found.
- IoT Devices – Agent sending underutilized messages.
- IoT Devices – Default IP Filter Policy should be Deny.
- IoT Devices – IP Filter rule large IP range.
- IoT Devices – Agent message intervals and size should be adjusted.
- IoT Devices – Identical Authentication Credentials.
- IoT Devices – Audited process stopped sending events.
- IoT Devices – Operating system (OS) baseline configuration should be fixed.
- Diagnostic logs in IoT Hub should be enabled.
Learn more about securing an Internet of Things (IoT) infrastructure here.
Category #6: Networking recommendations.
Network security could be defined as the process of protecting resources from unauthorized access or attack by applying controls to network traffic. The goal is to ensure that only legitimate traffic is allowed. Azure includes a robust networking infrastructure to support your application and service connectivity requirements. Network connectivity is possible between resources located in Azure, between on-premises and Azure hosted resources, and to and from the internet and Azure.
The following recommendations are part of this category:
- Network traffic data collection agent should be installed on Linux virtual machines.
- Network traffic data collection agent should be installed on Windows virtual machines.
- Network Watcher should be enabled.
- Non-internet-facing virtual machines should be protected with network security groups.
- Subnets should be associated with a network security group.
- Access to storage accounts with firewall and virtual network configurations should be restricted.
Azure Security Center provides description, manual remediation steps and additional information for every recommendation in this category, e.g.:

Learn more about Azure best practices for network security here.
Category #7: AWS and GCP recommendations.
Azure Security Center protects workloads in Azure, Amazon Web Services (AWS), and Google Cloud Platform (GCP).
Onboarding your AWS and/or GCP accounts into Security Center, integrates AWS Security Hub or GCP Security Command Center with Azure Security Center. Security Center thus provides visibility and protection across these cloud environments:
- Detection of security misconfigurations.
- A single view showing Security Center recommendations and AWS/GCP security findings.
- Incorporation of your AWS/GCP resources into Security Center’s secure score calculations.
- Regulatory compliance assessments of your AWS/GCP resources.
Azure Security Center provides description, manual remediation steps and additional information for every recommendation, e.g.:

Note: Microsoft is actively partnering with other cloud providers to expand ASC coverage and provide its customers with comprehensive visibility across and protection for their multi-cloud environments. A list of supported providers and security insights ASC pulling from those cloud continues to grow, so please expect to see the number of recommendations in this category to increase as we progress.
Worth mentioning that some recommendation might have the “Deny” or “Enforce” option that allows you to prevent creation of potentially insecure or incompliant resources, for instance:

Reference:
Microsoft Security Best Practices
Azure security best practices and patterns
Top 10 Best Practices for Azure Security
Security controls and their recommendations
Security recommendations – a reference guide
Recommendations with deny/enforce options
P.S. Consider joining our Tech Community where you can be one of the first to hear the latest Azure Security Center news, announcements and get your questions answered by Azure Security experts.
Reviewers:
@Yuri Diogenes, Principal Program Manager, ASC CxE
@Tom_Janetscheck, Senior Program Manager, ASC CxE
by Contributed | Apr 13, 2021 | Technology
This article is contributed. See the original author and article here.
We are excited to announce Azure Storage Day, a free digital event on April 29, 2021, where you can explore cloud storage solutions for all your enterprise workloads. Join us to:
- Understand cloud storage trends and innovations—and plan for the future.
- Map Azure Storage solutions to your different enterprise workloads.
- See demos of Azure disk, object, and file storage services.
- Learn how to optimize your migration with best practices.
- Find out how real customers are accelerating their cloud adoption with Azure Storage.
- Get answers to your storage questions from product experts.
This digital event is your opportunity to engage with the cloud storage community, see Azure Storage solutions in action, and discover how to build a foundation for all of your enterprise workloads at every stage of your digital transformation.
The need for reliable cloud storage has never been greater. More companies are investing in digital transformation to become more resilient and agile in order to better serve their customers. The rapid pace of digital transformation has resulted in exponential data growth, driving up demand for dependable and scalable cloud data storage services.
Register here.
Hope to see you there!
– Azure Storage Marketing Team
by Scott Muniz | Apr 13, 2021 | Security, Technology
This article is contributed. See the original author and article here.
SAP has released security updates to address vulnerabilities affecting multiple products. An attacker could exploit some of these vulnerabilities to take control of an affected system.
CISA encourages users and administrators to review the SAP Security Notes for April 2021 and apply the necessary updates.

Recent Comments